Oracle Verrazzano Enterprise Container Platform has been announced recently, and I became very excited to try it as soon as possible. Verrazzano provides a lot of capabilities for Cloud Native applications, and developers are encouraged to not only create new applications using it, but also see how to “Lift And Shift” their existing applications to the Cloud.
In this blog post, I would like to share all the steps needed to install Verrazzano locally so you can start empowering your applications. The overall steps covered in this blog post are:
- Prepare the environment using Kind (Kubernetes In Docker)
- Install Verrazzano operator and its components
- Access Verrazzano
- Get console credentials
The requirements needed to reproduce these steps in your laptop are:
- A host with 16GB (24GB+ recommended) of free memory and 6 CPUs.
- 20GB of disk space.
- Install docker (For Linux) or docker desktop (For Mac/Windows).
- Install Kind (Kubernetes IN Docker).
- Install Kubernetes CLI (kubectl).
So let’s start!
1 – Preparing the environment
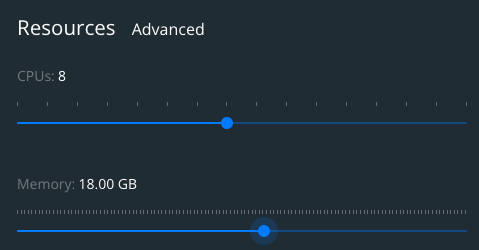
If you are running docker desktop, the first thing that you need to do is update its configuration to have docker using 6CPUs and 16GB of memory. For this, go to Preferences -> Resources -> Advanced and change it as you can see in the picture below. It will ask you to restart docker desktop.
Have in mind that docker for Linux doesn’t need this configuration as the docker daemon will use the memory available in the host machine.
Now that we have docker running, we will create a volume that will serve as a cache for our Verrazzano installation. This is a good practice because if you need to recreate your environment, you won’t need to download every resource/container image again. Remember, this is a development environment, and you might need to recreate the cluster from scratch.
To create this container volume, execute the following commands:
docker volume create containerd

docker volume inspect containerd #Sample output is shown
{
    "CreatedAt": "2021-01-11T16:27:47Z",
    "Driver": "local",
    "Labels": {},
    "Mountpoint": "/var/lib/docker/volumes/containerd/_data",
    "Name": "containerd",
    "Options": {},
    "Scope": "local"
}
Remember to take note about the `MountPoint`. We will need this information later when we create the cluster.
Another thing that we will need is the image that we should use when creating the cluster. Because KIND images are prebuilt for each release, we need to execute `$ kind version` and look at https://github.com/kubernetes-sigs/kind/releases for the image that we will use. For this blog post, we will use KIND version 0.11.1 and the Kubernetes version 1.20.
Execute the following command to create a Kuberntes cluster, replacing the `hostPath` with the `MountPoint` from `docker volume inspect` command, and the image with one suitable for the KIND release you are using. Example:
kind create cluster --config - <<EOF
kind: Cluster
apiVersion: kind.x-k8s.io/v1alpha4
nodes:
  - role: control-plane
    image: kindest/node:v1.20.7@sha256:cbeaf907fc78ac97ce7b625e4bf0de16e3ea725daf6b04f930bd14c67c671ff9
    kubeadmConfigPatches:
      - |
        kind: ClusterConfiguration
        apiServer:
          extraArgs:
            "service-account-issuer": "kubernetes.default.svc"
            "service-account-signing-key-file": "/etc/kubernetes/pki/sa.key"
    extraMounts:
      - hostPath: /var/lib/docker/volumes/containerd/_data
        containerPath: /var/lib/containerd
EOF
With the Kubernetes cluster running, we need to instal and configure MetalLB. This step is needed because KIND doesn’t come with any implementation of network load balancers (Services of type LoadBalancer).
So let’s install the latest version of MetalLB with the following commands:
kubectl apply -f https://raw.githubusercontent.com/metallb/metallb/v0.10.3/manifests/namespace.yaml

kubectl create secret generic \
    -n metallb-system memberlist \
    --from-literal=secretkey="$(openssl rand -base64 128)"

kubectl apply -f https://raw.githubusercontent.com/metallb/metallb/v0.10.3/manifests/metallb.yaml
MetalLB is idle until we configure it. The configuration is simple. We need to find what is the subnet that KIND uses, and then configure MetalLB to use the IPs in that subnet range.
To determine the subnet of the KIND execute the following command:
docker inspect kind | jq '.[0].IPAM.Config[0].Subnet' -r
For use by MetalLB, assign a range of IP addresses at the end of the kind network’s subnet CIDR range:
kubectl apply -f - <<-EOF
apiVersion: v1
kind: ConfigMap
metadata:
  namespace: metallb-system
  name: config
data:
  config: |
    address-pools:
    - name: my-ip-space
      protocol: layer2
      addresses:
      - 172.18.0.230-172.18.0.250
EOF
2 – Installing Verrazzano
Now that Kind is running, and MetalLB is configured, we can proceed with the installation of Verrazzano Operator:
kubectl apply -f https://github.com/verrazzano/verrazzano/releases/download/v1.1.1/operator.yaml
Before proceeding, it’s important that you wait for the deployment of the Verrazzano operator to complete:
kubectl rollout status deployment/verrazzano-platform-operator -n verrazzano-install
Now we can properly execute the deployment of Verrazzano, using the `dev` profile by using a Verrazzano custom resource:
kubectl apply -f - <<EOF
apiVersion: install.verrazzano.io/v1alpha1
kind: Verrazzano
metadata:
  name: my-verrazzano
spec:
  profile: dev
EOF
Because the installation takes several minutes as it needs to download some resources from the internet (which will be cached in that container volume that has been created previously), we might want to watch the logs and see how the installation is proceeding. To follow the installation logs, execute the following command:
kubectl logs -n verrazzano-install \
    -f $(kubectl get pod \
    -n verrazzano-install \
    -l app=verrazzano-platform-operator \
    -o jsonpath="{.items[0].metadata.name}") | grep '"operation":"install"'
Or you can wait for the “Install Complete” condition by typing:
kubectl wait \
    --timeout=20m \
    --for=condition=InstallComplete \
    verrazzano/my-verrazzano
3 – Accessing Verrazzano
Verrazzano installs a lot of consoles, and you can be aware of each console URL by running the following command:
$ kubectl get vz -o jsonpath="{.items[].status.instance}" | jq .
{
  "consoleUrl": "https://verrazzano.default.172.18.0.23x.nip.io",
  "elasticUrl": "https://elasticsearch.vmi.system.default.172.18.0.23x.nip.io",
  "grafanaUrl": "https://grafana.vmi.system.default.172.18.0.23x.nip.io",
  "keyCloakUrl": "https://keycloak.default.172.18.0.23x.nip.io",
  "kibanaUrl": "https://kibana.vmi.system.default.172.18.0.23x.nip.io",
  "prometheusUrl": "https://prometheus.vmi.system.default.172.18.0.23x.nip.io",
  "rancherUrl": "https://rancher.default.172.18.0.23x.nip.io"
}
Note that the URLs use the format 1.2.3.4.nip.io. Nip.io is a DNS service that easily provides host names that point to IP addresses without needing to edit your `/etc/hosts` file. In this way, the host verrazzano.default.172.18.0.231.nip.io will resolve to the IP 172.18.0.231. This IP is the internal KIND network.
Just open any of the URLs and you will see the respective console.
3.1 – Accessing Verrazzano from MacOS computers
Because MacOS uses Hyperkit to create a host running the docker daemon, the interfaces for docker’s bridge network aren’t actually routable interfaces. This means that you won’t be able to open your browser to make requests to any IPs in the network 172.18.0.0/16.
The solution for this problem is to use the project `docker-tuntap-osx` that will attach a TunTap interface into MacOS, creating a bridge interface between the docker daemon and MacOS.
The first thing that we need is clone this project, and install the TAP interface using the following commands:
git clone https://github.com/AlmirKadric-Published/docker-tuntap-osx

cd docker-tuntap-osx/

docker-tuntap-os$ ./sbin/docker_tap_install.sh
Installation complete
Restarting Docker
Process restarting, ready to go
With the interface already installed, it’s time now to bring it up, and run the command `ifconfig` to get the details of this TAP interface:
docker-tuntap-os$ ./sbin/docker_tap_up.sh
Unable to find image 'alpine:latest' locally
latest: Pulling from library/alpine
a0d0a0d46f8b: Pull complete
Digest: sha256:e1c082e3d3c45cccac829840a25941e679c25d438cc8412c2fa221cf1a824e6a
Status: Downloaded newer image for alpine:latest

$ ifconfig
...
tap1: flags=8843<UP,BROADCAST,RUNNING,SIMPLEX,MULTICAST> mtu 1500
ether 56:d6:3d:13:99:d3
inet 10.0.75.1 netmask 0xfffffffc broadcast 10.0.75.3
media: autoselect
status: active
Now that we have this tap interface up and running, we should redirect all the traffic to the network 172.18.0.0/16 using this interface’s gateway (10.0.75.2) through the following command:
sudo route add -net 172.18.0.0 -netmask 255.255.0.0 10.0.75.2
To access Verrazzano from a MacOS computer, extract the Server SSL certificates and import them into MacOS Keychain as trusted certificates. So let’s extract the server certificates and store them in the user’s home folder using the following commands. Remember to replace the IP addresses in the -connect and -servername parameters:
openssl s_client -connect 172.18.0.23x:443 -servername verrazzano.default.172.18.0.23x.nip.io -showcerts 2>/dev/null </dev/null |  sed -ne '/-BEGIN CERTIFICATE-/,/-END CERTIFICATE-/p' > ~/verrazzano.pem

sudo security add-trusted-cert -d -r trustAsRoot -k /Library/Keychains/System.keychain ~/verrazzano.pem

openssl s_client -connect 172.18.0.23x:443 -servername keycloak.default.172.18.0.23x.nip.io -showcerts 2>/dev/null </dev/null |  sed -ne '/-BEGIN CERTIFICATE-/,/-END CERTIFICATE-/p' > ~/keycloak.pem

sudo security add-trusted-cert -d -r trustAsRoot -k /Library/Keychains/System.keychain ~/keycloak.pem

openssl s_client -connect 172.18.0.23x:443 -servername elasticsearch.vmi.system.default.172.18.0.23x.nip.io -showcerts 2>/dev/null </dev/null |  sed -ne '/-BEGIN CERTIFICATE-/,/-END CERTIFICATE-/p' > ~/istio.pem

sudo security add-trusted-cert -d -r trustAsRoot -k /Library/Keychains/System.keychain ~/istio.pem
4 – Get consoles credentials
You will need the credentials to access the consoles installed by Verrazzano.
4.1 – The Verrazzano console and other consoles
Other consoles accessed by the same user name/password
- Grafana
- Prometheus
- Kibana
- Elasticsearch
- Kiali
User: verrazzano
To get the password:
kubectl get secret \
    --namespace verrazzano-system verrazzano \
    -o jsonpath={.data.password} | base64 \
    --decode; echo
4.2 – The Keycloak admin console
User: keycloakadmin
To get the password:
kubectl get secret \
    --namespace keycloak keycloak-http \
    -o jsonpath={.data.password} | base64 \
    --decode; echo
4.3 – The Rancher console
User: admin
To get the password:
kubectl get secret \
    --namespace cattle-system rancher-admin-secret \
    -o jsonpath={.data.password} | base64 \
    --decode; echo
Conclusion
In this blog post you saw how to install Verrazzano in your computer from scratch, and access it. Check out more details about Verrazzano on its webpage: https://verrazzano.io and https://www.oracle.com/java/verrazzano/ . At the Verrazzano’s Youtube channel, you will see a Verrazzano tour video and much more. News about this project is shared on Verrazzano’s Twitter profile. Verrazzano is a fast paced evolving open source project. You can follow, and also contribute to this awesome project on the Github project page. Keep in touch with this blog post series. The next blog post you will see how to use Verrazzano to empower your Cloud Native application.
