This technical blog shows how you can build an Agentic RAG application, an advanced Retrieval-Augmented Generation system by using a multi-agent architecture with Chain-of-Thought reasoning. It is designed for enterprise-scale deployment on Oracle Cloud Infrastructure (OCI).
The system leverages purpose-built AI agents for complex document analysis and query processing while taking advantage of Oracle Cloud Infrastructure (OCI) Kubernetes Engine (OKE), OCI’s managed Kubernetes service and security features for production-grade deployment.
This article will show you how to get started in a few steps to install and deploy this multi-agent RAG system using OKE and OCI.
Foundation and Components
This Agentic RAG system is based on the following technologies:
- OCI Kubernetes Engine (OKE)
- Oracle Cloud Infrastructure (OCI)
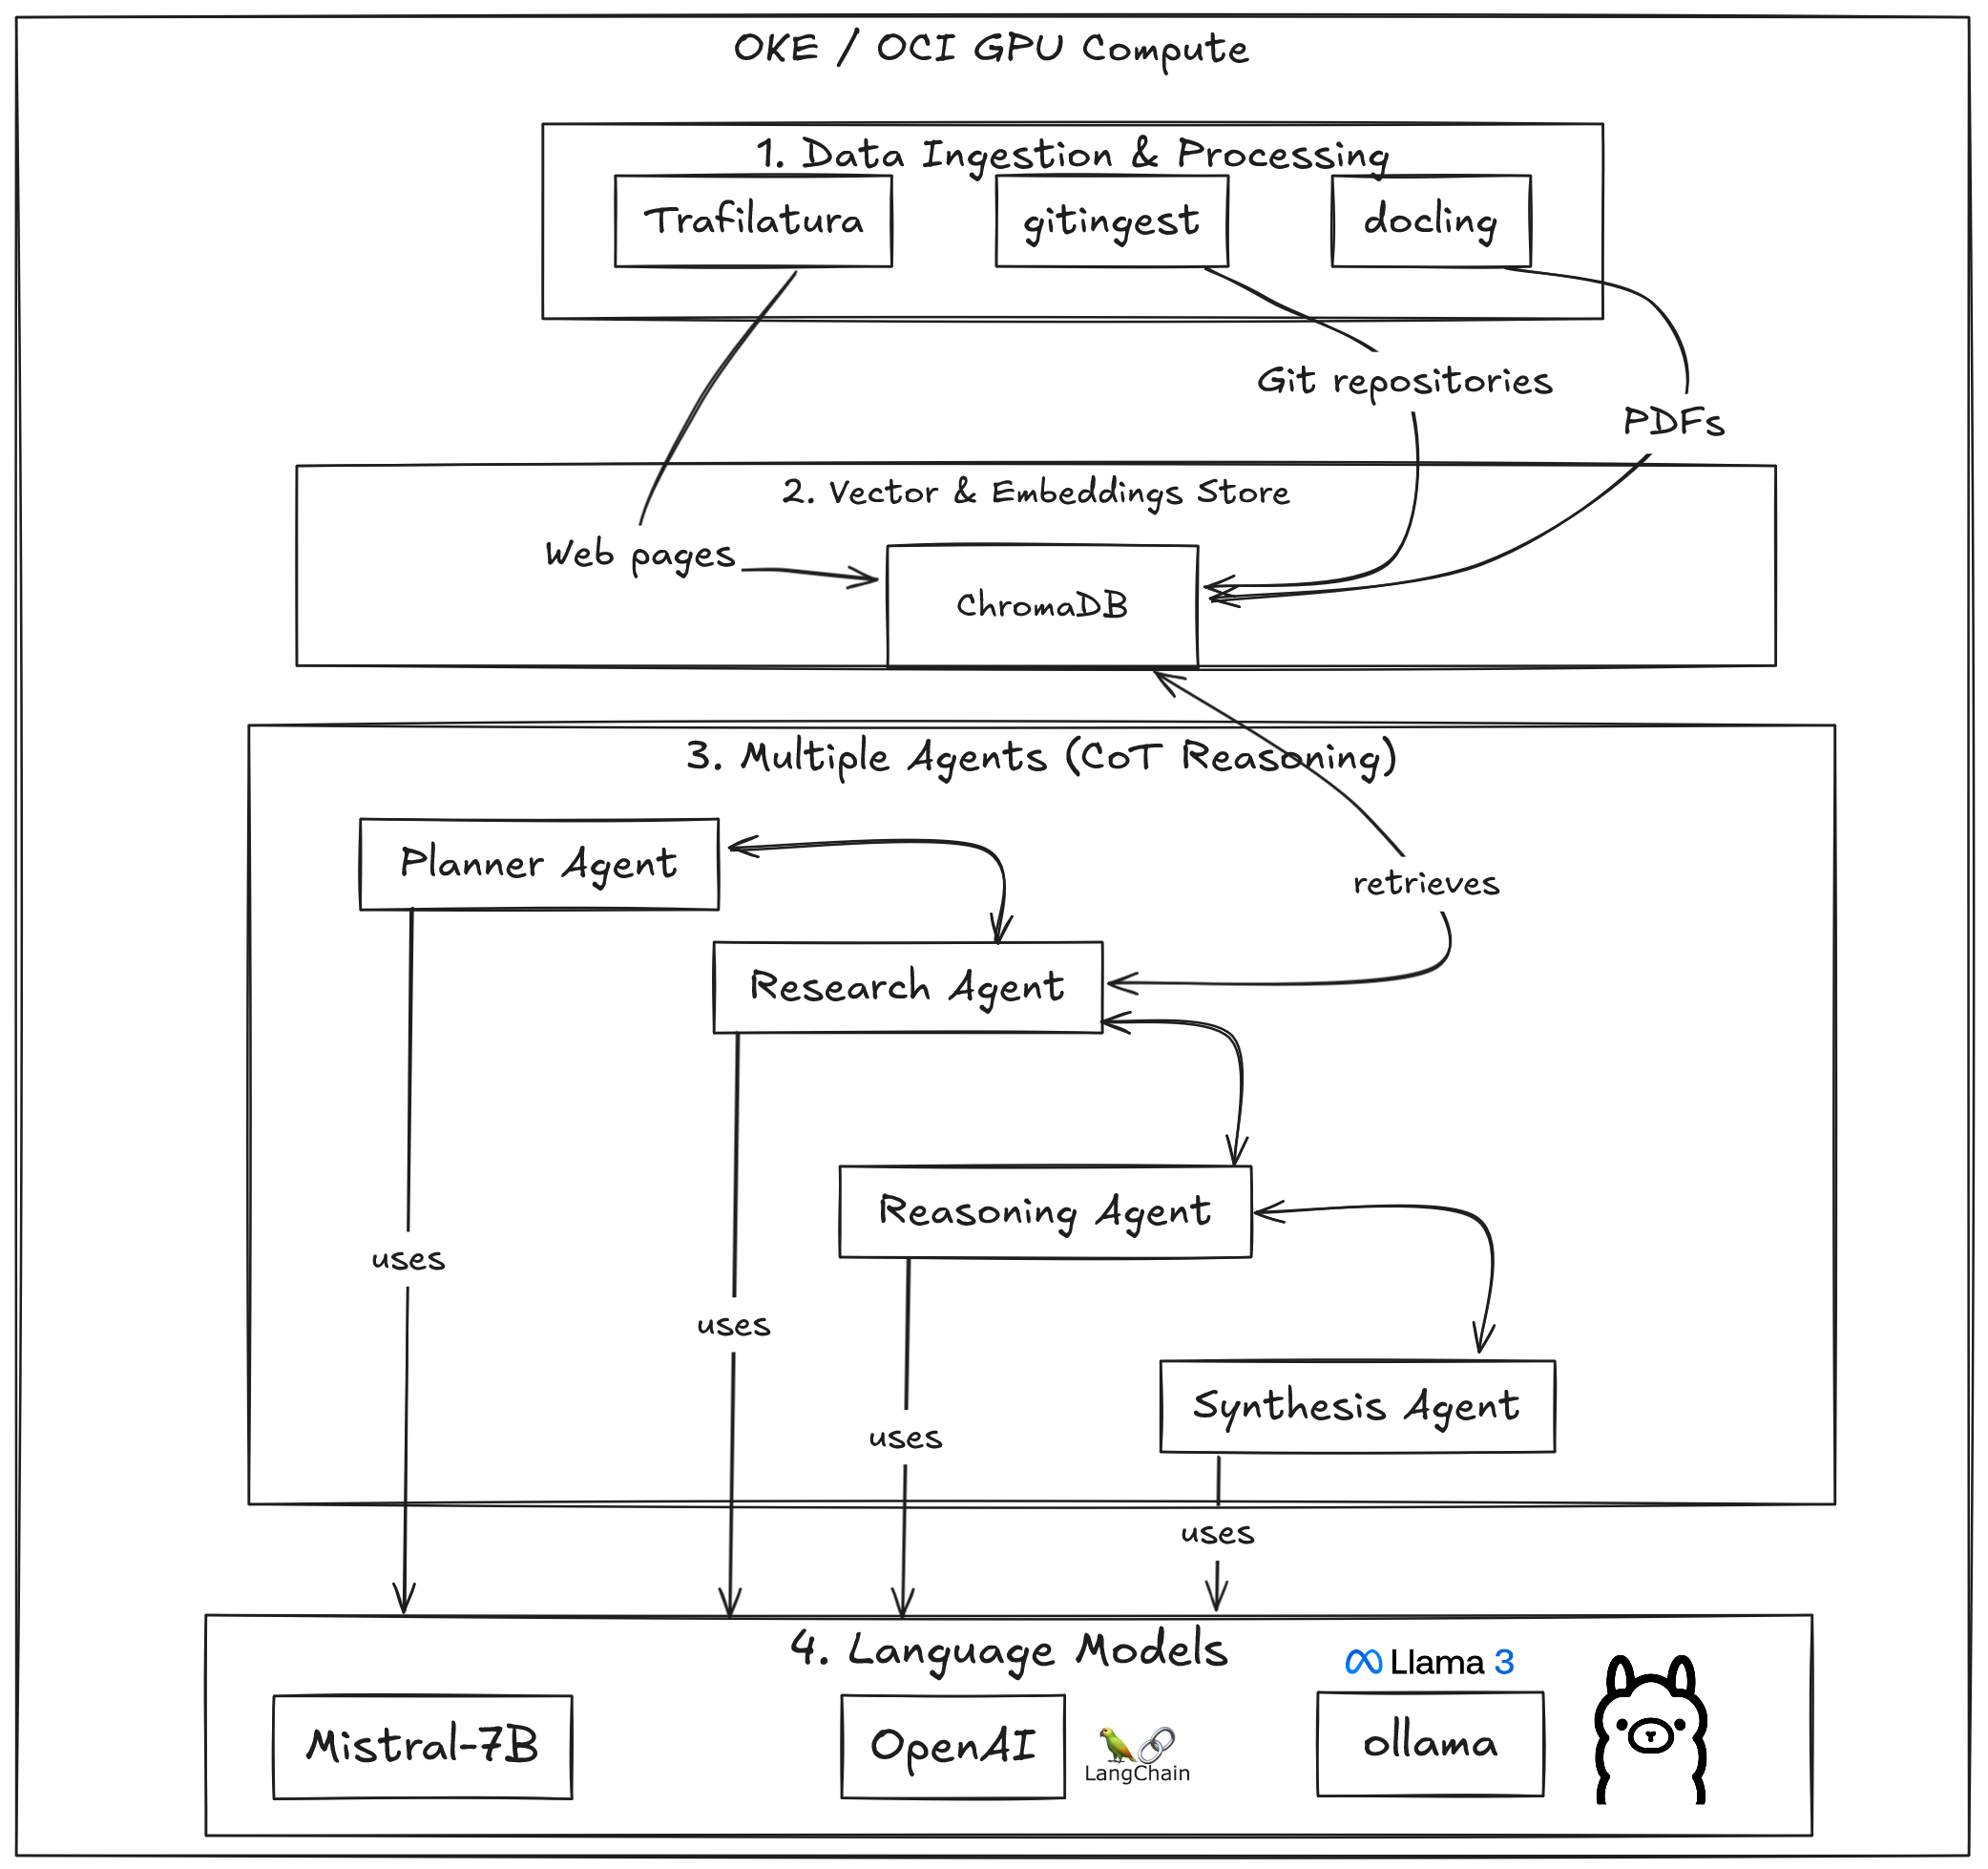
ollamaas the inference server for most Large Language Models (LLMs) available in the solution (llama3,phi3,qwen2)Mistral-7Blanguage model, with an optional multi-agent Chain of Thought reasoningChromaDBas vector store and retrieval systemTrafilatura,doclingandgitingestto extract the content from PDFs and web pages, and have them ready to be used by the RAG system- LangGraph-based multi-agent architecture with specialized agents:
- Planner Agent: Strategic decomposition of complex queries
- Research Agent: Intelligent information retrieval (from vector database)
- Reasoning Agent: Logical analysis and conclusion drawing
- Synthesis Agent: Comprehensive response generation
- Support for both cloud-based (OpenAI) and local (Mistral-7B) language models
- Step-by-step reasoning visualization
Gradioweb interface for easy interaction with the RAG system
Benefits of Containerized LLMs
Using containerized LLMs instead of running them directly on cloud instances offers several advantages:
- Scalability: you can easily scale the LLM workloads across Kubernetes clusters. In our case, we’re deploying the solution with 4 agents in the same cluster, but you could deploy each agent in a different cluster if you wanted to accelerate the Chain-of-Thought reasoning processing time (horizontal scaling). You could also use vertical scaling by adding more resources to the same agent.
- Resource Optimization: you can efficiently allocate GPU and memory resources for each agent
- Isolation: Each agent runs in its own container for better resource management
- Version Control: easily update and rollback LLM versions and configurations
- Reproducibility: have a consistent environment across development and production, which is crucial when you’re working with complex LLM applications
- Cost Efficiency: you pay only for the resources you need, and when you’re doen with your work, you can simply stop the Kubernetes cluster and you won’t be charged for the resources anymore.
- Integration: you can easily integrate the RAG system with other programming languages or frameworks, as we also made available a REST-based API to interact with the system, apart from the standard web interface.
With Kubernetes, you can easily scale your system up and down without worrying about underlying infrastructure, installation, or configuration.
Note that the way we’ve planned the infrastructure is important because it allows us to:
- Scale the
chromadbvector store system independently - The LLM container can be shared across agents, meaning only deploying the LLM container once, and then using it across all the agents
- The
Research Agentcan be scaled separately for parallel document processing, if needed - Memory and GPU resources can be optimized, since there’s only one LLM instance running
Deployment in Kubernetes
There are two deployment options in Kubernetes: local deployment and distributed system deployment, each offering unique advantages.
Local Deployment
This is the simplest deployment method, where all resources are deployed in a single pod.
Advantages:
- Simplicity: All components run in a single pod, making deployment and management straightforward
- Easier debugging: Troubleshooting is simpler when all logs and components are in one place (we’re looking to expand the standard logging mechanism that we have right now with
fluentd) - Quick setup: Ideal for testing, development, or smaller-scale deployments
- Lower complexity: No need to configure inter-service communication or network policies like port forwarding or such mechanisms.
Distributed System Deployment
By decoupling the ollama LLM inference system into a separate pod, the system is optimized for vertical scaling. This helps ensure that if additional resources are needed for larger models, other components retain sufficient processing and logging capabilities.
Advantages:
- Independent Scaling: Each component can be scaled according to its specific resource needs
- Resource Optimization: Dedicated resources for compute-intensive LLM inference separate from other components
- High Availability: System remains operational even if individual components fail, and we can have multiple pods running failover LLMs to help us with disaster recovery.
- Flexible Model Deployment: Easily swap or upgrade LLM models without affecting the rest of the system (also, with virtually zero downtime!)
- Load Balancing: Distribute inference requests across multiple LLM pods for better performance, thus allowing concurrent users in our Gradio interface.
- Isolation: Performance issues on the LLM side won’t impact the interface
- Cost Efficiency: Allocate expensive GPU resources only where needed (inference) while using cheaper CPU resources for other components (e.g. we use GPU for Chain of Thought reasoning, while keeping a quantized CPU LLM for standard chatting).
Quick Start
For this solution, we have currently implemented the local system deployment, which is what we’ll cover in this section.
First, we need to create a GPU OKE cluster with zx and Terraform. For this, you can follow the steps in this repository, or reuse your own Kubernetes cluster if you happen to already have one.
Then, we can start setting up the solution in our cluster by following these steps.
- Clone the repository containing the Kubernetes manifests:
git clone https://github.com/oracle-devrel/devrel-labs.git
cd devrel-labs/agentic_rag/k8s- Create a namespace:
kubectl create namespace agentic-rag- Create a ConfigMap:
This step will help our deployment for several reasons:
- Externalized Configuration: It separates configuration from application code, following best practices for containerized applications
- Environment-specific Settings: Allows us to maintain different configurations for development, testing, and production environments
- Credential Management: Provides a way to inject API tokens (like Hugging Face) without hardcoding them in the image
- Runtime Configuration: Enables changing configuration without rebuilding or redeploying the application container
- Consistency: Ensures all pods use the same configuration when scaled horizontally
In our specific case, the ConfigMap stores the Hugging Face Hub token for accessing (and downloading) the mistral-7b model (and CPU-quantized variants)
- Optionally, OpenAI API keys if using those models
- Any other environment-specific variables needed by the application, in case we want to make further development and increase the capabilities of the system with external API keys, authentication tokens… etc.
Let’s run the following command to create the config map:
# With a Hugging Face token
    cat <<EOF | kubectl apply -n agentic-rag -f -
    apiVersion: v1
    kind: ConfigMap
    metadata:
      name: agentic-rag-config
    data:
      config.yaml: |
        HUGGING_FACE_HUB_TOKEN: "your-huggingface-token"
    EOF

    # Or without a Hugging Face token
    cat <<EOF | kubectl apply -n agentic-rag -f -
    apiVersion: v1
    kind: ConfigMap
    metadata:
      name: agentic-rag-config
    data:
      config.yaml: |
        # No Hugging Face token provided
        # You can still use Ollama models
    EOF
This approach makes our deployment more flexible, secure, and maintainable compared to hardcoding configuration values.
- Apply the manifests:
kubectl apply -n agentic-rag -f local-deployment/deployment.yaml
kubectl apply -n agentic-rag -f local-deployment/service.yaml- Monitor the Deployment
With the following commands, we can check the status of our pod:
kubectl get pods -n agentic-ragAnd view the internal logs of the pod:
kubectl logs -f deployment/agentic-rag -n agentic-rag- Access the Application
Get the external IP address of the service:
kubectl get service agentic-rag -n agentic-rag
Access the application in your browser at http://<EXTERNAL-IP>.
Resource Requirements
The deployment of this solution requires the following minimum resources:
- CPU: 4+ cores
- Memory: 16GB+ RAM
- Storage: 50GB+
- GPU: recommended for faster inference. In theory, you can use
mistral-7bCPU-quantized models, but it will be sub-optimal.
Conclusion
You can check out the full AI solution and the deployment options we mention in this article in the official GitHub repository.