LangFlow makes it easier to design and run LLM-based applications through a visual and extensible interface. When combined with Oracle Cloud Infrastructure (OCI) and Kubernetes, it becomes a practical option for teams that want flexibility, scalability, and clear operational boundaries.
This blog provides a step-by-step guide to deploying LangFlow on Oracle Kubernetes Engine (OKE) using a modern, cloud-native traffic management approach. It starts by establishing the required networking foundation with Kubernetes Gateway API and Envoy Gateway, backed by a private OCI Network Load Balancer, enabling secure internal access within the VCN. From there, it walks through the deployment of LangFlow using Helm, the configuration of host-based routing via HTTPRoutes, and private DNS resolution for both frontend and backend services. Finally, the guide demonstrates how to optionally expose only the LangFlow GUI to the internet using OCI API Gateway, focusing on development convenience while maintaining a clear separation between internal services and external access.
IMPORTANT: This blog is designed solely for educational and study purposes. It provides an environment for learners to experiment and gain practical experience in a controlled setting. It is crucial to note that the security configurations and practices employed in this lab might not be suitable for real-world scenarios.
Security considerations for real-world applications are often far more complex and dynamic. Therefore, before implementing any of the techniques or configurations demonstrated here in a production environment, it is essential to conduct a comprehensive security assessment and review. This review should encompass all aspects of security, including access control, encryption, monitoring, and compliance, to ensure that the system aligns with the organization’s security policies and standards.
Security should always be a top priority when transitioning from a lab environment to a real-world deployment.
Technologies powering this solution
- OKE – Oracle Kubernetes Engine : Oracle Cloud Infrastructure Kubernetes Engine (OKE) is a fully-managed, scalable, and highly available service for deploying containerized applications to the cloud. With OKE, you can build, deploy, and manage cloud-native applications using open source Kubernetes that is certified as conformant by the Cloud Native Computing Foundation (CNCF)
- LangFlow : Langflow is an open-source, Python-based, customizable framework for building AI applications. It supports important AI functionality like agents and the Model Context Protocol (MCP), and it doesn’t require you to use specific large language models (LLMs) or vector stores
- Kubernetes Gateway API: Gateway API is an official Kubernetes project focused on L4 and L7 routing in Kubernetes. This project represents the next generation of Kubernetes Ingress, Load Balancing, and Service Mesh APIs. From the outset, it has been designed to be generic, expressive, and role-oriented.
- Envoy Gateway: Envoy Gateway is an open source project for managing Envoy Proxy as a standalone or Kubernetes-based application gateway. Gateway API resources are used to dynamically provision and configure the managed Envoy Proxies.
- OCI API Gateway: The API Gateway service enables you to publish APIs with private endpoints that are accessible from within your network, and which you can expose with public IP addresses if you want them to accept internet traffic. The endpoints support API validation, request and response transformation, CORS, authentication and authorization, and request limiting.
Prerequisites – Oracle Cloud Infrastructure
- Oracle account with admin level access permissions, if not admin level then apply the needed policies for managing your OKE Cluster, see details here: OKE Access Control
- Oracle CLI installed on your local machine, see details here: Installing the CLI
- Brand new Oracle Kubernetes Engine deployed, see details here: Creating a Cluster
- You can use the “Quick create” option which will create all needed network resources.
- Kubectl for interacting with your OKE Install and Set Up kubectl on Linux
- Helm will be used to install LangFlow Installing Helm
Quick Start
- Installing Envoy, Kubernetes Gateway API and a private Load Balancer:
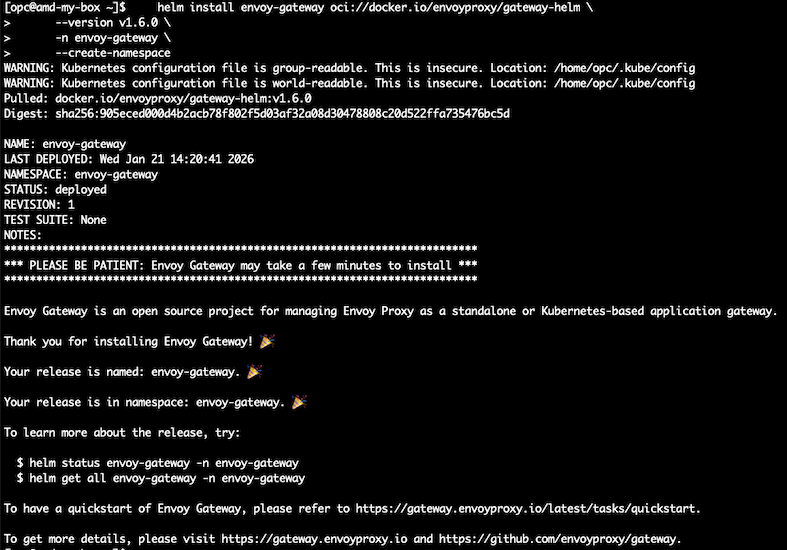
- 1.1 – Go to your shell machine and install Envoy Gateway.
helm install envoy-gateway oci://docker.io/envoyproxy/gateway-helm \
--version v1.6.0 \
-n envoy-gateway \
--create-namespace
Now, check current status:
kubectl get all -n envoy-gateway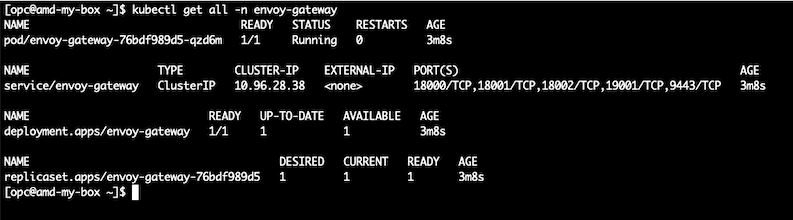
- 1.2 – Create a file named gateway.yaml and paste the following content on it.
apiVersion: gateway.networking.k8s.io/v1
kind: Gateway
metadata:
  name: nlb-gateway
  namespace: envoy-gateway
spec:
  gatewayClassName: envoy-oci
  listeners:
  - name: http
    protocol: HTTP
    port: 80
    allowedRoutes:
      namespaces:
        from: Selector
        selector:
          matchLabels:
gateway-access: public- 1.3 – Create a file named gatewayclass.yaml and paste the following content on it.
apiVersion: gateway.networking.k8s.io/v1
kind: GatewayClass
metadata:
  name: envoy-oci
spec:
  controllerName: gateway.envoyproxy.io/gatewayclass-controller
  parametersRef:
    group: gateway.envoyproxy.io
    kind: EnvoyProxy
    name: oci-lb-proxy
namespace: envoy-gateway- 1.4 – Create a file named envoy-proxy.yaml and paste the following content on it.
Note Ensure you have the OCID of the subnet where the Load Balancer will be provisioned. This subnet must be identified in advance, as it is required during the Gateway and Envoy configuration process. If you created your OKE cluster using the Quick create option, you may select your service subnet OCID for this load balancer.
Make sure you change the line ‘oci-network-load-balancer.oraclecloud.com/subnet: “YOUR_SUBNET_OCID_HERE”‘ with your subnet OCID bellow before saving the file.
apiVersion: gateway.envoyproxy.io/v1alpha1
kind: EnvoyProxy
metadata:
  name: oci-lb-proxy
  namespace: envoy-gateway
spec:
  provider:
    type: Kubernetes
    kubernetes:
      envoyService:
        type: LoadBalancer
        externalTrafficPolicy: Cluster
        annotations:
          oci.oraclecloud.com/load-balancer-type: "nlb"
          oci-network-load-balancer.oraclecloud.com/internal: "true"
          oci-network-load-balancer.oraclecloud.com/subnet: "YOUR_SUBNET_OCID_HERE"
          oci-network-load-balancer.oraclecloud.com/health-check-protocol: "TCP"
- 1.5 – On your shell machine, apply the manifest files in your OKE by using the kubectl command.
ls -lrt
kubectl apply -f envoy-proxy.yaml -n envoy-gateway
kubectl apply -f gatewayclass.yaml -n envoy-gateway
kubectl apply -f gateway.yaml -n envoy-gateway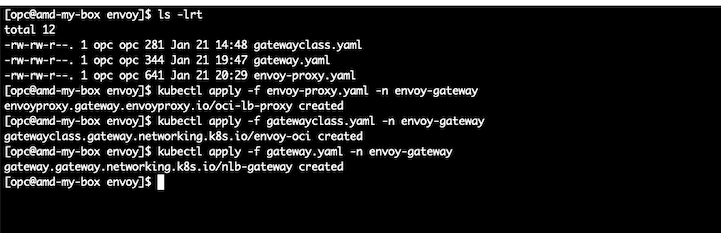
- 1.6 – Check if your load balancer was created successfully.
kubectl get svc -n envoy-gateway
Check if the EXTERNAL-IP moves from pending status to a valid private IP address as we see on the screenshot.
Note The Network Load Balancer provision may take few minutes to complete, you may see it also on the OCI Console at Networking, Network Load Balancer page.
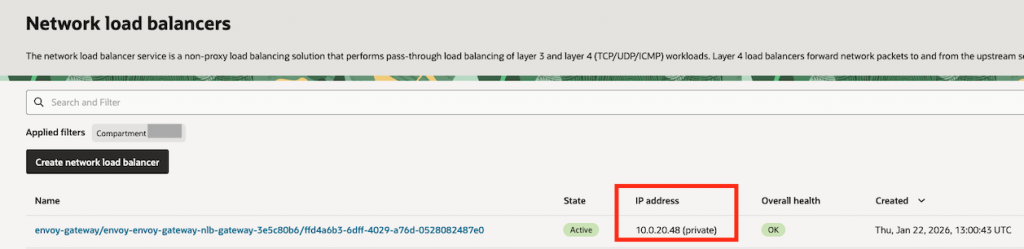
Take note of your Network Load Balancer IP address, it will be needed on the folowing steps
2. Deploy LangFlow using helm and expose it internally (private access)
- 2.1 – On your shell machine, run the following commands to install the helm repo needed for LangFLow installation
helm repo add langflow https://langflow-ai.github.io/langflow-helm-charts
helm repo update 
- 2.2 – Deploy LangFlow using helm by running the following commands on your shell machine.
Create a new file named langflow_env.yaml and paste the contents below. Make sure to define a secure password of your choice
langflow:
  backend:
    env:
      - name: LANGFLOW_AUTO_LOGIN
        value: "false"
      - name: LANGFLOW_SUPERUSER
        value: "admin"
      - name: LANGFLOW_SUPERUSER_PASSWORD
        value: "chooseYOURpassword!"
      - name: LANGFLOW_PORT
        value: "7860"
      - name: LANGFLOW_ALEMBIC_LOG_FILE
        value: "/app/db/alembic.log"
      - name: LANGFLOW_UPDATE_STARTER_PROJECTS
        value: "false"
LangFlow provides a comprehensive set of customization options to accommodate different use cases. For detailed guidance, refer to the official LangFlow documentation.
Note Make sure you select the correct image TAG based on your Node Pool architecture such as x86_64, arm, etc. You can check the available versions and tags on Oficial Langflow DockerHub
helm install langflow-ide langflow/langflow-ide -n langflow-dev --create-namespace \
--set langflow.backend.image.repository=docker.io/langflowai/langflow \
--set langflow.backend.image.tag=1.7.2-amd64 \
--set langflow.frontend.image.repository=docker.io/langflowai/langflow-frontend \
--set langflow.frontend.image.tag=1.7.2-amd64 \
-f langflow_env.yaml

#Setup the label that will allow gateway api to route traffic for this namespace
kubectl label ns langflow-dev gateway-access=public --overwrite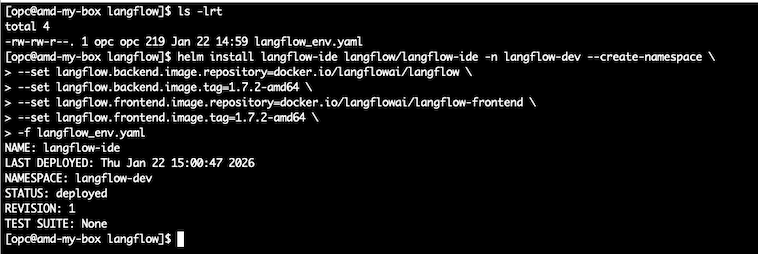
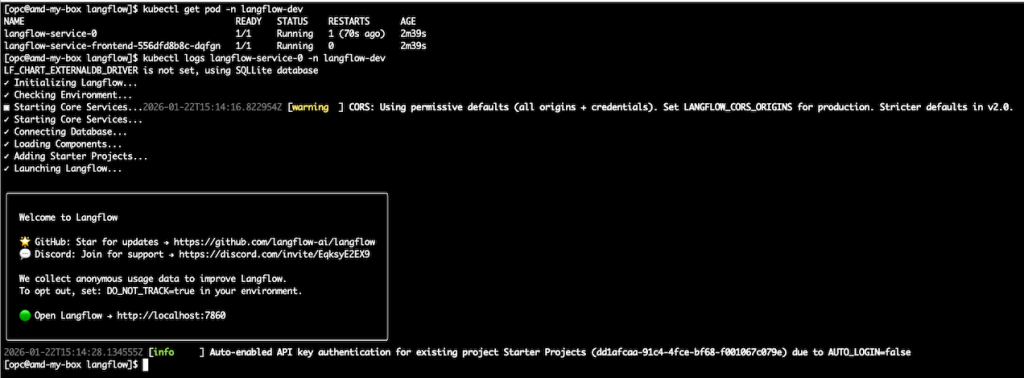
- 2.3 – Check the installation and verify if langflow pods are running.
kubectl get pod -n langflow-dev
kubectl logs langflow-service-0 -n langflow-dev
Note It may take few minutes to get into running state, please be a little patience.
- 2.4 – Deploy the httproutes for Langflow Front and Backend.
Create a new file named httproute_front.yaml and paste the contents below. Make sure modify the domain name for your own.
apiVersion: gateway.networking.k8s.io/v1
kind: HTTPRoute
metadata:
  name: langflow-front-route
spec:
  parentRefs:
    - name: nlb-gateway
      namespace: envoy-gateway
      sectionName: http
  hostnames:
    - langflow.inpute-your-domain.com
  rules:
    - matches:
        - path:
            type: PathPrefix
            value: /
      backendRefs:
        - name: langflow-service
          port: 8080
Now, create a new file named httproute_backend.yaml and paste the contents below. Make sure modify the domain name for your own
apiVersion: gateway.networking.k8s.io/v1
kind: HTTPRoute
metadata:
  name: langflow-backend-route
spec:
  parentRefs:
    - name: nlb-gateway
      namespace: envoy-gateway
      sectionName: http
  hostnames:
    - langflow-backend.inpute-your-domain.com
  rules:
    - matches:
        - path:
            type: PathPrefix
            value: /
      backendRefs:
        - name: langflow-service-backend
          port: 7860
Run the following commands to apply the new httproutes :
kubectl apply -f httproute_front.yaml -n langflow-dev
kubectl apply -f httproute_backend.yaml -n langflow-dev
kubectl get httproute -n langflow-dev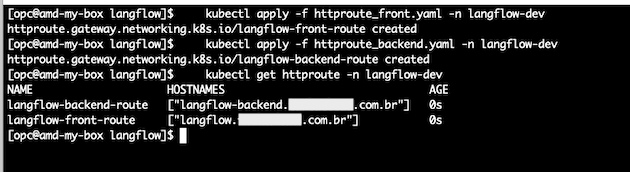
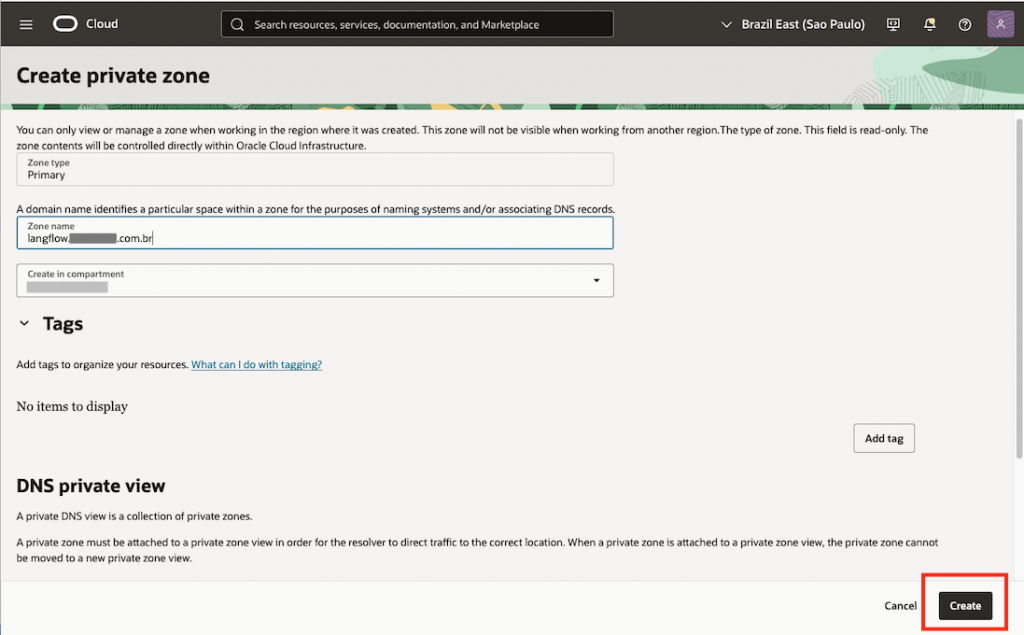
- 2.5 – Setup your PrivateZone DNS to be able to resolve your both front and backend URL domains.
In OCI Console, go to Networking, under DNS Management click on Private Zones and then push Create zone button.
In the Zone Name, set the frontend hostname to match the value defined in the corresponding HTTPRoute for the front-end langflow.inpute-your-domain.com and hit Create.
Now, click on Records tab, and hit Manage records button, then Add record
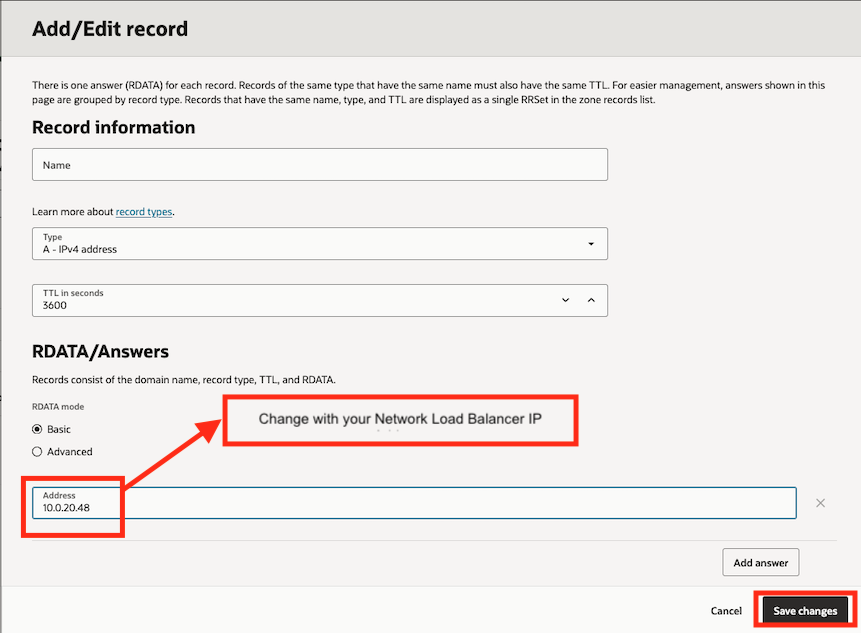
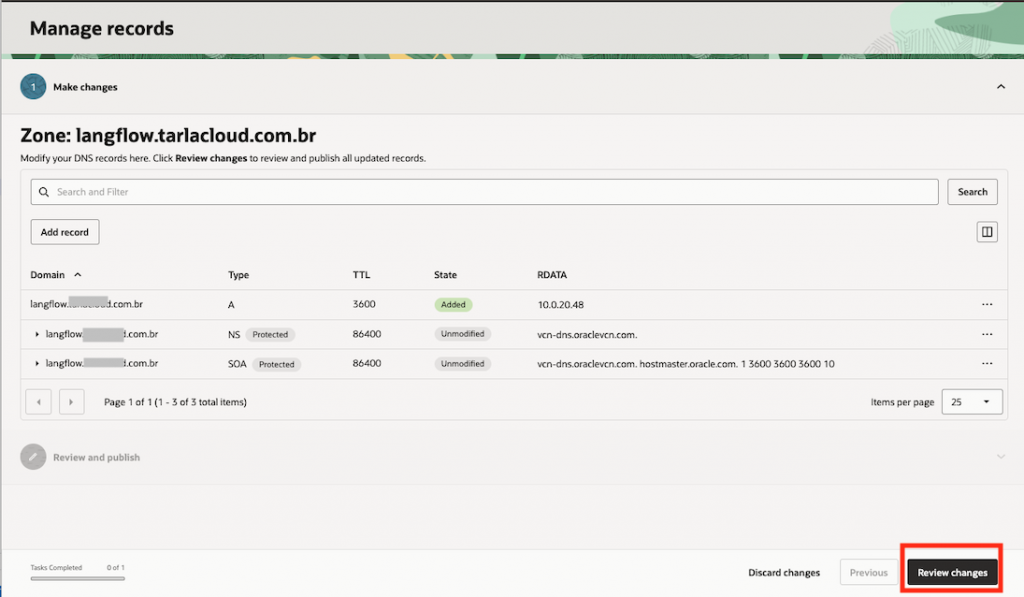
Now, click on Publish changes and the LangFlow backend URL is now resolvable within the VCN in the internal network (private)
- 2.6 – Repeat the process on the step 2.5, but now for the hostname corresponding HTTPRoute for the backend langflow-backend.inpute-your-domain.com
- Create the Private DNS Zone for langflow-backend.inpute-your-domain.com
- Add the record and input your network load balancer IP Address
- Save
- Review
- Publish changes
3 – Expose LangFlow User Interface Only to the Internet usign a Public OCI API Gateway
At this point, LangFlow is exposed internally using the Kubernetes Gateway API and Envoy through a private Network Load Balancer. If you need to make the LangFlow GUI accessible from the internet, proceed with the following step.
Note : This blog demonstrates how to expose the LangFlow GUI to the internet to simplify development, testing, and troubleshooting workflows. However, in production environments, exposing the LangFlow GUI is not recommended due to security and access control considerations.
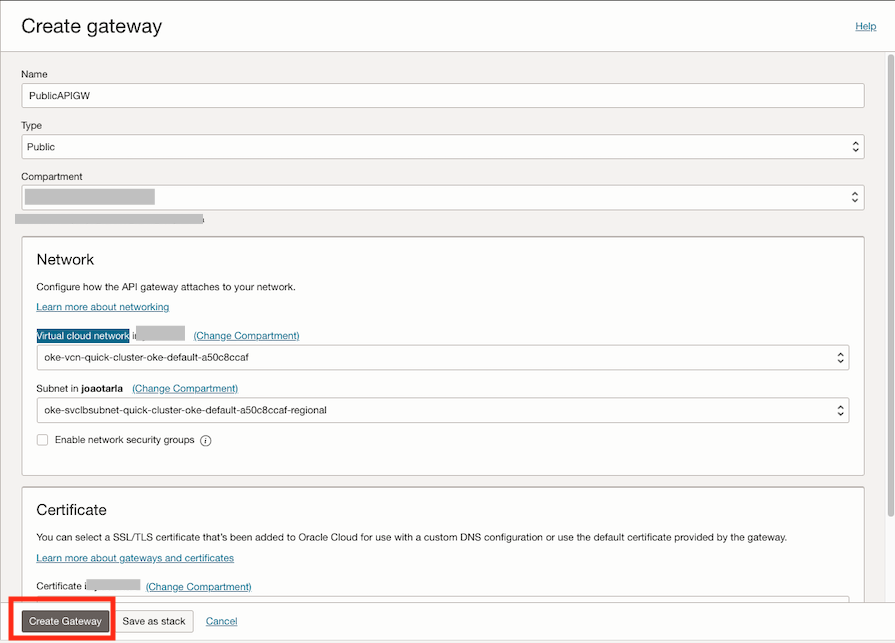
- Creating an OCI Public API Gateway: Go to Development Services, under API Management click on Gateways and then hit the Create Gateway button.
- Type: Public
- Virtual cloud network: Select your OKE VCN
- Subnet: Select your Service Subnet (public)
- Click on Create Gateway
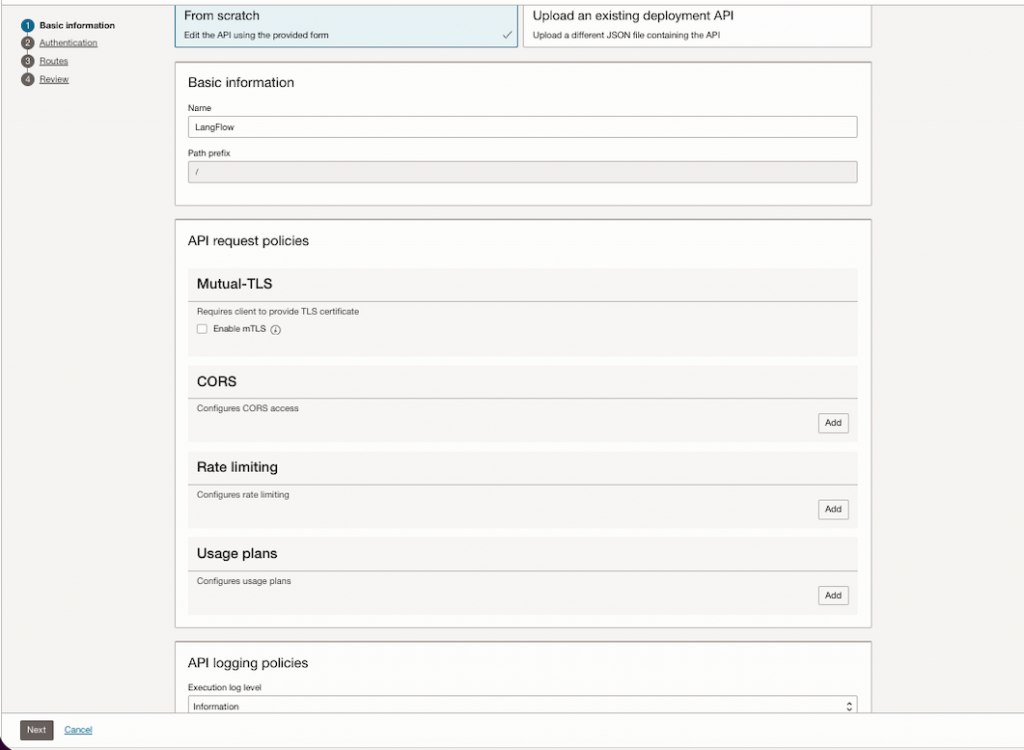
Select the created API Gateway and then go on the left pane, click on Deployments then hit Create Deployment button.
- Name: LangFlow
- Path Prefix: /
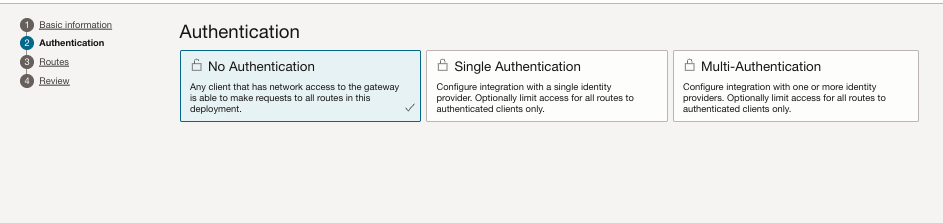
- Authentication: No Authentication
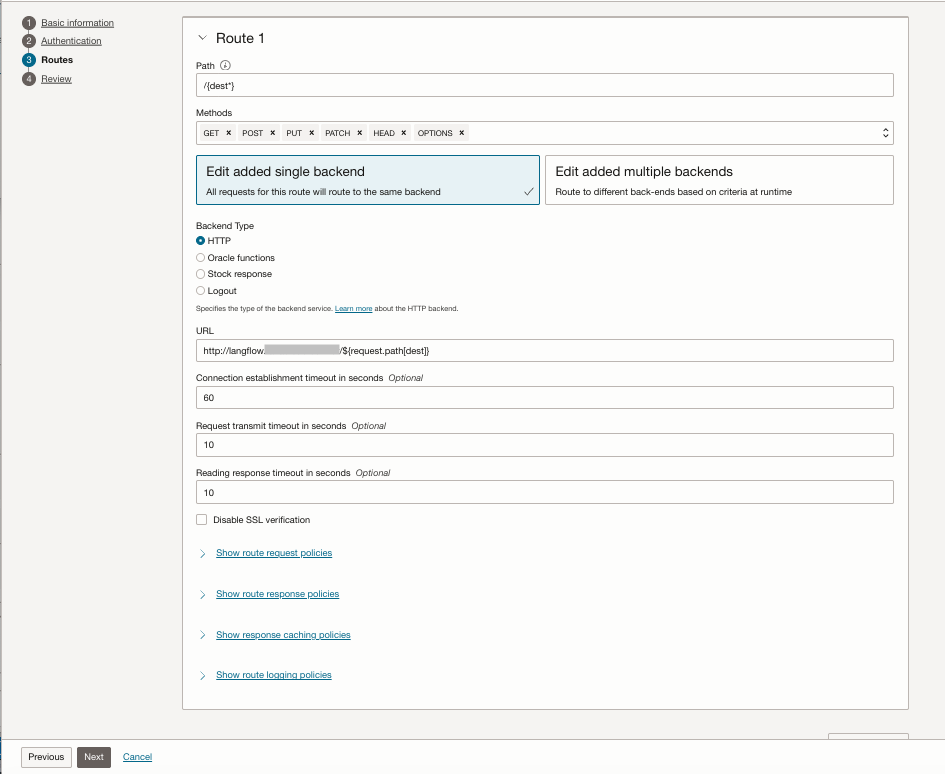
- Routes 1
- path: /{dest*}
- Methos: [GET, POST, PUT, PATCH, HEAD, OPTIONS]
- Backend Type: HTTP
- URL: http://langflow.inpute-your-domain.com/${request.path[dest]}
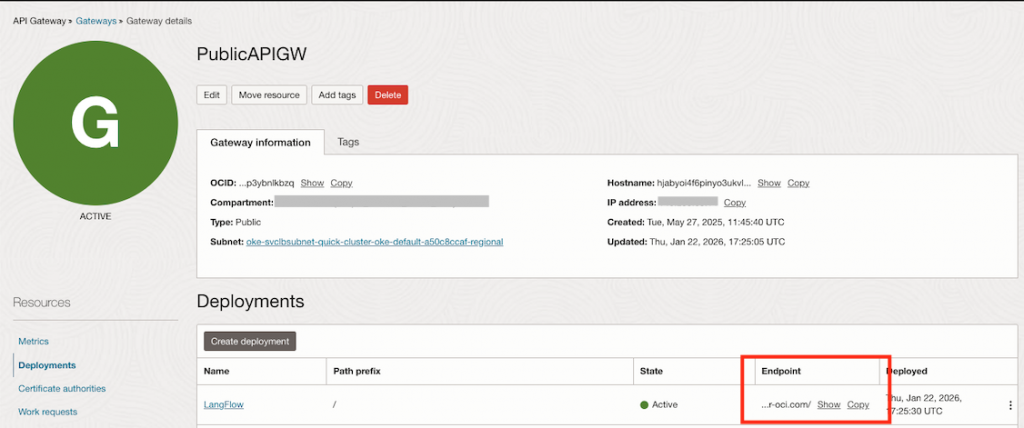
After the API Gateway is created, it will display the endpoint that can be used to access LangFlow over the internet.
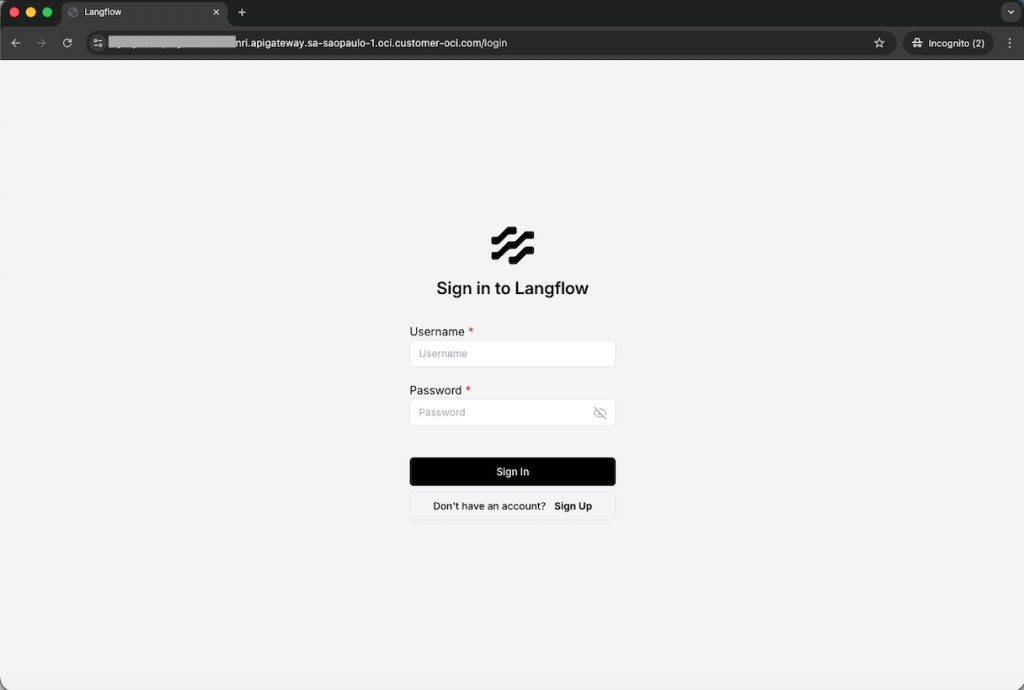
Open your browser and paste the endpoint to access the langflow.
Note: The username and password was previsouly defined on the langflow_env.yaml file on earlier steps.
Conclusion
This guide showed how to deploy LangFlow on OCI Kubernetes Engine using Kubernetes Gateway API and Envoy to manage traffic in a clean and modern way. The setup keeps all services private by default, using a Network Load Balancer and private DNS, and demonstrates how the LangFlow UI can be exposed to the internet only when needed for development. For production environments, the recommended approach is to keep the GUI private and rely on controlled access patterns, preserving security and operational simplicity.