Introduction
Oracle JavaScript Extension Toolkit (JET) is a free and versatile set of toolkits for web developers. It helps you create attractive user interfaces (UIs) following widely accepted practices and leverages Preact, a popular open-source framework similar to React but more lightweight. Oracle JET provides additional features and services to help streamline application development.
What exactly is Virtual DOM architecture?
It is a programming pattern where a virtual representation of the Document Object Model (DOM) resides in memory, synchronized with the live DOM via a JavaScript library. This pattern has gained traction for its ability to efficiently update the browser’s DOM. In Oracle JET, this synchronization is powered by Preact, a JavaScript library impressively bridging changes in the virtual DOM to the live DOM.
Visualize this process with the following diagram:
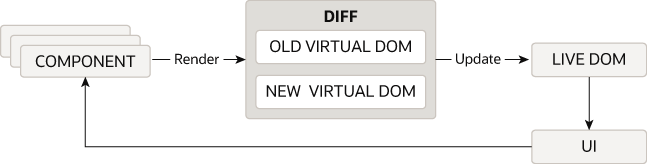
Above diagram source : Virtual DOM architecture
In this setup, when a state change occurs, Virtual DOM architecture intelligently computes the differences, resulting in just one action – a targeted re-render of the affected DOM node(s) in the live DOM. This streamlined approach is an important contributor to creating optimal performance and a smoother user experience.
Oracle Cloud Infrastructure Vision (OCI Vision) unlocks image intelligence. Pre-trained models handle common tasks like object detection (finding objects in images) and text extraction from documents. You can also train custom models for specific needs, like a retailer identifying clothing types. These features, along with easy integration, make OCI Vision a powerful tool for developers to build applications that can “see” and understand visual data.
This blog will guide you through building a basic application in Oracle JET using the Virtual DOM (VDOM) architecture and integrate OCI Vision services for enhanced functionality.
Structure
This blog consists of three sections:
• Part 1: Demonstrates the process of uploading images to OCI bucket.
Prerequisites
- Nodejs
- Java 17
- Integrated Development Environment (IDE)
- Oracle Cloud Account (free oracle cloud services should be sufficient)
The final application should look as follows on a localhost server:
Our blog will feature a one-page application with Object Storage Details and OCI Vision Result sections. In the Object Storage Details section, users enter Tenancy Region and Bucket Name. After validating the inputs, the application fetches the images stored in the provided object storage, which are then displayed in object lists. Upon submission, the OCI Vision API analyzes the selected image, displaying both the object and text in the OCI Vision Result section. Additionally, it highlights numbers in text detection and offers users filtering options for more refined results[AG1] [KC2] .
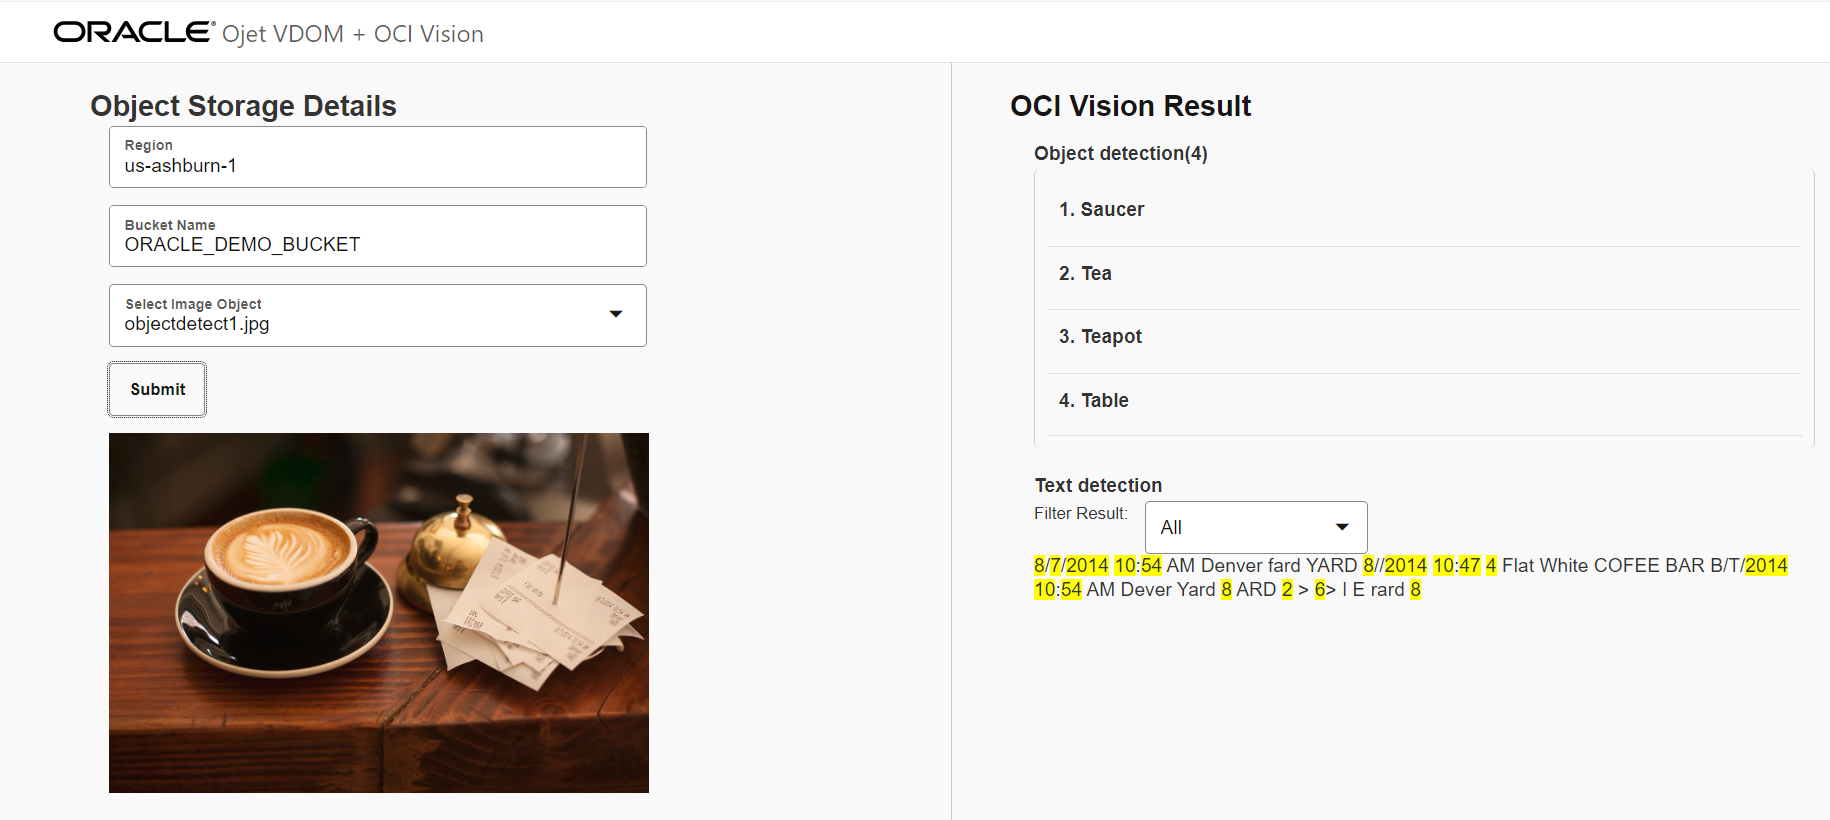
Note: image courtesy of pixabay.com
Part 1: Demonstrates the process of uploading images to OCI bucket.
- Login to your Oracle Cloud Account. If you don’t have one yet, sign up at cloud.oracle.com.
- Create a compartment from the OCI “Identity and Security” menu and note the CompartmentID.
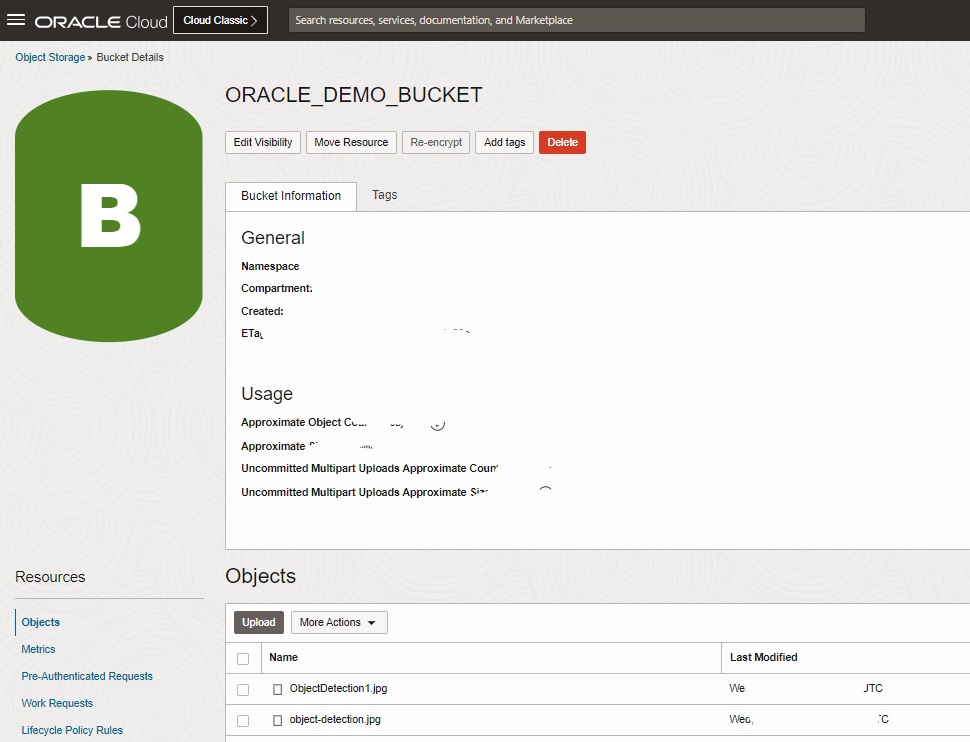
- From the Storage menu, choose the “Bucket” option. Create a bucket the compartment you created above and name it “ORACLE_DEMO_BUCKET” .
- Upload sample images.
- Set up an API signing key and OCI profile mentioned in OCI documentation.
Part[AG3] [KC4] 2: Integrate with OCI Vision service and process image through a Spring Boot application.
- Clone the OCI SDK ai-vision-service-integration from oci-sdk-java.
- Setup any Java supported IDE
• Open File > Import and choose Existing Projects into workspace.
• Select Root Directory to your cloned location and ai-vision-service-integration.
• Click on Finish
- Changes in AIVisionController.java file :
• Add below method[AG5] [KC6] :
@ResponseBody
@RequestMapping(value = "/ai/vision/objectlist", method = RequestMethod.GET, produces = MediaType.APPLICATION_JSON_VALUE)
public List
   getObjectListWithUrls(@RequestParam(value = "bucket", defaultValue = "your-bucket", required = false) String bucket,
                                                      @RequestParam(value = "region", defaultValue = "US_ASHBURN_1", required = false) String region) throws Exception {
    AuthenticationDetailsProvider provider = OCIConfig.getAuthenticationDetailsProvider();
    try (ObjectStorage objStoreClient = new ObjectStorageClient(provider)) {
        GetNamespaceResponse namespaceResponse = objStoreClient.getNamespace(GetNamespaceRequest.builder().build());
        String namespace = namespaceResponse.getValue();
        ListObjectsRequest lor = ListObjectsRequest.builder().namespaceName(namespace).bucketName(bucket).build();
        System.err.println("Listing objects from bucket " + bucket);
        AtomicInteger idGenerator = new AtomicInteger(1);
        ListObjectsResponse response = objStoreClient.listObjects(lor);
        List

    objectListResponses = response.getListObjects().getObjects().stream().map(obj -> new ObjectListResponse(idGenerator.getAndIncrement(), obj.getName(), obj.getName(), generatePreSignedUrl(region, namespace, bucket, obj.getName()))).collect(Collectors.toList());
        return objectListResponses;
    } catch (Throwable e) {
        System.err.println("Error fetching object list from bucket " + e.getMessage());
        throw new Exception("Failed to fetch objects", e);
    }
}
private String generatePreSignedUrl(String region, String namespace, String bucket, String objectName) {
String baseUrl = String.format("https://objectstorage.%s.oraclecloud.com/n/%s/b/%s/o/", region, namespace, bucket);
    return baseUrl + objectName;
}
- Create a file named ‘ObjectListResponse’ and add Getter Setter method of below field.
private int id;
private String name;
private String title;
private String imageUrl
- Click on Run As > Java Application from the
OciAIVisionApplicationjava file. - Wait for the successful start of the Spring Boot service.
Hit below URI to process the image and identify the image attributes using OCI Vision service.
http://<HOST>:<PORT>/ai/vision/image?object=<OBJECT_NAME_FROM_STORAGE>&bucket=<OBJECT_STORAGE_BUCKET_NAME>®ion=<OCI_REGION_NAME>http://<HOST>:<PORT>/ai/vision/objectlist? bucket=<OBJECT_STORAGE_BUCKET_NAME>®ion=<OCI_REGION_NAME>
Part 3: Developing an Oracle JET (VDOM) application to consume and display the results from OCI Vision Service.
Before you start creating a VComponent in Oracle JET, ensure that you have the following tools and resources:
- An Oracle JET application created using the command:
npx @oracle/ojet-cli create JET-Virtual-DOM-app --template=basic –vdom - Create files named VisionAIResultView.tsx and ObjectStorageForm.tsx under the JET-Virtual-DOM-app/src/components/content directory.
- ObjectStorageForm.tsx :
This component contains the oj-form-layout element which takes object bucket information from the user and call /ai/vision/objectlist service to fetch the objects/images from the OCI buckets.
Add the following import statements to the top of the file:
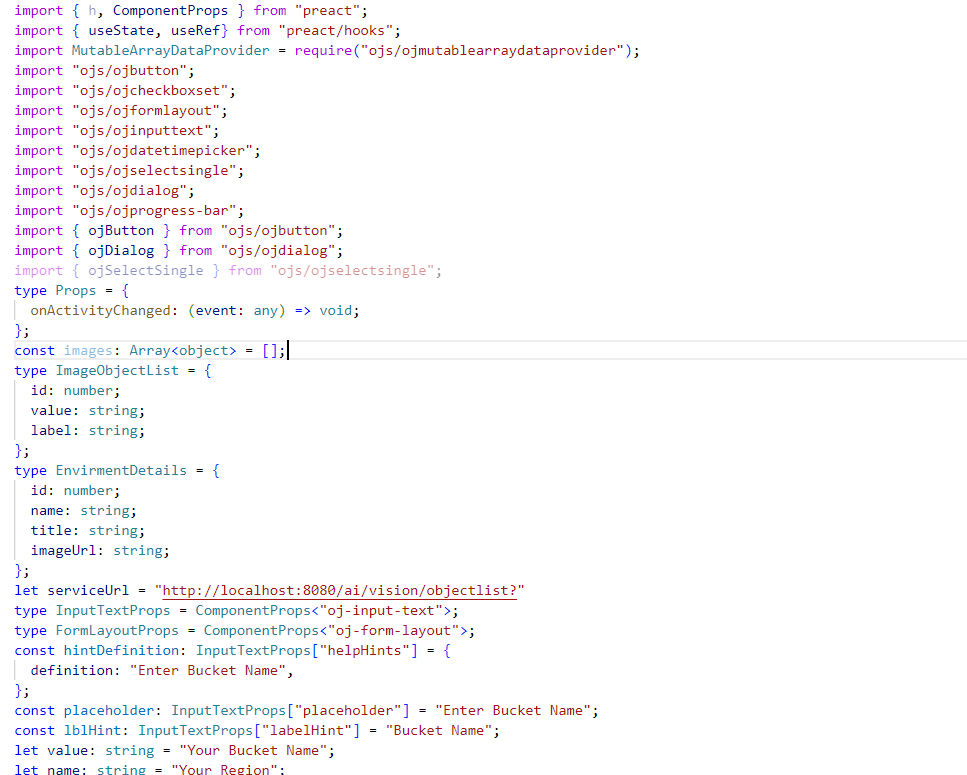
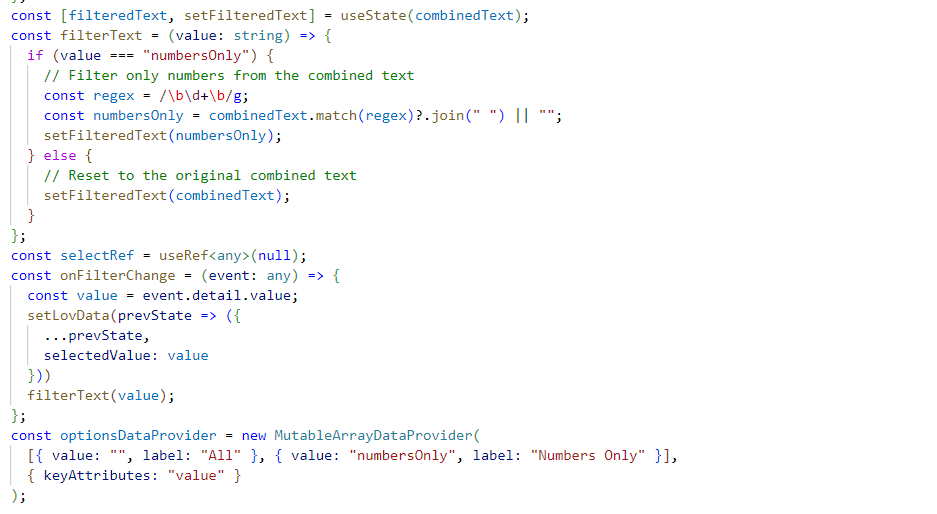
Below is the service call and function code snippet: 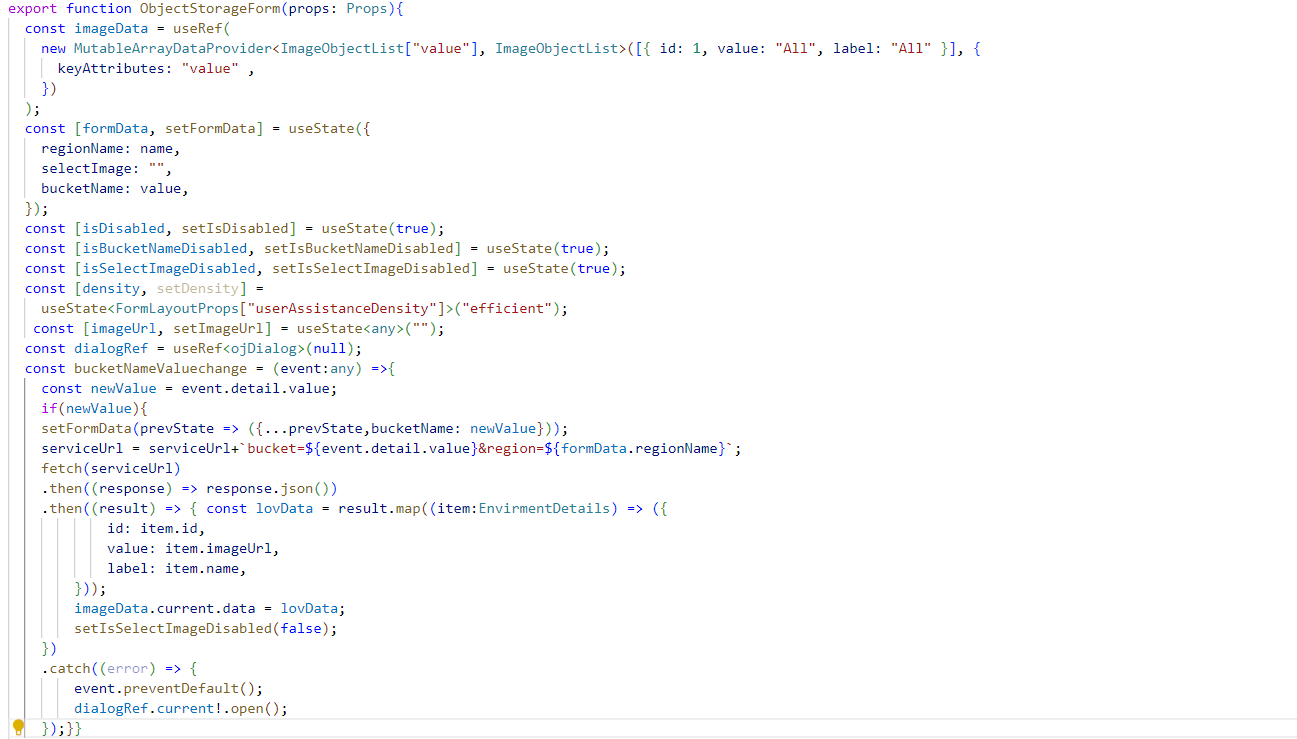
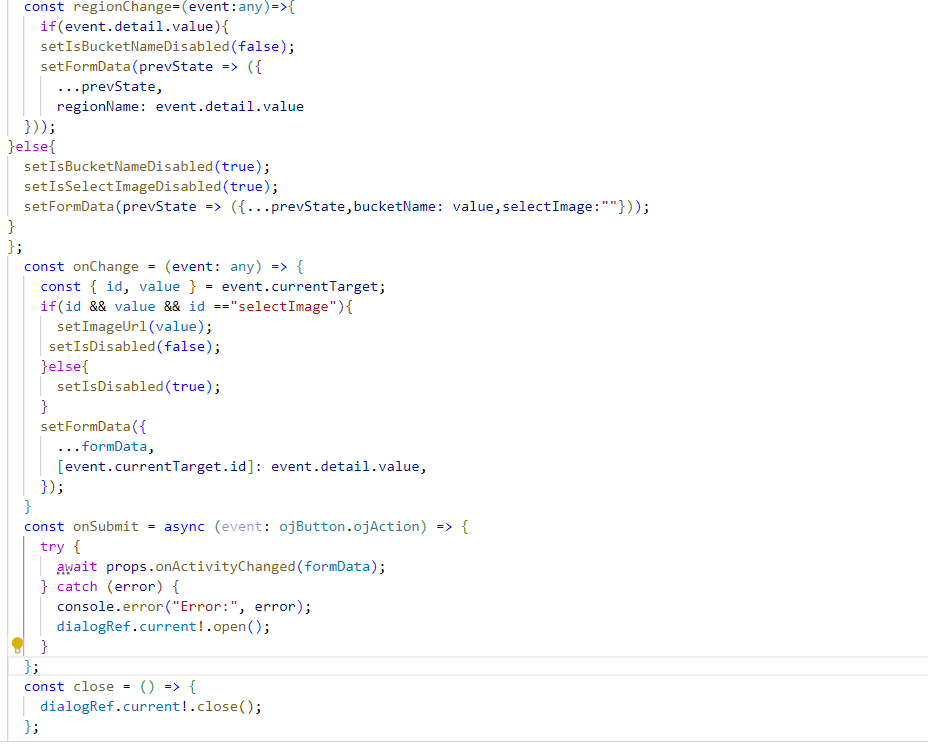
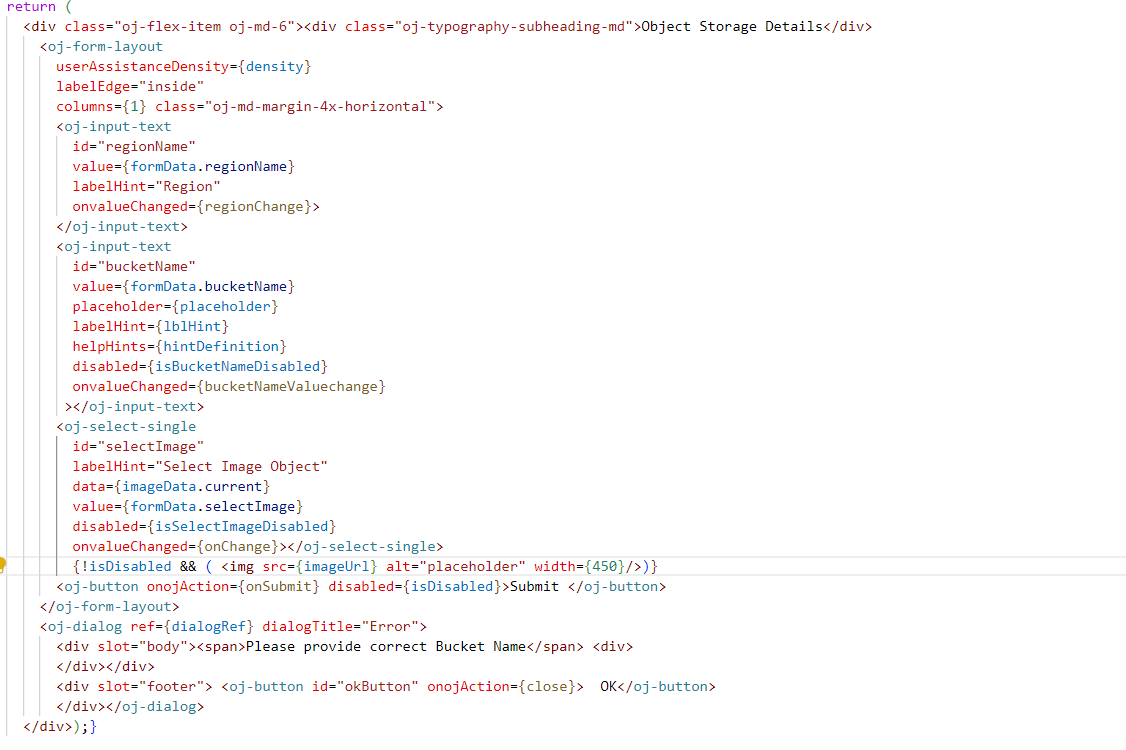
Form VComponent code snippet:
- VisionResultView :This component contains the ListView function, which is called when a user submits form data from ObjectStorageForm.tsx. It retrieves information from props, calls the /ai/vision/image service, and displays image objects and text information.
Add the following import statements and functions:
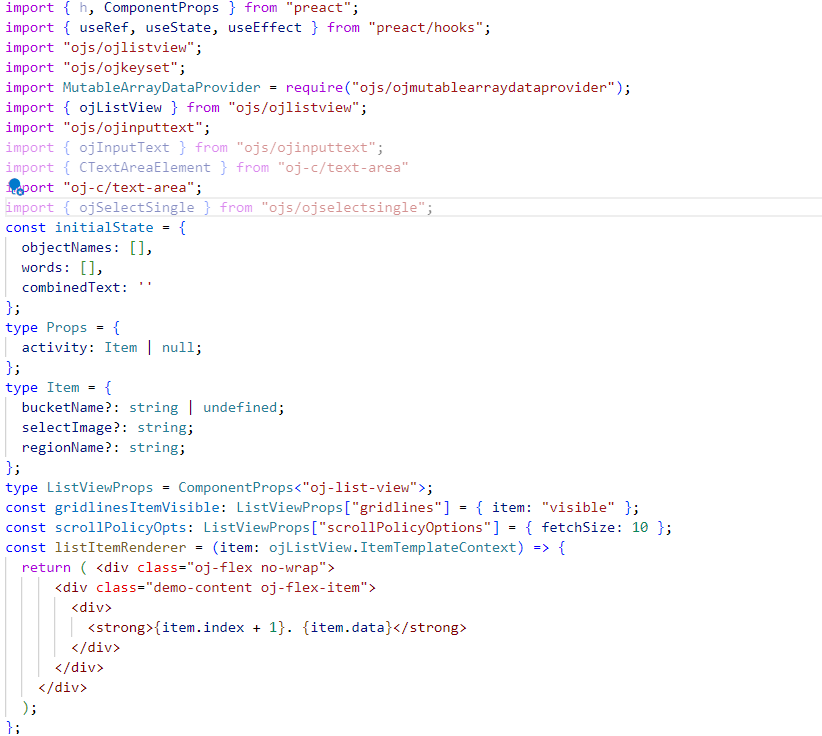
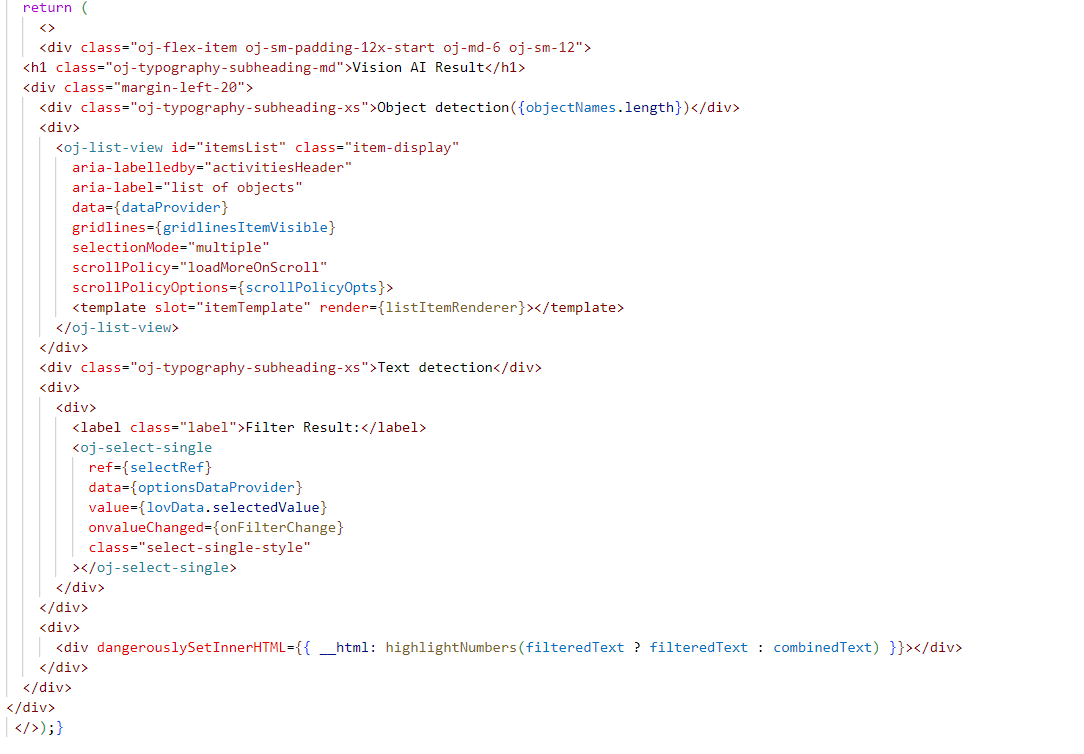
ResultsView VComponent code snippet:

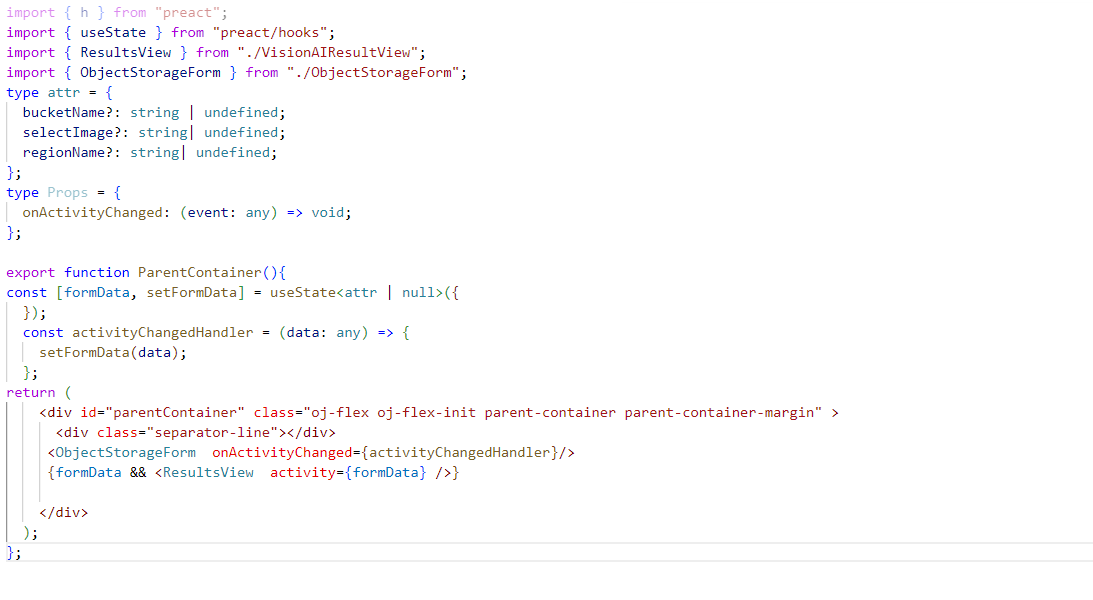
ParentContainer component, which is the parent container component for both the components.
- Run the Virtual DOM application in the terminal window, change to the JET-Virtual-DOM-app directory and run the app.
npx ojet serve
For more information on Oracle JET, go to the Oracle JET website.
- [AG1]See email for comments re: image and sreencap.
- Also note, the screencap incorrectly says “Vision AI” when it should say “OCI Vision” (following the approved product name)
[KC2]I’ve accepted your changes, and now everywhere it’s OCI vision, including application screenshots. Additionally, I replaced the image (the embedded car image )and added a simple image, clearly stating the source as pixabay.com, which provides royalty-free images Content License Summary (pixabay.com) . This platform is used across all other OCI blogs to source images example
[AG3]See email for comments re: screencap.
[KC4]The image was taken from the local OCI console, and I have already obscured all details in the image. No copyright information is necessary.
[AG5]See email re: approval for code snippets.
[KC6]Code is reviewed by SME and provided approval , It is open source code and anybody can use . No copyright information is necessary.