This post is by one of our guest authors – Muthukumar Sivagnanam, Principal Cloud Architect, ISV Prime, Cloud Engineering
BUSINESS CASE
Many Customers operate with unpredictable peak and non-peak workloads. In this case, Oracle Autonomous Ai Database (ADB) offers powerful built-in autoscaling (up to 3x) on top of a defined baseline ECPU/OCPU and a best fit. Oracle Autonomous AI Database also provides a highly resilient, self-managing, and performance-optimized platform with intelligent autoscaling to handle demand spikes.
To further enhance cost efficiency for a predictable peak and non-peak workloads, I implemented a time-based baseline ECPU/OCPU automation layer that dynamically adjusts the baseline during peak and off-peak hours—while still fully leveraging ADB’s native autoscaling. This enables customers to align infrastructure costs with real business usage patterns and maximize the value of Autonomous AI Database. This requirement emerged from the discussions with multiple ISV customers.
SOLUTION IMPLEMENTATION
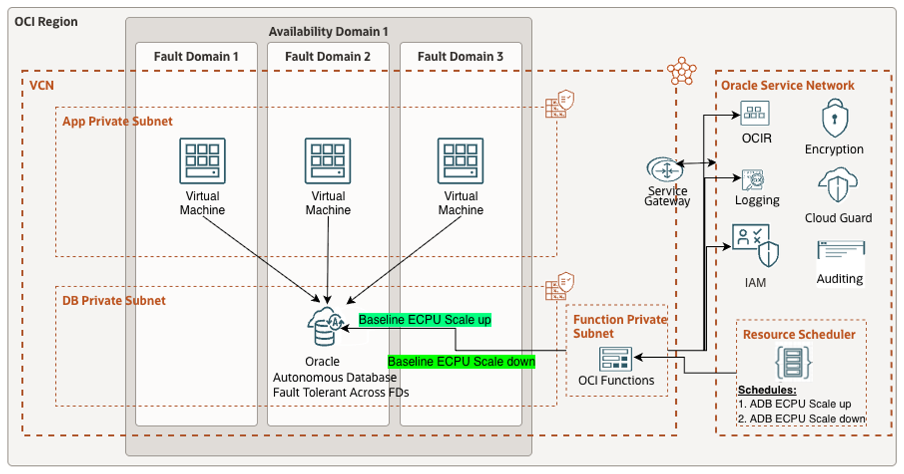
I implemented a serverless automation using OCI Functions and Resource Scheduler to programmatically increase and decrease the baseline ECPUs based on predefined schedules. The solution uses Resource Principals, dynamic groups, and IAM policies, requires no credentials, operates entirely in a private network on security, and complements ADB autoscaling seamlessly.
This optimization not only delivers immediate financial benefits but also builds customer confidence to migrate and run additional workloads on OCI, further strengthening their trust in Oracle and OCI as a strategic cloud platform.
ARCHITECTURE
STEPS TO IMPLEMENT:
1. CREATE A DYNAMIC GROUP FOR FUNCTIONS
We need to establish an identity for our resources. We want to say:
“All Functions in this application are allowed to call Vault and Database APIs.”
Steps
- Go to Identity & Security → Domains → your domain → Dynamic groups
- Click Create Dynamic group
- Name: fn-adb-scale-dg
- Description: Functions that can scale ADB and read secrets
- Rule (Replace the OCID below with your actual compartment OCID):
ALL {resource.type = ‘fnfunc’, resource.compartment.id = ‘<YOUR_FUNCTIONS_COMPARTMENT_OCID>’}
- Click Save
Note: This rule effectively states:
“Any function residing in this specific compartment belongs to this dynamic group.”
2. ADD IAM POLICIES FOR FUNCTION ACCESSS TO AUTONOMOUS AI DATABASE
Now we tell IAM:
“This dynamic group we just created is allowed update the Autonomous AI Database.”
Steps
- Go to Identity → Policies
- Choose the tenancy or the specific compartment where your resources reside
- Click Create policy
- Name: fn-adb-scale-policy
- Description: Allow functions to manage ADB
- Statements (adjust for your compartment names):
Allow dynamic-group fn-adb-scale-dg to manage autonomous-databases in compartment <YOUR_ADB_COMPARTMENT_NAME>
Tip:
If you want to be stricter, you can use use instead of manage, but for a first test, manage is the easiest path.
3. CREATE A FUNCTIONS APPLICATION
Steps
- Go to Developer Services → Functions → Applications
- Click Create application
- Name: adb-scale-app
- Compartment: Select the same compartment used in your dynamic group rule
- VCN + Subnet: Choose a subnet with network access
(usually a private subnet with a Service Gateway) - Logging: Enable this (highly recommended for debugging)
- Click Create
This application will act as the container for your function.
4. PREPARE THE PYTHON FUNCTION CODE
We will create a function that calls the Autonomous AI Database Update API to set the CPU count.
Function Project Structure
We will use Cloud Shell combined with the Fn CLI (simplest method, no local setup).
Steps
- Open Cloud Shell (click the >_ icon at the top-right of the OCI Console)
- From Cloud Shell, list applications and contexts:
# fn list apps
# fn list context
- Update / use the context for region, compartment, and registry:
# fn use context ap-singapore-1
# fn update context <Compartment OCID>
# fn update context registry sin.ocir.io/axsfxxxxxbhpo/adb-auto.0.1
- Create an Auth Token from OCI Console → User Settings, then log in to OCIR with the token:
# docker login -u ‘axsfxxxxxbhpo/muthukumar’ sin.ocir.io
Password: <User Auth Token>
(Note: This example is for the Singapore region — change the region accordingly.)
- Initialize the function project:
# fn init –runtime python adb-scale-fn
# cd adb-scale-fn
This creates a folder named adb-scale-fn with boilerplate files.
- Func.yaml
- Func.py
- requirements.txt
Edit func.yaml with the below content
Update func.yaml as shown below:
schema_version: 20180708
name: adb-scale-fn
version: 0.0.11
runtime: python
build_image: fnproject/python:3.11-dev
run_image: fnproject/python:3.11
entrypoint: /python/bin/fdk /function/func.py handler
memory: 256
Update requirements.txt with the below content
oci
fdk
Replace func.py with the Following Code
# func.py
I have added the code to my GitHub repository: https://github.com/muthus-ca/oci-automation.git
5. DEPLOY THE FUNCTION
# fn -v deploy –app adb-scale-app
Verify in OCI Console:
- Developer Services → Functions → Applications → adb-scale-app
- Select function adb-scale-fn
- Check Configuration
6. TEST THE FUNCTION
Invoke directly from Cloud Shell:
Increase CPU
# fn invoke adb-scale-app adb-scale-fn <<EOF
{“adb_ocid”: “ocid1.autonomousdatabase.oc1..xxxx”, “new_cpu_count”: 8}
EOF
You should see the database state move to UPDATING.
Decrease CPU
# fn invoke adb-scale-app adb-scale-fn <<EOF
{“adb_ocid”: “ocid1.autonomousdatabase.oc1..xxxx”, “new_cpu_count”: 2}
EOF
7. AUTOMATE THE FUNCTION VIA RESOURCE SCHEDULER
STEP 1: NAVIGATE TO RESOURCE SCHEDULER
-
- Log in to OCI Console
- Go to: Governance & Administration → Resource Scheduler
- Click Schedules
STEP 2: CREATE A NEW SCHEDULE
-
- Click Create schedule
- Provide the following details:
Basic Information
- Name: adb-scale-up-schedule (example)
- Description: Triggers OCI Function to increase Autonomous DB ECPU
- Action to be Executed: Start
- Compartment: <Select Compartment Name>
- Resources: Static and select the deployed Function
- Apply Parameters: parameter type – Body, Value (JSON)
In the Payload / Request Body field, enter the JSON input required by the function. (Adjust your CPU count accordingly)
Increase ECPU Count
{
“adb_ocid”: “ocid1.autonomousdatabase.oc1.ap-singapore-1.xxxxxxv5aq”,
“new_cpu_count”: 8
}
# Create another schedule to decrease the CPU count by repeating the steps outlined above and providing the following JSON input. (Adjust your CPU count accordingly)
Decrease ECPU Count
{
“adb_ocid”: “ocid1.autonomousdatabase.oc1.ap-singapore-1.xxxxxxv5aq”,
“new_cpu_count”: 2
}
Note: This payload is passed directly to the function’s handler() as the request body.
STEP 3: CONFIGURE THE SCHEDULE TIMING
Choose one of the following:
- Option A: Simple Schedule (Form Interface) – We used this method for the demo
- Frequency: One time / Hourly / Daily / Weekly / Monthly (Used one time for the demo)
- Repeat: 1
- Time: Select time (UTC time zone – 24 hr format)
- Start Date: <Start Date> End Date: <Optional>
Review & Save
STEP 4: VALIDATE EXECUTION
A. Check Schedule Run Status
-
- Open the schedule
- Go to Runs / Execution history
- Confirm status = Succeeded
B. Check Function Logs
-
- Go to: Developer Services → Functions → Applications
- Select your application
- Open the function
- Click Logs
- Verify successful execution messages
C. Validate Autonomous AI Database
-
- Navigate to Autonomous AI Databases
- Open the target DB
- Check:
- Compute Model (ECPU/OCPU)
- CPU/ECPU count updated
-
- Lifecycle state shows UPDATING → AVAILABLE
STEP 5: CREATE SEPARATE SCHEDULES FOR SCALE-UP AND SCALE-DOWN
Recommended Setup
| Schedule Name | Time | CPU |
| adb-scale-up | Business hours | 8 ECPU |
| adb-scale-down | Off hours | 2 ECPU |
Each schedule invokes the same function with different JSON payloads.
SUMMARY
By dynamically scaling the baseline ECPU/OCPU for the predictable workload during peak and non-peak hours, customers achieved significant monthly cost savings of around 40–50% per database. When applied across multiple Autonomous AI Databases and environments, this delivered substantial cost optimization without affecting performance.
These savings can be reinvested to onboard new workloads and support additional business initiatives.
The solution is fully automated and serverless, with no operational overhead, is secure by design with private connectivity and fine-grained access control, and provides complete observability and auditability through integrated monitoring, logging, and auditing.
Special thanks to our guest author Muthukumar Sivagnanam – Principal Cloud Architect, ISV Prime, Cloud Engineering
Muthukumar has over 20 years of IT experience, with more than a decade specializing in cloud technologies. At Oracle, he serves as a trusted advisor to OCI ISV customers, leading cloud architecture & solutions, automation, and cost optimization initiatives. He specializes in translating business requirements into secure, scalable OCI solutions and presenting technology strategies aligned with business outcomes at the CXO level and adding value to the Customer Business and Oracle.