Introduction
Oracle Linux 7 support will end this year (2024). Existing GoldenGate Marketplace customers who are running on Oracle Linux 7 needs to upgrade to Oracle Linux 8. Although Oracle has detail instructions and KM notes for this upgrade, there are certain settings that need to be taken care of to achieve a successful upgrade. This Blog will cover those areas in detail.
Prepare for the Upgrade
1. Stop all GoldenGate applications
Login to the VM via ssh, and start adminclient
shell>cd /u01/app/ogg/bin
shell>./adminclient
Connect to the GoldenGate Deployment using the credential provided in /home/opc/ogg-credentials.json, stop all the GoldenGate processes, Extract/Replicat/Distpath and etc.
adminclient>connect http://localhost:9000 as oggadmin
adminclient>stop extract *
adminclient>stop replicat *
adminclient>stop distpath all
Stop the Deployment
adminclient>stop deployment <your deployment name>
By default, the deployment name is Marketplace. If you have changed it, you will find the deployment name in the output of “info all” command.
Doublecheck all GG processes and Deployment Services are stopped
adminclient> info all
Exit out of adminclient
Stop OracleGoldenGate Service
shell>sudo systemctl stop OracleGoldenGate
Stop the nginx service
shell>sudo systemctl stop nginx
If needed, shut down the instance and perform a full backup of the boot volumes and the block storage volumes from this VM instance.
2. Prepare the system to get all the packages needed to run Leapp
shell>sudo yum update -y
Once update is done, reboot the system
shell>sudo reboot
Install the Leapp utility and its supporting repositories.
shell>sudo yum install -y leapp –enablerepo=ol7_leapp,ol7_latest
Remove openssl11-libs package to avoid potential conflict with Oralce Linux 8 openssl libraries after the upgrade
shell>sudo yum remove openssl11-libs -y
Run the leapp preupgrade command to start the preupgrade process.
shell>sudo leapp preupgrade –oci
Once this taask is done, you will see this print out on your screen
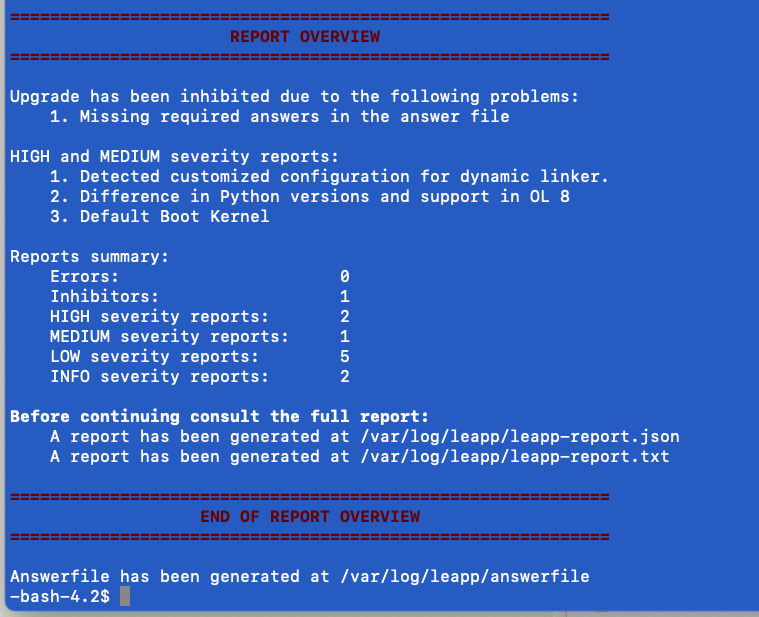
Check the report file in /var/log/leapp/leapp-report.txt
The only Inhibitor Error should be this
Risk Factor: high (inhibitor)
Title: Missing required answers in the answer file
Summary: One or more sections in answerfile are missing user choices: remove_pam_pkcs11_module_check.confirm
For more information consult https://docs.oracle.com/en/operating-systems/oracle-linux/8/leapp/leapp-UpgradingtheSystem.html#preupgrade-report.
Remediation: [hint] Please register user choices with leapp answer cli command or by manually editing the answerfile.
[command] leapp answer --section remove_pam_pkcs11_module_check.confirm=True
Key: d35fxxxxxxxxxxxxxxxxxx3670d90fa92f0d54b
Please run the command given to update the answer file
shell>sudo leapp answer –section remove_pam_pkcs11_module_check.confirm=True
Execute the Upgrade
Run the following command to execute the upgrade
shell>sudo leapp upgrade –oci –enablerepo ol8_codeready_builder
It will take some time for the process to finish and come back with similar report file
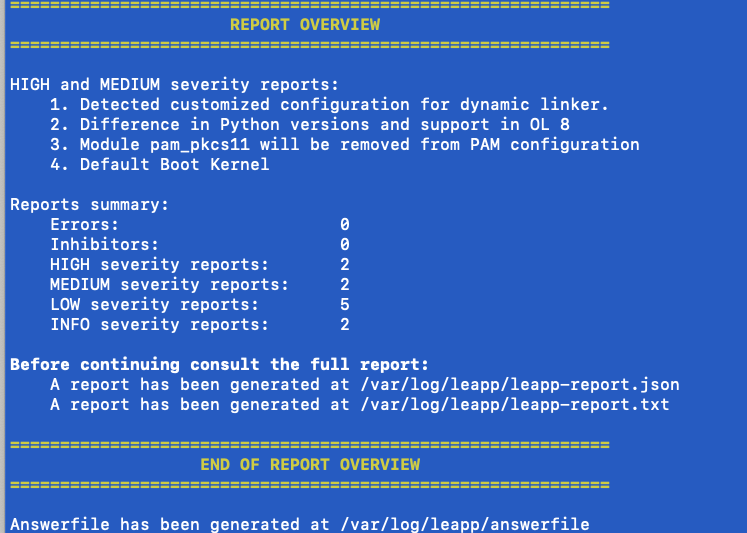
There should be zero Errors, zero Inhibitors shown in the report file.
Check your ssh public key is still in /home/opc/.ssh/authorized_keys
shell>cat ~/.ssh/authorized_keys
Reset opc user’s password to refresh all authorization tokens
shell>sudo passwd opc
( **It is highly recommended to have a serial console enabled for the VM instance, so it will be easier to monitor the upgrade progress. Otherwise, during the upgrade is running, you will not be able to ssh or login to your instance, check this doc for more details)
Reboot the system
shell>sudo reboot
The whole upgrade process could take up to 15-30 minutes. Please check the serial console for the progress if you have enabled and connected it in OCI console.
Post Upgrade
1. Once the system upgrade is completed successfully, try to ssh into the new instance and verify the linux version has successfully been upgraded.
shell>cat /etc/oracle-release
Please also review the report file /var/log/leapp/leapp-report.txt, take necessary actions recommended in the report file.
2. Reinstall nginx
shell>sudo dnf install nginx -y
3. Restart GoldenGate Service
Start the Service Manager
shell>sudo systemctl start OracleGoldenGate
Start the Deployment and all GG processes
shell>cd /u01/app/ogg/bin
shell>./adminclient
Connect to the GoldenGate Deployment using the credential provided in /home/opc/ogg-credentials.json, start the Deployment Services
adminclient>connect http://localhost:9000 as oggadmin
adminclient>start deployment <your deployment name>
adminclient>info all
Once confirmed all services are running, connect to the Service Manager again, start all the GG Extract/Replicat/Distpath processes
adminclient>connect http://localhost:9000 as oggadmin
adminclient>start extract *
adminclient>start replicat *
adminclient>start distpath all
adminclient>info all
4. Update firewall direct rule to allow ingress on port 443
sudo vi /etc/firewalld/direct.xml
Find the line that has passthrough rule for ingres traffic to port 22
<passthrough ipv=”ipv4″>-A INPUT -p tcp -m state –state NEW -m tcp –dport 22 -j ACCEPT</passthrough>
Add a similar passthrough rule to allow ingress traffic for port 443, right below
<passthrough ipv=”ipv4″>-A INPUT -p tcp -m state –state NEW -m tcp –dport 443 -j ACCEPT</passthrough>
Restart firewalld
shell>sudo systemctl restart firewalld
Double-check the direct rule is enabled
shell>sudo iptables -vnxL INPUT
Now you can verify your GoldenGate Deployment connection from the WebUI
Your GoldenGate Deployment should be working now on the new Oracle Linux 8.
Known Issues
1. Cannot ssh to the VM instance as opc after the upgrade.
Please make sure you wait long enough till the upgrade is completed. If still fail, you will need to reset the password for user opc to refresh all authentication tokens. This needs to be done on the serial console thru OCI.
Follow the instructions in https://docs.oracle.com/en-us/iaas/Content/Compute/References/serialconsole.htm#five to set the system in maintenance mode via serial console. Then reset user opc password.
Once the password is reset succesfully, reboot the system again from the serial console.
On the ssh client side, make sure you remove the instance from the known_hosts file, you can use the following command
shell>ssh-keygen -R <hostname>
Try to ssh again
References
https://docs.oracle.com/en/learn/ol-linux-leapp/index.html#update-to-latest-packages
https://docs.oracle.com/en/operating-systems/oracle-linux/8/leapp/leapp-PreparingfortheUpgrade.html#leapp-reportfile
https://docs.oracle.com/en-us/iaas/Content/Compute/References/serialconsole.htm#five