
We are excited to announce the availability of Native UI for Oracle GoldenGate on Oracle AI Database@Azure, making it easier for Azure customers to create, configure, and manage GoldenGate resources directly from the Microsoft Azure Portal.
Oracle GoldenGate on Oracle AI Database@Azure is a fully managed, native cloud service for real-time, large-scale data movement. It processes data as it flows from one or more source data management systems to target databases, enabling customers to build real-time replication, integration, migration, and event-driven architectures across Oracle, Azure, on-premises, and multicloud environments.
With the new Native UI experience, customers can now perform the core GoldenGate lifecycle tasks from the Azure Portal:
- Create an Oracle GoldenGate deployment
- Create a database connection
- Assign a connection to a deployment, or assign a deployment to a connection
Why this matters
Many enterprises are modernizing Oracle workloads in Azure while continuing to rely on Oracle Database, Oracle Exadata, Autonomous AI Database, analytics platforms, event streaming systems, and applications across multiple environments. For these customers, real-time data movement is foundational. Data must be available where business teams, applications, AI services, analytics platforms, and operational systems need it—without introducing downtime, batch delays, or complex self-managed infrastructure.
Native UI for GoldenGate on Oracle AI Database@Azure helps customers get started faster by bringing GoldenGate provisioning and connection management into the Azure experience they already use every day. This means customers can:
- Deploy GoldenGate from the Azure Portal
- Use Azure subscriptions, resource groups, regions, availability zones, and tags as part of the provisioning workflow
- Connect GoldenGate to Oracle Database, Kafka, or Microsoft Fabric connection types from the Azure Portal
- Choose shared or dedicated endpoint networking options
- Monitor deployment and connection state from the Azure Portal
- Use Oracle GoldenGate’s proven real-time replication technology in an Azure-native operating model
What is new with Native UI?
The Native UI experience is designed to help Azure users create and manage Oracle GoldenGate resources from a familiar Azure Portal workflow. From the Azure Portal, customers can create a GoldenGate deployment, create a connection, and then associate that connection with the deployment so it can be used for replication and data movement. Oracle documentation confirms that GoldenGate deployment creation, database connection creation, and connection assignment are supported in the Azure Portal.
Before you begin, complete the prerequisites for Oracle GoldenGate on Oracle AI Database@Azure. You also need a Resource Anchor and a Network Anchor created from the Azure Portal. The Resource Anchor identifies the target OCI compartment, while the Network Anchor identifies the target Azure virtual network and subnet that will be used by the deployment.
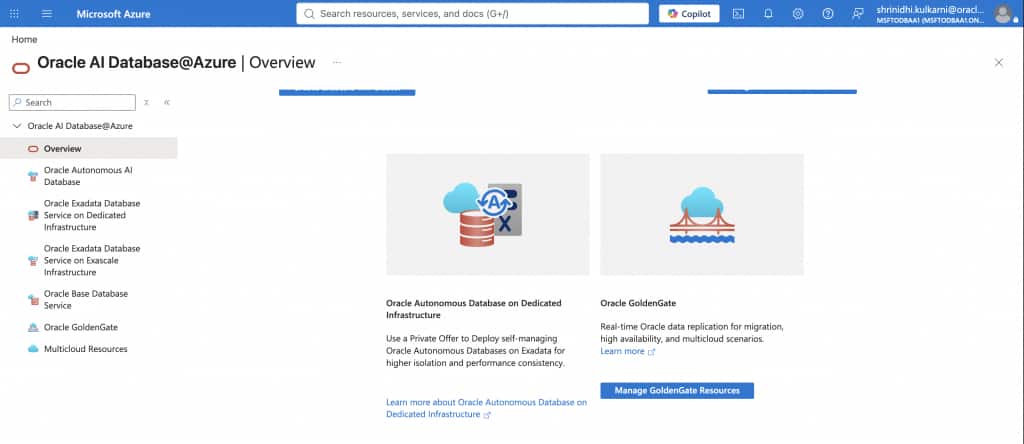
Step 1: Open Oracle GoldenGate in the Azure Portal
In the Azure Portal, go to Oracle AI Database@Azure, and then select Oracle GoldenGate. This is the starting point for creating and managing GoldenGate deployments and connections from the Native UI experience.
Step 2: Start a new GoldenGate deployment
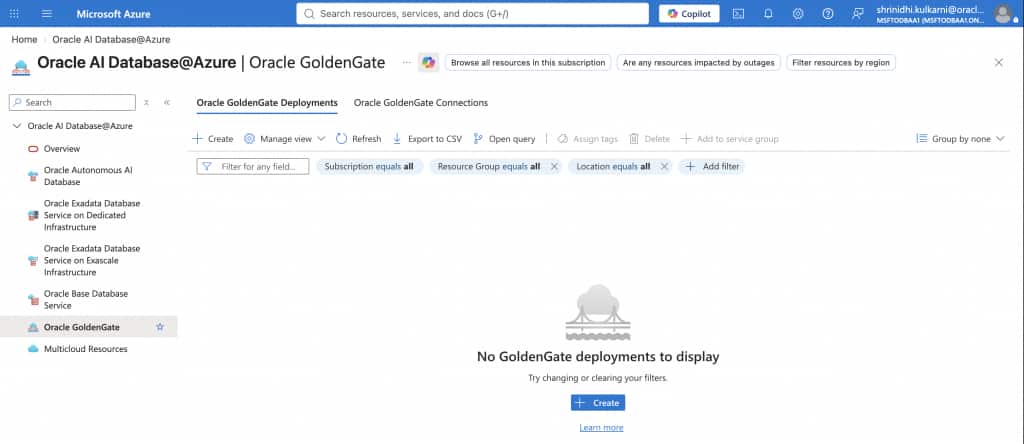
Select the Oracle GoldenGate Deployments tab, and then select Create. A deployment is the managed GoldenGate runtime environment where you later configure and run replication processes such as Extracts and Replicats.
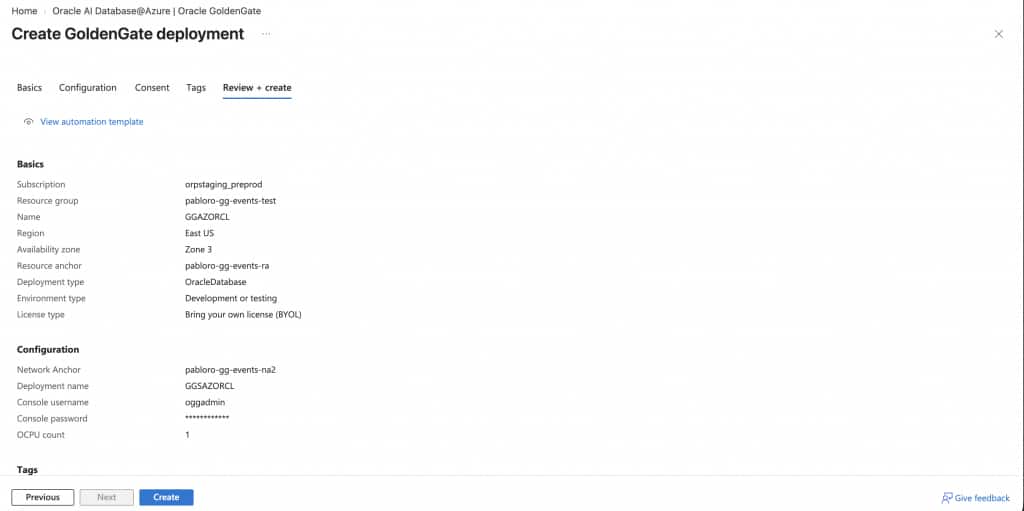
On the Basics page, provide the Azure and Oracle AI Database@Azure placement details for the GoldenGate deployment. This step is important because it determines where the deployment is created, how it is organized in Azure, and which Oracle Cloud compartment it maps to through the Resource Anchor. Start by selecting the Subscription in which the Oracle GoldenGate deployment will be created. From the dropdown list, select the subscription associated with your Oracle AI Database@Azure setup, i.e. ORACLEDBATAZURE subscription. Next, select an existing Resource group, or select Create new to create a new resource group for the Oracle GoldenGate deployment. A resource group is a collection of Azure resources that share the same lifecycle, permissions, and policies. Choose a resource group that aligns with the application, environment, or project where this GoldenGate deployment will be used.
From the Resource Anchor dropdown list, select the resource anchor that should be used for this deployment. The Resource Anchor maps the Azure resource experience to the target OCI compartment where the corresponding Oracle resource is created.
On this page, also select the deployment characteristics:
- Deployment type: Choose OracleDatabase or BigData, depending on the replication or integration use case.
- Environment type: Choose Production for business-critical workloads, or Development or testing for non-production validation.
- License type: Choose License included or Bring your own license (BYOL) based on your licensing model.
Note: The Azure Portal Native UI currently lists the deployment types available in the Azure experience. Other GoldenGate deployment types are also supported and can be configured from the OCI Console. Expanding the Azure Portal Native UI to include all supported GoldenGate deployment types is on the roadmap.
Enter a descriptive Name for the Oracle GoldenGate deployment resource. Use a name that helps administrators quickly identify the environment or workload, such as ogg-prod-east or ogg-dev-app1.
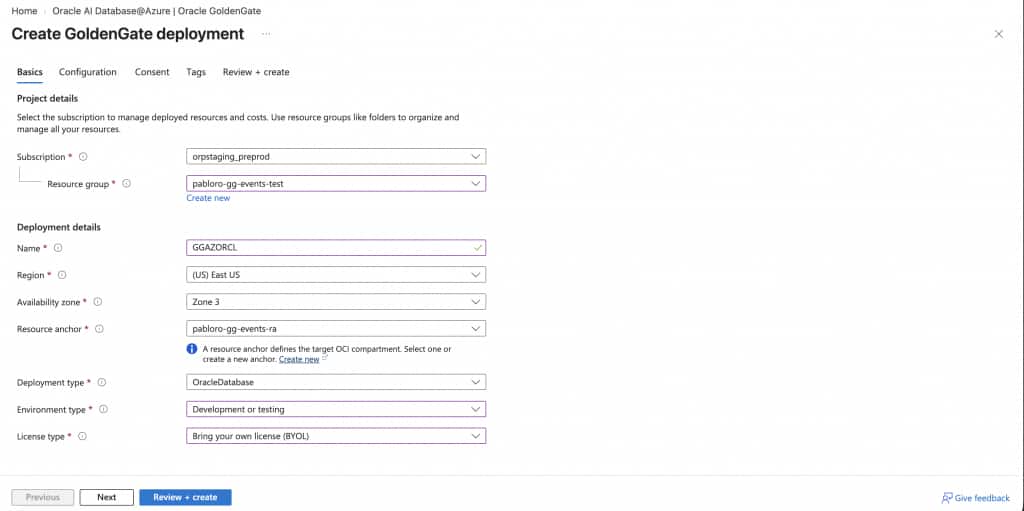
Select the Region where the Oracle GoldenGate deployment will be created. Make sure you select the correct Azure region for your Oracle AI Database@Azure environment. Before choosing the region, confirm the supported region and the corresponding logical zone mapping for your deployment. This helps ensure that the GoldenGate deployment is created in the intended location and aligned with the Oracle AI Database@Azure infrastructure in that region.
Select the Availability zone where the Oracle GoldenGate deployment will be created. The availability zone should match your deployment planning and the supported logical zone mapping for the selected region.
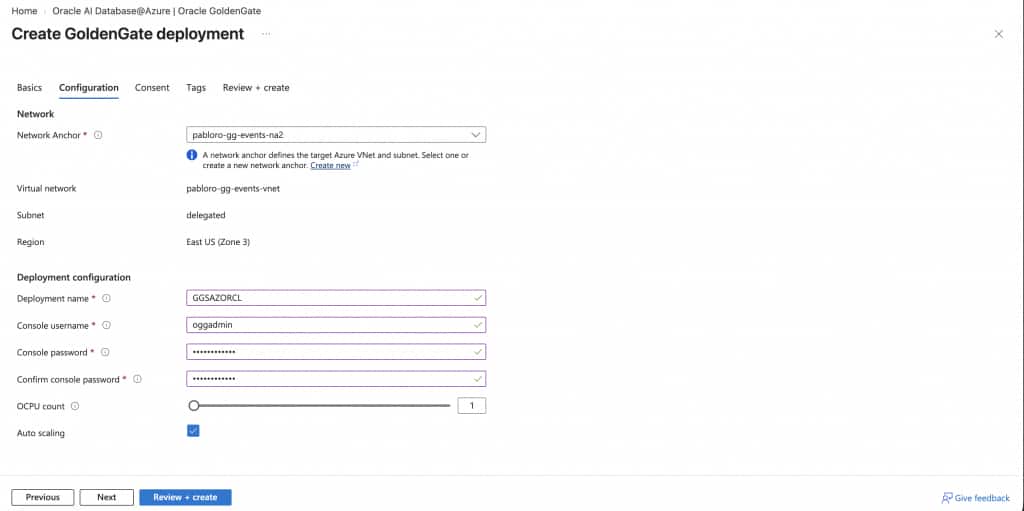
On the Configuration page, review the Network Anchor selected for the deployment. The Network Anchor is populated based on the selected subscription and resource group, and it defines the target Azure virtual network and subnet. If a Network Anchor has not already been created, create one before continuing. In the deployment configuration section, enter a unique Deployment name. Then provide the GoldenGate console credentials by entering the Console username, Console password, and Confirm console password. Next, configure the compute capacity by using the slider or entering the OCPU count. The Azure Portal flow supports 1 to 24 OCPUs for the deployment. Autoscaling is optional and is not selected by default. Enable autoscaling only if you want the deployment to scale based on workload needs.
Review all values carefully before continuing, especially the subscription, region, availability zone, and Resource Anchor. These selections determine the placement and ownership context of the GoldenGate deployment.
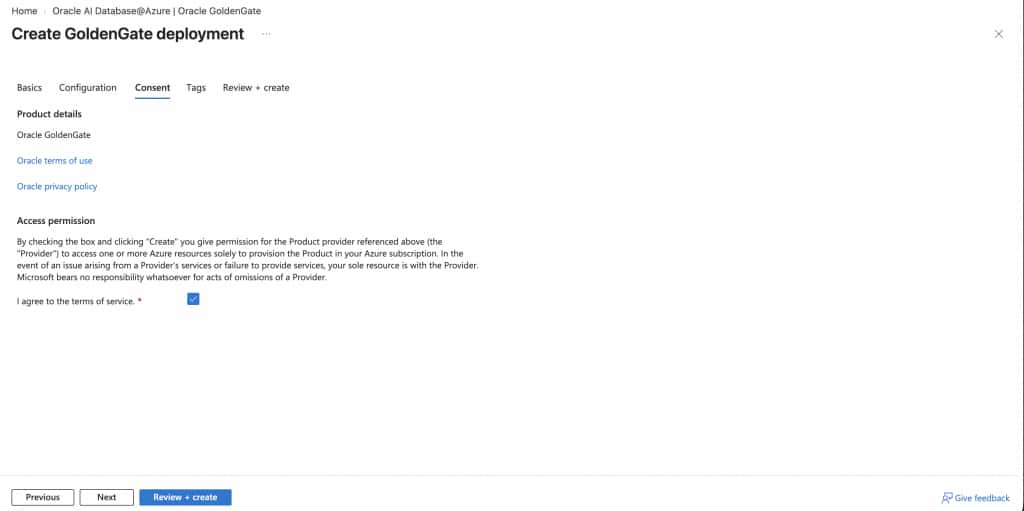
On the Consent page, review the Oracle terms of service, privacy policy, and required access permissions. Accept the required items, and then continue. On the Tags page, optionally add Microsoft Azure tags. Tags can help with cost tracking, ownership, automation, governance, and lifecycle management. For example, you can tag the deployment by application, environment, owner, business unit, or cost center.
Finally on the Review + create page, review the deployment configuration. Azure validates the values entered in the previous steps. If validation fails, correct the highlighted errors before starting the creation process. After validation succeeds, create the deployment. Deployment creation can take time; may take up to one hour or more.
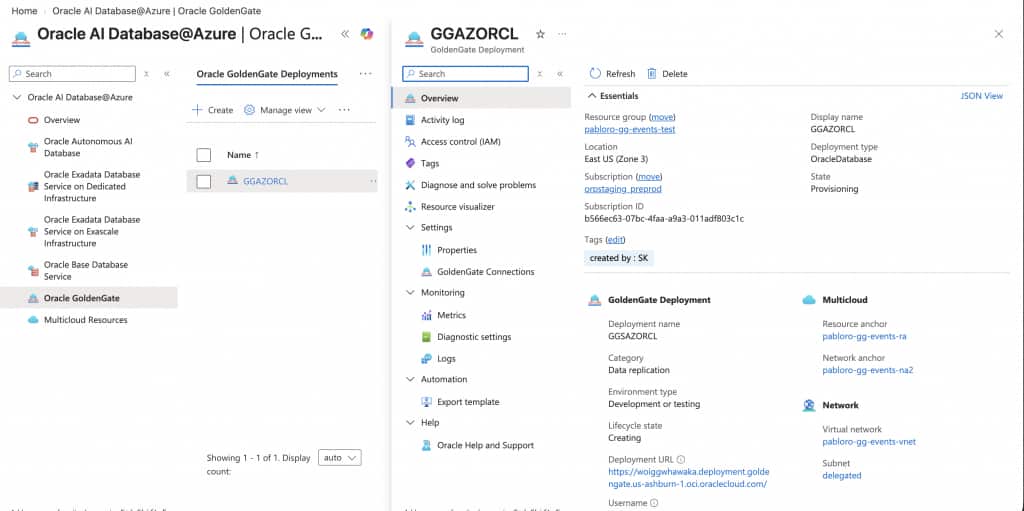
After submitting the request, return to the Oracle GoldenGate Deployments tab and monitor the deployment State. Wait until the deployment is active before assigning connections or configuring replication processes.
Step 3: Create a GoldenGate connection
After the GoldenGate deployment is created, create a connection for the source or target system that GoldenGate will access. A connection stores the endpoint, credential, and networking information that GoldenGate uses to communicate with a database, streaming platform, or supported target service.
From the Azure Portal, go to Oracle AI Database@Azure, select Oracle GoldenGate, open the Oracle GoldenGate Connections tab, and then select Create.
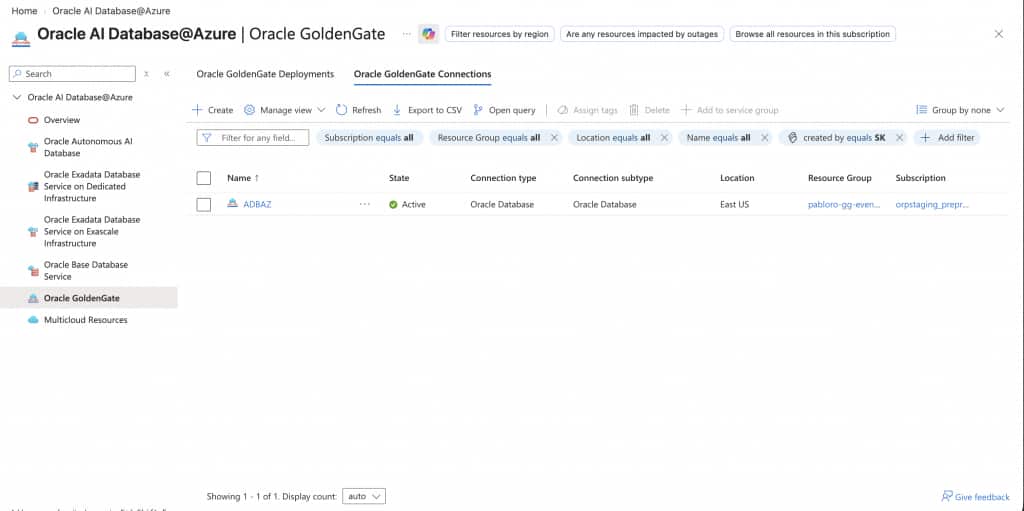
On the Basics page, provide the placement and ownership details for the connection.
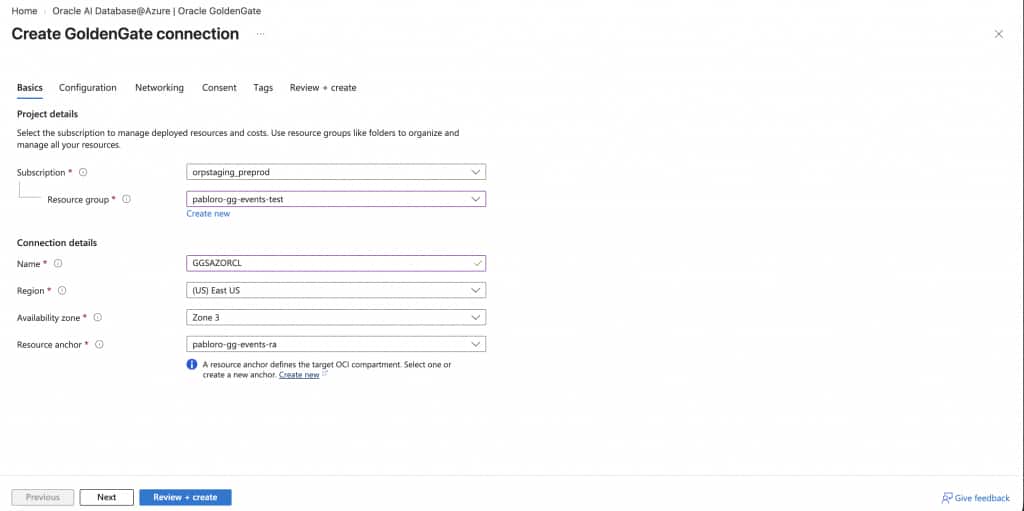
Select the Subscription in which the GoldenGate connection will be created. For this setup, select the ORACLEDBATAZURE subscription from the dropdown list. Select an existing Resource group, or select Create new to create a new resource group for the connection. As with the deployment, choose a resource group that aligns with the workload, environment, and ownership model.
Enter a descriptive Name for the GoldenGate connection. Then select the Region and Availability zone where the connection will be created. Make sure these selections align with your Oracle AI Database@Azure deployment plan and supported logical zone mapping. From the Resource Anchor dropdown list, select the Resource Anchor for the connection. The Resource Anchor defines the target OCI compartment.
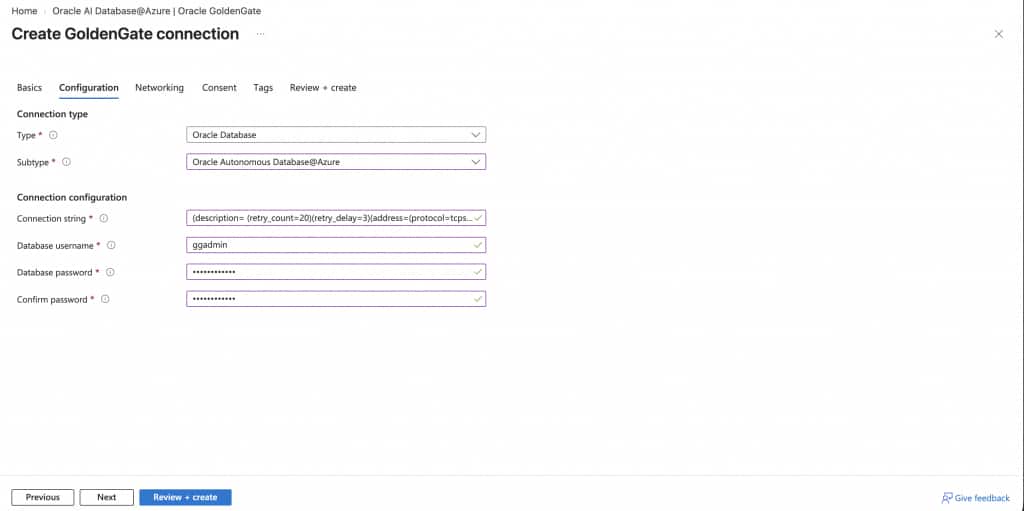
On the Configuration page, choose the connection type and provide the required connection details. The Azure Portal flow currently supports the following connection types:
- Oracle Database
- Kafka
- Microsoft Fabric
Note: The Azure Portal Native UI currently lists the connection types available in the Azure experience. Other GoldenGate connection types are also supported and can be configured from the OCI Console. Expanding the Azure Portal Native UI to include all supported GoldenGate connection types is on the roadmap.
After selecting the Type, choose the appropriate Subtype for the selected connection type. Then provide the required connection details, such as the connection string, database username, password, and password confirmation. The exact fields may vary depending on the selected connection type and subtype.
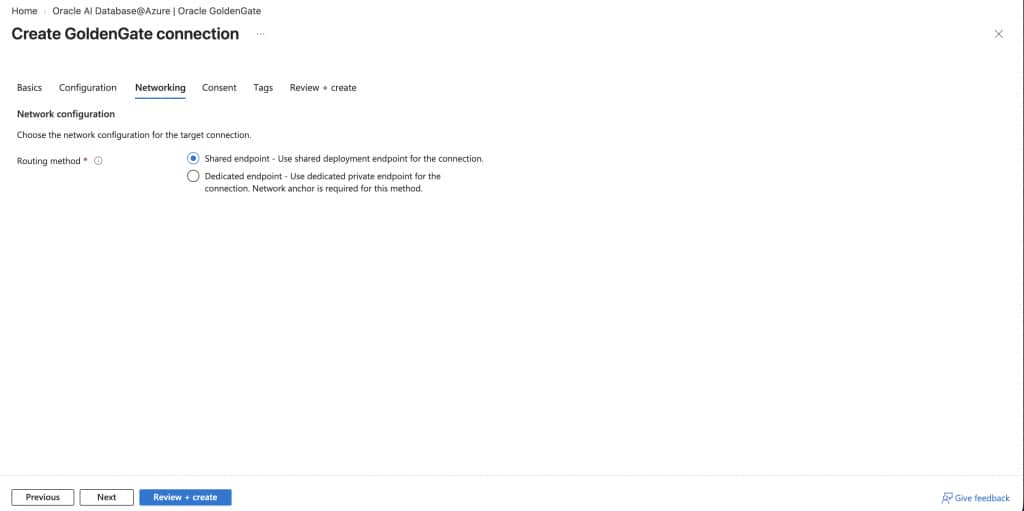
On the Networking page, select the routing method for the connection. Choose Shared endpoint when you want the connection to use the shared deployment endpoint. Choose Dedicated endpoint when you want the connection to use a dedicated private endpoint. A Network Anchor is required for dedicated endpoint routing. When you select Dedicated endpoint, select the Network Anchor from the dropdown list, and then verify the associated virtual network, subnet, and region.
This step is important because it determines how GoldenGate reaches the connected system and how network isolation is applied.
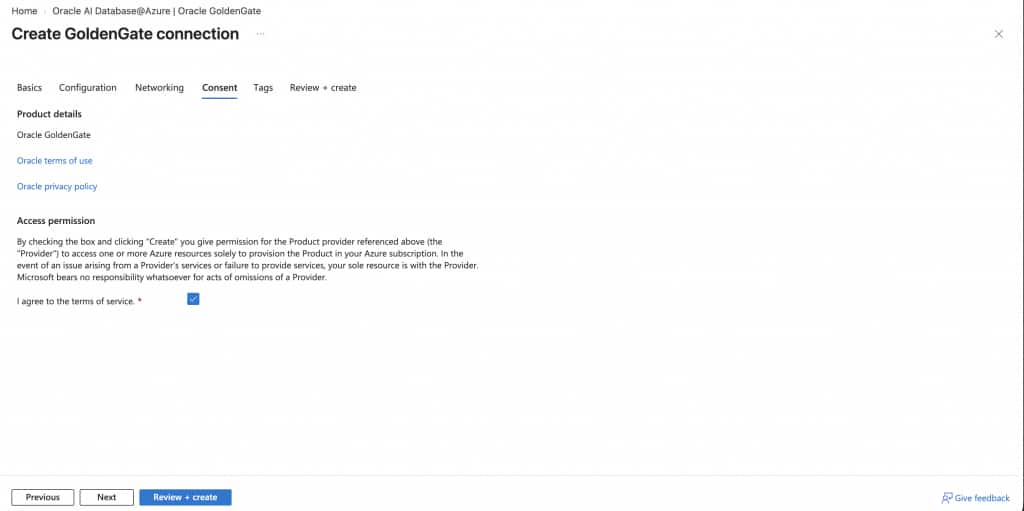
On the Consent page, review the Oracle terms of service, privacy policy, and required access permissions. Accept the required items, and then continue. Next on the Tags page, optionally add Microsoft Azure tags for the connection. Use the same tagging strategy across GoldenGate deployments and connections so teams can identify ownership, environment, application, cost center, and lifecycle status consistently.
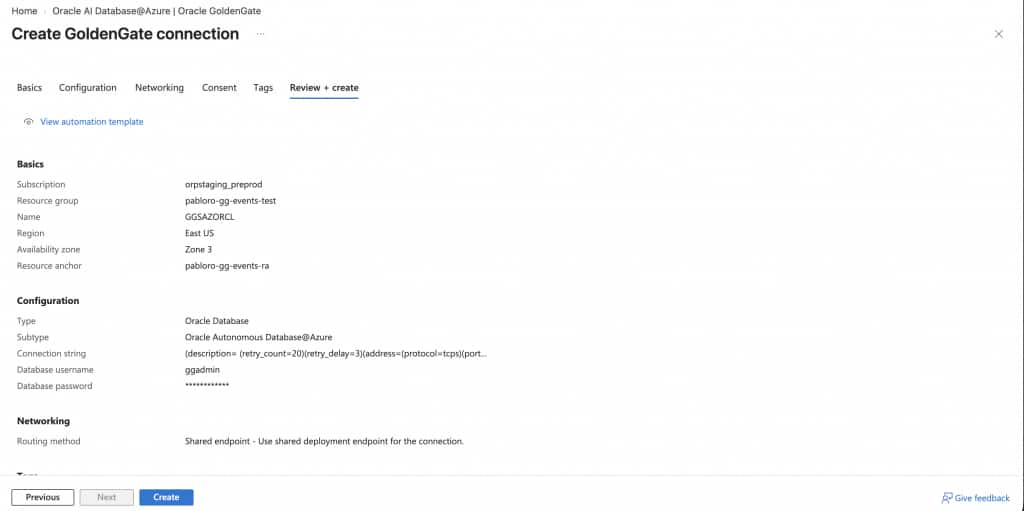
Finally on the Review + create page, review the connection configuration. Azure validates the values entered in the previous steps. If validation fails, correct the highlighted errors before starting the creation process. After validation succeeds, create the connection. Return to the Oracle GoldenGate Connections tab and monitor the connection State. Wait until the connection is available before assigning it to a deployment.
Step 4: Assign the connection to the deployment
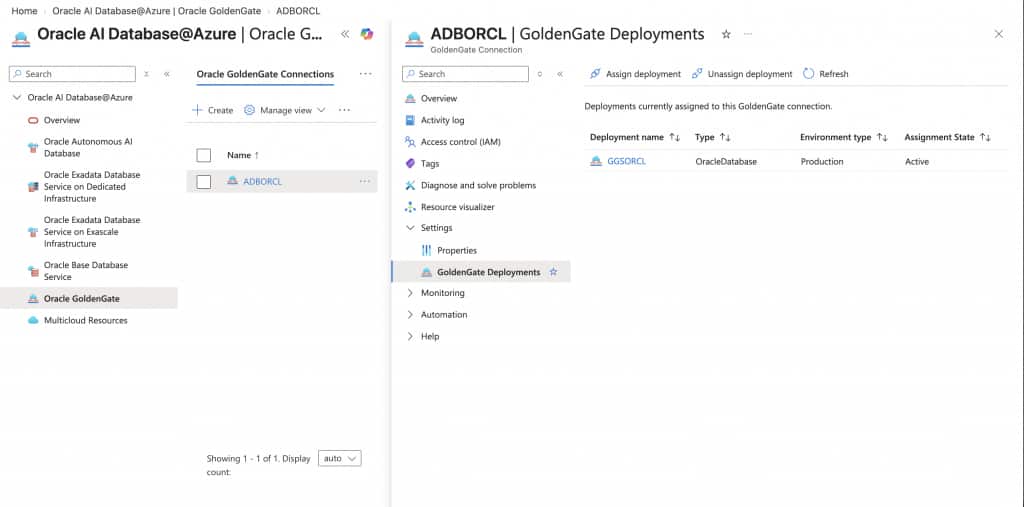
After both the deployment and connection are available, assign the connection to the deployment. This association allows the GoldenGate deployment to use the connection for replication and data movement. The Native UI supports assignment from either direction: you can assign a connection from the deployment page, or assign a deployment from the connection page.
Go to Oracle GoldenGate Deployments, and then select the deployment that should use the connection. From the left menu, expand Settings, and then select GoldenGate Connections.
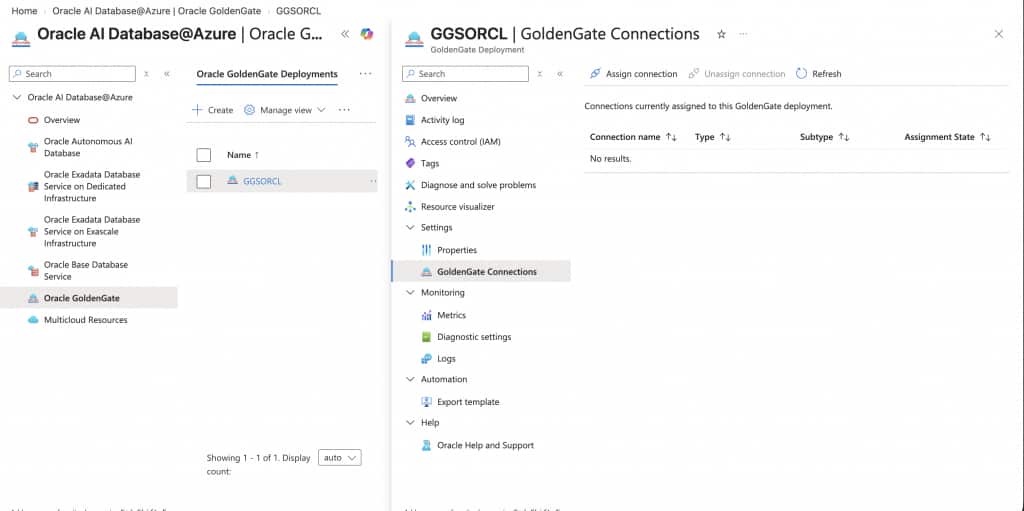
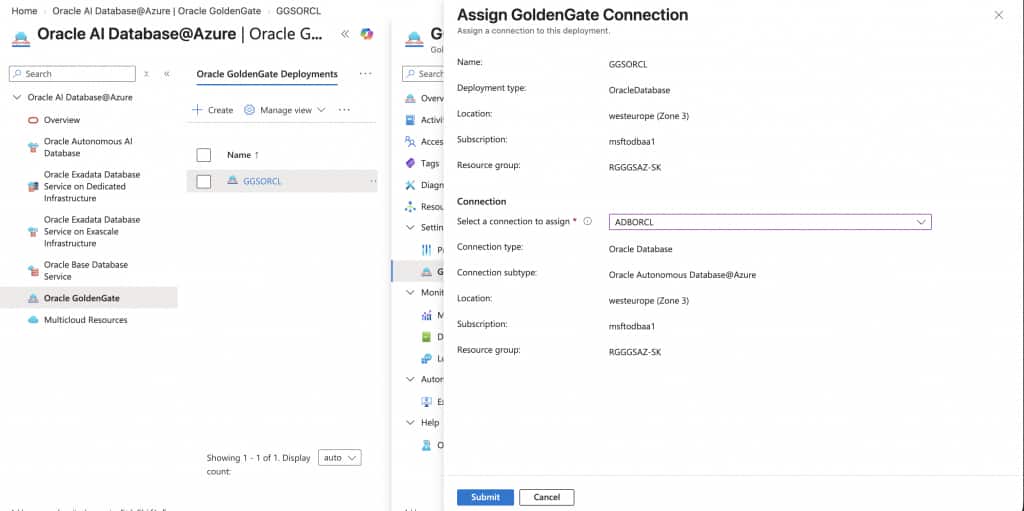
Select Assign connection, choose the connection to assign to the deployment, and then submit the change.
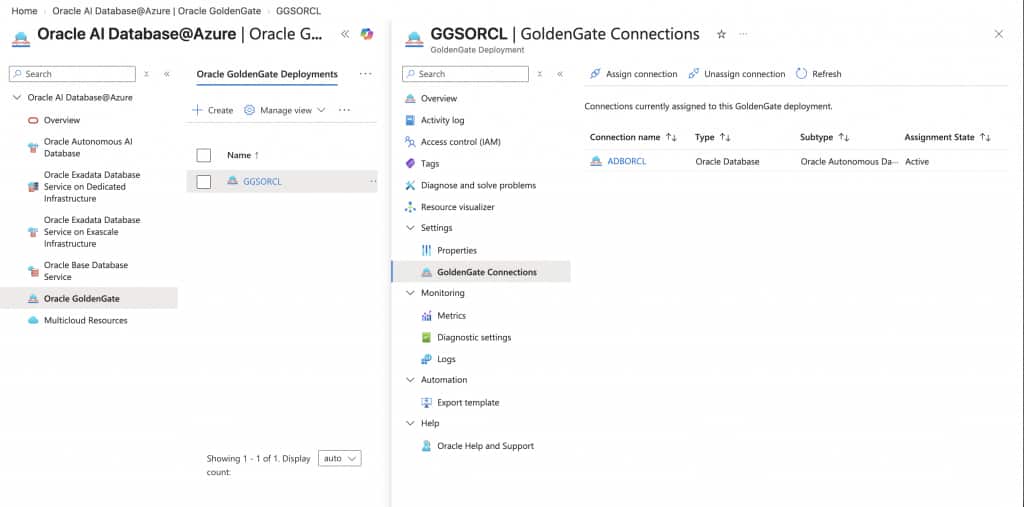
Return to the deployment’s GoldenGate Connections page and confirm that the connection is listed. This confirms that the deployment can now use the connection in GoldenGate replication or data movement configuration.
Optional path: Assign a deployment from the connection page
You can also start from the connection resource. Go to Oracle GoldenGate Connections, select the connection, expand Settings, and then select GoldenGate Deployments. Select Assign deployment, choose the deployment, and submit the change. This option is useful when your workflow starts from a newly created connection and you want to attach it to an existing deployment.
Step 5: Access the GoldenGate deployment console
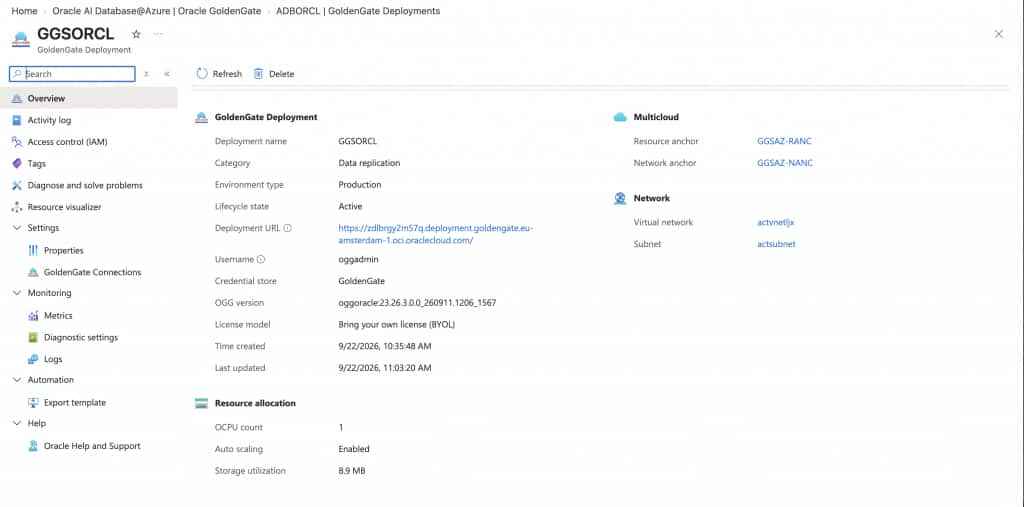
After the deployment becomes active, open the GoldenGate deployment details page to find the GoldenGate console URL. The console credentials are created during the deployment configuration step. Because the Azure Portal flow uses a Network Anchor for the target Azure virtual network and subnet, customers should plan console access through a network path that can reach the deployment. The console is not exposed through an internet-facing public endpoint by default in this Azure Portal flow.
For private administrative access, use an approved network access pattern such as bastion-based access, SSH port forwarding, VPN or private network connectivity, or an Azure VM that can reach the deployment network. This keeps GoldenGate administration within controlled network boundaries while allowing database administrators and replication teams to configure Extracts, Replicats, paths, and monitoring from the GoldenGate console.
With Native UI for Oracle GoldenGate on Oracle AI Database@Azure, users now have a simpler and more familiar way to get started with real-time data movement from the Azure Portal. By bringing deployment creation, connection configuration, and connection assignment into the Azure experience, Oracle is helping customers reduce setup complexity and accelerate their path to secure, scalable, enterprise-grade replication. Whether you are planning a migration, enabling real-time analytics, integrating with Kafka or Microsoft Fabric, or building a multicloud data architecture, Oracle GoldenGate on Oracle AI Database@Azure gives you the flexibility to move data where your business needs it—faster and with greater confidence.
Helpful links
- Create Oracle GoldenGate resources on Oracle AI Database@Azure — the main setup documentation for creating deployments, connections, and assignments. Oracle GoldenGate on Oracle AI Database@Azure setup guide
- Oracle AI Database@Azure overview — product concepts, onboarding, and how Oracle database services are delivered natively in Azure. Oracle AI Database@Azure documentation
- Regional availability for Oracle AI Database@Azure — use this to verify supported Azure regions, physical zones, OCI region mappings, and Oracle GoldenGate availability. Regional availability and zone mapping
- Oracle GoldenGate documentation — the main documentation hub for GoldenGate concepts, quickstarts, replication patterns, APIs, release notes, and operational guidance. Oracle GoldenGate documentation