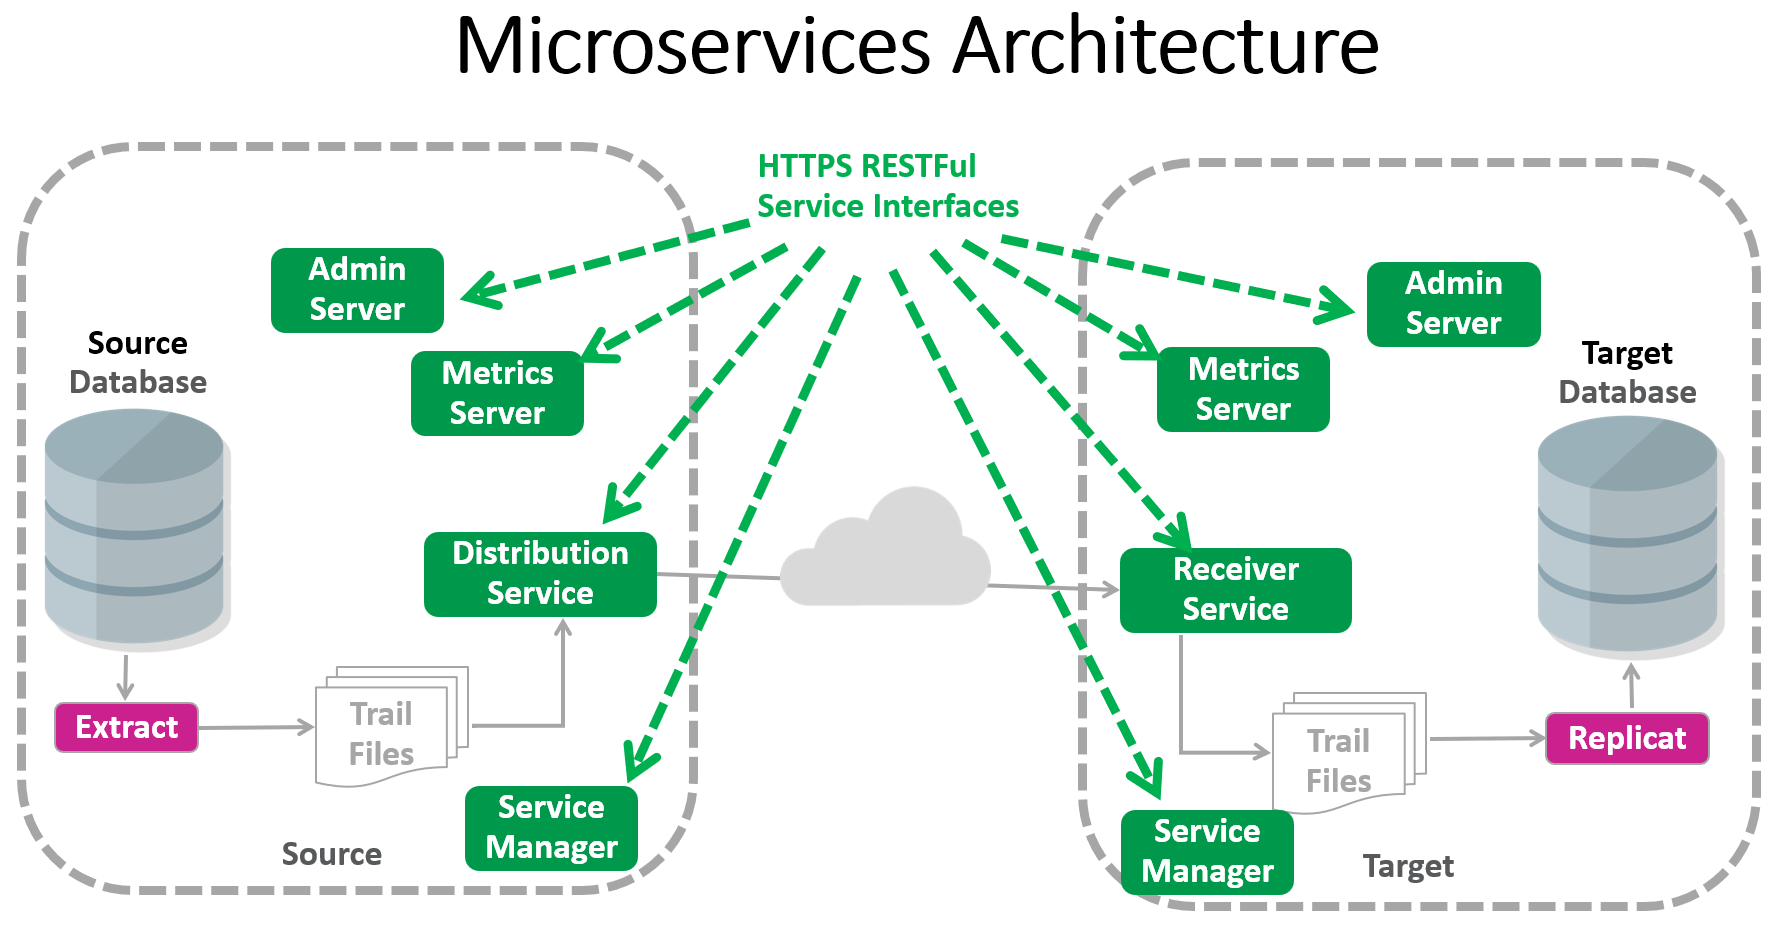
Within GoldenGate, all administrative operations are authorized and made using REST API calls. HTTP is the communication protocol using REST. If you secure your GoldenGate instance, secure HTTP (HTTPS) will be used. Also, you can use the secure Web socket (WSS) protocol for the Distribution Path to route trail file information from source to target GoldenGate instance securely.
Note that this Blog mainly focuses on deploying a secure Goldengate instance. Many interesting security capabilities (example: Trail File encryption) are not covered here. The main goal is to provide a cookie-cutter recipe so that a secure deployment does not lack due to the pre-requisite of providing/creating certificates.
This Blog provides two scripts (available in the appendix) to create the certificates that are needed for GoldenGate 23ai ( in pem format) and GoldenGate 19c/21c (as a wallet).
The PEM format (Privacy-Enhanced Mail) is a base64 encoded format that uses ASCII characters to encode binary data. It is commonly used for encoding certificates, private keys, and other cryptographic data. The private key file in PKCS#8 format and the private key file must not be encrypted. The wallet is another data structure used to store and manage security credentials for an individual entity. Wallets created wit orapki are generated in PKCS#12 format by default.
There are two options for setting up a secure GoldenGate instance. You can choose to enable a secure configuration at the deployment time (Deployment Creation). In this case, you must apply certificates to the system. If this is not feasible, you might secure the environment with a Reverse Proxy (Nginx). This Blog focuses on the first option, which is using certificates at the deployment time.
TLS and Certificates
Working with certificates is something new in the GoldenGate Microservice Architecture. For this reason, I describe the fundamental concepts of certificates within GoldenGate and focus on scripting (creation of self-signed certificates) and managing certificates in GoldenGate.
There are two types of certificates commonly used:
- Trusted Certificates from a commercial/business Certificate Authority
- Self-signed certificates are created on your own with orapki or openssl commands.
The following tables show the advantages and disadvantages of both types:
| Type of Certificate | Pros | Cons |
| Self-signed certificate |
|
|
| Trusted CA certificate |
|
|
As you see from the table, it is obviously about costs/independence vs. security.
What type of certificate you use depends on your environment. I have seen self-signed certificates in an internal (or intranet) environment where none of the websites are external for testing and working with non-sensitive data. Consider using trusted CA certificates when you need security and validation of your domains so that it can be trusted publicly. In my following example, I am using self-signed certificates to set up my development/test system in my protected environment, where all my data is not critical test data.
TLS (and its predecessor, SSL) is a cryptographic protocol that provides security for data sent between applications over the network. The TLS protocol addresses authentication, confidentiality, and integrity of the network communication.
During the phase of a TLS handshake, the client and server together will do the following:
- Specify which version of TLS (1.2 or 1.3) they will use.
- Decide on which cipher suites they will use.
- Authenticate the server’s identity via the server’s public key and the SSL certificate authority’s digital signature.
- Generate session keys to use symmetric encryption after the handshake is complete.
The TLS handshake is described in the Oracle Security Guide. A detailed description is provided within RFC 8846. I don’t want to go too deep into the theory, but I want to focus pragmatically on how to set up a secured GoldenGate Instance at its deployment time using Certificates.
The Oracle GoldenGate Configuration assistant (oggca.sh) expects the created Goldengate instance to be secure by default. For this reason, there are two certificates requested:
- Server Certificate
- DistClient Certificate
Server Certificate
Let’s focus on the Server certificate first. In oggca.sh for Goldengate 23ai, you will be prompted for the certificates as the Security checkbox is enabled by default:
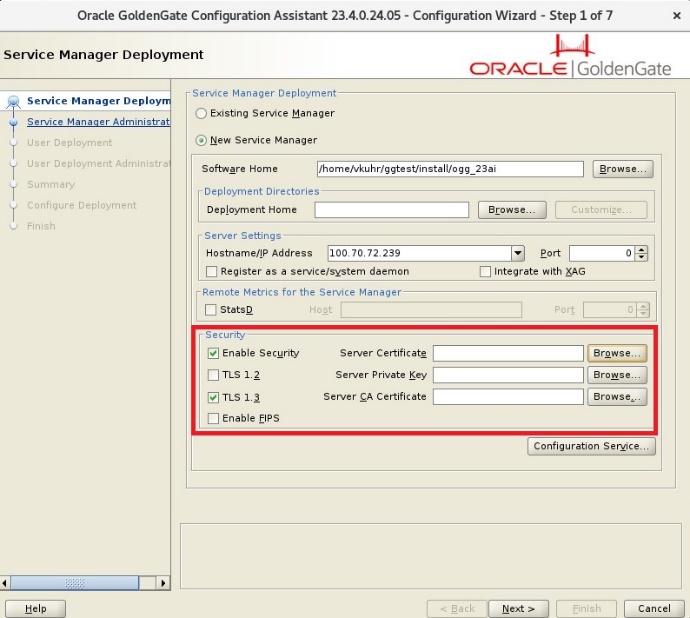
You are asked to provide the server certificate, the server’s private key (which never leaves the application/system), and the CA certificate. The CA Certificate signed the Server Certificate Request (see comments within the scripts). I usually name the CA Certificate rootCA.
After your deployment, the GoldenGate instance is secured. All requests to the MicroServices are managed by the HTTPS protocol that uses TLS underneath.
If you are connecting with adminclient to the GoldenGate Administration Service, you provide a URL using HTTPS:
adminclient> CONNECT https://server01:9230 DEPLOYMENT depl_23 AS ggma, PASSWORD *** !
Note the exclamation mark (“!”) at the end of the command – this is necessary as the network security is based on a self-signed certificate. If you are using a web browser, you will also see the icon that the connection is not secure as self-signed certificates are in play:

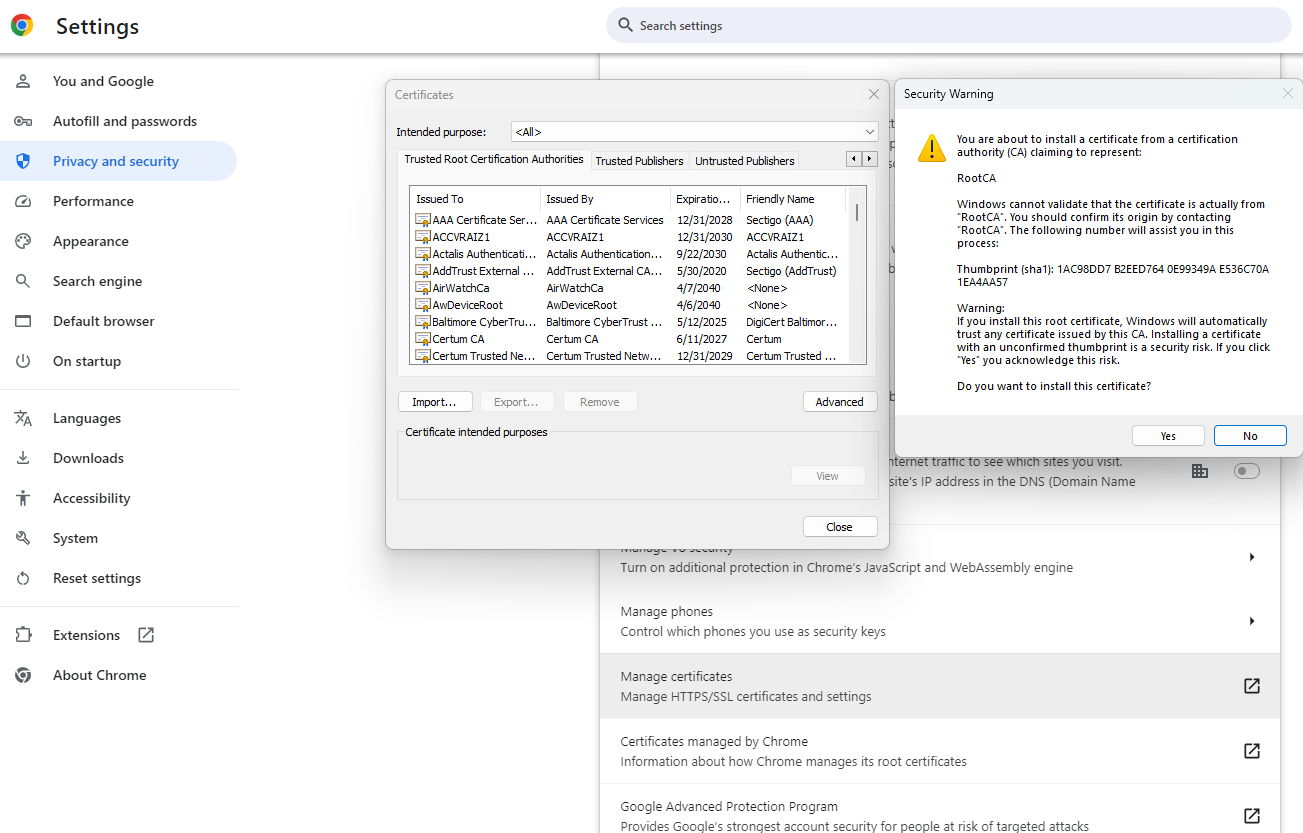
Your browser already has commonly used trusted commercial/business CA certificates. If you apply the CA Certificate explicitly to your browser as trusted, you guarantee the certificates are trusted. Most browsers can add additional certificates. For example, you go to your Chrome browser’s option:
Settings à Privacy and Security à Security àManage Certificates. You can import the CA Certificate (other browsers have similar options).
After cleaning the history and the cache of the browser and restarting, you noticed that the communication appears to be secure:

I want to spend a little bit more time on the TLS Handshake that I briefly described from the perspective of theory earlier and walk through the communication step-by-step:
- The Client (Web-Browser) sends a request to the Goldengate Server
- The Goldengate Server response by sending the Server Certificate
- The Client (Web-Browser) validates the Server Certificate. This is done with the information of the signing CA certificate that was imported into the browser certificate management system).
- Once the Client verifies the identity of the Server, further negotiation happens to exchange information securely using HTTPS.
- The GoldenGate Server validates the Client (Web-Browser) by the credentials used to login into the Web-UI.
The Web-Browser or AdminClient are only two examples of secure communication. Suppose you want to integrate GoldenGate with an external Identity Provider (IDP) such as IDCS/IAM, or OAM. In that case, it is also required that the Server (Goldengate instance) is secured and the client application (IDP) contains the signing CA certificate.
Client Certificate
Understanding how the Server certificate is needed makes it easy to understand how the Distribution Path is set up securely using the secure Web Socket (WSS) protocol. Here it is the same around:
The GoldenGate instance (as a client) verifies the incoming Distribution Path (as a server), checking the DistClient certificate with the signing CA certificate. Once verified, the identity of the Distribution Path is proofed, and further negotiation happens to exchange information securely using HTTPS. The secure Web Socket (WSS) can be used using the network encryption defined by the cipher suites.
Note that the Oracle GoldenGate Configuration assistant (oggca.sh) requests the DistClient certificates in another section within the oggca.sh wizzard. If the GoldenGate deployment is only used as a target, it won’t be necessary to provide the Client Certificates.
Setting up the DistPath
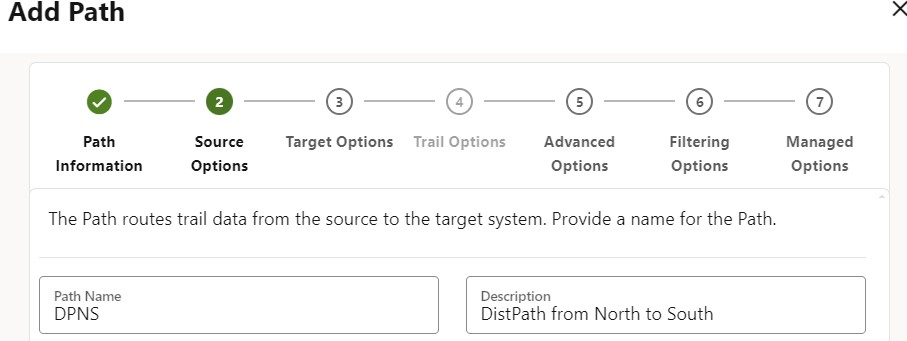
If you have the certificates handy, setting up the DistPath becomes simple. There are 4 steps involved:
- You are defining the Name of the Distribution Path. Optionally add a description (I prefer using a from/to naming explanation).
- You are adding information about the source system. (This is, where the trail generated by Extract is located).
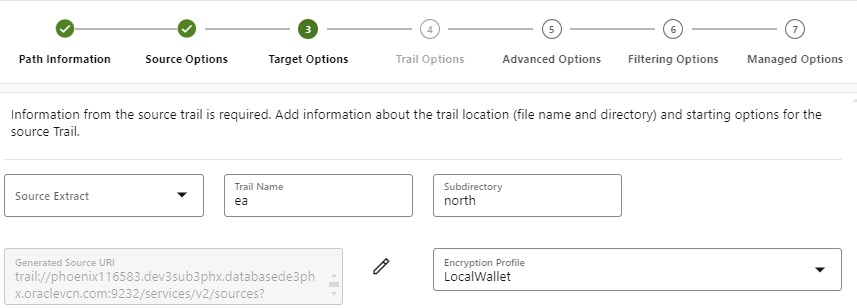
- You are adding information for the target system. Besides the name and location of the target trail file, you have to add the server name of the target GoldenGate system and its Receiving Service port number. Note that the name of the target host must match the Common Name (CN) of the server used in the Certificates, as you see in the appendix.
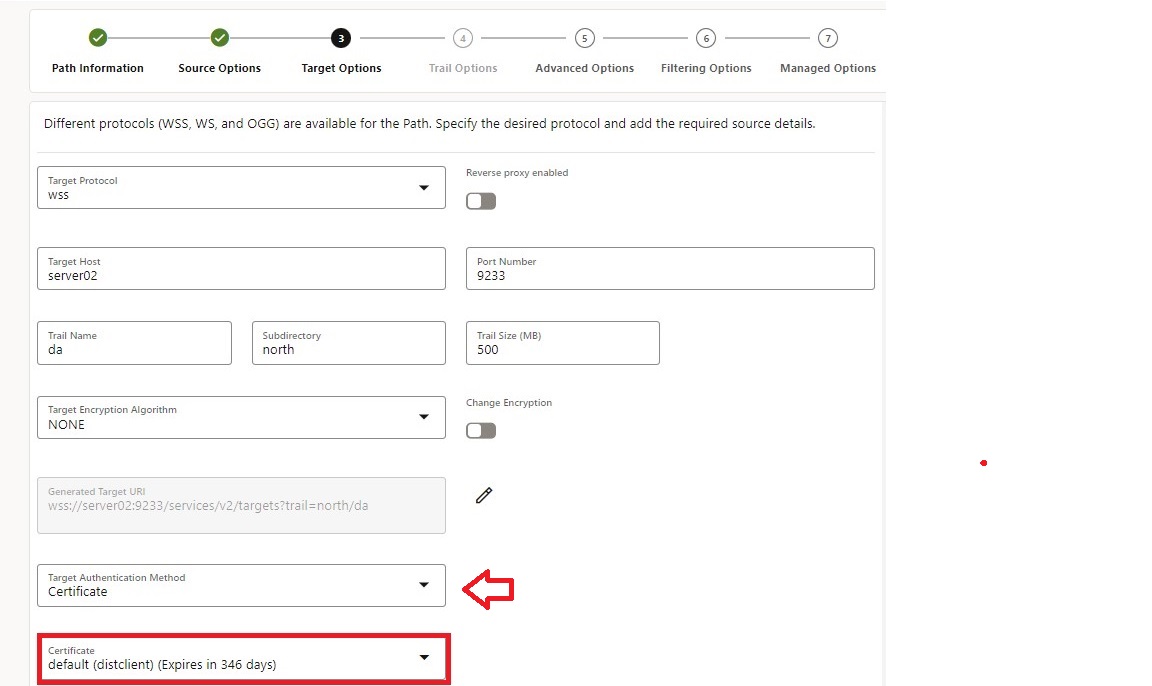
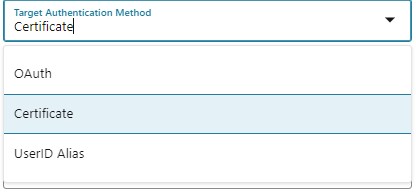
- You can authenticate with different options: Certificate, UserIDAlias, or an external Identity Provider using the OAuth2 protocol. As I focus on certificates in this Blog, I used the DistClient Certificate that I created earlier (as you see in the scripts in the appendix)
Appendix
Creation of self-signed Certificates using openssl and orapki
The following script samples show how to create self-signed certificates for GoldenGate. In GoldenGate 23ai, you will be prompted to apply the certificate, private key, and the signing CA certificate (rootCA) for the server. If this GoldenGate instance might act as a source routing/distributing changes to a target GoldenGate instance, you might also want to add the set of certificates for the DistClient.
Note that within this script set, all sites (source and target GoldenGate instances) use the same rootCA certificate. This makes the implementation easy. Sometimes, source and target systems are independent and have different rootCA certificates. This topic of mutual TLS is not covered in this Blog. More information about mutual TLS is within the secure abstract of the GoldenGate documentation and might be explained in another Blog article if requested. Within this Blog, I want to provide the most common and straightforward set of self-signed certificates so that you have all the prerequisites for setting up GoldenGate using the HTTPS communication protocol and the WSS protocol for the Distribution Path.
In earlier releases of GoldenGate (21c and 19c), you can also use wallets that are in the PKCS #12 format. While I show the creation of the 23ai certificates with the openssl commands, I use the orapki utility to create the appropriate wallets.
Please note that the following scripts need to be adjusted, and you might modify them. Free format names, passwords, and expiration dates are just some settings that need mentioning.
A.1: GoldenGate 23ai: Creating Certificates (in pem format)
#!/bin/bash
set -e
v_server_fqdn_01=north.us.oracle.com
v_server_fqdn_02=south.us.oracle.com
v_server_short_01=`echo $v_server_fqdn_01 | cut -d ‘.’ -f 1`
v_server_short_02=`echo $v_server_fqdn_02 | cut -d ‘.’ -f 1`
v_passphrase=”Welcome#123″
mkdir -p OGG_Certs
cat <<EOF> OGG_Certs/Server_${v_server_short_01}_cert.cnf
extendedKeyUsage = serverAuth
subjectAltName = DNS:${v_server_short_01},DNS:${v_server_fqdn_01},DNS:localhost,IP:127.0.0.1
EOF
cat <<EOF> OGG_Certs/Server_${v_server_short_02}_cert.cnf
extendedKeyUsage = serverAuth
subjectAltName = DNS:${v_server_short_02},DNS:${v_server_fqdn_02},DNS:localhost,IP:127.0.0.1
EOF
cat <<EOF> OGG_Certs/DistClient_cert.cnf
extendedKeyUsage = clientAuth
EOF
#———————————————————————-
#–
#– RootCA_Cert
#–
#———————————————————————-
openssl req -subj “${subj}/CN=RootCA” \
-newkey rsa:2048 -nodes \
-keyout OGG_Certs/RootCA_key.pem \
-new -x509 \
-days 365 \
-out OGG_Certs/RootCA_cert.pem
#———————————————————————-
#–
#– Server Certificate #01
#–
#———————————————————————-
subject=”/C=US/O=OGG Development/CN=${v_server_short_01}”
openssl req -subj “${subject}” \
-newkey rsa:2048 -nodes \
-keyout OGG_Certs/Server_${v_server_short_01}_key.pem \
-new \
-out OGG_Certs/Server_${v_server_short_01}.csr
openssl x509 -CAcreateserial \
-CA OGG_Certs/RootCA_cert.pem \
-CAkey OGG_Certs/RootCA_key.pem \
-req \
-in OGG_Certs/Server_${v_server_short_01}.csr \
-extfile OGG_Certs/Server_${v_server_short_01}_cert.cnf \
-days 365 \
-out OGG_Certs/Server_${v_server_short_01}_cert.pem
#———————————————————————-
#–
#– Server Certificate #02
#–
#———————————————————————-
subject=”/C=US/O=OGG Development/CN=${v_server_short_02}”
openssl req -subj “${subject}” \
-newkey rsa:2048 -nodes \
-keyout OGG_Certs/Server_${v_server_short_02}_key.pem \
-new \
-out OGG_Certs/Server_${v_server_short_02}.csr
openssl x509 -CAcreateserial \
-CA OGG_Certs/RootCA_cert.pem \
-CAkey OGG_Certs/RootCA_key.pem \
-req \
-in OGG_Certs/Server_${v_server_short_02}.csr \
-extfile OGG_Certs/Server_${v_server_short_02}_cert.cnf \
-days 365 \
-out OGG_Certs/Server_${v_server_short_02}_cert.pem
#———————————————————————-
#–
#– DistClient Certificate
#–
#———————————————————————-
subject=”/C=US/O=OGG Development/CN=distclient”
openssl req -subj “${subject}” \
-newkey rsa:2048 -nodes \
-keyout OGG_Certs/DistClient_key.pem \
-new \
-out OGG_Certs/distclient.csr
openssl x509 -CAcreateserial \
-CA OGG_Certs/RootCA_cert.pem \
-CAkey OGG_Certs/RootCA_key.pem \
-req \
-in OGG_Certs/distclient.csr \
-extfile OGG_Certs/DistClient_cert.cnf \
-days 365 \
-out OGG_Certs/DistClient_cert.pem
mkdir -p OGG_Certs/misc
mv OGG_Certs/*.csr OGG_Certs/*.cnf OGG_Certs/*.srl OGG_Certs/misc
printf “\nSuccessfully created Server and Client certificates for GoldenGate.\n”
tree -lt -L 1 OGG_Certs/
exit 0
linux> setup_Certificate_2Deployments_singleRootCA.sh
[...]
Successfully created Server and Client certificates for GoldenGate.
OGG_Certs/
├── DistClient_cert.pem
├── DistClient_key.pem
├── misc
├── RootCA_cert.pem
├── RootCA_key.pem
├── Server_server01_cert.pem
├── Server_server01_key.pem
├── Server_server02_cert.pem
└── Server_server02_key.pem
In my scripts, I take the X.509 certificate specification Common Name (CN) as the hostname for the Server. In GoldenGate 19c/21c, the target server’s name must match the Common Name: if you use the fully qualified server name as a target server, you must also use the fully qualified server name for the Common Name (CN). Similary, if you take the short name (non-fully qualified server name), you have to stick to this short name.
A.2: GoldenGate 19c and 21c: Creating Certificates (as wallets)
#!/bin/bash
set -e
export PATH=$OGG_HOME/bin:$PATH
v_server_01=north.us.oracle.com
v_server_02=south.us.oracle.com
mkdir -p OGG_Wallets
# ———————————————————————
# —
# — 1. Self-Signing (root) CA Certificate
# —
# ———————————————————————
printf “\nCreate self-signed Root certificate”
printf “\n=================================================\n”
orapki wallet create -wallet OGG_Wallets/RootCA \
-auto_login \
-pwd welcome123 -nologo
orapki wallet add -wallet OGG_Wallets/RootCA -dn “CN=RootCA” \
-keysize 2048 -self_signed -validity 365 \
-pwd welcome123 -nologo
orapki wallet export -wallet OGG_Wallets/RootCA -dn “CN=RootCA” \
-cert OGG_Wallets/RootCA_cert.pem \
-pwd welcome123 -nologo
# ———————————————————————
# —
# — 2. Server Certificates
# —
# ———————————————————————
printf “\nCreate Server (${v_server_01}) certificate”
printf “\n=================================================\n”
orapki wallet create -wallet OGG_Wallets/Server_${v_server_01} \
-auto_login -pwd welcome123 -nologo
orapki wallet add -wallet OGG_Wallets/Server_${v_server_01} \
-dn “CN=${v_server_01}” -keysize 2048 \
-pwd welcome123 -nologo
orapki wallet export -wallet OGG_Wallets/Server_${v_server_01} \
-dn “CN=${v_server_01}” \
-request OGG_Wallets/Server_${v_server_01}_req.pem \
-pwd welcome123 -nologo
orapki cert create -wallet OGG_Wallets/RootCA \
-request OGG_Wallets/Server_${v_server_01}_req.pem \
-cert OGG_Wallets/Server_${v_server_01}_cert.pem \
-serial_num 25 -validity 365 \
-pwd welcome123 -nologo
orapki wallet add -wallet OGG_Wallets/Server_${v_server_01} \
-trusted_cert -cert OGG_Wallets/RootCA_cert.pem \
-validity 365 -pwd welcome123 -nologo
orapki wallet add -wallet OGG_Wallets/Server_${v_server_01} \
-user_cert \
-cert OGG_Wallets/Server_${v_server_01}_cert.pem \
-pwd welcome123 -nologo
printf “\nCreate Server (${v_server_02}) certificate”
printf “\n=================================================\n”
orapki wallet create -wallet OGG_Wallets/Server_${v_server_02} \
-auto_login -pwd welcome123 -nologo
orapki wallet add -wallet OGG_Wallets/Server_${v_server_02} \
-dn “CN=${v_server_02}” -keysize 2048 \
-pwd welcome123 -nologo
orapki wallet export -wallet OGG_Wallets/Server_${v_server_02} \
-dn “CN=${v_server_02}” \
-request OGG_Wallets/Server_${v_server_02}_req.pem \
-pwd welcome123 -nologo
orapki cert create -wallet OGG_Wallets/RootCA \
-request OGG_Wallets/Server_${v_server_02}_req.pem \
-cert OGG_Wallets/Server_${v_server_02}_cert.pem \
-serial_num 25 -validity 365 \
-pwd welcome123 -nologo
orapki wallet add -wallet OGG_Wallets/Server_${v_server_02} \
-trusted_cert -cert OGG_Certs/RootCA_cert.pem \
-validity 365 -pwd welcome123 -nologo
orapki wallet add -wallet OGG_Wallets/Server_${v_server_02} \
-user_cert \
-cert OGG_Wallets/Server_${v_server_02}_cert.pem \
-pwd welcome123 -nologo
# ———————————————————————
# —
# — 3. Distribution Server Certificate
# —
# ———————————————————————
printf “\nCreate Distribution Client certificate”
printf “\n=================================================\n”
orapki wallet create -wallet OGG_Wallets/DistClient -auto_login \
-pwd welcome123 -nologo
orapki wallet add -wallet OGG_Wallets/DistClient \
-dn “CN=DistClient” -keysize 2048 \
-pwd welcome123 -nologo
orapki wallet export -wallet OGG_Wallets/DistClient \
-dn “CN=DistClient” \
-request OGG_Wallets/DistClient_req.pem \
-pwd welcome123 -nologo
orapki cert create -wallet OGG_Wallets/RootCA \
-request OGG_Wallets/DistClient_req.pem \
-cert OGG_Wallets/DistClient_cert.pem \
-serial_num 26 -validity 365 \
-pwd welcome123 -nologo
orapki wallet add -wallet OGG_Wallets/DistClient \
-trusted_cert -cert OGG_Wallets/RootCA_cert.pem \
-pwd welcome123 -nologo
orapki wallet add -wallet OGG_Wallets/DistClient \
-user_cert \
-cert OGG_Wallets/DistClient_cert.pem \
-pwd welcome123 -nologo
mkdir -p OGG_Wallets/misc
mv OGG_Wallets/*.pem OGG_Wallets/misc/
printf “\n Successfully created Server and Client wallets for GoldenGate.\n”
tree -lt -L 1 OGG_Wallets/
exit 0
linux> create_Wallets_2Deployments_singleRootCA.sh
[...]
Successfully created Server and Client wallets GoldenGate deployment.
OGG_Wallets/
├── RootCA
├── Server_server01
├── Server_server02
├── DistClient
└── misc