How to Restore a GoldenGate Marketplace Instance using a Boot Volume Backup
Background
GoldenGate Marketplace Instance is a customer-managed OCI VM. The user can back up all the block volumes, including the Boot Volume, where the GoldenGate binary files reside. In an unlikely case, if you need to revert to an older GoldenGate version that is no longer available or you have made some changes that have damaged your boot volume and could not be fixed, the Boot Volume Backup will be the last resort. Again, there is a certain risk of using the old backup from the Boot Volume. Hence, Oracle recommends you test it out on a different instance first.
To perform the steps listed in this blog, the OCI user will need appropriate privileges to manage the VM instance and Block Storage as well as using the VCN network resources.
1. Locate the Boot Volume backup and create a new Boot Volume out of it
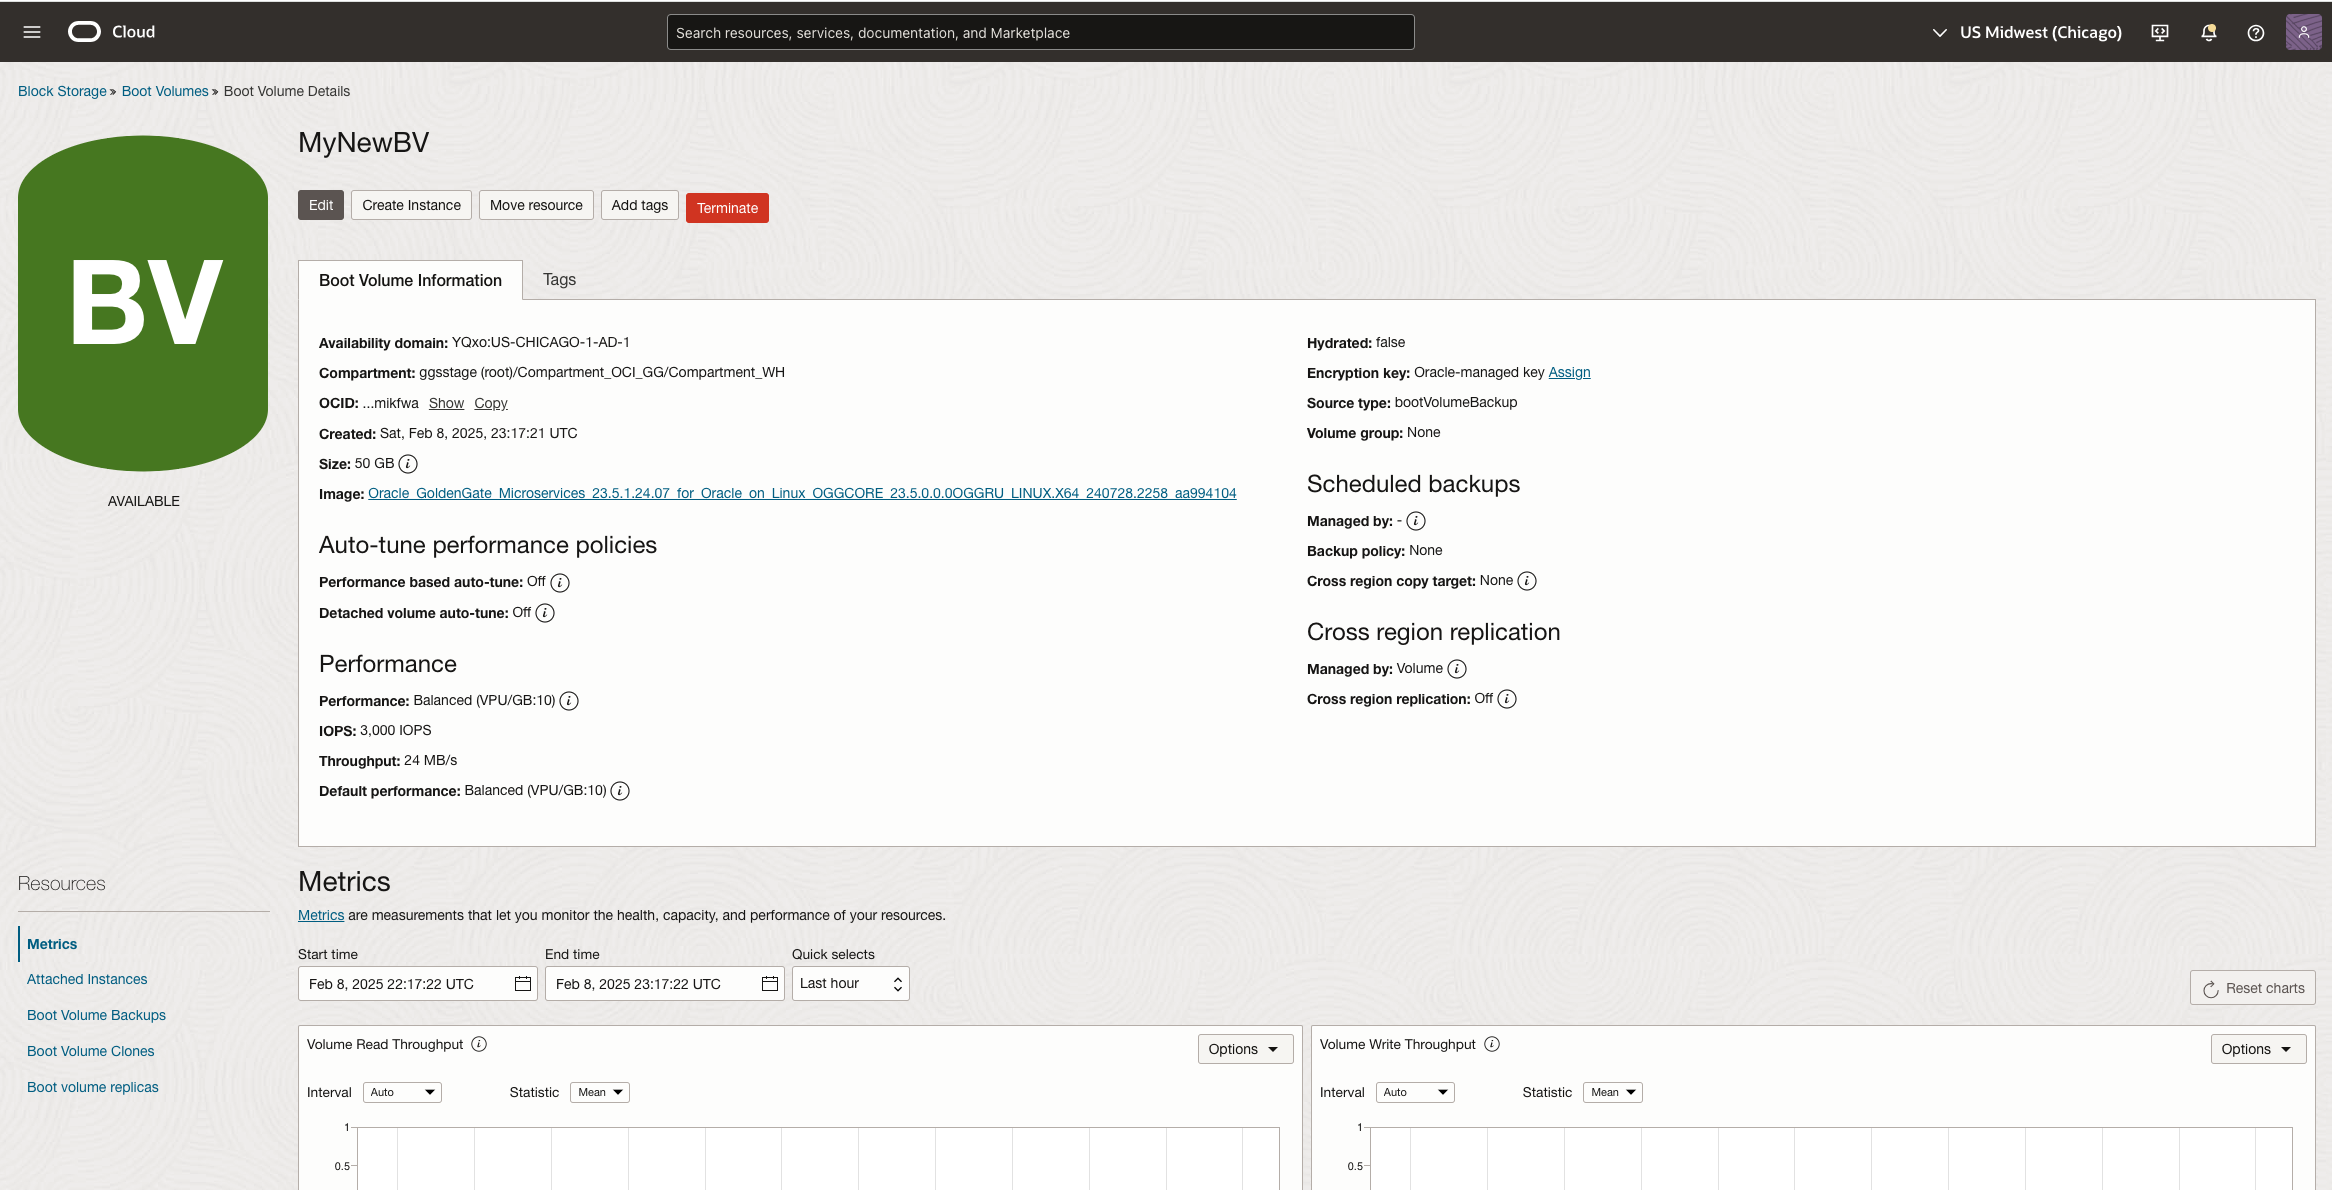
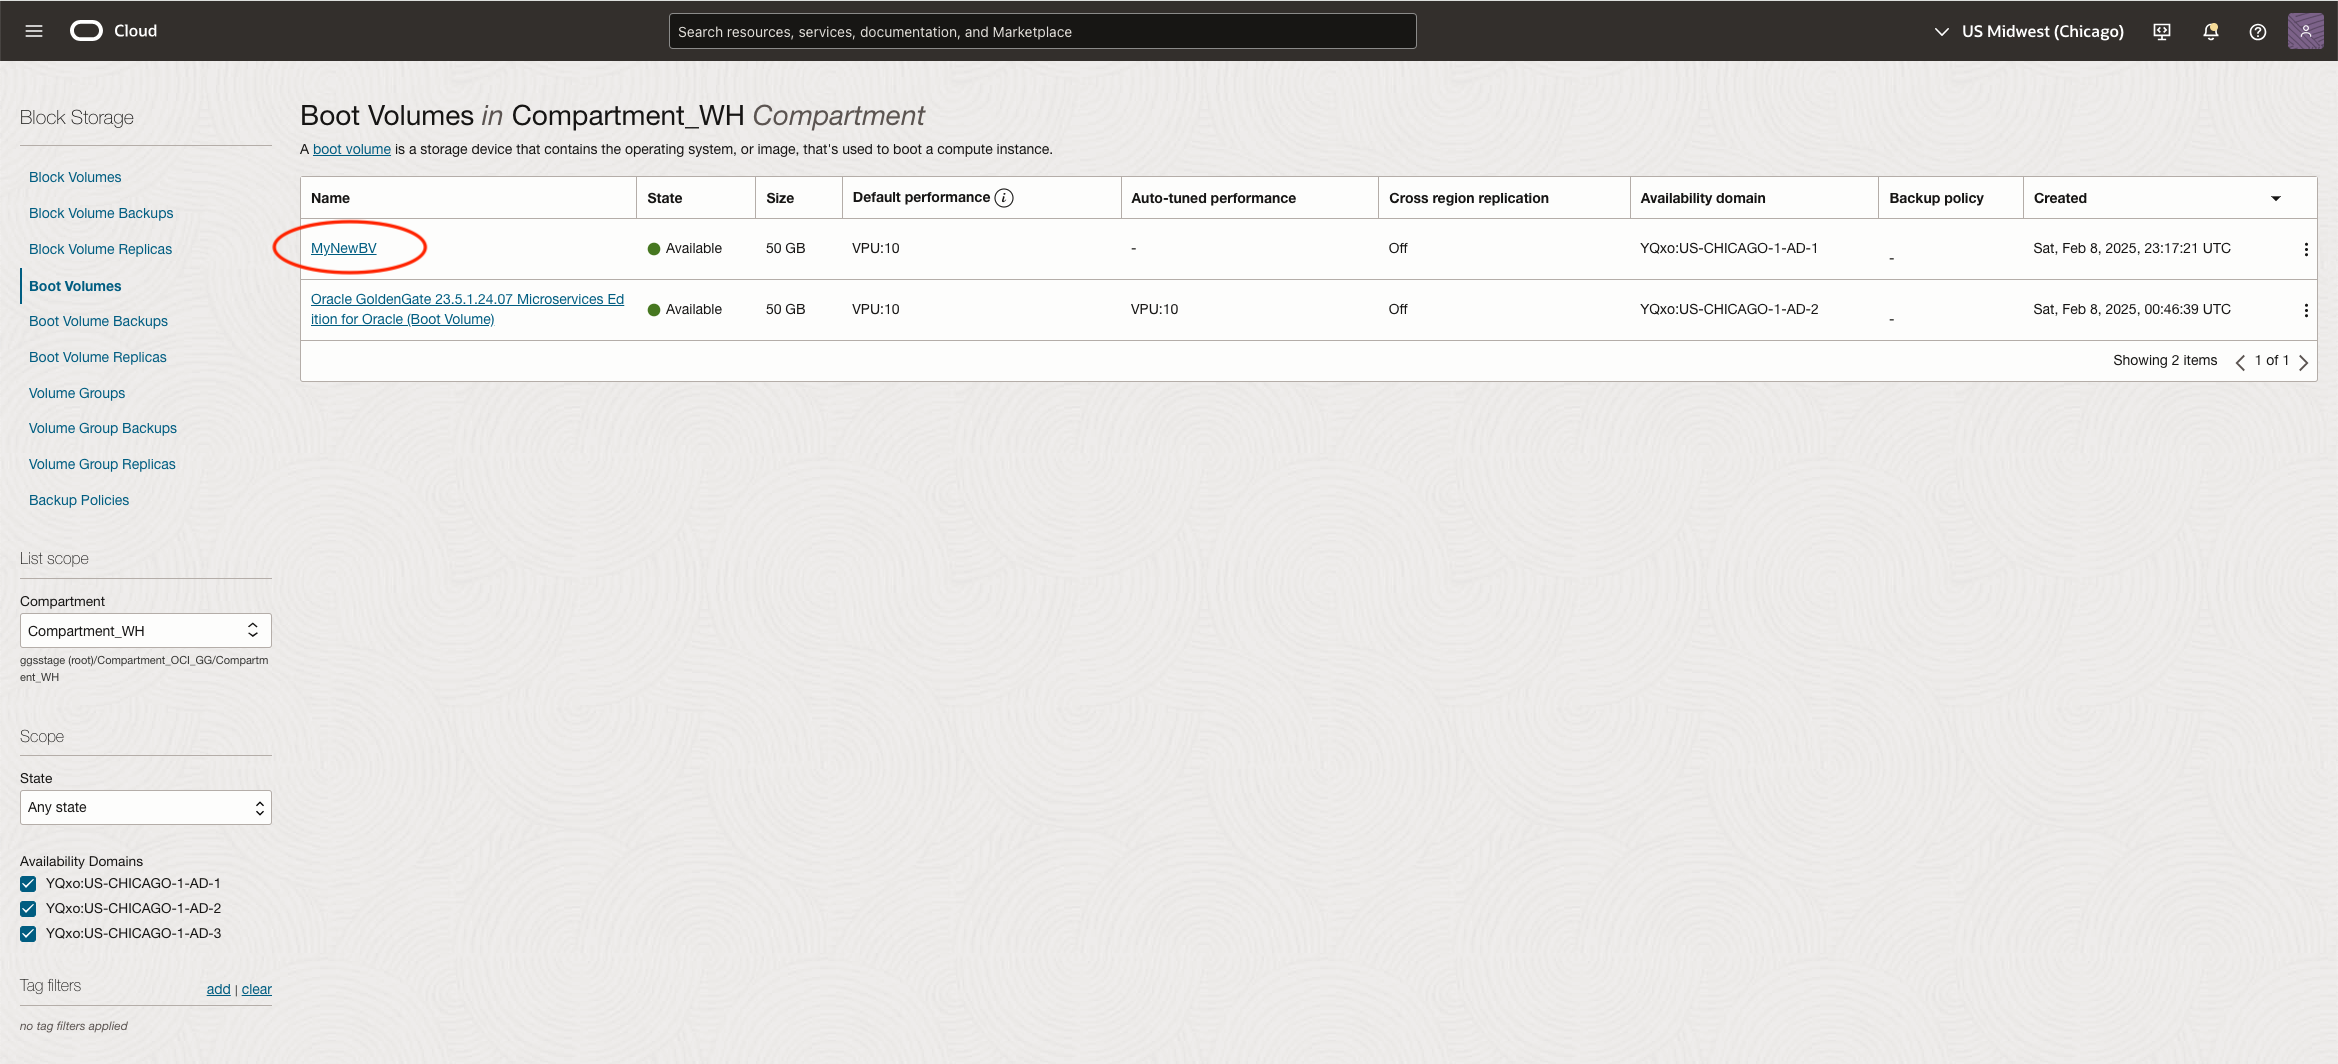
First, track down your GoldenGate instance, find the Boot Volume, and then click on it.
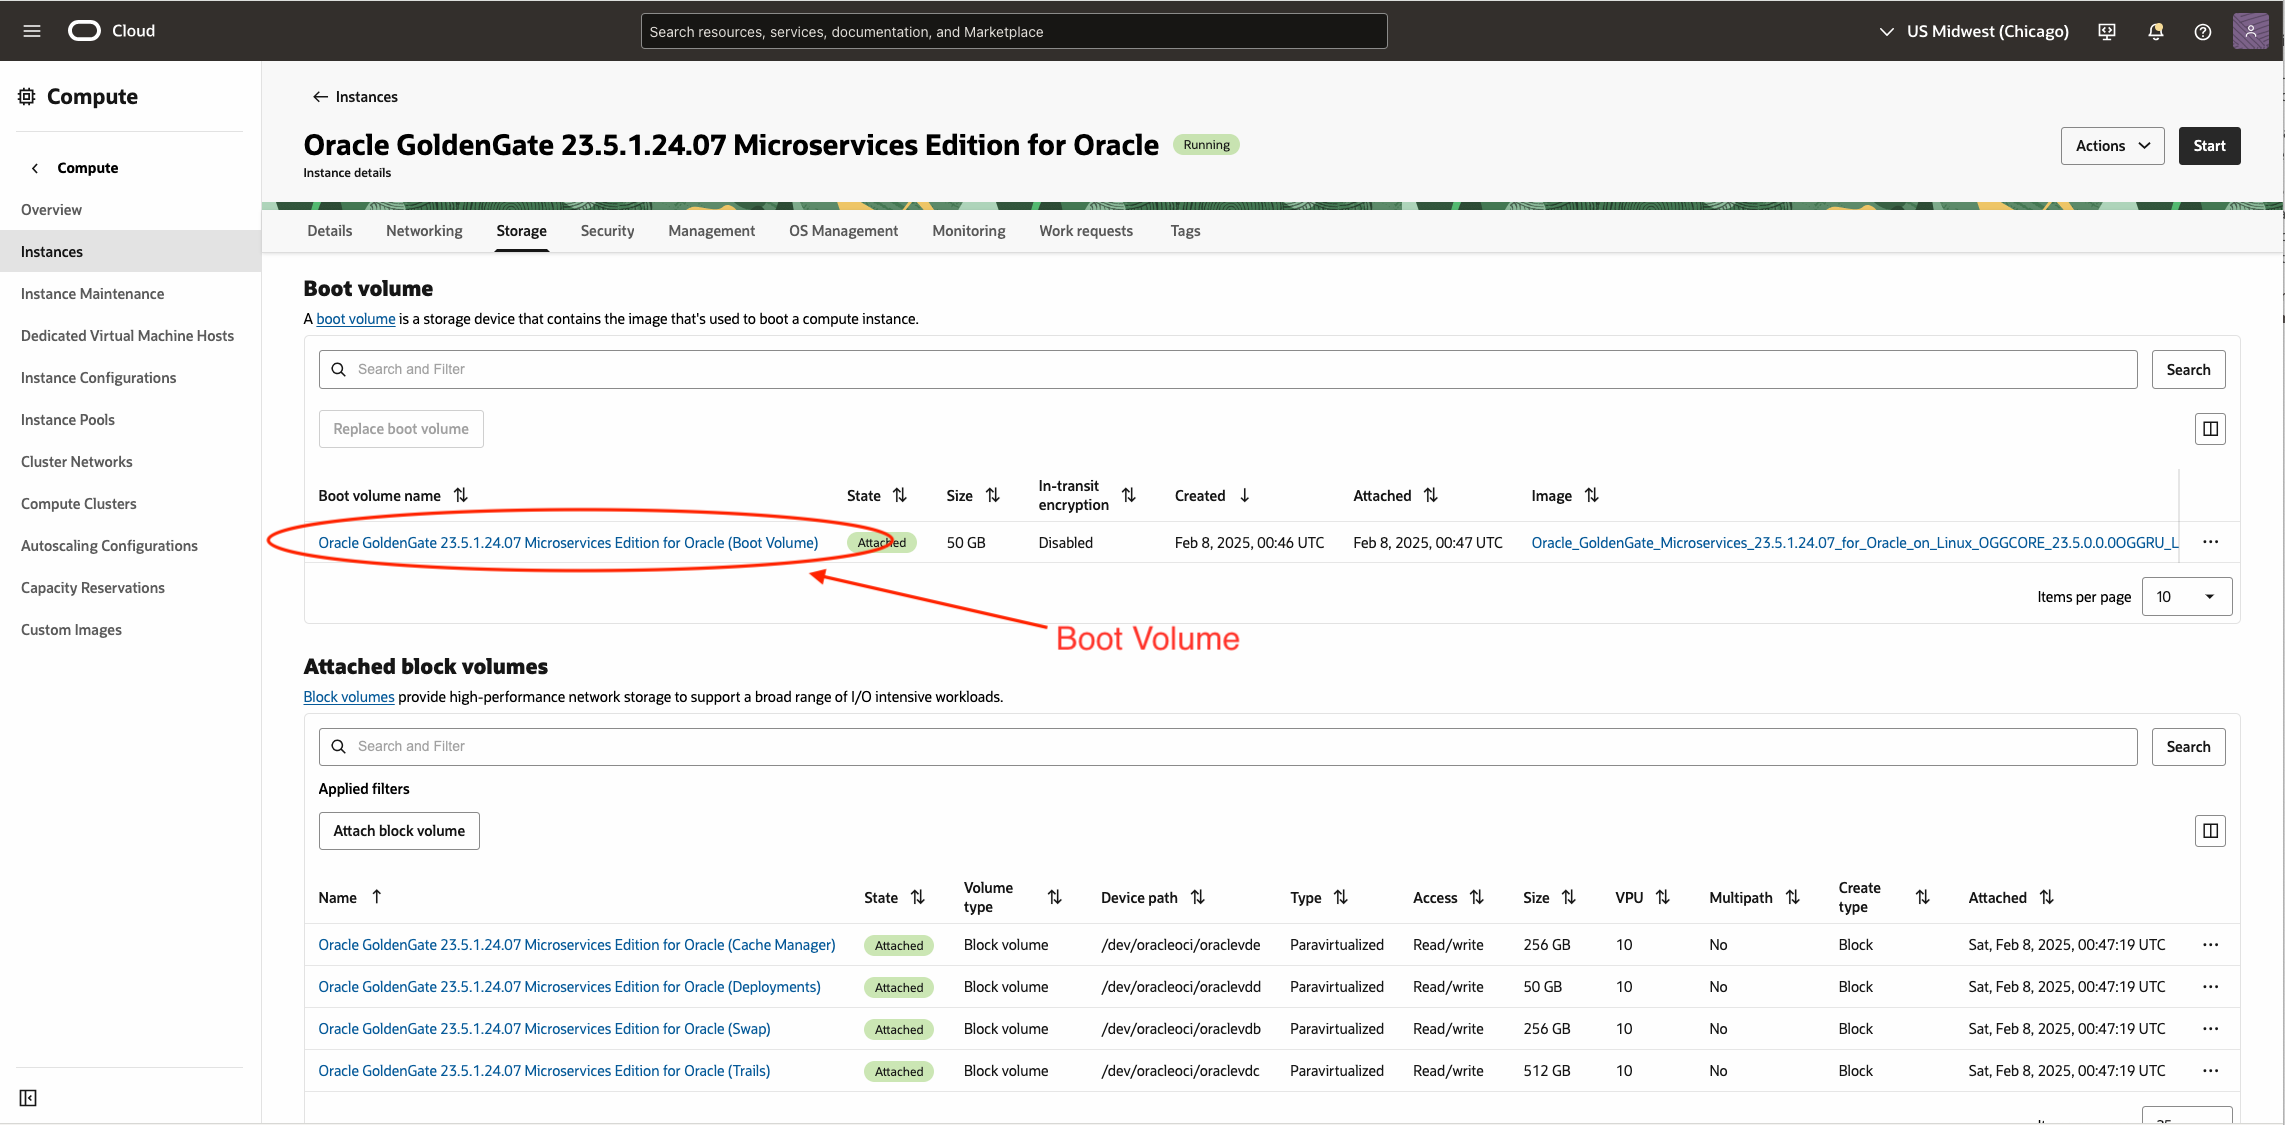
Then, find the backup you want to use and create a new Boot Volume out of it.
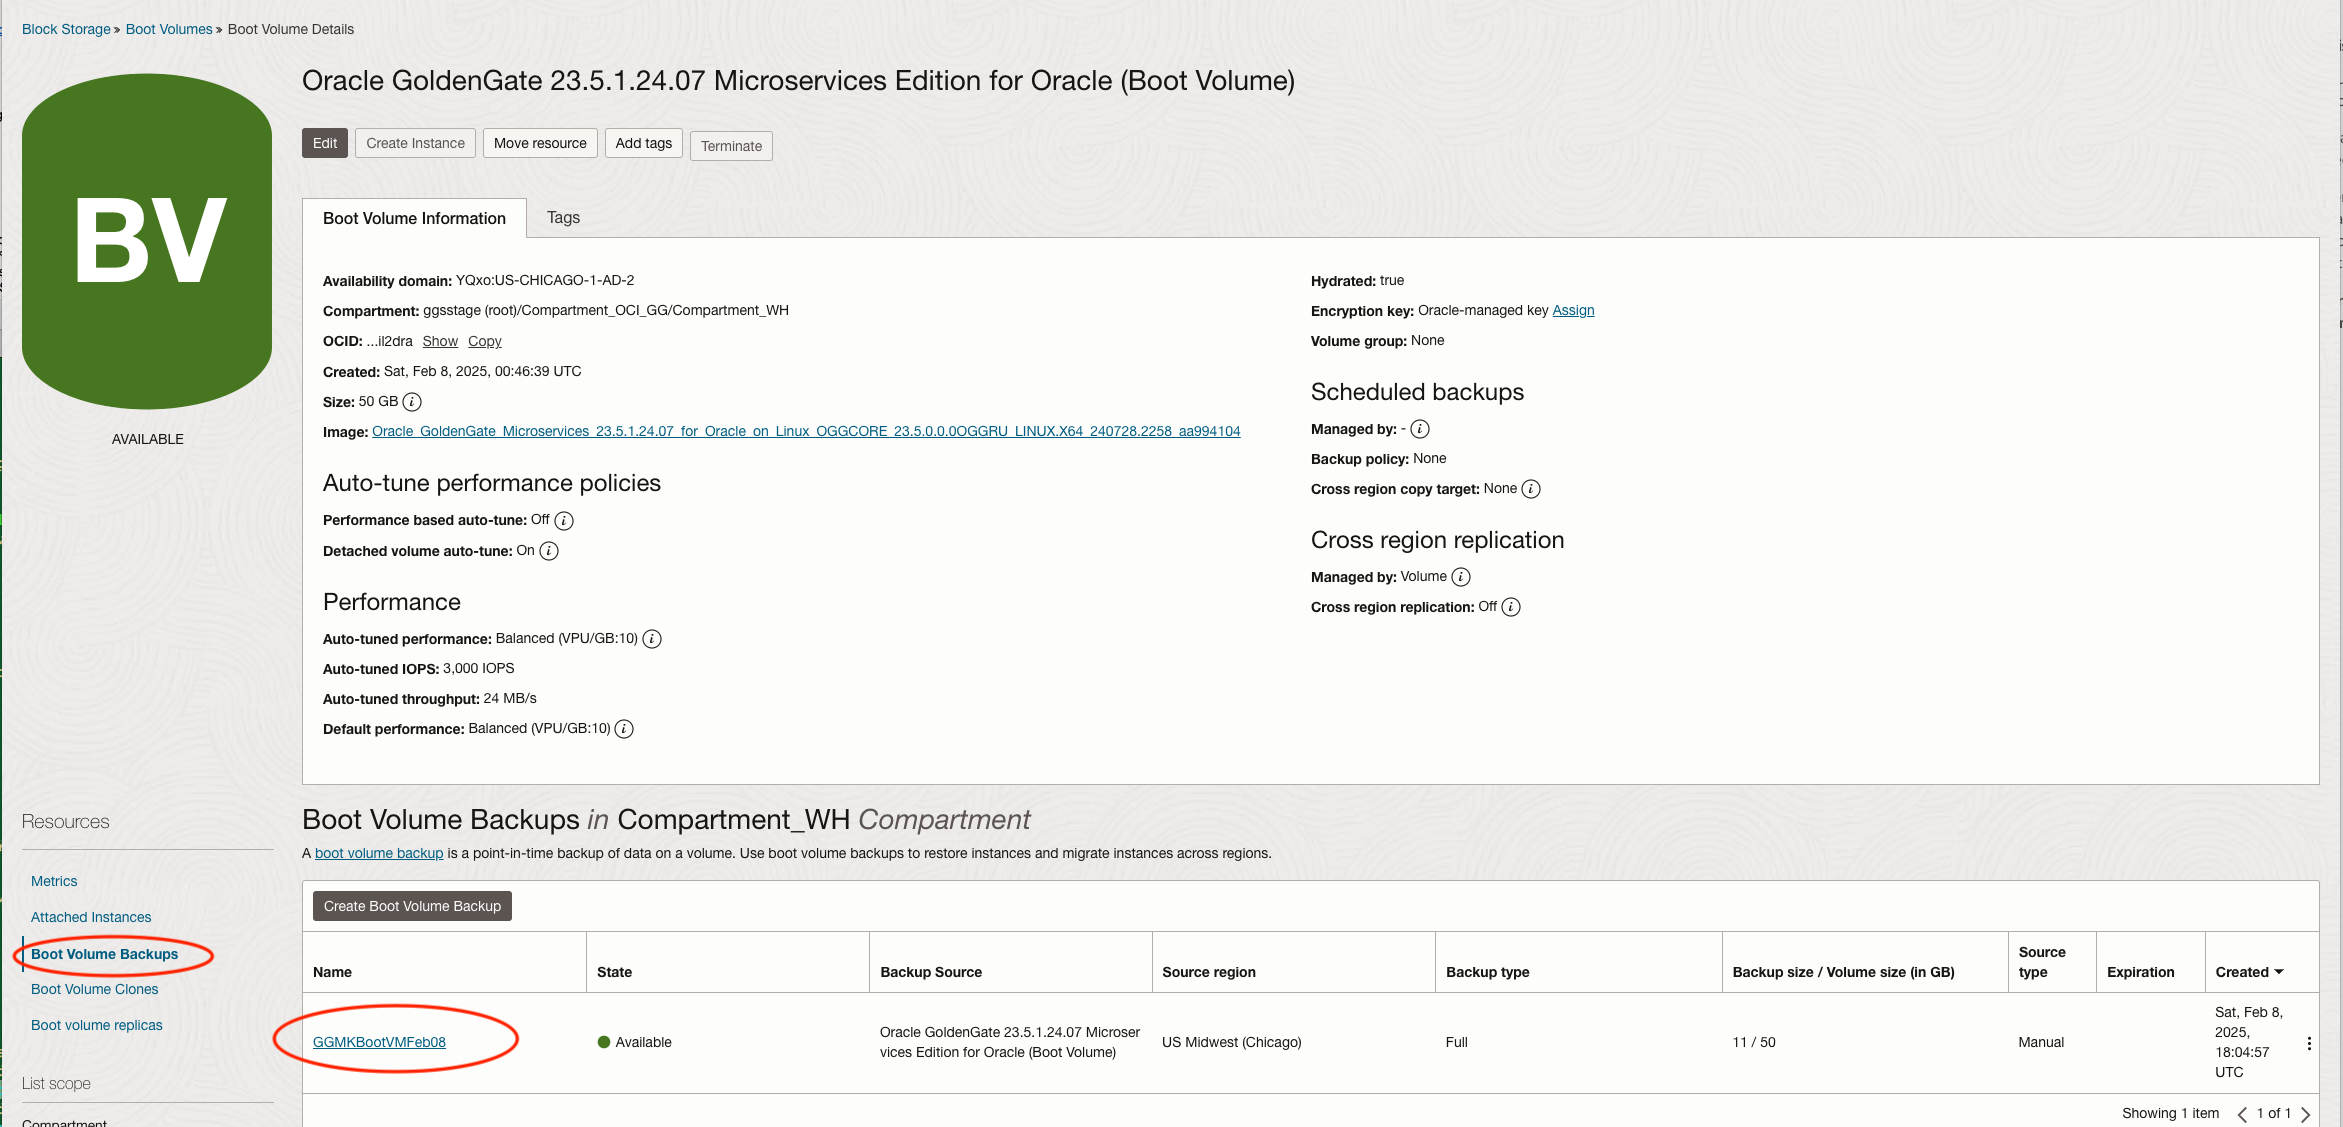
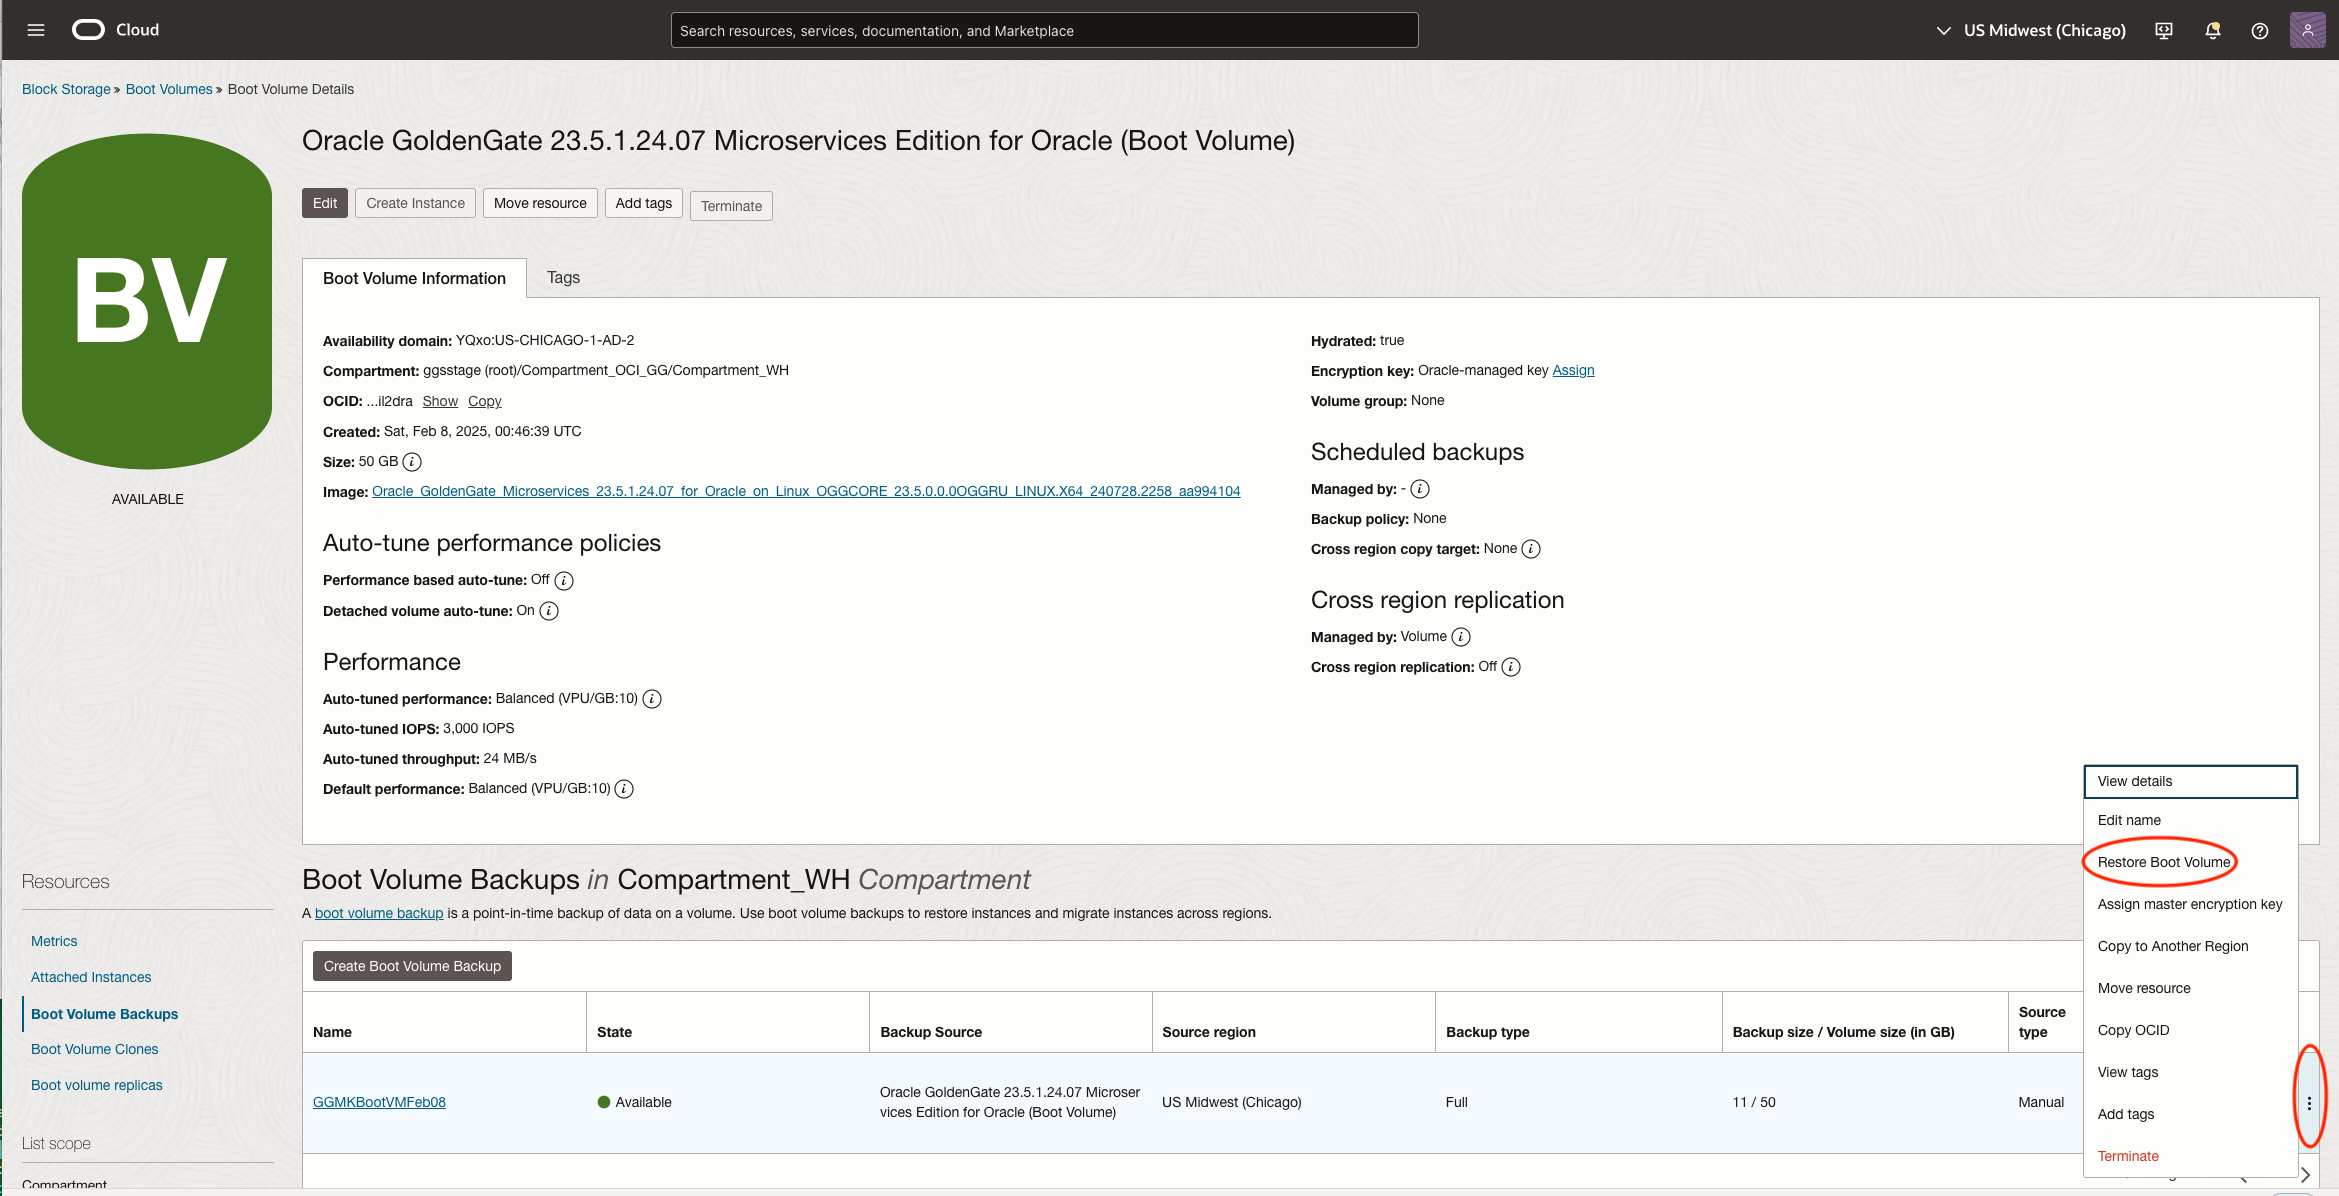
Click on the backup and create a new boot volume by using the Restore option.
Put in the new Boot Volume name and click on Restore. This will create a new Boot Volume.
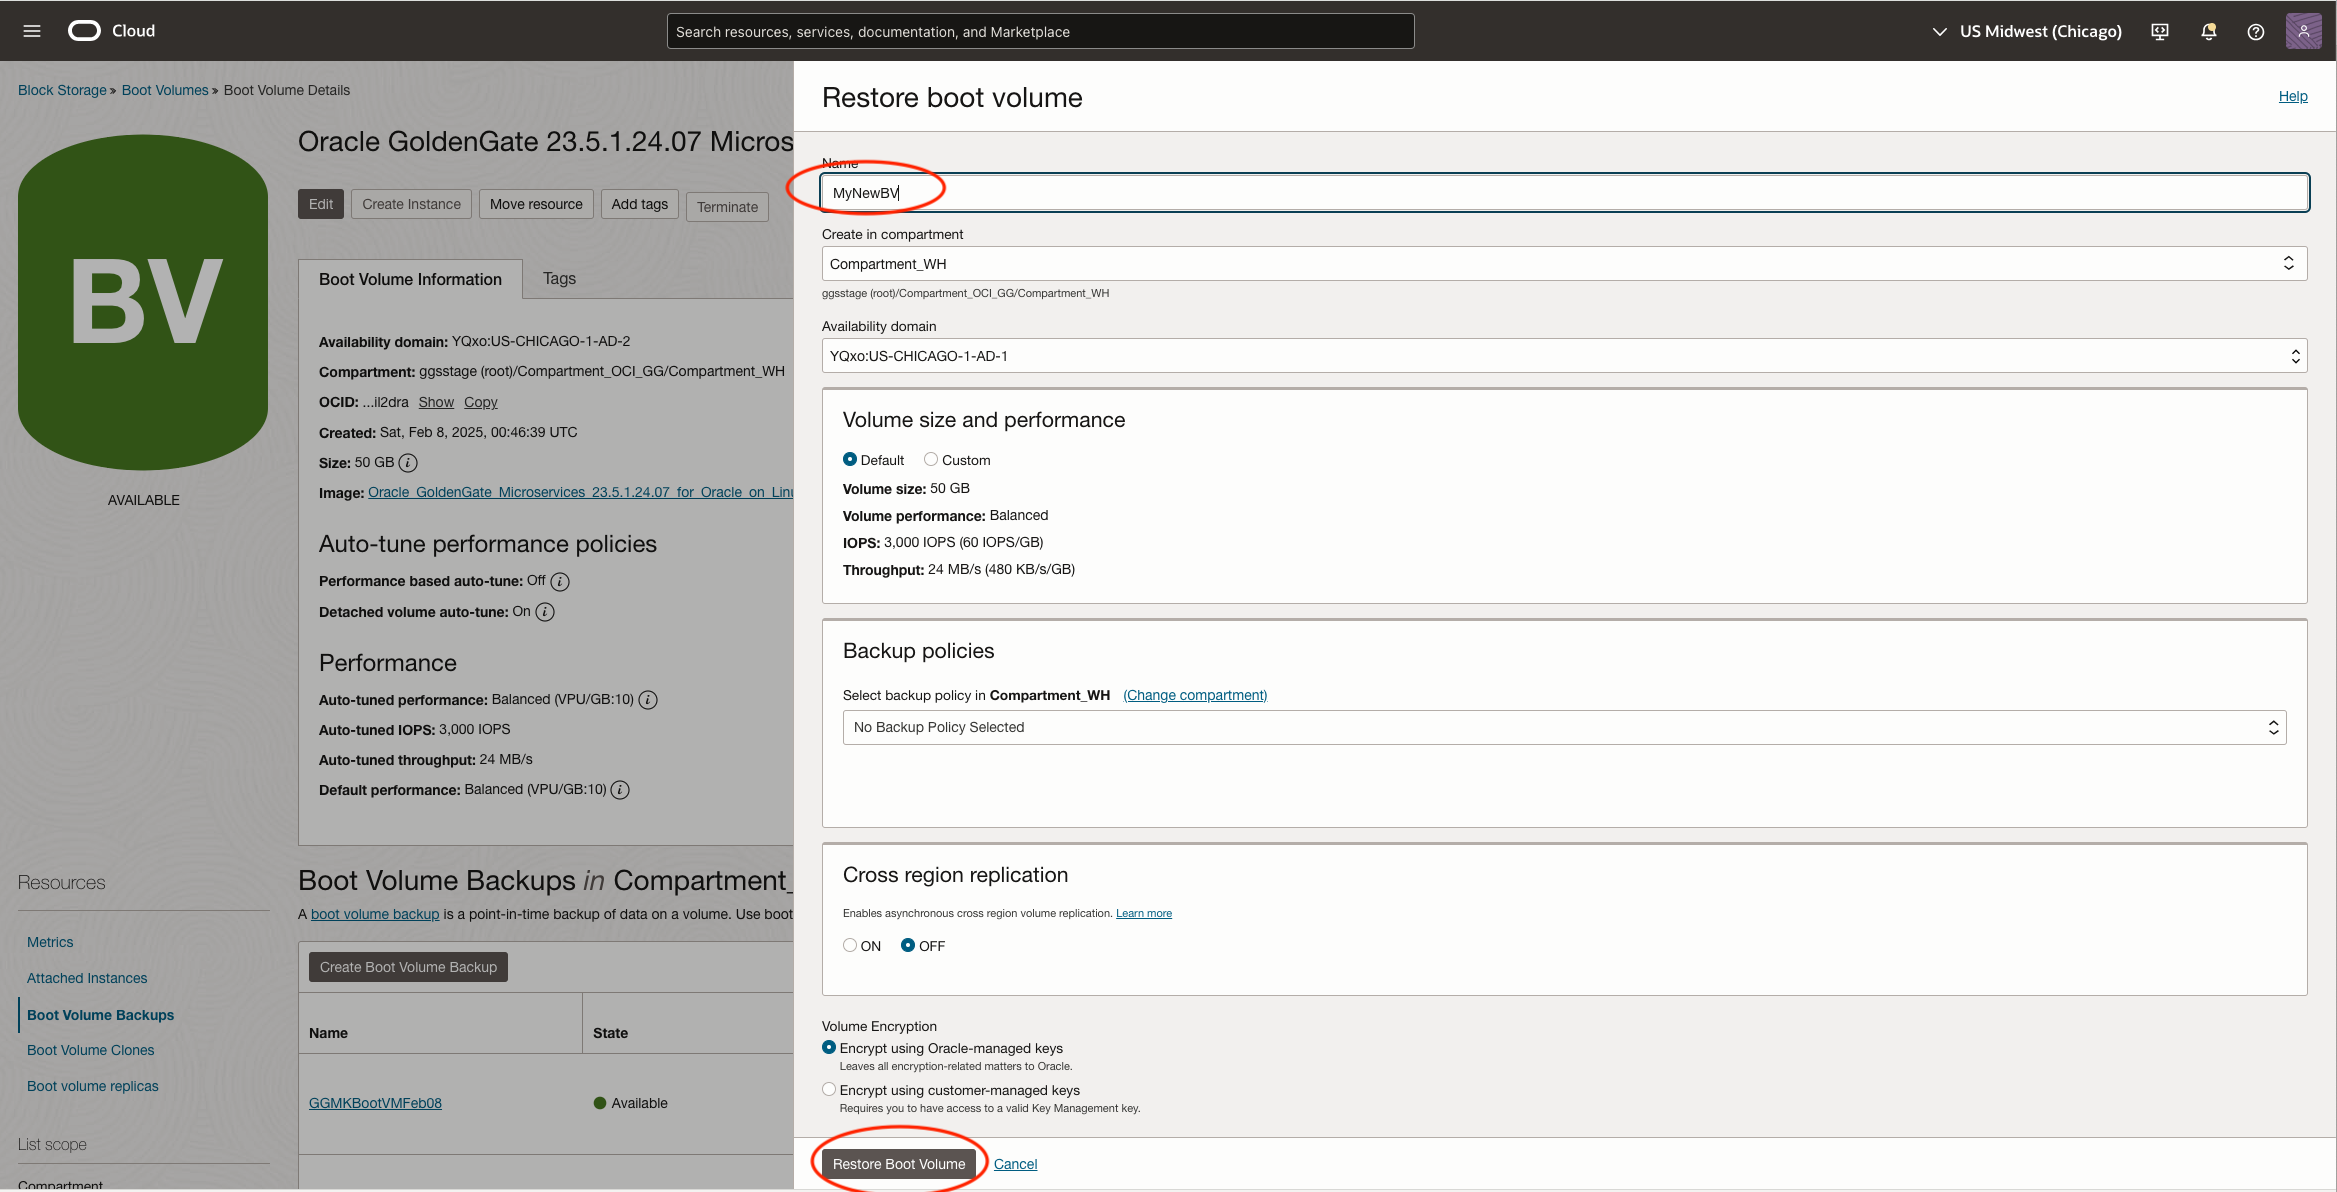
Once the new Boot Volume is ready, it will show up in your Boot Volume list.
2. Find the GoldenGate VM instance Metadata Info
If your current GoldenGate Marketplace VM instance is still running, please issue the following command as opc user
shell>curl -s -H ‘Authorization: Bearer Oracle’ http://169.254.169.254/opc/v2/instance/metadata
You will get a response like this
[opc@ogg23prv ~]$ curl -s -H 'Authorization: Bearer Oracle' http://169.254.169.254/opc/v2/instance/metadata
{
  "cacheManager_device": "/dev/oracleoci/oraclevde",
  "cacheManager_directory": "/u02/cacheManager",
  "deployment_adb_wallet": "",
  "deployments": [
    {
      "name": "Marketplace"
    }
  ],
  "deployments_device": "/dev/oracleoci/oraclevdd",
  "deployments_directory": "/u02/deployments",
  "installations_directory": "/u01/app/ogg",
  "ssh_authorized_keys": "ssh-rsa AAAAB3NzaC1yc2EAAAADAXXXXXXXXXXXXXXXXXXXXXXXXXXXXXXXXXXXXXXXXXXXXXXXX",
  "swap_device": "/dev/oracleoci/oraclevdb",
  "trails_device": "/dev/oracleoci/oraclevdc",
  "trails_directory": "/u02/trails"
Pay attention to the mount location of /dev/oracleoci/oraclevdb/c/d/e. These are the mount points for various black storage that hold your GoldenGate Deployment information.
If your GG instance is already down and cannot be restarted, and you have not made any customized changes to the block storage attach locations, they should take the default value as shown above. That location will be used when you attach the cloned volumes to the new instance.
3. Stop your existing GG Marketplace VM instance and clone all the GG deployment block volumes.
Make sure all your GoldenGate Processes, including Extract/Replicat/DistPath, are gracefully stopped in your GoldenGate deployment.
Then, stop the VM instance from using OCI Console or CLI.
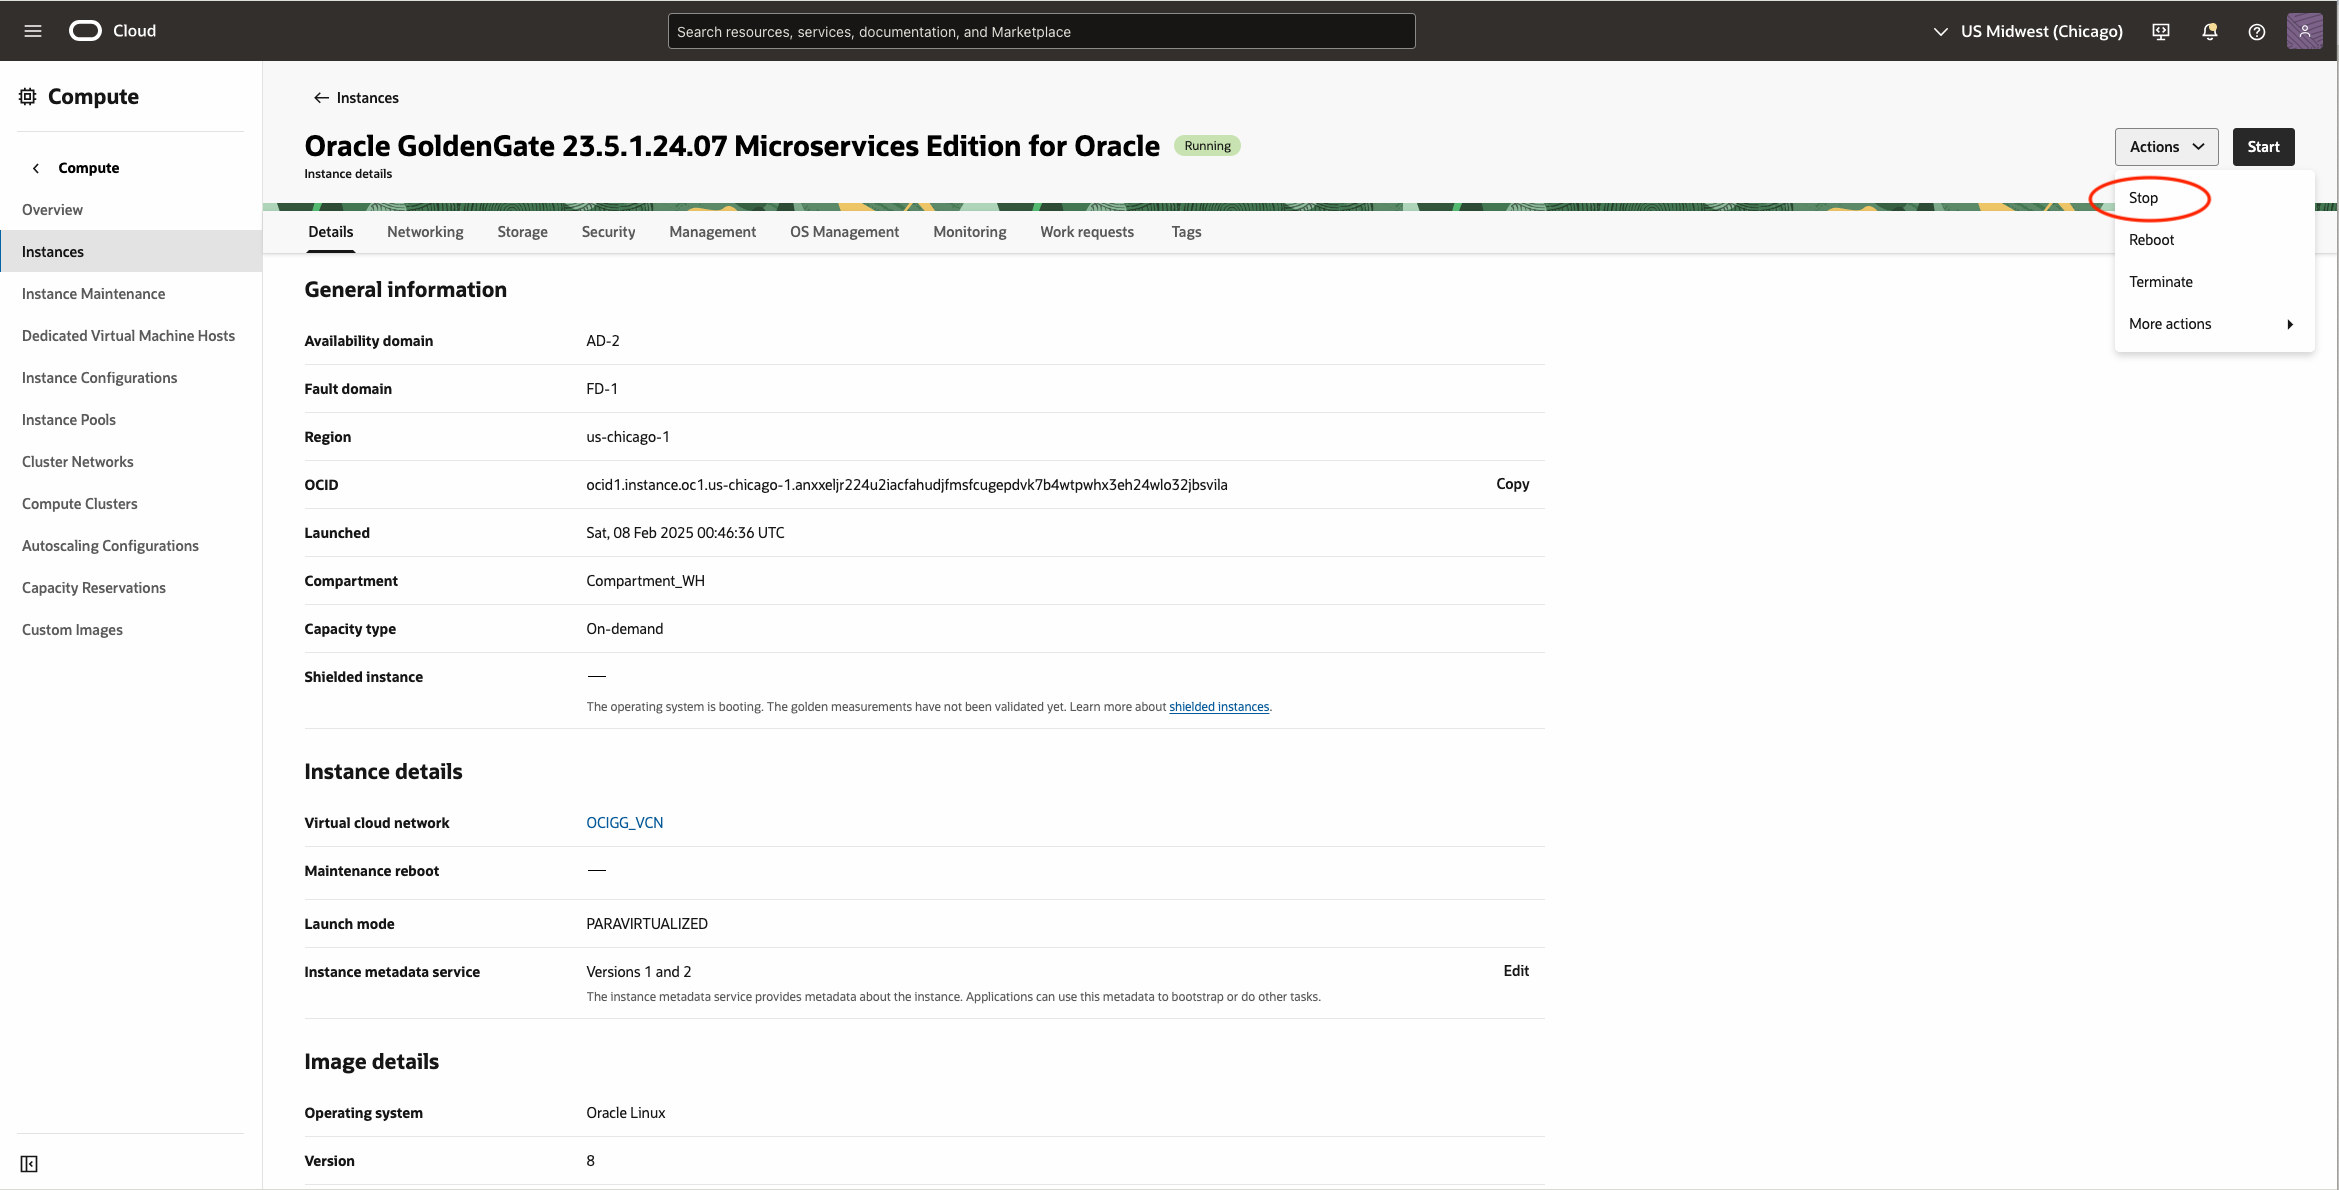
Once it is fully stopped, click on the name of the instance, track down the block volume it uses for GG Deployment.
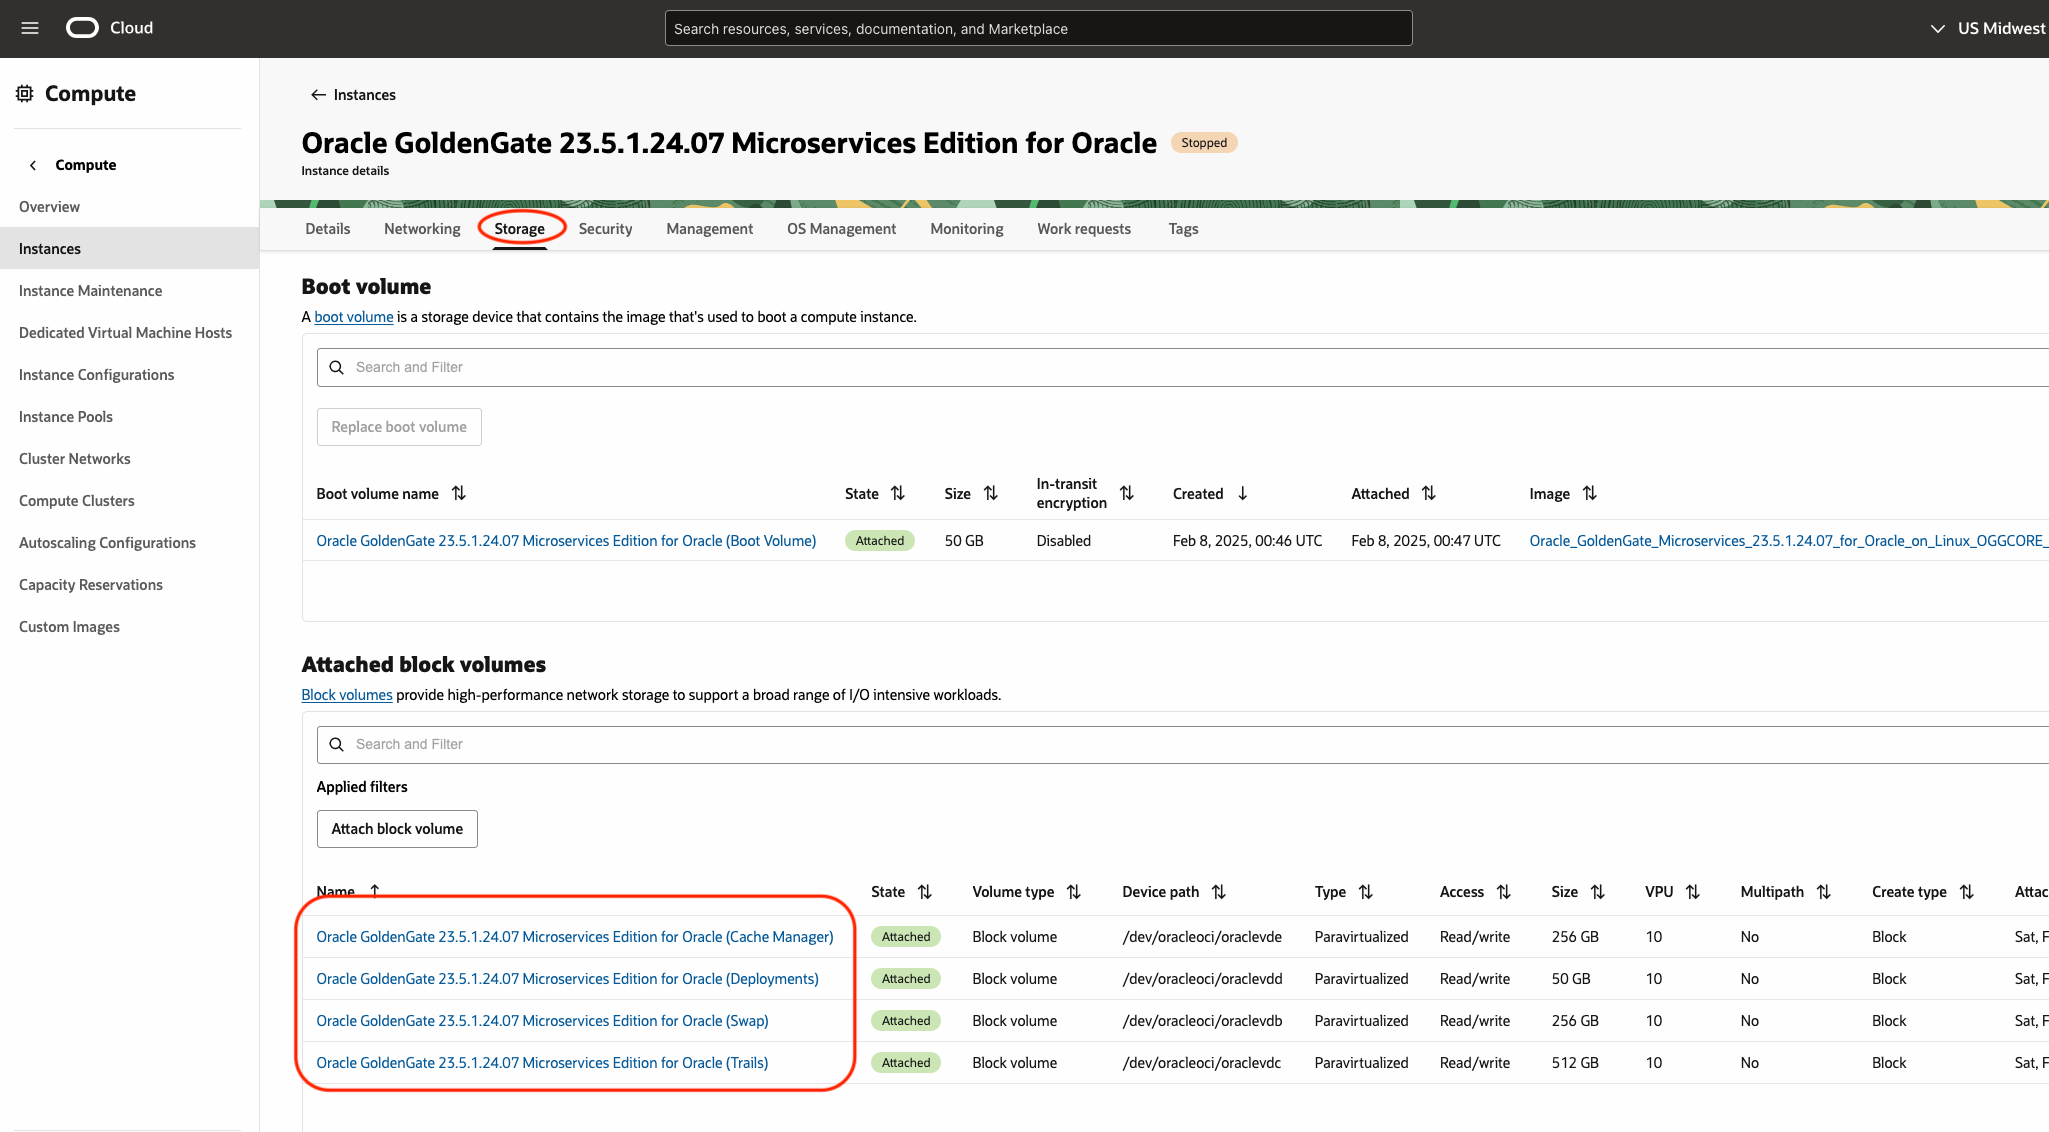
Here is the list of the four block volumes that will need to be cloned
Oracle GoldenGate 23.5.1.24.07 Microservices Edition for Oracle (Cache Manager)
Oracle GoldenGate 23.5.1.24.07 Microservices Edition for Oracle (Deployments)
Oracle GoldenGate 23.5.1.24.07 Microservices Edition for Oracle (Swap)
Oracle GoldenGate 23.5.1.24.07 Microservices Edition for Oracle (Trails)
Make sure you only clone the Block Volumes shown in the highlighted list, not the Boot Volume.
Go to the Block Storage menu to Clone those block volumes and give them a different name.
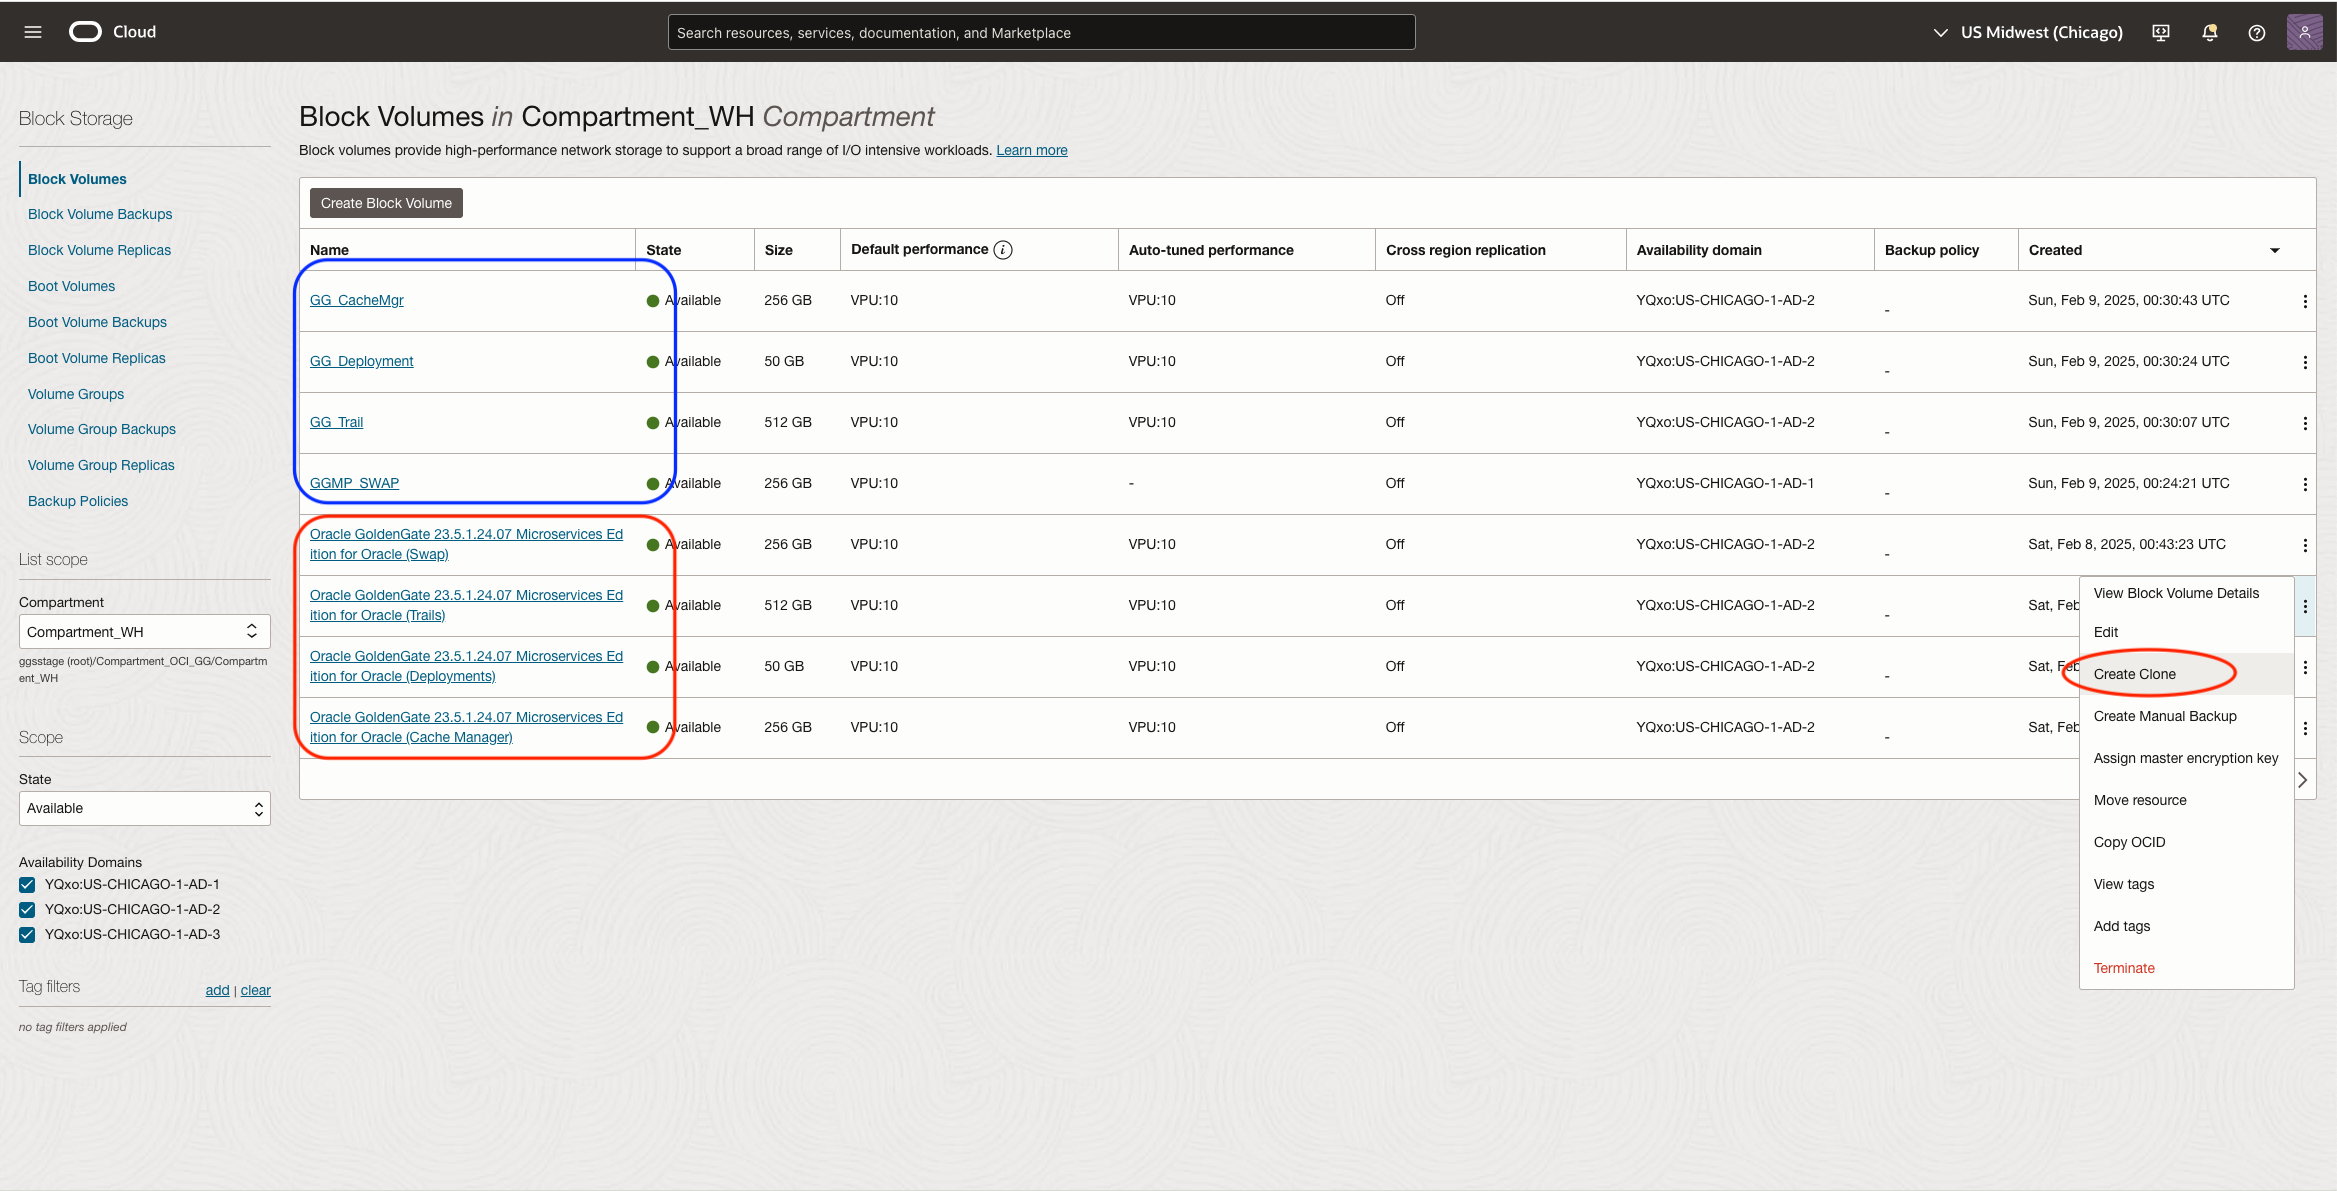
The screenshot shows the original block volumes in the red rectangle and the clone ones in the blue rectangle
4. Create a new instance with the new Boot Volume created in Step 1
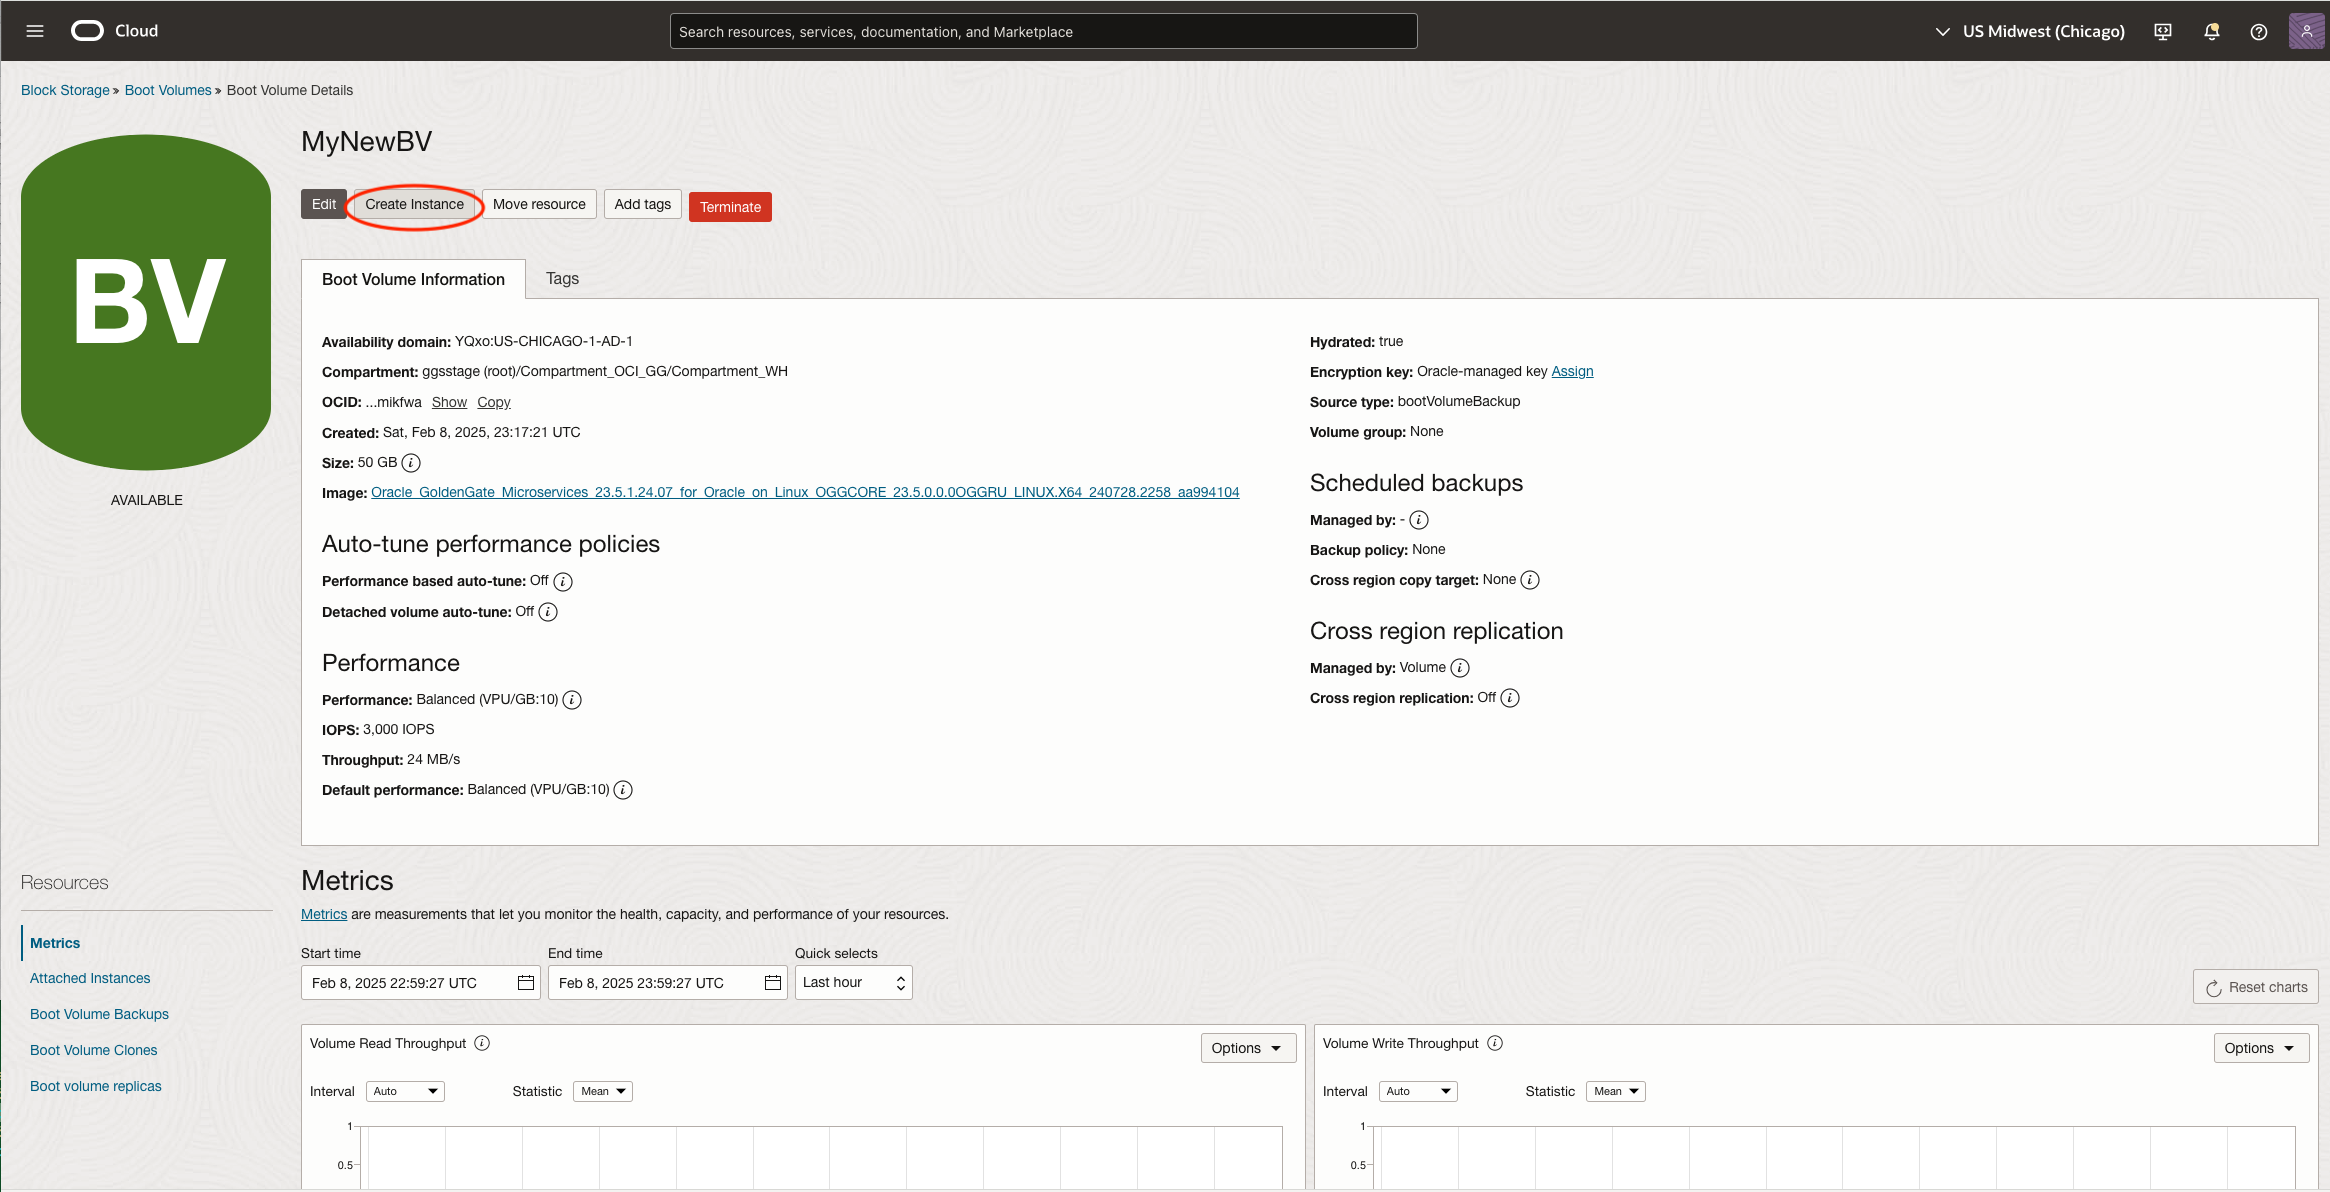
Find out the new boot volume you created from Step 1, Click on the name of it.
Create a new instance from it.
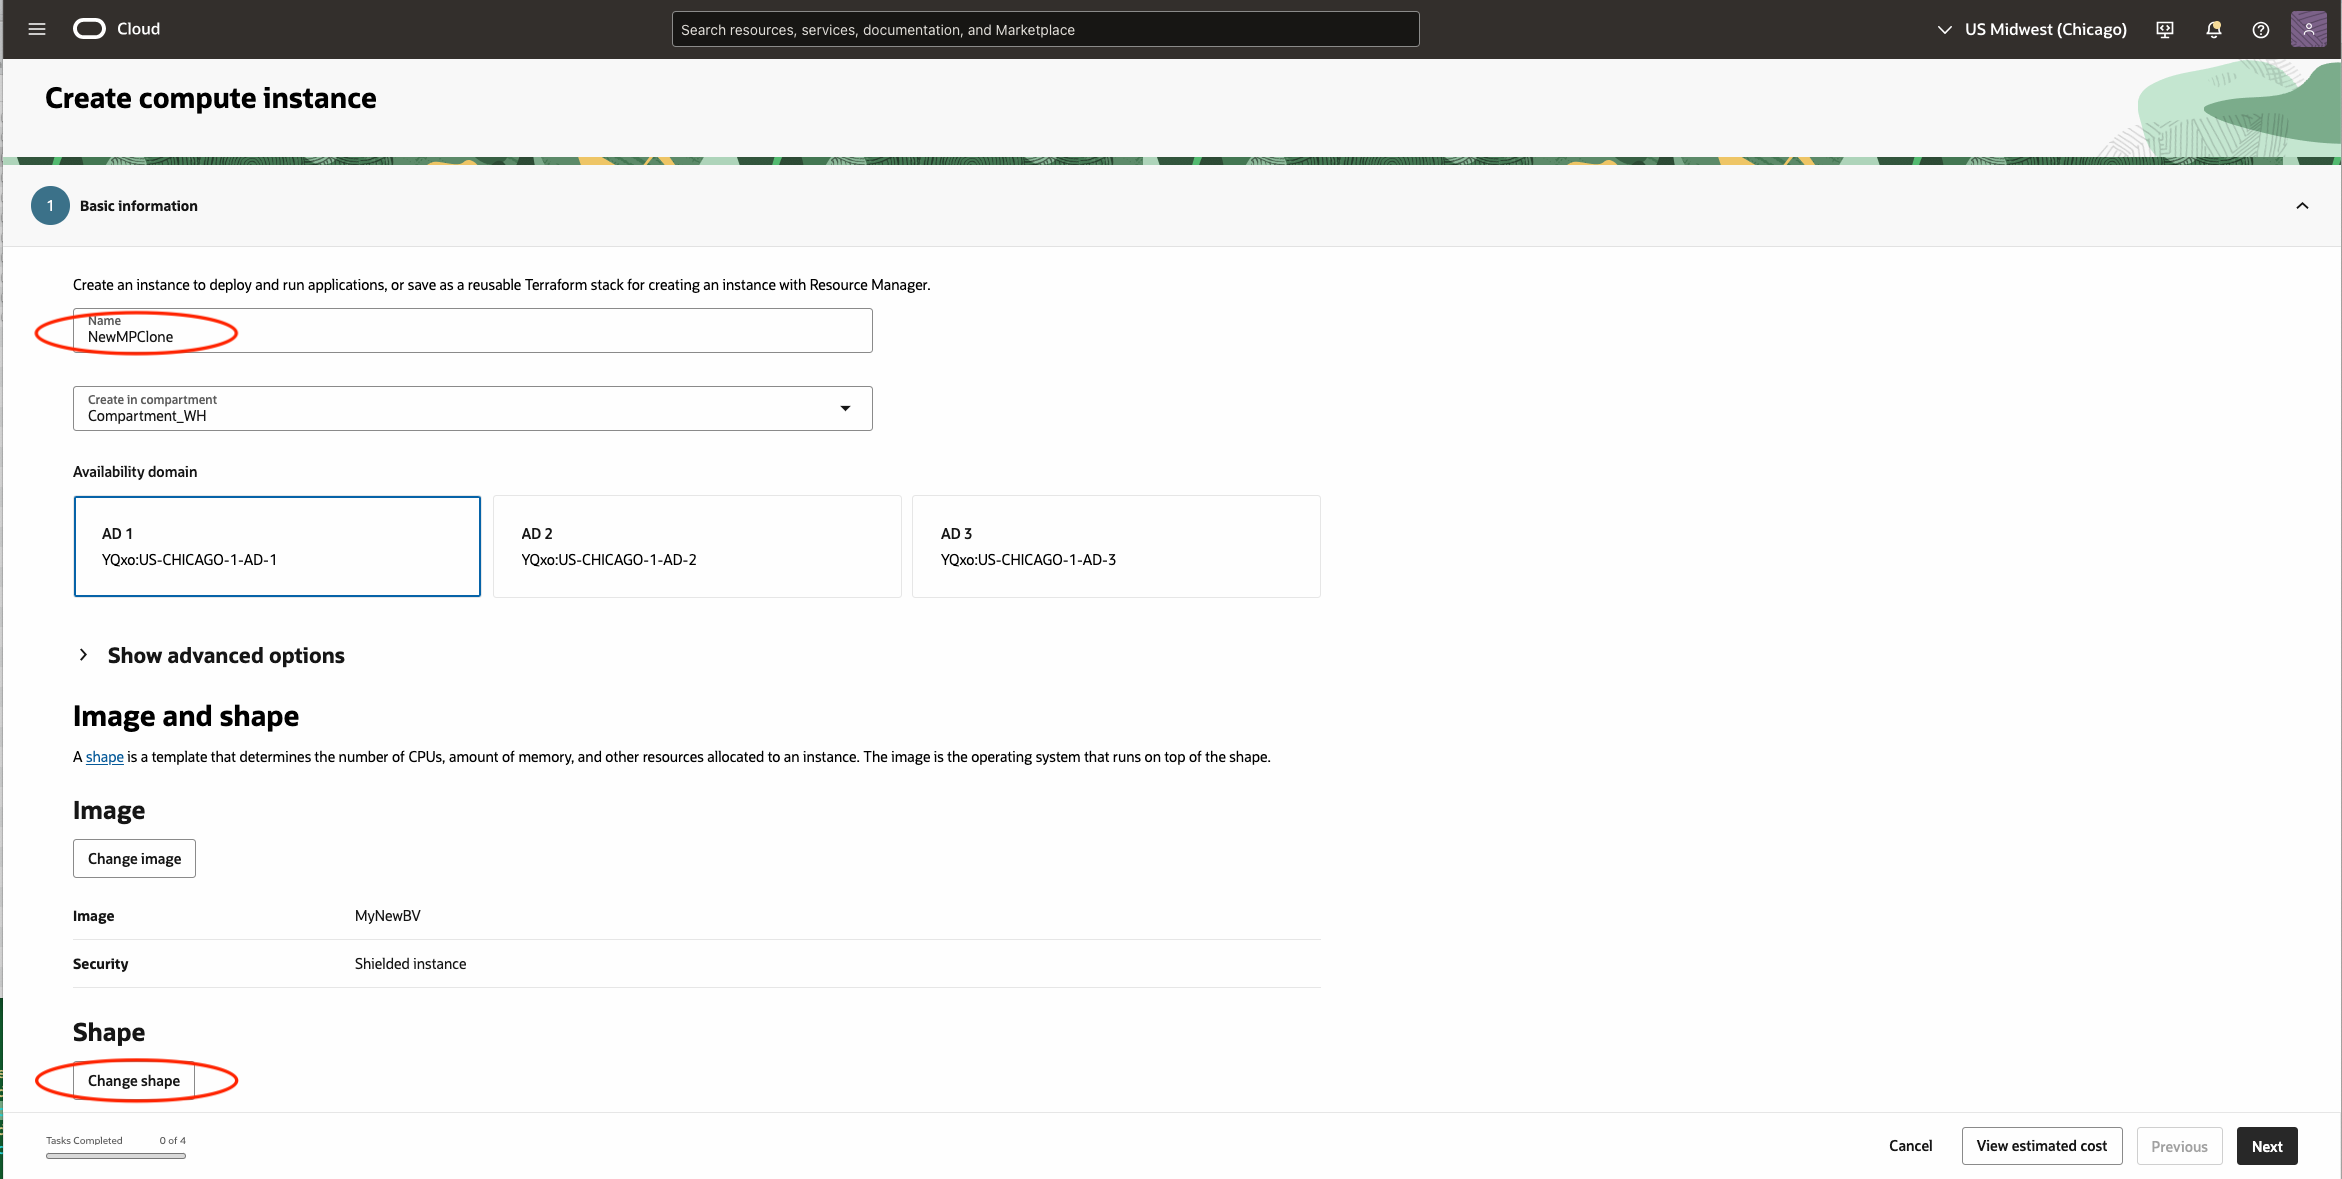
Add all necessary information for the new instance, make sure you give it a new name, choose the appropriate shape,
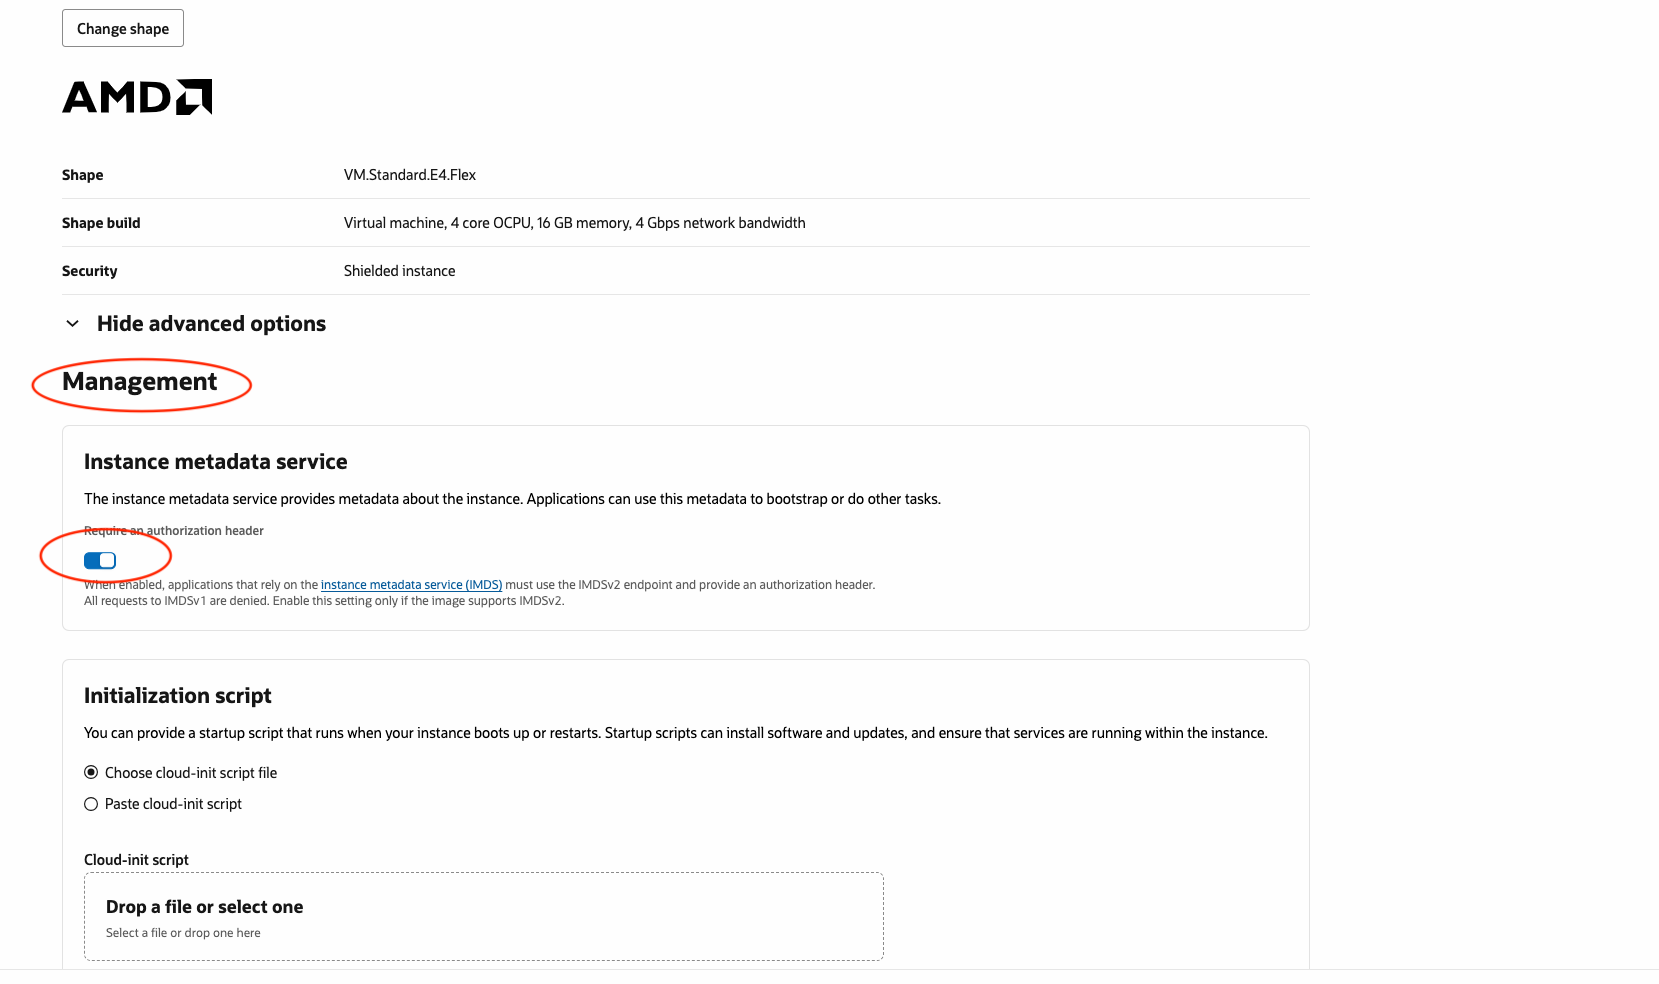
Make sure you enable the Instance Metadata. You have to expand the Advance Option and look at it in ther the Management section.
Make sure you configure the Network options correctly including any network security groups and rules and also add your ssh key so you can login to the instance once it is up running.
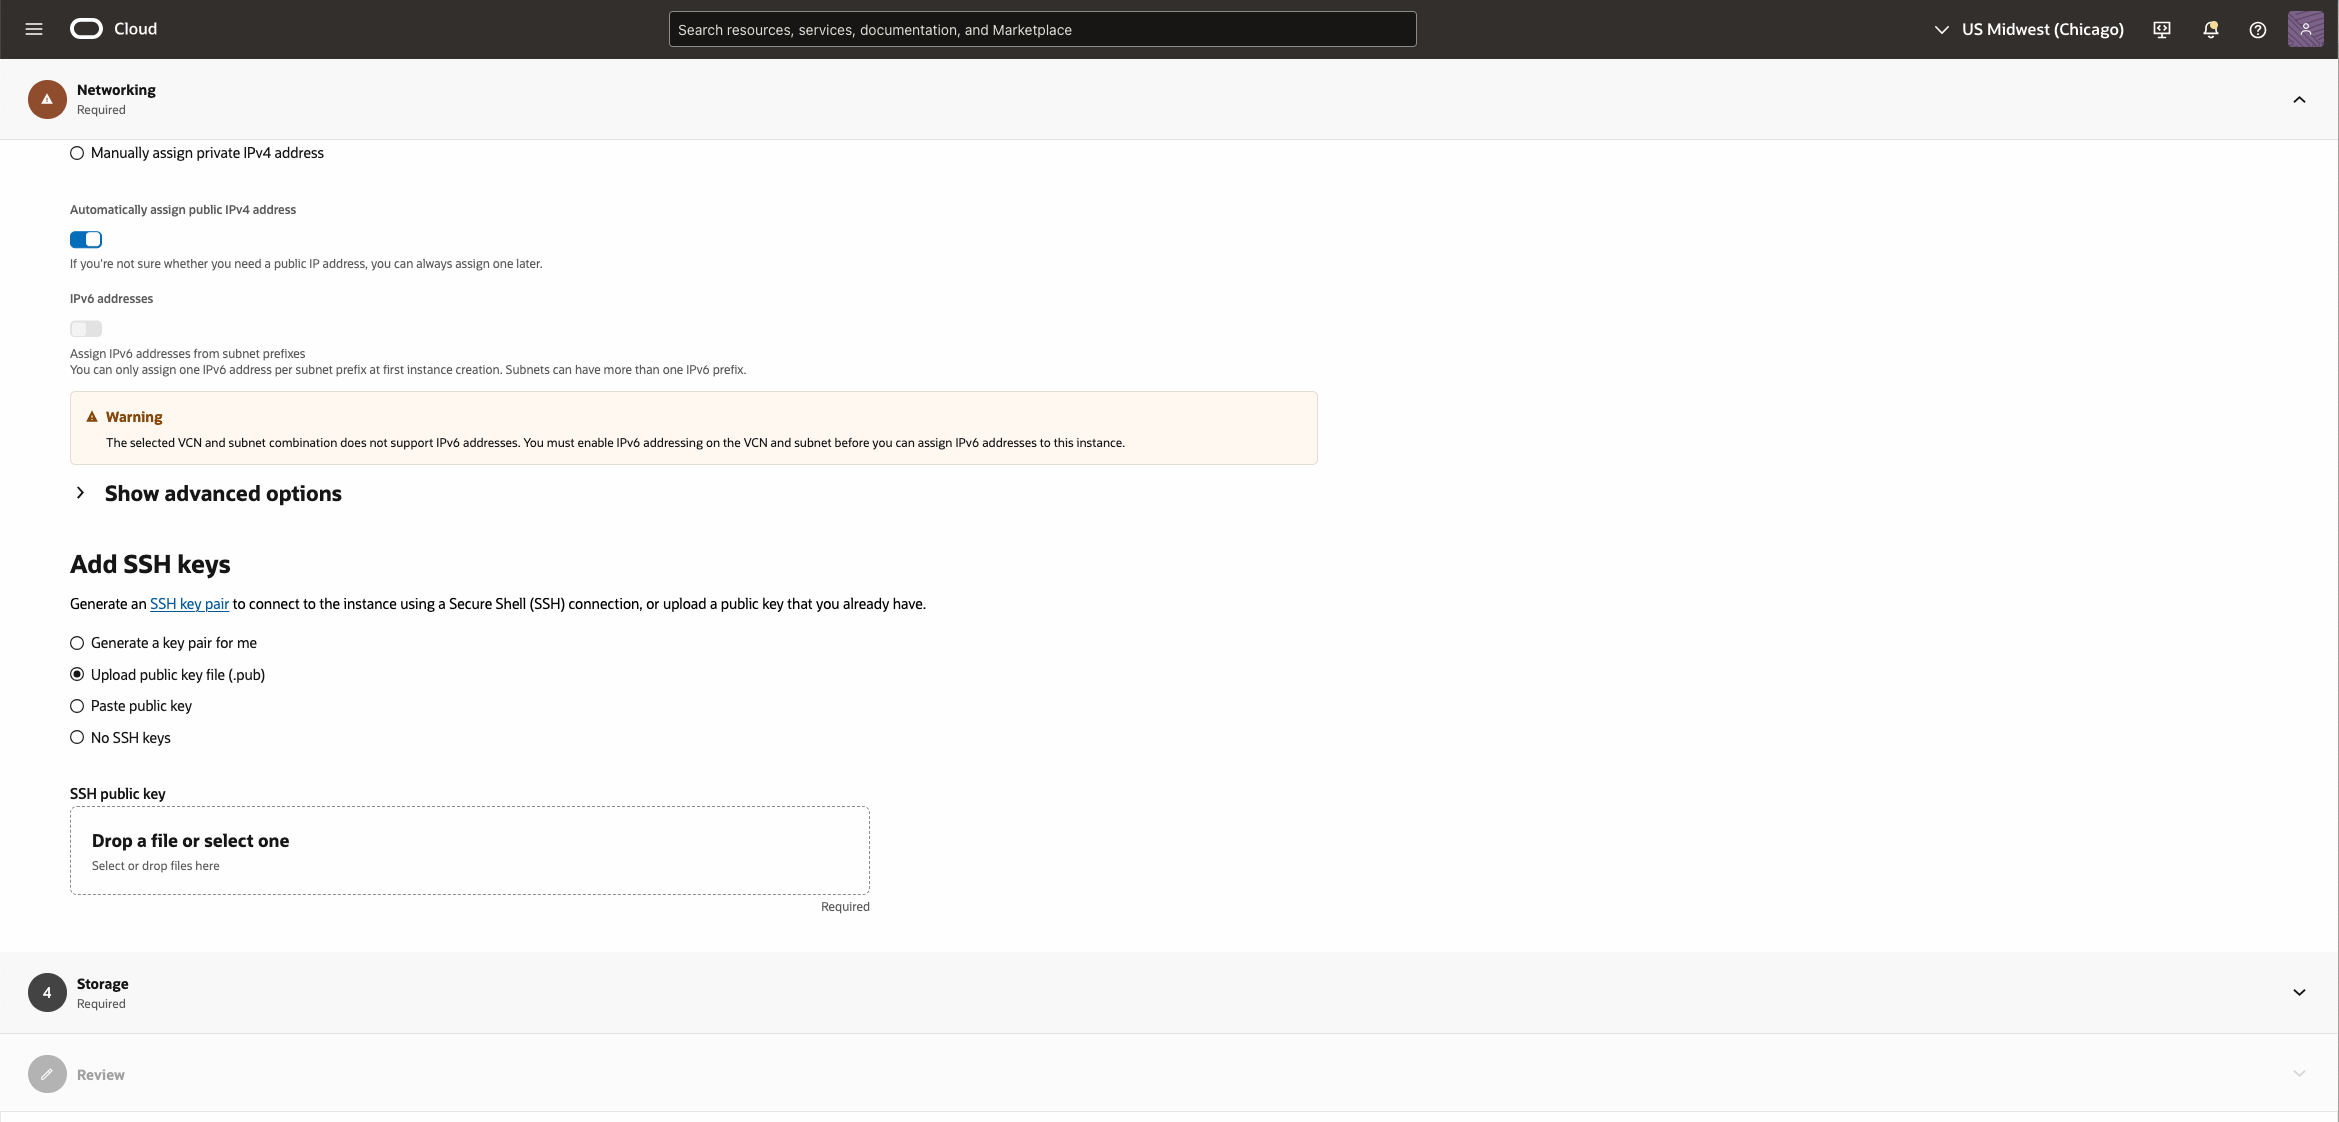
Skip the Storage section, DO NOT do anything at this moment. Then, Create the instance.
5. Attach those cloned block volumes from Step 3 to the new instance
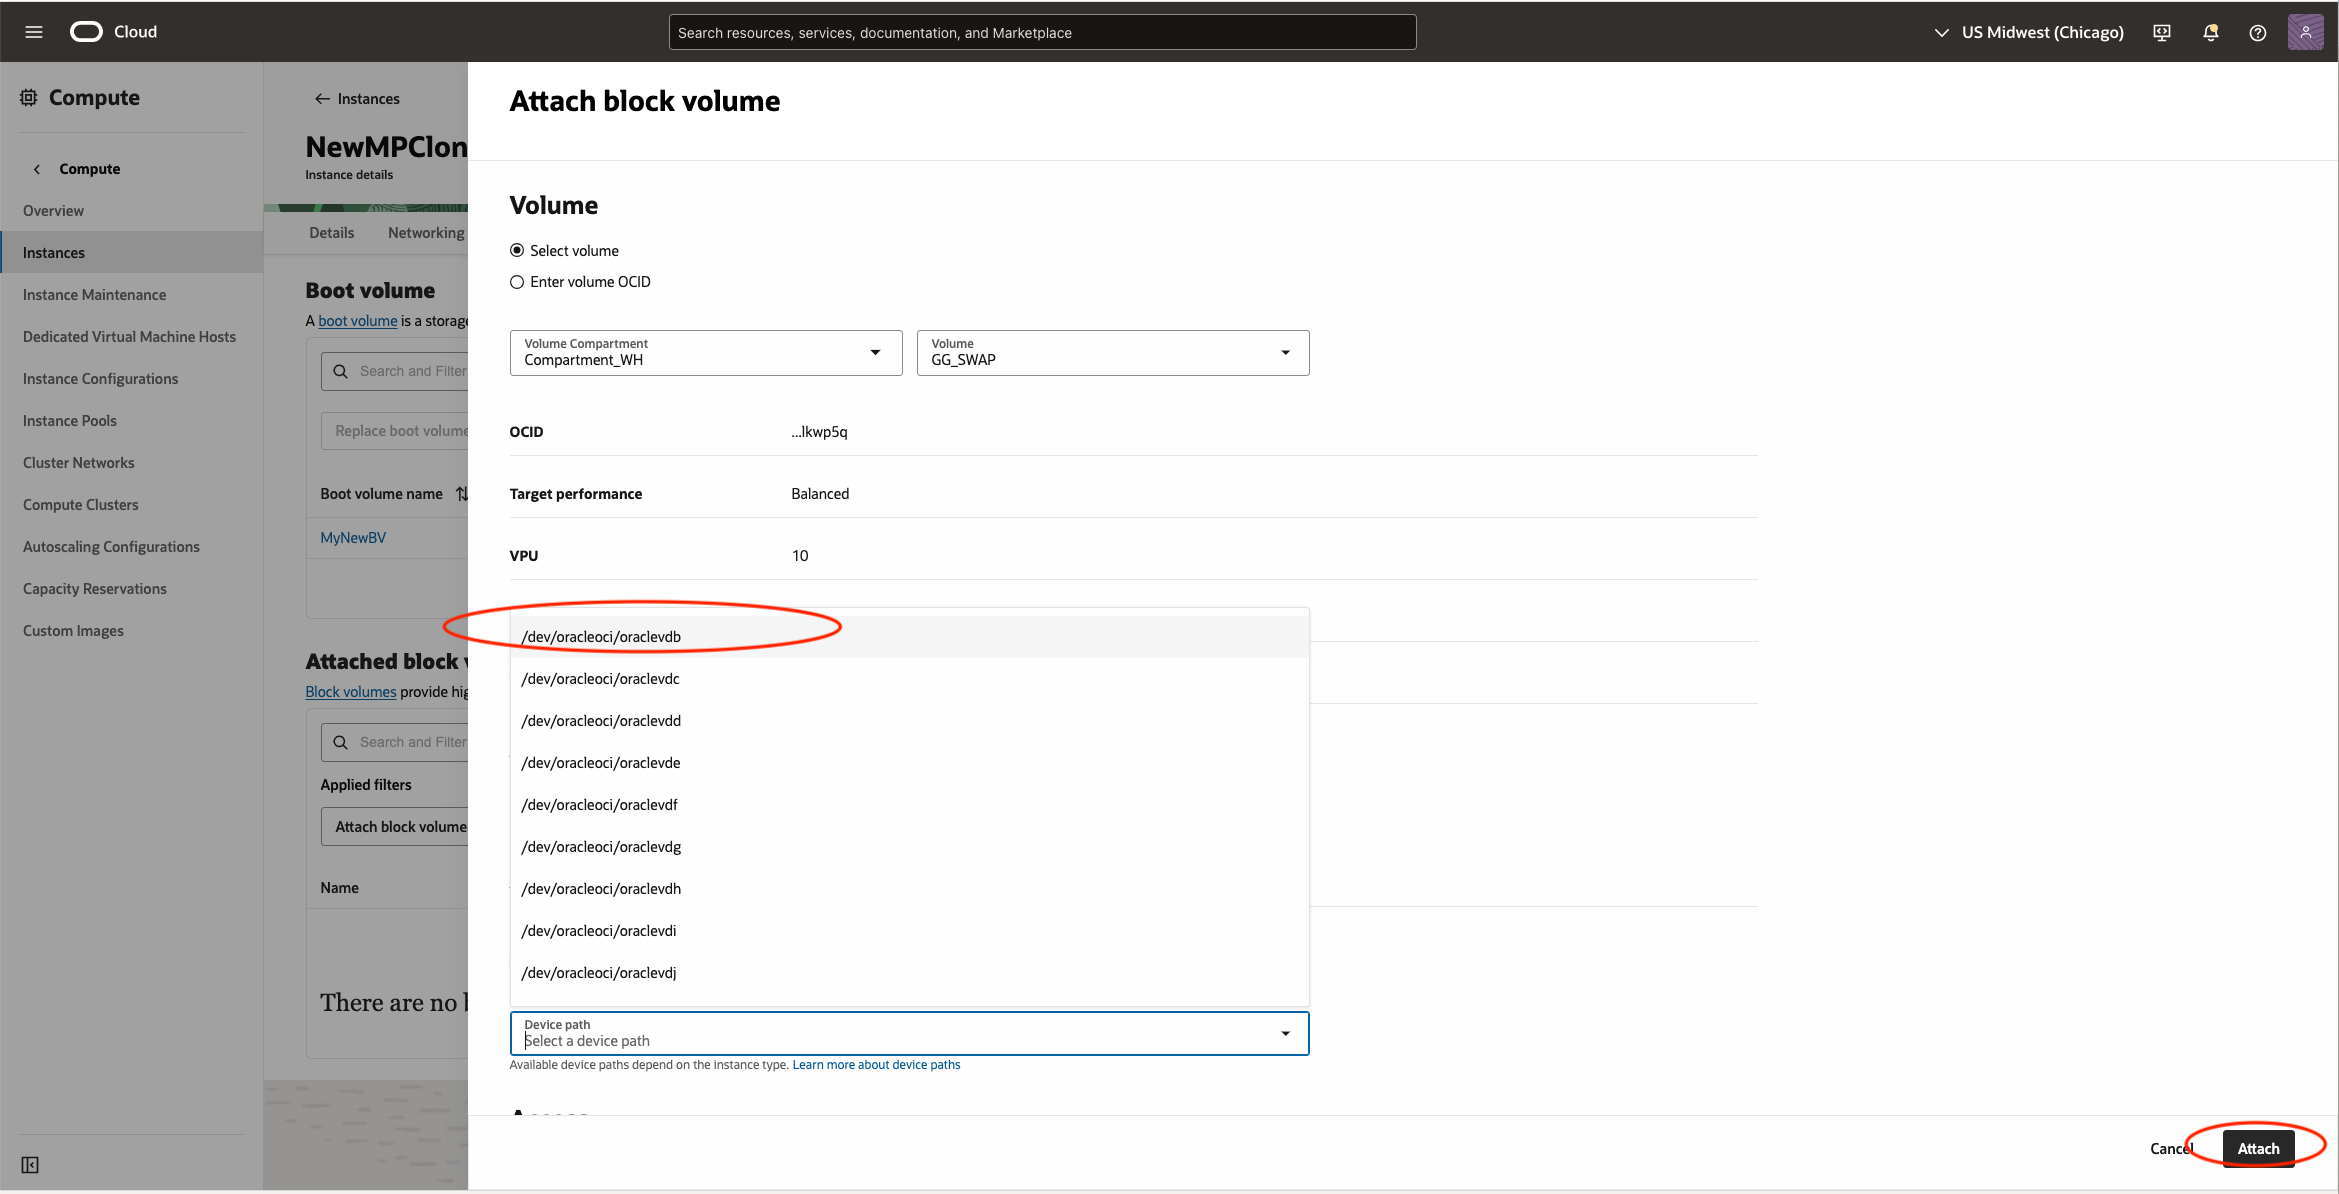
Use the information collected from Step 2 to determine the device path to attach those volumes
Here is an example from the previous info collected.
/dev/oracleoci/oraclevdb – swap
/dev/oracleoci/oraclevdc – ogg trails
/dev/oracleoci/oraclevdd – ogg deployments
/dev/oracleoci/oraclevde – ogg cacheManager
Attach those cloned block volumes one by one to the new instance
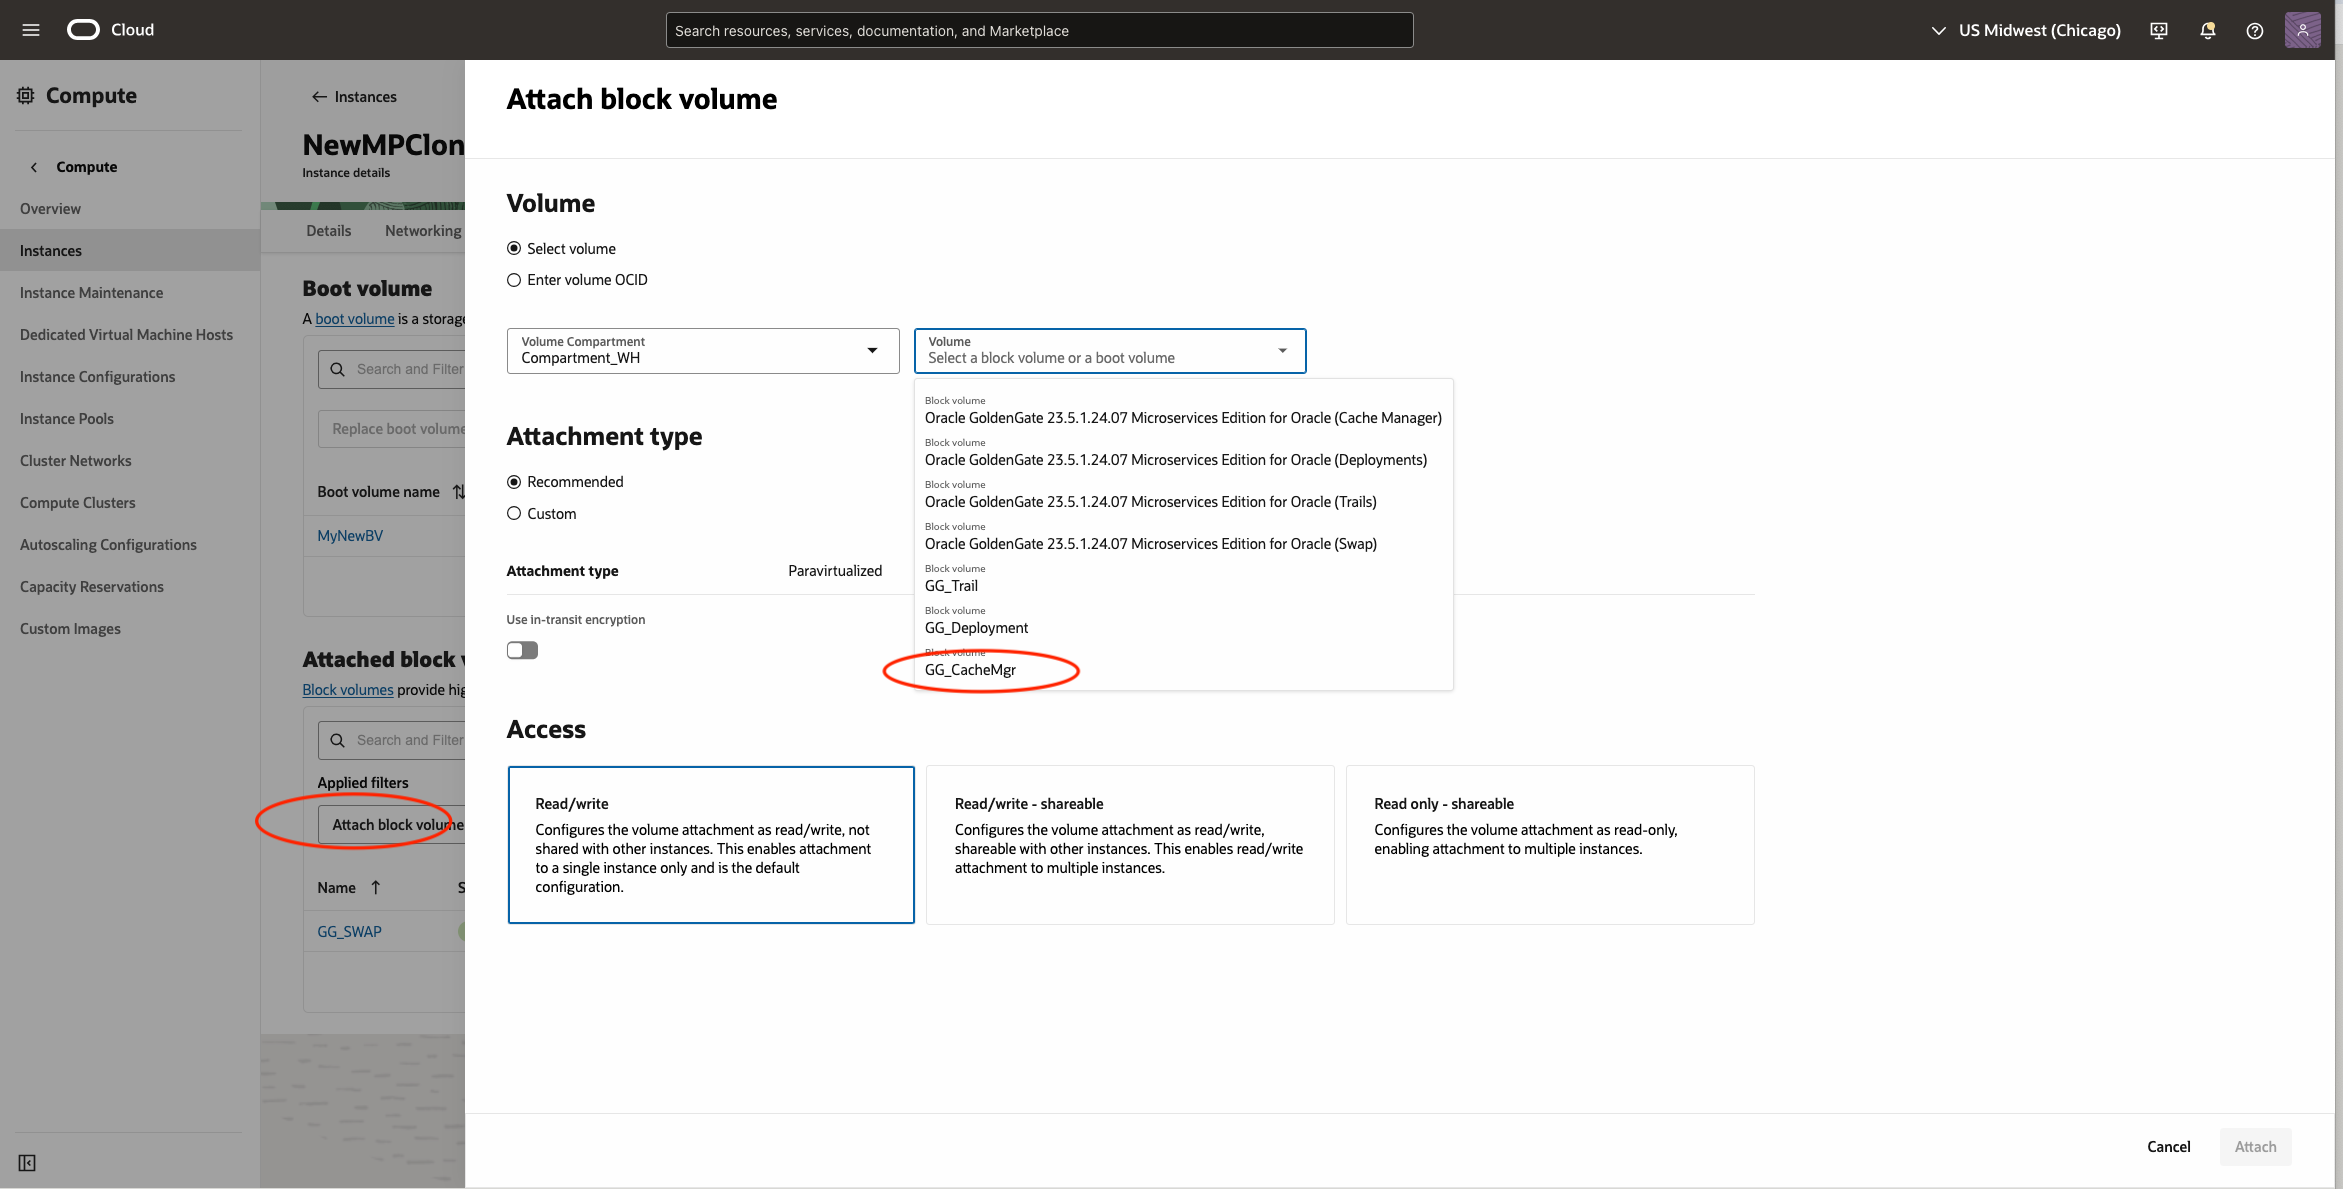
Make sure you choose the correct device path according to the above list.
Once all block volumes are attached, You can find them on the VM.
Once all is done, you will be able to see the list under the Attached Block volumes.

You can also verify that on the instance after you ssh into it.
Before attaching, you will see your block storage below
[opc@newmpclone ~]$ lsblk
NAME               MAJ:MIN RM  SIZE RO TYPE MOUNTPOINT
sda                  8:0    0   50G  0 disk
├─sda1               8:1    0  100M  0 part /boot/efi
├─sda2               8:2    0    1G  0 part /boot
└─sda3               8:3    0 45.5G  0 part
  ├─ocivolume-root 252:0    0 35.5G  0 lvm  /
  └─ocivolume-oled 252:1    0   10G  0 lvm  /var/oled
After the attach is done, you will see those GoldenGate Volumes.
[opc@newmpclone ~]$ lsblk
NAME               MAJ:MIN RM  SIZE RO TYPE MOUNTPOINT
sda                  8:0    0   50G  0 disk
├─sda1               8:1    0  100M  0 part /boot/efi
├─sda2               8:2    0    1G  0 part /boot
└─sda3               8:3    0 45.5G  0 part
  ├─ocivolume-root 252:0    0 35.5G  0 lvm  /
  └─ocivolume-oled 252:1    0   10G  0 lvm  /var/oled
sdc                  8:32   0  256G  0 disk
└─sdc1               8:33   0  256G  0 part /u02/cacheManager
sdd                  8:48   0  256G  0 disk [SWAP]
sde                  8:64   0  512G  0 disk
└─sde1               8:65   0  512G  0 part /u02/trails
sdf                  8:80   0   50G  0 disk
└─sdf1               8:81   0   50G  0 part /u02/deployments
[opc@newmpclone ~]$ ls -l /dev/oracleoci/oraclevd[b-e]
lrwxrwxrwx. 1 root root 6 Feb  9 02:46 /dev/oracleoci/oraclevdb -> ../sdd
lrwxrwxrwx. 1 root root 6 Feb  9 02:47 /dev/oracleoci/oraclevdc -> ../sde
lrwxrwxrwx. 1 root root 6 Feb  9 02:47 /dev/oracleoci/oraclevdd -> ../sdf
lrwxrwxrwx. 1 root root 6 Feb  9 02:45 /dev/oracleoci/oraclevde -> ../sdc
6. Update the instance Metadata Record
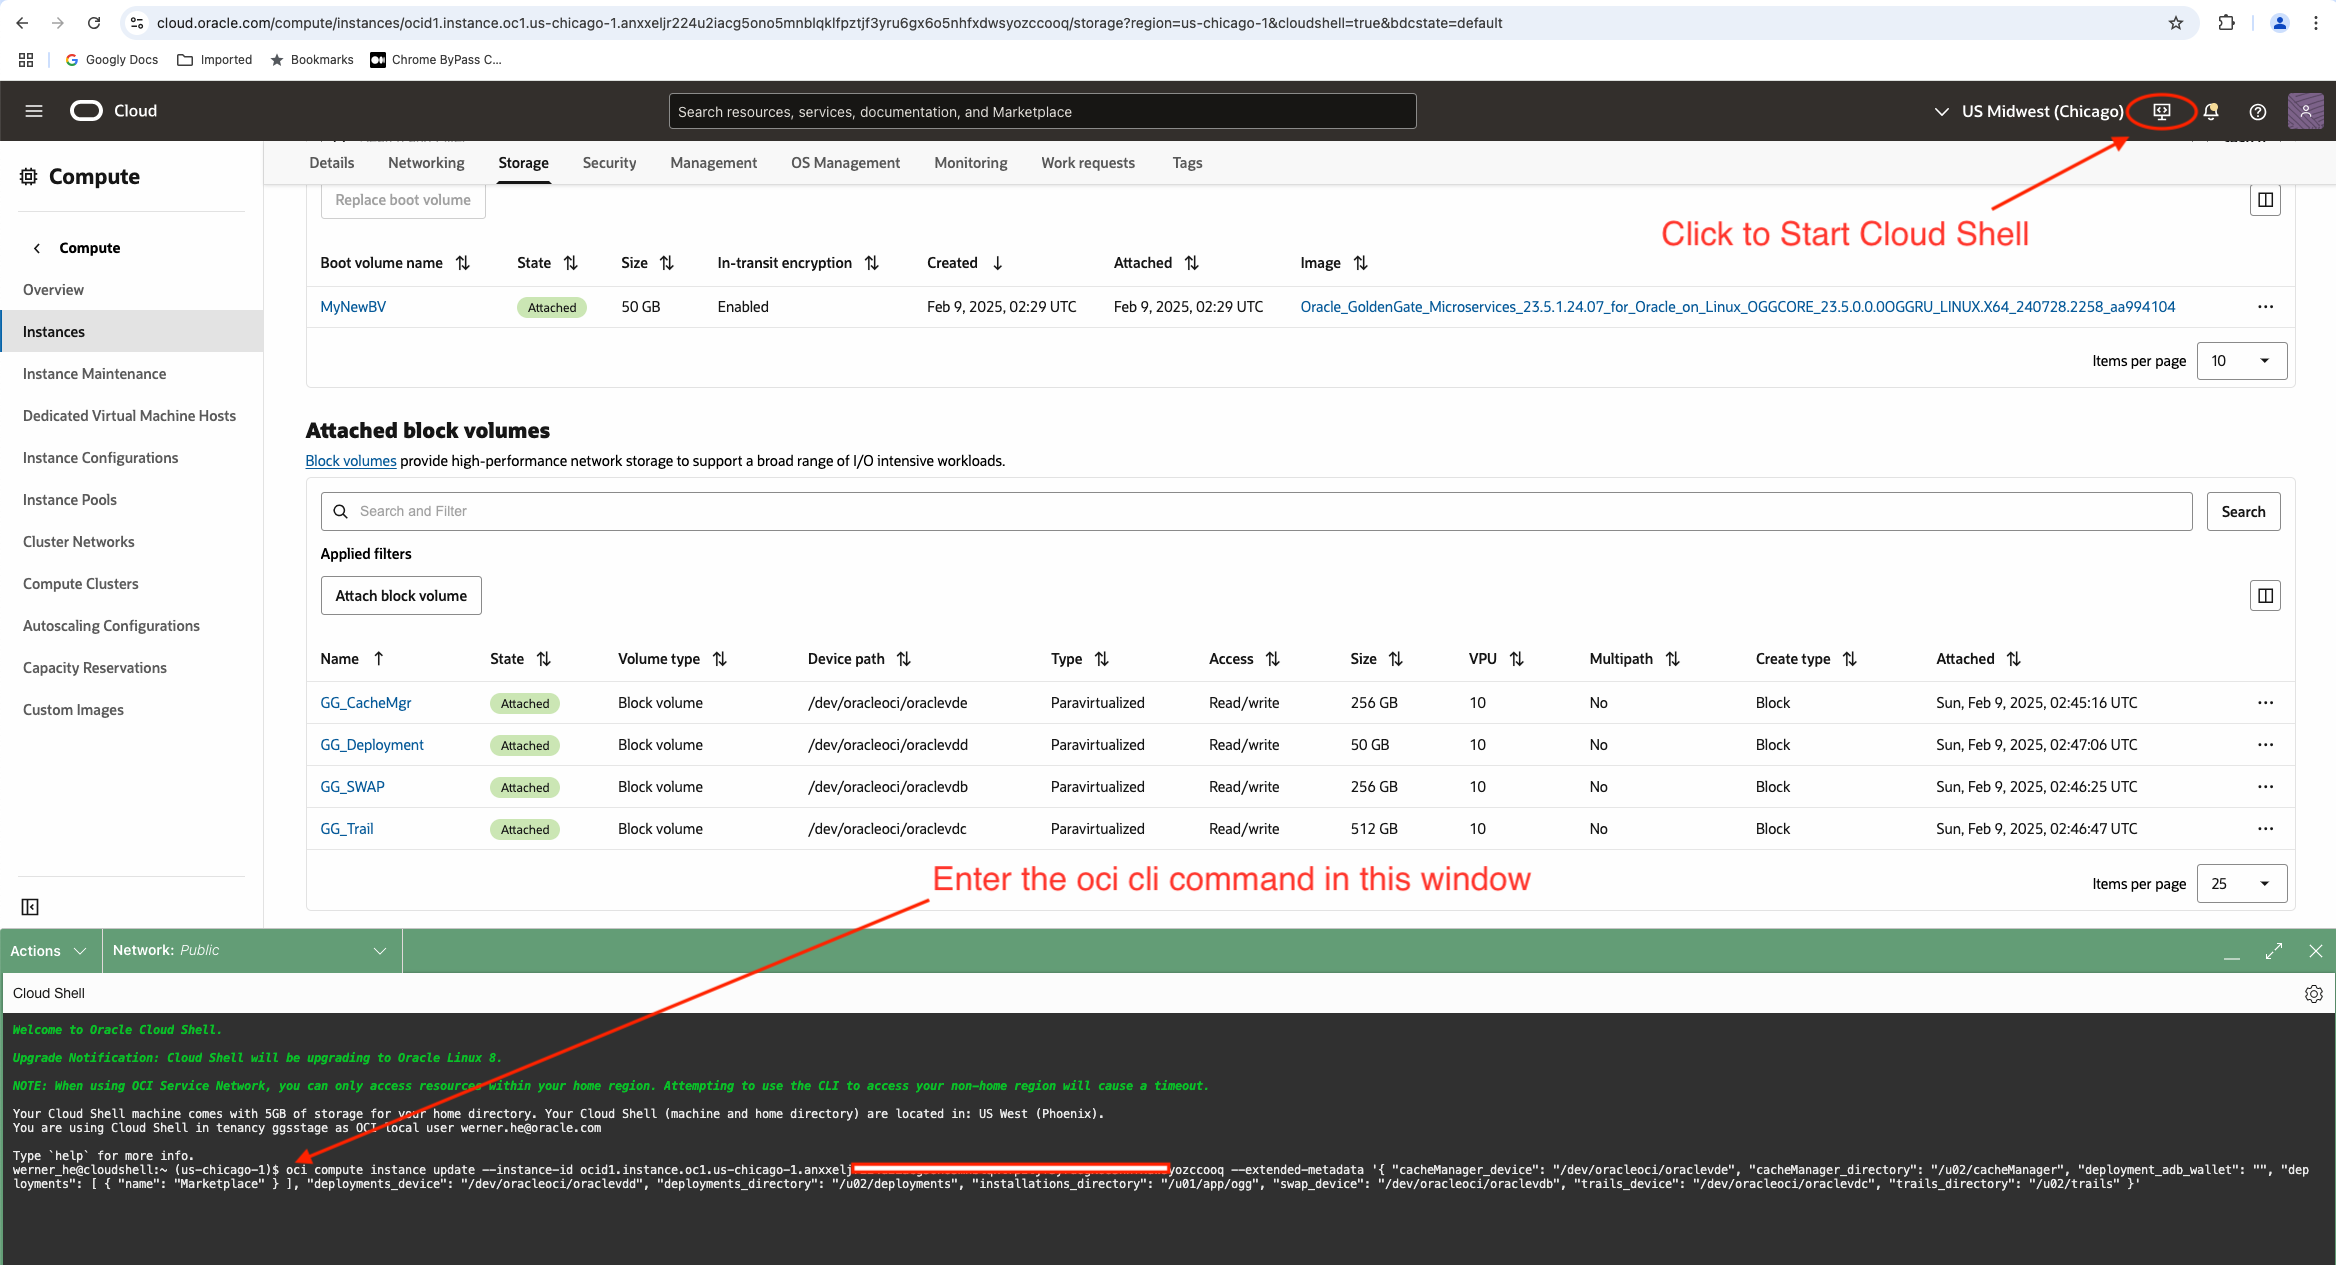
First, track down your new instance’s OCID. You can find that on the Instance page.
Then use the information collected from Step 2 to update the new instance with the oci cli running in the cloud shell.
For example, here is the OCI command that needs to be done, just replace the -instance-id value with your new instance’s OCID.
oci compute instance update --instance-id ocid1.instance.oc1.us-chicago-1.anxxxxxxxxxxxxzccooq --extended-metadata '{ "cacheManager_device": "/dev/oracleoci/oraclevde", "cacheManager_directory": "/u02/cacheManager", "deployment_adb_wallet": "", "deployments": [ { "name": "Marketplace" } ], "deployments_device": "/dev/oracleoci/oraclevdd", "deployments_directory": "/u02/deployments", "installations_directory": "/u01/app/ogg", "swap_device": "/dev/oracleoci/oraclevdb", "trails_device": "/dev/oracleoci/oraclevdc", "trails_directory": "/u02/trails" }'
We need all the fields except “ssh_authorized_keys” as it was updated when the instance was created and is not allowed to be updated once it is provisioned.
This step will require the user to have the privilege to use cloud shell.
Alternatively, this command could also be done on a server that has OCI LCI and can connect to the OCI Tenancy with proper authentication.
Once the metadata update is done successfully, the command will return the full metadata result. Otherwise, if you run into any error, please double-check the syntax and the ocid to make sure there is no typo.
After the metadata has been successfully updated, if you issue the query below on your new instance, you can see all the values shown up.
[opc@newmpclone ~]$ curl -s -H 'Authorization: Bearer Oracle' http://169.254.169.254/opc/v2/instance/metadata
{
  "cacheManager_device": "/dev/oracleoci/oraclevde",
  "cacheManager_directory": "/u02/cacheManager",
  "deployment_adb_wallet": "",
  "deployments": [
    {
      "name": "Marketplace"
    }
  ],
  "deployments_device": "/dev/oracleoci/oraclevdd",
  "deployments_directory": "/u02/deployments",
  "installations_directory": "/u01/app/ogg",
  "ssh_authorized_keys": "ssh-rsa AAAAB3NzaC1ycXXXXXXXXXXXXGaMT3rSxAw== opc@ggmpclone1",
  "swap_device": "/dev/oracleoci/oraclevdb",
  "trails_device": "/dev/oracleoci/oraclevdc",
  "trails_directory": "/u02/trails"
7. Restart OracleGoldenGate Service on the new instance
ssh into your new instance as opc user and issue the following command
[opc@newmpclone ~]$ sudo systemctl restart OracleGoldenGate
It will take a couple of seconds to restart all the GoldenGate processes. Once the prompt comes back, you can check the status of the service by running the following command
[opc@newmpclone ~]$ sudo systemctl status OracleGoldenGate
● OracleGoldenGate.service – Oracle GoldenGate
Loaded: loaded (/usr/lib/systemd/system/OracleGoldenGate.service; enabled; vendor preset: disabled)
Active: active (running) since Sun 2025-02-09 03:23:22 GMT; 37s ago
Process: 12664 ExecStart=/usr/local/bin/OracleGoldenGate.sh (code=exited, status=0/SUCCESS)
Process: 12654 ExecStartPre=/usr/bin/bash -c /usr/local/bin/init-ogg-device.sh cacheManager &>>/tmp/OracleGoldenGate-init.txt (code=exited, status=0/SUCCESS)
Process: 12645 ExecStartPre=/usr/bin/bash -c /usr/local/bin/init-ogg-device.sh deployments &>>/tmp/OracleGoldenGate-init.txt (code=exited, status=0/SUCCESS)
Process: 12636 ExecStartPre=/usr/bin/bash -c /usr/local/bin/init-ogg-device.sh trails &>>/tmp/OracleGoldenGate-init.txt (code=exited, status=0/SUCCESS)
Process: 12630 ExecStartPre=/usr/bin/bash -c /usr/local/bin/init-swap-device.sh &>>/tmp/OracleGoldenGate-init.txt (code=exited, status=0/SUCCESS)
Main PID: 12690 (ServiceManager)
Tasks: 109 (limit: 99881)
Memory: 425.2M
CGroup: /system.slice/OracleGoldenGate.service
├─12690 /u01/app/ogg/bin/ServiceManager
├─12738 /u01/app/ogg/bin/pmsrvr –config /u02/deployments/ServiceManager/var/run/Marketplace-pmsrvr-config.dat
├─12740 /u01/app/ogg/bin/distsrvr –config /u02/deployments/ServiceManager/var/run/Marketplace-distsrvr-config.dat
├─12742 /u01/app/ogg/bin/recvsrvr –config /u02/deployments/ServiceManager/var/run/Marketplace-recvsrvr-config.dat
└─12744 /u01/app/ogg/bin/adminsrvr –config /u02/deployments/ServiceManager/var/run/Marketplace-adminsrvr-config.dat
Feb 09 03:23:20 newmpclone OracleGoldenGate.sh[12738]: HTTP Port ……..: 9014
Feb 09 03:23:20 newmpclone OracleGoldenGate.sh[12738]: IPC Path ………: /u02/deployments/Marketplace/var/run/PMSERVER.s
Feb 09 03:23:21 newmpclone OracleGoldenGate.sh[12664]: + allow_https
Feb 09 03:23:21 newmpclone OracleGoldenGate.sh[12835]: + command -v firewall-cmd
Feb 09 03:23:21 newmpclone OracleGoldenGate.sh[12835]: /usr/bin/firewall-cmd
Feb 09 03:23:21 newmpclone OracleGoldenGate.sh[12664]: + sudo firewall-cmd –zone=public –permanent –add-port=443/tcp
Feb 09 03:23:21 newmpclone sudo[12836]: opc : PWD=/ ; USER=root ; COMMAND=/bin/firewall-cmd –zone=public –permanent –add-port=443/tcp
Feb 09 03:23:22 newmpclone OracleGoldenGate.sh[12664]: + sudo firewall-cmd –reload
Feb 09 03:23:22 newmpclone sudo[12840]: opc : PWD=/ ; USER=root ; COMMAND=/bin/firewall-cmd –reload
Feb 09 03:23:22 newmpclone systemd[1]: Started Oracle GoldenGate.
Now, your GoldenGate Deployment is running on the new instance. All your GoldenGate processes are there, as it is an exact clone of the previous deployment.
Since this is a new instance, it might have a different IP depending on your configuration. If you have any other GoldenGate instance or Database Instance that communicates with this new GoldenGate instance, you might need to adjust the firewall rules accordingly.
Summary
We are able to clone a GoldenGate Marketplace instance by using a boot volume backup from an existing GoldenGate Marketplace instance. By cloning all the block volumes on the old GoldenGate instance, the new GoldenGate instance has exactly the same GoldenGate Deployment configuration as the existing one. This will help when you have some unrecoverable error on the boot volume on your existing GoldenGate Marketplace instance. However, since it has multiple steps for cloning the block volumes and creating new instance, you need to be extremely cautious when performing this task. Also, you will need to make sure all the resources you created are in the same availability domains when creating the new instance.