Content contributed by Mr. Shrinidhi Kulkarni, Senior Solution Engineer, Solution Engineering NA Technology, Oracle
Use case: Real-time data Replication from an on-premises database to Snowflake on AWS using GoldenGate for Oracle & GoldenGate for Big Data.
Architecture & Components:
- GoldenGate 19.1 (Source Database can be any of the GoldenGate supported databases)
- GoldenGate for Oracle 19.1
- GoldenGate For Big Data 19.1
- AWS EC2 Instance
- AWS S3 Bucket
- Snowflake Cloud data warehouse
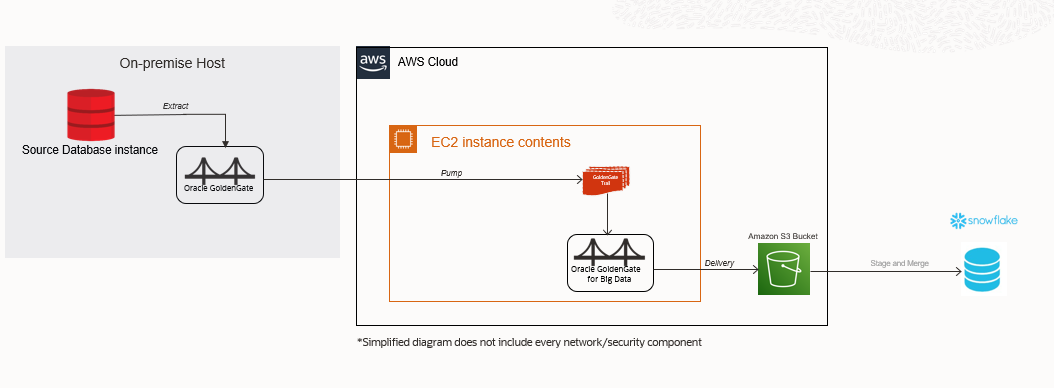
Replication Flow:
Source Database ——–>GoldenGate Extract ——–> GoldenGate Trail ——–> GoldenGate Pump ——–> GoldenGate for Big Data Replicat ——–> Amazon S3 Bucket ——-> Snowflake
GoldenGate for Big Data snowflake Replicat configuration consists of File Writer (with Avro Formatter) -> S3 Event handler -> Command Event handler.
Pre-Requisites:
- GoldenGate should be already configured to extract data from source database and pump extract trails to AWS EC2 instance.
- VPC and subnets already configured in AWS Cloud
- AWS EC2 instance already provisioned with enough storage to hold GoldenGate trail files.
- Snowflake data warehouse provisioned, which is running on top of Amazon Web services or Azure cloud infrastructure.
Connecting to Your Linux Instance from Windows Using PUTTY
- You may refer to the following link & the instructions in it that explain how to connect to your EC2 instance using PUTTY and on how to Transfer files to your instance using WinSCP.
https://docs.aws.amazon.com/AWSEC2/latest/UserGuide/putty.html
Required Downloads:
1. Download GoldenGate for Big Data 19.1.0.0.8
You may download the patch from My Oracle Support (MOS), https://support.oracle.com/epmos/faces/PatchHome by searching for patch number 32465377

Note: Once you install GoldenGate for Big Data 19.1.0.0.8, the installation contains a sub-directory ” ../AdapterExamples/big-data/data-warehouse-utils/snowflake/ ” which contains all the configuration and scripts needed for snowflake replication using stage and merge. For additional details, refer to product documentation:
2. Oracle GoldenGate for Big Data is certified for Java 1.8. Before installing and running Oracle GoldenGate 19.1, you must install Java (JDK or JRE) version 1.8 or later. Either the Java Runtime Environment (JRE) or the full Java Development Kit (which includes the JRE) may be used.
sudo yum install java-1.8.0
3. Latest AWS SDK on the EC2 machine.
https://mvnrepository.com/artifact/com.amazonaws/aws-java-sdk
4. Latest snowflake JDBC driver
https://repo1.maven.org/maven2/net/snowflake/snowflake-jdbc/
5. Create a snowflake account and make sure to select right Cloud provider
Replication Setup:
1. Download and transfer the GoldenGate for Big data 19.1 zip file to the AWS EC2 instance.
2. Unzip the downloaded GoldenGate for Big Data zip file:

3. Now extract the GoldenGate 19.1.tar file using “tar -xvf” command.

4. After the “tar –xvf” operation finishes, the entire GoldenGate directory structure looks like this:
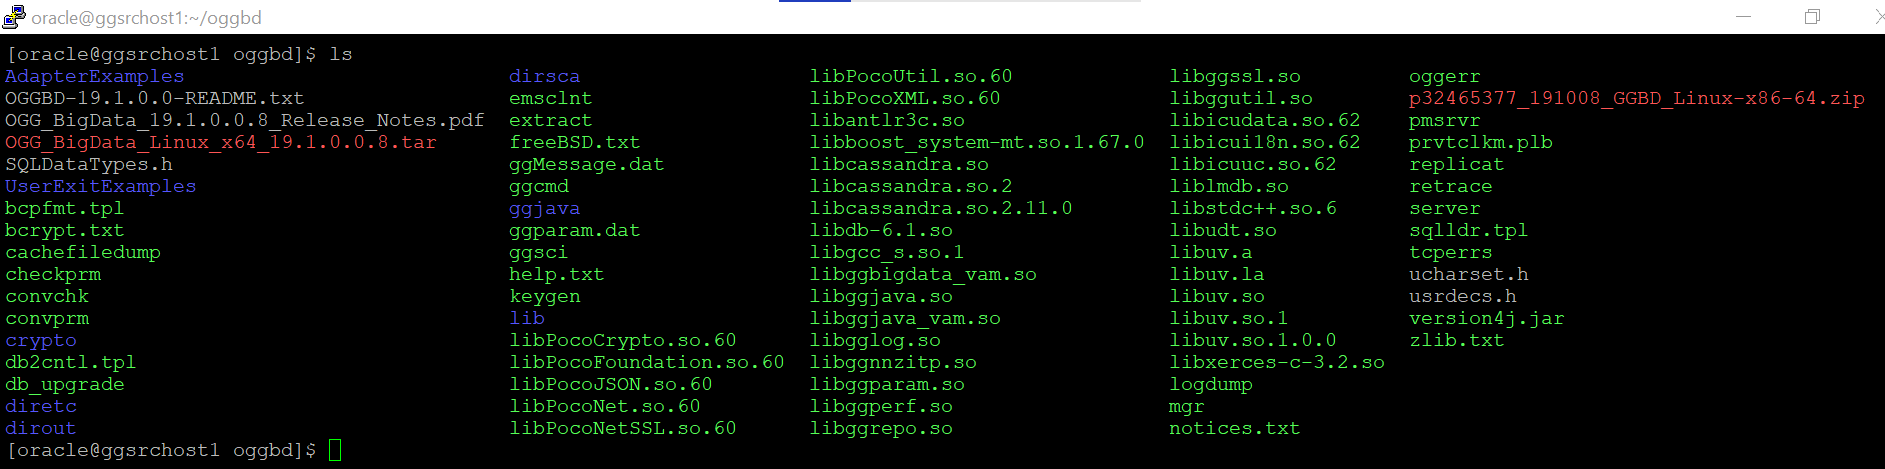
5. You can have a look at the directory structure( files extracted) and then you can traverse to the “AdapterExamples” directory:

6. The sample configuration files for snowflake are not available within AdapterExamples like the other Big Data targets until GoldenGate for Big Data 19.1.0.0.8.
Instead, you can download and copy the GoldenGate-snowflake Replicat artifacts from GoldenGate for Big Data 19.1.0.0.8 to your current environment.
NOTE: The directory AdapterExamples/big-data/data-warehouse-utils/snowflake/ in the Oracle GoldenGate Big Data 19.1.0.0.8 install contains all the configuration files and scripts needed for snowflake replication using stage and merge.
7. Export the JAVA_HOME & LD_LIBRARY_PATH as shown below:
export JAVA_HOME=<path-to-Java-1.8>/jre1.8.0_181
export LD_LIBRARY_PATH=<path-to-Java 1.8>/lib/amd64/server:$JAVA_HOME/lib
8. Once you’re done, log into GoldenGate for Big Data Instance using ./ggsci command and execute create subdirs command to create all GoldenGate specific sub-directories:

9. Configure the Manager parameter file and start the Manager process:
edit param mgr
PORT 7980
10. Once the Manager process is started, the GoldenGate pump process(on-premises) can be started to pump trail files to the EC2 instance.
11. Copy these three files (sf.props, sf.prm and sf.sh) from AdapterExamples/big-data/data-warehouse-utils/snowflake/ directory to ./dirprm directory within the GoldenGate for Big Data home.
12. In sf.prm file, edit the MAP statement to include the required schema name and table Name.
REPLICAT sf
TARGETDB LIBFILE libggjava.so SET property=dirprm/sf.props
REPORTCOUNT EVERY 1 MINUTES, RATE
GROUPTRANSOPS 1000
MAP “QASOURCE”.”TCUSTMER”, TARGET “PUBLIC”.”TCUSTMER”;
Note: Here TCUSTMER table is used as an example here.
13. In sf.props file, you need to edit the parameters that are tagged as #TODO
Following are the fields that need to be modified-
a. S3 bucket region name and bucket name
b. Path in the command event handler, i.e. path to the Stage and Merge script
c. Snowflake connection URL- <account_name>.<region_name>.snowflakecomputing.com/?db=<database_name>
Note:
*Region name within snowflake connection URL is the region that you selected while provisioning
snowflake account.
*Region name is not required in the URL if the region is us-west
*Database_name is the name of the target database in Snowflake.
d. username and password to connect to snowflake instance
e. modify the classpath to include AWS Java SDK and Snowflake JDBC driver.
f. AWS access key and secret key required for authorized access and replication to intermediate s3 bucket
# Copyright (c) 2020, Oracle and/or its affiliates. All rights reserved.
# Configuration to load GoldenGate trail operation records
# into Snowflake Data Warehouse by chaining
# File writer handler -> S3 Event handler -> Command Event handler -> Using the script sf-aws.sh.
# Note: Recommended to only edit the configuration marked as TODO
gg.handlerlist=sf
# The File Writer Handler
gg.handler.sf.type=filewriter
gg.handler.sf.mode=op
gg.handler.sf.includetokens=false
gg.handler.sf.partitionByTable=true
gg.handler.sf.pathMappingTemplate=./dirout
gg.handler.sf.stateFileDirectory=./dirsta
gg.handler.sf.fileNameMappingTemplate=${groupName}_${fullyQualifiedTableName}_${currentTimestamp}.avro
gg.handler.sf.fileRollInterval=1m
gg.handler.sf.maxFileSize=3g
gg.handler.sf.inactivityRollInterval=15m
gg.handler.sf.rollOnShutdown=true
gg.handler.sf.fileWriteActiveSuffix=.tmp
gg.handler.sf.finalizeAction=delete
gg.handler.sf.deferAvroFlush=true
gg.handler.sf.rollOnPkUpdate=true
gg.handler.sf.rollOnTruncate=true
# Operation Aggregator configuration.
gg.aggregate.operations=true
gg.aggregate.operations.lrucache.limit=10000000
gg.aggregate.operations.flush.interval=30000
gg.aggregate.operations.pkupdate.to.delete.insert.pair=true
# Timestamp formats.
gg.format.timestamp=yyyy-MM-dd HH:mm:ss.SSSSSSSSS
gg.format.timestampWithTimeZone=yyyy-MM-dd HH:mm:ss.SSSSSSSSSXXX
gg.passthrough.datetime=true
## Choose Avro OCF formatter
gg.handler.sf.format=avro_row_ocf
gg.handler.sf.format.iso8601Format=false
gg.handler.sf.format.pkUpdateHandling=delete-insert-increment-pos
gg.handler.sf.format.mapLargeNumbersAsStrings=true
gg.handler.sf.format.metaColumnsTemplate=${optype},${position}
gg.handler.sf.format.includeFieldMask=true
#Selecting the S3 Event Handler
gg.handler.sf.eventhandler=s3
#The S3 Event Handler
gg.eventhandler.s3.type=s3
#TODO: Edit the AWS region
gg.eventhandler.s3.region=us-west-1
#TODO: Edit the AWS S3 bucket
gg.eventhandler.s3.bucketMappingTemplate=testgg
gg.eventhandler.s3.pathMappingTemplate=${fullyQualifiedTableName}
gg.eventhandler.s3.finalizeAction=none
#Selecting the Command Event Handler
gg.eventhandler.s3.eventHandler=command
gg.eventhandler.s3.enableBucketAdmin=false
#The Command Event Handler
gg.eventhandler.command.type=command
#TODO: Edit the Path to the Stage and Merge script
gg.eventhandler.command.command=/u01/app/ggbd/OGG_BigData_Linux_x64_19.1.0.0.0/dirprm/sf.sh
gg.eventhandler.command.commandArgumentTemplate=${tableName},${dataFileDir},${dataFileName},${countTruncates},${uuid}
# Configure the JDBC Metadata provider.
gg.mdp.type=jdbc
gg.mdp.DriverClassName=net.snowflake.client.jdbc.SnowflakeDriver
#TODO: Edit ConnectionUrl, replace <snowflake-account> and database name <db-name>
gg.mdp.ConnectionUrl=jdbc:snowflake://wka99658.snowflakecomputing.com/?db=<db_name>
#TODO: Edit user name
gg.mdp.UserName=<username>
#TODO: Edit password
gg.mdp.Password=<password>
#TODO:Set the classpath to include AWS Java SDK and Snowflake JDBC driver.
gg.classpath=/u01/app/aws/aws-java-sdk-1.11.718/lib/*:/u01/app/aws/aws-java-sdk-1.11.718/third-party/lib/*:/home/opc/parquet/jar/*:/u01/app/ggbd/OGG_BigData_Linux_x64_19.1.0.0.0/snowflake-jdbc-3.12.4.jar
#TODO:Set the AWS access key and secret key. Provide sufficient memory (at least 8GB).
jvm.bootoptions=-Xmx8g -Xms8g -Djava.class.path=.:ggjava/ggjava.jar:./dirprm -Daws.accessKeyId=<access_key> -Daws.secretKey=<secret_key>
gg.log=log4j
gg.log=debug
14. sf.sh is the shell script that is responsible for creating a stage table on snowflake, copying the data from s3 files to snowflake stage table, and executing a merge operation on the target snowflake table.
Its recommended to only edit the configuration marked as TODO
a. #TODO: In case of multiple replicats, edit the following parameter to ensure each Replicat uses a unique prefix.
stagingTablePrefix=RBD_STAGE_
b. #TODO: Insert the AWS S3 bucket name.
bucket=<bucket_name>
c. #TODO: Edit AWS credentials awsKeyId and awsSecretKey
awsKeyId=<AWS_Access_key>
awsSecretKey=<AWS_Secret_key>
d. #TODO: Edit the Snowflake account name, username and password in the function “executeQuery”
## Execute query
function executeQuery () {
#TODO: Edit the Snowflake account name, database, username and password.
sfAccount=<account_name>
sfRegion=<region_name>
sfDatabase=<database_name>
sfUser=<snowflake_username>
sfPassword=<password>
SNOWSQL_PWD=${sfPassword} snowsql -a ${sfAccount}.${sfRegion} -u ${sfUser} -d ${sfDatabase} –query “${1}”
}
Note: **If your region is us-west, then remove the ${sfRegion} from the snowsql command above
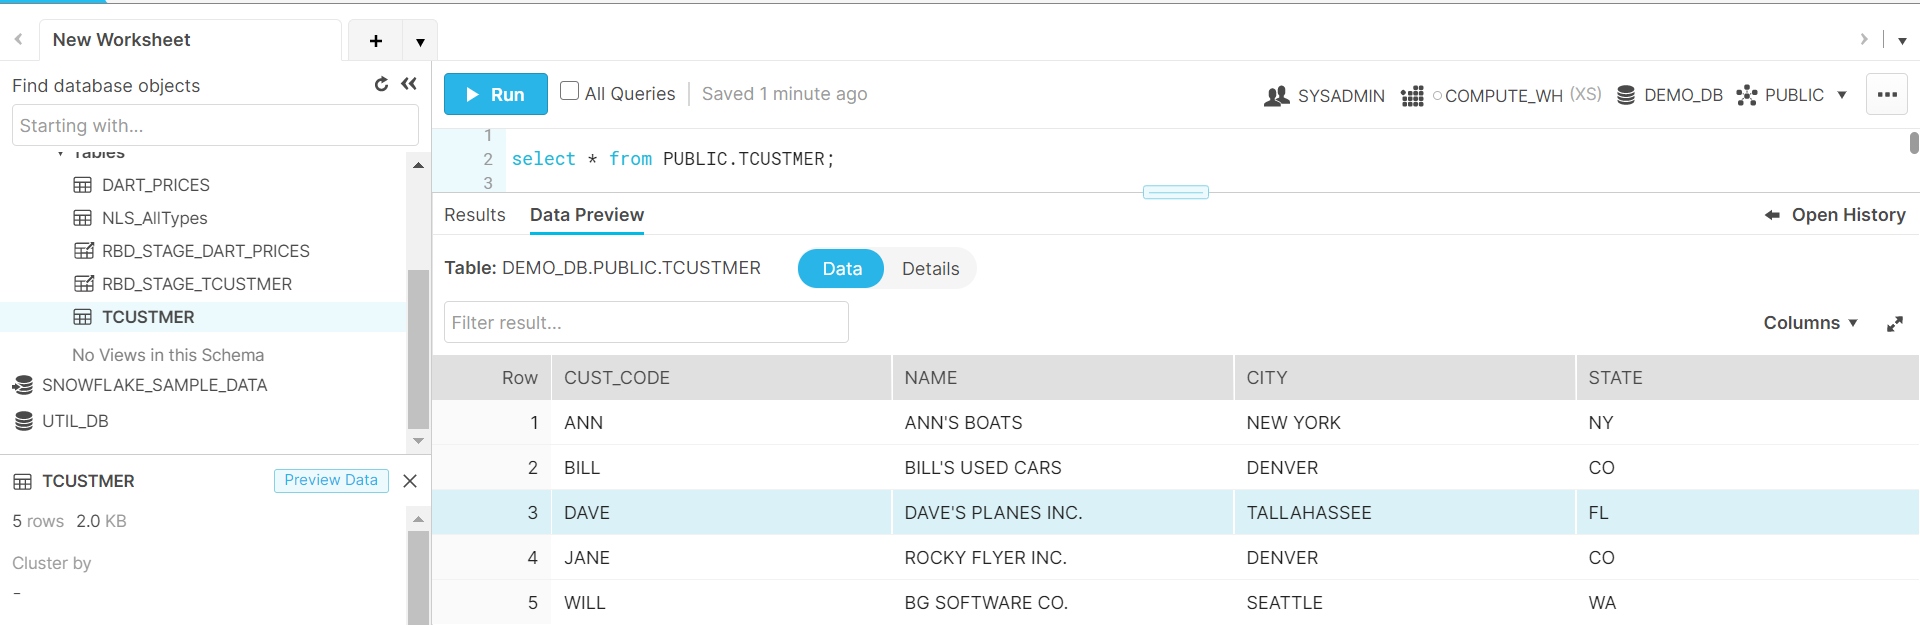
e. #TODO Login into your snowflake account and create the target table on Snowflake manually
CREATE TABLE PUBLIC.TCUSTMER(
cust_code VARCHAR2(4),
name VARCHAR2(30),
city VARCHAR2(20),
state CHAR(2));
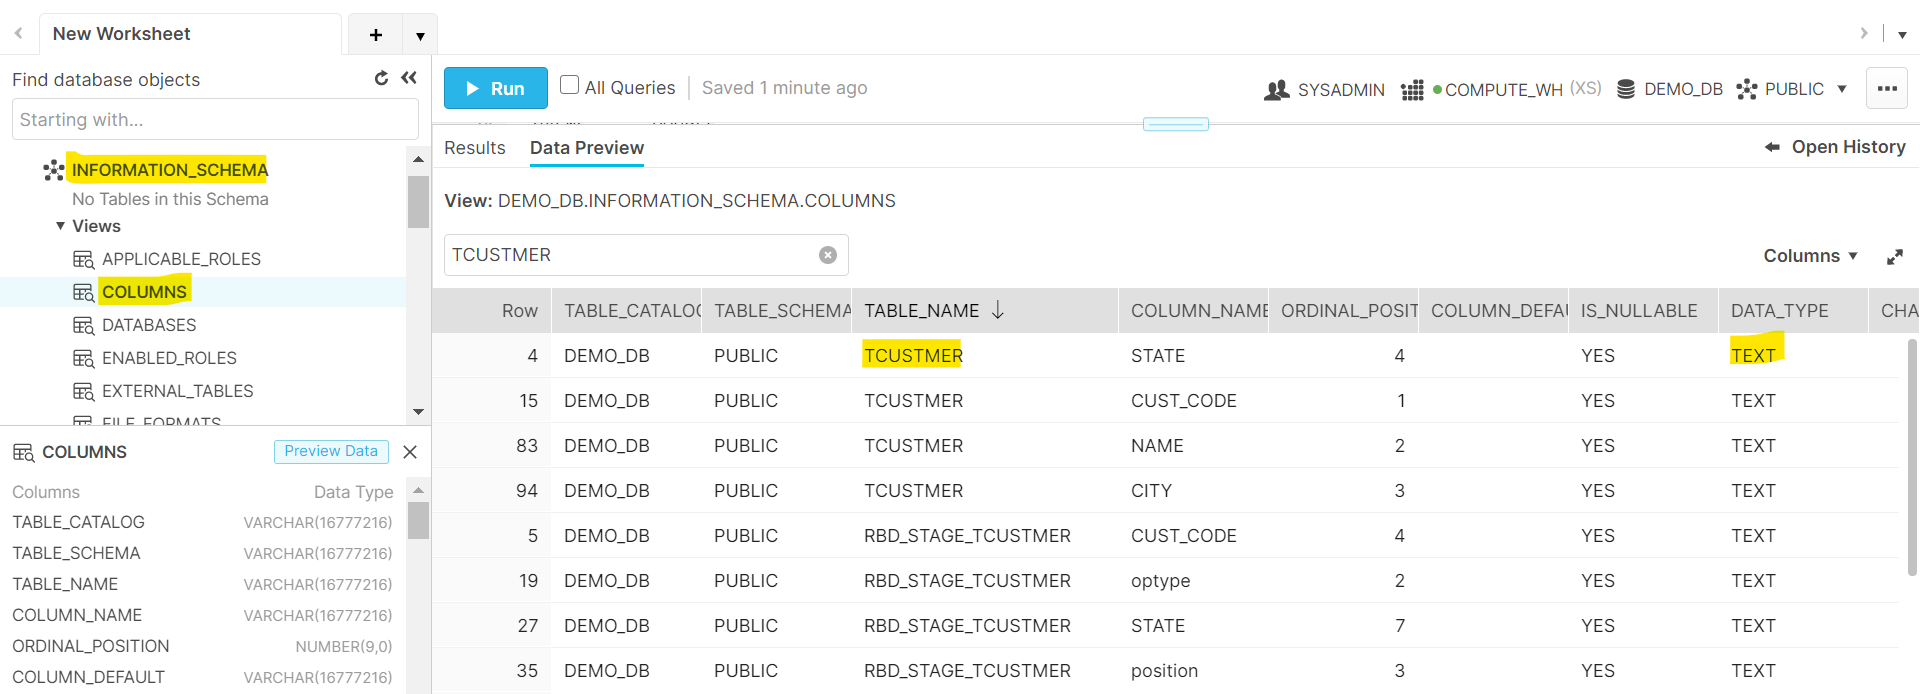
f. #TODO Edit the create Staging Table SQL in the below section of the script
- Edit the column data types of the staging table to match the target table created in previous step. Collect the metadata for all the columns by querying the Snowflake information schema.
- Edit all the column names of the staging table to match the column names in target table.
- The create external table SQL example here is configured for the example table TCUSTMER defined in sf-ddl.sql file.
# TODO: Add similar SQL queries for each table.
elif [ $shortName == “TCUSTMER” ]
then
#Insert SQLs for this table.
echo “Over here”
executeQuery \
“CREATE OR REPLACE EXTERNAL TABLE \”${schema}\”.\”${stagingTable}\” (
\”optype\” VARCHAR(30) AS (VALUE:\”optype\”::VARCHAR(30)),
\”position\” VARCHAR(30) AS (VALUE:\”position\”::VARCHAR(30)),
\”CUST_CODE\” TEXT AS (VALUE:\”CUST_CODE\”::TEXT),
\”NAME\” TEXT AS (VALUE:\”NAME\”::TEXT),
\”CITY\” TEXT AS (VALUE:\”CITY\”::TEXT),
\”STATE\” TEXT AS (VALUE:\”STATE\”::TEXT),
\”field_mask\” VARCHAR(16) AS (VALUE:\”field_mask
) WITH LOCATION = @\”${schema}\”.\”${stagingTable}\”/ FILE_FORMAT = (TYPE = ‘AVRO’ COMPRESSION = ‘AUTO’) PATTERN = ‘.*.*’ AUTO_REFRESH = false; “
g. #TODO: Edit the merge SQL of the script to add each target table within “merge” function
Collect the metadata for all the columns by querying the Snowflake information schema.
#TODO: Edit all the column names of the staging and target tables.
# The merge SQL example here is configured for the example table TCUSTMER defined in sf-ddl.sql file.
# TODO: Add similar SQL queries for each table.
elif [ $shortName == “TCUSTMER” ]
then
#Insert SQLs for this table.
echo “Over here”
echo “Insert started”
echo “Table added”
executeQuery \
“MERGE INTO \”${schema}\”.\”${shortName}\” TARGET
USING \”${schema}\”.\”${stagingTable}\” STAGE
ON ((NVL(CAST(TARGET.\”CUST_CODE\” AS VARCHAR(4000)),’${uuid}’)=NVL(CAST(STAGE.\”CUST_CODE\” AS VARCHAR(4000)),’${uuid}’)))
WHEN MATCHED AND STAGE.\”optype\” != ‘D’ THEN UPDATE SET TARGET.\”NAME\” = CASE WHEN (substr(STAGE.\”field_mask\”, 2, 1) = ‘M’) THEN TARGET.\”NAME\” ELSE STAGE.\”NAME\” END,TARGET.\”CITY\” = CASE WHEN (substr(STAGE.\”field_mask\”, 3, 1) = ‘M’) THEN TARGET.\”CITY\” ELSE STAGE.\”CITY\” END,TARGET.\”STATE\” = CASE WHEN (substr(STAGE.\”field_mask\”, 4, 1) = ‘M’) THEN TARGET.\”STATE\” ELSE STAGE.\”STATE\” END
WHEN MATCHED AND STAGE.\”optype\” = ‘D’ THEN DELETE
WHEN NOT MATCHED AND STAGE.\”optype\” != ‘D’ THEN INSERT
(\”CUST_CODE\”,\”NAME\”,\”CITY\”,\”STATE\”)
VALUES (STAGE.\”CUST_CODE\”,STAGE.\”NAME\”,STAGE.\”CITY\”,STAGE.\”STATE\”) ;
“
15. Traverse back to GoldenGate Directory, execute ./ggsci and add the replicat in the GoldenGate for Big Data instance using the following command:
add replicat sf, exttrail <source_Trail_files_location>
For TCUSTMER Table, you can configure the Replicat to read from the sample trail file
add replicat sf, exttrail AdapterExamples/trail/tr
16. Before you start the Replicat , you can download and install snowsql CLI on the same host. Check the connectivity to the snowflake using the following command-
snowsql -a <accountName>.<region_name> -u <userName> -d <database_name>
Once the connectivity is established, you can go ahead and start the Replicat sf.
17. The command handler aggregates the records before loading the data into snowflake table. The snowflake Replicat deletes the files on s3 after the data is loaded from s3 into snowflake table.
18. Check the SF.log within ./dirrpt directory to find whether data has been successfully loaded into snowflake .
INFO 2021-03-22 18:09:13.000246 [main] – File Writer Handler – finalizing flush.
INFO 2021-03-22 18:09:13.000247 [main] – No Event Handler wait is required for [PUBLIC.TCUSTMER].
WARN 2021-03-22 18:09:13.000255 [main] – Factory (UserExitDataSourceFactory, instance #1) had not finished initialization before shutdown.
INFO 2021-03-22 18:09:13.000256 [main] – Merge statistics ********START*********************************
INFO 2021-03-22 18:09:13.000256 [main] – Number of update operations merged into an existing insert operation: [1]
INFO 2021-03-22 18:09:13.000256 [main] – Time spent aggregating operations : [7]
INFO 2021-03-22 18:09:13.000256 [main] – Time spent flushing aggregated operations : [84]
INFO 2021-03-22 18:09:13.000256 [main] – Merge statistics ********END***********************************
19. Execute the stats command to check the stats on the Replicat.
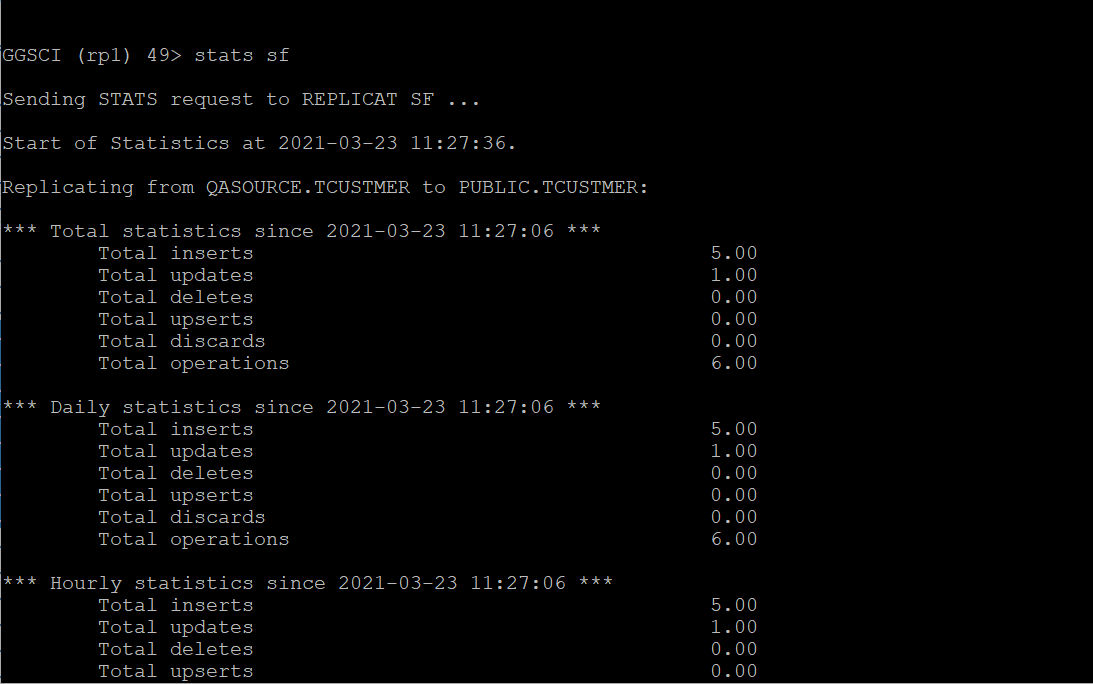
20. As you can see from the stats command output and within the SF.log,
Number of update operations merged into an existing insert operation: [1]
21. Now Check the rows in the target table on snowflake. So , GoldenGate for Big Data replicat has performed the merge operation for that one update operation i.e. merged the record from the staging table into the target table.