Welcome back! We hope that you’re enjoying these introductory blogs about Oracle Cloud Infrastructure (OCI) Data Integration. To get the list of previous blogs related to Data Integration, refer to the Data Integration blog site. Today, we’re learning about the REST Task in OCI Data Integration. In this blog post, we walk you through an example of how you can sftp data to/from object storage from compute nodes in OCI using example code created in a proof of concept.
Note, an alternative to this is to stand up an sftp server in OCI and use the OCIFS to project the SFTP server as a bucket in OCI Object Storage – check this blog here https://blogs.oracle.com/linux/post/introducing-ocifs – this is an internet-scale, high-performance storage platform that offers reliable and cost-efficient data durability.
A common ask from customers when integrating data in the cloud is how to transfer files into object storage using mechanisms such as sftp and incorporate either on a schedule or in an orchestration flow. This post will cover how this can be achieved using the REST Task from within OCI Data Integration. The REST Task allows you to integrate an endless number of operations. Within OCI, Functions allow you to create business functions using a fully managed, multi-tenant, highly scalable, on-demand, Functions-as-a-Service platform – in this post we will see a function that performs sftp and is invoked via a REST endpoint. There are other options also for providing more cloud native sftp solutions such as this one here that put the information directly into Object Storage rather than on a traditional ftp file system.
- Overview
- Create REST Task
- Define Payload for REST Task
- SFTP example Function
- Execute REST Task
- Schedule REST Task
- Orchestrate REST Task to Load ADW
- Conclusion
Overview
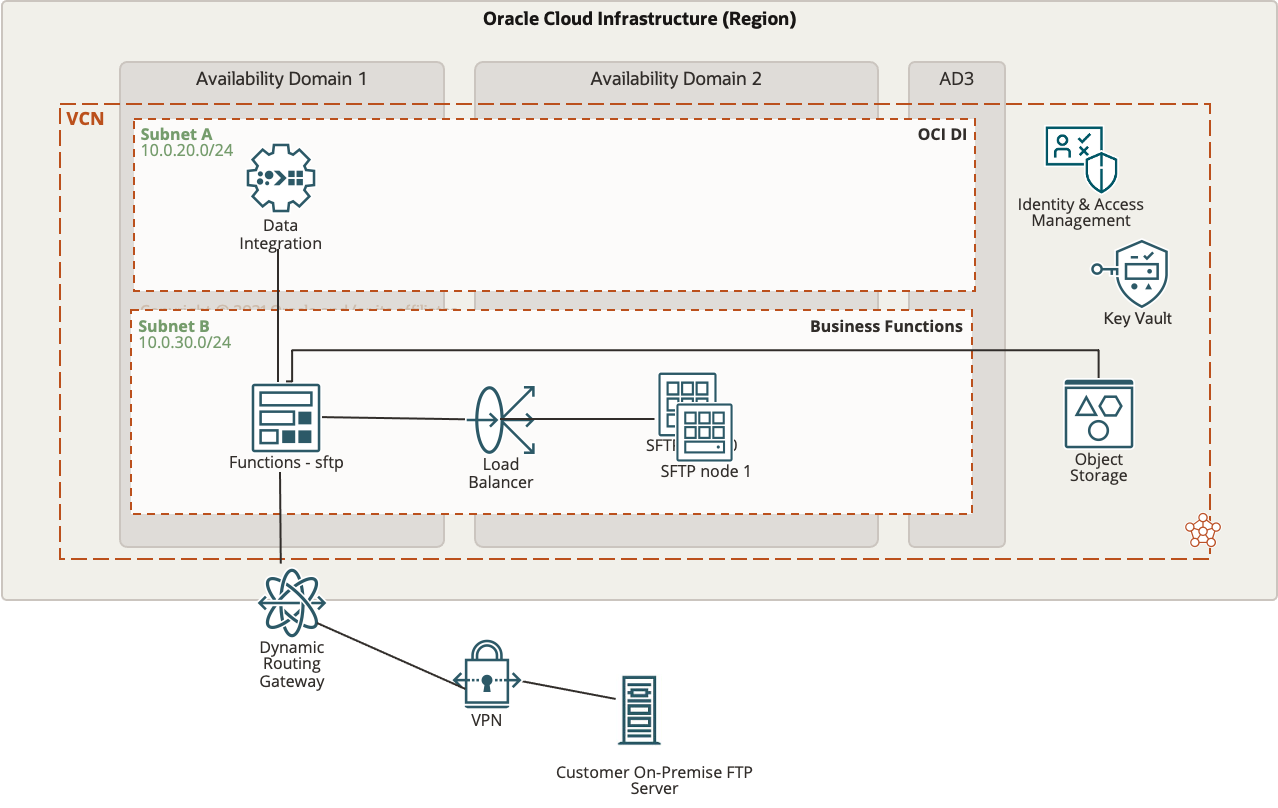
The below diagram shows the deployment of Data Integration workspace with private connectivity to one customer subnet and it leveraging an OCI Function for the SFTP client which can then copy files from/to available storage to OCI Object Storage. The function uses a secret in the Key Vault in order to securely connect between the function and the SFTP node – the SFTP server could be on any connectable node, could be in OCI, in customer’s on-premise for example.

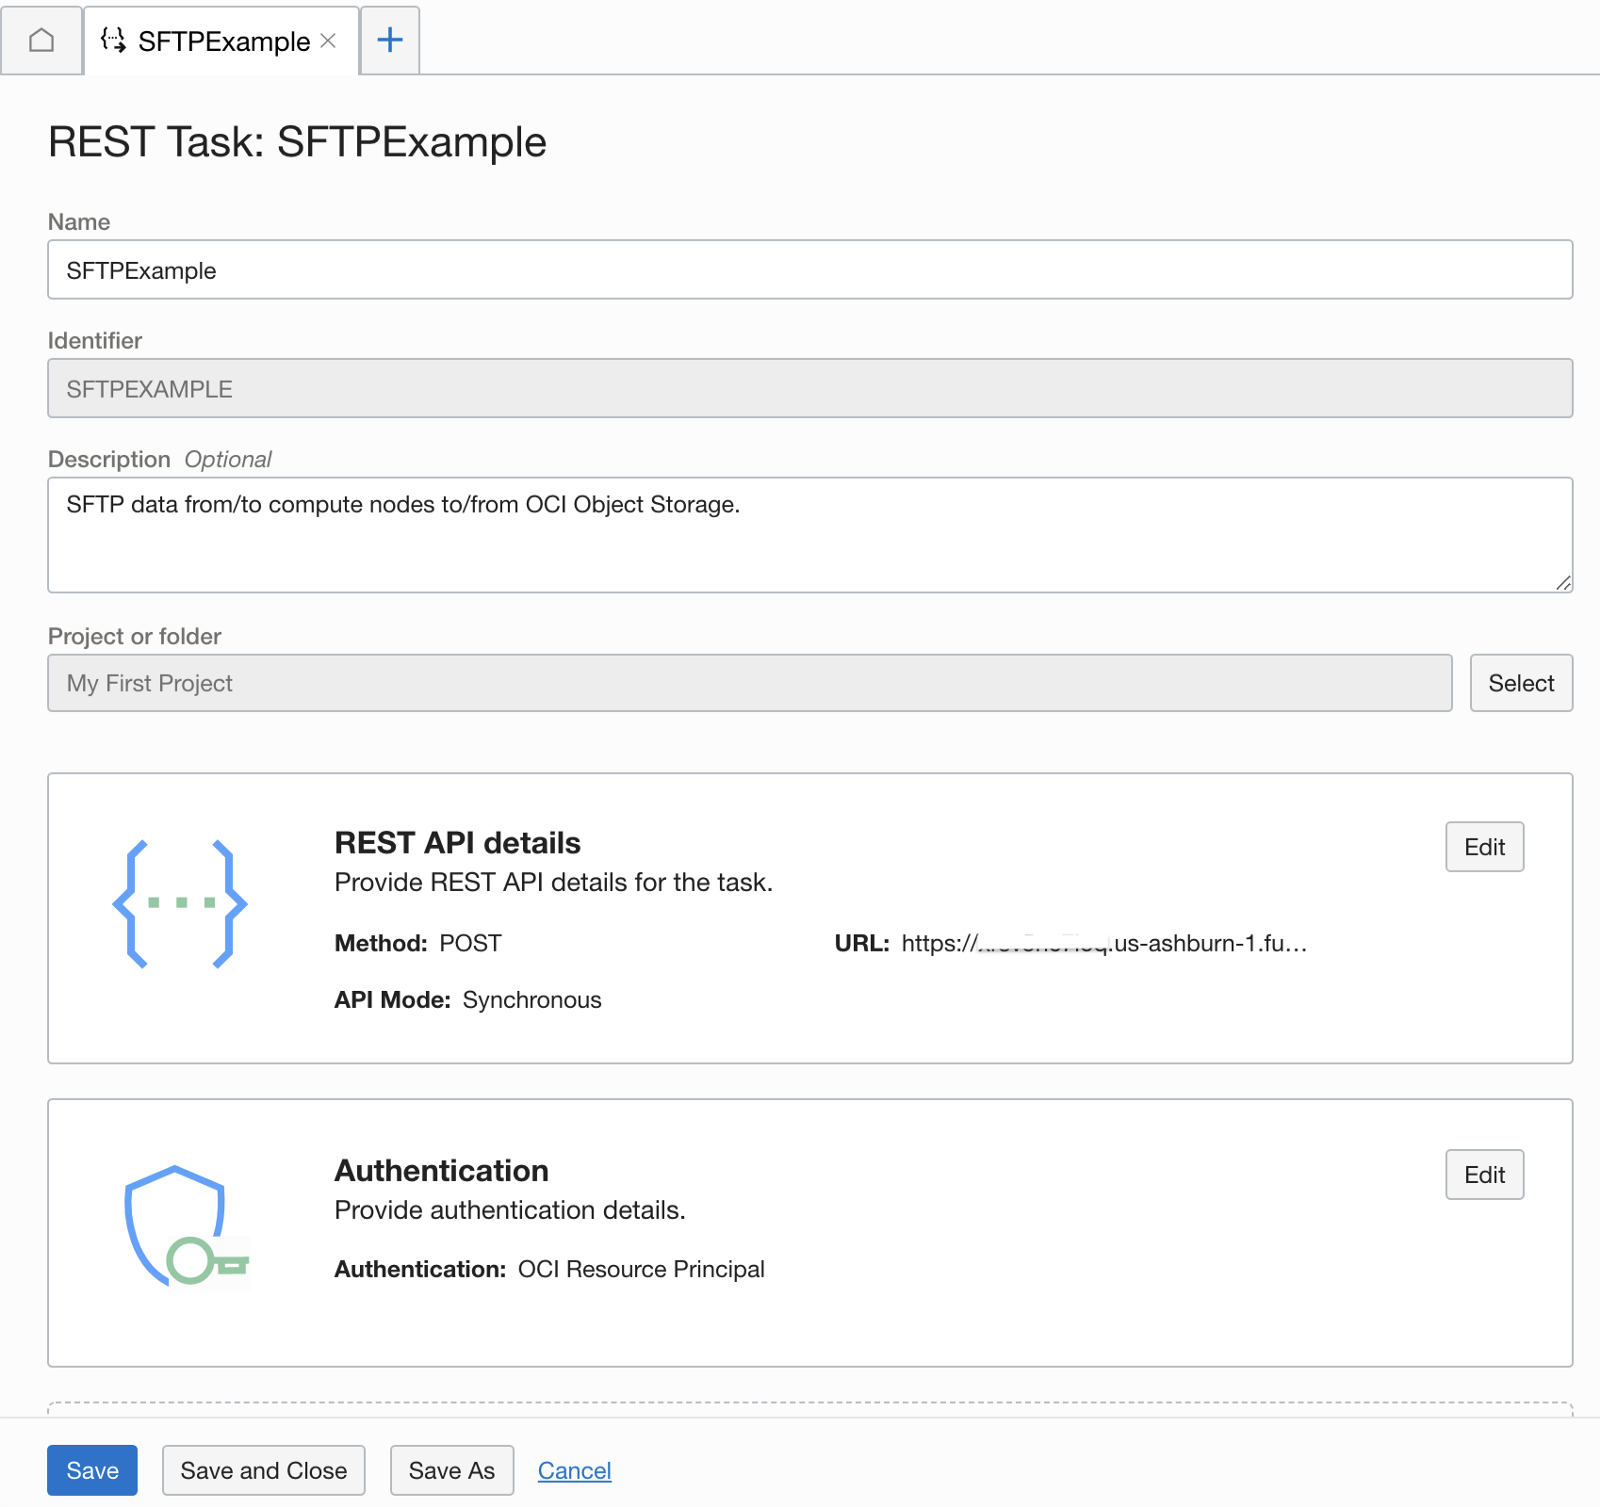
Create REST Task
The REST Task in OCI Data Integration allows users to integrate endless REST based functions; headers, request payload and authentication mechanisms can be defined. The example we will look at here is doing SFTP via an OCI Function.
With OCI Functions we will be restricted to the 5 minute timeout — so that is something to remember for any work, OCI Data Integration REST tasks have a 60 second timeout for sychnronous API calls, which means for any potentially longer running function calls you should use the asynchronous mode – functions can be invoke in detached mode by setting fn-invoke-type=detached in the REST task header.
Define Payload for REST Task
The payload for the REST task is defined in the Request tab below — you can see below I have defined the payload with template values (the actual values can be defined when the task is configured in pipeline or in a task schedule);
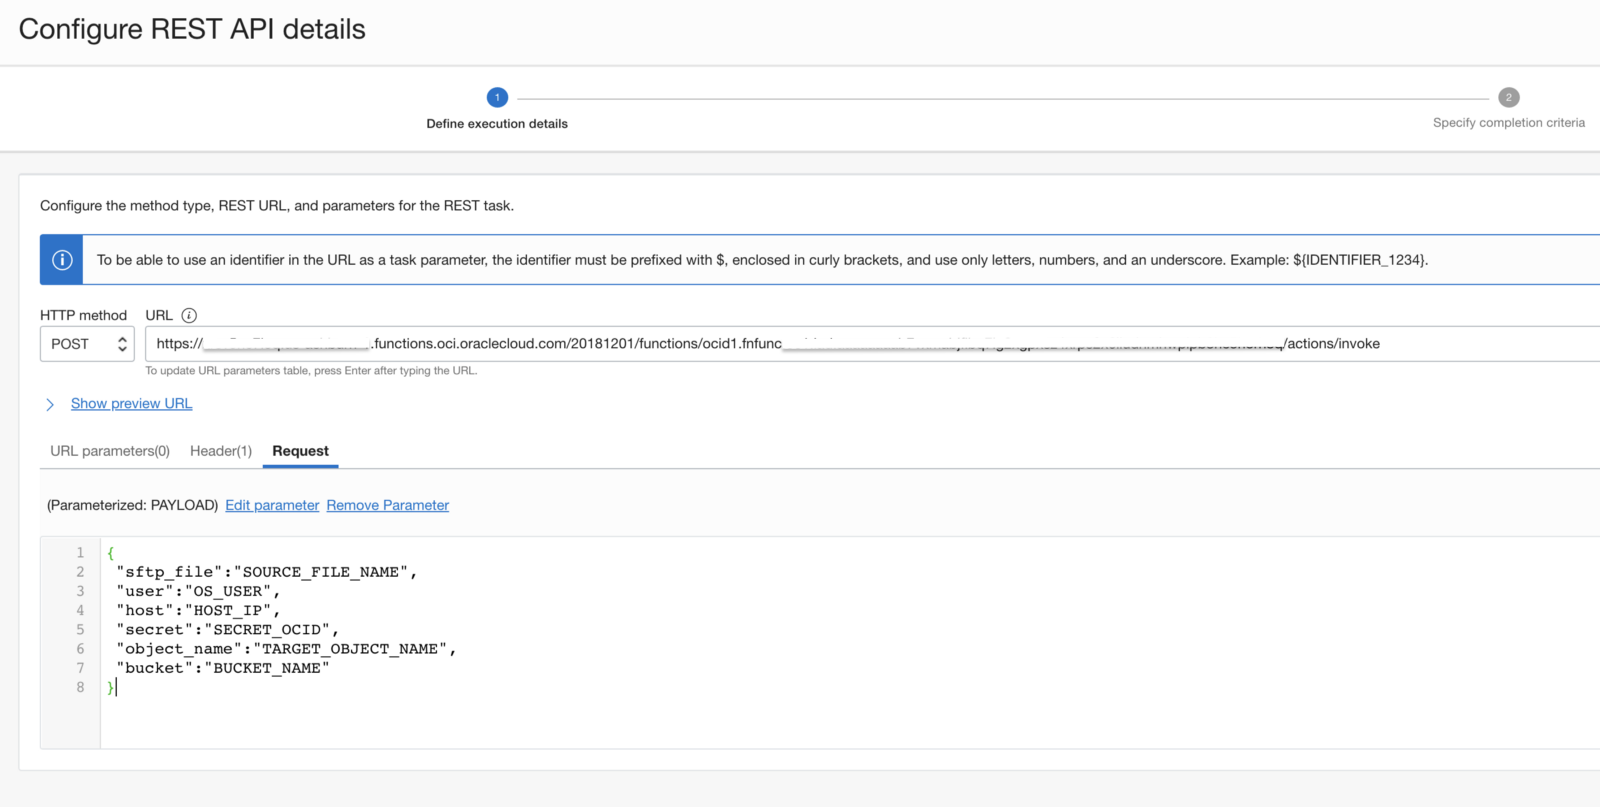
The code also supports getting data from object storage by specifying the operation as GET (above illustrates putting data in object storage);
|
|
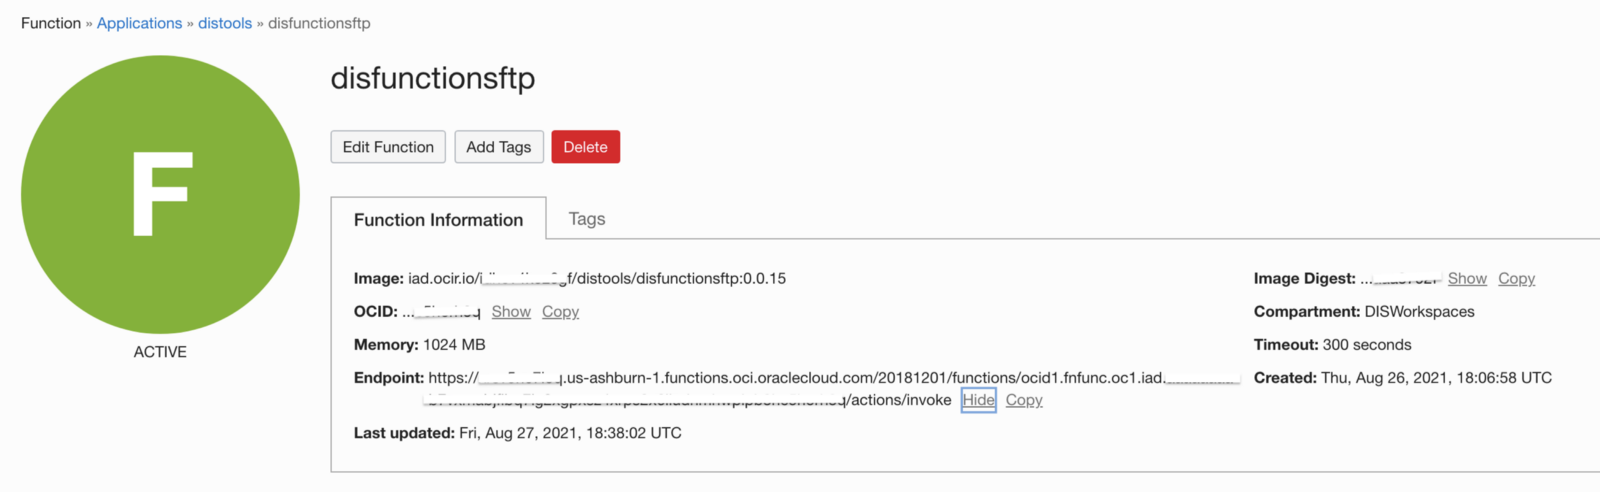
The URL endpoint for the function can be retrieved from the OCI Console, below image for my function disfunctionsftp has the endpoint.
If you are going to asynchronously execute the function using the detached mode (set fn-invoke-type=detached in REST task header), you can use the async mode in the REST task and define
a polling URL and expression. For example I can check that a specific file is available if I use this in the polling URL using GET (you can parameterize the pieces or hard-wire, whatever suits);
- https://objectstorage.${REGION}.oraclecloud.com/n/S{NAMESPACEy/b/${BUCKETy/o?prefix=${OBJECT_NAME}
The polling condition can then check that this API which lists the objects with this name does not have any items (so make sure its not going to);
- CAST(son_path(SYS.RESPONSE_PAYLOAD, ‘S.objects.length(‘) AS Integer) != 1
The success condition can then be when the length of the objects in the list object equals 1 as below;
- SYS.RESPONSE STATUS >= 200 AND SYS.RESPONSE_STATUS < 300 AND CAST(son _path(SYS.RESPONSE_PAYLOAD, ‘S.objects.length(‘) AS Integer) == 1
With this approach you can run the OCI Function which may take up to 5 minutes and poll on the result of that function.
SFTP example Function
The code for this OCI Function can be found at the github gist shown below — it is written in python and uses the OCI Object Storage and Secrets SDK and also the python library paramiko for providing the sftp. This is sample code for illustration purposes, if you have any questions comment here on the blog. Its useful to understand how to debug OCI Functions also, enabling logging is key for any errors that happen, this example has been further enhanced to return the backend errors and more logging (common errors are the function resource type not having access to either object storage family or secret family – then when used from OCI Data Integration its the workspace resource that needs the permission).
The OCI Function will SFTP a file on an accessible node to/from OCI Object Storage. The private key is specified in OCI Vault in a secret, the secret ocid is passed into the function along with the OS user for SFTP, the IP/hostname and the target bucket and object name. You must create a secret with the private key for SFTP’ing to the host. Also ensure the functions resource principal can access the secret.
When the function is created you can test by using the command line, here are examples for PUT and GET;
1. Sftp a file in to a bucket in OCI Object Storage – by default does a PUT
echo ‘{“sftp_file”:”SOURCE_FILE_NAME”, “object_name”:”TARGET_OBJECT_NAME”,”bucket”:”TARGET_BUCKET_NAME”, “user”:”SOURCE_OS_USER”, “host”:”SOURCE_IPADDRESS”, “secret”:”SECRET_OCID”}’ | fn invoke distools disfunctionsftp
2. Sftp GET a file from object storage and save in SFTP server
echo ‘{“operation”:”GET”,”sftp_file”:”mytargetdata.csv”, “object_name”:”fromsftp”,”bucket”:”disdemodatax”, “user”:”opc”, “host”:”IPADDRESS”, “secret”:”SECRET_OCID”}’ | fn invoke distools disfunctionsftp
The code for the function can be found at the links below;
- The python for the sftp is here; https://gist.github.com/davidallan/33ef14a8686e4c2aeacb4a52f37cb932#file-func-py
- The OCI Function YAML is here; https://gist.github.com/davidallan/33ef14a8686e4c2aeacb4a52f37cb932#file-func-yaml
- The requirements for the python are here; https://gist.github.com/davidallan/33ef14a8686e4c2aeacb4a52f37cb932#file-requirements-txt
In order to leverage these SDKs from within the function you will need policies to grant a dynamic group the ability to read secret-family and manage object-family, I had added these;
allow dynamic-group faas_dyn_group to read secret-family in compartment DISWorkspaces
allow dynamic-group faas_dyn_group to manage object-family in compartment DISWorkspaces
My group was defined as;
ALL {resource.type = ‘fnfunc’, resource.compartment.id=’ocid1.compartment.oc1..zzzzzzzz’}
For executing the function via REST from OCI Data Integration you will need policies such as these (see here for policies and REST tasks), you can narrow down the specific workspace also (if you use application as the resource principal change the request.principal.type to disapplication);
allow any-user to use functions-family in compartment your_compartment _name where ALL {request.principal.type = ‘disworkspace’}
allow any-user to use secret-family in compartment your_compartment _name where ALL {request.principal.type = ‘disworkspace’}
allow any-user to use object-storage-family in compartment your_compartment_name where ALL {request.principal.type = ‘disworkspace’}
Follow the regular instructions for creating OCI Functions (see the quickstart here). Let’s see what you can do when you have a REST Task defined.
Execute REST Task
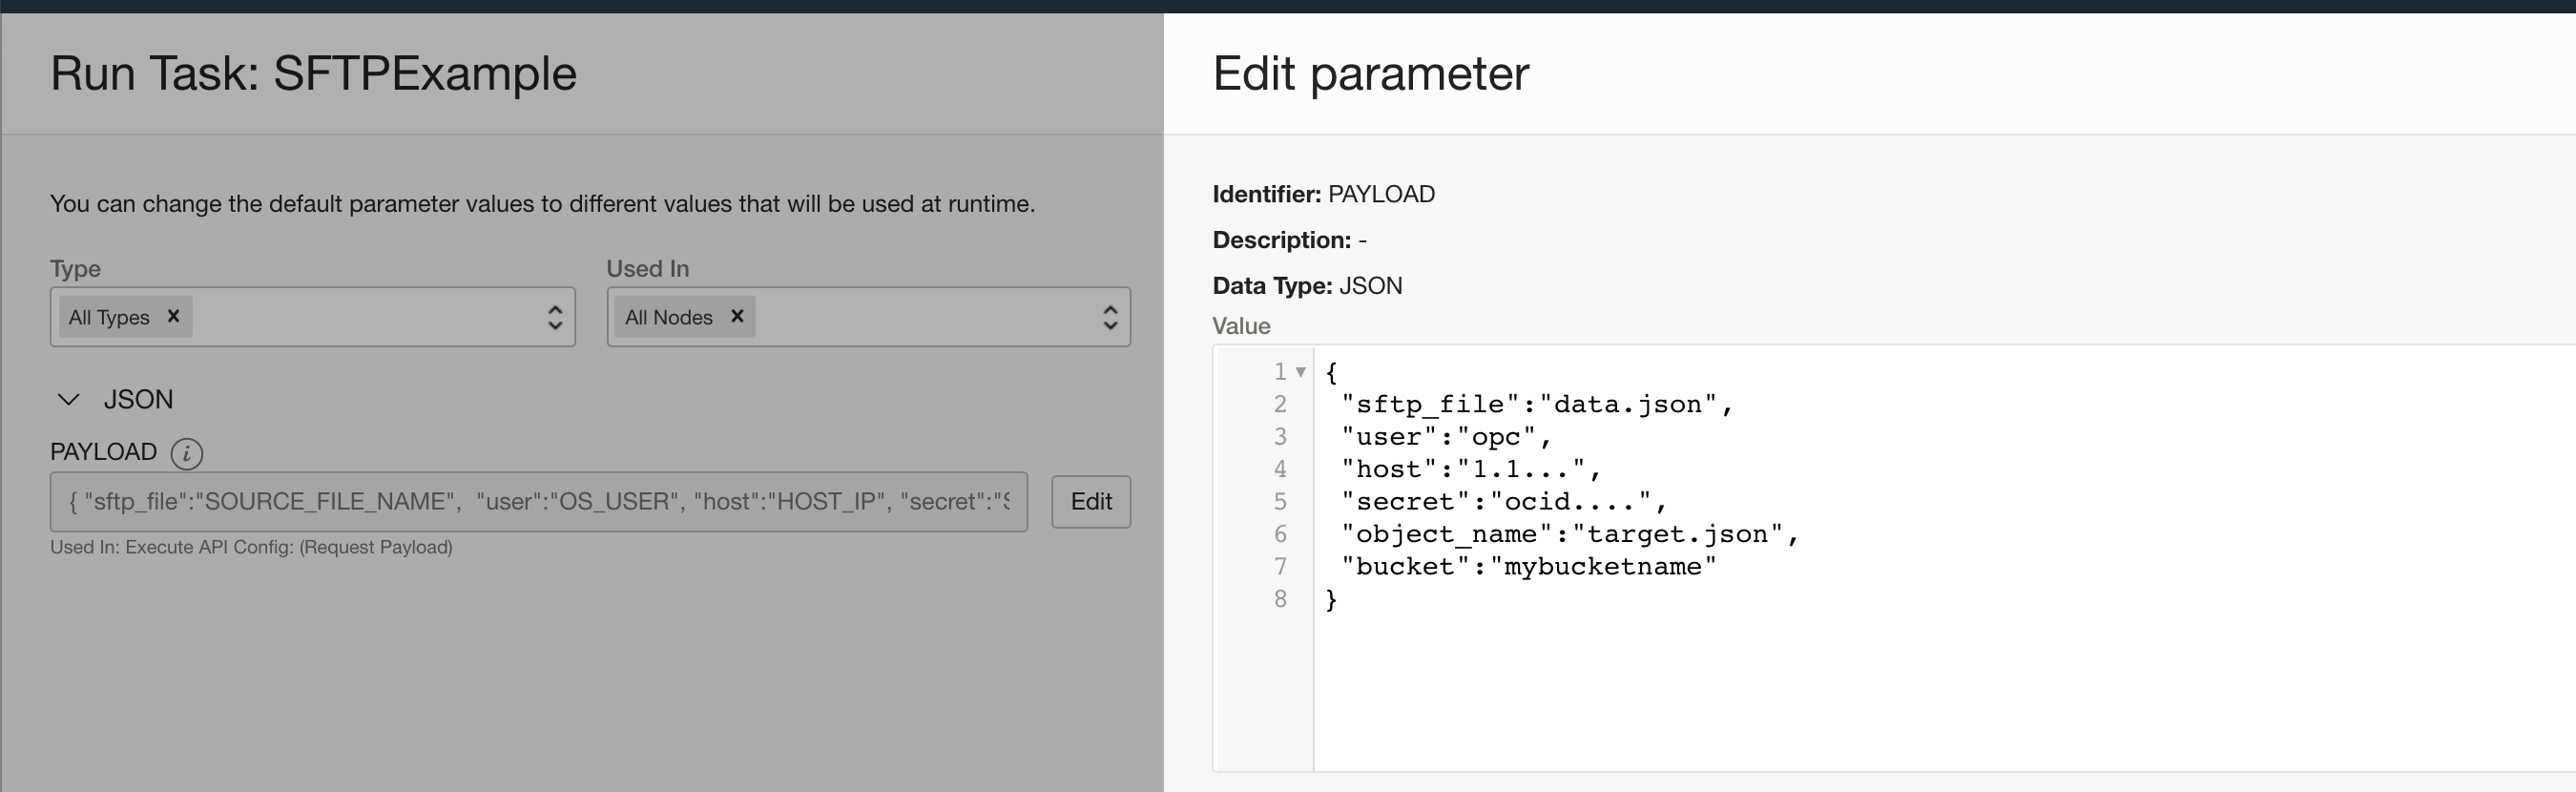
All OCI Data Integration tasks can be executed from within OCI DI, when we execute the REST task we can define the payload here;

Schedule REST Task
All OCI Data Integration tasks can be scheduled. If you want to schedule hourly, daily etc. or even using a custom cron expression, you can create a schedule and then schedule tasks using it.
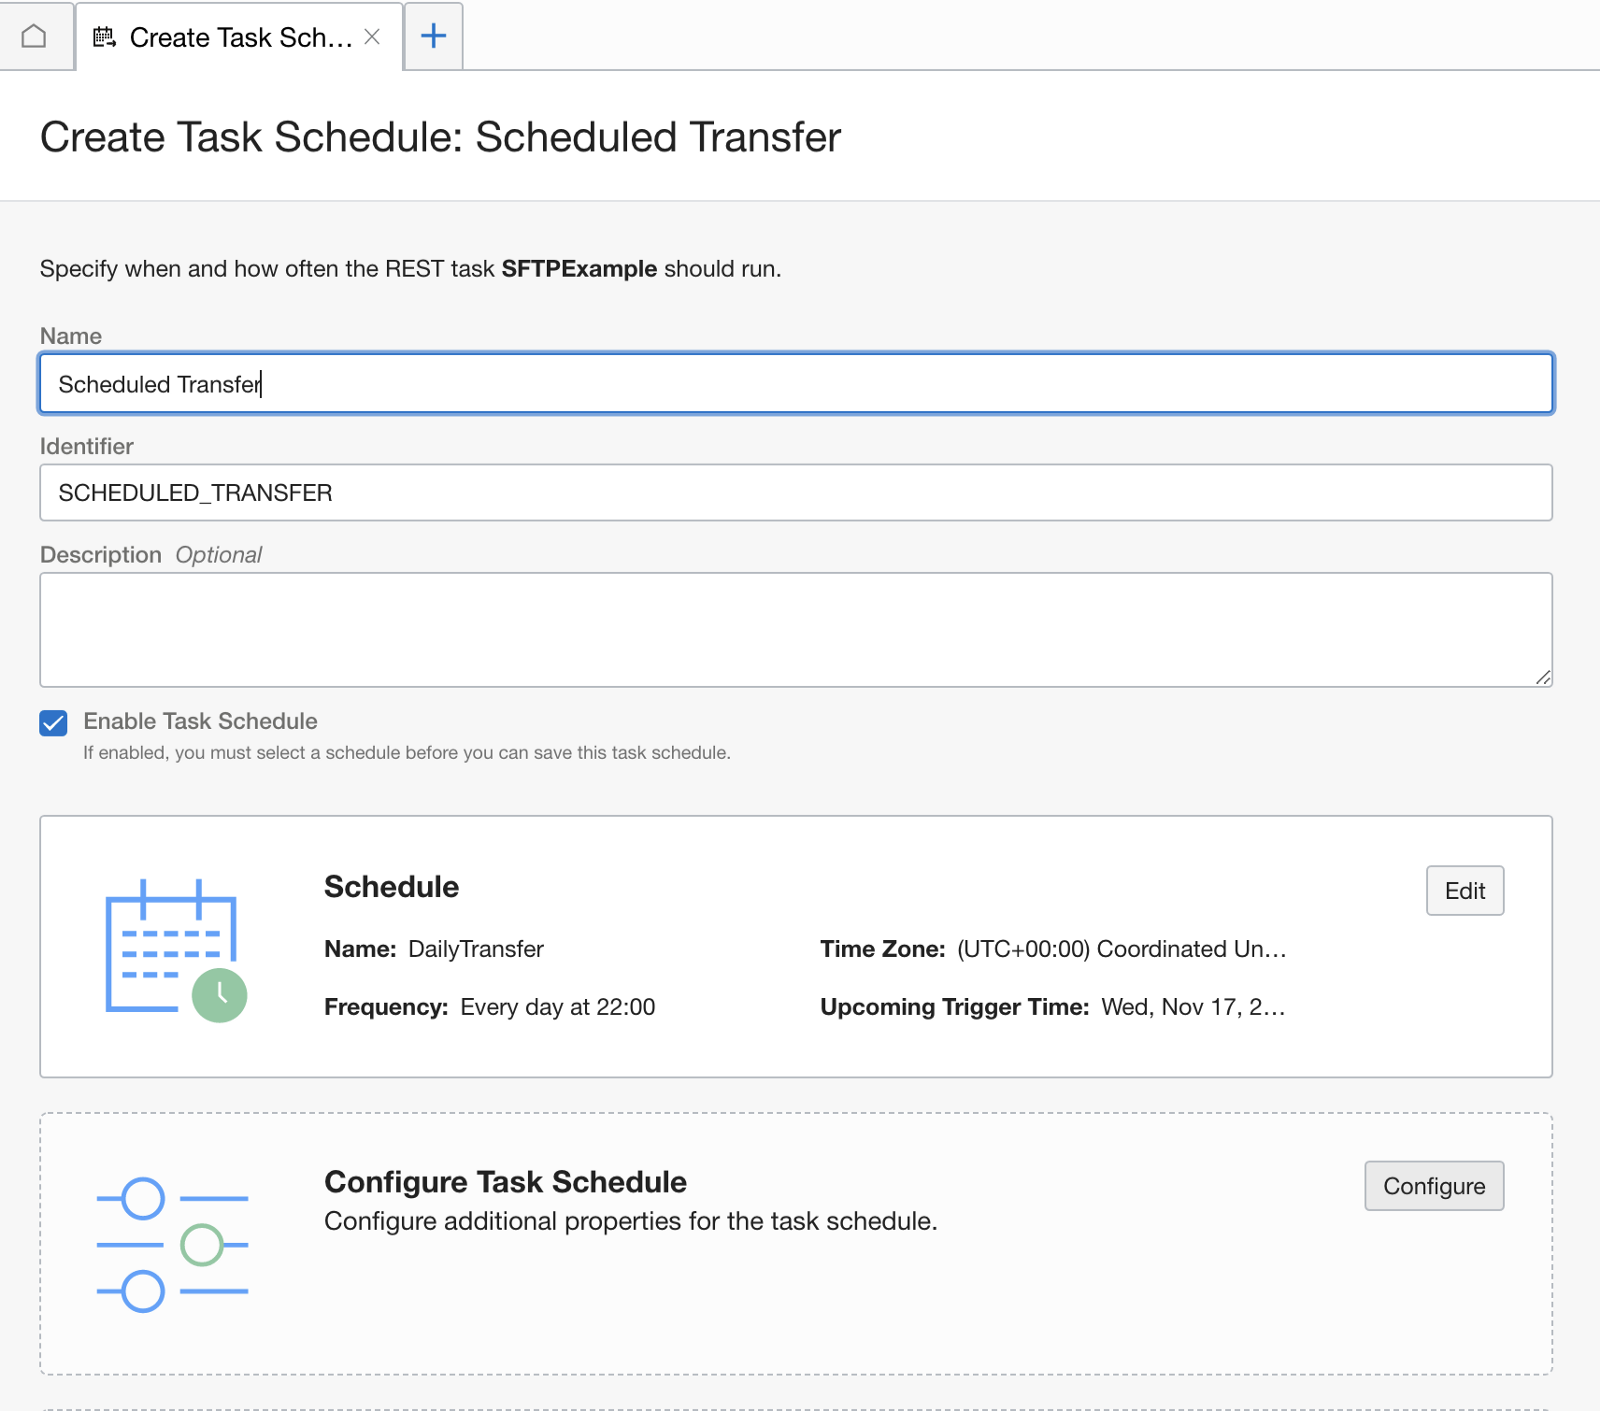
As part of the schedule task, you can configure the parameter values to be used when the task is executed;
Pressing the Edit button above, we can define the parameter value, below I can specify the sftp_file is called data.json, the user is opc, the host is .. and so on.
Orchestrate REST Task to Load ADW
Another option is to integrate the REST Task in a pipeline. If you have dependencies such as after the file is transferred you want to load an ADW target, then you can define that dependency in a Pipeline and then schedule / execute this.
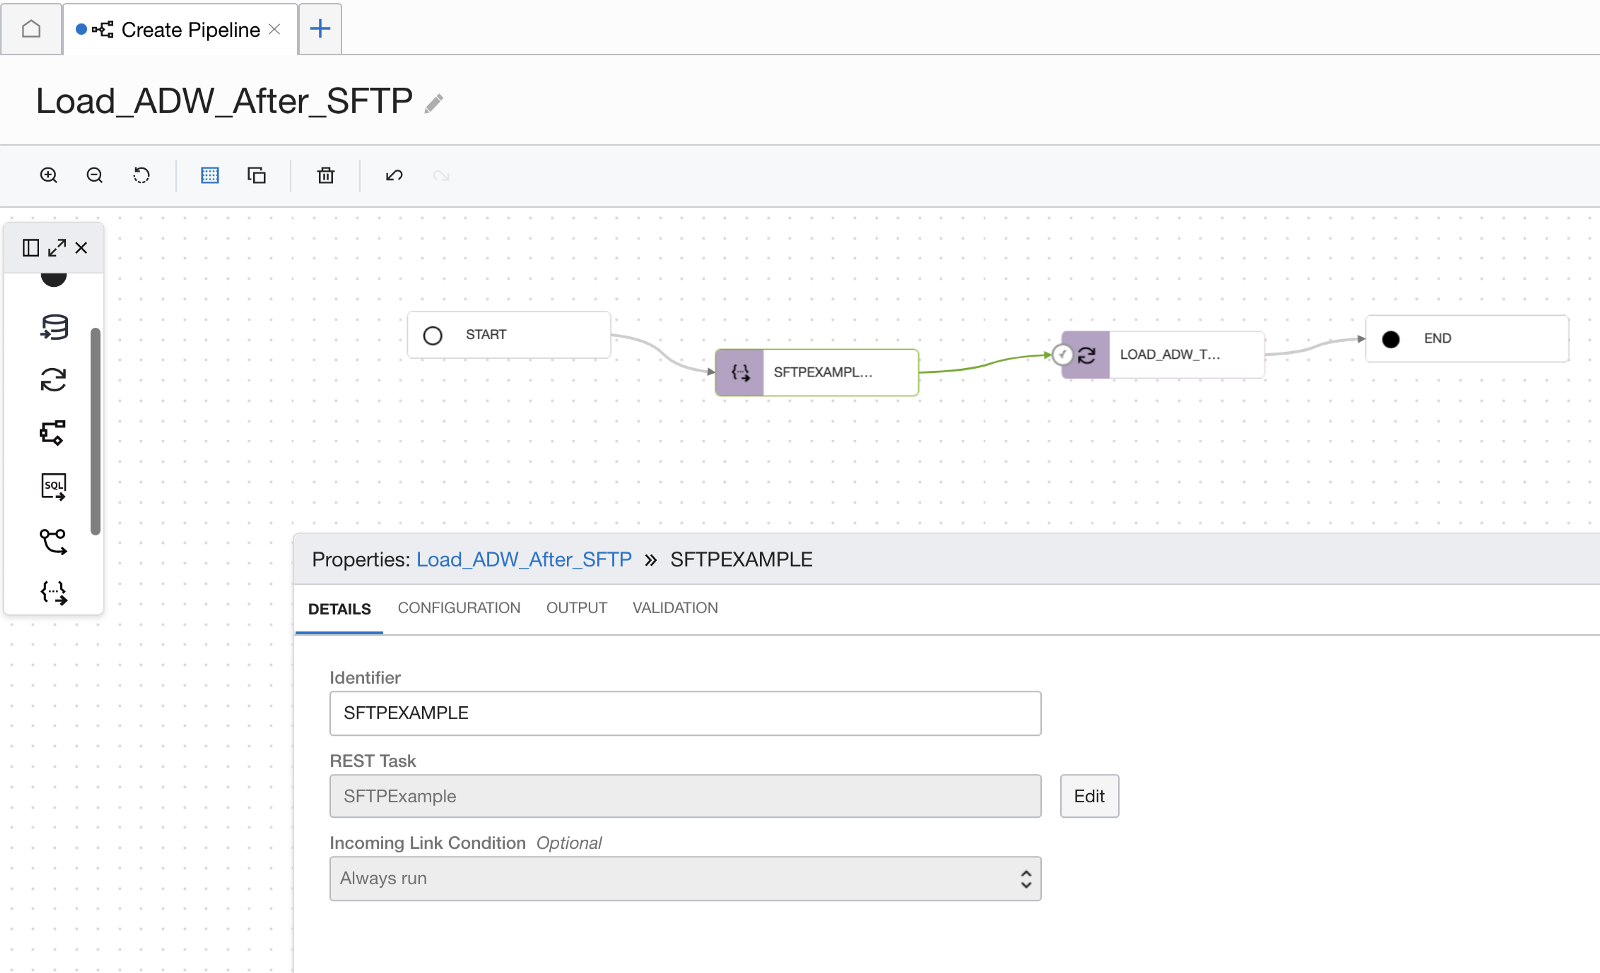
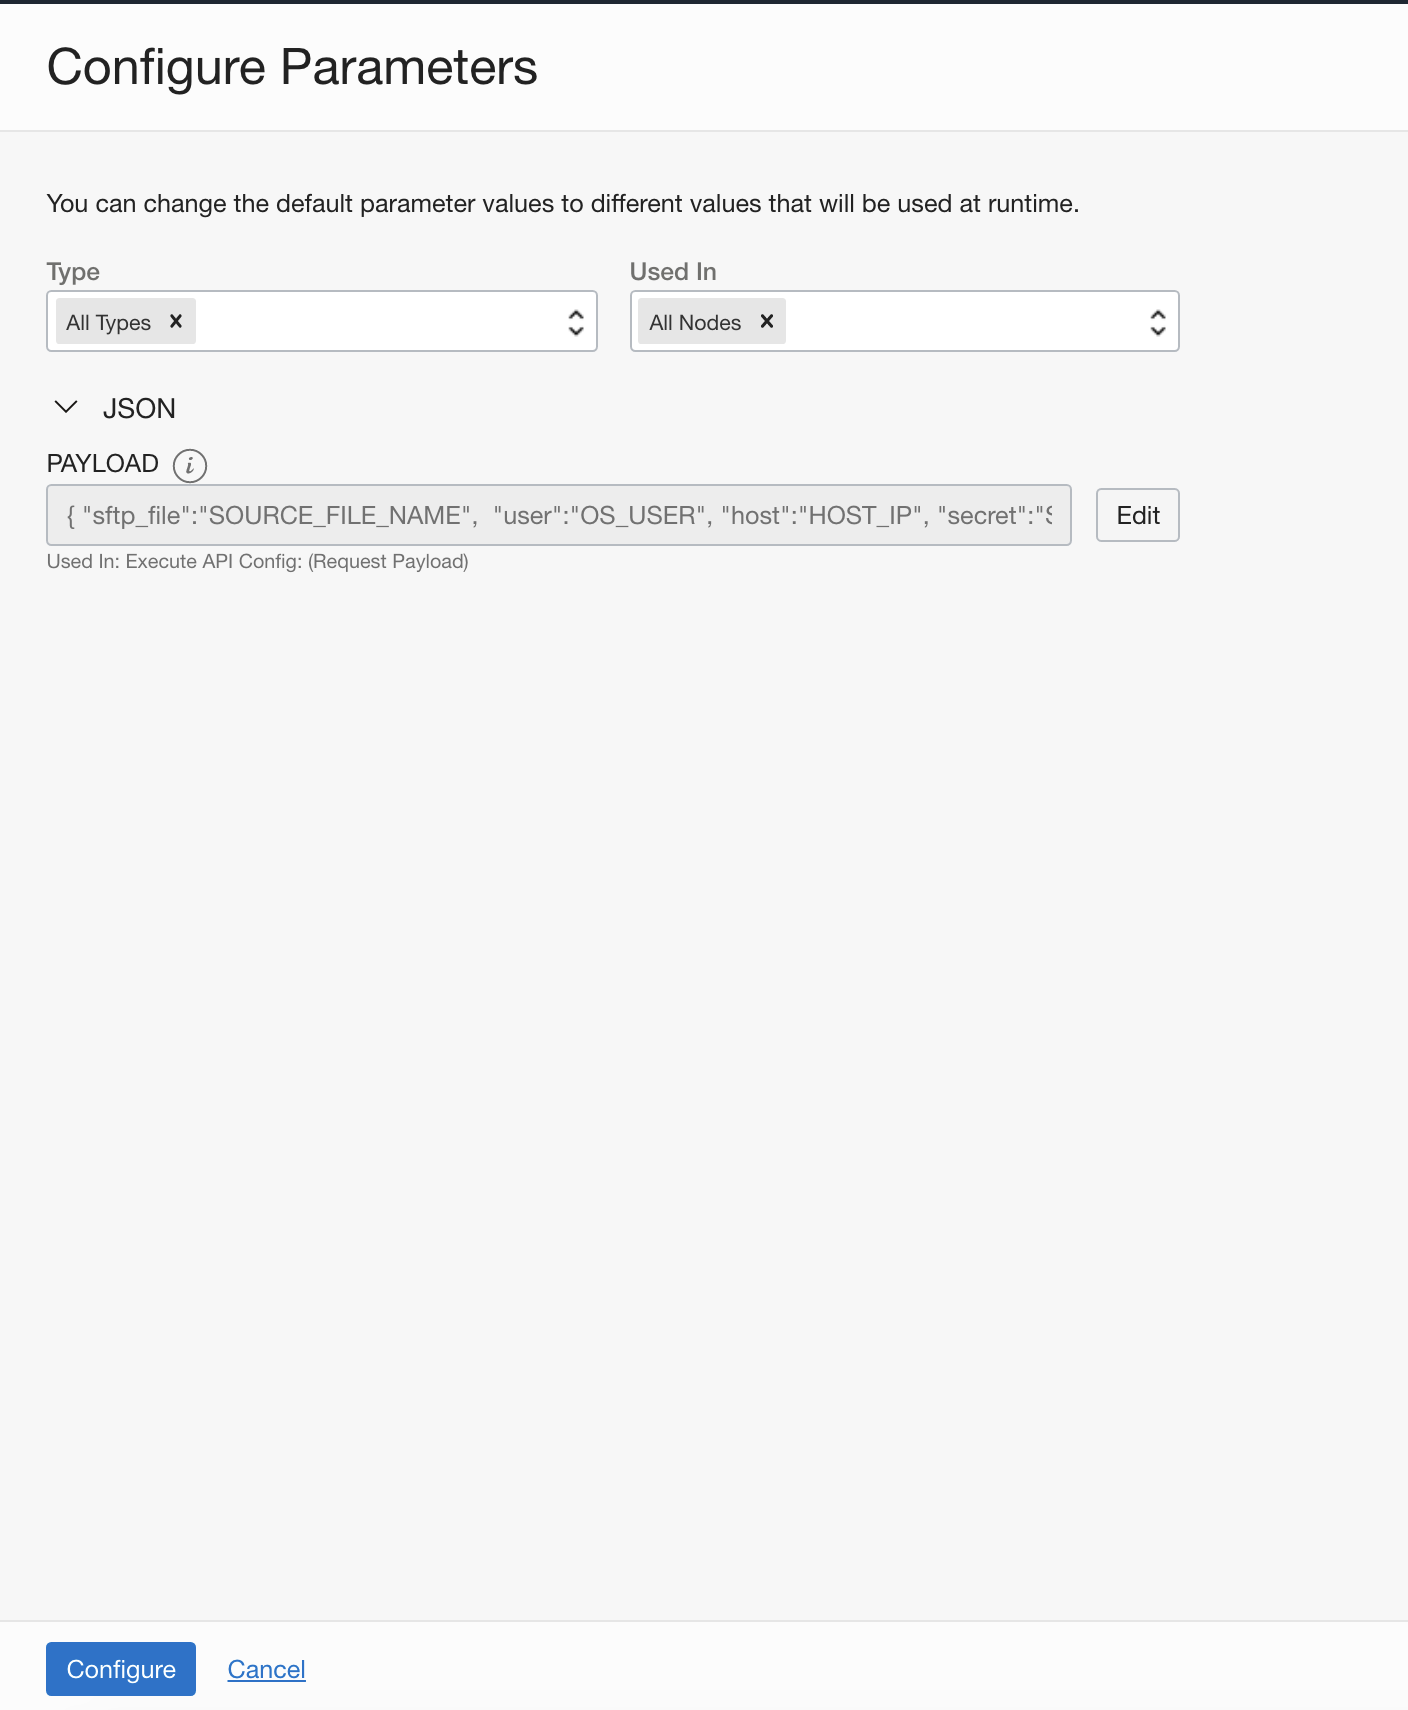
If we look at the configuration for the REST task we can see the parameter is not configured, configuring the parameter will allow us to define the values to be used rather than the template values in the REST Task;
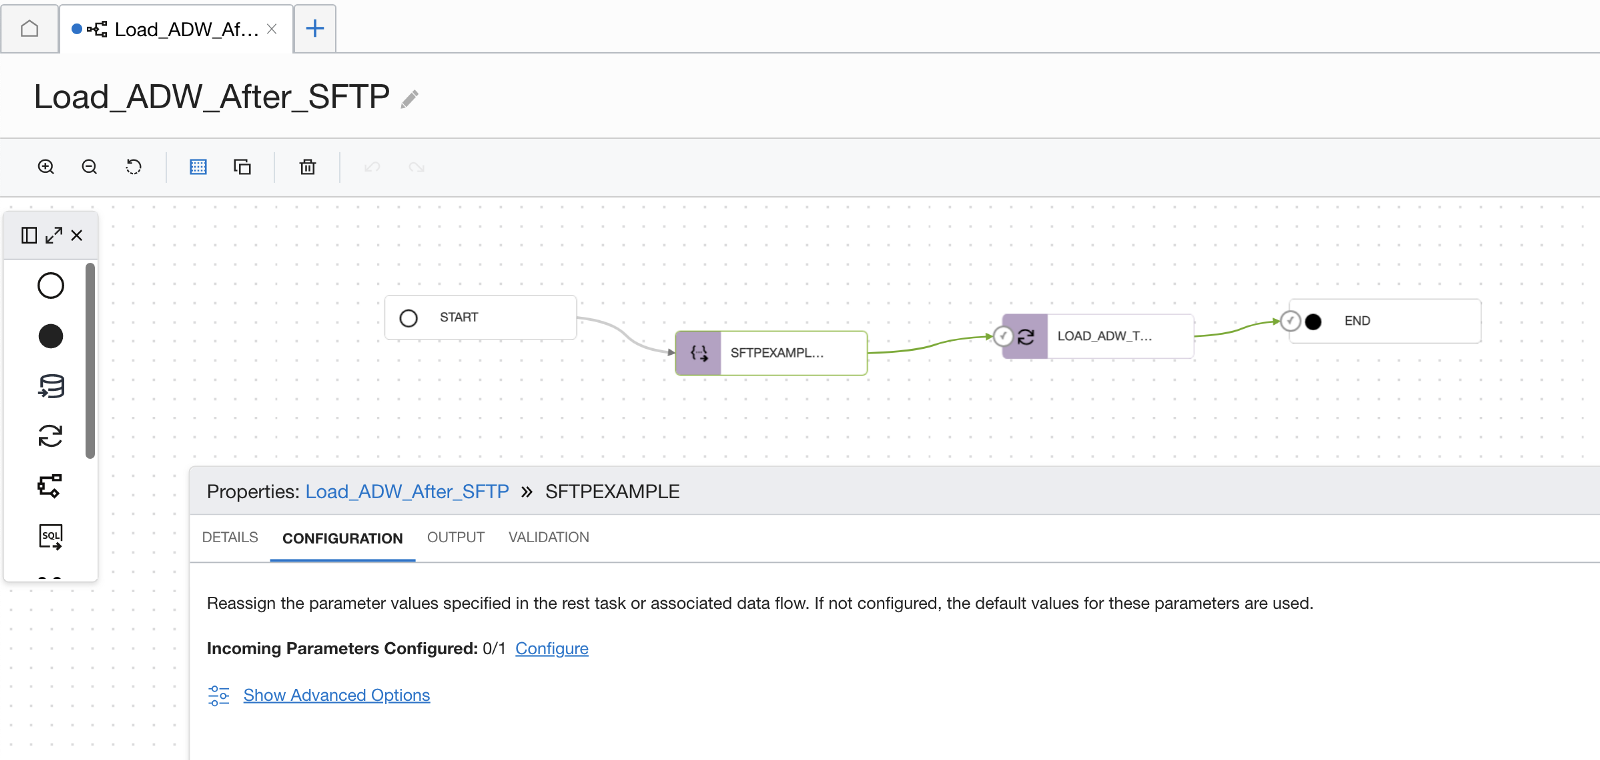
When we click on Configure above, the panel below is displayed with all of the configurable parameters;

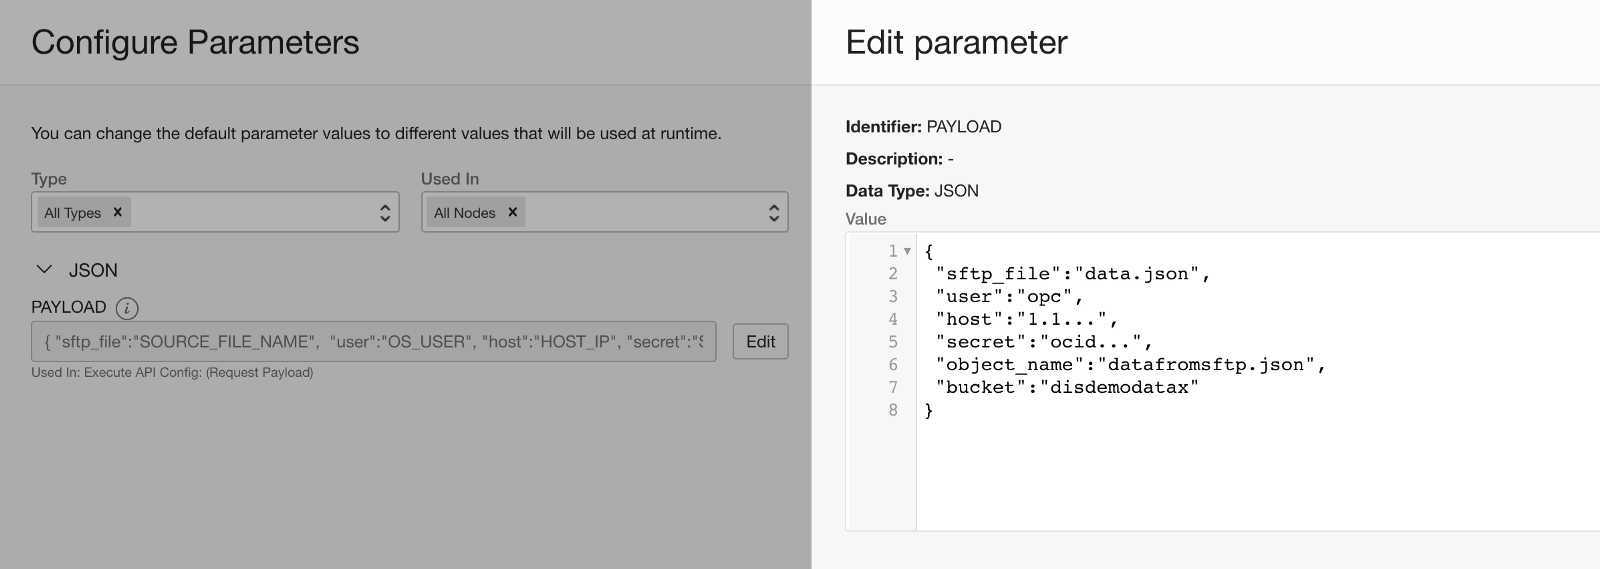
When we click configure on the value we can do a few things – we can assign a value – you can enter all of the values for the payload here or you can assign a parameter and do that at runtime when the task is executed. Below you can see we can assign the value on the REST task operator within the pipeline;
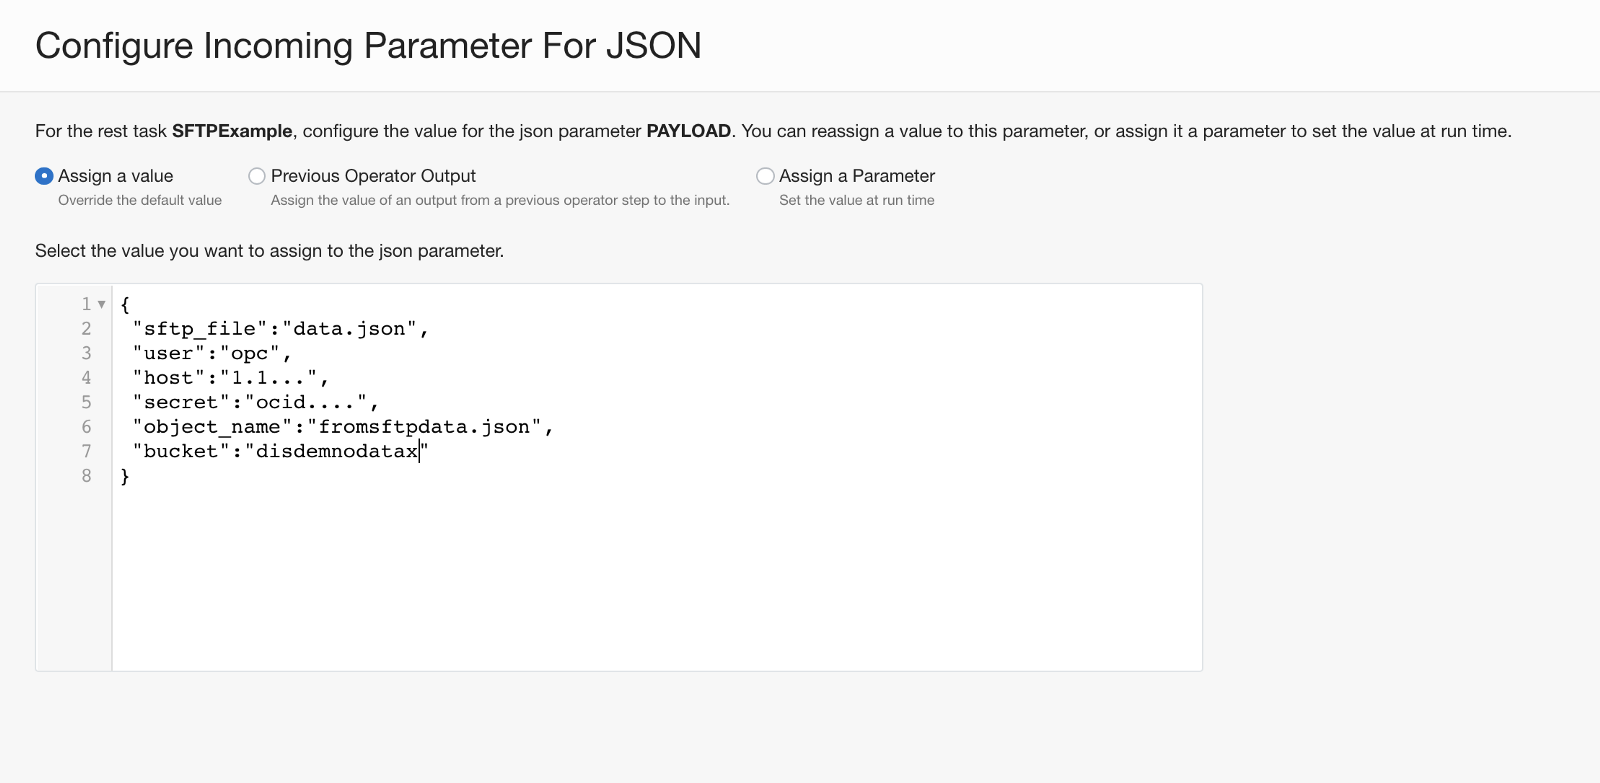
As mentioned we can also assign a parameter and have this value passed at runtime!
Conclusion
In this article, we illustrated how to perform SFTP to transfer data into / out of Object Storage within OCI Data Integration. We also saw how using OCI Functions can help integrate custom transformations as a REST Task in Data Integration. An alternative to this is to stand up an sftp server in OCI and use the OCIFS to project the SFTP server as a bucket in OCI Object Storage – check this blog here https://blogs.oracle.com/linux/post/introducing-ocifs. We hope that this blog helps as you learn more about Oracle Cloud Infrastructure Data Integration. For more information, check out the tutorials and documentation. Remember to check out all the blogs on OCI Data Integration!