Larry Ellison and Satya Nadella recently announced the general availability of Oracle Database Service for Microsoft Azure (ODSA) which enables customers to easily provision and use Oracle Database services in Oracle Cloud Infrastructure (OCI) with a familiar Azure-like experience.
Underpinned by the Oracle and Microsoft strategic partnership, forged in September 2019, ODSA provides joint customers the best technology capabilities by connecting Azure and Oracle Clouds with low end-to-end latency. In just a couple of clicks, ODSA connects your Azure subscription with your OCI tenancy, automates the network configuration, and uses Azure Active Directory credentials to authenticate users across Azure and OCI. ODSA creates a graceful co-existence of Azure applications connecting to Oracle Database services as if operating in one cloud, over a secure, private high-speed interconnect. With Oracle Database services in OCI, Azure users not only can simplify the development of innovative applications with the Oracle Database converged architecture, but can also benefit from the fully managed Autonomous Database, experience the performance of the Exadata platform, and achieve high availability with Oracle Real Application Clusters (RAC).
ODSA is available in these OCI Azure Interconnect regions around the world, backed by an Oracle – Microsoft Collaborative Support Model. ODSA supports Oracle Autonomous Database on Shared Exadata Infrastructure, Exadata Database Service on Dedicated Infrastructure, and Base Database Service. Support for other Oracle Cloud database services will be added in the upcoming releases.
In this blog post, let’s take a look at how you provision Exadata Database Service on Dedicated Infrastructure with ODSA.
Prerequisites for Oracle Database Service for Azure
To complete the sign up process for Oracle Database Service for Azure, you will need:
- An Azure user account with administration privileges and ownership of the Azure subscriptions you want to link to OCI. The following Azure roles have sufficient privileges to sign up and can be removed once sign up is complete:
Global Administrator
Application Administrator
Cloud Application Administrator
Privileged Role Administrator
- To sign up with an existing OCI tenancy, the tenancy must support identity domains. Or an OCI tenancy can be created when signing up
- At least one Azure Virtual Network (VNET), which will be paired with a corresponding OCI virtual cloud network (VCN)
- Non overlapping CIDR blocks for any Azure VNets and OCI VCNs
- Adequate Oracle Exadata Database Service Limits and OCI Service limits prior to provisioning
- Exadata Database Service provisioning in ODSA requires a direct billing relationship, a Pay-As-You-Go subscription is not valid.
Signing Up for Oracle Database Service for Azure
To start your Oracle Database Service for Azure sign up, visit the sign up website at https://signup.multicloud.oracle.com/azure.
You will be prompted to sign in to your Azure account and consent to the permissions required to initiate the account linking with Azure:
Perform the Azure and OCI account linking via ODSA’s fully-automated configuration or guided account linking options
You will need to consent to a complete set of permissions and the workflow is fully automated.
Note: The fully-automated configuration requires that the Azure user onboarding to ODSA is a Global Administrator in Azure and is assigned as an Owner for each Azure subscription linked to ODSA.
When following this option you will land in a fully functional ODSA portal, ready to provision databases by following the automated process:
- Consent to the required permissions
- Identify the Azure subscription(s) you would like to link
- Authenticate with OCI (or create a new tenancy based on the workflow)
- You are redirected to the ODSA portal
- You are ready to provision databases
- You can log into OCI via SSO
By choosing the ‘guided’ path, you will be given a choice to automate Roles and Subscription setup and Federation independently as per the documentation Signing up for the Oracle Database Service for Azure.
Identity Federation
If ODSA users will need to use the OCI Console to perform tasks, then the Azure Administrators should enable identity federation between Azure and OCI to enable users to use a single set of credentials to login to both cloud environments.
When using identity federation with OCI IAM, Azure users must have last names and email addresses in Azure Active Directory for the identity federation to work. Identity federation is created automatically when Fully-Automated Configuration is used to set up ODSA. It is optional when Guided Account Linking is used to set up ODSA.
Adding ODSA Users in Azure After Completing Your Sign Up
Oracle Database Service for Azure (ODSA) creates user groups in Azure Active Directory (AAD) during the initial account linking stage of your ODSA sign up.
Upon completion of the cloud linking, two new tiles will appear at the top of the ODSA Portal (Assigning ODSA roles and Link Your Subscriptions), the following must be performed sequentially:
- Step 1: Active Directory: Assign ODSA Enterprise Application ARM Roles to Users (assigning ODSA Roles)
- Step 2: Assign ODSA ARM Roles to Users within an Azure Subscription (Link your subscriptions)
- Step 3: Active Directory: Assign Users to the appropriate ODSA user groups
Step 1: Active Directory: Assign ODSA Enterprise Application ARM Roles to Users
You can assign Azure users to the appropriate ODSA user groups in AAD to enable access to database and infrastructure resources at a granular level. By doing so, users are assigned to the ODSA enterprise application and to the related Azure Resource Manager (ARM) role for the “Oracle Database Service” enterprise application.

In the Azure Portal, search for the Enterprise Application “Oracle Database Service”, then select it from the list. This takes you to the Enterprise Application “Oracle Database Service Overview” page.
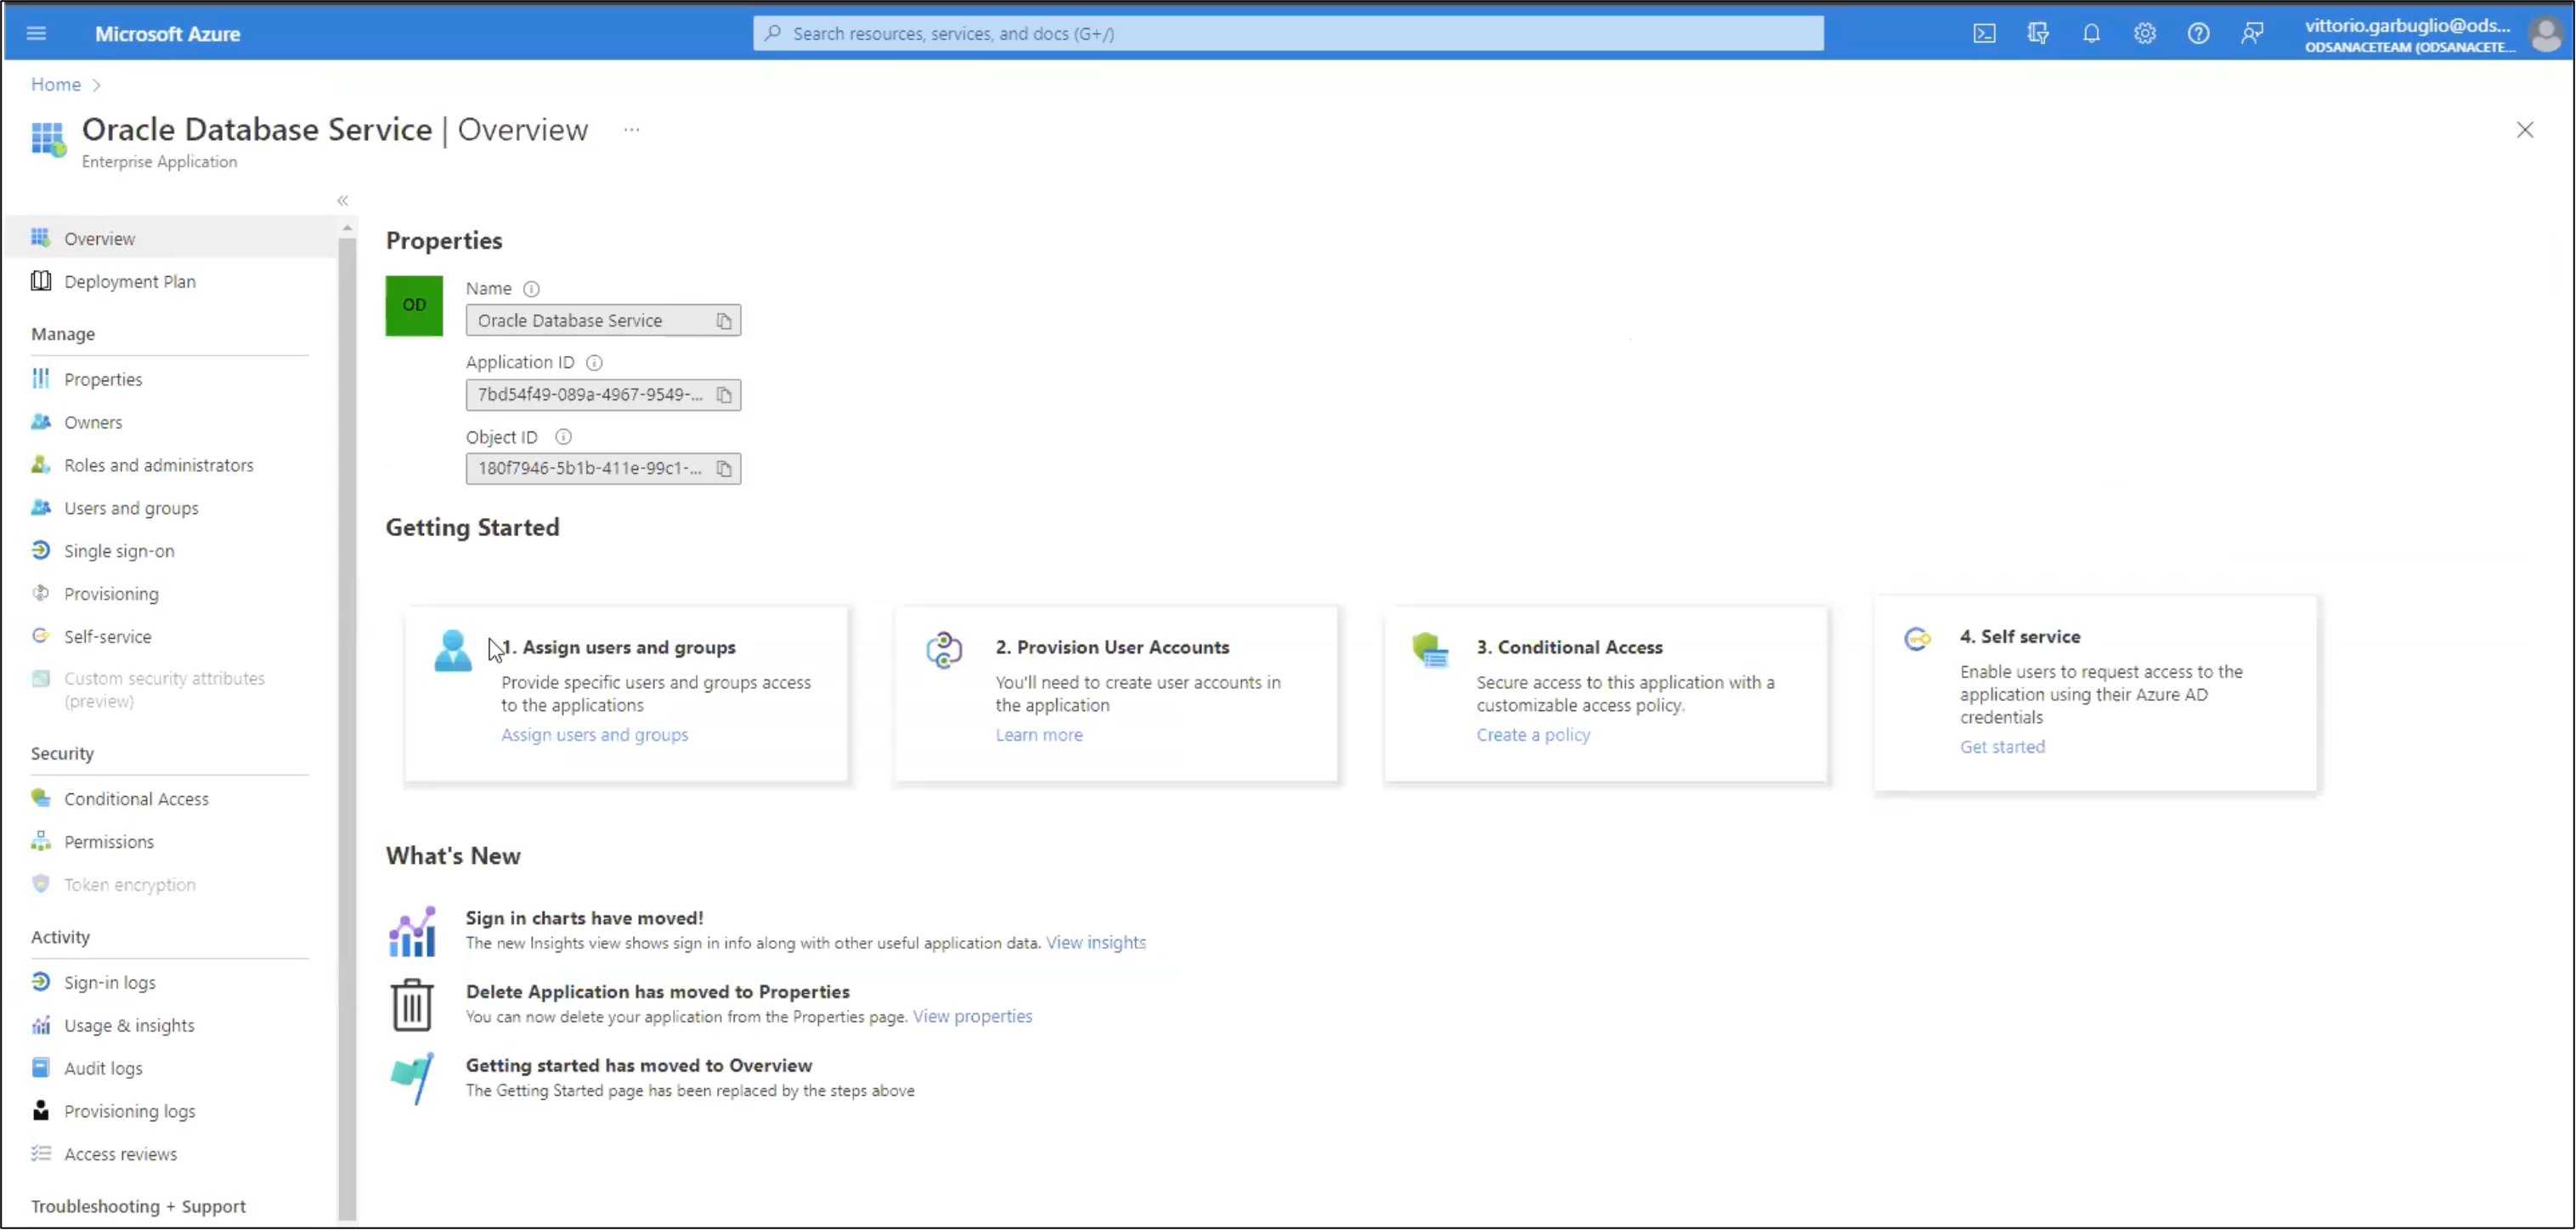
In the list of enterprise applications, click on the name of the “Oracle Database Service” application to view the application’s Overview page,
click Assign users and groups → click + Add user/group. The Add Assignment page is displayed.
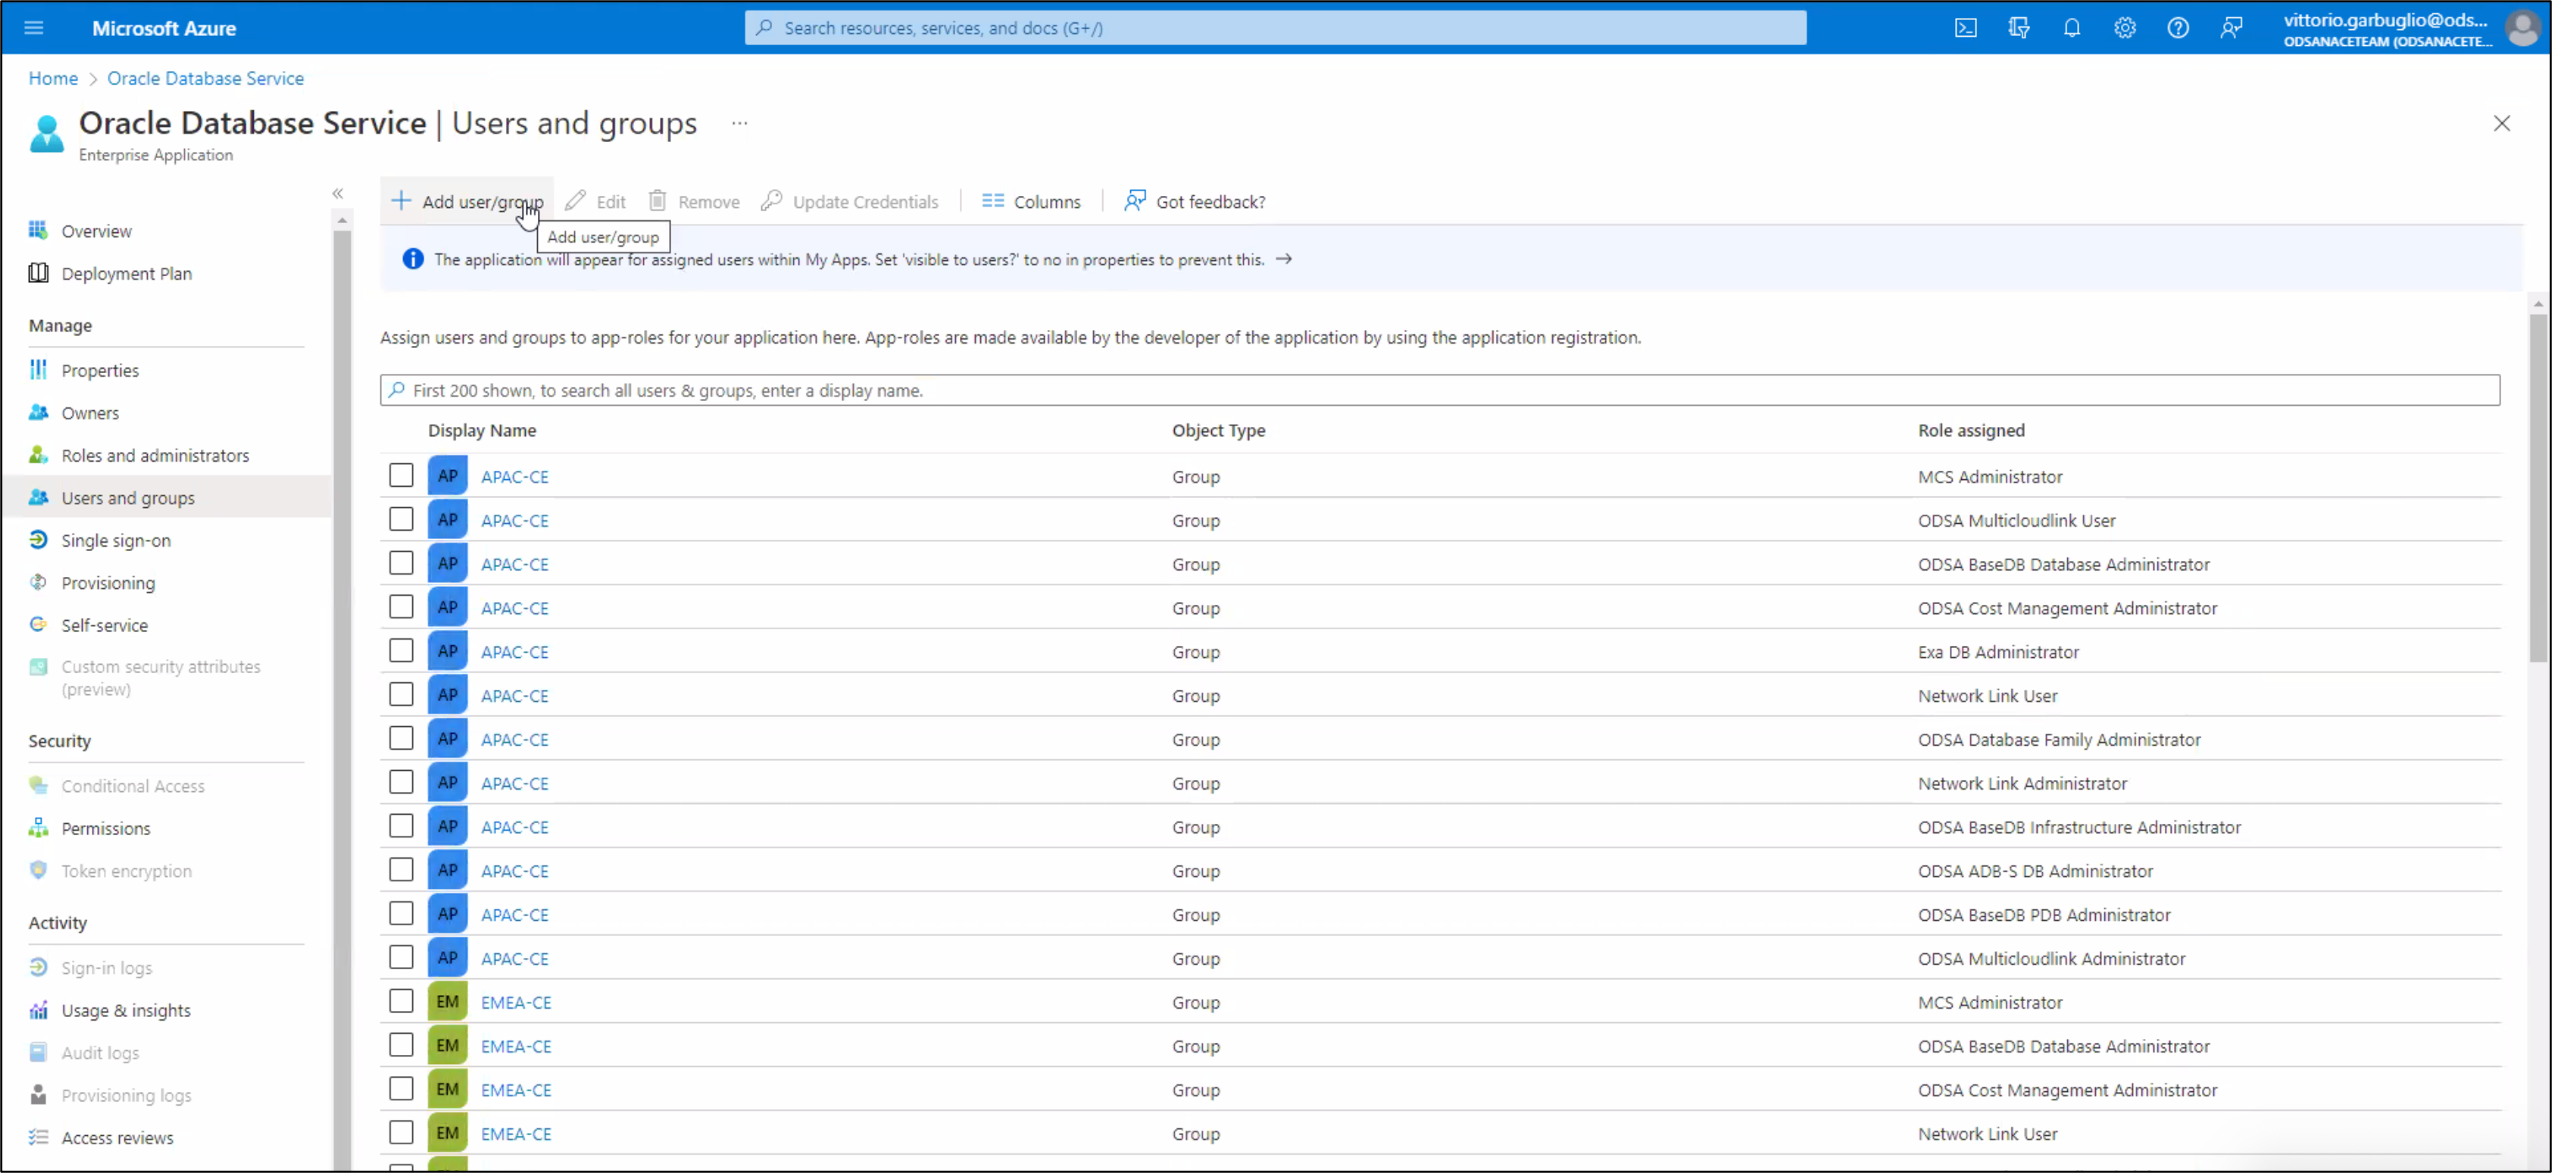
Select the applicable users in the Users panel, find the users you want to assign, then click Select. Under Select a role, click None Selected, then select the ARM role you are assigning to the user.
Step 2 Assign ODSA ARM Roles to Users within an Azure Subscription
Oracle Database Service for Azure users require the “Contributor” ARM role for each subscription in which they will be managing ODSA resources, as well as the ARM roles for ODSA for networking, events and monitoring metrics found in the documentation. Assign the user the “Contributor” role with the subscriptions that the user will be accessing ODSA. As a contributor, the user has full access to manage ODSA resources including databases, database system infrastructure, and networking, but cannot assign roles in Azure role-based access control (RBAC) to other Azure users.
Step 3 Assign Users to the Appropriate ODSA User Groups
The ODSA Database Family groups are for users who need to either manage or view all ODSA resource types. Users in this group can manage all resources.
The user groups in this task are pre-configured during the ODSA deployment. You are not responsible for creating the ODSA user groups.
In Azure Active Directory add users to the ODSA Groups as per the documentation.
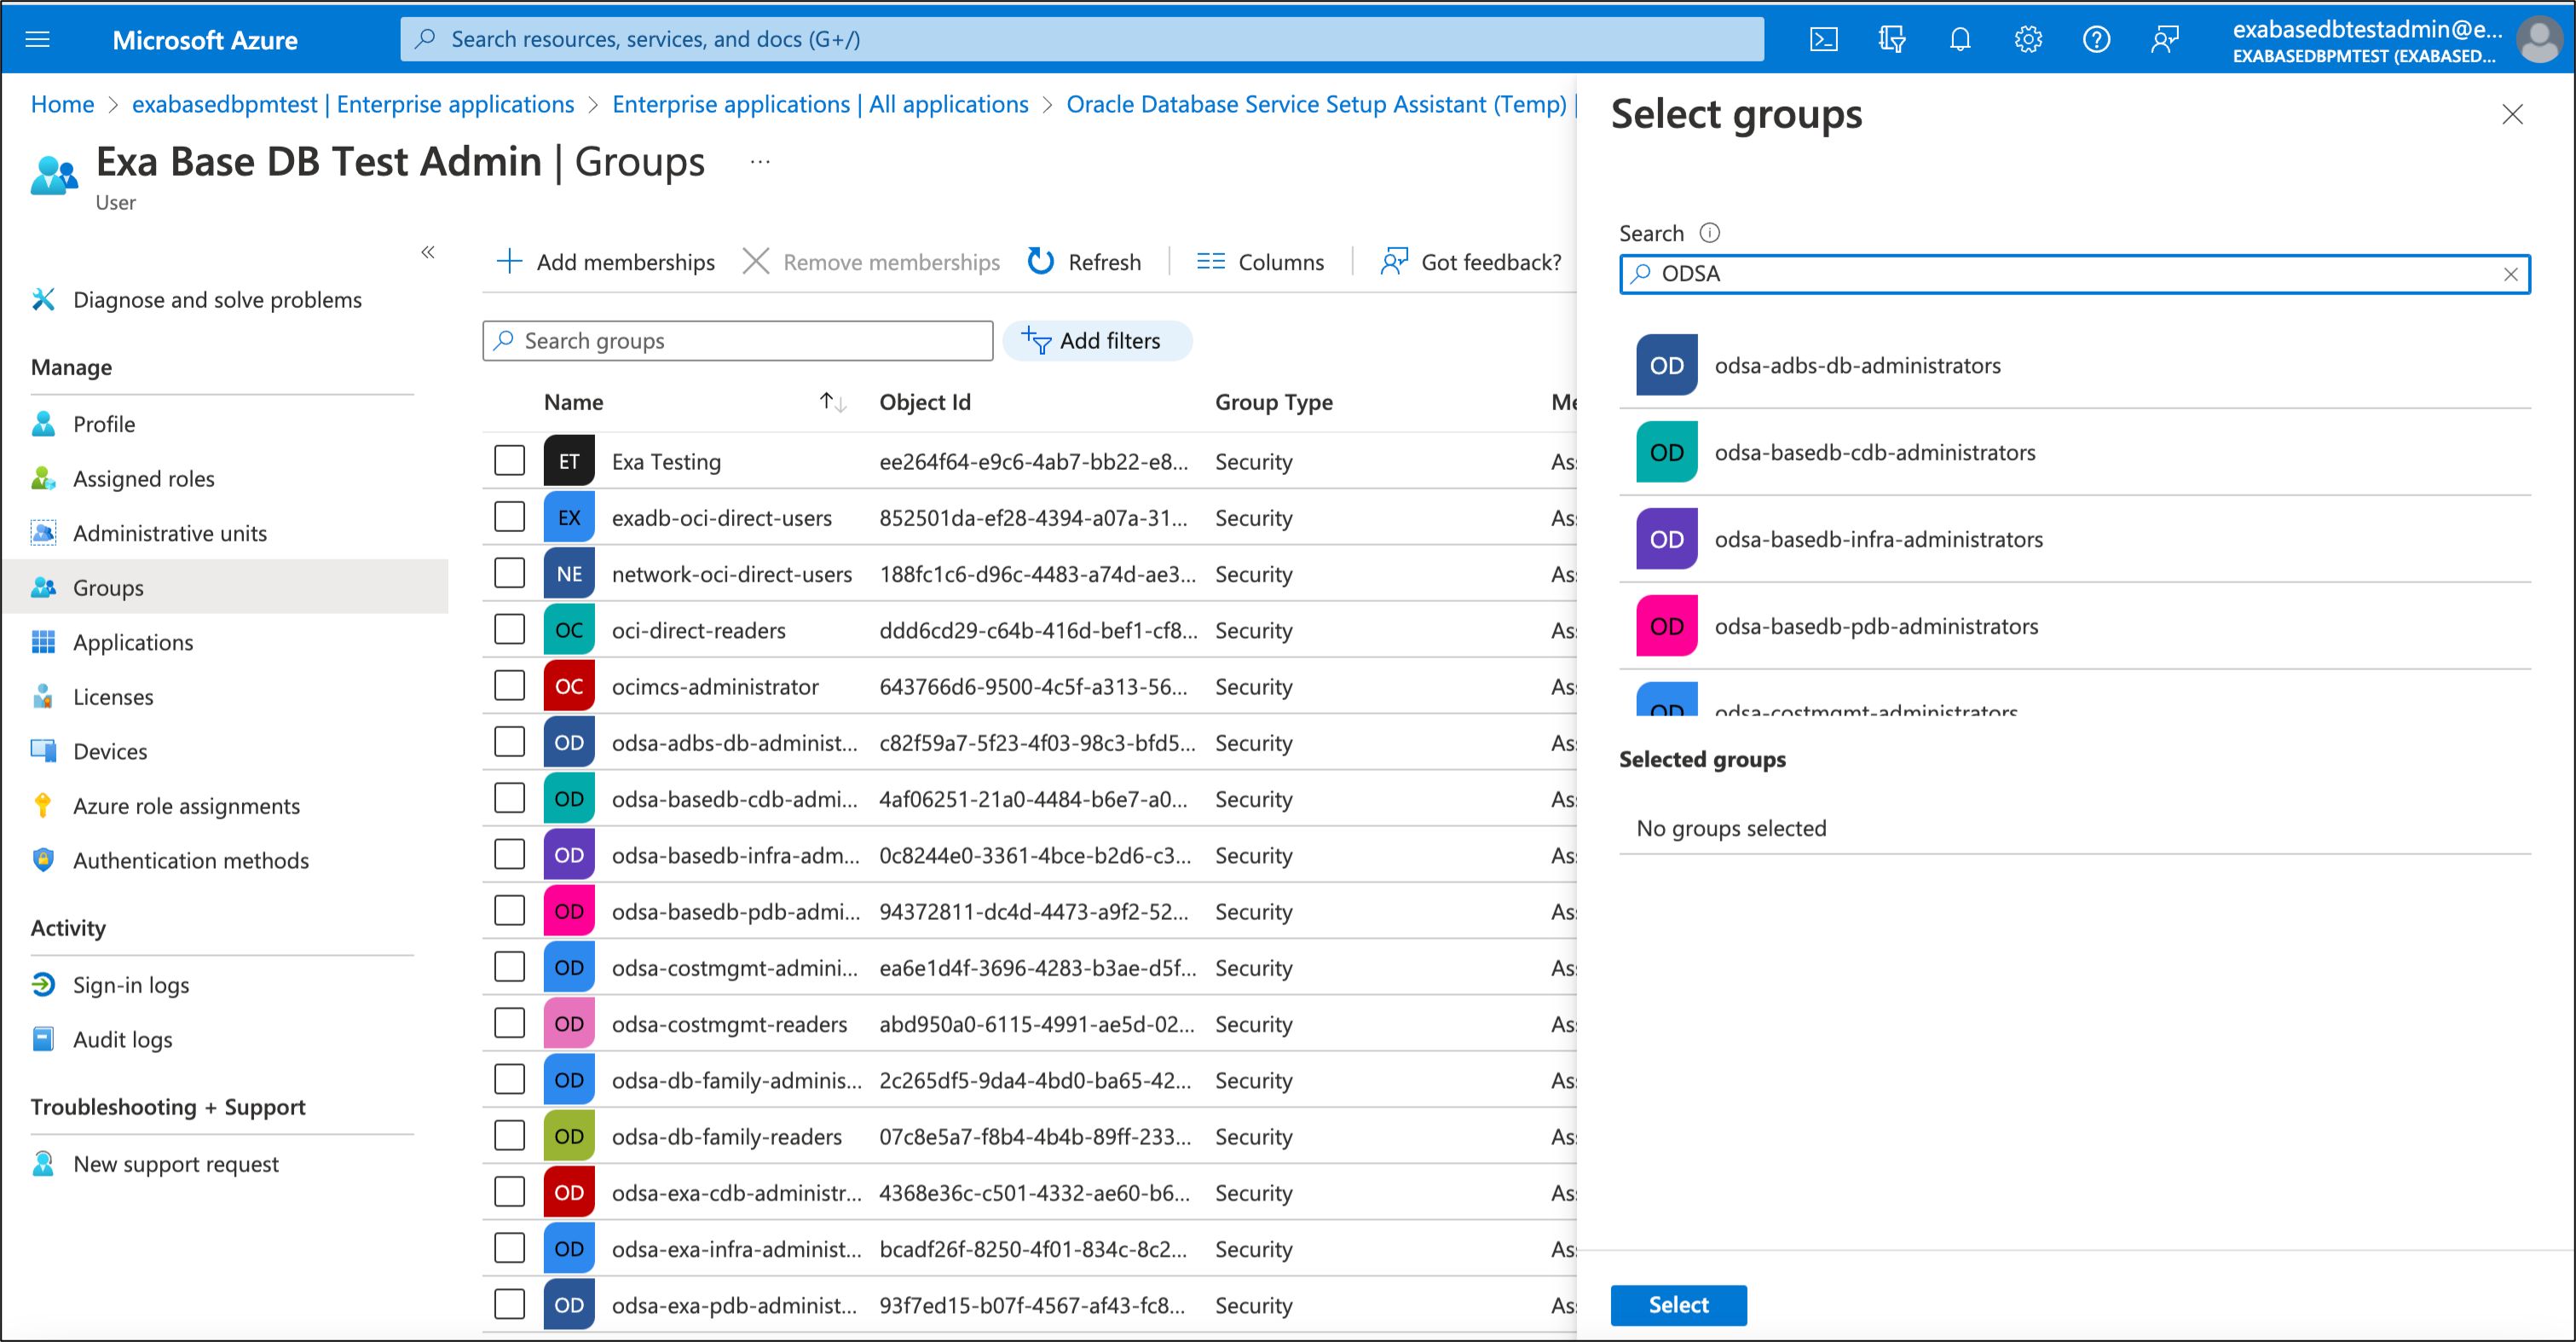
The Azure user groups allow you to control user access to specific Oracle Database Services in Oracle Database Service for Azure, here we show how to administer ODSA users and groups using ODSA ExaDB roles as an example.
ODSA Exadata Infrastructure Administrators (ODSA User Group) can perform create, list, get, update, delete operations on:
- cloud-exadata-infrastructures
- cloud-vmcluster
- db-nodes
ODSA Database Administrators (ODSA User Group) can perform create, list, get, update, delete operations on:
- db-homes
- databases
- db-backups
ODSA Database developers (ODSA User Group) can create, list, get, update, delete
- pluggable databases
Azure user groups define the level of access for the resource, so a user group only with “list ” and “get” operations has read-only access to ODSA resources displayed in the ODSA portal. A user group with “create”, “update”, and “delete” operations can create, manage, and delete ODSA resources in the ODSA portal. Additional tasks that can be executed on ODSA include:
- Clone database
- Create database automatic or manual backup
- Restore database backup to an existing database
- Create user defined tags
- Generate Azure connection string
- Display database metrics
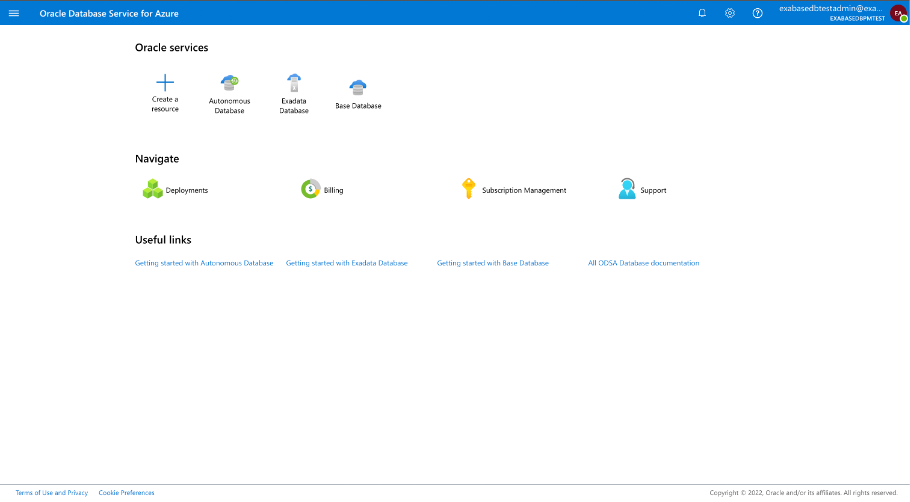
Navigating the Azure Portal in Oracle Database Service for Azure
From the Azure Portal landing page, you can create a resource by clicking on “create a resource” for the respective Database Services, as well as view your deployments, check your billing, manage your subscription and if required, directly raise a Support Request (SR)
Provisioning Exadata Database Service on Dedicated Infrastructure from the ODSA Portal
As mentioned in the prerequisites, the service limits for the database and storage servers in your tenancy should be sufficient to provision an Exadata System with the Exadata system model and configuration of your choice. Take a look at Requesting a Service Limit Increase for more details on how to increase service resources with the Oracle Cloud Infrastructure console.
Identify the primary OCI Azure Interconnect region you want to use as your default region for ODSA resource provisioning. During onboarding, this region will become the primary OCI region associated with your OCI account.
ODSA portal shares the same look and feel of the Azure Portal. To provision the Oracle Exadata Database Service resource, you need to:
1) Provision Exadata Cloud Infrastructure
2) Create the Exadata VM Cluster
3) Finally provision the Exadata Database
ODSA opens the Create wizard which walks you through the provisioning steps either by clicking on the “Create Resource” icon and then selecting each of the above respective resources, or by selecting the “Exadata Database” icon on the ODSA Portal landing page.
This takes you to the Exadata Database home page below.
You can choose to provision the Exadata Infrastructure, VM Cluster and Exadata Database either by:
1) Clicking “Create” and select “Create Exadata System” (a one step provisioning for the Exadata Infrastructure, VM Cluster and Exadata Database)
Or
2) By creating the Exadata Infrastructure, VM Cluster and Exadata Database separately by invoking each respective wizard.
We will create the Exadata Infrastructure, VM Cluster and Exadata Database separately by clicking on the respective resources on the left-hand-side panel, then will select the “Create” link at the top which opens a wizard to create that specific resource.
1) Provision Exadata Cloud Infrastructure
On the left-hand-side panel we will select “Infrastructures” then click the “Create” link at the top to provision Exadata Infrastructure.
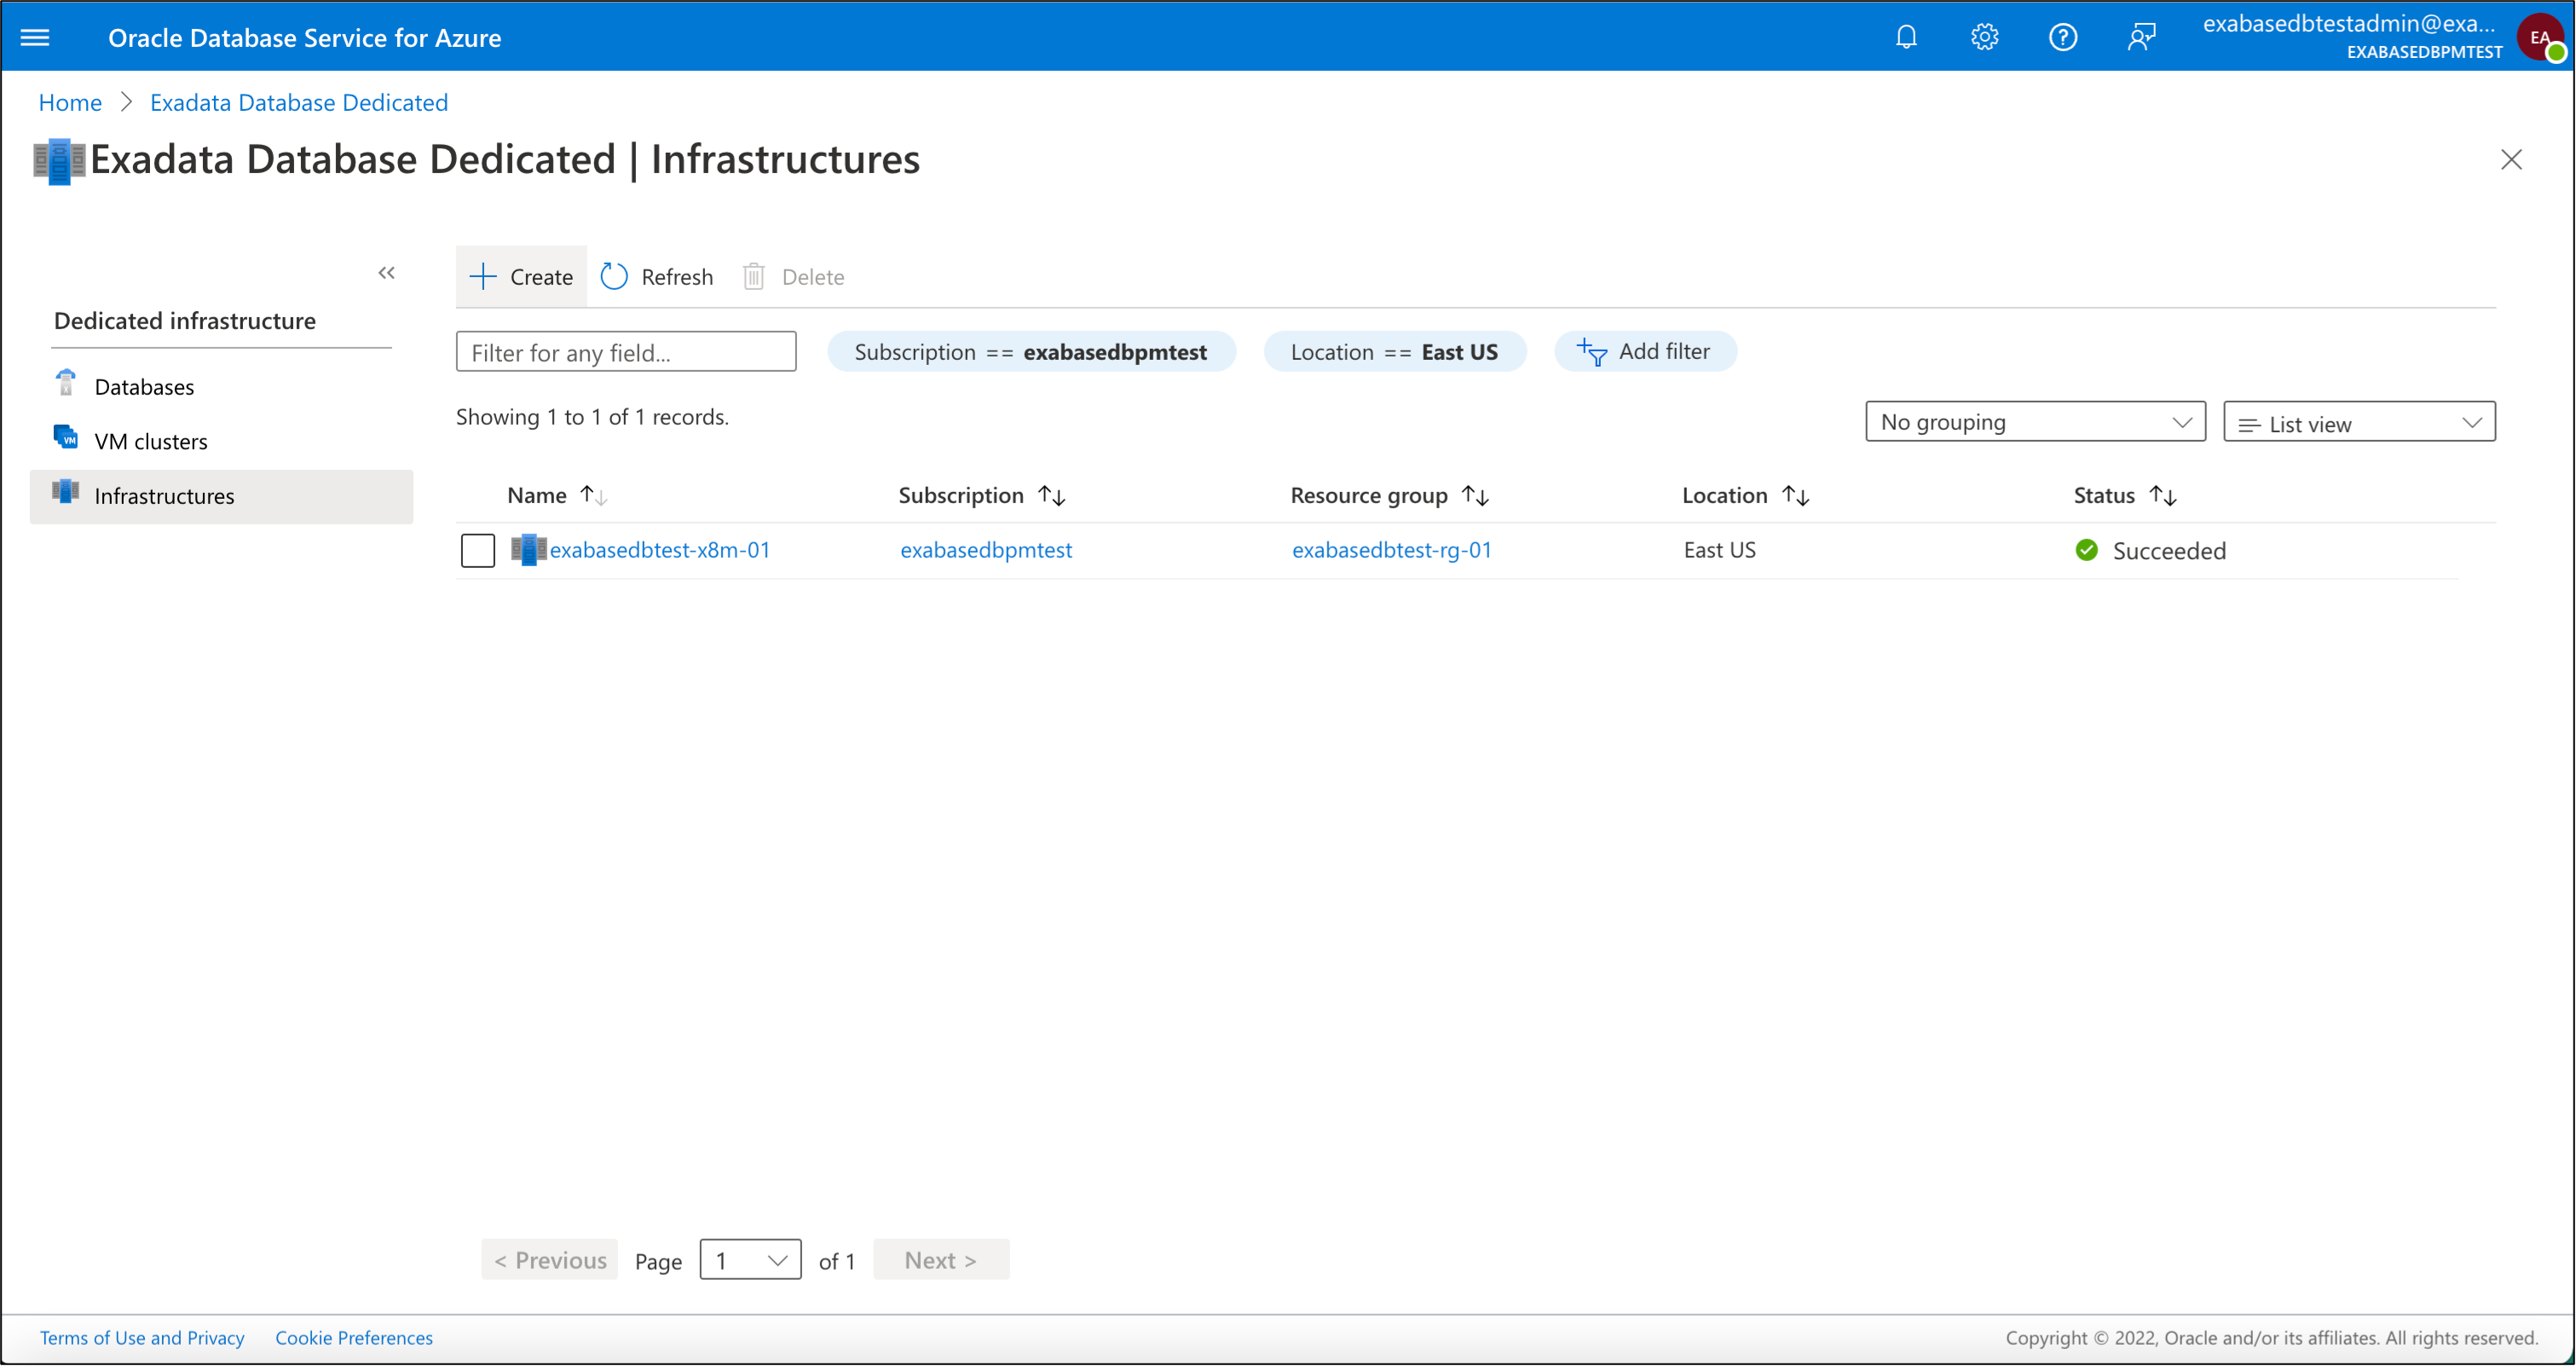
This opens up the “Create Exadata infra” wizard. To learn more about each of the tabs to provision Exadata Infrastructure, you can find the ODSA documentation here.
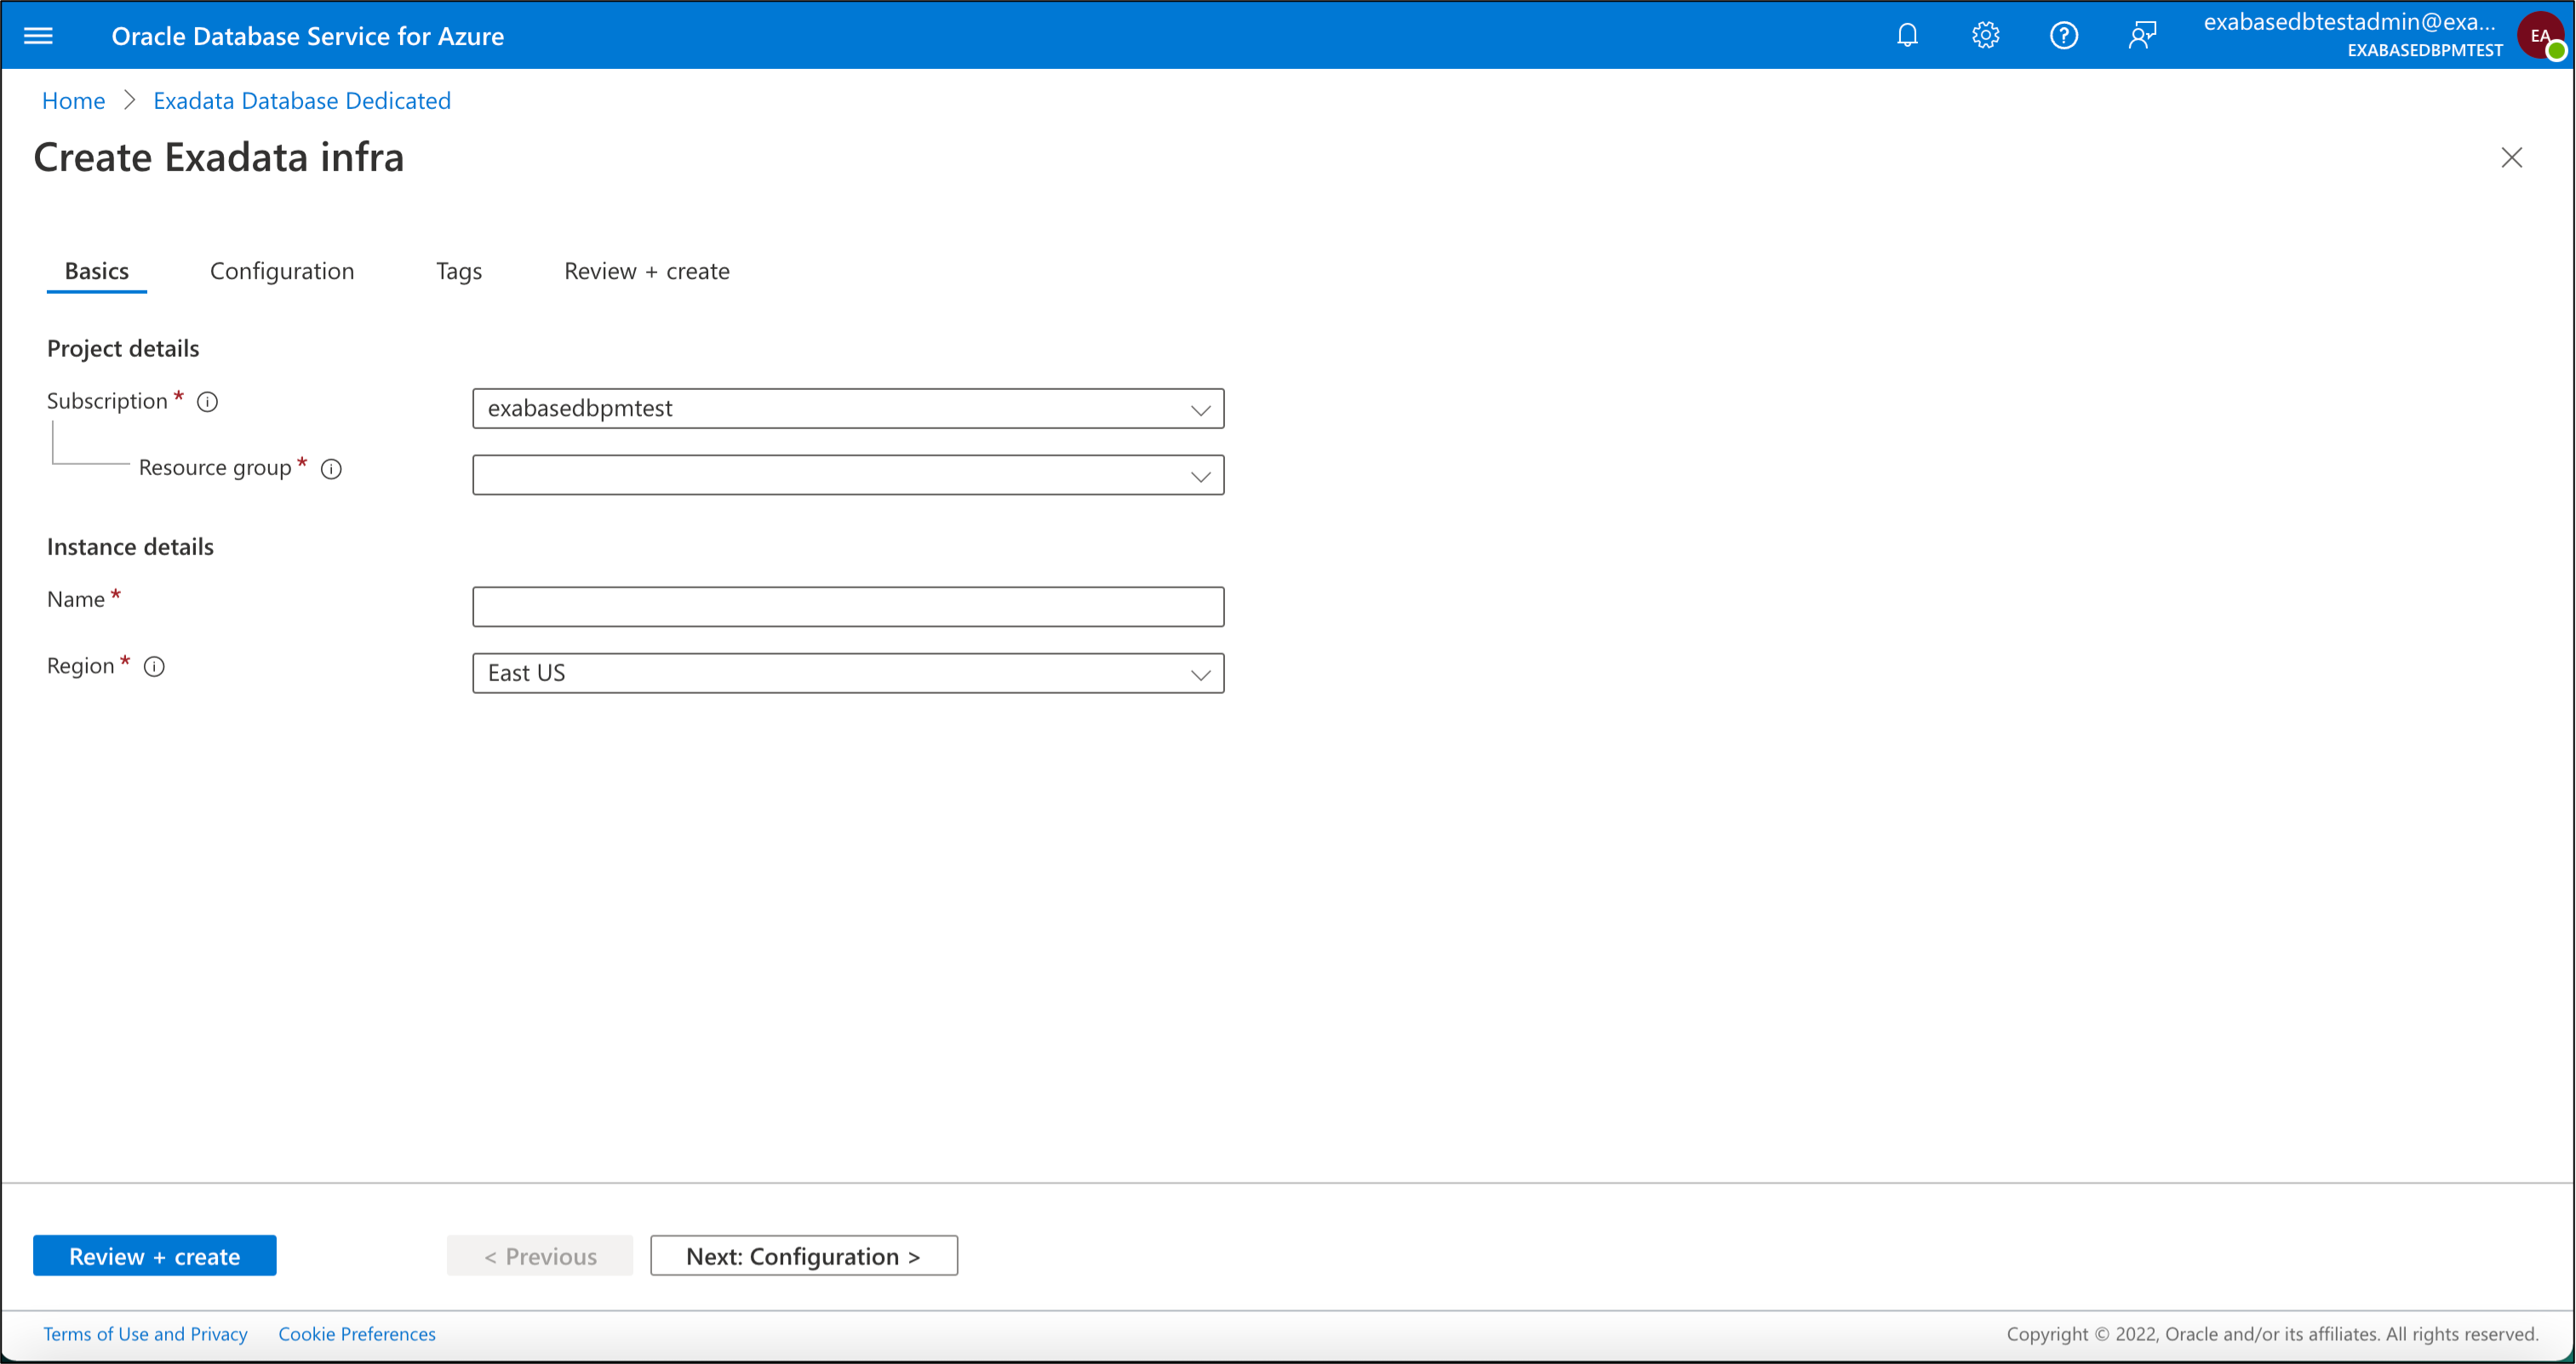
Click the Next: Review + create > button, review the summary screen and once validation has succeeded, click “Create”.
2) Create the Exadata VM Cluster
On the Exadata Database home page we will click “VM Clusters” on the left (see below) then select the “Create” link at the top which opens a wizard to create the Exadata VM Cluster resource.
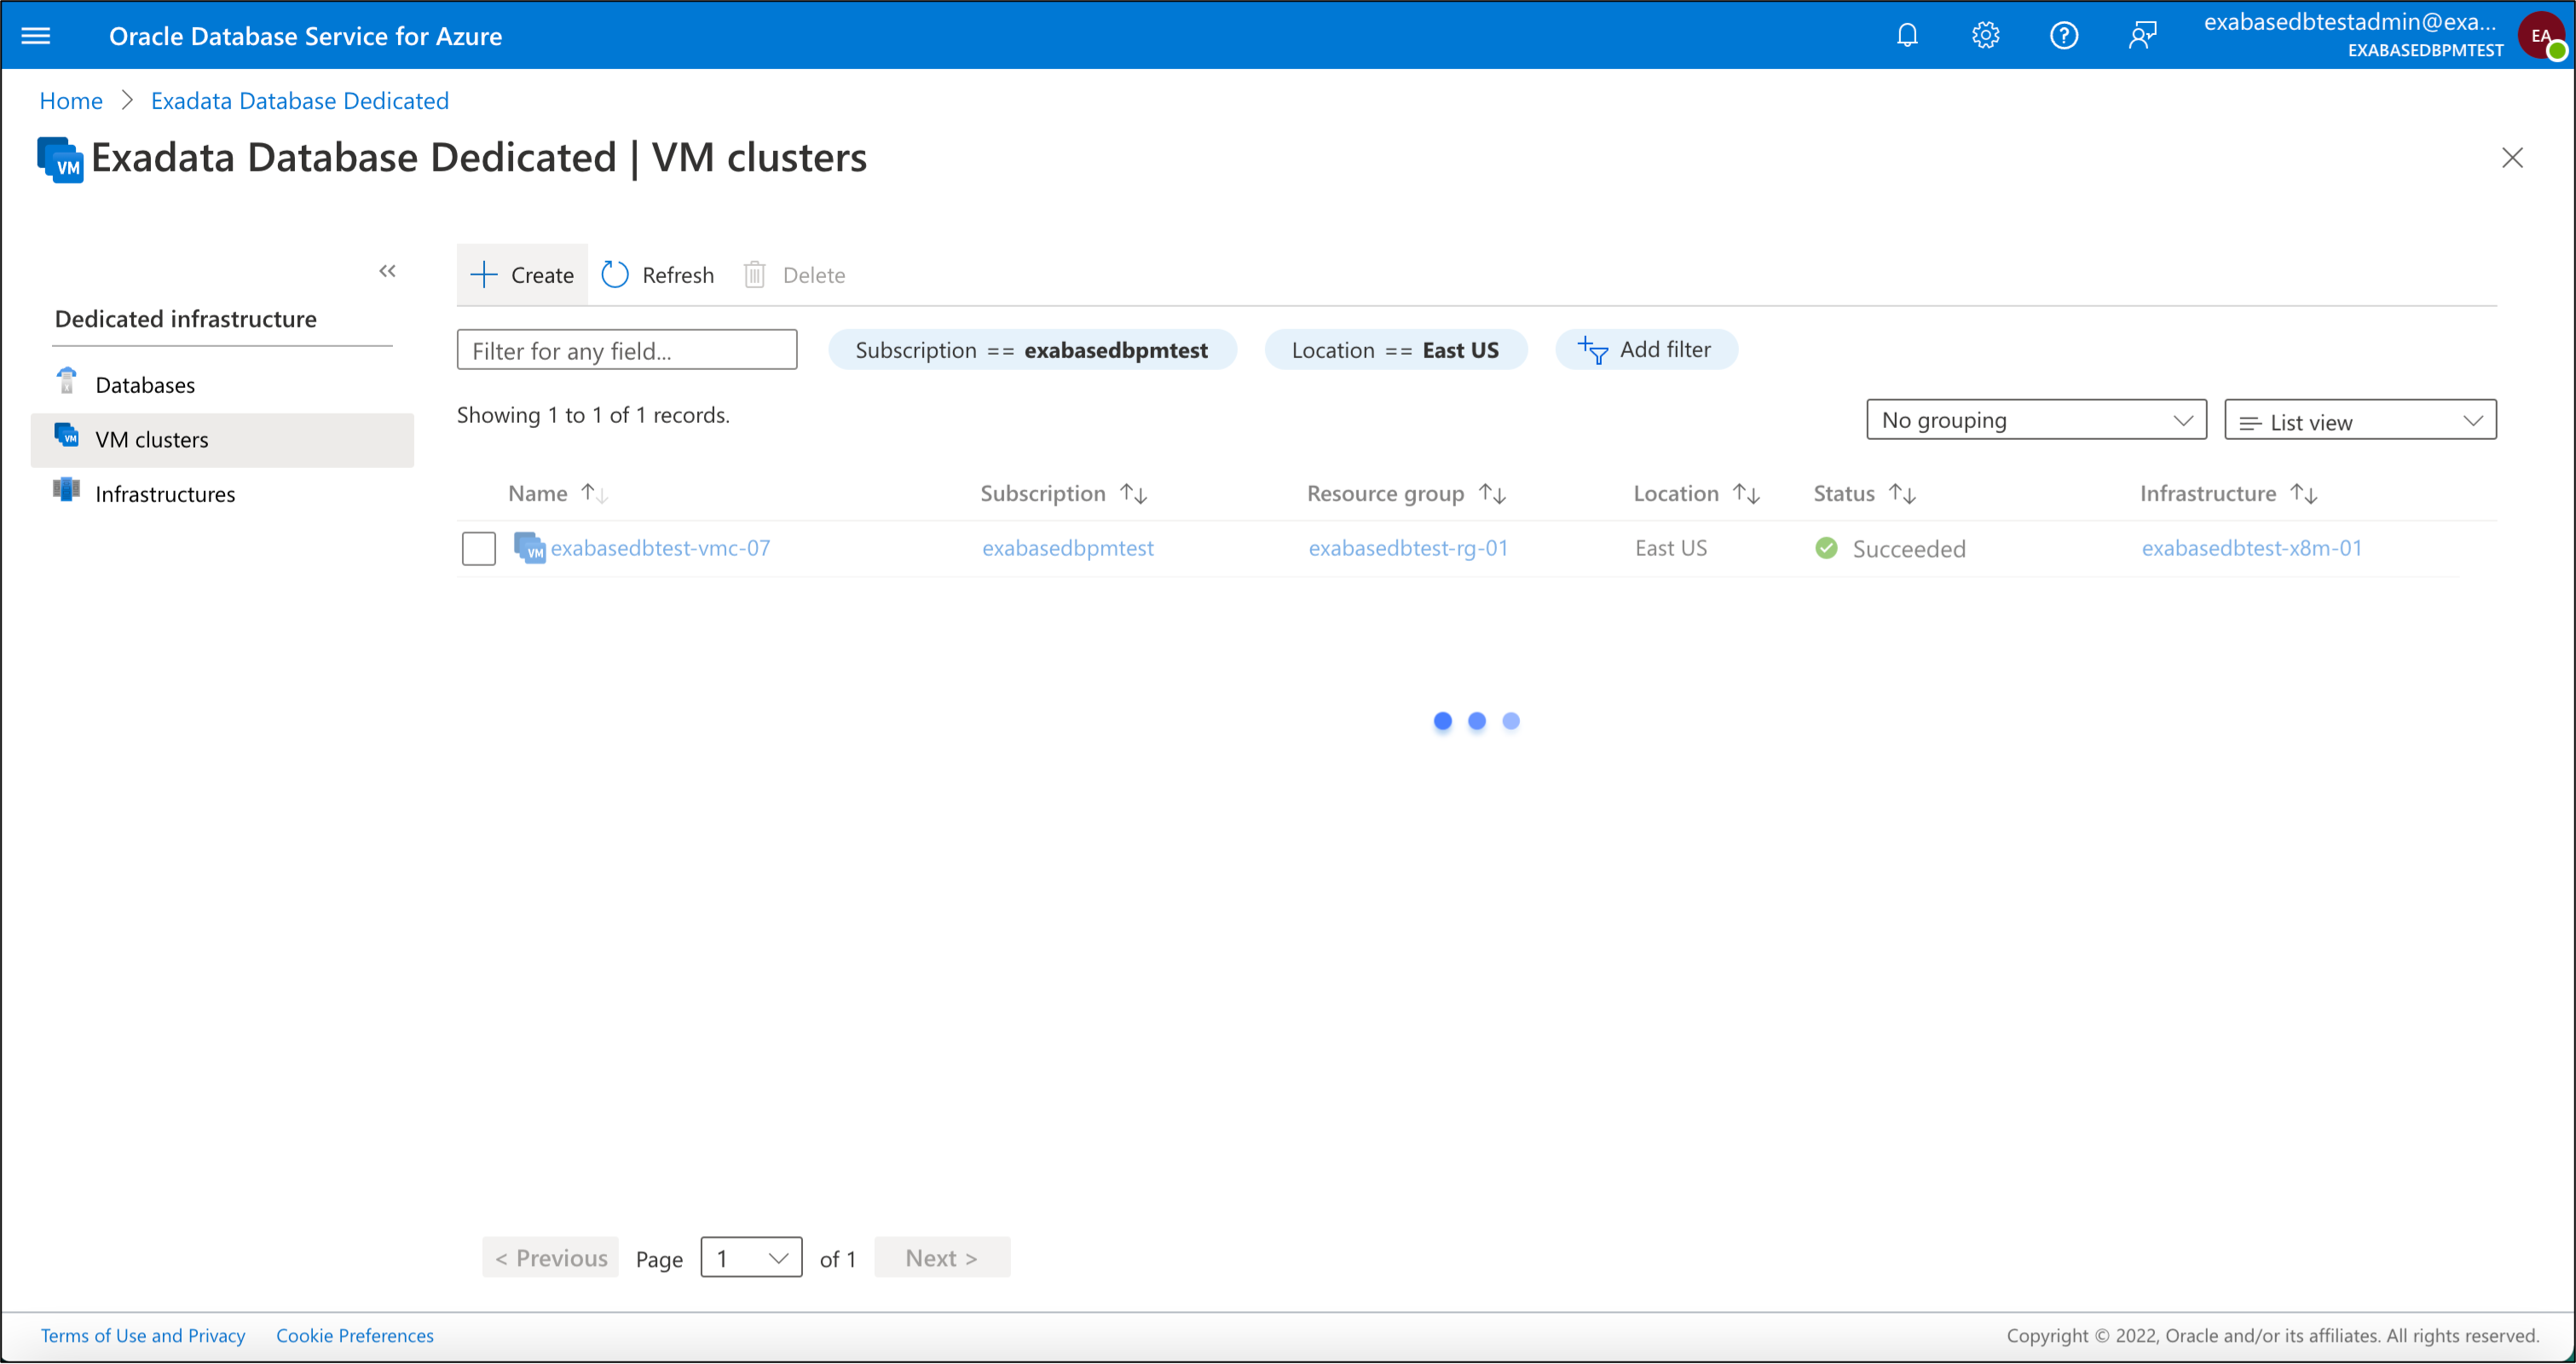
Here you have a series of tabs to provision the Exadata VM Cluster, to learn more, consult the documentation here.
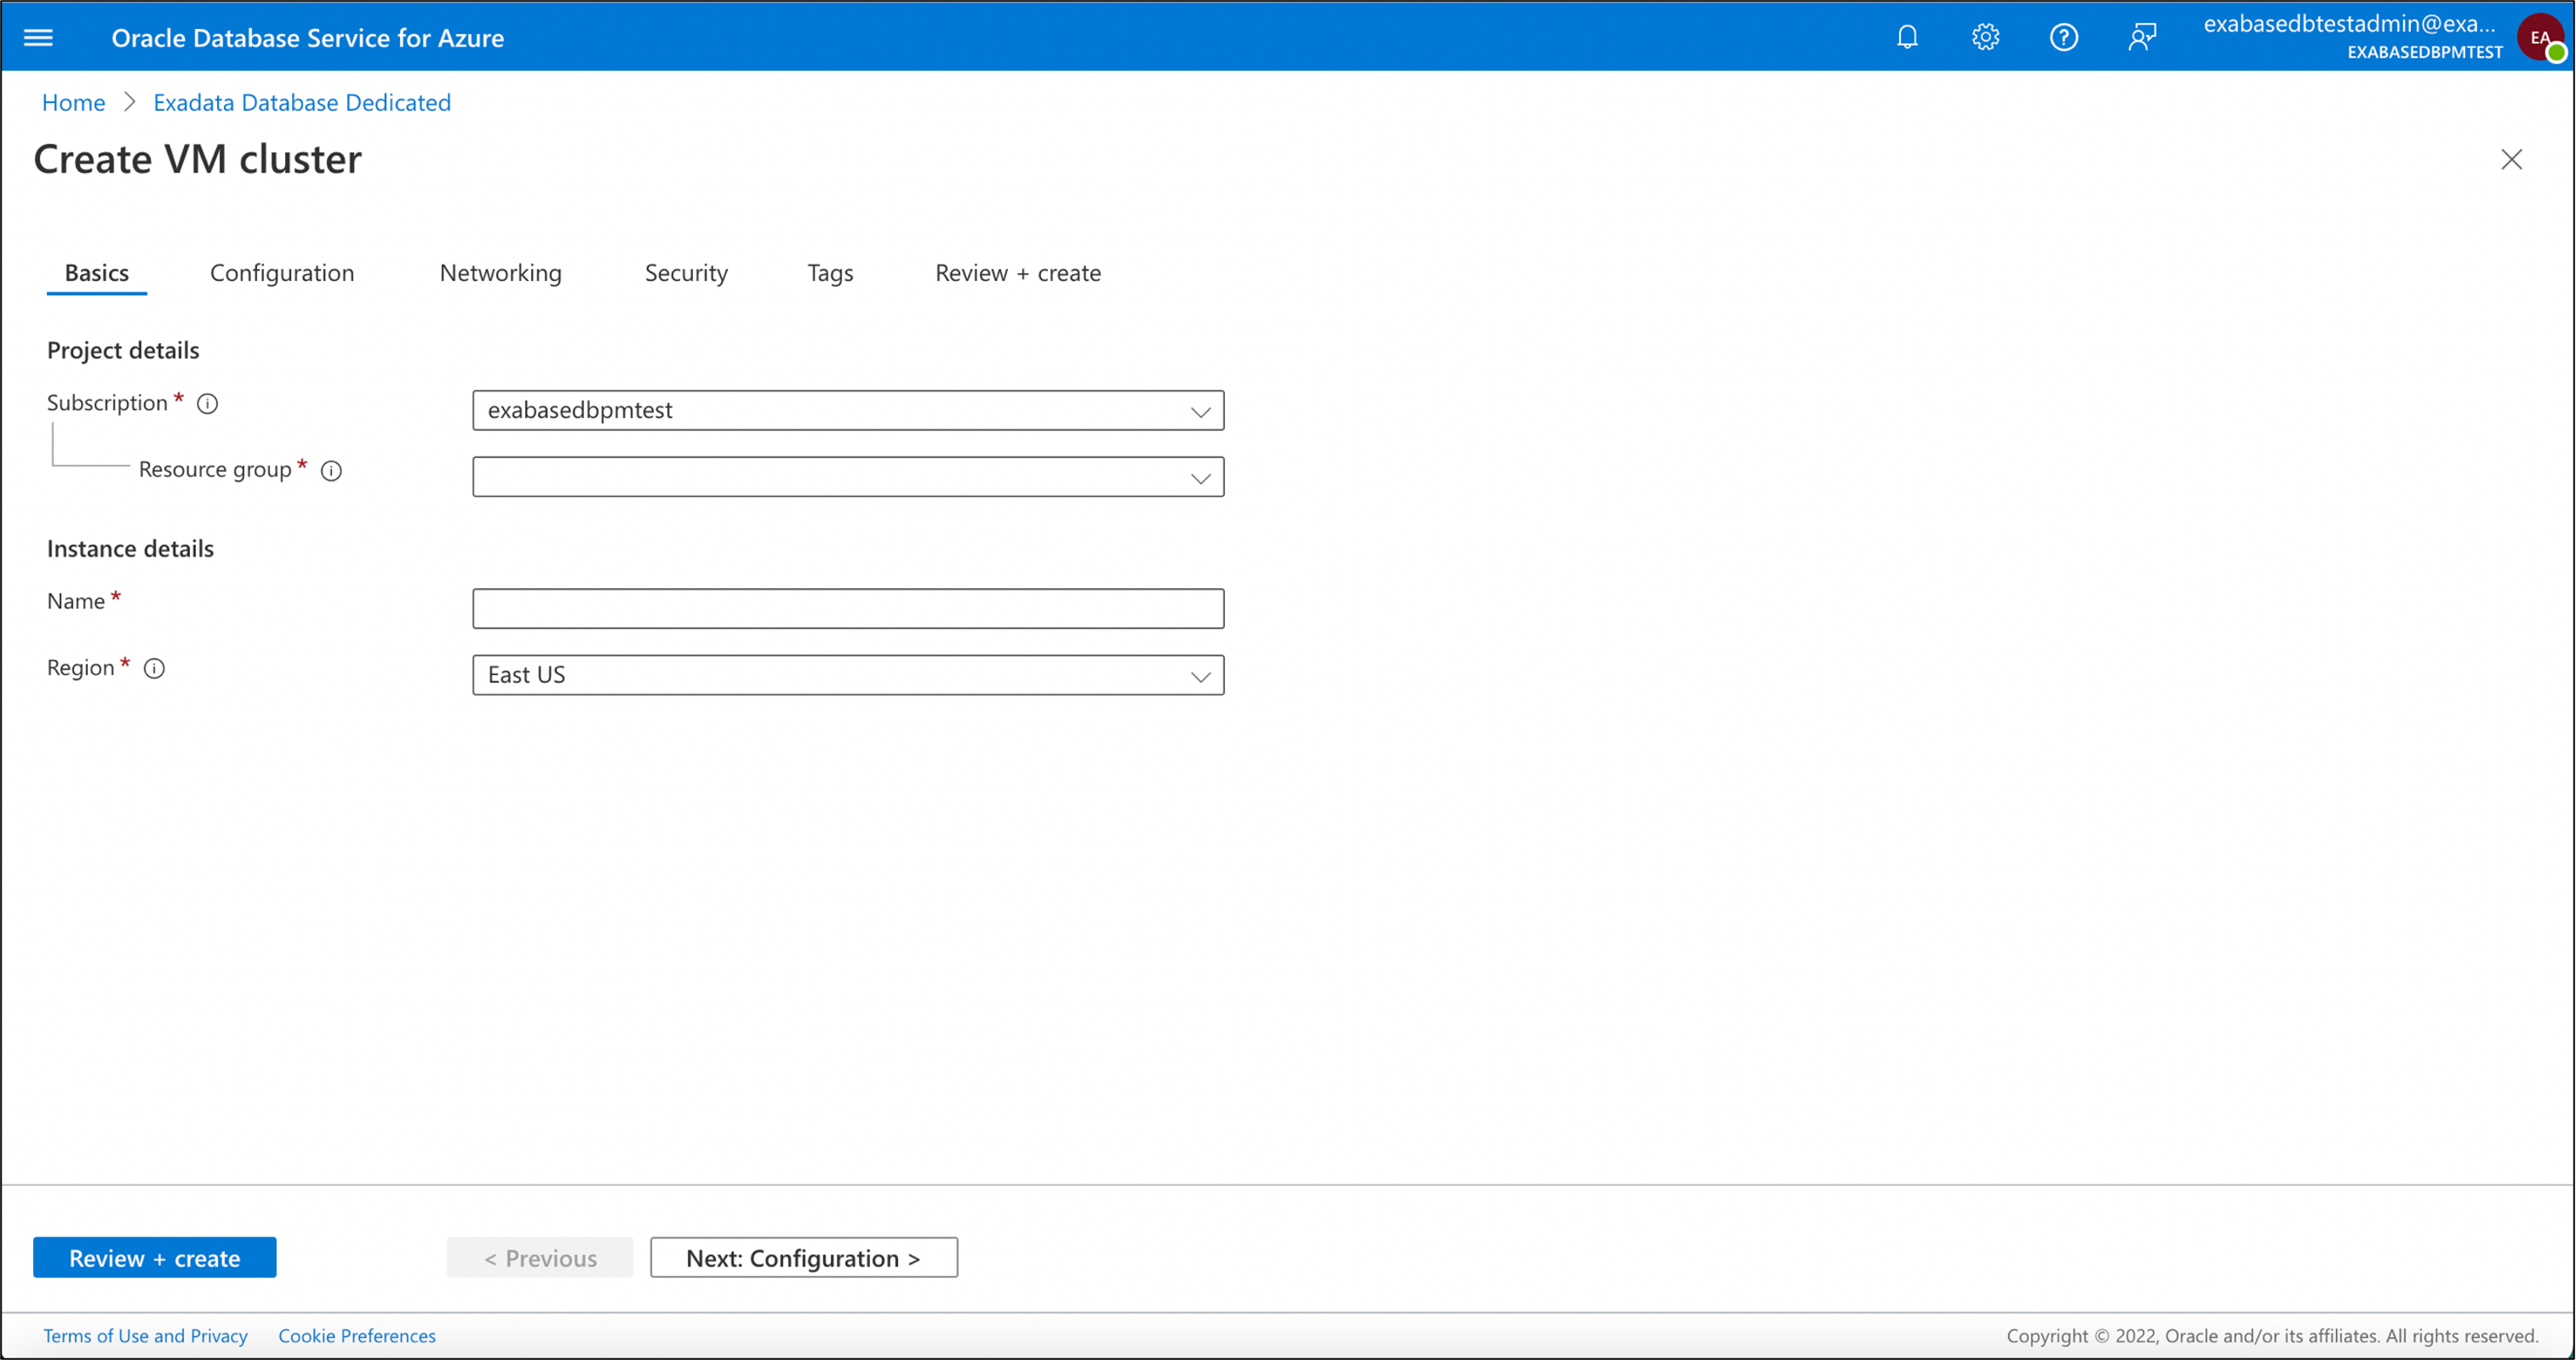
Click Next: Review + create > button to open the Review + create tab
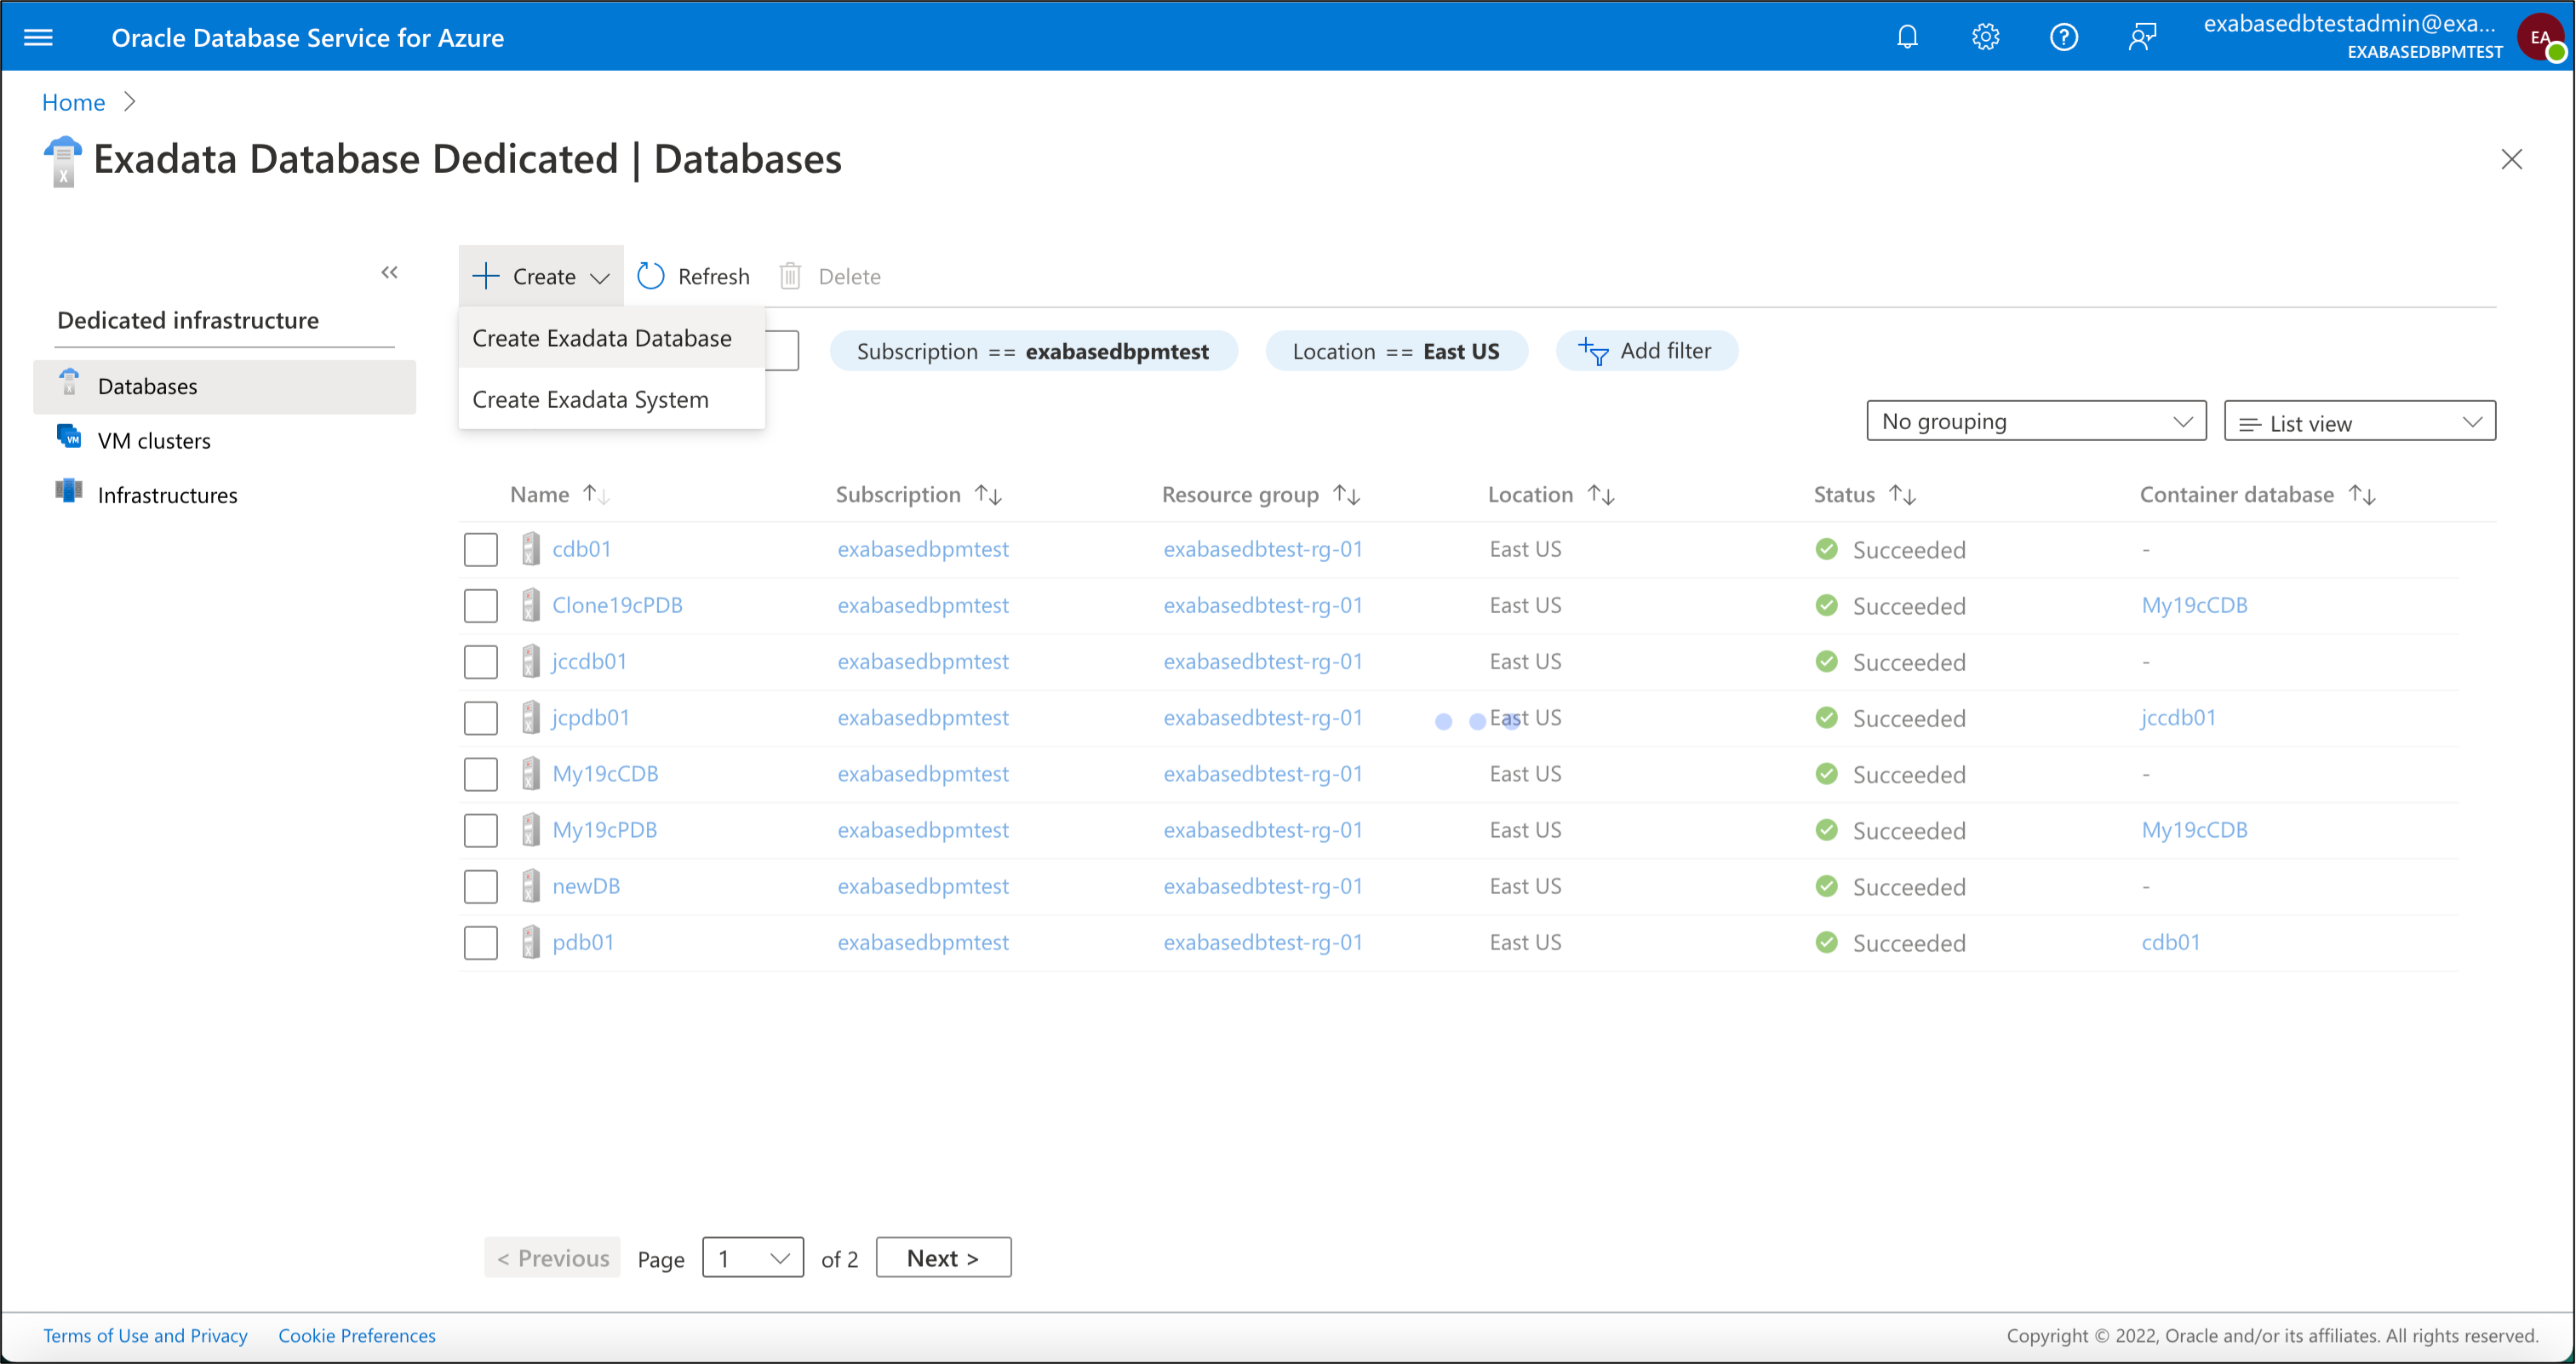
3) Provision the Exadata Database
Finally on the Exadata Database home page we will click “Databases” on the left (see below), then select the “Create Exadata Database” link at the top which opens a wizard to create the Exadata Database resource.
Here you have the final set of tabs to navigate in order to provision the Exadata Database:
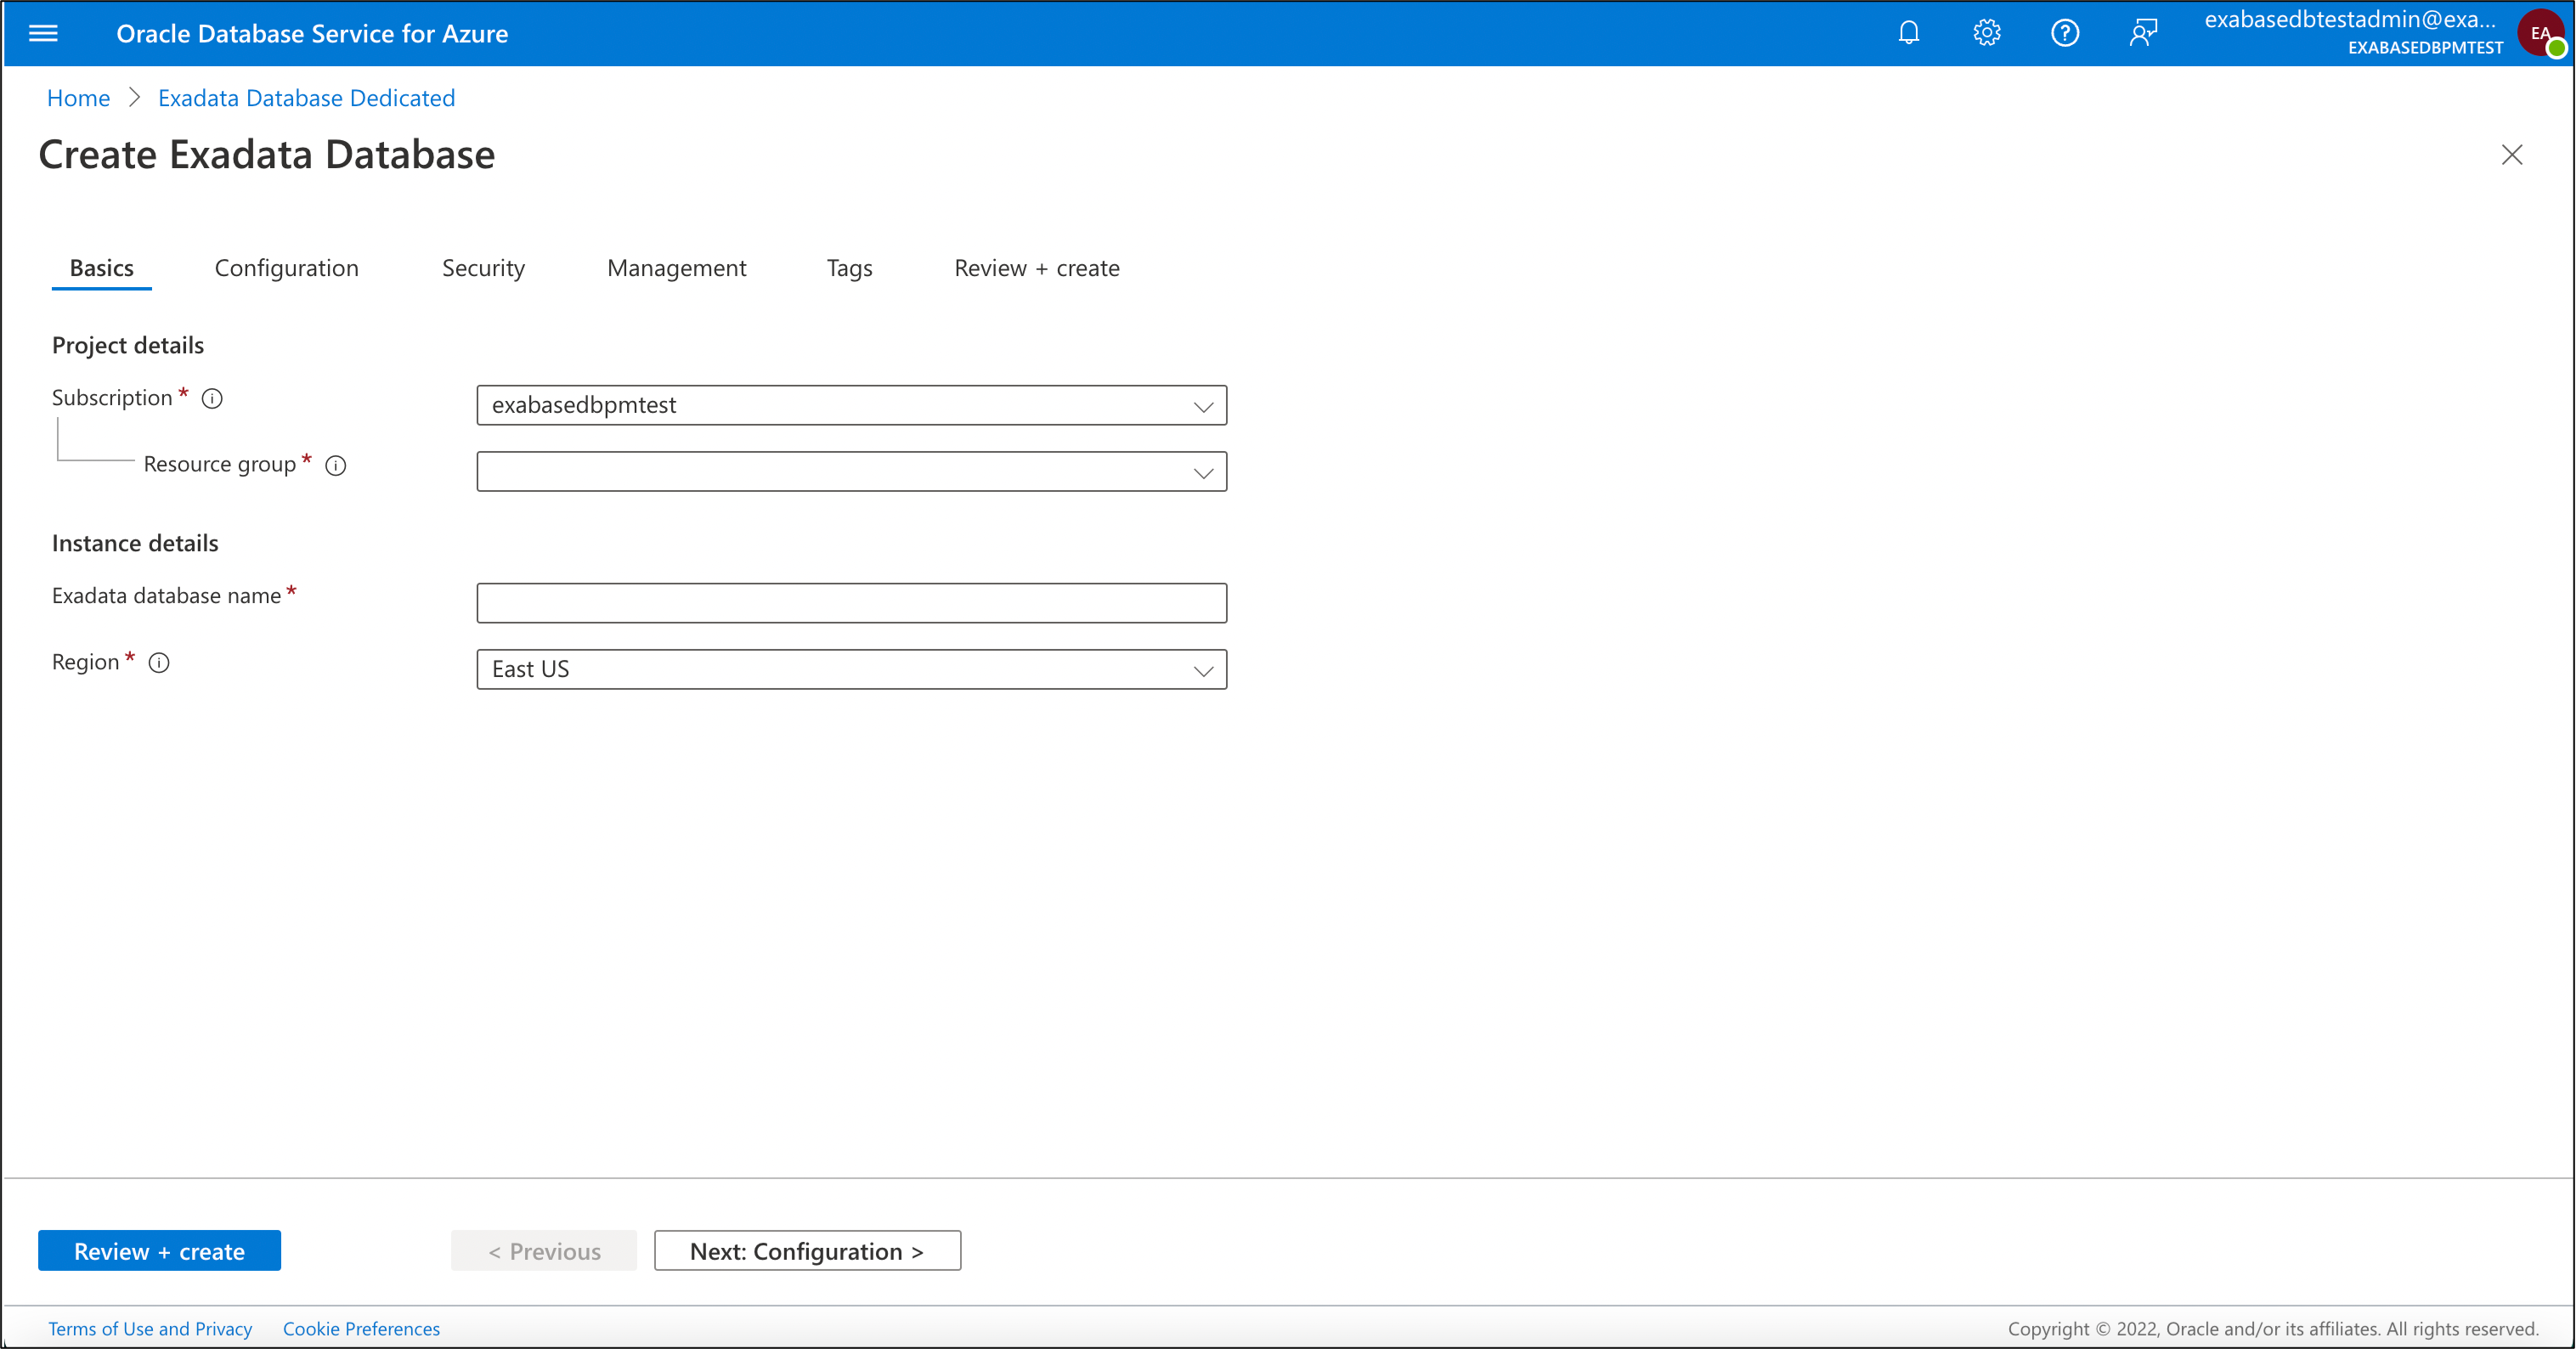
To learn more about the required inputs for each tab, consult the documentation here
Finally review and click create.
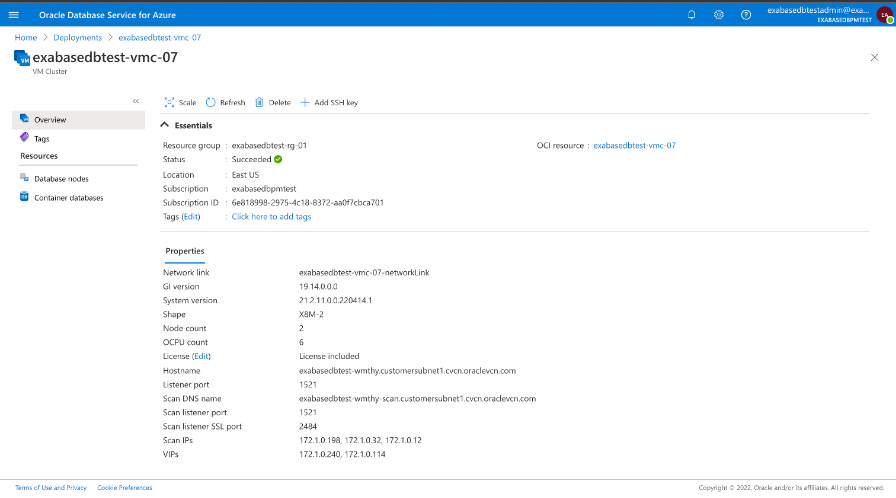
Once provisioned you will see the status overview. Here you can see that the ExaDB X8M deployment completed successfully
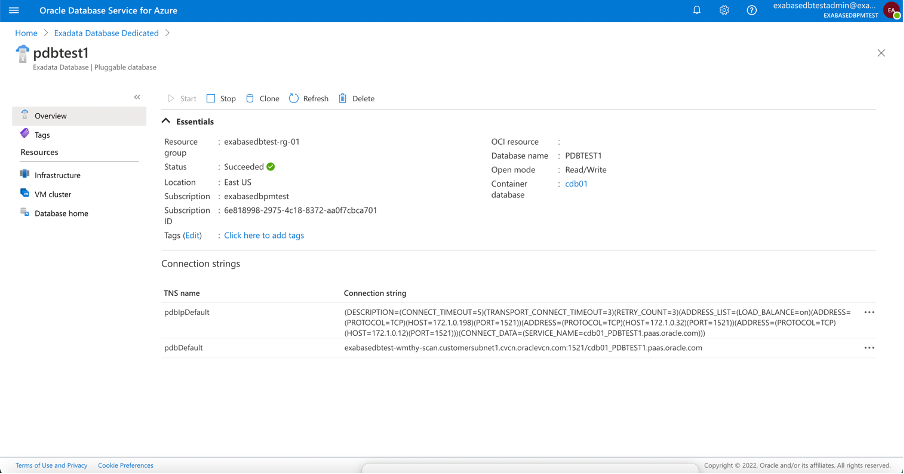
Finally, use the database connection string for Azure applications to access the Oracle Database created in ODSA, you connect Azure Applications to the Oracle Database the same way as today.
Each database resource created in ODSA obtains an Azure Connection String you can use to connect to the database from any Azure application. During provisioning, ODSA creates network connections between the cloud environments. During database provisioning, ODSA defines the DNS entries and connection strings needed to access the resource from Azure.
Azure developers (and applications) don’t need any prior knowledge about ODSA, they just the connection string. The connection string is published on the custom dashboard created in Azure for the database so developers don’t have to leave the Azure Portal to access the applicable databases from their applications.
Azure Integrated Telemetry for Database Metrics – Logs and Events
Oracle Database metrics are exported from Oracle Cloud Infrastructure to Azure Application Insights and as previously mentioned, ODSA automatically creates an Azure dashboard for each database resource provisioned by the service.
The custom dashboard displays graphs for the Oracle Exadata Database Service metrics. This provides developers and administrators a tiled view of all the basic metrics in one place, giving developers the freedom to augment their dashboard with any other application metrics as a single pane of glass for observability.
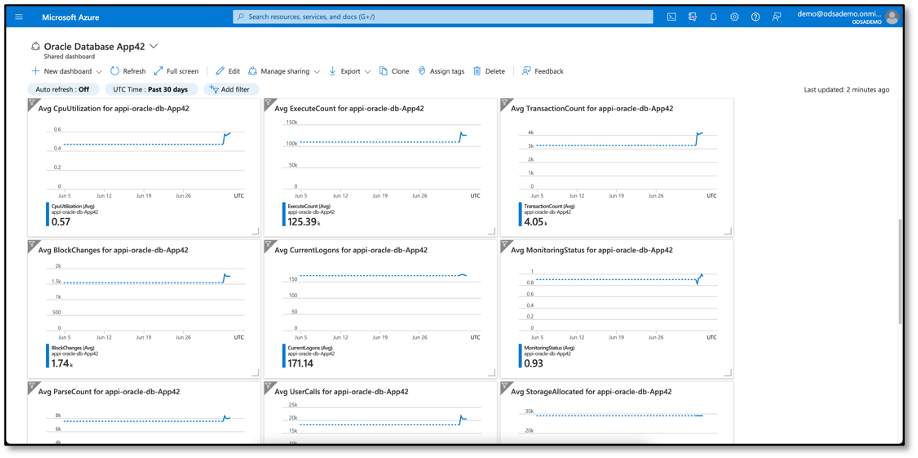
ODSA streams database events to Azure Log Analytics and Azure Event Grid, enabling administrators and developers to monitor and alert on events and trigger actions based on relevant events.
Summary
Oracle Database Service for Azure provides joint Microsoft and Oracle customers the freedom of choice with the capability to directly access the best Oracle Database services for Azure applications. Save time and cost with ODSA’s automated provisioning of identity federation and networking between Azure and Oracle clouds to achieve low latency and a single pane of glass with Azure integrated Oracle Database metrics for observability. ODSA is designed for Azure customers looking to realize a multicloud strategy by provisioning, managing, and monitoring Oracle Database Services from the ODSA Portal as easily as native Azure services, seamlessly, as if in one cloud.
More Info
To learn more about how ODSA works, read the technical blog overview from Max Romanenko, VP of OCI Engineering.
Additional resources
Product page: Oracle Database Service for Azure
IDC blog: Oracle and Microsoft Simplify the Path to Multicloud Choice
Oracle Database Service for Azure documentation
Announcing Oracle Database Service for Azure
Getting Started with Autonomous Database on Oracle Database Service for Microsoft Azure
