Oracle Autonomous Database Elastic Pools (elastic pools) are an innovative way to achieve financial and operational consolidation benefits without the effort of physically consolidating databases. By taking advantage of elastic pools, your organization can achieve remarkable cost savings – up to 87% – while maintaining flexibility and efficiency in your database operations. Elastic pools work with existing Oracle Autonomous Databases or newly migrated databases to Oracle Autonomous Database. By adding databases to an elastic pool, you’re utilizing a pool of ECPUs, whose cost is shared across all databases in an elastic pool for specified time period (e.g., hourly). For more details on Elastic Pools, see this blog.
You can now take advantage of these benefits on Google Cloud with our new Oracle Database@Google Cloud service. Oracle Database@Google Cloud lets you quickly build modern apps with Oracle’s best cloud databases – Oracle Exadata Database Service and Oracle Autonomous Database – in combination with Google Cloud’s powerful app dev, analytics and AI tools. You can build apps faster, more easily and with the security you expect from Oracle Database.
In this blog, you will learn how to deploy Oracle Autonomous Database Elastic Pools on Google Cloud. Autonomous Databases can easily be added to a new or existing elastic pool in Oracle Database@Google Cloud and, if needed, can just as easily be moved out of an elastic pool.
Elastic Pool Concepts
Before we start, it is essential to understand the significant concepts of elastic pools.
- Pool Leader: An Autonomous Database pool leader creates the pool and is the consolidation point for billing. There is one and only one pool leader per pool. The pool leader must also not be part of any other elastic pool. The pool leader must be a Transaction Processing database, but the pool can contain any mix of Transaction Processing, Data Warehouse, JSON, or APEX type Autonomous Databases.
- Pool Member: An Autonomous Database billed as part of the elastic pool. Pool Members can only be part of one elastic pool at a time.
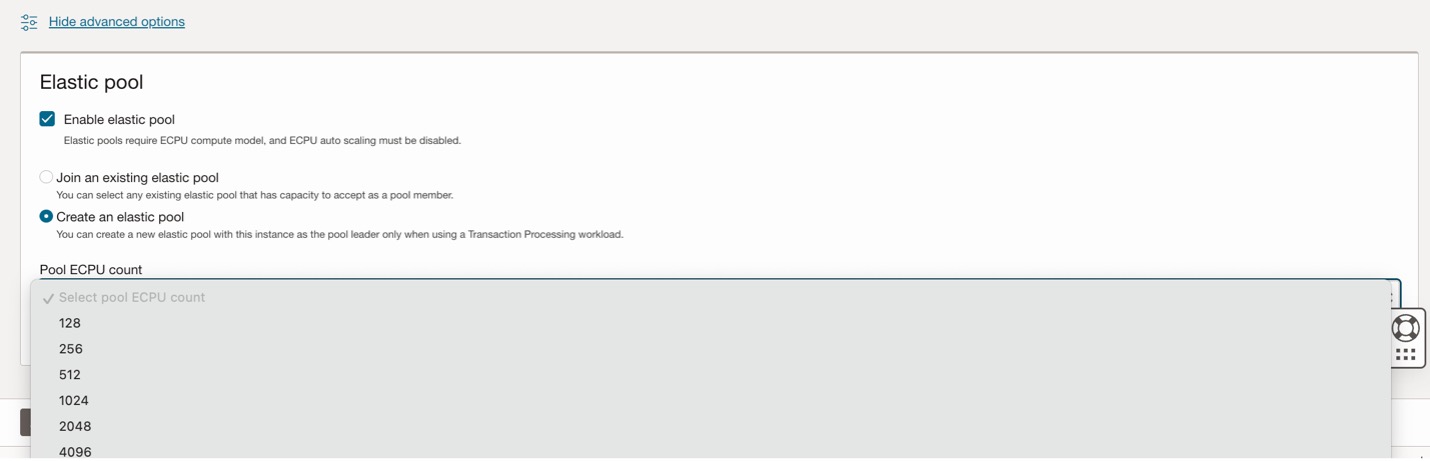
- Pool Size and Shape: The pool size must be one of the available elastic pool shapes: 128, 256, 512, 1024, 2048, or 4096 ECPUs.
- Pool Capacity: The pool capacity is assigned as 4X the pool size, establishing the maximum number of ECPUs that an elastic pool can use and it related memory and sessions capacity.
- Scaling: Autoscaling is not used in elastic pools and should be disabled.
- ECPU Minimums: Once a database is added to an elastic pool, the minimum ECPU size changes from 2 ECPUs to 1 ECPU.
By sharing compute resources, elastic pools shift the focus from managing individual database costs and allocations to managing a complete pool.
Getting Started on Google Cloud
In a previous blog, we outlined the steps to launch a standalone database on Autonomous Database running on Google Cloud. In this blog, we will create a pool leader database and multiple pool members. Using Google Cloud’s public offer, your journey to running Oracle Autonomous Database on Google Cloud is activated with an Oracle subscription configured from your Google Cloud account or between existing Google Cloud and OCI accounts. Federating identities between these tenancies is accomplished by simply configuring permissions and roles. OCI automatically creates predefined groups with corresponding policies to grant access to all projects within your Google Cloud entitlement.
The Oracle Autonomous Database on Google Cloud architecture requires a Google Cloud project and a Virtual Private Cloud to provide networking for application resources within a Google Cloud region. Using the OCI-managed network, the VPC application subnet connects to the Oracle Autonomous Database on Google Cloud, operating in an OCI child site collocated in the same Google Cloud region.
Autonomous Databases running on Google Cloud are launched from Google Cloud. You should have previously performed the one-time onboarding of Oracle Database@Google Cloud, but if you still need to, the directions are in the documentation.
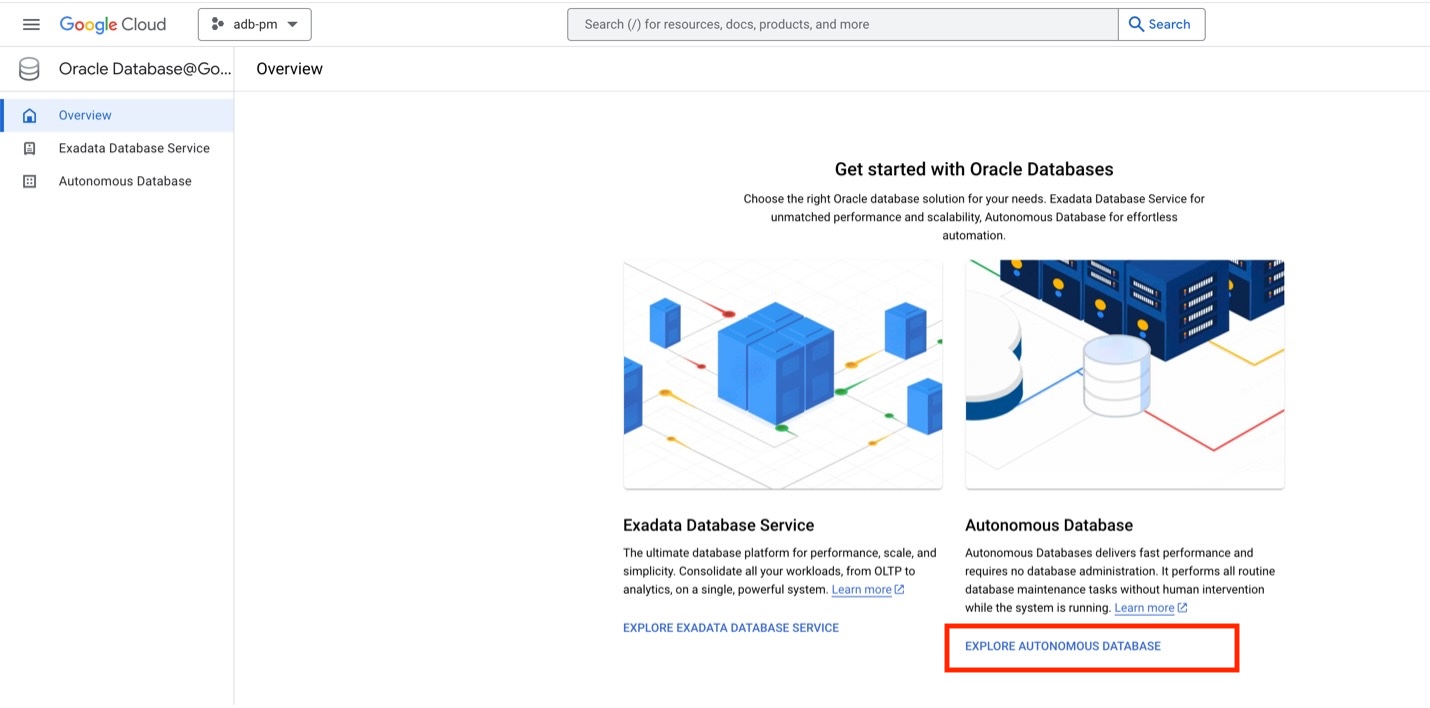
The first step to set up an elastic pool is to open the Oracle Database@Google Cloud in Google Cloud and select “Explore Autonomous Database.”
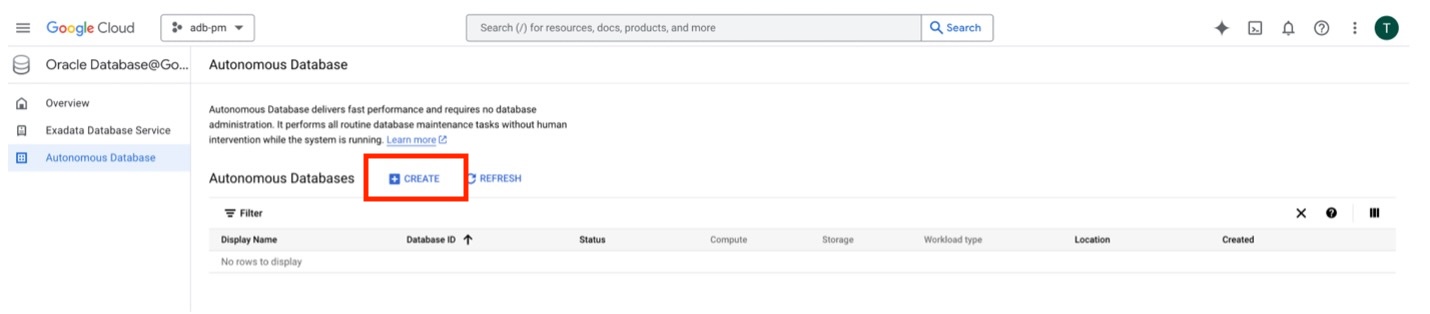
On the subsequent screen, click “+Create” to create a new Autonomous Database.
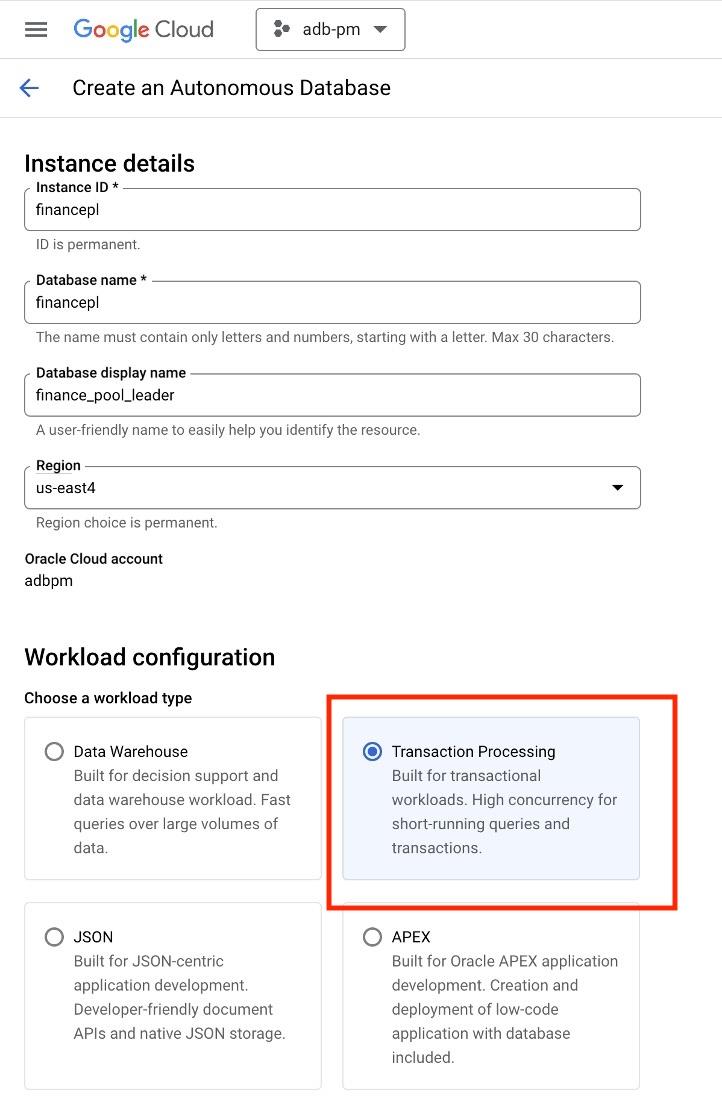
On the creation screen, fill in the appropriate information. This create database screen is shown here in multiple screen captures, but it is a single scrollable screen in the console. It can be helpful to name a pool leader with identifying characters. In this case, we are creating a pool for the finance organization using the prefix “finance” and “pl.” Next, select the proper regions since elastic pools are region-specific, and select “Transaction Processing” as the workload type since a pool leader must have a workload type of transaction processing.
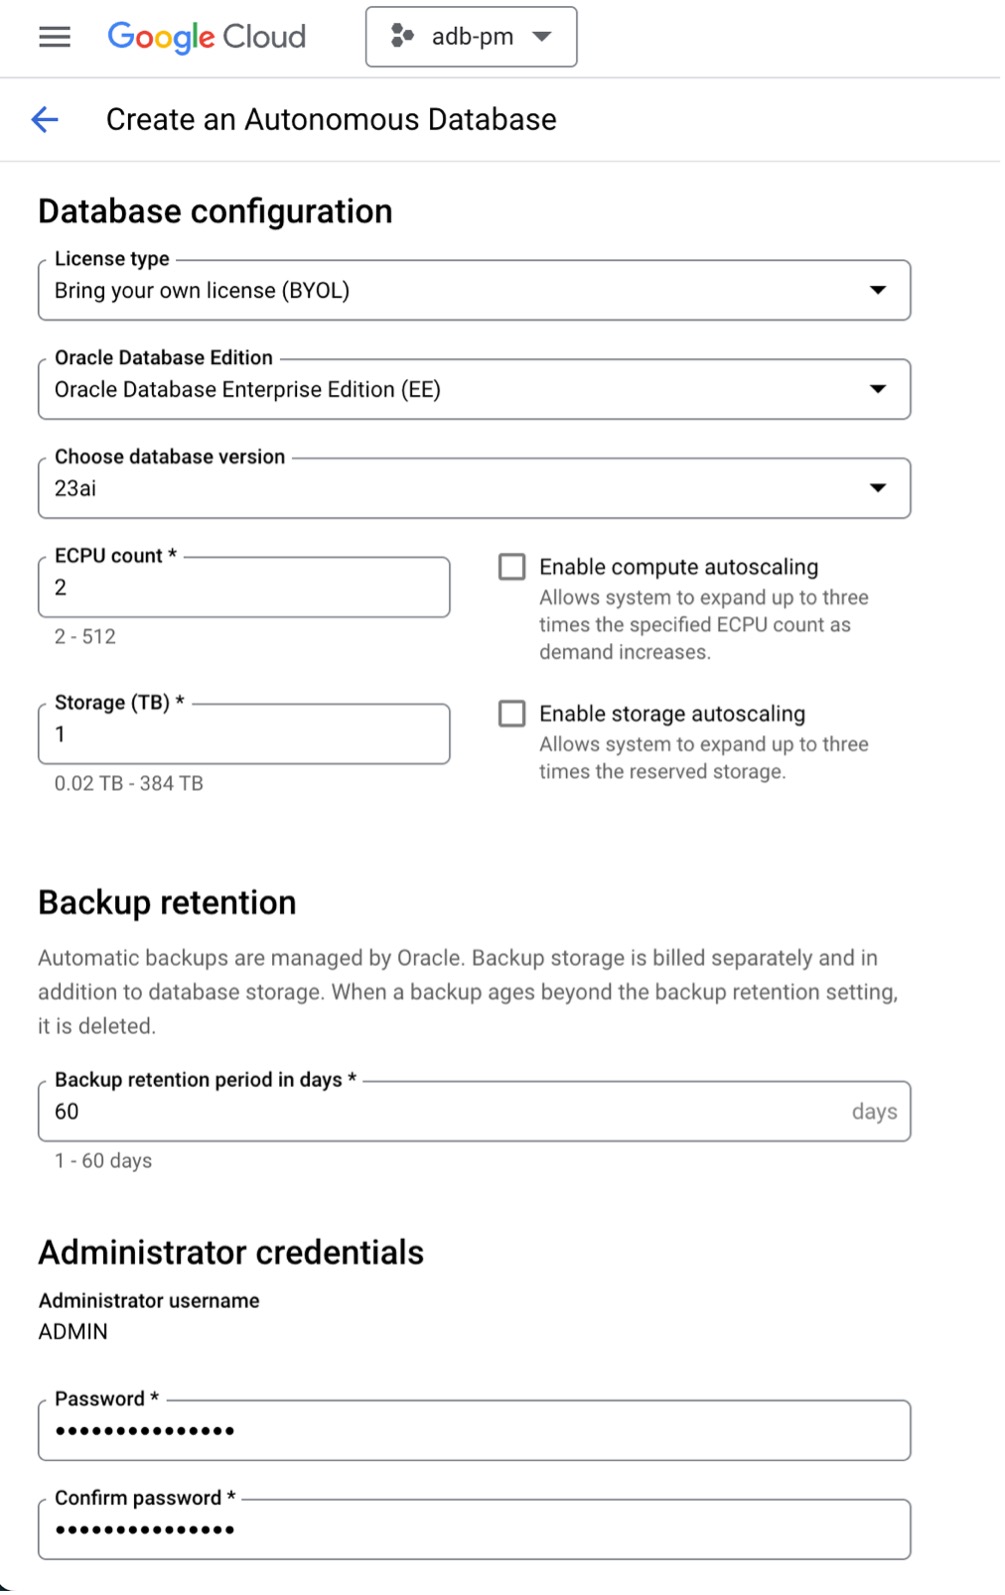
You can now add the license, database edition, and database version. For ECPUs, you can choose a minimum of 2, but after a database is added to an elastic pool, you can optionally lower this to 1 to further lower your costs. You should also uncheck Auto scaling since it will not be used in elastic pools. Be sure to add and remember the password for Administrator credentials.
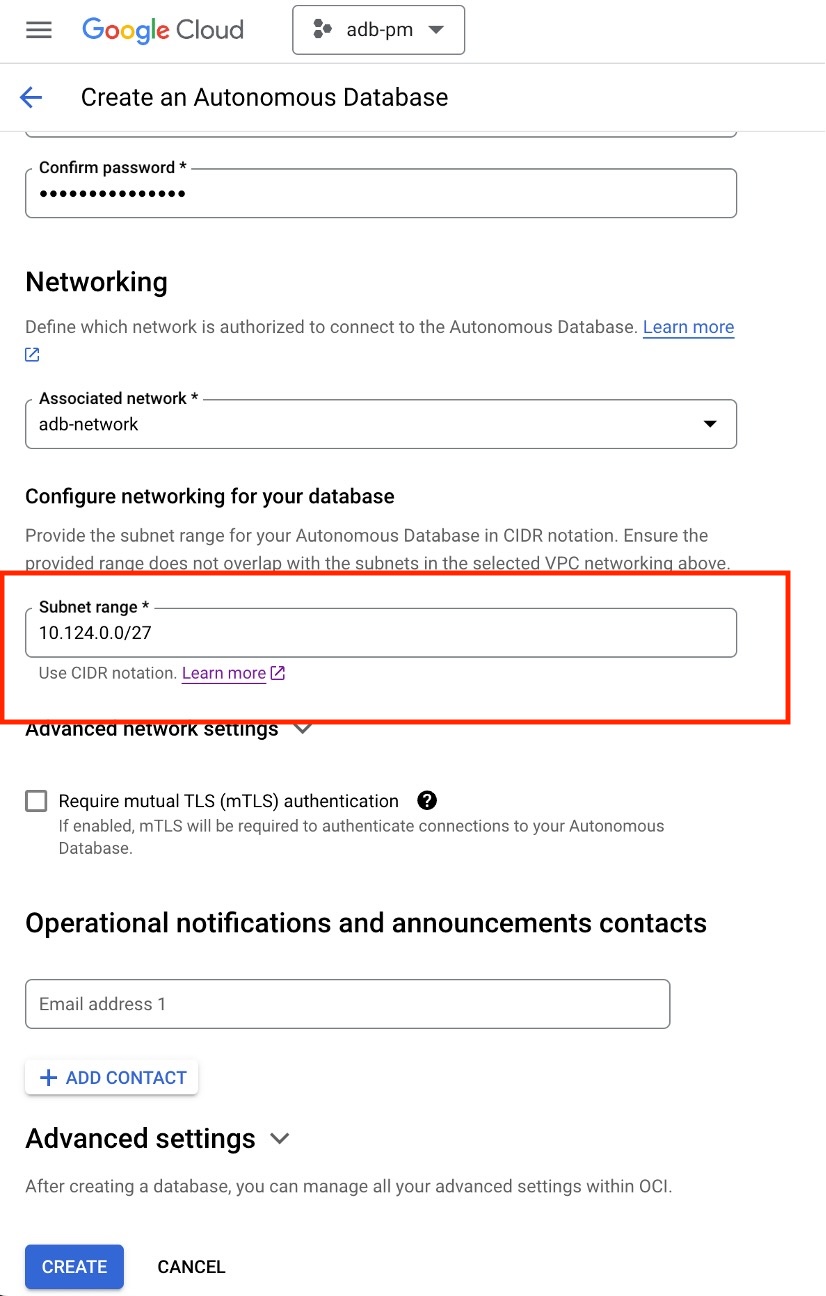
Next, you define your network. In this case, we used an existing Google VPC and chose a non-overlapping CIDR range with a minimum size of /27 as required by Autonomous Databases running at Google Cloud. We will skip the advanced settings and hit “Create”.
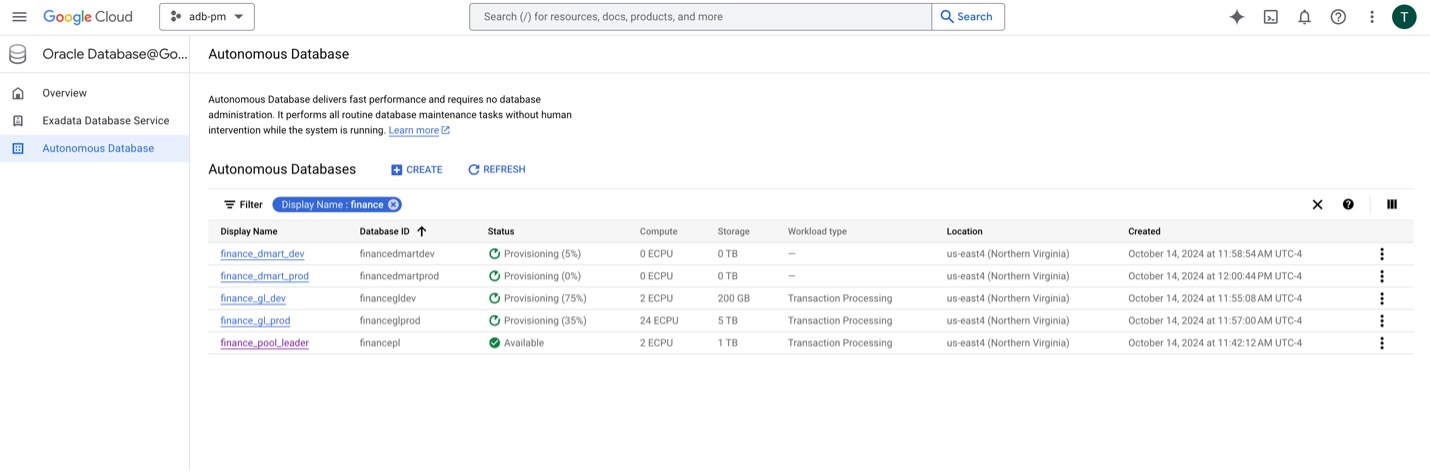
While waiting for the pool leader to provision, we can add four more databases that will become members of the elastic pool using a similar dialog.
| Name |
ECPUs |
Workload |
Storage |
CIDR |
| finance_gl_dev |
2 |
Transaction Processing |
200G |
10.124.1.0/27 |
| finance_gl_prod |
24 |
Transaction Processing |
5 TB |
10.124.2.0/27 |
| finance_dmart_dev |
2 |
Data Warehouse |
1TB |
10.124.3.0/27 |
| finance_dmart_prod |
24 |
Data Warehouse |
10TB |
10.124.4.0/27 |
Once the pool leader is fully provisioned, you can convert it to a pool leader. This is a one-time process that allows multiple members to join the pool. You do not need to wait for the members to be provisioned before converting the pool leader.
Create a Pool Leader
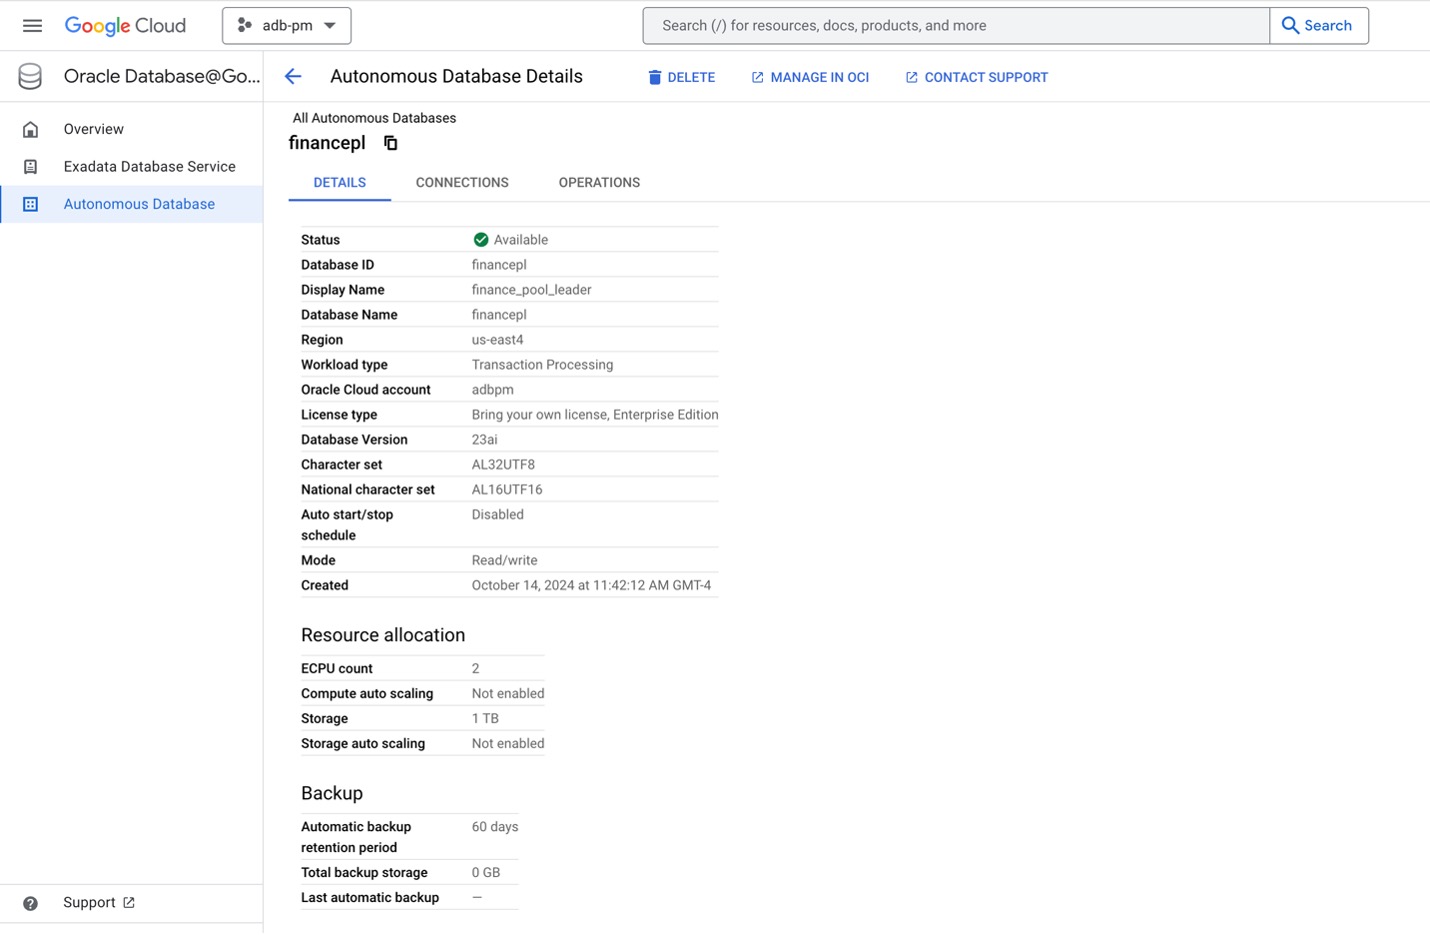
To convert the first database to a pool leader, you manage an Autonomous Database running at Google Cloud by clicking on it to show its details. You should first examine the characteristics to ensure they are as expected.
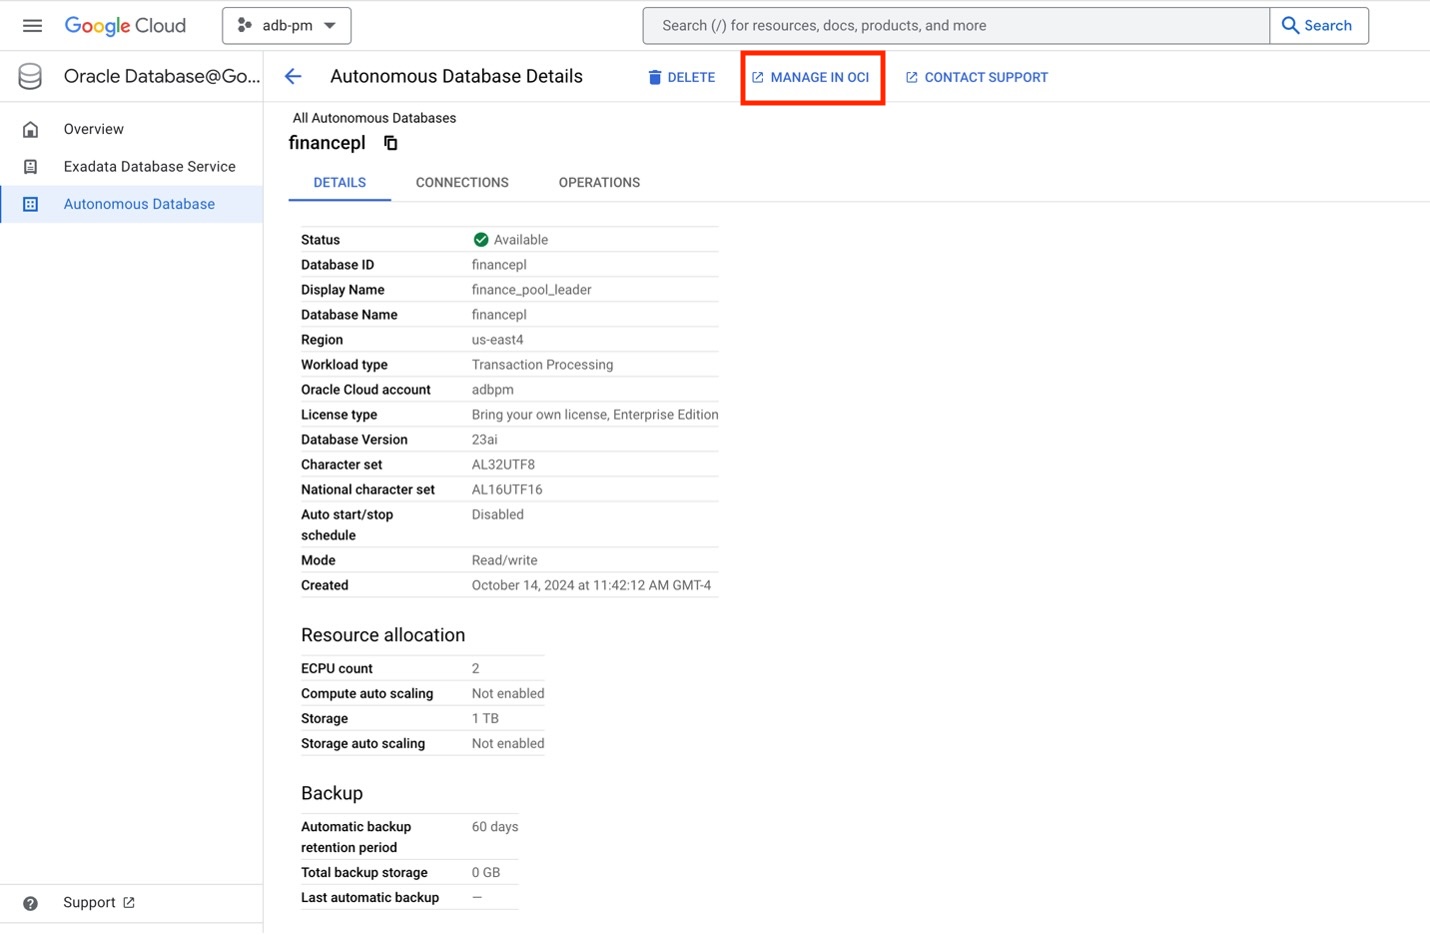
You can now manage the database like any other Oracle Autonomous Database from the child OCI console onboarded to this account. To switch to the OCI console, click “Manage in OCI,” which will open the OCI console in a new tab.
Once in OCI, you will see the database details. You should see two differences from a standard OCI Autonomous Database details screen.
- The subscription type should be Google Cloud.
- A Subscription Number.
You should also see that under Resource Allocation, we have Compute Autoscaling disabled, and you do not yet see an elastic pool assigned.
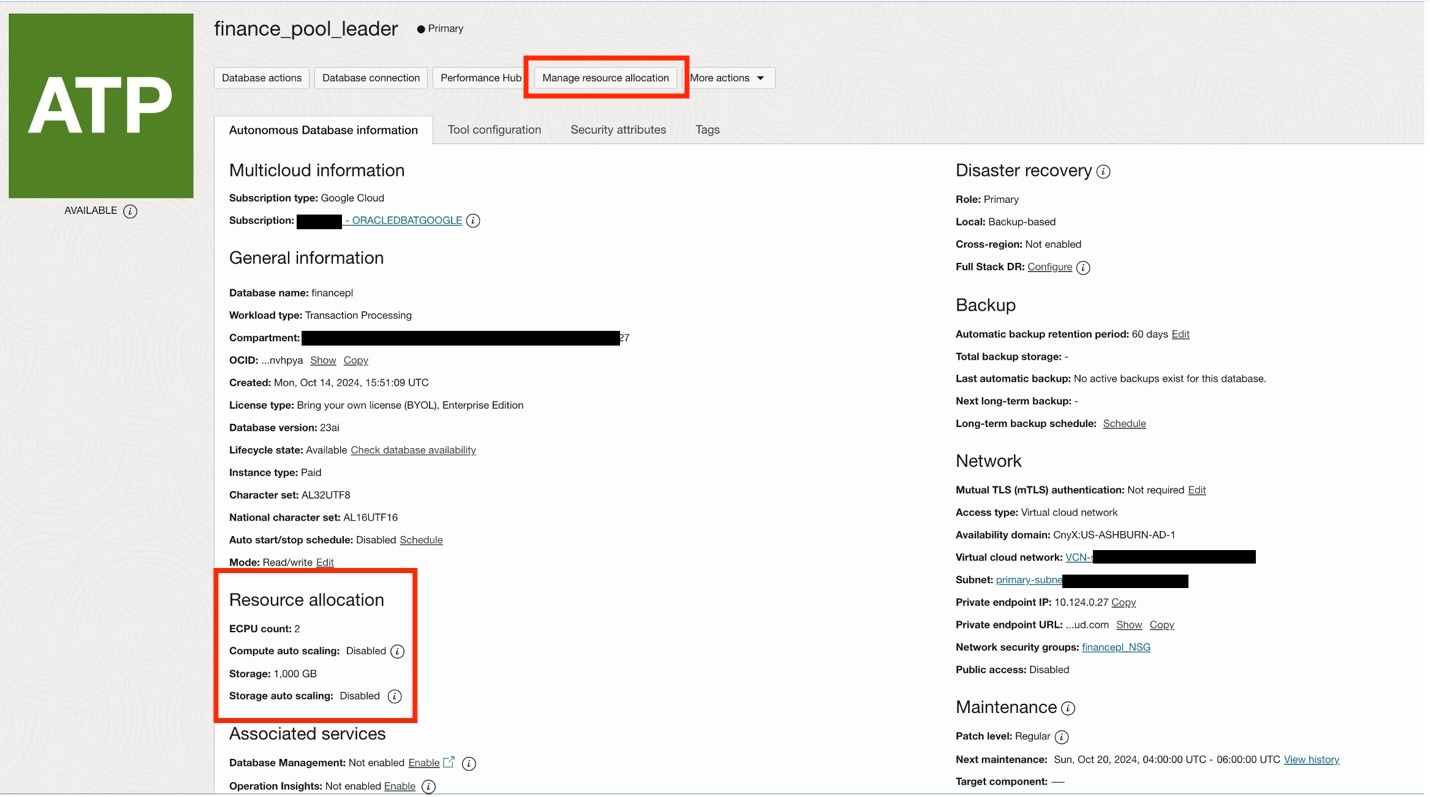
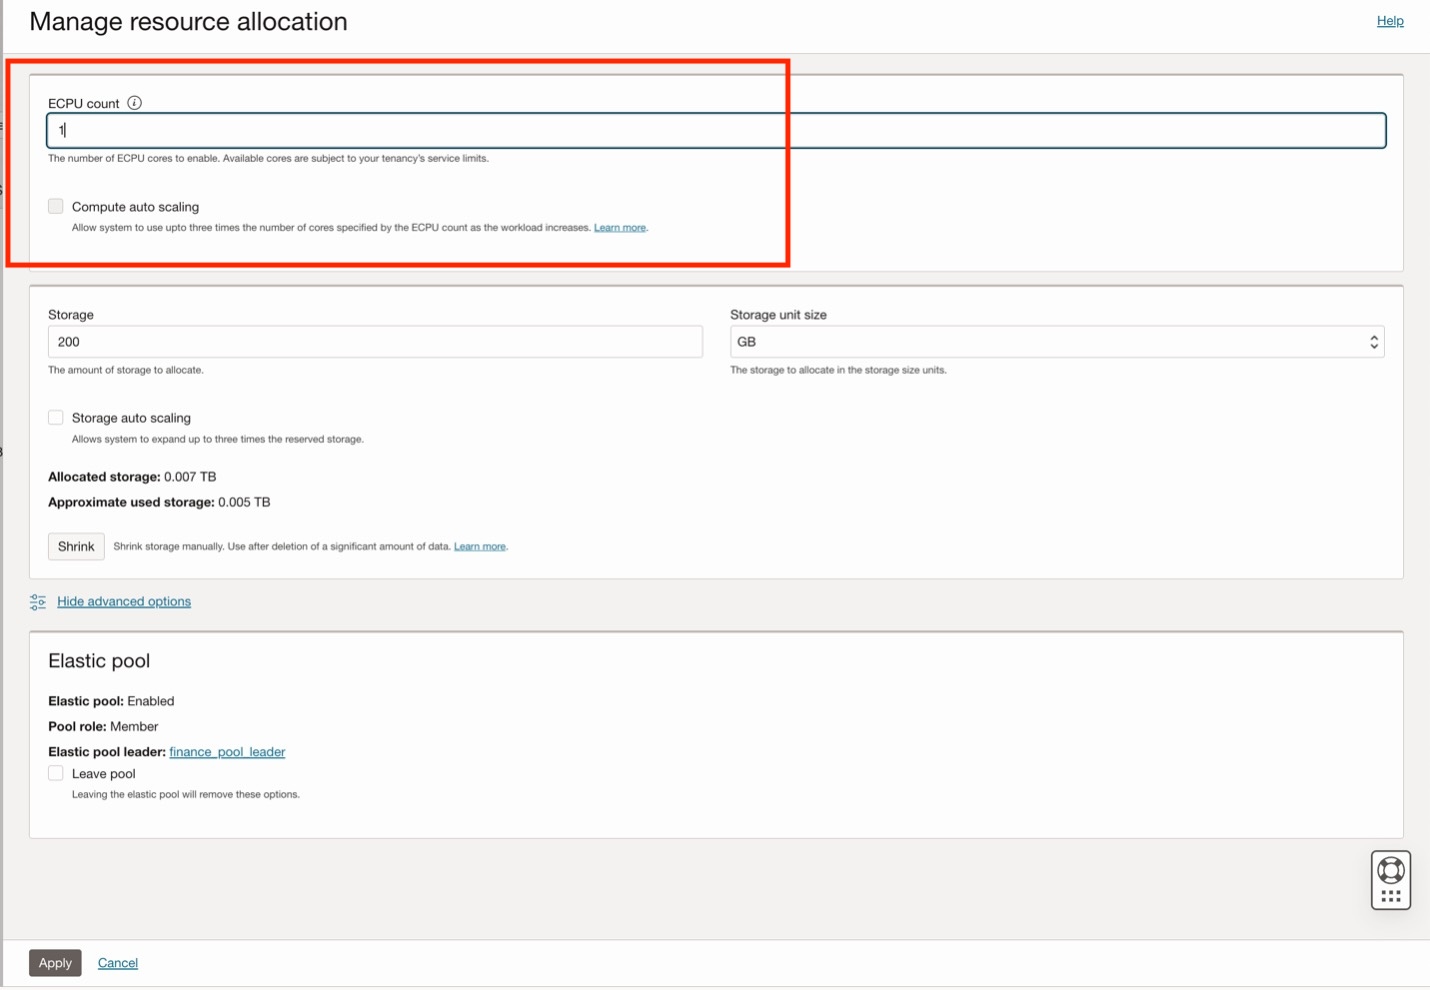
Clicking on “Manage resource allocation” will open a dialog to update the compute and storage for that database. Clicking “Advanced options” will expand to show the elastic pool options.
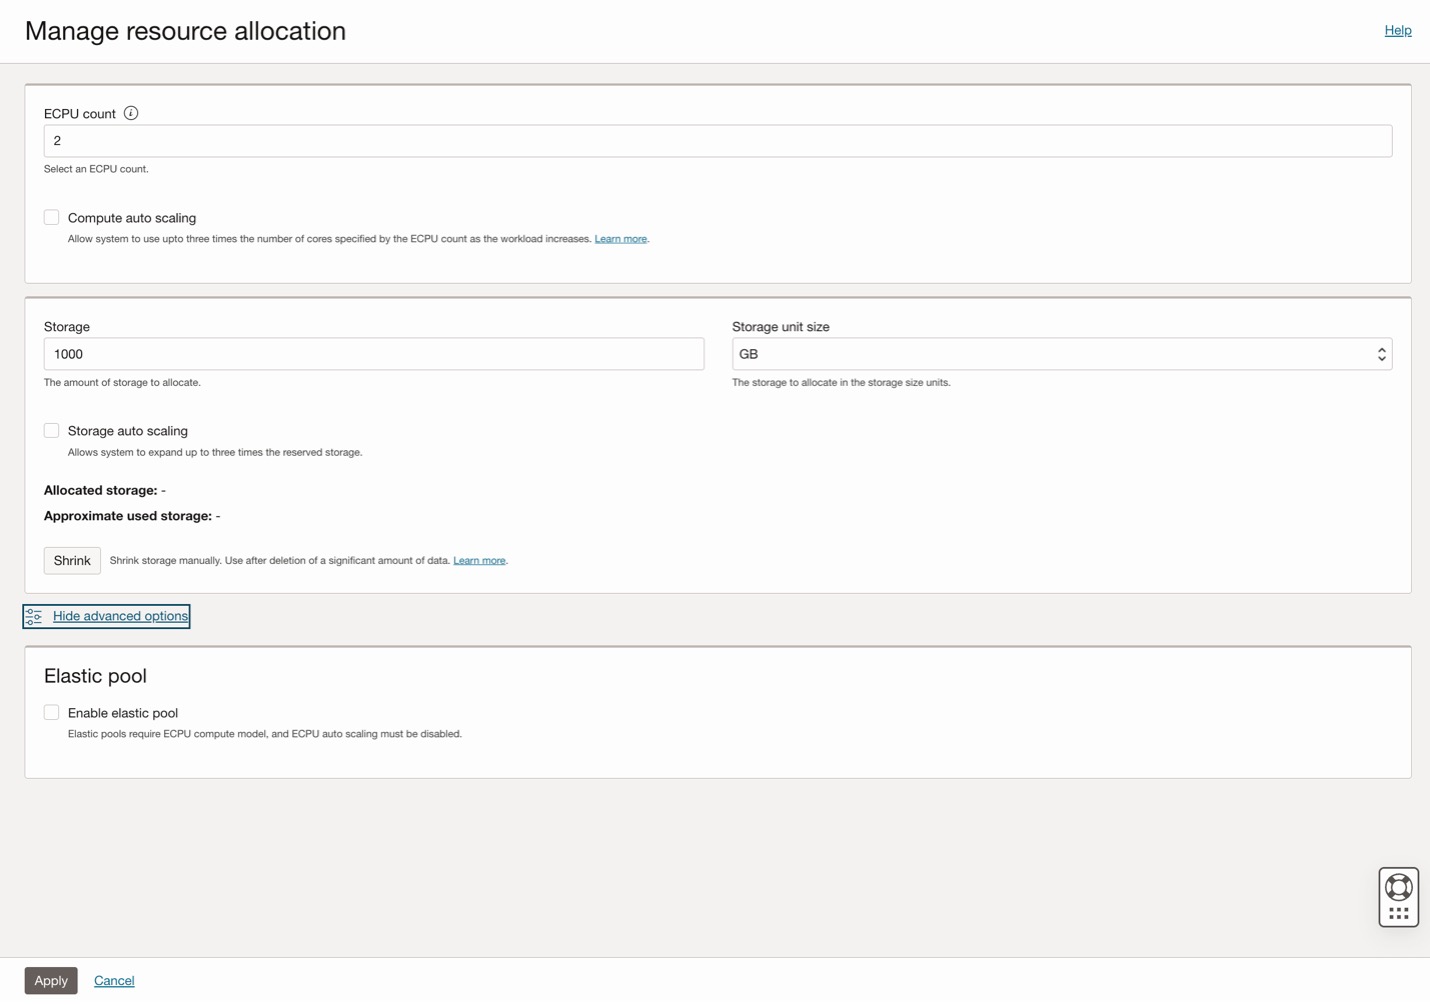
When you click the “Enable elastic pool” checkbox, you can either join an existing one or create a new one. In this case, you can create a new one and pick a size of 128, the minimum size for an elastic pool. Also, if you had mistakenly enabled auto scaling when creating the database, you must uncheck the “Compute auto scaling” to participate in or lead an elastic pool. You can now click “Apply”.
The database will briefly show a status of “Updating,” when the status changes back to “Available,” the elastic pool will be displayed as enabled under Resource Allocation.

Add databases to your elastic pool
With the elastic pool enabled, you can now add your members to the pool. To do so, you can stay in the OCI console and open the individual member database. You then open the “Manage Resources” dialog, expand the advanced options, join the existing elastic pool, and repeat this for the other members
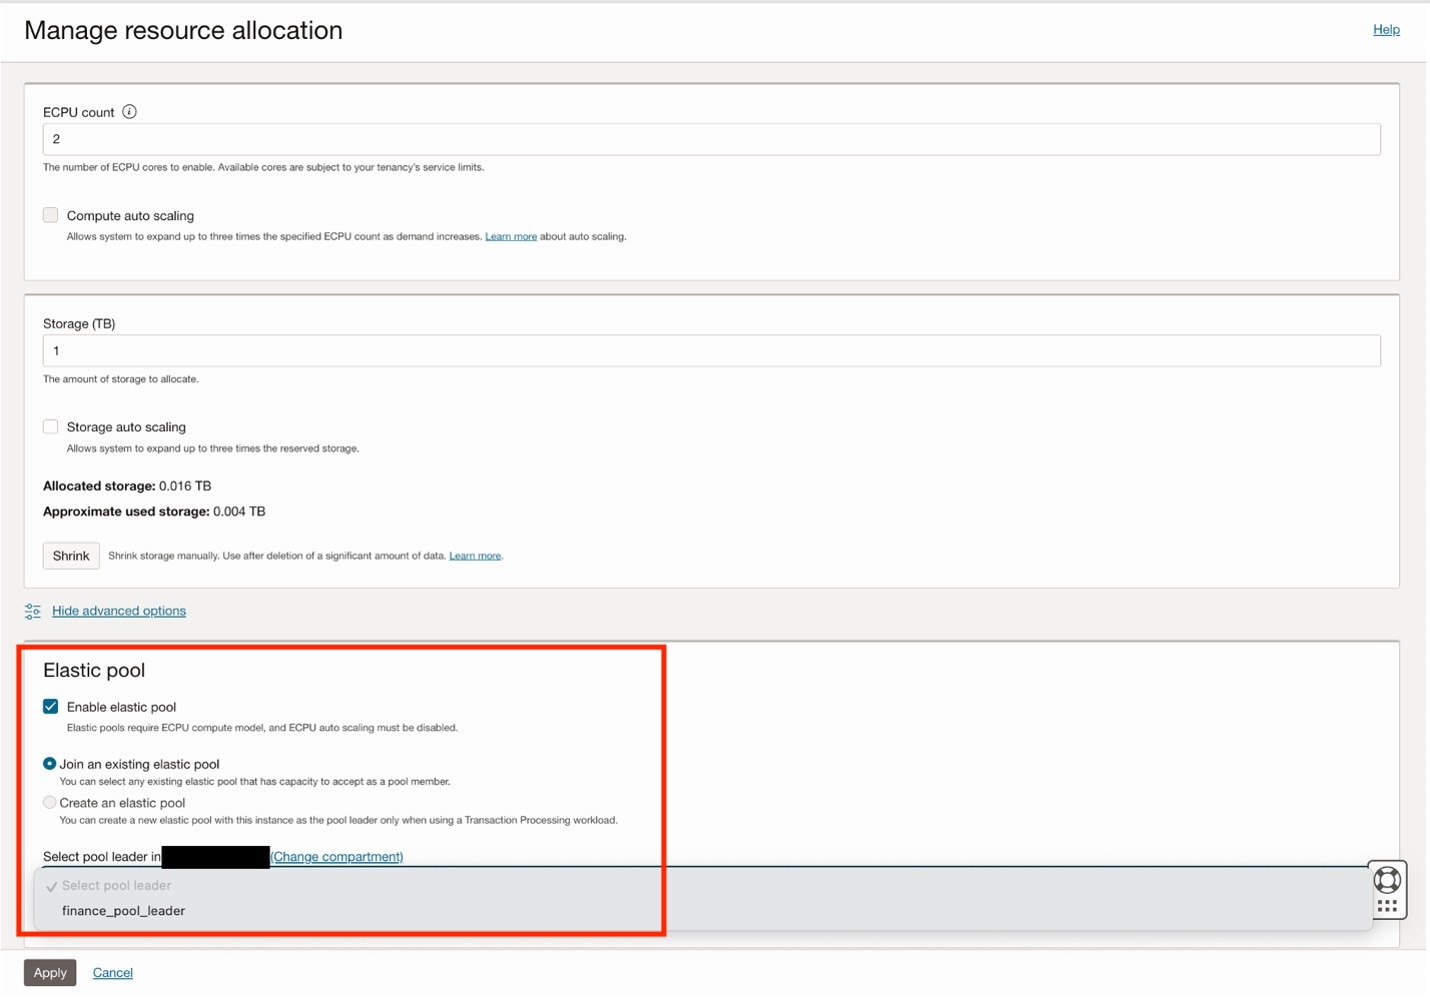
After repeating this for the other three databases, you can examine the members by opening the pool leader details, scrolling down, and clicking “Elastic pool members.”

As mentioned earlier, once in the pool, the minimum ECPU size can optionally be lowered to 1 ECPU. This can benefit smaller development databases by minimizing the space they utilize in the elastic pool. You can change this for a member database by opening the database details, clicking “Manage Resources,” and updating the ECPU to 1.
The database will briefly show scaling, and after scaling is completed, you will see the new 1 ECPU allocation.
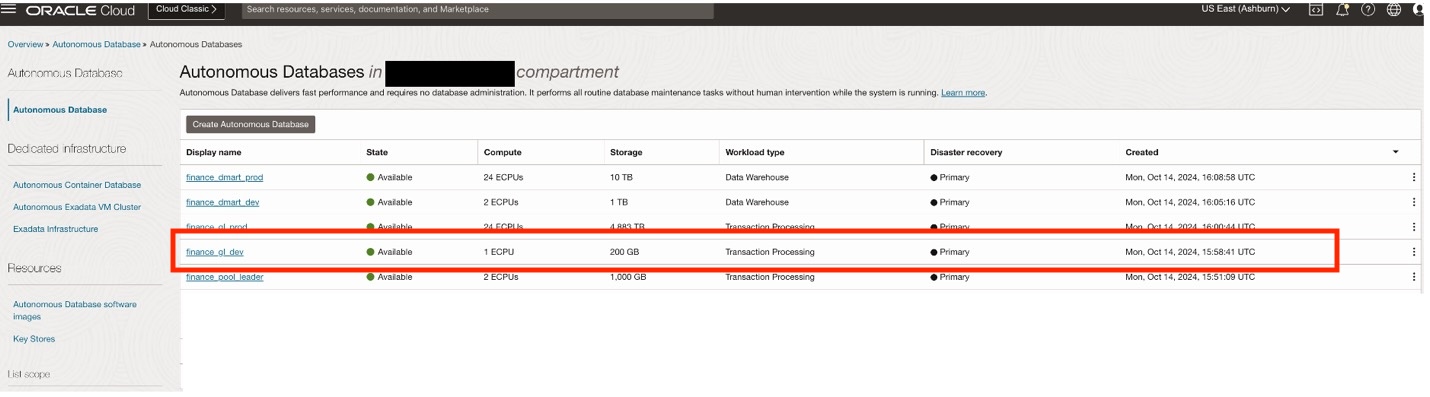
Returning to the Google Cloud console, you will see the same reflected in the Autonomous Databases. Take notice of the new 1 ECPU size for the database we just changed.
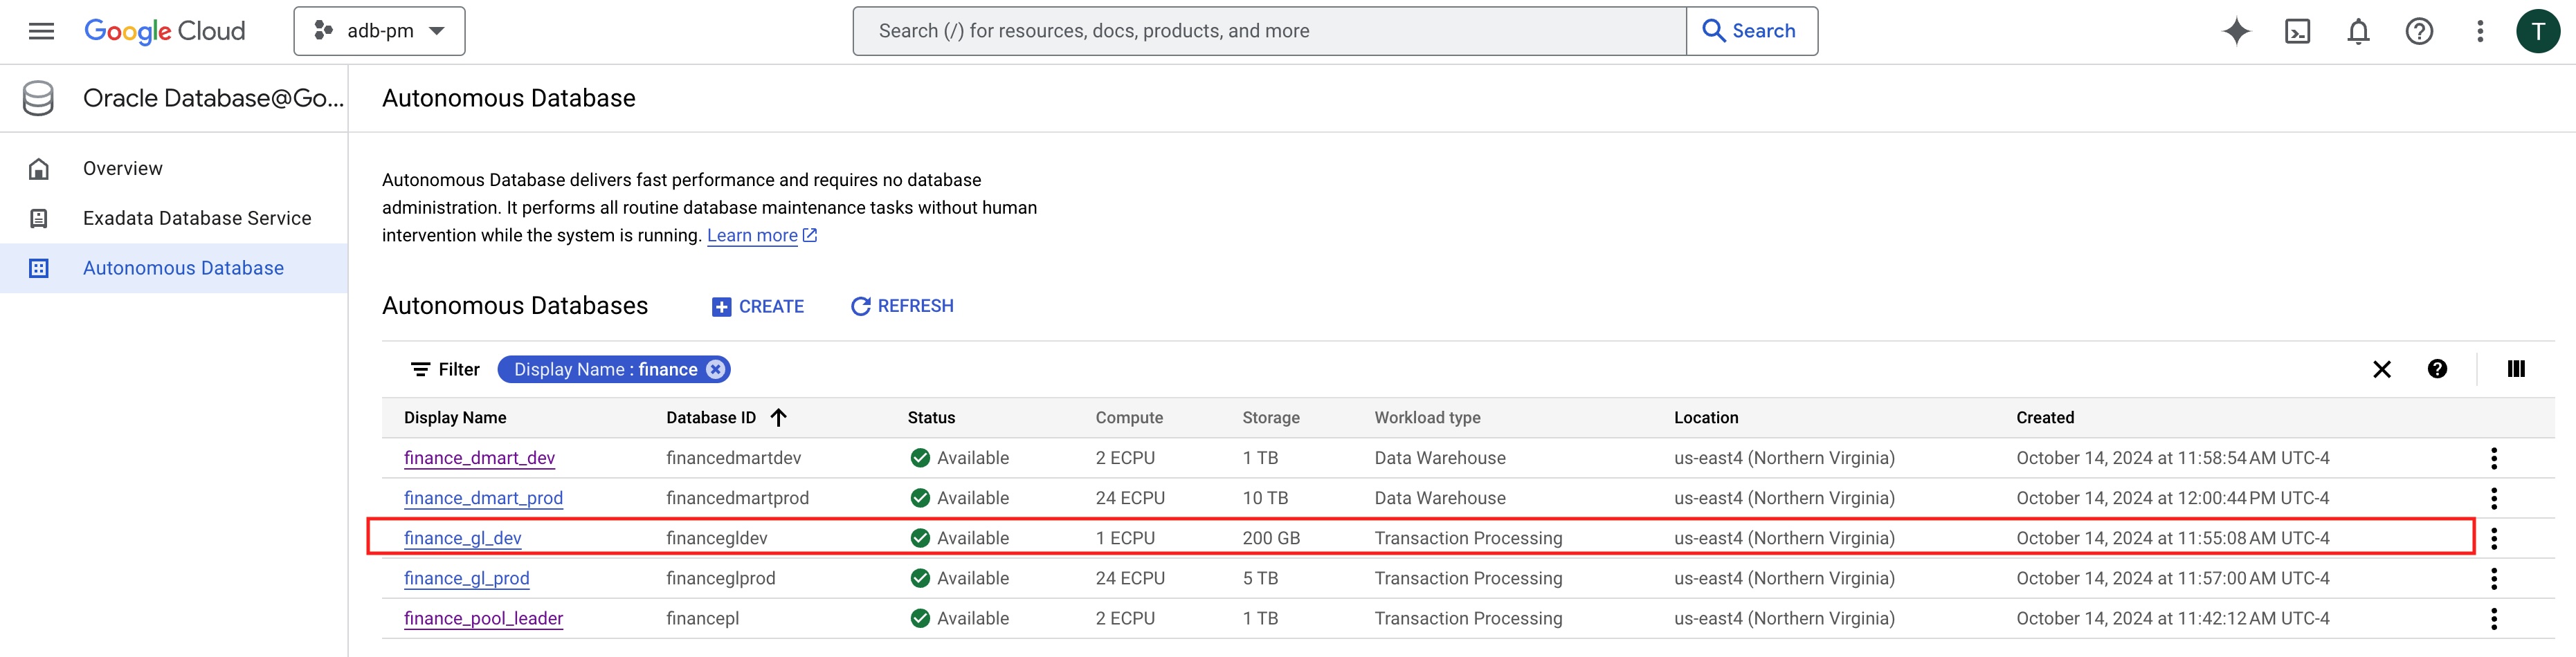
With the database available and in the elastic pool, you can now configure your Google Cloud workloads to access these databases. You can also reconfigure the databases, perform backup/recovery, and add/remove databases that we cover in a different blog.
Summary
With Oracle Database@Google Cloud, your organization can now run Oracle Database applications in Google Cloud. Oracle Autonomous Database running on Google Cloud provides a fully autonomous database running on Exadata, including self-patching, self-repairing, and self-securing. Elastic pools can be easily configured to allow the sharing of computing costs and resources, driving down the total cost of ownership of each database while keeping each database running independently. Google Cloud applications and services such as Looker and Vertex AI can now have low-latency, native access to Oracle databases running on Oracle Autonomous Database and take advantage of Oracle Database 23ai features like AI Vector Search.
- Learn more about Oracle Cloud Infrastructure
- Learn more about Oracle on Google Cloud
- Learn more about OCI’s distributed cloud
- Learn more about Oracle Database services, Oracle Autonomous Database, and Oracle Exadata Database Service.
- Learn more about Autonomous Database Elastic Pools.
