We are giving a tutorial on modeling evolving graph data on May 5 2020 at the Knowledge Graph Conference (KGC 2020)
https://www.knowledgegraph.tech/the-knowledge-graph-conference-kgc/workshops-and-tutorials/#1580503925986-452b8bbf-6757
Tutorial slides available here: here
The tutorial will include several live demonstrations. This blog post describes how to set up the evnironment used during the tutorial for those who want to follow along or try things out themselves. All Oracle software used is free for evaluation purposes.
Setting up Virtual Box and Importing the VM
Download and Install Virtual Box:
https://www.virtualbox.org/
Download Pre-built DB Developer Day VM (7.3 GB):
https://www.oracle.com/database/technologies/databaseappdev-vm.html
Follow directions to import the VM at the bottom of the download page (~ 30 GB total with data).
Downloading Software and Data
After importing the Developer Day VM, startup the VM, open a Firefox browser window inside the VM (Applications->Favorites->Firefox) and download the following Oracle software.
Download the latest Oracle Jena Adapter from OTN
(Oracle Database 19c, 18c, and 12c Support for Apache Jena 3.1.0, Apache Jena Fuseki 2.4, and Protégé Desktop 5.2):
https://www.oracle.com/database/technologies/semantic-technologies-downloads.html
Download the latest Oracle Graph Server and Client from OTN
(Oracle Graph Server)
https://www.oracle.com/database/technologies/spatialandgraph/property-graph-features/graph-server-and-client/graph-server-and-client-downloads.html
Download Java 11, which is needed to run JShell (jdk-11.0.6_linux-x64_bin.tar.gz).
https://www.oracle.com/java/technologies/javase-jdk11-downloads.html
This tutorial will use some RDF data about movies. Specifically, it will use the Linked Movie Data Base dataset from a University of Toronto project described in this paper http://events.linkeddata.org/ldow2009/papers/ldow2009_paper12.pdf.
An RDF dump of this dataset is available here: http://www.cs.toronto.edu/~oktie/linkedmdb/
We will use the 3 million triple dataset (linkedmdb-18-05-2009-dump.tar.gz) for this demo. Follow the link and download the dataset using Firefox in your VM.
Configuring the Environment
1. Configuring Support for Apache Jena
Open a terminal (Applications->Favorites->Terminal) and execute the following steps.
[oracle@localhost oracle]$ cd /home/oracle
[oracle@localhost oracle]$ mkdir RDF
[oracle@localhost oracle]$ cd RDF
[oracle@localhost RDF]$ mkdir Jena
[oracle@localhost RDF]$ cd Jena/
[oracle@localhost Jena]$ mv ~/Downloads/Oracle19c_Jena-3.1.0_Build_20191127.zip .
[oracle@localhost Jena]$ ls
Oracle19c_Jena-3.1.0_Build_20191127.zip
[oracle@localhost Jena]$ unzip Oracle19c_Jena-3.1.0_Build_20191127.zip
Archive:  Oracle19c_Jena-3.1.0_Build_20191127.zip
   creating: joseki/
  inflating: joseki/application.xml
  …
  creating: fuseki/run/logs/
   creating: fuseki/run/system_files/
[oracle@localhost Jena]$ ls
bin             jar                                      protege_plugin
bug_notes.txt   javadoc                                  README
examples        joseki                                   release_notes.txt
fuseki          joseki-web-app                           sparqlgateway-web-app
fuseki-web-app  Oracle19c_Jena-3.1.0_Build_20191127.zip  version.txt
2. Configuring Oracle Graph Server and Client
2.1 Installing Oracle Graph Server and Client
Execute the following steps in a terminal.
[oracle@localhost Jena]$ cd /home/oracle/RDF/
[oracle@localhost RDF]$ ls
Jena
[oracle@localhost RDF]$ mv ~/Downloads/oracle-graph-20.1.0.x86_64.rpm .
[oracle@localhost RDF]$ ls
Jena  oracle-graph-20.1.0.x86_64.rpm
[oracle@localhost RDF]$ sudo rpm -i oracle-graph-20.1.0.x86_64.rpm
[sudo] password for oracle: oracle
[oracle@localhost RDF]$ ls /etc/oracle/graph
log4j2-server.xml  log4j2.xml  pgx.conf  server.auth.conf  server.conf
[oracle@localhost RDF]$ ls /opt/oracle/graph
bin  COPYRIGHT  data  doc  examples  graphviz  hadoop  lib  pgx  scripts
[oracle@localhost RDF]$ sudo chown oracle /opt/oracle/graph/pgx/tmp_data/
[sudo] password for oracle:
2.2 Setting up Java 11
Execute the following commands from a terminal.
[oracle@localhost RDF]$ cd /home/oracle/RDF/
[oracle@localhost RDF]$ mv ~/Downloads/jdk-11.0.6_linux-x64_bin.tar.gz .
[oracle@localhost RDF]$ ls
jdk-11.0.6_linux-x64_bin.tar.gz  Jena  oracle-graph-20.1.0.x86_64.rpm
[oracle@localhost RDF]$ tar -xzf jdk-11.0.6_linux-x64_bin.tar.gz
[oracle@localhost RDF]$ ls
jdk-11.0.6                       Jena
jdk-11.0.6_linux-x64_bin.tar.gz  oracle-graph-20.1.0.x86_64.rpm
[oracle@localhost RDF]$
3 Setting up RDF Knowledge Graph in Oracle Database
Oracle Database 19.3 should already be installed and running when you start the VM.
First, we will create a directory in /usr to store a tablespace for our RDF data.
Open a terminal and execute the following commands.
[oracle@localhost ~]$ cd /usr/
[oracle@localhost usr]$ sudo mkdir dbs
[sudo] password for oracle:
[oracle@localhost usr]$ ls -l
total 4
dr-xr-xr-x. 1 root root 31422 May 31  2019 bin
drwxr-xr-x. 1 root root     0 May  1 15:01 dbs
drwxr-xr-x. 1 root root     0 Apr 10  2018 etc
drwxr-xr-x. 1 root root     0 Apr 10  2018 games
drwxr-xr-x. 1 root root  2626 May 31  2019 include
dr-xr-xr-x. 1 root root  4488 May 31  2019 lib
dr-xr-xr-x. 1 root root 76110 May 31  2019 lib64
drwxr-xr-x. 1 root root  8672 May 31  2019 libexec
drwxr-xr-x. 1 root root    90 Apr 10  2018 local
dr-xr-xr-x. 1 root root 12296 May  1 09:48 sbin
drwxr-xr-x. 1 root root  4080 May 31  2019 share
drwxr-xr-x. 1 root root    24 May 31  2019 src
lrwxrwxrwx. 1 root root    10 May 31  2019 tmp -> ../var/tmp
[oracle@localhost usr]$ sudo chown oracle dbs
[oracle@localhost usr]$ ls -l
total 4
dr-xr-xr-x. 1 root   root 31422 May 31  2019 bin
drwxr-xr-x. 1 oracle root     0 May  1 15:01 dbs
drwxr-xr-x. 1 root   root     0 Apr 10  2018 etc
drwxr-xr-x. 1 root   root     0 Apr 10  2018 games
drwxr-xr-x. 1 root   root  2626 May 31  2019 include
dr-xr-xr-x. 1 root   root  4488 May 31  2019 lib
dr-xr-xr-x. 1 root   root 76110 May 31  2019 lib64
drwxr-xr-x. 1 root   root  8672 May 31  2019 libexec
drwxr-xr-x. 1 root   root    90 Apr 10  2018 local
dr-xr-xr-x. 1 root   root 12296 May  1 09:48 sbin
drwxr-xr-x. 1 root   root  4080 May 31  2019 share
drwxr-xr-x. 1 root   root    24 May 31  2019 src
lrwxrwxrwx. 1 root   root    10 May 31  2019 tmp -> ../var/tmp
[oracle@localhost usr]$
To use the RDF Knowledge Graph feature, we need to create a database user and an RDF network.
Open a text editor (Applications->Accessories->Text Editor) and copy/paste the following SQL script.
set echo on;
set serverout on;
set linesize 160;
set pagesize 10000;
set timing on;

conn sys/oracle as sysdba;
alter session set container=orcl;

-- create rdfuser
grant connect,resource,create view to rdfuser identified by rdfuser;

-- create network and temporary tablespaces
-- using /usr/dbs/ instead of /u01/app/... because /usr is mounted on a different
-- virtual disk that has more free space
create tablespace RDFTBS datafile '/usr/dbs/rdftbs.dbf' size 512M reuse AUTOEXTEND ON NEXT 128M MAXSIZE 10G segment space management auto;

create temporary tablespace TEMPTBS tempfile '/usr/dbs/temptbs.dbf' size 128M reuse AUTOEXTEND ON NEXT 128M MAXSIZE 5G;

alter database default temporary tablespace TEMPTBS;

-- grant tablespace quotas
alter user rdfuser quota unlimited on RDFTBS;
alter user rdfuser default tablespace RDFTBS;
alter user MDSYS quota unlimited on RDFTBS;

-- create semantic network
conn system/oracle@orcl;
exec sem_apis.create_sem_network('RDFTBS');

-- setup indexes
-- drop PSCGM index
exec sem_apis.drop_sem_index('PSCGM');

-- add SPCGM index
exec sem_apis.add_sem_index('SPCGM');

-- add CPSGM index
exec sem_apis.add_sem_index('CSPGM');

-- create a bulk load event trace table in rdfuser’s schema
conn rdfuser/rdfuser@orcl;
CREATE TABLE RDF$ET_TAB (
  proc_sid VARCHAR2(30),
  proc_sig VARCHAR2(200),
  event_name varchar2(200),
  start_time timestamp,
  end_time timestamp,
  start_comment varchar2(1000) DEFAULT NULL,
  end_comment varchar2(1000) DEFAULT NULL
);

-- Grant privileges on RDF$ET_TAB to MDSYS
GRANT INSERT, UPDATE on RDF$ET_TAB to MDSYS;
Save the file as rdf_network_setup.sql in /home/oracle/RDF.
Double-click the sqlcl icon on the Desktop to start sqlcl. Use system/oracle for the username and password.
SQLcl: Release 19.1 Production on Fri May 01 15:23:10 2020

Copyright (c) 1982, 2020, Oracle.  All rights reserved.

Username? (''?) system
Password? (**********?) ******
Last Successful login time: Fri May 01 2020 15:23:17 -04:00

Connected to:
Oracle Database 19c Enterprise Edition Release 19.0.0.0.0 - Production
Version 19.3.0.0.0


SQL>
Now execute the rdf_network_setup.sql script that we created.
SQL> @ /home/oracle/RDF/rdf_network_setup.sql
SQL> set serverout on;
SQL> set linesize 160;
SQL> set pagesize 10000;
SQL> set timing on;
SQL>
SQL> conn sys/oracle as sysdba;
Connected.
SQL> alter session set container=orcl;

Session altered.

Elapsed: 00:00:00.016
SQL>
SQL> -- create rdfuser
SQL> grant connect,resource,create view to rdfuser identified by rdfuser;

Grant succeeded.

Elapsed: 00:00:00.077
SQL>
SQL> -- create network and temporary tablespaces
SQL> -- using /usr/dbs/ instead of /u01/app/... because /usr is mounted on a different
SQL> -- virtual disk that has more free space
SQL> create tablespace RDFTBS datafile '/usr/dbs/rdftbs.dbf' size 512M reuse AUTOEXTEND ON NEXT 128M MAXSIZE 10G segment space management auto;

Tablespace created.

Elapsed: 00:00:01.372
SQL>
SQL> create temporary tablespace TEMPTBS tempfile '/usr/dbs/temptbs.dbf' size 128M reuse AUTOEXTEND ON NEXT 128M MAXSIZE 5G;

Tablespace created.

Elapsed: 00:00:00.069
SQL>
SQL> alter database default temporary tablespace TEMPTBS;

Database altered.

Elapsed: 00:00:00.030
SQL>
SQL> -- grant tablespace quotas
SQL> alter user rdfuser quota unlimited on RDFTBS;

User altered.

Elapsed: 00:00:00.017
SQL> alter user rdfuser default tablespace RDFTBS;

User altered.

Elapsed: 00:00:00.010
SQL> alter user MDSYS quota unlimited on RDFTBS;

User altered.

Elapsed: 00:00:00.018
SQL>
SQL> -- create semantic network
SQL> conn system/oracle@orcl;
Connected.
SQL> exec sem_apis.create_sem_network('RDFTBS');

PL/SQL procedure successfully completed.

Elapsed: 00:00:19.331
SQL>
SQL> -- setup indexes
SQL> -- drop PSCGM index
SQL> exec sem_apis.drop_sem_index('PSCGM');

PL/SQL procedure successfully completed.

Elapsed: 00:00:01.770
SQL>
SQL> -- add SPCGM index
SQL> exec sem_apis.add_sem_index('SPCGM');

PL/SQL procedure successfully completed.

Elapsed: 00:00:00.472
SQL>
SQL> -- add CPSGM index
SQL> exec sem_apis.add_sem_index('CSPGM');

PL/SQL procedure successfully completed.

Elapsed: 00:00:00.056
SQL>
Elapsed: 00:00:00.058
SQL>
SQL>
SQL> -- create a bulk load event trace table in rdfuser’s schema
SQL> conn rdfuser/rdfuser@orcl;
Connected.
SQL> CREATE TABLE RDF$ET_TAB (
  2    proc_sid VARCHAR2(30),
  3    proc_sig VARCHAR2(200),
  4    event_name varchar2(200),
  5    start_time timestamp,
  6    end_time timestamp,
  7    start_comment varchar2(1000) DEFAULT NULL,
  8    end_comment varchar2(1000) DEFAULT NULL
  9  );

Table created.

Elapsed: 00:00:00.032
SQL>
SQL> -- Grant privileges on RDF$ET_TAB to MDSYS
SQL> GRANT INSERT, UPDATE on RDF$ET_TAB to MDSYS;

Grant succeeded.

Elapsed: 00:00:00.006
SQL>
Loading the Linked Movie Data Base RDF data.
We will use the orardfldr command line utility included with Support for Apache Jena.
First, prepare the LMDB data for loading. Open a terminal and execute the following commands.
[oracle@localhost ~]$ cd /home/oracle/RDF
[oracle@localhost RDF]$ mkdir LMDB
[oracle@localhost RDF]$ cd LMDB
[oracle@localhost LMDB]$ mkdir DATA
[oracle@localhost LMDB]$ cd DATA/
[oracle@localhost DATA]$ mv ~/Downloads/linkedmdb-18-05-2009-dump.tar.gz .
[oracle@localhost DATA]$ ls
linkedmdb-18-05-2009-dump.tar.gz
[oracle@localhost DATA]$ tar -xzf linkedmdb-18-05-2009-dump.tar.gz
[oracle@localhost DATA]$ ls
dump.nt  linkedmdb-18-05-2009-dump.tar.gz
[oracle@localhost DATA]$ rm -f linkedmdb-18-05-2009-dump.tar.gz
[oracle@localhost DATA]$ ls
dump.nt
Some URIs in the LMDB dataset have invalid characters that should be URL encoded (“, }, and `). We will use perl to do this URL encoding before loading the data. Execute the following commands from a terminal.
[oracle@localhost DATA]$ cd /home/oracle/RDF/LMDB/DATA/
[oracle@localhost DATA]$ ls
dump.nt
[oracle@localhost DATA]$ perl -pi -e 's/\<([^\>]*)"([^\>]*)\>/\<$1%22$2\>/g' dump.nt
[oracle@localhost DATA]$ perl -pi -e 's/\<([^\>]*)"([^\>]*)\>/\<$1%22$2\>/g' dump.nt
[oracle@localhost DATA]$ perl -pi -e 's/\<([^\>]*)\}([^\>]*)\>/\<$1%7D$2\>/g' dump.nt
[oracle@localhost DATA]$ perl -pi -e 's/\<([^\>]*) ([^\>]*)\>/\<$1%20$2\>/g' dump.nt
[oracle@localhost DATA]$ perl -pi -e 's/\<([^\>]*)`([^\>]*)\>/\<$1%60$2\>/g' dump.nt
[oracle@localhost DATA]$ perl -pi -e 's/\<([^\>]*)`([^\>]*)\>/\<$1%60$2\>/g' dump.nt
[oracle@localhost DATA]$ perl -pi -e 's/\<([^\>]*)`([^\>]*)\>/\<$1%60$2\>/g' dump.nt
[oracle@localhost DATA]$
Now we can setup the orardfldr utility. First, we need to define an $ORACLE_JENA_HOME environment variable and add $ORACLE_JENA_HOME/bin to our PATH. Run the following commands in a terminal.
[oracle@localhost DATA]$ cd /home/oracle/RDF/LMDB
[oracle@localhost LMDB]$ export ORACLE_JENA_HOME=/home/oracle/RDF/Jena
[oracle@localhost LMDB]$ export PATH=$PATH:$ORACLE_JENA_HOME/bin
[oracle@localhost LMDB]$ orardfldr --help
Usage: orardfldr --modelName=NAME --fileDir=DIR --lang=FMT --jdbcUrl=URL
       --user=USER --password=PASSWORD [--bulkLoadFlags="FLAGS"]
       [--networkName=NAME] [--networkOwner="OWNER"] [--numThreads=INT]
       [--rebuildAppTabIdx=BOOLEAN] [--truncateStgTab=BOOLEAN]
Performs an RDF bulk load of all files in a directory into Oracle Database.

  Mandatory Arguments:
    --modelName=NAME             Target semantic model for the load
    --fileDir=DIR                Data directory for the load
    --lang=FMT                   Data format (N-TRIPLE, RDF/XML, TURTLE,
                                 N-QUADS, TRIG)
    --jdbcUrl=URL                JDBC url for the target database
    --user="USER"                Database user name (case sensitive)
    --password=PASSWORD          Database user password

  Optional Arguments:
    --bulkLoadFlags="FLAGS"      Flags string to use with
                                 SEM_APIS.BULK_LOAD_FROM_STAGING_TABLE
    --networkName=NAME           Name of the semantic network to load into
                                 (Default MDSYS network if omitted)
    --networkOwner="OWNER"       Owner of the semantic network to load into
                                 (case sensitive, MDSYS is used if omitted)
    --numThreads=INT             Number of threads to use when populating
                                 the staging table (default 1)
    --rebuildAppTabIdx=BOOLEAN   TRUE (default) to do bottom-up rebuilding
                                 of application table indexes
    --truncateStgTab=BOOLEAN     TRUE (default) to truncate pre-existing
                                 data in the staging table

[oracle@localhost LMDB]$
Next, invoke orardfldr on the /home/oracle/RDF/LMDB/DATA directory to load the LMDB N-triple file. This will create an RDF model named LMDB and perform a bulk load into the model. Expect this step to take up to 10 min depending on your VM resources.
[oracle@localhost LMDB]$ cd /home/oracle/RDF/LMDB
[oracle@localhost LMDB]$ orardfldr --modelName=LMDB --fileDir=./DATA --lang=N-TRIPLE --jdbcUrl=jdbc:oracle:thin:@localhost:1521/orcl --user=RDFUSER --password=rdfuser --bulkLoadFlags="MBV_METHOD=SHADOW PARALLEL=2"
loadRDF: enabling parallel DDL/DML/query for session [0]
loadRDF: truncating staging tables
loadRDF in parallel: PrepareWorker [0] running
PrepareWorker: thread [0] process to 10000
PrepareWorker: thread [0] process to 20000
…
PrepareWorker: thread [0] process to 3560000
PrepareWorker: thread [0] process to 3570000
PrepareWorker: thread [0] done to 0, file = ./DATA/dump.nt in (ms) 126155
loadRDF: preparing for bulk load
loadRDF: setting application table index RDFUSER.LMDB_IDX to UNUSABLE
loadRDF: starting bulk load
loadRDF: bulk load flags="MBV_METHOD=SHADOW PARALLEL=2"
loadRDF: bulk load completed in (ms) 541741
loadRDF: rebuilding application table index RDFUSER.LMDB_IDX
loadRDF: finished rebuilding application table index RDFUSER.LMDB_IDX in (ms) 33639
[oracle@localhost LMDB]$
Next we need to gather statistics for the RDF data we loaded. Open sqlcl by double-clicking on the sqlcl icon on the desktop. Use system/oracle for the user and password. Then execute the following commands to gather statistics.
SQLcl: Release 19.1 Production on Fri May 01 17:23:44 2020

Copyright (c) 1982, 2020, Oracle.  All rights reserved.

Username? (''?) system
Password? (**********?) ******
Last Successful login time: Fri May 01 2020 17:23:51 -04:00

Connected to:
Oracle Database 19c Enterprise Edition Release 19.0.0.0.0 - Production
Version 19.3.0.0.0


SQL> exec sem_perf.gather_stats(estimate_percent=>20, degree=>2);

PL/SQL procedure successfully completed.

SQL>
Using SQL Developer
Now we can open SQL Developer and configure the RDF Semantic Graph component.
Double-click the SQL Developer icon on the Desktop.
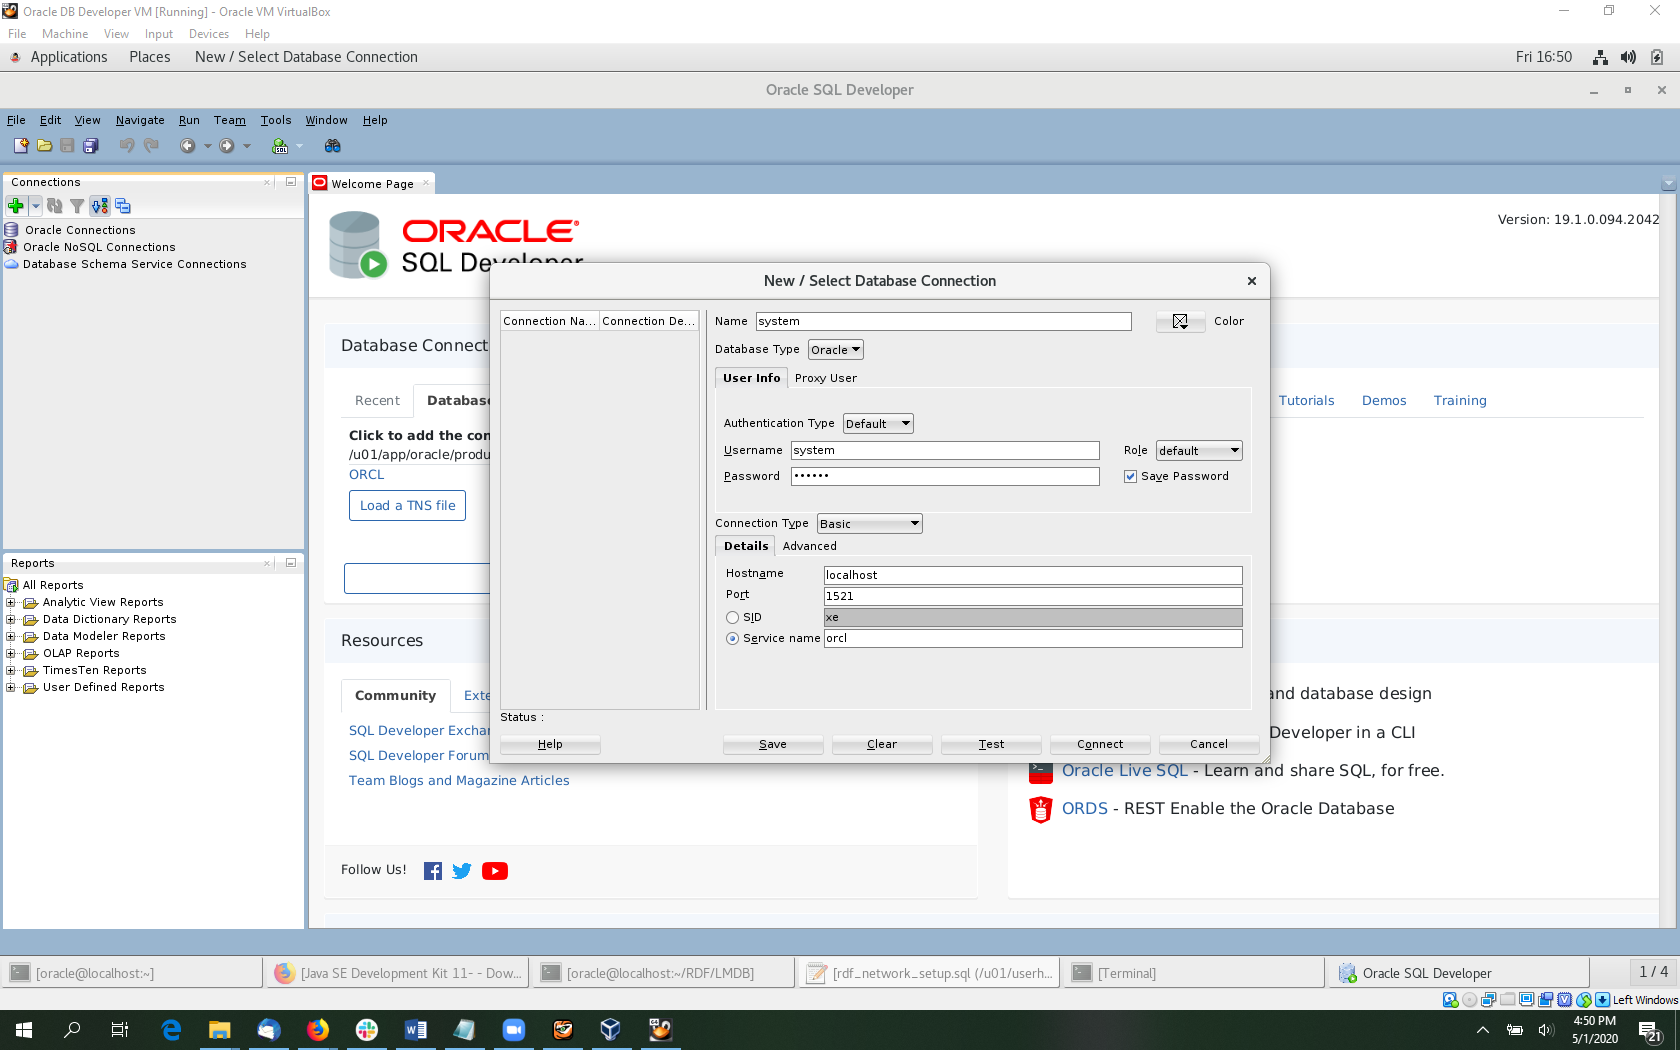
First, we need to create connections for SYSTEM and RDFUSER. Click on the green plus sign on the top left to create a new connection.
Fill in the form using system/oracle, localhost, 1521 and orcl. Click test to verify your information and then click save. Note that orcl is the Service name not SID, which is selected by default.
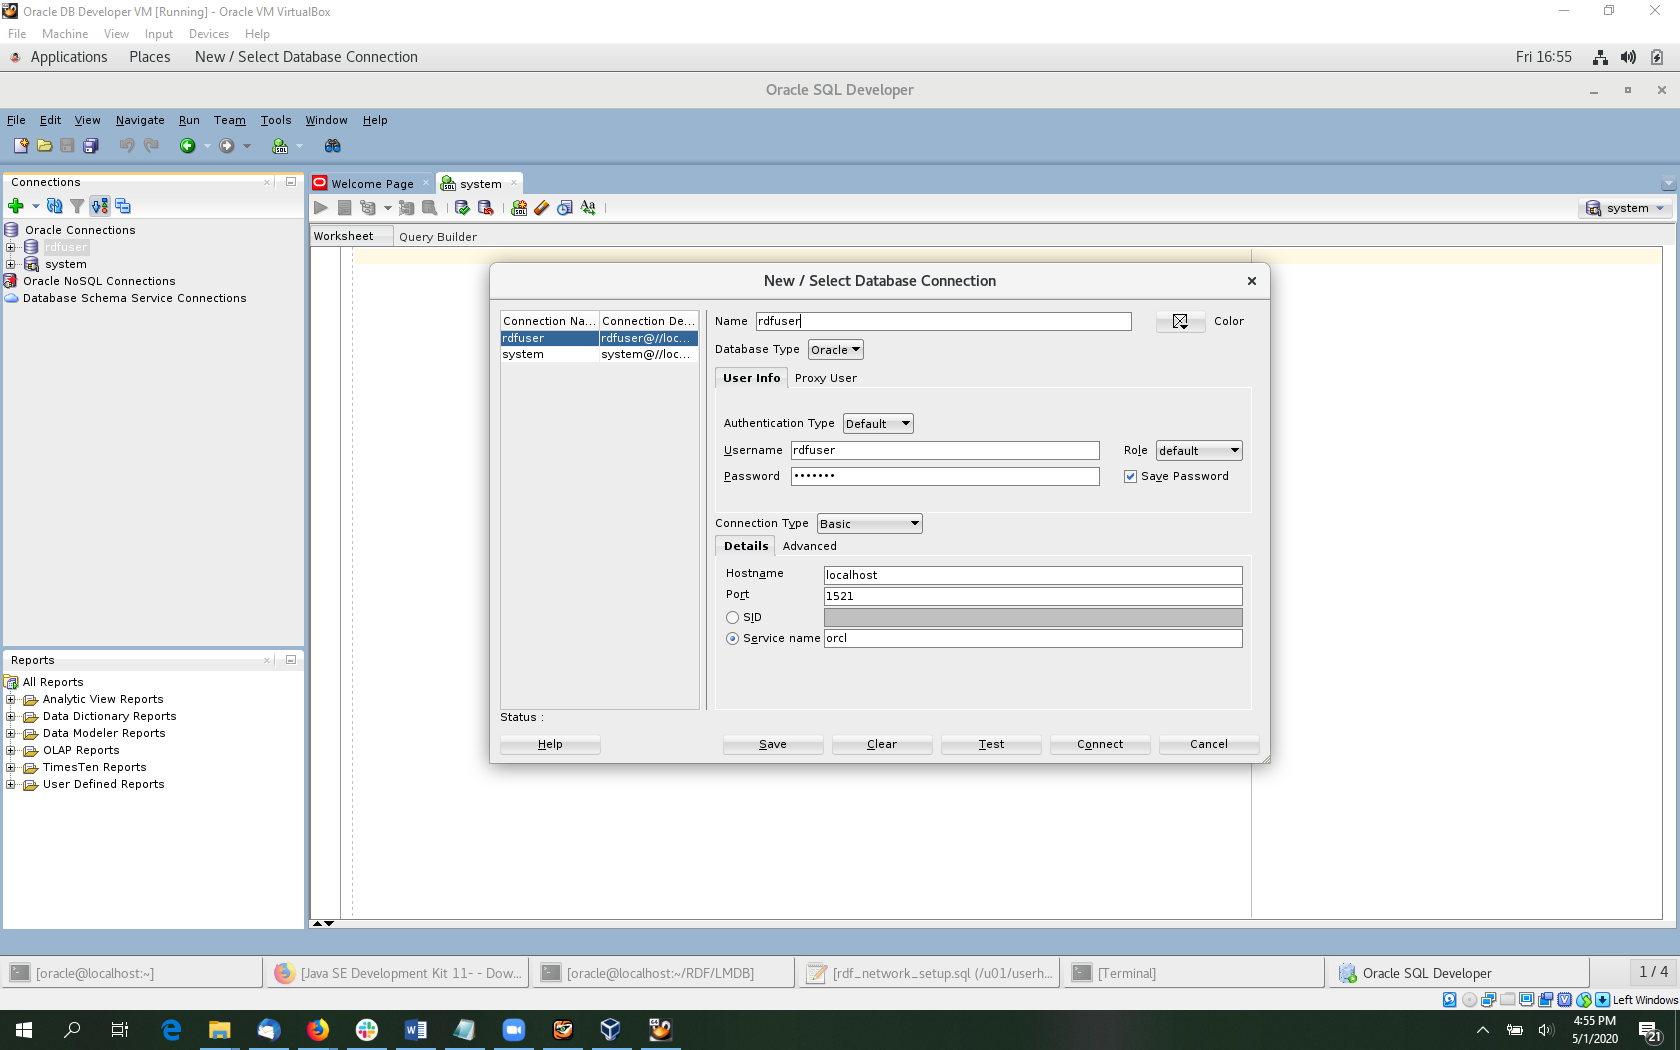
Next, fill in the form with rdfuser/rdfuser, localhost, 1521 and orcl. Click test to verify your information and then click save to save the connection. Note that orcl is the Service name not SID, which is selected by default.
Before using the RDF Semantic Graph component of SQL Developer, we need to enable some features in the database. Expand the system connection in the connection tree and right-click on RDF Semantic Graph.
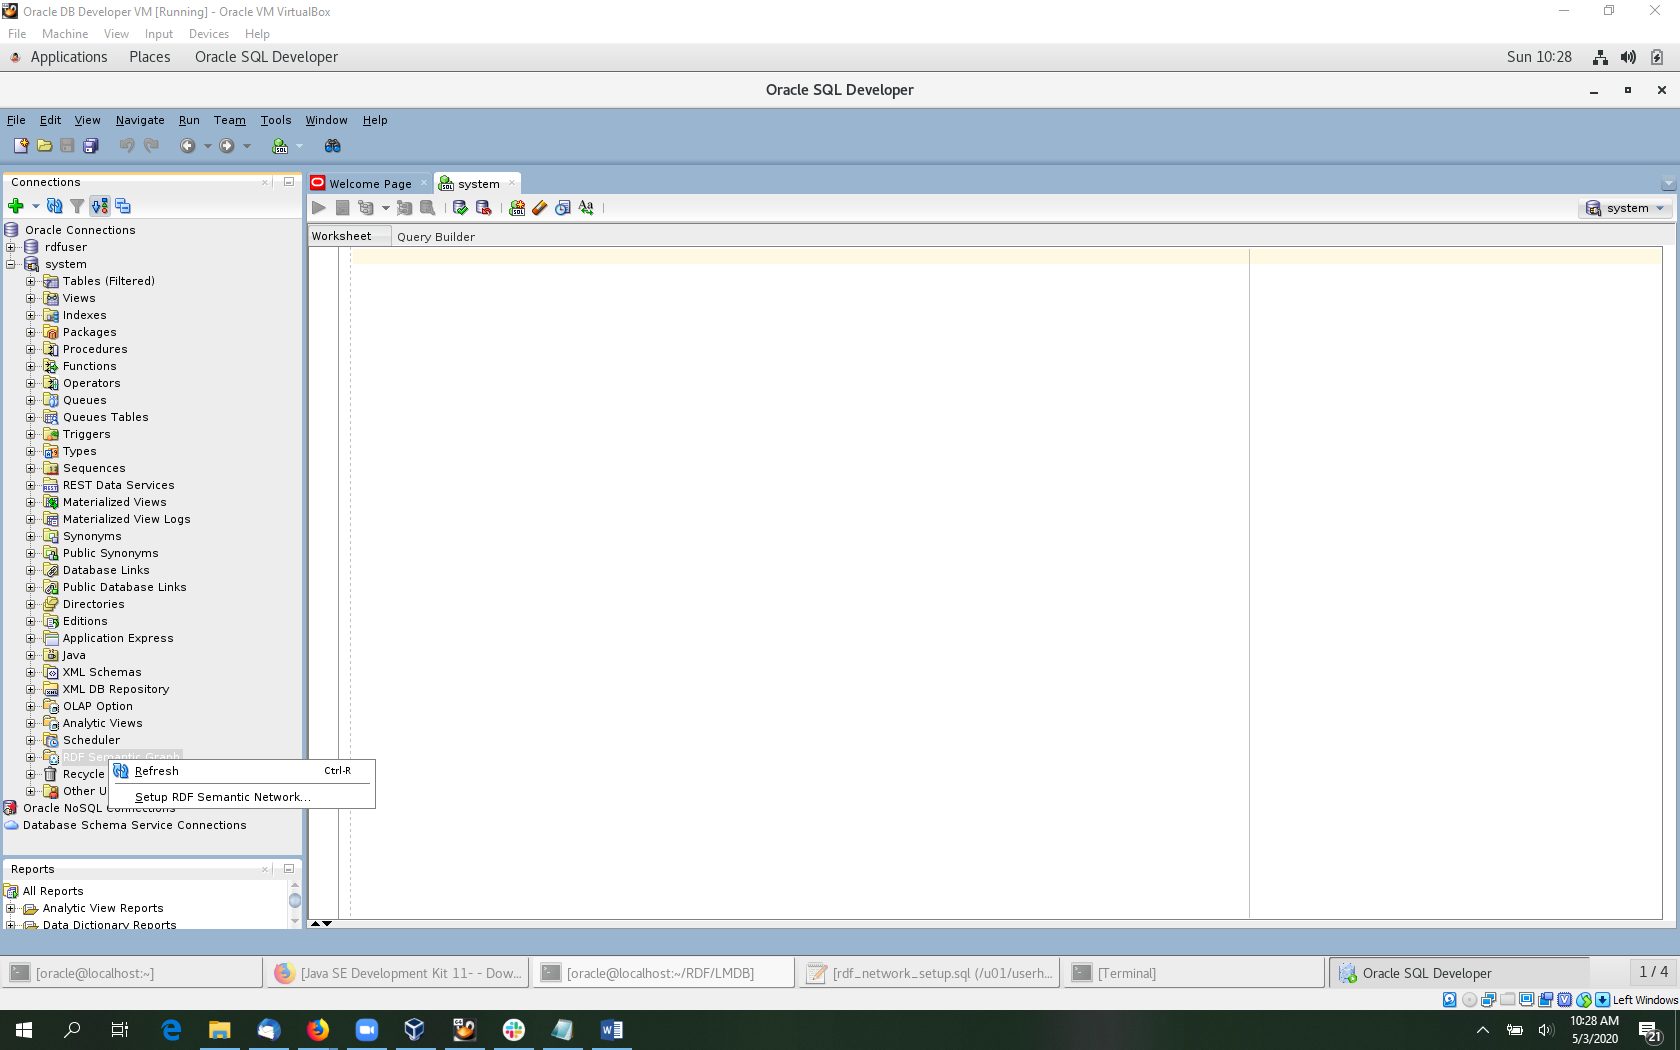
Select Setup RDF Semantic Network. Then click Apply in the dialog that opens.
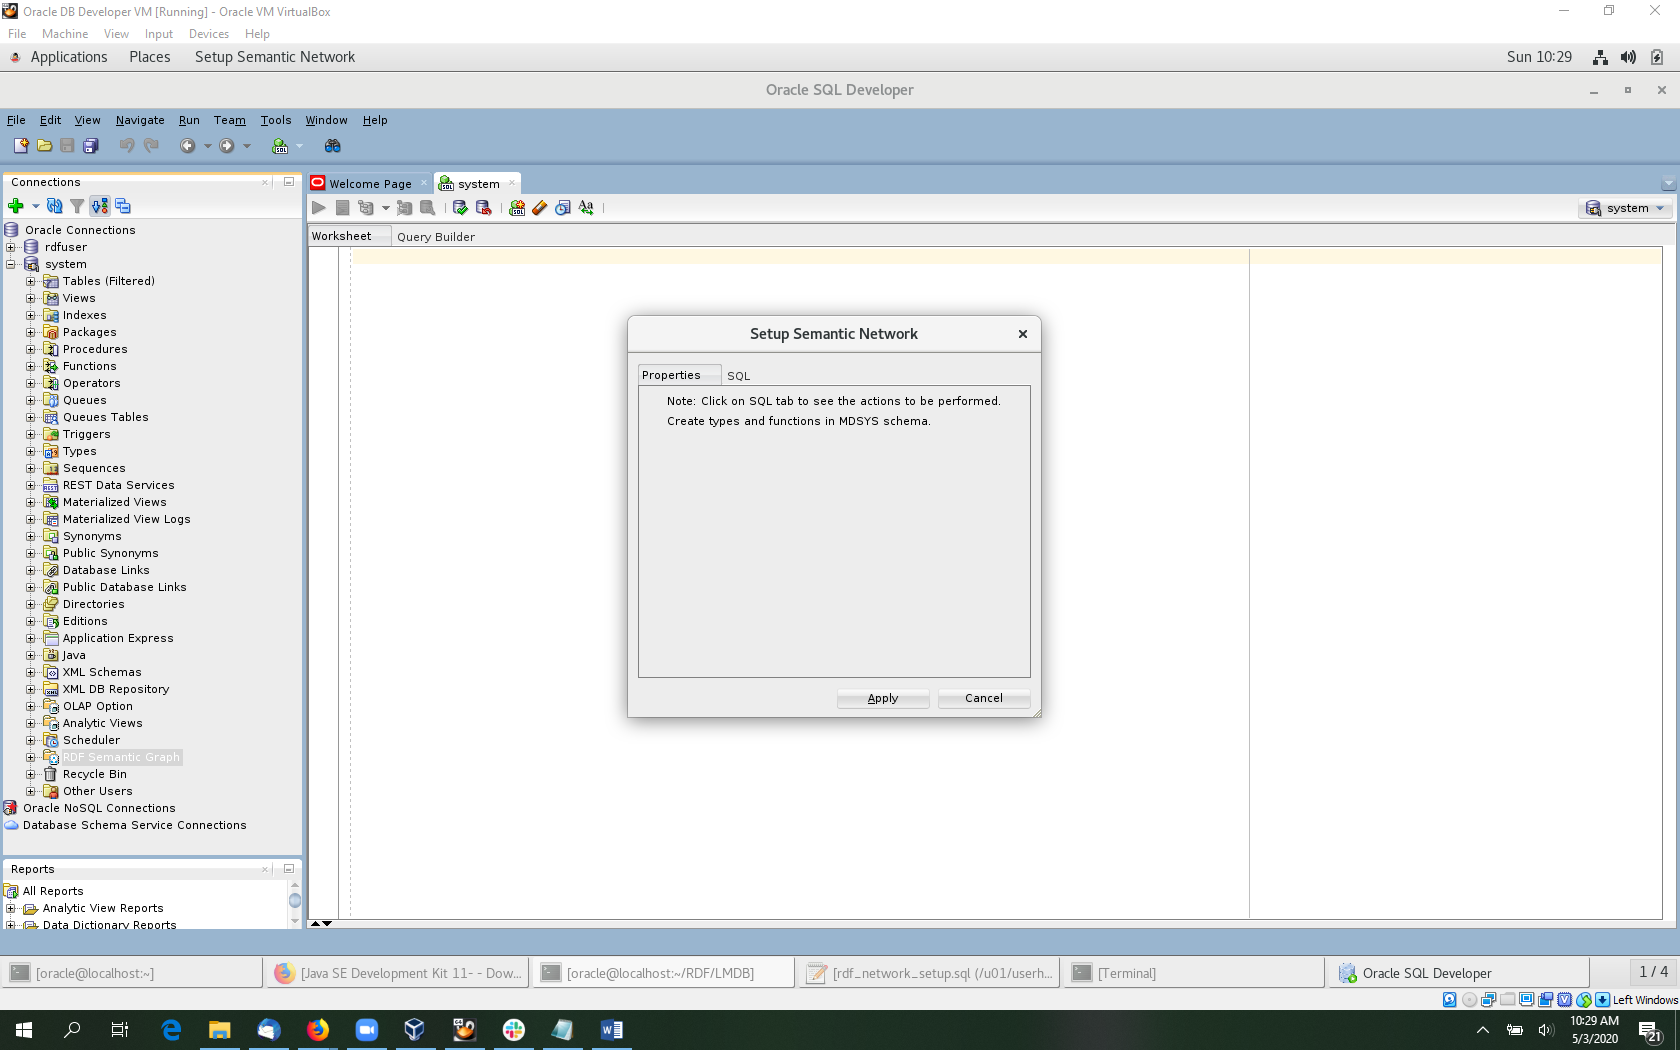
Now the RDF Semantic Graph plugin for SQL Developer is ready to use on this database. This operation needs to be performed only once for each database.
Running SPARQL queries against the LMDB RDF Dataset
Expand the rdfuser connection in the connection tree of SQL Developer. Then expand RDF Semantic Graph, Networks, MDSYS, and Regular Models. Now click on LMDB under Regular Models. This will open a SPARQL editor for LMDB.
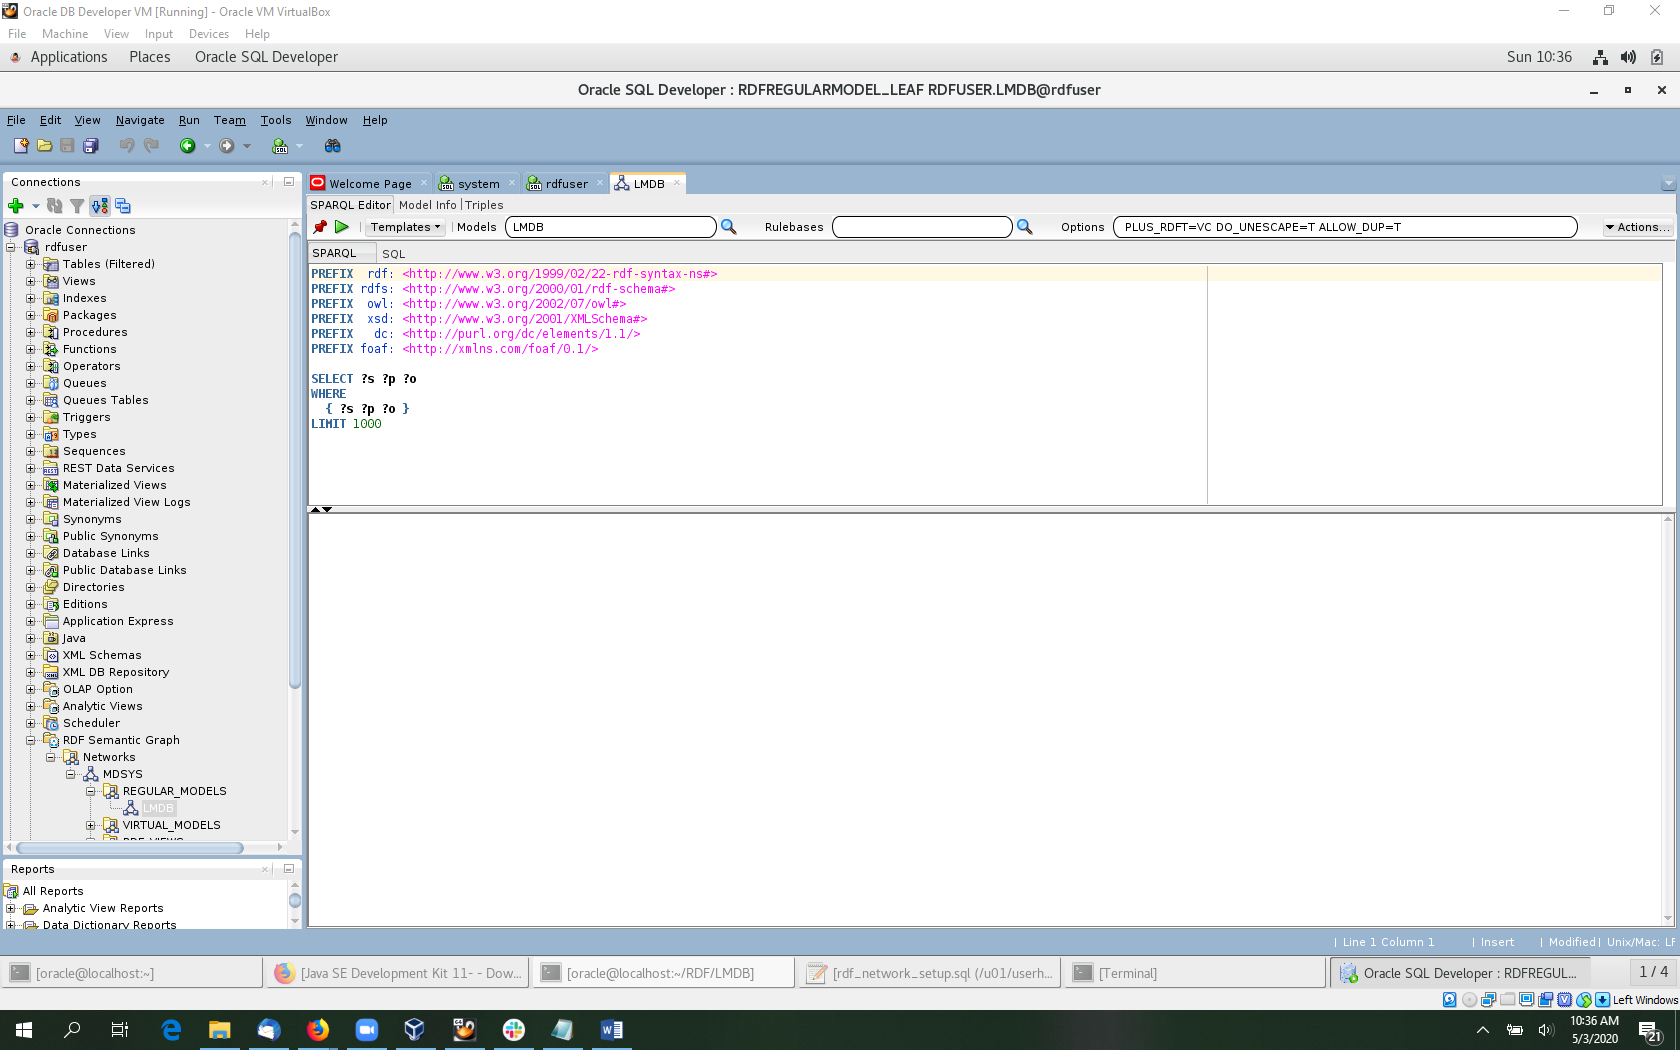
Now we can execute several example SPARQL queries such as the ones below. Click the green triangle to run the query. Also, the Templates drop down lists several templates for common query patterns that can be loaded into the editor.
A complete list of queries used in the tutorial is available here
# select modifiers
# Distinct genres of movies with Kenau Reeves
PREFIX  rdf: <http://www.w3.org/1999/02/22-rdf-syntax-ns#>
PREFIX rdfs: <http://www.w3.org/2000/01/rdf-schema#>
PREFIX  owl: <http://www.w3.org/2002/07/owl#>
PREFIX dcterms: <http://purl.org/dc/terms/>
PREFIX movie: <http://data.linkedmdb.org/movie/>

SELECT DISTINCT ?gname
WHERE { ?movie movie:actor ?actor .
        ?actor movie:actor_name "Keanu Reeves" .
        ?movie movie:genre ?genre .
        ?genre movie:film_genre_name ?gname .
}

# Aggregates
# Find the 10 movie series with the most movies
PREFIX  rdf: <http://www.w3.org/1999/02/22-rdf-syntax-ns#>
PREFIX rdfs: <http://www.w3.org/2000/01/rdf-schema#>
PREFIX  owl: <http://www.w3.org/2002/07/owl#>
PREFIX dcterms: <http://purl.org/dc/terms/>
PREFIX movie: <http://data.linkedmdb.org/movie/>

SELECT ?sname (COUNT(?movie) AS ?mcnt)
WHERE {
  ?movie movie:film_series ?series .
  ?series movie:film_series_name ?sname .
}
GROUP BY ?sname
ORDER BY DESC(?mcnt)
LIMIT 10
Performing SPARQL Update Operations on LMDB
We will use the SQL interface to perform updates on the LMDB model to show how this data can evolve with movie rating information.
Open a SQL worksheet for rdfuser. File->New. Then select Database Files and click OK.
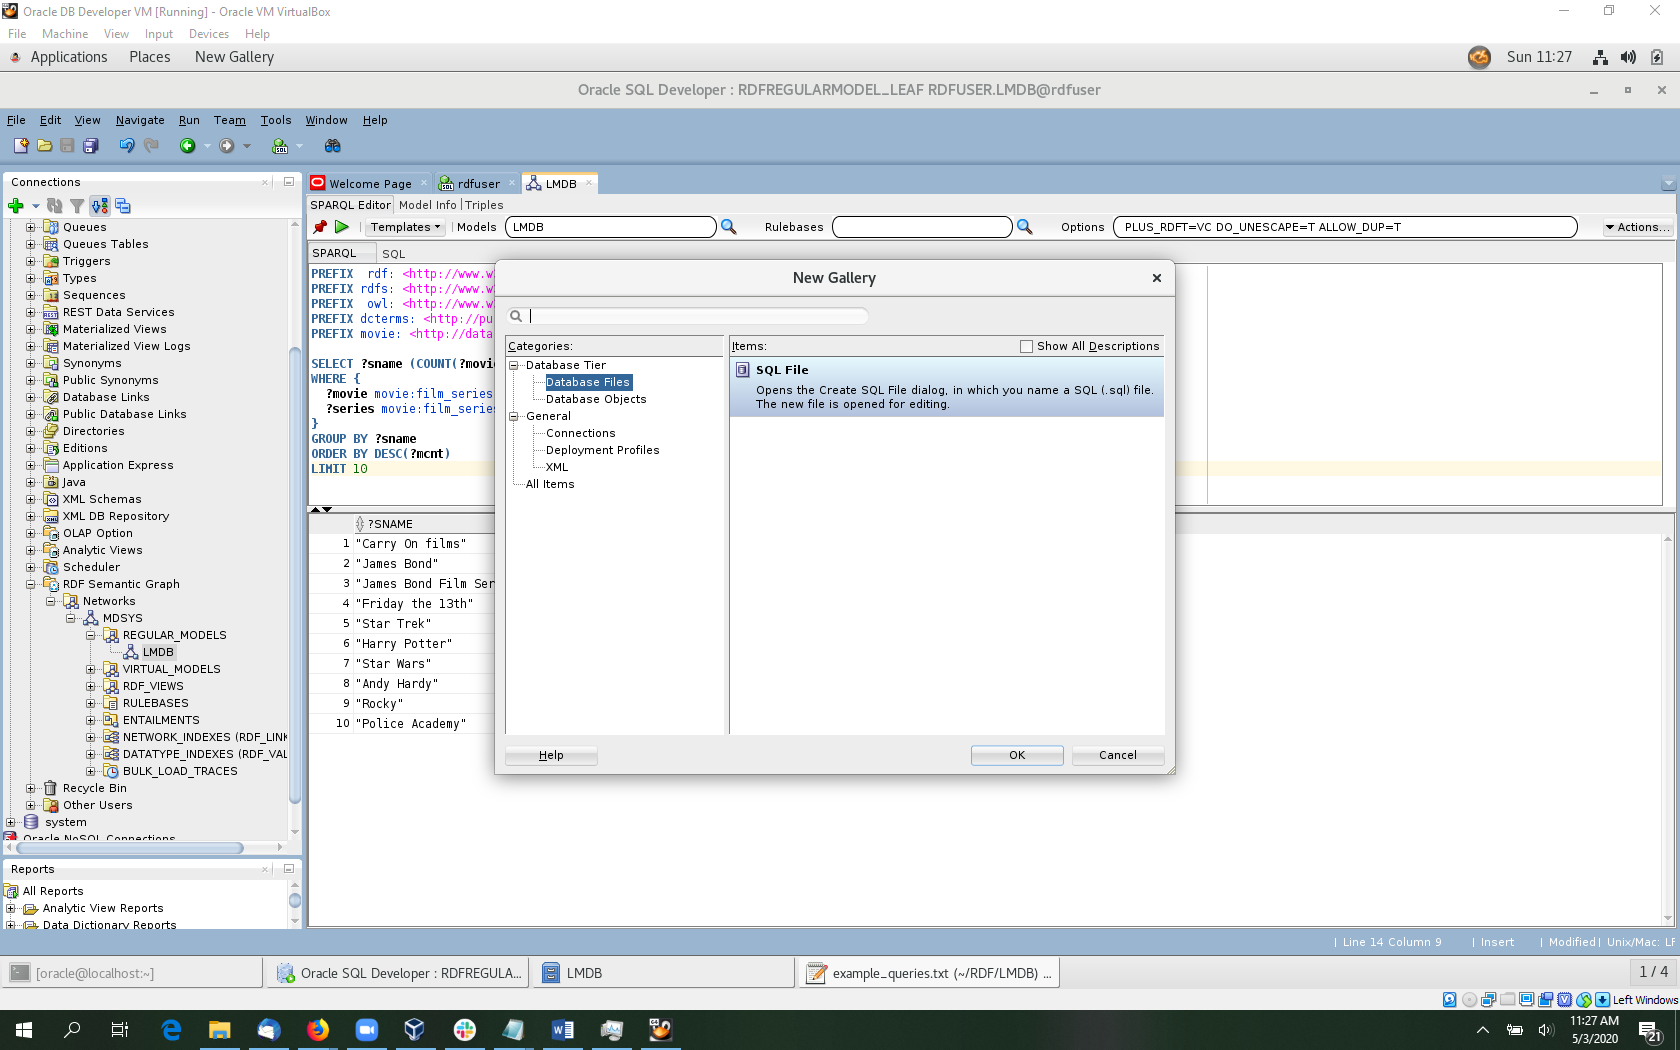
Pick a file name and location and click OK.
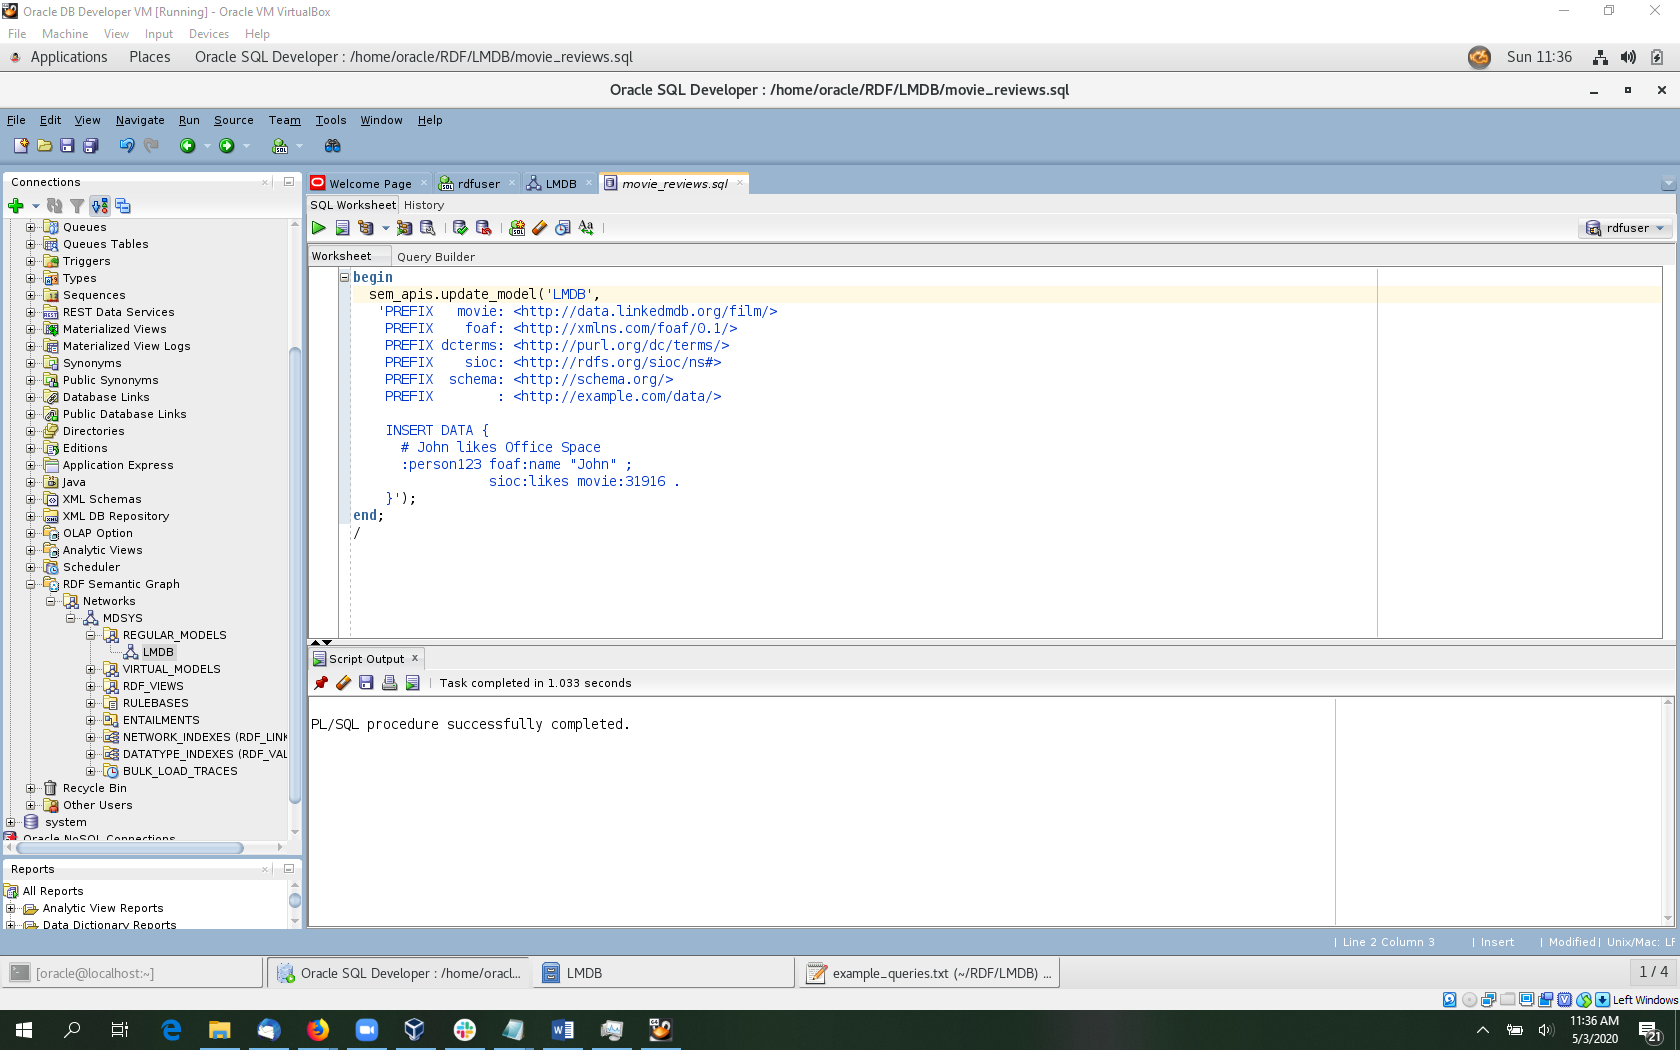
Now we can perform some SPARQL Update operations using the SEM_APIS PL/SQL package. Some example updates are below. Be sure to select the rdfuser connection for this worksheet in the connection drop down menu on the top right. Some example updates are shown below. The full list of movie review updates is available here, and corresponding queries are available here.
begin
  sem_apis.update_model('LMDB',
   'PREFIX   movie: <http://data.linkedmdb.org/film/>
    PREFIX    foaf: <http://xmlns.com/foaf/0.1/>
    PREFIX dcterms: <http://purl.org/dc/terms/>
    PREFIX    sioc: <http://rdfs.org/sioc/ns#>
    PREFIX  schema: <http://schema.org/>
    PREFIX        : <http://example.com/data/>

    INSERT DATA {
      # John likes Office Space
      :person123 foaf:name "John" ;
                 sioc:likes movie:31916 .
    }'
);
end;
/

begin
  sem_apis.update_model('LMDB',
   'PREFIX   movie: <http://data.linkedmdb.org/film/>
    PREFIX    foaf: <http://xmlns.com/foaf/0.1/>
    PREFIX dcterms: <http://purl.org/dc/terms/>
    PREFIX    sioc: <http://rdfs.org/sioc/ns#>
    PREFIX  schema: <http://schema.org/>
    PREFIX        : <http://example.com/data/>

    # remove triple
    DELETE DATA { :person123 sioc:likes movie:31916 . };
    INSERT DATA {
      # replace triple with quad assigning :edge1 as id
      GRAPH :edge1 { :person123 sioc:likes movie:31916 . }
      # add edge property for rating
      :edge1 schema:ratingValue 5 .
    }'
);
end;
/
Graph Analytics with RDF Data
The next portion of the tutorial will illustrate how to extract a subgraph from our LMDB RDF data and use an in-memory graph analytics engine on the extracted subgraph.
Extracting the Subgraph
We will use the SEM_MATCH SQL table function to create some database views that represent Vertex and Edge tables for our extracted subgraph. SEM_MATCH allows the execution of SPARQL queries within SQL statements.
Use a SQL worksheet to create the following relational views in the rdfuser schema. The full script is available here.
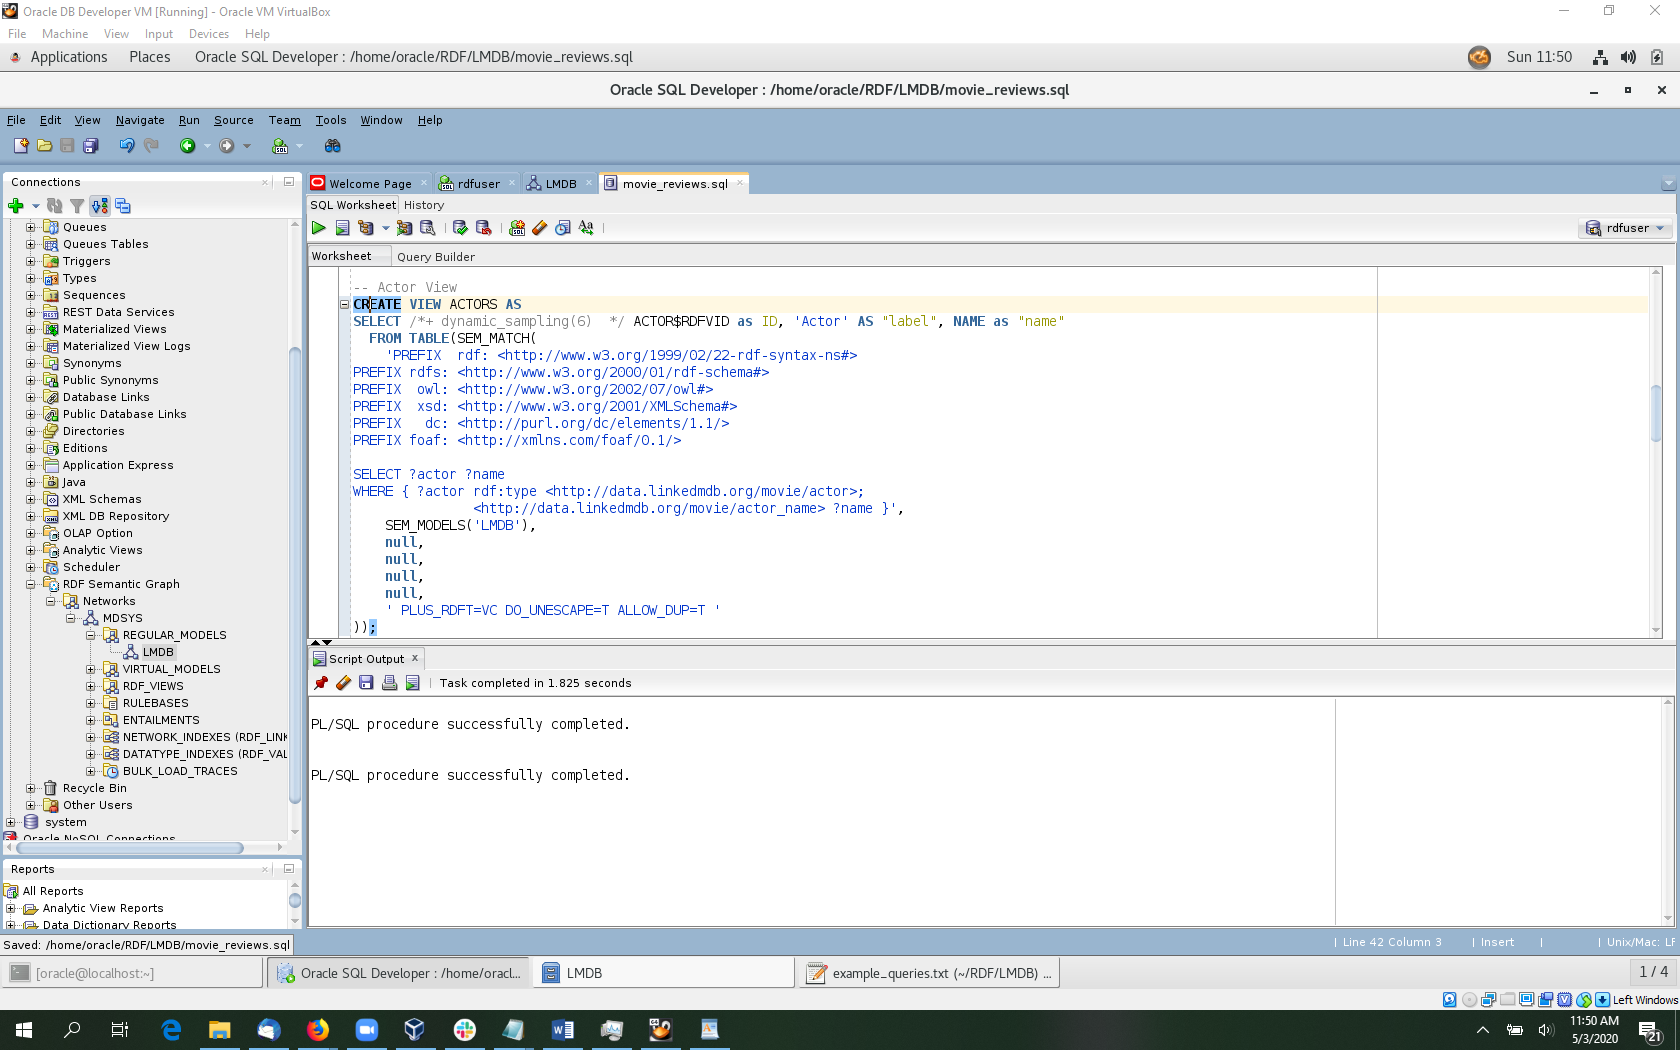
-- Create node and edge views for PGX

-- Actor View
CREATE VIEW ACTORS AS
SELECT ACTOR$RDFVID as ID, 'Actor' AS "label", NAME as "name"
  FROM TABLE(SEM_MATCH(
    'PREFIX  rdf: <http://www.w3.org/1999/02/22-rdf-syntax-ns#>
SELECT ?actor ?name
WHERE { ?actor rdf:type <http://data.linkedmdb.org/movie/actor>;
               <http://data.linkedmdb.org/movie/actor_name> ?name }',
    SEM_MODELS('LMDB'),
    null,
    null,
    null,
    null,
    ' PLUS_RDFT=VC DO_UNESCAPE=T ALLOW_DUP=T '
));

-- Movie table
CREATE VIEW MOVIES AS
SELECT MOVIE$RDFVID as ID, 'Movie' AS "label", MTITLE AS "title", MGENRE AS "genre"
  FROM TABLE(SEM_MATCH(
    'PREFIX  rdf: <http://www.w3.org/1999/02/22-rdf-syntax-ns#>
SELECT ?movie (MAX(STR(?genre)) AS ?mGenre) (MAX(STR(?title)) AS ?mTitle)
WHERE { ?movie rdf:type <http://data.linkedmdb.org/movie/film>;
               <http://purl.org/dc/terms/title> ?title ;
               <http://data.linkedmdb.org/movie/genre>/<http://data.linkedmdb.org/movie/film_genre_name> ?genre }
GROUP BY ?movie
               ',
    SEM_MODELS('LMDB'),
    null,
    null,
    null,
    null,
    ' PLUS_RDFT=VC DO_UNESCAPE=T ALLOW_DUP=T '
    ));

-- edge table
-- forward edge
CREATE VIEW ACTED_IN AS
SELECT ACTOR$RDFVID AS SOURCE_ID, MOVIE$RDFVID AS DEST_ID, 'acted_in' AS "label"
  FROM TABLE(SEM_MATCH(
    'PREFIX  rdf: <http://www.w3.org/1999/02/22-rdf-syntax-ns#>
SELECT ?actor ?movie
WHERE { ?movie <http://data.linkedmdb.org/movie/actor> ?actor }',
    SEM_MODELS('LMDB'),
    null,
    null,
    null,
    null,
    ' PLUS_RDFT=VC DO_UNESCAPE=T ALLOW_DUP=T '
    ));

-- backward edge
CREATE VIEW HAD_ACTOR AS
SELECT MOVIE$RDFVID AS SOURCE_ID, ACTOR$RDFVID AS DEST_ID, 'had_actor' AS LABEL
  FROM TABLE(SEM_MATCH(
    'PREFIX  rdf: <http://www.w3.org/1999/02/22-rdf-syntax-ns#>
SELECT ?actor ?movie
WHERE { ?movie <http://data.linkedmdb.org/movie/actor> ?actor }',
    SEM_MODELS('LMDB'),
    null,
    null,
    null,
    null,
    ' PLUS_RDFT=VC DO_UNESCAPE=T ALLOW_DUP=T '
    ));
Setting up Oracle Graph Server and Client
We will use JShell for this portion of the tutorial. First, we need to open a terminal and setup the environment. Execute the following commands in a terminal.
[oracle@localhost oracle]$ export JAVA_HOME=/home/oracle/RDF/jdk-11.0.6
[oracle@localhost oracle]$ export PATH=$JAVA_HOME/bin:$PATH
[oracle@localhost oracle]$ which java
~/RDF/jdk-11.0.6/bin/java
[oracle@localhost oracle]$
In order to load a graph from Oracle Database, we need to setup a Java Keystore file for the database connection password, and we need to create a configuration file for the graph we are loading.
Create a file called config.json in the RDF directory with the following contents. The full config.json file is available here.
{
    "name":"lmdb",
    "jdbc_url":"jdbc:oracle:thin:@localhost:1521/orcl",
    "username":"rdfuser",
    "keystore_alias":"database1",
    "vertex_id_strategy": "keys_as_ids",
    "vertex_providers":[
        {
            "name":"Actor",
            "format":"rdbms",
            "database_table_name":"ACTORS",
            "key_column":"ID",
            "key_type": "long",
            "props":[
                {
                    "name":"name",
                    "type":"string"
                }
            ]
        },
        {
            "name":"Movie",
            "format":"rdbms",
            "database_table_name":"MOVIES",
            "key_column":"ID",
            "key_type": "long",
            "props":[
                {
                    "name":"title",
                    "type":"string"
                },
                {
                    "name":"genre",
                    "type":"string"
                }
            ]
        }
    ],
    "edge_providers":[
        {
            "name":"acted_in",
            "format":"rdbms",
            "database_table_name":"ACTED_IN",
            "source_column":"SOURCE_ID",
            "destination_column":"DEST_ID",
            "source_vertex_provider":"Actor",
            "destination_vertex_provider":"Movie"
        },
        {
            "name":"had_actor",
            "format":"rdbms",
            "database_table_name":"HAD_ACTOR",
            "source_column":"SOURCE_ID",
            "destination_column":"DEST_ID",
            "source_vertex_provider":"Movie",
            "destination_vertex_provider":"Actor"
        }
   ]
}
Next, we need to setup the Java Keystore file. Execute the following in your terminal.
[oracle@localhost oracle]$ cd /home/oracle/RDF
[oracle@localhost RDF]$ keytool -importpass -alias database1 -keystore keystore.p12 -storetype pkcs12
Enter keystore password:
Re-enter new password:
Enter the password to be stored:
Re-enter password:
[oracle@localhost RDF]$
Enter a password for your keystore file and then enter the password for your rdfuser database account.
Using Oracle Graph Server and Client with JShell
This portion of the tutorial will use JShell to demonstrate parts of the Java API for Graph Server and Client. Run the following commands from your terminal to start the opg-jshell-rdbms client.
[oracle@localhost RDF]$ unset CLASSPATH
[oracle@localhost RDF]$ /opt/oracle/graph/bin/opg-rdbms-jshell --secret_store keystore.p12
12:26:25,578 INFO Ctrl$1 - >>> start engine

enter password for keystore keystore.p12:
For an introduction type: /help intro
Oracle Graph Server Shell 20.1.0
PGX server version: 19.4.0 type: SM running in embedded mode.
PGX server API version: 3.6.0
PGQL version: 1.2
Variables instance, session, and analyst ready to use.
opg-jshell-rdbms>
Run the following commands to load the extracted graph from LMDB into memory.
opg-jshell-rdbms> var graph = session.readGraphWithProperties("config.json");
graph ==> PgxGraph[name=lmdb,N=51456,E=124888,created=1588523322551]
opg-jshell-rdbms>
Now, we can use graph.queryPgql to run some PGQL queries. A full list of example queries is available here.
opg-jshell-rdbms> graph.queryPgql(
...> "SELECT a.name as name "+
...> "MATCH (m:Movie)-[:had_actor]->(a:Actor) "+
...> "WHERE m.title = 'Home Alone'").print();
+------------------+
| name             |
+------------------+
| Catherine O'Hara |
| Daniel Stern     |
| John Candy       |
| Macaulay Culkin  |
| John Heard       |
| Daniel Stern     |
| Joe Pesci        |
| Roberts Blossom  |
+------------------+
$2 ==> PgqlResultSetImpl[graph=lmdb,numResults=8]
opg-jshell-rdbms>
opg-jshell-rdbms> graph.queryPgql(
...> "SELECT COUNT(e) AS pathLen, ARRAY_AGG(t.title) AS movie, ARRAY_AGG(t.name) AS coStar "+
...> "MATCH SHORTEST ( (a) ((s)-[e:acted_in]-(t))* (b) ) "+
...> "WHERE a.name = 'Charlie Chaplin' AND b.name = 'Mr. T'").print();
+------------------------------------------------------------------------------------------------------+
| pathLen | movie                                        | coStar                                      |
+------------------------------------------------------------------------------------------------------+
| 6       | [Limelight, Home for the Holidays, Spy Hard] | [Geraldine Chaplin, Charles Durning, Mr. T] |
+------------------------------------------------------------------------------------------------------+
$3 ==> PgqlResultSetImpl[graph=lmdb,numResults=1]
We can also use the Analyst API to run graph algorithms over our extracted graph. Use the commands below to run Page Rank against the LMDB graph. Running the algorithm adds a pagerank property to each vertex, which we can access with PGQL queries.
opg-jshell-rdbms> var analyst = session.createAnalyst();
analyst ==> NamedArgumentAnalyst[session=6b26e194-3dfe-40af-9e14-e9e34031b546]
opg-jshell-rdbms> VertexProperty
   pagerank = analyst.pagerank(graph);
pagerank ==> VertexProperty[name=pagerank,type=double,graph=lmdb]
opg-jshell-rdbms> pagerank.getName();
$6 ==> "pagerank"
opg-jshell-rdbms> graph.queryPgql("select id(a), a.pagerank, a.title match (a:Movie) order by a.pagerank desc limit 10").print();
+-------------------------------------------------------------------------------------------+
| id(a)               | a.pagerank            | a.title                                     |
+-------------------------------------------------------------------------------------------+
| 9203356100102031272 | 4.5957911542206383E-4 | Stranger Than Fiction                       |
| 3043577596047303050 | 3.7362096519635195E-4 | Walk Hard: The Dewey Cox Story              |
| 1551281233598901313 | 3.0906541971418243E-4 | 30 Days of Night                            |
| 4716692856789145745 | 2.9467453955043946E-4 | Talladega Nights: The Ballad of Ricky Bobby |
| 5136965450075342208 | 2.7029926744780766E-4 | Untraceable                                 |
| 8906191549691061753 | 2.366584825237721E-4  | Baby Boy                                    |
| 1924525656707524741 | 2.2347530719121642E-4 | Night at the Museum                         |
| 2044045883429832681 | 2.0619976574073263E-4 | Adventures Into Digital Comics              |
| 3830516857956502081 | 2.057737297912671E-4  | The Other Boleyn Girl                       |
| 1250359656689937498 | 1.920351747698865E-4  | First Sunday                                |
+-------------------------------------------------------------------------------------------+
$7 ==> PgqlResultSetImpl[graph=lmdb,numResults=10]
opg-jshell-rdbms> graph.queryPgql("select id(a), a.pagerank, a.name match (a:Actor) order by a.pagerank desc limit 10").print();
+-----------------------------------------------------------------+
| id(a)               | a.pagerank            | a.name            |
+-----------------------------------------------------------------+
| 6918926442303567142 | 3.652943214921537E-4  | Oliver Hardy      |
| 5108249384479603329 | 3.534905433635076E-4  | Stan Laurel       |
| 2217693998232186748 | 3.5033153856543363E-4 | John Wayne        |
| 1521869729662604452 | 3.266064860979765E-4  | Claudette Colbert |
| 7570309037436615508 | 3.187072825866198E-4  | William Garwood   |
| 4463808826027376555 | 3.147493787789601E-4  | Charlie Chaplin   |
| 1130732531415155834 | 2.7138550552431096E-4 | Harry von Meter   |
| 6706176589560490413 | 2.5675796106955844E-4 | Jackie Chan       |
| 3000787937460459606 | 2.336318740626907E-4  | Vincent Price     |
| 7730444284418262623 | 2.2997707687822115E-4 | Joan Crawford     |
+-----------------------------------------------------------------+
$8 ==> PgqlResultSetImpl[graph=lmdb,numResults=10]
opg-jshell-rdbms>