Introduction
Following our recent announcement that the Oracle Private AI Services Container is now available on Oracle Container Registry, it’s time to move from “what’s new” to “how it works”. In this post we’ll walk through installing, configuring, and using the container in your own environment.
After reading this blog, you will understand:
Dashboard
- The software and hardware prerequisites for Oracle Private AI Services Container
- How to install Podman for Oracle Linux 8
- How to download the container image from Oracle Container Registry
- How to extract the installation scripts from the container
- How to install and configure the container using HTTP
- How to install and configure the container using HTTP/SSL
- How to check whether the container is running
- How to check whether the container is healthy
- How to list the loaded embedding models
- How to create vectors with different embedding models
- How to check the runtime metrics for the embedding models
Prerequisites
In the examples below, we’ll be working with Oracle Linux 8 on an Oracle Cloud Infrastructure (OCI) virtual machine, making use of the OpenSSL software that’s included out of the box. We’ll also install Podman specifically tailored for Oracle Linux 8.
To set the stage, our VM, aptly named privateaivm is configured with 2 OCPUs, 24 GB of memory, and a default boot volume offering 36 GB of disk space. This environment provides a solid foundation for all the examples in this blog post.
A free Oracle account is required to download images from the Oracle Container Registry. This account will have an associated Single Sign-On (SSO) username. The most challenging part of the installation process is often obtaining the container image from the Oracle Container Registry. Oracle Accounts, Oracle Single Sign-On, and Oracle Container Registry are standard Oracle technologies used independently of Oracle Private AI Services Container.
The detailed prerequisites for installing the Oracle Private AI Services Container are provided in the official documentation.
Install Podman
These examples use the Podman container runtime. Docker is currently not supported with the install scripts.
Once you are logged into your Oracle Linux 8 virtual machine, install the Podman software package by running:
sudo dnf module install -y container-tools:ol8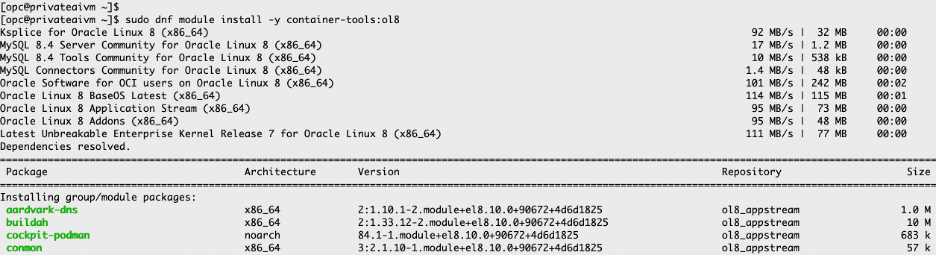
…

Verify that Podman is installed correctly and whether any images are loaded:
podman versionpodman images
Process to download the container image
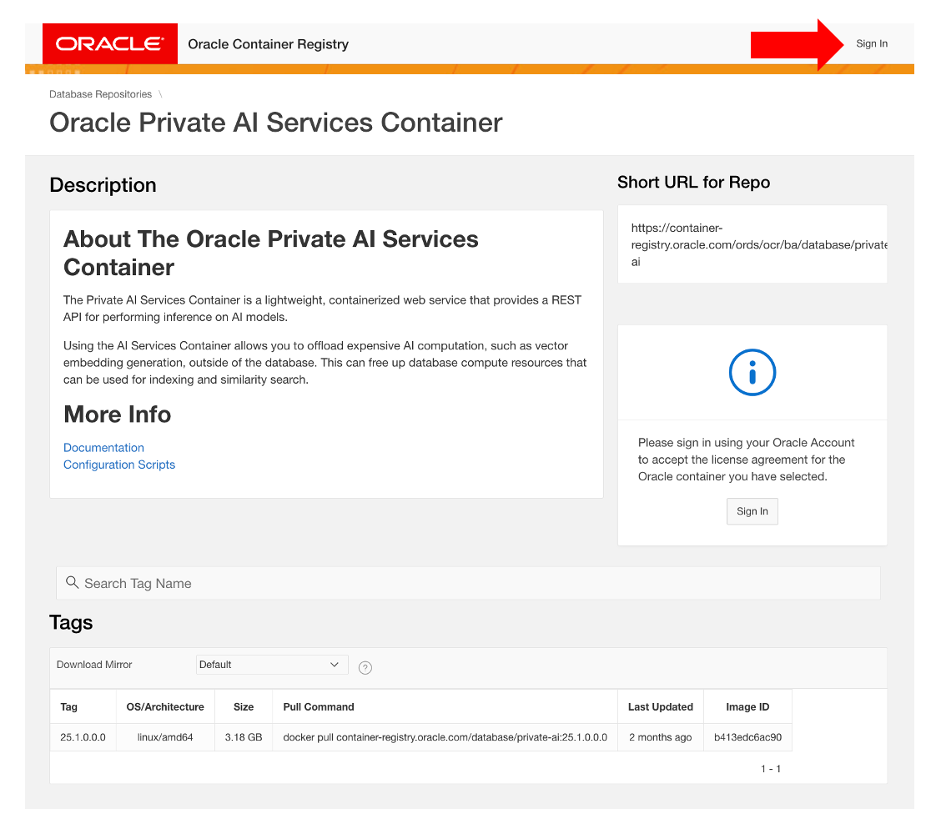
1. Sign in to Oracle Container Registry
Go to the Private AI Services Container page on the Oracle Container Registry website and sign in. The sign-in link is located at the top right of the page.
You will need to have or create a free Oracle account. You will be prompted to enter your Oracle Single Sign-On (SSO) username and password. If you are not yet registered with container-registry.oracle.com , you will be prompted to do so. Registering associates your SSO username with the Oracle Container Registry as an SSO-allowed user.
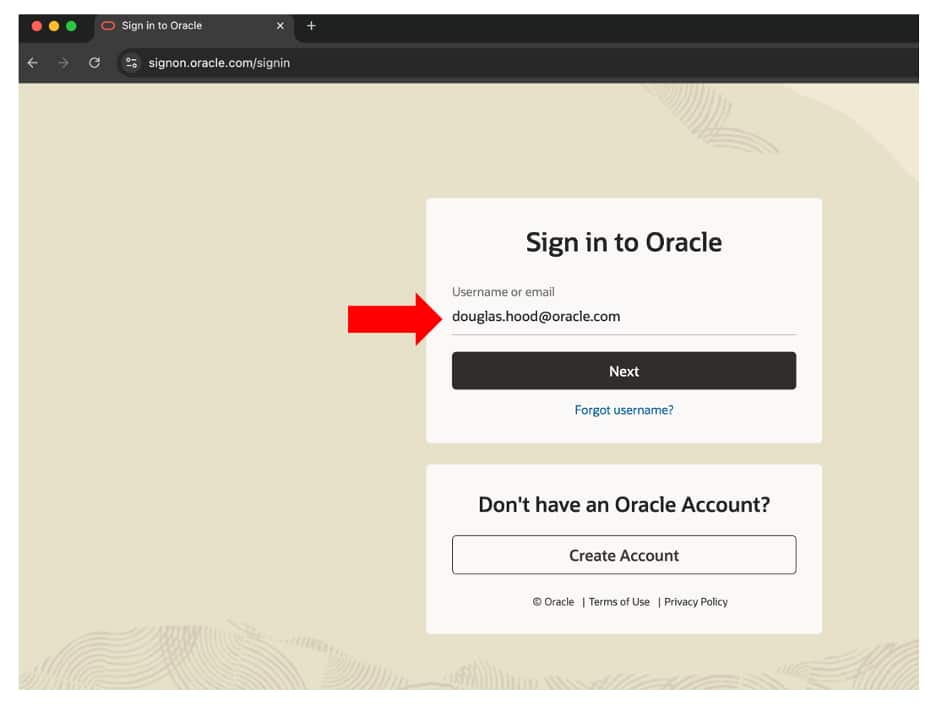
After completing this one-time registration, clicking Sign In on future visits will only require you to enter your SSO username and password.
Note Be sure to use your own SSO username and password for your Oracle Account, not mine.
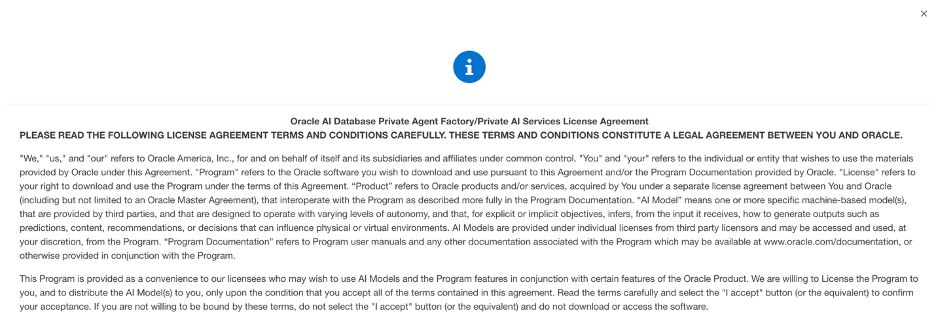
2. Accept the License Agreement
You must click Continue to read and accept the license agreement for the Oracle Private AI Services Container. The license is free to use, does not require a credit card, and is only accepted once—your acceptance will be remembered for future access.

The following is the beginning of the Oracle Private AI Services Container license:
…
The following is the end of the Oracle Private AI Services Container license:
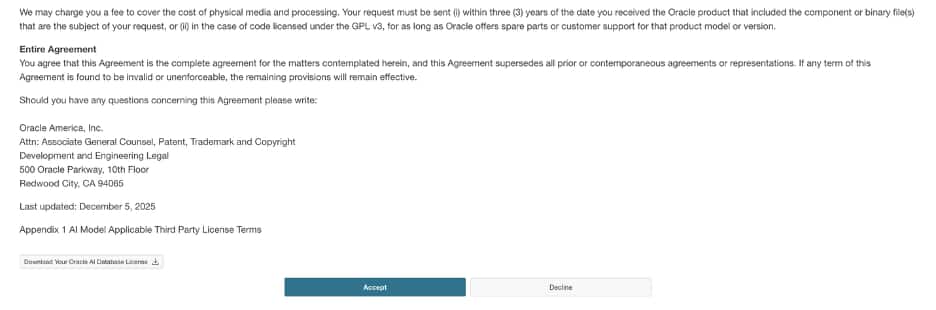
You need to click on Accept to be able to download the container. If you decline, you will not be able to download the container.
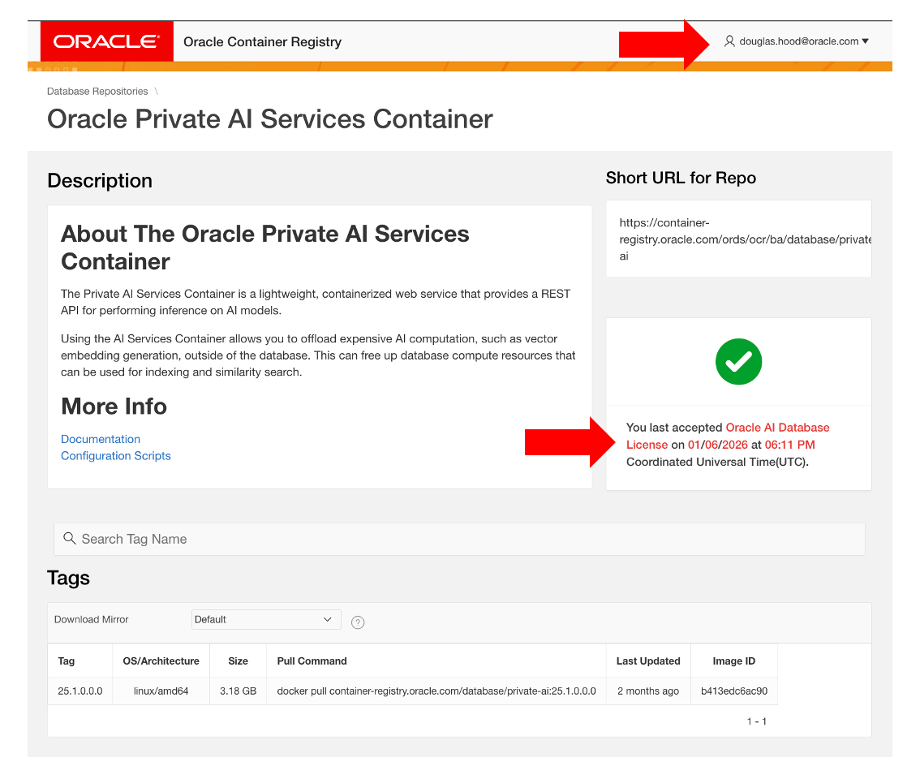
Once you accept the license, this status is displayed on the right-hand side of the Private AI Services Container page on the Oracle Container Registry.
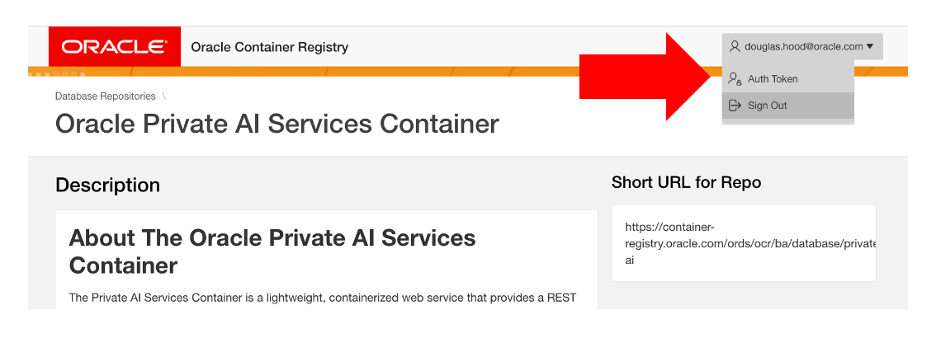
3. Generate an auth token to pull the container image
An auth token is required (used as the password) to log in to the Oracle Container Registry. To generate an auth token, click on your Oracle Account profile name at the top right of the page, then select the Auth Token option from the profile menu.
From the Auth Token page, click on the Generate Secret Key link.
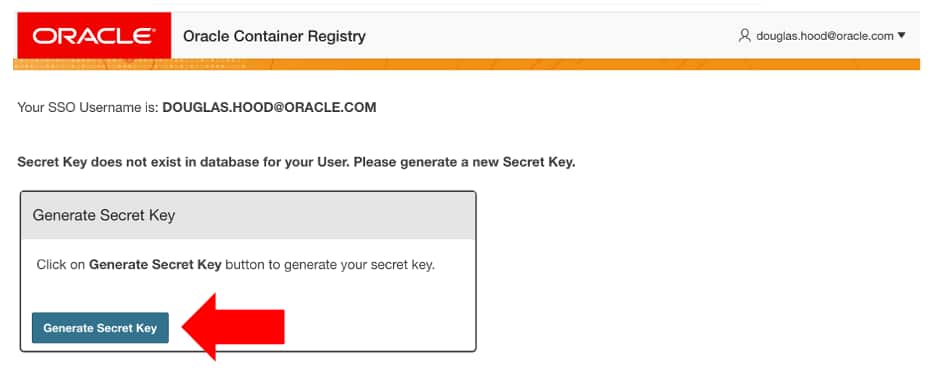
Make sure that you copy the generated Auth Token as it will only be displayed once.
Note You can always generate a new Auth Token when you forget your old one.
4. Download the container image
Download the Private AI Services Container image to your virtual machine.
a. Login to the Oracle Container Registry from the command-line
The username will be the Single Sign On / Profile username for your Oracle account.
The password will be the auth token that you just generated from the Oracle Container Registry website.
podman login container-registry.oracle.com
b. Pull the image from OCR
The time required to download the container image will depend on your network speed and the storage performance of your virtual machine.
podman pull container-registry.oracle.com/database/private-ai:25.1.2.0.0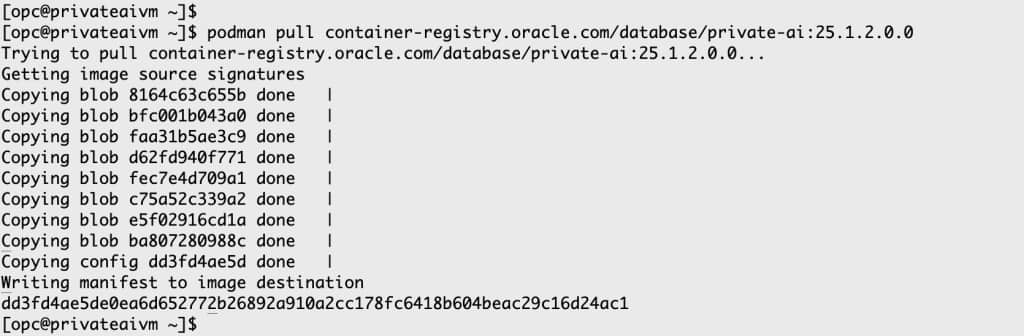
The time taken to download the container will depend on your network bandwidth and how fast the storage is on your VM.
c. Verify container image has been downloaded
podman images
d. Extract the install scripts
The installation scripts for Private AI Services Container are the recommended method for installing and configuring the container. They enable best practices and handle complex tasks such as enabling least privilege for SELinux, creating digital certificates and API keys, and configuring TLS 1.3.
The install scripts are packaged within the container, you need to create a container and then copy those install scripts to your Linux host machine.
1. Create container image
Use the imageid obtained from the above podman ps output to create, but not run the container.
export IMAGE_ID=dd3fd4ae5de0podman create $IMAGE_ID
2. Determine the container id
The output of creating the container image is the new container_id, even though the container is not currently running.
export CONTAINER_ID=477cce1adc23fd6911465757d93aac1be0f38e4d60821597160bf54f358c6207
3. Extract the install scripts
export INSTALL_SCRIPT_ZIP=/privateai/scripts/privateai-setup-25.1.2.0.0.zipexport DESTINATION=/home/opcpodman cp $CONTAINER_ID:$INSTALL_SCRIPT_ZIP $DESTINATION
4. Unzip the install scripts
cd /home/opcunzip privateai-setup-25.1.2.0.0.zip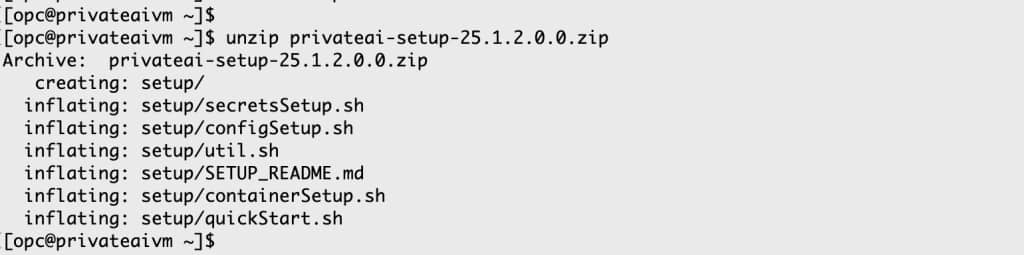
You have now completed the most challenging parts of the installation process. The actual installation and configuration using the provided scripts is much simpler.
Container Install & Config
The Private AI Services Container supports both default and advanced configurations for HTTP and HTTP/SSL. To minimize the learning curve, this blog will focus on the simplest configurations: default HTTP and default HTTP/SSL. More advanced configuration scenarios will be discussed in a future post.
With these two basic configurations, you can perform the following operations:
- Configure the HTTP or HTTP/SSL port
- Use the vector embedding models shipped with the container
- Start, check, stop, or restart the container
- Check the status of the container using Podman and the /health endpoint
- View the available embedding models
- Create vectors using various embedding models
- Check performance metrics for different models
Install with HTTP and default models
1. Create the Simplest HTTP configuration
This is the most basic setup: API key authentication and SSL are not used. The default embedding models are enabled, and the service is accessible via HTTP on port 8080.
The software can be installed under the user’s home directory:
- The PRIVATE_DIR environment variable points to the directory tree where directories will be created in the host machine
- The PRIVATE_DIR does not need to be called /home/opc/privateai
Note
The http parameter must be preceded by two dashes (--). If you do not use two dashes, you will encounter syntax errors.
mkdir /home/opc/privateaiexport PRIVATE_DIR=/home/opc/privateaicd ~/setup./configSetup.sh -d $PRIVATE_DIR./containerSetup.sh -d $PRIVATE_DIR --http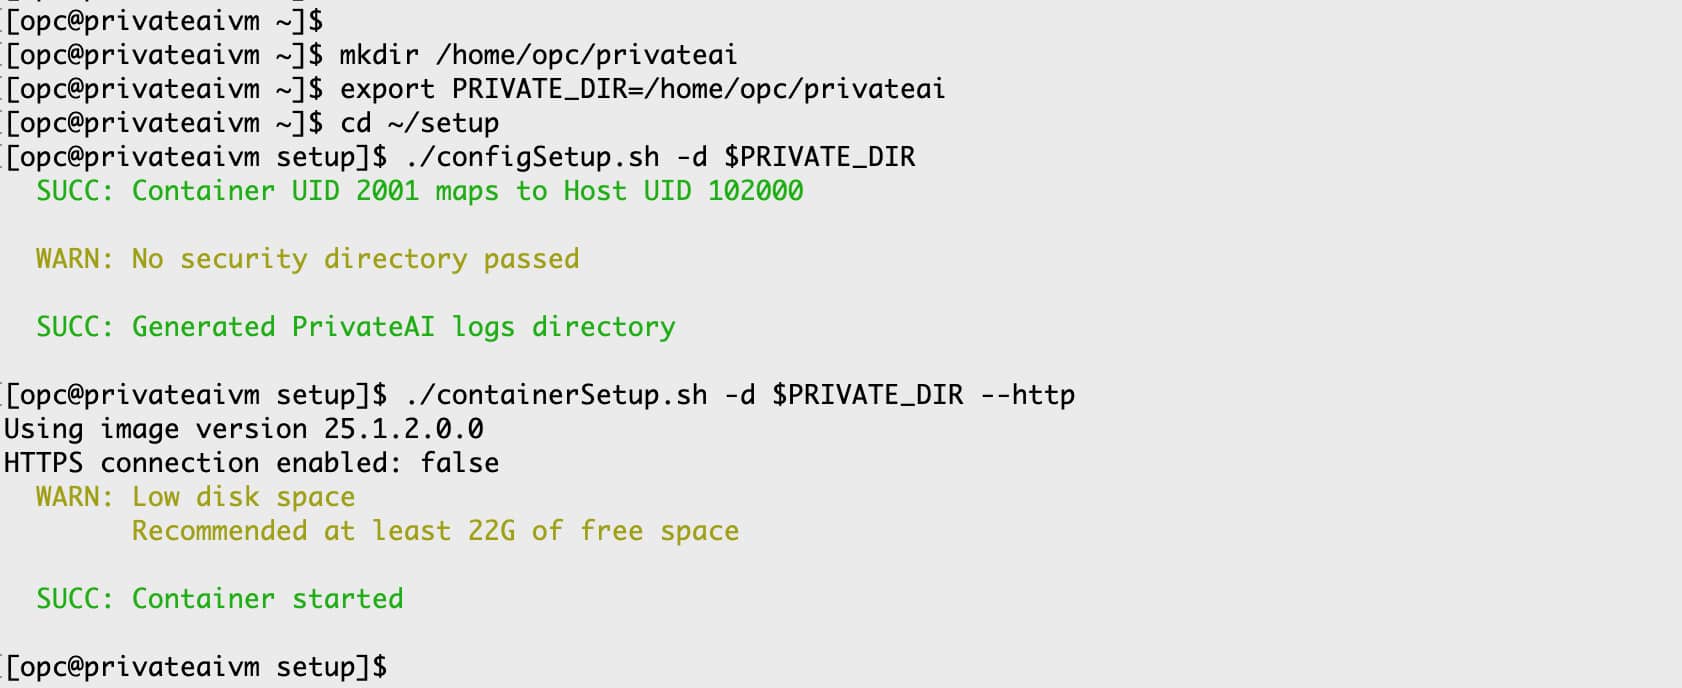
It should only take a few seconds to run these scripts with this simple configuration.
Note
- The warning about the missing security directory does not affect this configuration.
- The warning about low disk space can be ignored for this example.
2a. Check whether the container is running
podman ps
The Podman output shows:
- The container ID
- The image name
- That the container has been created
- How long that the container has been running for
- The external and internal TCP ports
- The network addresses that are being listened on
- The container instance name
This output is critical for life-cycle management of the container.
2b. Check whether the container is responding to HTTP requests
Using curl commands on the same machine as the container is the simplest way to get started. This allows you to use localhost as the machine name for HTTP requests.
curl -i http://localhost:8080/health
It may take a few seconds after starting the container before it begins responding to web requests.
This curl command performs an HTTP GET request to the /health endpoint on the local machine, using the default TCP port (8080). The -i parameter displays the HTTP response headers. An HTTP 200 OK message indicates that the container is responding correctly to HTTP requests.
3. Determine the loaded embedding models
The Private AI Services Container supports a variety of vector embedding models. The specific models loaded depend on the container version, the models included with the container, and the current configuration settings. You can use the /models endpoint to view the list of available models.
curl http://localhost:8080/v1/models
This HTTP GET request shows the available embedding models.
The following models are available with the default configuration:
- clip-vit-base-patch32-txt
- clip-vit-base-patch32-img
- all-mpnet-base-v2
- all-MiniLM-L12-v2
- multilingual-e5-base
- multilingual-e5-large
This means that you can create vectors with any of those embedding models.
The English-only models (all-mpnet-base-v2 and allMiniLM-L12-v2) provide slightly better accuracy on English text compared to multilingual models. For multi-modal vector queries (e.g., text + image), use the CLIP models.
4. Create vectors from the loaded models
The OpenAI API defines a set of REST endpoints for common AI operations. For example, the /v1/embedding endpoint is used to create vector embeddings. The example below demonstrates how to create a vector using the /v1/embedding endpoint with the Private AI Services Container.
curl -X POST -H "Content-Type: application/json" -d '{"model": "multilingual-e5-base", "input":["This is a phrase to vectorize"]}' http://localhost:8080/v1/embeddings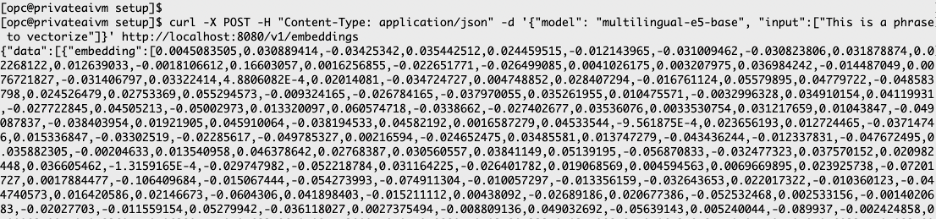
…

This network request performs an HTTP POST to localhost on port 8080, targeting the /v1/embedding endpoint. The POST body uses JSON to specify the desired embedding model and input data. This generic approach allows you to use different embedding models as needed. The OpenAI SDK offers equivalent programmatic functionality through various language libraries (such as Python, Node.js, and Java), which will be covered in upcoming blog posts.
5. Stop the container
You can stop the container using either its container ID or its name. By default, the container is named privateai.
podman stop privateai
Install with HTTP/SSL with default models
This example uses the simplest SSL configuration with the embedding models included in the container. Self-signed digital certificates are used, as they are free and enable SSL (TLS 1.3) for internal deployments.
1. Determine the fully qualified hostname
You want to find the fully qualified hostname to be used for both the digital certificate and the URLs for the REST calls.
export HOST=$(hostname -f)echo $HOST
2a. Configure the container with SSL
The software can be installed under the user’s home directory:
- The PRIVATE_DIR environment variable points to the directory tree where directories will be created in the host machine
- This PRIVATE_DIR directory tree does not need to be called /home/opc/privateai
- The SECRETS_DIR is where the digital certificate and API_KEY will be created
- The SECRETS_DIR directory does not need to be called /home/opc/secrets
cd /home/opc/setupmkdir -p /home/opc/privateaimkdir -p /home/opc/secretsexport PRIVATE_DIR=/home/opc/privateaiexport SECRETS_DIR=/home/opc/secrets
2b. Create the digital signature, API Key and Keystore
./secretsSetup.sh -s $SECRETS_DIR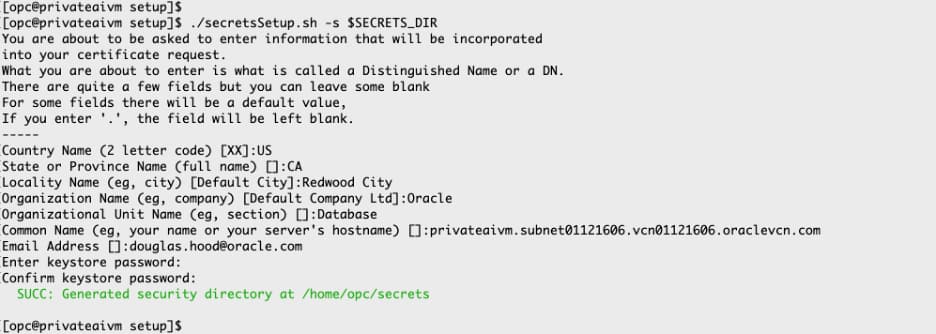
2c. Start the container with HTTP/SSL
./configSetup.sh -d $PRIVATE_DIR -s $SECRETS_DIR./containerSetup.sh -d $PRIVATE_DIRpodman ps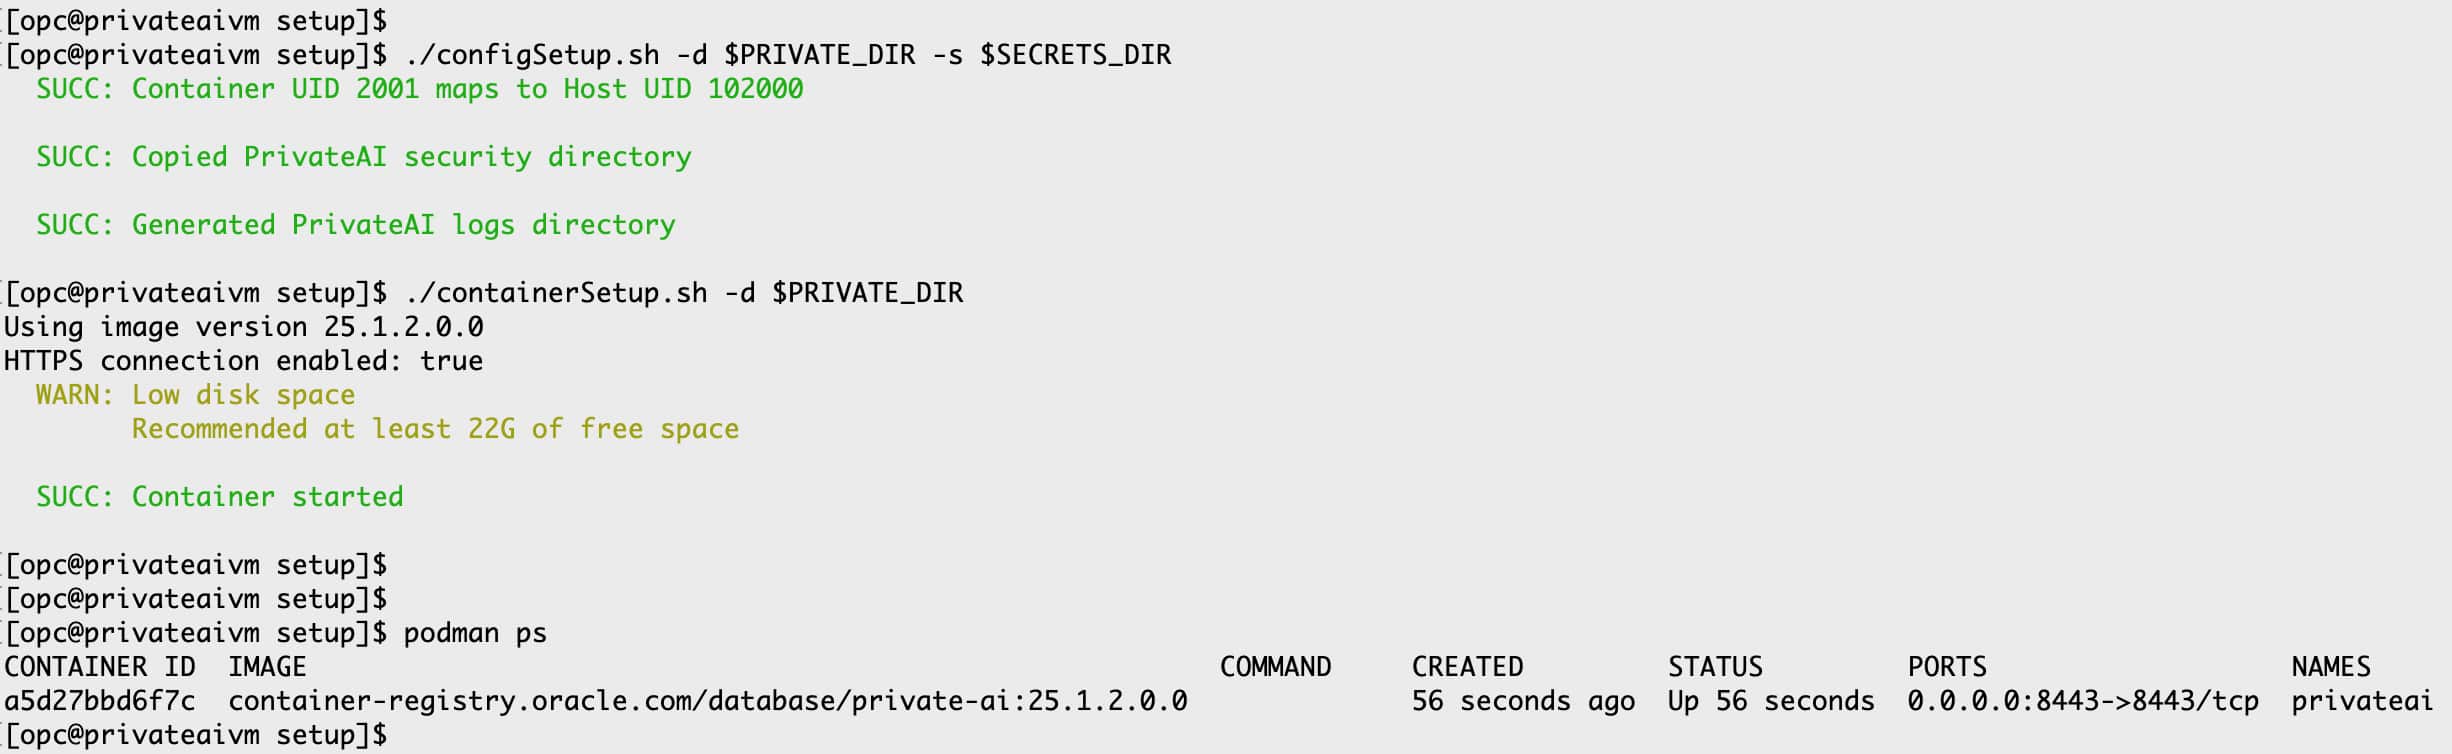
The container is now running with HTTP/SSL enabled on port 8443.
3. Check the health of the container
When using HTTP/SSL, curl must:
- Reference the digital certificate using the
--cacertparameter. - Use the fully qualified hostname.
- Specify the SSL port (e.g., 8443).
curl -i --cacert $SECRETS_DIR/cert.pem https://$HOST:8443/health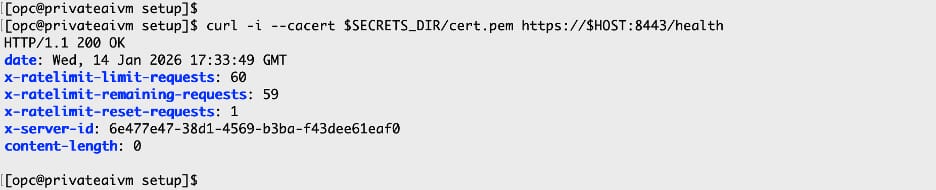
The /health endpoint does not require an API key.
4. Define the API_KEY
The value of the API key is required for other REST calls, so it is convenient to store it in an environment variable.
export API_KEY=$(cat $SECRETS_DIR/api-key)
The API_KEY value is generated by the secretsSetup.sh script and is used for authentication.
5. List the loaded models using HTTP/SSL
When using the /v1/models and /v1/embeddings REST endpoints with SSL, they require a valid API_KEY and digital certificate.
curl --header "Authorization: Bearer $API_KEY" --cacert $SECRETS_DIR/cert.pem https://$HOST:8443/v1/models
6a. Create a vector using HTTP/SSL
Use the multilingual-e5-base embedding model to create a vector for the data “The quick brown fox“.
curl -X POST --header "Authorization: Bearer $API_KEY" -H "Content-Type: application/json" -d '{"model": "multilingual-e5-base", "input":["The quick brown fox"]}' --cacert $SECRETS_DIR/cert.pem https://$HOST:8443/v1/embeddings
…

6b. Create another vector using HTTP/SSL
Use the all-minilm-l12-v2 embedding model to create a vector for the data “jumped over a lazy dog”. The model attribute in the JSON payload determines the embedding model to use.
curl -X POST --header "Authorization: Bearer $API_KEY" -H "Content-Type: application/json" -d '{"model": "all-minilm-l12-v2", "input":["jumped over a lazy dog"]}' --cacert $SECRETS_DIR/cert.pem https://$HOST:8443/v1/embeddings
…

7. Check the container metrics using HTTP/SSL
Use the following example to determine the runtime metrics for each embedding model.
curl --header "Authorization: Bearer $API_KEY" --cacert $SECRETS_DIR/cert.pem https://$HOST:8443/metrics/embeddings_call_latency