
Autonomous AI Vector Database helps builders by providing a simple, code-first experience while supporting enterprise capabilities as applications grow.
Many AI applications start with vector search over documents and knowledge bases. For example, a customer support assistant may begin by finding relevant product documentation and support articles. As it evolves into a production service, it needs to combine that knowledge with customer, order, and case data, graph relationships, and spatial information. AI applications also need the security, reliability, and operational scale required of enterprise applications.
Autonomous AI Vector Database is a fully managed vector database service designed to help developers quickly build AI applications using Python, REST APIs, or PL/SQL. It provides a simple developer experience while leveraging the enterprise capabilities of Oracle Autonomous AI Database, including automated provisioning, patching, backups, and scaling, and enterprise security capabilities.
Getting started requires just a few steps. You will provision an Autonomous AI Vector Database instance, connect using the Python SDK, create a vector table, load data, and perform your first semantic search. These core tasks introduce the workflow you will use when incorporating Autonomous AI Vector Database into your own AI applications.
Prerequisites
Before getting started, you will need access to an Oracle Cloud Infrastructure (OCI) account with permission to create an Autonomous AI Vector Database instance. If you don’t have an account, you can create an Oracle Cloud Free Tier account that includes Always Free services that allow you to provision an Autonomous AI Vector Database instance.
With your OCI environment in place, you are ready to create your first Autonomous AI Vector Database instance.
Provision an Autonomous AI Vector Database instance
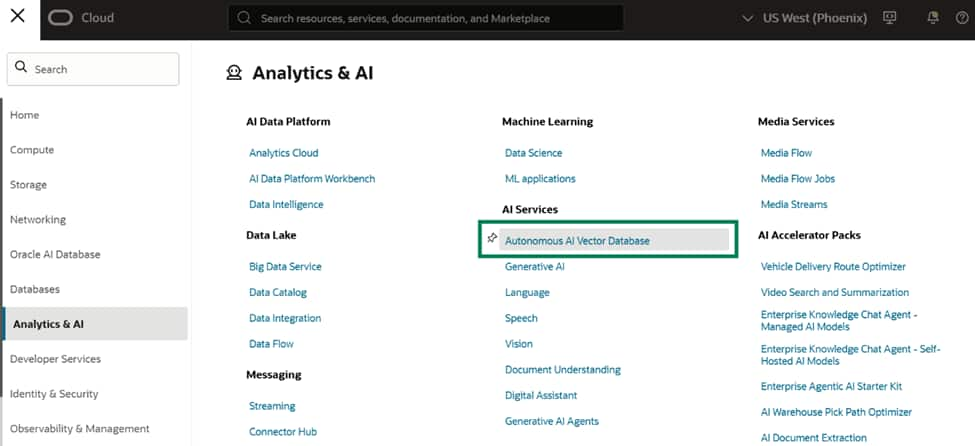
Creating an Autonomous AI Vector Database instance typically takes just a few minutes. Sign in to your OCI account and in the OCI Console open the Navigation Menu.

Navigate to Analytics & AI and then select Autonomous AI Vector Database.
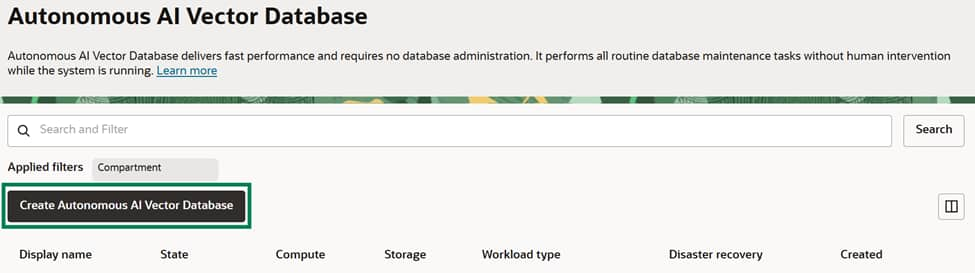
You are now ready to create your Autonomous AI Vector Database Instance. Click on the Create Autonomous AI Vector Database button.
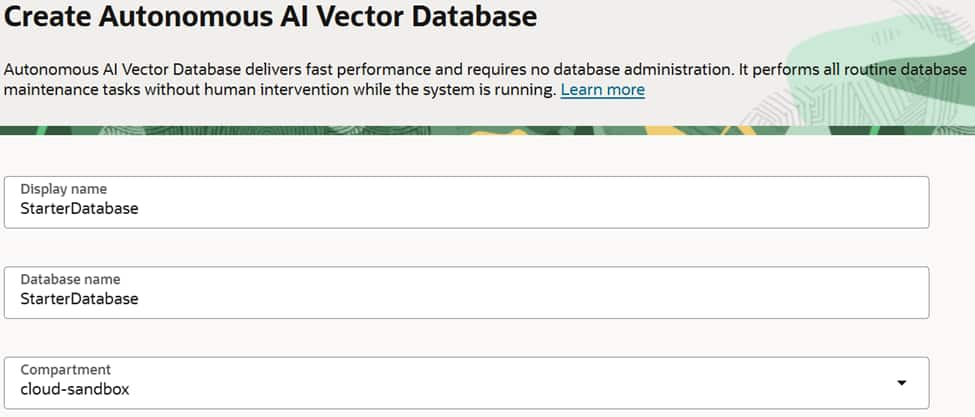
Enter a Display name and Database name. For this example, use StarterDatabase, or choose another meaningful name.
The Display name is used as a friendly name shown in the OCI Console, while the Database name is often a more compact name used in Python connection objects and REST service endpoints.
Choose the Compartment where you want to create the database. Compartments are OCI’s logical containers for organizing and controlling access to resources. For shared or production environments, follow your organization’s compartment and IAM policies. If you’re using a new tenancy and do not want to create a new compartment yet, the root compartment is sufficient.
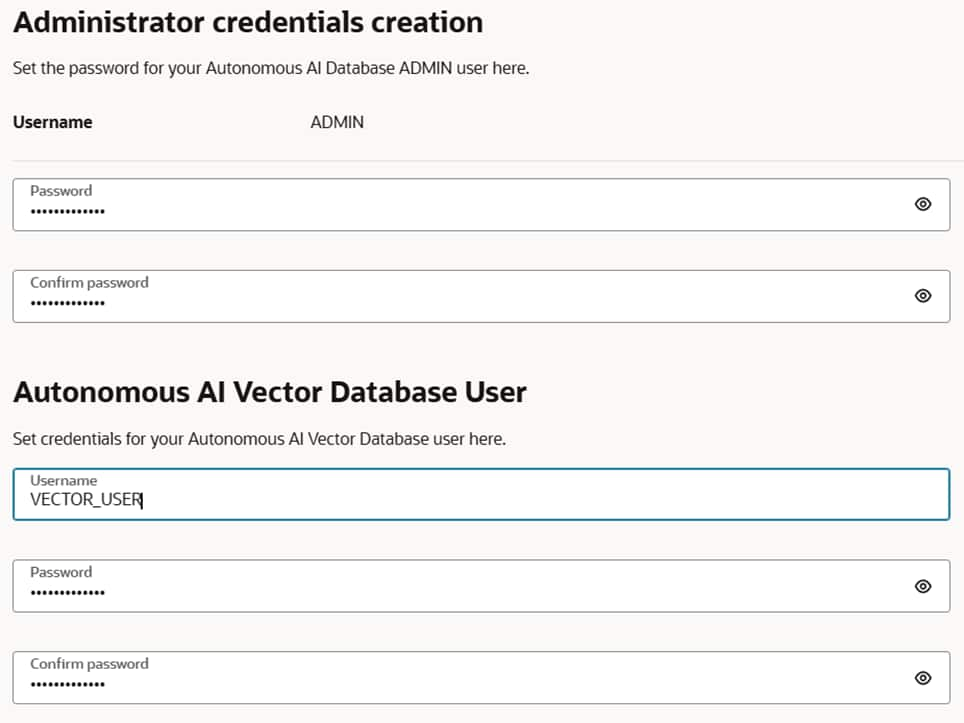
Scroll down to enter your Autonomous AI Vector Database credentials.
First, specify an ADMIN password. This account is used to administer the database and is separate from the vector application user you will create for development.
Next, create an Autonomous AI Vector Database username and password. These are the credentials your applications will use to connect to the database through the SDK or REST APIs. Additional database users can be added as needed.
Important: You will use the Autonomous AI Vector Database User username and password later when connecting from Python.
The final section lets you choose the deployment option and size of your Autonomous AI Vector Database. You can choose between the Always Free, Developer, or full Autonomous AI Vector Database versions.
- Always Free provides a small, fixed compute shape. Note: Only two Always Free Oracle Autonomous AI Databases per tenancy.
- Developer version is a low-cost, fixed shape of 4 ECPUs.
- If you do not select either of these options, you will use the Autonomous AI Vector Database option where you configure the number of ECPUs, storage, and optional auto scaling for production workloads.
If you select one of the first two options, you can always perform an in-place upgrade to the full version via the upgrade button.
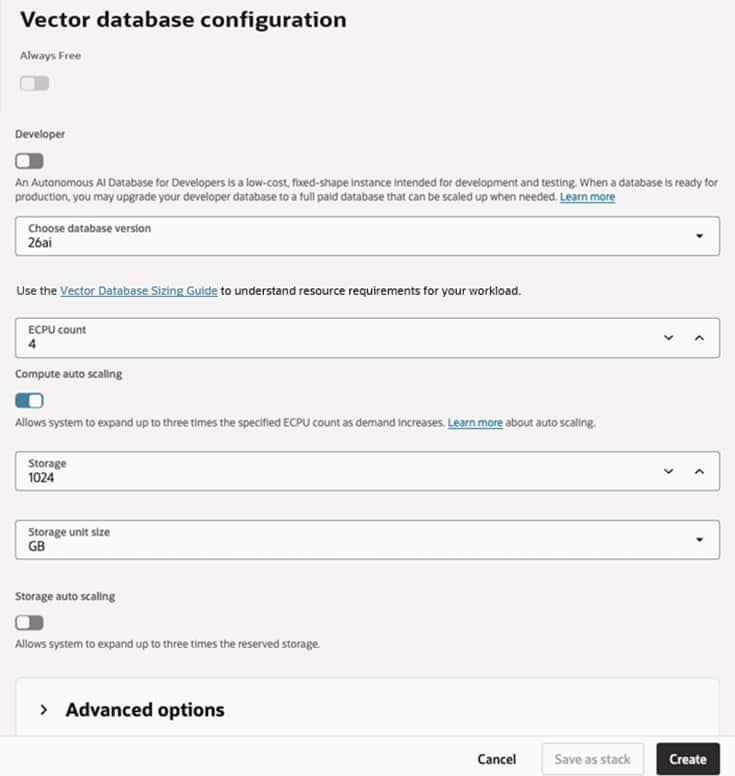
For this quick start, use the Developer configuration by toggling the switch. This configuration will incur charges. If you want to use the Always Free or full Autonomous AI Vector Database shapes, toggle the appropriate configuration. Click Create.

Provisioning typically takes a few minutes. During this time, the database status displays Provisioning. Once the status changes to Available, your Autonomous AI Vector Database instance is ready to use.
Explore your Autonomous AI Vector Database
With your Autonomous AI Vector Database instance provisioned, you will be taken to the database details page. This page provides access to the tools you will use to manage your database, monitor activity, or upgrade your Autonomous AI Vector Database. It also provides a way to open the Vector Database Console.
The Vector Database Console provides tools for loading embedding models, creating vector tables, running semantic searches, and generating OAuth tokens. We will focus on loading an embedding model and locating the REST endpoint needed to connect from Python.
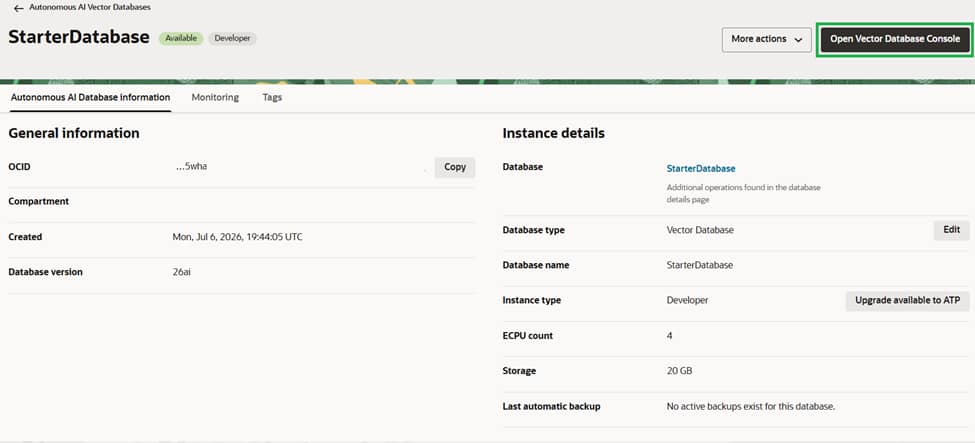
To begin, click Open Vector Database Console.
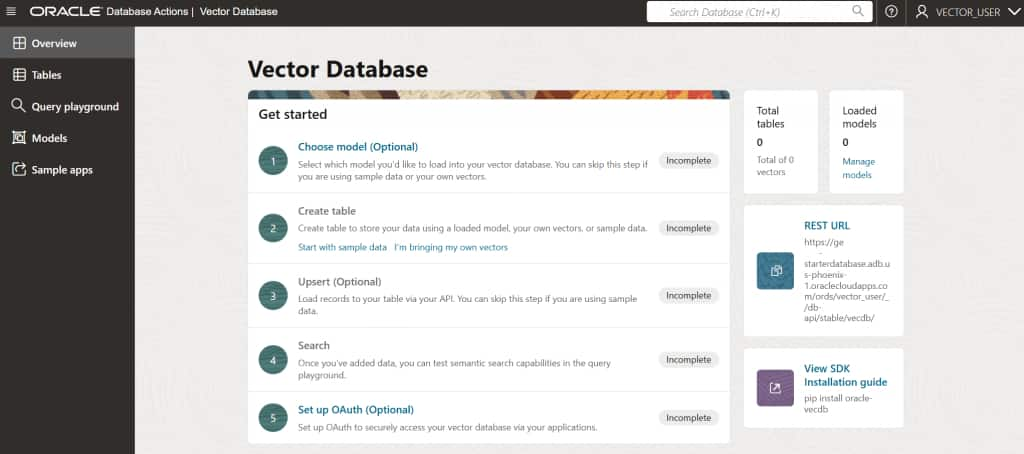
Getting the REST Endpoint
The Python SDK requires the REST endpoint for your Autonomous AI Vector Database instance. Locate the REST URL on the database details page and copy it to a safe location. You’ll use this value later when configuring the Python SDK.

Loading an Embedding Model
One of the features of Autonomous AI Vector Database is the ability to automatically generate embeddings as data is inserted into your vector tables. Before using this capability, you’ll need to load an embedding model into your database.
Select Choose Model (Optional) to view the available embedding models. Some models may already be loaded, while others are staged and ready to import. For this example, load the all_MiniLM_L12_v2 model by selecting the More Actions menu (⋮) and choosing Load.
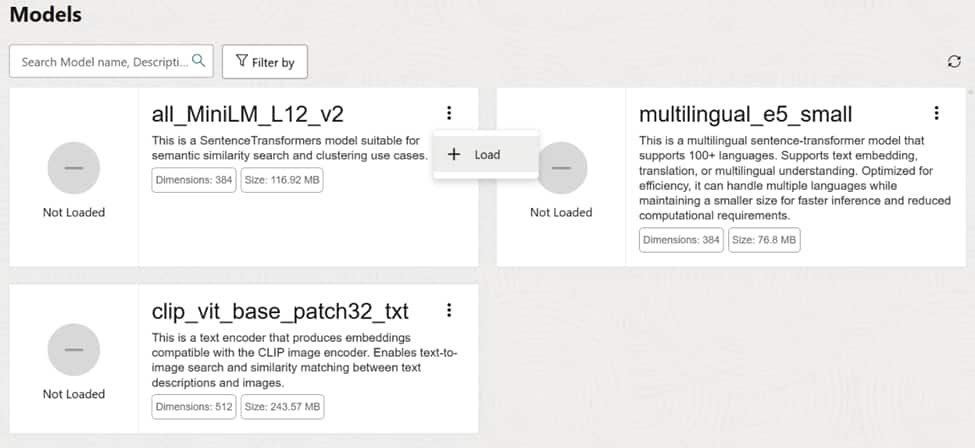
The model only needs to be loaded once. After it becomes available, you’ll reference it when creating your vector table so that embeddings are generated automatically as data is inserted.
With the REST endpoint saved and the embedding model loaded, you’re ready to connect to your Autonomous AI Vector Database instance from Python.
Connect to Autonomous AI Vector Database from Python
Autonomous AI Vector Database provides a Python SDK that is a simple interface for creating vector tables, loading data, and running semantic searches. The SDK is called oracle-vecdb and can be installed with pip. The package is located at PyPI and requires Python 3.10 or later.
Begin by installing the SDK using pip:
pip install oracle-vecdbNow install the remaining Python dependencies we will use in this example.
pip install python-dotenv pandasThis example uses python-dotenv to load connection information from a .env file and pandas to display query results.
Next, create a .env file to store your connection information.
# Autonomous AI Vector Database connection settings
REST_URL=<REST_URL>
VECDB_USERNAME=<USERNAME>
VECDB_PASSWORD=<PASSWORD>
Replace each value with the REST endpoint, username, and password you created earlier. Using a .env file keeps sensitive credentials out of your source code and makes it easy to move between development environments.
You will need to store credentials securely. Do not commit the .env file to source control. Add .env to .gitignore, restrict file access, and use an approved secrets-management solution for deployed applications. Username and password authentication is being used to simplify this getting-started post. But you can also create an OAuth token.
With the prerequisites in place, you can start coding using your favorite Python development environment. The following code examples are designed to run in a Jupyter notebook that can run on your computer or a hosted environment. You will start by connecting to your database.
import os
import pandas as pd

from dotenv import load_dotenv
from oracle_vecdb import OracleVecDB, Configuration

load_dotenv()

config = Configuration(
    rest_url=os.getenv("REST_URL"),
    username=os.getenv("VECDB_USERNAME"),
    password=os.getenv("VECDB_PASSWORD"),
)

vecdb = OracleVecDB(config)

print(f"Configured client for {config.host}")
The code output tells you the REST URL that will be used, but does not make the connection yet.
The vecdb object instantiated from OracleVecDB is the primary entry point for interacting with your database. You’ll use it throughout the remainder of this post to create tables, load data, and execute semantic searches.
You are now ready to start creating vector tables and loading data.
Create your first vector table
One of the goals of the Python SDK is to let you start working with vector data without having to design a complex database schema. When you create a vector table, the SDK automatically creates a purpose-built schema with the components required to store vectors and metadata and support semantic search.
As your application evolves, you can customize the schema, indexing strategy, and embedding behavior. For this quick start, however, the default configuration is all that’s required.
The following example creates a vector table named parks. The table is configured to automatically generate embeddings using the all_MiniLM_L12_v2 model that you loaded earlier. Whenever data is inserted, the text stored in the description field is automatically vectorized and stored using the embedding model.
vecdb.create_vector_table(
    name="parks",
    table_params={"auto_generate_id": True},
    embed_params={
        "model": "all_MiniLM_L12_v2",
        "embed_metadata_jsonpath": "description"
    }
)
The embed_metadata_jsonpath parameter identifies which key in your metadata, stored as a JSON string, should be converted into a vector embedding. In this example, the value of description is sent to the all_MiniLM_L12_v2 embedding model whenever data is inserted into the table. This allows you to store your original text while automatically generating the vector used for semantic search, eliminating the need to create embeddings as a separate step before loading into the database.
You may have noticed that the example doesn’t define a vector column. That’s because the SDK creates it automatically as part of its schema. In addition to the vector column, the SDK also creates the metadata structures needed to support semantic search, including information about the embedding model used, allowing you to start building applications without manually designing the underlying database objects.
The schema also creates a vector IVF vector index and a metadata index to improve performance for semantic queries. As your application grows, you can customize these indexes or define your own indexing strategy to meet your performance and scalability requirements. For more information about customizing tables, indexes, and schema options, see the Autonomous AI Vector Database API Reference.
Now that you have a vector table created, you’re ready to start loading data. As you’ll see in the next section, embeddings are generated automatically during data insertion, allowing you to focus on your application rather than embedding generation or schema management.
Load data
To get started, you will use a small collection of records describing U.S. National Parks. Each record consists of a metadata document containing information about the park, including its name, location, and a description.
Because the table was configured to automatically generate embeddings from the description field, there’s no need to create vectors before inserting the data. Simply provide the metadata, and Autonomous AI Vector Database generates and stores the vector representation automatically. A sample Python record to hold the text to be encoded and associated metadata looks like this.
vectors = [
    {
        "metadata": {
            "park_code": "alfl",
            "name": "Alibates Flint Quarries",
            "state": "TX",
            "description": "13,000 years ago, Alibates was used by mammoth hunters..."
        }
    }
]
You can load these 10 records into your vector table.
vectors = [
{"metadata":{"park_code":"alfl","name":"Alibates Flint Quarries","state":"TX","description":"13,000 years ago,  Alibates was used by mammoth hunters as a source of flint for tools. The colorful flint has never lost its value or usefulness in the Texas Panhandle. Learn how important this site was to the survival,  commerce,  and culture of the people of the High Plains."}},
{"metadata":{"park_code":"band","name":"Bandelier","state":"NM","description":"Bandelier National Monument protects over 33,000 acres of ruggedly beautiful canyon and mesa country. Petroglyphs,  dwellings carved into the soft rock cliffs,  and standing masonry walls pay tribute to the early days of a culture that still survives in the surrounding communities."}},
{"metadata":{"park_code":"bawa","name":"Baltimore-Washington","state":"MD","description":"This 29-mile highway connects Baltimore,  MD and Washington,  D.C. The parkway has carried visitors to and from the capital city since 1954."}},
{"metadata":{"park_code":"biho","name":"Big Hole","state":"MT","description":"On August 9,  1877,  gun shots shattered a chilly dawn on a sleeping camp of Nez Perce. By the time the smoke cleared on August 10,  almost 90 Nez Perce were dead along with 31 soldiers and volunteers. Big Hole National Battlefield was created to honor all who were there."}},
{"metadata":{"park_code":"afam","name":"African American Civil War Memorial","state":"DC","description":"Over 200,000 African-American soldiers and sailors served in the U.S. Army and Navy during the Civil War. Their service helped to end the war and free over four million slaves. The African American Civil War Memorial honors their service and sacrifice."}},
{"metadata":{"park_code":"apco","name":"Appomattox Court House","state":"VA","description":"On April 9,  1865,  the surrender of the Army of Northern Virginia in the McLean House in the village of Appomattox Court House,  Virginia signaled the effective end of the nation's largest war. Questions remained: could the nation reunite as one? How would emancipation be realized?"}},
{"metadata":{"park_code":"chic","name":"Chickasaw","state":"OK","description":"Springs,  streams,  lakes - whatever its form,  water is the attraction at Chickasaw National Recreation Area."}},
{"metadata":{"park_code":"anti","name":"Antietam","state":"MD","description":"23,000 soldiers were killed,  wounded or missing after twelve hours of savage combat on September 17,  1862. The Battle of Antietam ended the Confederate Army of Northern Virginia's first invasion into the North and led Abraham Lincoln to issue the preliminary Emancipation Proclamation."}},
{"metadata":{"park_code":"cana","name":"Canaveral","state":"FL","description":"Reflect on the barrier island which is composed of dune,  hammock,  and lagoon habitat. Explore ancient Timucua shell mounds. Experience the sanctuary that is provided for thousands of species of plants and animals that call Canaveral National Seashore home."}},
{"metadata":{"park_code":"cave","name":"Carlsbad Caverns","state":"NM","description":"High ancient sea ledges,  deep rocky canyons,  flowering cactus,  and desert wildlife—treasures above the ground in the Chihuahuan Desert. Hidden beneath the surface are more than 119 caves—formed when sulfuric acid dissolved limestone leaving behind caverns of all sizes."}},
]
Load the data into the table using the upsert_vectors() method.
vecdb.upsert_vectors(
    table_name="parks",
    vectors=vectors
)
The SDK automatically extracts the description field from each metadata document, generates an embedding using the all_MiniLM_L12_v2 model, and stores both the metadata and vector in the table.
If you want to generate embeddings using another model or service, you can also bring your own vectors and store them directly without generating embeddings in the database. This flexibility allows you to choose the workflow that best fits your application architecture.
At this point, your data has been embedded, indexed, and is ready for semantic search.
Perform a semantic search
Unlike traditional keyword searches, semantic search compares the meaning of your query with the vector embeddings stored in the database. This allows you to find relevant results even when the query doesn’t contain the same words as the stored documents.
The following example searches for parks with waterfalls and other water features.
search_text = "We are looking for waterfalls and other water features"

result = vecdb.query(
    table_name="parks",
    query_by={"text": search_text},
    top_k=5
)
The SDK automatically converts the search text into an embedding using the same embedding model configured for the table, performs a similarity search against the stored vectors, and returns the five closest matches.
To make the results easier to read, extract a few of the metadata fields and display them using a pandas DataFrame.
recommendations = []

for item in result:
    meta = item.get("metadata") or {}

    recommendations.append(
        {
            "Park": meta.get("name"),
            "Park Code": meta.get("park_code"),
            "State": meta.get("state"),
            "Description": meta.get("description"),
        }
    )

pd.DataFrame(recommendations)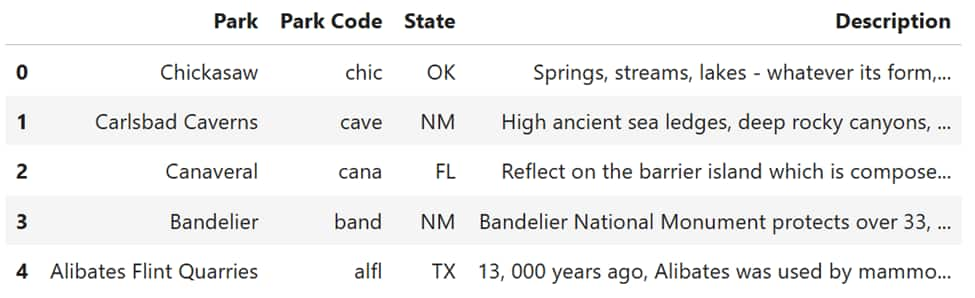
Notice that the query doesn’t need to exactly match the wording in the park descriptions. Instead, Autonomous AI Vector Database returns parks whose descriptions are semantically similar to the search text.
Filtering Results
Semantic search can also be combined with metadata filters to narrow the search space before ranking the results. The SDK will filter results based on vector and metadata indexes to return the best match for the top-k results based on the encoding model used.
For example, you can limit the search to specific states by adding a filter:
result = vecdb.query(
    table_name="parks",
    query_by={"text": search_text},
    filters={
        "state": {
            "$in": ["DC", "MD"]
        }
    },
    top_k=5
)
Combining vector similarity search with metadata filtering lets applications return results that are semantically relevant and refined to meet specific criteria, such as location, product category, or time periods. Autonomous AI Vector Database evaluates these distinct filtering techniques concurrently to return results that more closely align with the search criteria.
Reranking
For applications that require even higher-relevance search results, Autonomous AI Vector Database also supports reranking. Reranking applies an additional language model after the initial vector search to improve the ordering of the returned results, helping surface the most relevant matches for complex queries.
This quick start focuses on the core workflow. Reranking is a useful next step for applications that need more precise ordering of search results. See the Autonomous AI Vector Database API Reference for information about enabling reranking and other advanced search capabilities .
Wrap up
You have now completed the core workflow so you can begin building applications with Autonomous AI Vector Database. In just a few steps, you have provisioned a database, connected to the database with the Python SDK, created a vector table, loaded data, and performed a semantic search.
While this post focused on the quickest path to getting started, Autonomous AI Vector Database provides many additional capabilities for production AI applications, including custom embedding models, bringing your own vectors, reranking, custom indexing, and flexible authentication options.
For additional examples, see our Sample Applications and Notebooks that cover a wide range of use cases. For complete product information, see the Autonomous AI Vector Database documentation.