Overview
In part one of this tutorial, you’ll learn how to configure OCI Identity and Access Management (OCI IAM) so that Roles-Based Access Control claims (RBACs) are made available in your JSON Web Tokens (JWTs). You’ll then use these RBACs to access an OAuth2.0-protected Oracle database REST API. You’ll use Oracle REST Data Services (ORDS) to REST-enable some sample PL/SQL. With ORDS, your PL/SQL remains stored and protected in the database. And once you REST-enable a Procedure, Function, Table, View, Duality View, etc. you only need the URI and your preferred REST library (e.g., the Fetch API, Python’s Requests, Axios in React, Go’s net/http library, and more) to interact with your database logic.
In part one, you’ll observe how ORDS uses the JWT to authorize access to an Integrated Application (one registered with your OCI Identity Domain). Part one relies on an API testing tool to demonstrate this functionality (You may choose to use Insomnia, an alternative to Postman).
Part two of this tutorial demonstrates this relationship using a simple single-page web application. This application is JavaScript-based (using HTML, Node.js, and the Express.js framework). If you are familiar with setting up and configuring all dependencies, you can skip to part two now.
Key Terms
Roles-Based Access Control (RBAC) / Claims-Based Access Control (CBAC)
These two terms refer to the different claims (properties) that might exist in a JSON Web Token (JWT). Generally speaking, when registering an application with an Identity Provider (such as OCI IAM, Microsoft Azure, Okta, etc.), you’ll create a Primary Audience. You might have a Secondary Audience, too. After creating these audiences, you would create a Scope or series of Scopes for your application. You can optionally create Roles too. Depending on your configuration, you might later include these Scopes or Roles in your JWT. You’ll see this interaction in both parts of this tutorial.
Oracle REST Data Services (ORDS)
For the developer, ORDS is your window to the database. ORDS enables you to quickly create REST APIs for the objects in your database. PL/SQL procedures, Views, and Duality Views, Tables, Functions, and even JavaScript can all be “REST-enabled.” What this means to you is that all of your backend logic (code) remains in the database; you are provided a single endpoint (URI) to use in your mid-tier (e.g., microservices) or your front-end application logic. ORDS provides two ways to achieve these REST APIs: auto-REST and custom modules. This tutorial demonstrates a custom module with a simple PL/SQL procedure. ORDS APIs support your most common HTTP methods/operations like GET, PUT, POST, DELETE, as well as our unique BATCHLOAD operation.
You can interact with ORDS via a command line like SQLcl, our VS Code Extension, or from the browser. ORDS APIs are self-documenting; we use the OpenAPI specification for documentation. ORDS comes preinstalled in OCI (i.e., Oracle Autonomous Database), it is also always freely available for download, and available as a Docker/Podman image too.
About ORDS JWT Profiles
ORDS JWT Profiles can be configured to accept Scope-based or Role-based JWT claims. This tutorial demonstrates using an OCI IAM Integrated Application’s Groups and its Users as the basis for Role-Based Access. You may optionally use custom User Attributes for your custom claims. Although that use case is outside the scope of this tutorial, and will be demonstrated in a future article.
About: ORDS JWT profiles
Note: Developer resources are provided at the end of this tutorial.
Prerequisites
The following prerequisites apply to both of the use cases mentioned above.
- An existing Identity Domain
-
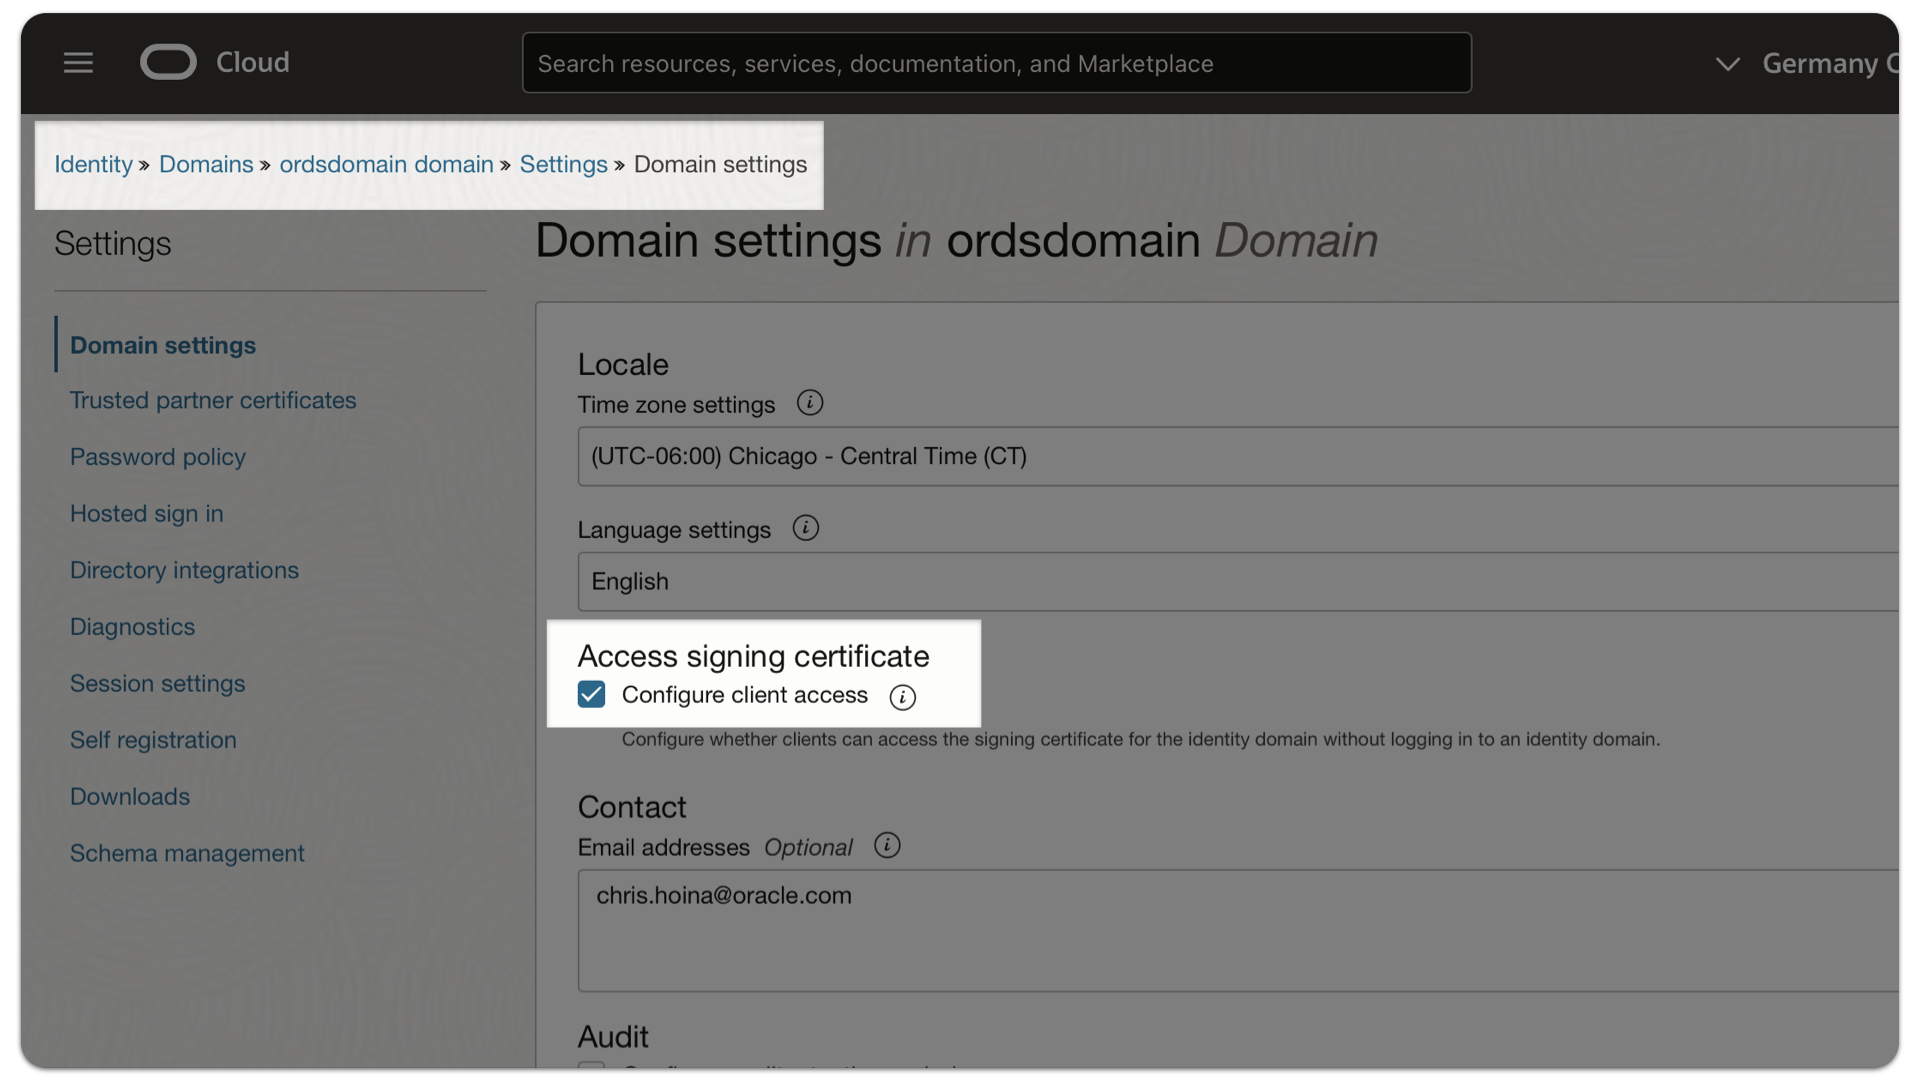
Your Domain should have the Configure client access Domain setting enabled.
Note: You can enable this setting from within your Identity Domain’s dashboard by navigating to Settings, locating the Access signing certificate setting, and verifying that the Configure client access check box is checked.
-
- Integrated Applications
-
You’ll configure (i.e., Register) two Integrated Applications in your Identity Domain, one each for:
-
Creating Custom Claims for your Identity Domain
-
Your target/demo application
Note: You’ll need at least one Group and one User for your target application.
-
-
- An existing 25.1 or later ORDS installation
-
You’ll onfigure the following to reproduce this demonstration (see below for included scripts to assist you with this tutorial):
- ORDS Roles and Privileges
- ORDS JWT Profile
- ORDS Resource Module, Template, and Handlers
-
- An Oracle database installation; one of:
- Oracle Autonomous Database
- Oracle Database 19c or later
- An Integrated Development Environment capable of installing the required project dependencies via NPM
- You will need the following packages to follow along:
dotenvexpressnode-fetch
- From within your project root folder, install these packages with the following command:
npm install express dotenv node-fetch
Note: Prerequisites 5 – 7 are only required if you intend to complete part two of this tutorial.
Configuration
Additional configuration will be required in three areas:
- Identity Domain
- ORDS
- IDE/Project Folder
Identity Domain
You will need to create and configure two Integrated Applications in your Identity Domain. In this example, you’ll use:
ords-jwt-demo-appmanage-claims-app
Configuring the ords-jwt-demo-app application
This ords-jwt-demo-app is a Confidential Application type. The Resource server and Client configuration settings used for this Integrated Application are included for your reference. You may copy these settings to better follow along.
Resource server configuration
- Access token expiration:
3600(seconds) - Primary Audience:
audience01 - Scopes:
iam_groups
Client configuration
- Allowed grant types:
Client credentials,JWT assertion,Authorization code,Implicit - Allow non-HTTPS URLs:
Enabled - Redirect URL :
http://localhost:3000/callback, https://insomnia.rest, https://oauth.pstmn.io/v1/callback - Client type:
Confidential - Client IP address:
Anywhere - Token issuance policy: Authorized resources:
All
Note: You’ll use the Authorization code grant type for this tutorial; others are included for your convenience.
Note: The Redirect URLs include all URLs that might be used for this tutorial. In order, the first URL is used in part two of this tutorial. While URLs two and three would be used for either Insomnia or Postman. You may include all URLs, doing so will have zero impact on the outcome of this tutorial.
Groups
You’ll create two Groups in your Identity Domain. However, you only need one to complete this tutorial. You’re optionally creating a second, Beta Group in case you want to test how ORDS will behave when a User of the Beta Group attempts to issue a request protected by the Alpha Group role (the request will fail).
The ords-jwt-demo-app has two Groups:
alphagroupbetagroup
For demonstration purposes, each Group will have two Users:
You can name these Users anything. However, you might find that naming the Users in a similar way to the Groups might be easier to follow along.
alphauserbetauser
In a later section, you will see how these users are mapped to ORDS Roles. Those Roles will then be assigned to ORDS Privileges, which will be used when validating the OCI IAM JSON Web Token. In short, the ORDS Roles need to match the Custom Claims (your RBAC Claim) seen in the JWT.
Configuring the manage-claims-app application
You’ll need to update the claims in your Identity Domain to include user-created custom claims. Adding these claims will ensure they are included in the JWTs from your Identity Domain.
To update these claims, you will need to configure a separate administrative Integrated Application (in this example, you’ll notice the manage-claims-app application is used for this process). After completing the steps in this tutorial, you will be issued an Access Token. You will then use this token to update your Identity Domain’s claims to include a new Custom Claim.
Using the Access Token acquired from the tutorial, submit a POST request to the /admin/v1/CustomClaims/ endpoint.
Your Custom Claim domain
https://<domainURL>/admin/v1/CustomClaims/Note: Remove embedded comments in the JSON object below prior to issuing your POST request.
Example payload included in your POST request
{
    "schemas": [
        "urn:ietf:params:scim:schemas:oracle:idcs:CustomClaim"
    ],
    "name": "iam_groups",
    "value": "$user.groups.*.display", // A user expression which returns an array (denoted by the "*") of the sub-attribute "display."
    "expression": true,
    "mode": "always",
    "tokenType": "AT",
    "allScopes": false,
    "scopes": [
    "audience01iam_groups" // A concatenation of the Primary Audience and Scope of your target Integrated Application.
  ]
}
Learn more: System for Cross-domain Identity Management (SCIM) specifications
Sample curl command
An example cURL command to your /admin/v1/CustomClaims/ endpoint (in this demo you may use Insomnia, Postman, or cURL).
curl --request POST \
  --url https://idcs-[Your Identity Doimain Unique Identifier].identity.oraclecloud.com:443/admin/v1/CustomClaims/ \
  --header 'Authorization: Bearer [Your Access Token]' \
  --header 'Content-Type: application/json' \
  --data '{
    "schemas": [
        "urn:ietf:params:scim:schemas:oracle:idcs:CustomClaim"
    ],
    "name": "iam_groups",
    "value": "$user.groups.*.display",
    "expression": true,
    "mode": "always",
    "tokenType": "AT",
    "allScopes": false,
    "scopes": [
    "audience01iam_groups"
  ]
}'
You will receive an HTTP/1.1 201 Created response after your POST request is complete. You may also issue a subsequent GET request to the same endpoint to review these changes.
Example GET request
curl --request GET \
  --url https://idcs-[Your Identity Domain Unique Identifier].identity.oraclecloud.com:443/admin/v1/CustomClaims/ \
  --header 'Authorization: Bearer [Your Access Token]' \
With the configuration complete, you can configure the ORDS Resource Modules, JWT Profile, Roles, and Privileges. You will do this in the next section with the provided SQL script.
ORDS
You can use the following definitions to reproduce this demonstration.
Note: You’ll need to have an existing REST-enabled schema to proceed. If you are unsure where to begin, review the ORDS Quick Start Guide.
Resource Module
As the user, execute the following script (you can accomplish this via SQLcl, SQL Developer Web, or SQL Developer for VS Code).
DECLARE
  l_roles     OWA.VC_ARR;
  l_modules   OWA.VC_ARR;
  l_patterns  OWA.VC_ARR;

BEGIN
  ORDS.DEFINE_MODULE(
      p_module_name    => 'alpha.group.module.v1',
      p_base_path      => '/alpha_v1/',
      p_items_per_page => 25,
      p_status         => 'PUBLISHED',
      p_comments       => NULL);

  ORDS.DEFINE_TEMPLATE(
      p_module_name    => 'alpha.group.module.v1',
      p_pattern        => 'alpha_group',
      p_priority       => 0,
      p_etag_type      => 'HASH',
      p_etag_query     => NULL,
      p_comments       => NULL);

  ORDS.DEFINE_HANDLER(
      p_module_name    => 'alpha.group.module.v1',
      p_pattern        => 'alpha_group',
      p_method         => 'GET',
      p_source_type    => 'plsql/block',
      p_mimes_allowed  => NULL,
      p_comments       => NULL,
      p_source         =>
'DECLARE
    l_date VARCHAR2(100);
    l_user varchar2(100);
    l_status varchar2(100);
BEGIN
    l_user := :current_user;
    SELECT
        SYSTIMESTAMP, :current_user
    INTO l_date, l_user
    FROM
        DUAL;

    :dbActual := l_date;
    :crtUser := l_user;
END;');

  ORDS.DEFINE_PARAMETER(
      p_module_name        => 'alpha.group.module.v1',
      p_pattern            => 'alpha_group',
      p_method             => 'GET',
      p_name               => 'dbActual',
      p_bind_variable_name => 'dbActual',
      p_source_type        => 'RESPONSE',
      p_param_type         => 'STRING',
      p_access_method      => 'OUT',
      p_comments           => NULL);

  ORDS.DEFINE_PARAMETER(
      p_module_name        => 'alpha.group.module.v1',
      p_pattern            => 'alpha_group',
      p_method             => 'GET',
      p_name               => 'crtUser',
      p_bind_variable_name => 'crtUser',
      p_source_type        => 'RESPONSE',
      p_param_type         => 'STRING',
      p_access_method      => 'OUT',
      p_comments           => NULL);

  ORDS.DEFINE_MODULE(
      p_module_name    => 'beta.group.module.v1',
      p_base_path      => '/beta_v1/',
      p_items_per_page => 25,
      p_status         => 'PUBLISHED',
      p_comments       => NULL);

  ORDS.DEFINE_TEMPLATE(
      p_module_name    => 'beta.group.module.v1',
      p_pattern        => 'beta_group',
      p_priority       => 0,
      p_etag_type      => 'HASH',
      p_etag_query     => NULL,
      p_comments       => NULL);

  ORDS.DEFINE_HANDLER(
      p_module_name    => 'beta.group.module.v1',
      p_pattern        => 'beta_group',
      p_method         => 'GET',
      p_source_type    => 'plsql/block',
      p_items_per_page => 25,
      p_mimes_allowed  => NULL,
      p_comments       => NULL,
      p_source         =>
'DECLARE
    l_date VARCHAR2(100);
    l_user varchar2(100);
    l_status varchar2(100);
BEGIN
    l_user := :current_user;
    SELECT
        SYSTIMESTAMP, :current_user
    INTO l_date, l_user
    FROM
        DUAL;

    :dbActual := l_date;
    :crtUser := l_user;
END;');

  ORDS.DEFINE_PARAMETER(
      p_module_name        => 'beta.group.module.v1',
      p_pattern            => 'beta_group',
      p_method             => 'GET',
      p_name               => 'crtUser',
      p_bind_variable_name => 'crtUser',
      p_source_type        => 'RESPONSE',
      p_param_type         => 'STRING',
      p_access_method      => 'OUT',
      p_comments           => NULL);

  ORDS.DEFINE_PARAMETER(
      p_module_name        => 'beta.group.module.v1',
      p_pattern            => 'beta_group',
      p_method             => 'GET',
      p_name               => 'dbActual',
      p_bind_variable_name => 'dbActual',
      p_source_type        => 'RESPONSE',
      p_param_type         => 'STRING',
      p_access_method      => 'OUT',
      p_comments           => NULL);


  ORDS.CREATE_ROLE(p_role_name => 'alphagroup');
  ORDS.CREATE_ROLE(p_role_name => 'betagroup');

  l_roles(1) := 'alphagroup';
  l_modules(1) := 'alpha.group.module.v1';

  ORDS.DEFINE_PRIVILEGE(
      p_privilege_name => 'alphagroup',
      p_roles          => l_roles,
      p_patterns       => l_patterns,
      p_modules        => l_modules,
      p_label          => 'alphagroup',
      p_description    => 'alphagroup',
      p_comments       => 'alphagroup');

  l_roles.DELETE;
  l_modules.DELETE;
  l_patterns.DELETE;

  l_roles(1) := 'betagroup';
  l_modules(1) := 'beta.group.module.v1';

  ORDS.DEFINE_PRIVILEGE(
      p_privilege_name => 'betagroup',
      p_roles          => l_roles,
      p_patterns       => l_patterns,
      p_modules        => l_modules,
      p_label          => 'betagroup',
      p_description    => 'betagroup',
      p_comments       => 'betagroup');

  l_roles.DELETE;
  l_modules.DELETE;
  l_patterns.DELETE;


COMMIT;

END;
You will now have two Resource Modules:
/ords/[Your schema]/alpha_v1/alpha_group/ords/[Your schema]/beta_v1/beta_group
Later in this tutorial, you’ll perform a GET request on each endpoint. The response would include values for the current SYSTIMESTAMP and for the ORDS :current_user Implicit Parameter. In part two of this demonstration, you’ll use these values to dynamically populate the elements in your app’s home page (i.e., Index.html).
Roles
You will also notice two Roles:
alphagroupbetagroup
Privileges
Each Role can then be assigned to an ORDS Privilege. You will now have the following privileges:
alphagroupbetagroup
JWT Profile
You’ll need to create an ORDS JWT Profile. Each schema may have only one valid JWT Profile at a time. The JWT can be one of:
- Scope-Based Access Control (SBAC)
- Role-Based Access Control (RBAC)
When configuring custom claims in OCI IAM, you may do so with one of two options:
- Identity Domain’s User Attributes (additional attributes that you may have created)
- Integrated Application’s Groups (and users therein)
This tutorial demonstrates RBAC JWT Profiles using an Integrated Application’s Groups. Execute the following PL/SQL procedure to configure your JWT Profile:
DECLARE
    L_P_ISSUER          VARCHAR2(200) := 'https://identity.oraclecloud.com/'; -- You must include a trailing backslash.
    L_P_AUDIENCE        VARCHAR2(200) := 'audience01';
    L_P_JWK_URL         VARCHAR2(200) := 'https://idcs-[Your Identity Doimain Unique Identifier].identity.oraclecloud.com:443/admin/v1/SigningCert/jwk'
    ;
    L_P_DESCRIPTION     VARCHAR2(200) := 'ORDS RBAC JWTs demonstration';
    L_P_ROLE_CLAIM_NAME VARCHAR2(200) := '/iam_groups'; -- You must include a leading backslash. ORDS will interpret this as a JSON Pointer.
BEGIN
    ORDS_METADATA.ORDS_SECURITY.DELETE_JWT_PROFILE(); -- It is a common best practice to delete an existing JWT Profile and overwrite.
    ORDS_METADATA.ORDS_SECURITY.CREATE_JWT_PROFILE(
        P_ISSUER          => L_P_ISSUER,
        P_AUDIENCE        => L_P_AUDIENCE,
        P_JWK_URL         => L_P_JWK_URL,
        P_DESCRIPTION     => L_P_DESCRIPTION,
        P_ROLE_CLAIM_NAME => L_P_ROLE_CLAIM_NAME
    ); -- Not included here: P_ALLOWED_SKEW and P_ALLOWED_AGE. These are optional parameters; when omitted, their values are set to NULL (i.e., infinity).
END;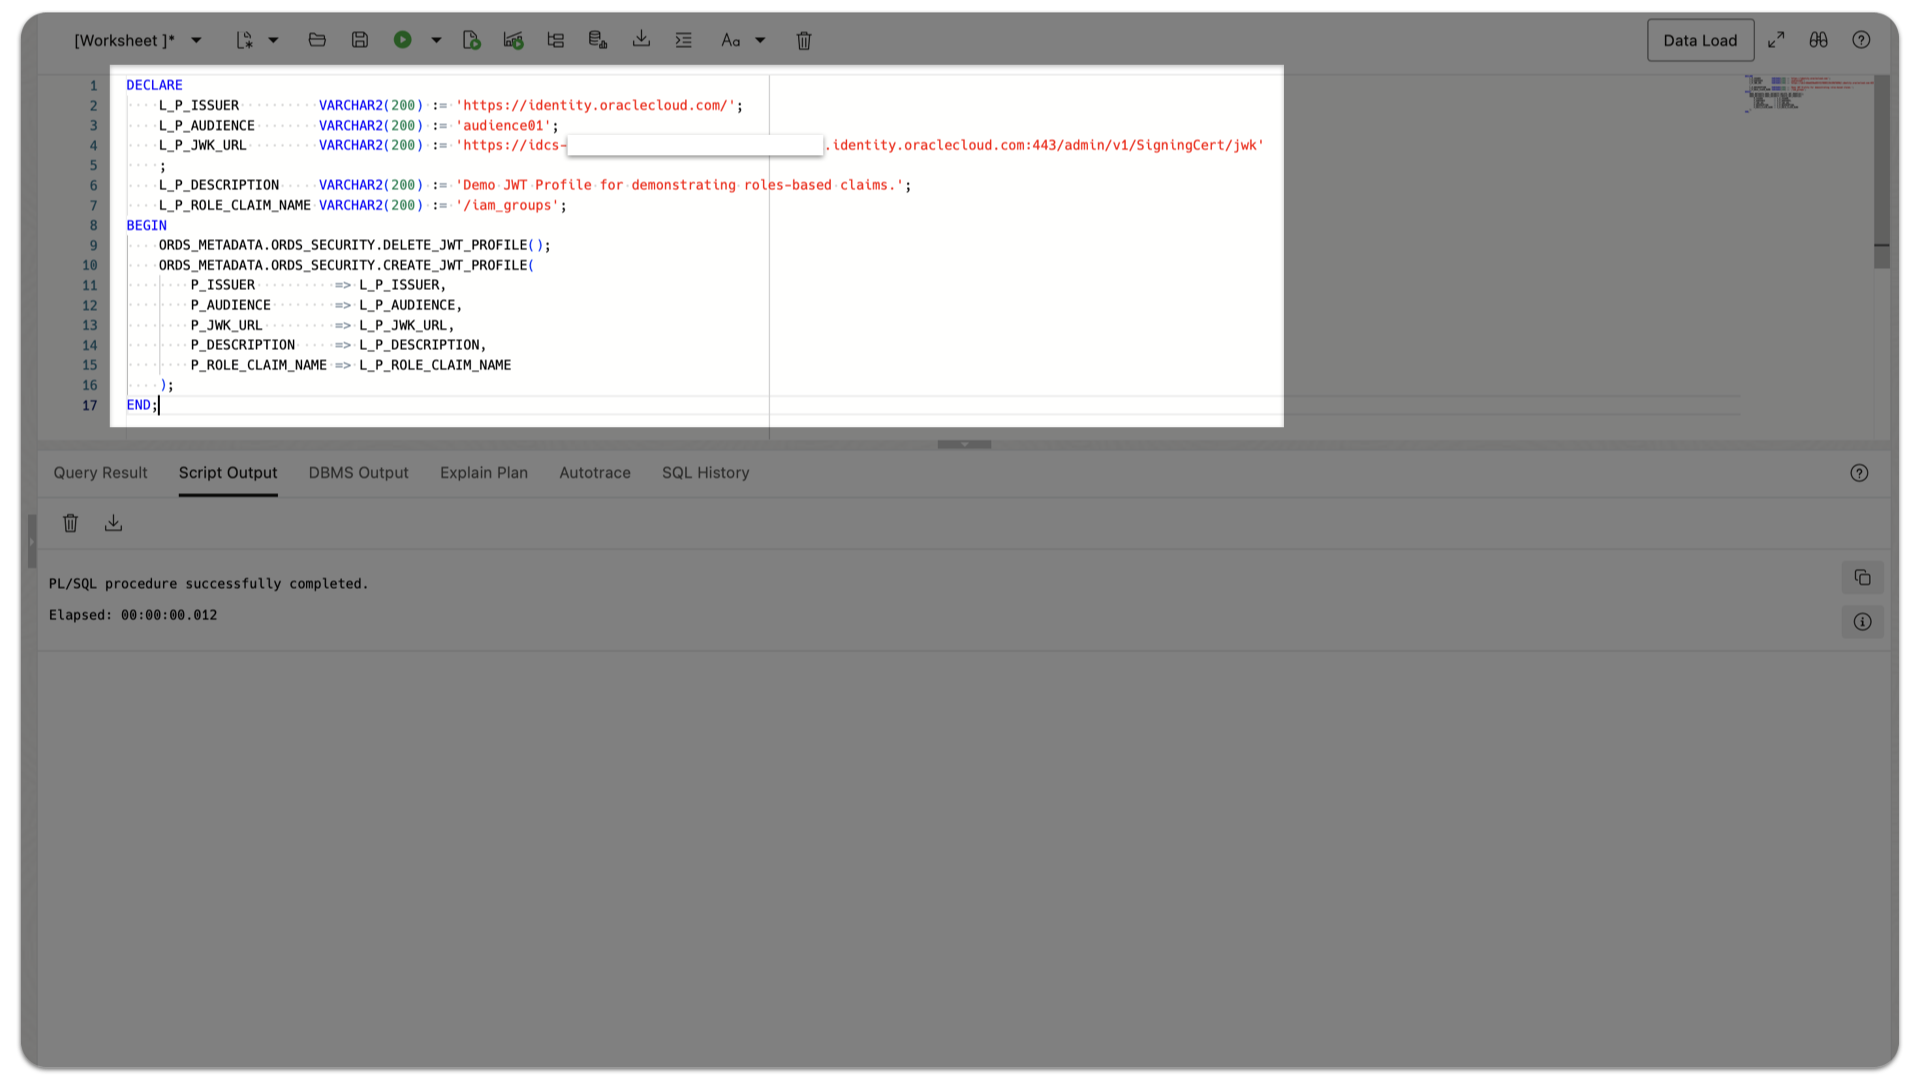
ORDS will now expect a stringArray[] (which was set in the previous OCI IAM custom claims configuration steps) iam_groups since the P_ROLE_CLAIM_NAME parameter (i.e., JSON Pointer) was used.
Note: If no ORDS Role has been assigned to a Privilege, then any authenticated user with the iam_groups[ ] claim would be authorized to access one of these protected resources.
Important: When an Identity Domain User, who is not assigned to a Group, requests an IAM JWT using the Authorization Code grant type, an empty string would be returned (e.g., iam_groups " ") instead of an empty stringArray[ ] (e.g., )iam_groups[ ]). Because of this, ORDS 25.1 will not authorize a privileged IAM User, despite having the correct (albeit empty) claim in a JWT. A future ORDS update will add support for cases where a roles-based claim displays an empty string or empty stringArray[ ].
Accessing protected ORDS resources
Next, you’ll use Insomnia (or optionally, Postman) as well as cURL. These steps will be similar for Postman and other testing tools.
Note: In part two of this tutorial, you’ll use a simple single-page web application using JavaScript and Node.js/Express.js to demonstrate this functionality. View Part Two.
Example 1: Insomnia and cURL
Requesting an Authorization Code and Acquiring a JWT
You’ll need to configure your Insomnia client with the following values:
- Grant Type:
Authorization Code - Authorization URL:
https://idcs-[Your Identity Domain Unique Identifier].identity.oraclecloud.com:443/oauth2/v1/authorize - Access Token URL:
https://idcs-[Your Identity Domain Unique Identifier].identity.oraclecloud.com:443/oauth2/v1/token - Client ID:
- Client Secret:
- Redirect URL:
https://insomnia.rest - Scope:
audience01iam_groups - Credentials:
As Basic Auth Header (default)
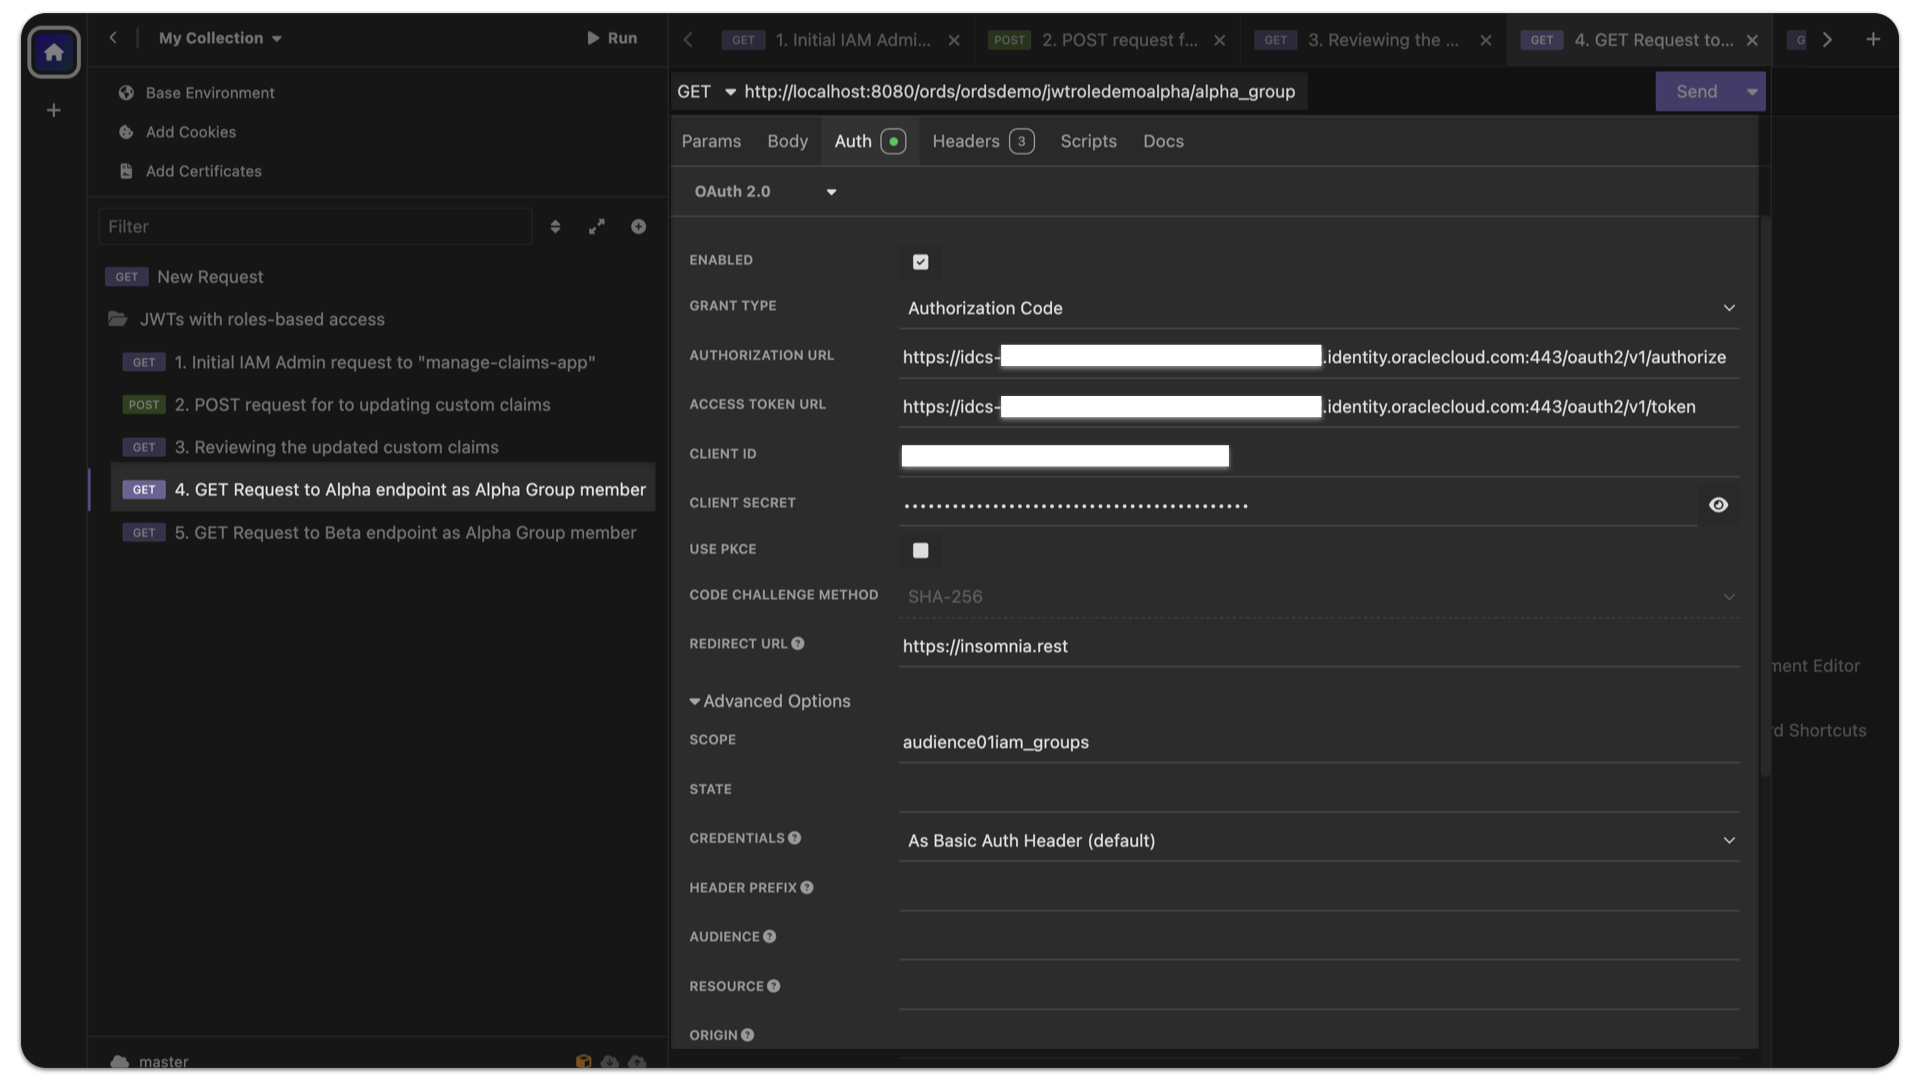
With these values set, you’ll first send a GET request (i.e., clicking the Fetch Tokens button) to the /oauth2/v1/authorize endpoint to request an Authorization code.
A new browser window or tab will open, enter the credentials for the Alpha User with:
- User Name:
alphauser - Password:
[Password selected upon creating the alphauser]
After submitting the user credentials, a POST request is sent to the /oauth2/v1/token endpoint to both present an Authorization code and exchange it for a valid JWT (this is done automatically).
You will then be redirected back to Insomnia (or other tool used). You may inspect the JWT to review the properties of the JSON payload
Inspecting the JWT
You may use your tool of choice for decoding or inspecting a JWT.
Optional: Two freely available options for decoding JWTs are jwt.io and jwt.ms.
Notice how the iam_groups stringArray[] is included in the JWT. ORDS will expect this since it was included as a JSON Pointer in the CREATE_JWT_PROFILE PL/SQL procedure.
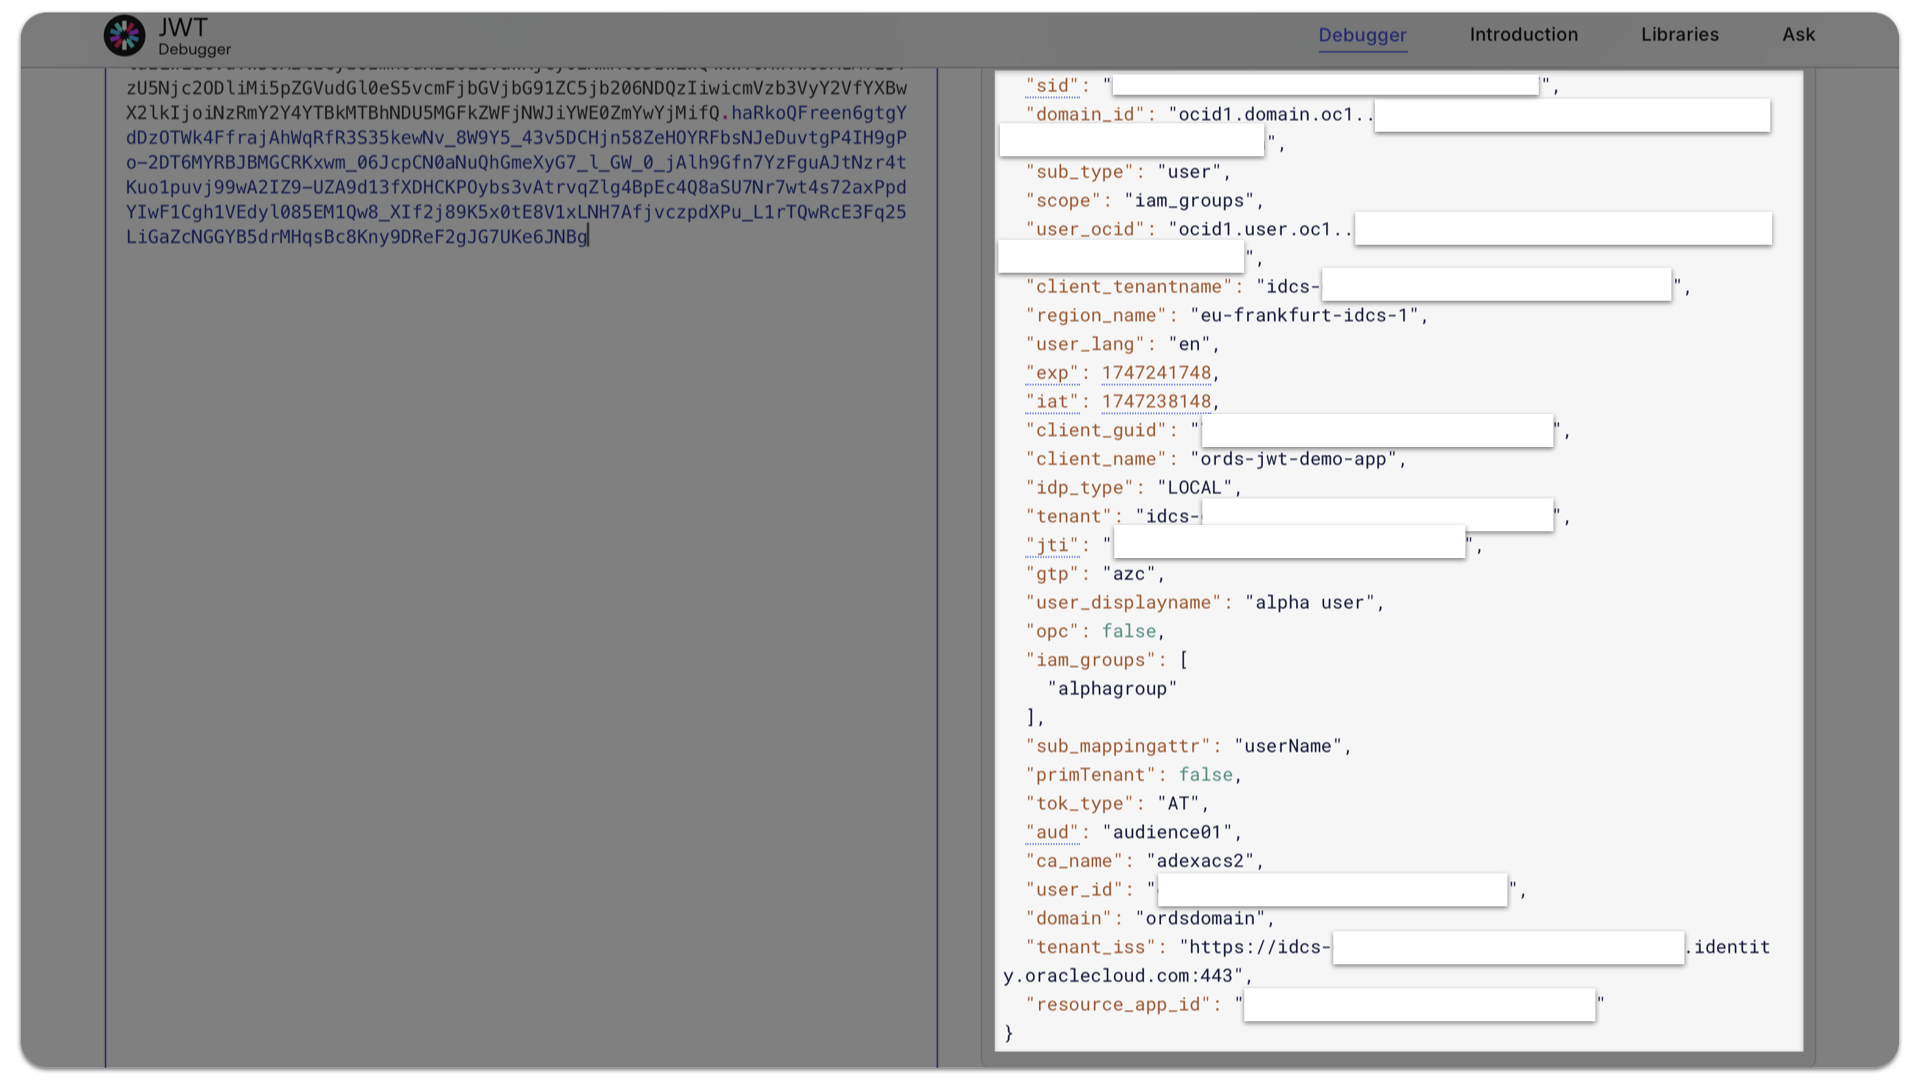
Example JWT
An example of a decoded JWT, for reference:
{
  "client_ocid": "ocid1.domainapp.oc1.eu-frankfurt-1.123abc456def789ghi012jkl345mno678pqr901stu234vwx567yz",
  "user_tz": "America/Chicago",
  "sub": "alphauser",
  "user_locale": "en",
  "sidle": 480,
  "idp_name": "UserNamePassword",
  "user.tenant.name": "idcs-[Your unique Tenant Identifier]",
  "idp_guid": "UserNamePassword",
  "amr": [
    "USERNAME_PASSWORD"
  ],
  "iss": "https://identity.oraclecloud.com/",
  "domain_home": "eu-frankfurt-1",
  "ca_ocid": "ocid1.tenancy.oc1..abcdefghijklmnopqrstuvwxyzabcdefghijklmnopqrstuvwxyz",
  "user_tenantname": "idcs-[Your unique Tenant Identifier]",
  "client_id": "ttylsmhrofl123456",
  "sid": "q1w2e3r4t5y6:411abc",
  "domain_id": "ocid1.domain.oc1..abcdefghijklmnopqrstuvwxyzabcdefghijklmnopqrstuvwxyz",
  "sub_type": "user",
  "scope": "iam_groups",
  "user_ocid": "ocid1.user.oc1..aaaaaaaane7pcss3u6urqagkcnkyzp5gdwaehiwilkzsgykhnxagnsiewnuq",
  "client_tenantname": "idcs-[Your unique Tenant Identifier]",
  "region_name": "eu-frankfurt-idcs-1",
  "user_lang": "en",
  "exp": 1747065294,
  "iat": 1747061694,
  "client_guid": "abcdefghijk0123456789",
  "client_name": "ords-jwt-demo-app",
  "idp_type": "LOCAL",
  "tenant": "idcs-[Your unique Tenant Identifier]",
  "jti": "1ab2cd3ef4gh5ij6kl7mn8op9qr",
  "gtp": "azc",
  "user_displayname": "alpha user",
  "opc": false,
  "iam_groups": [
    "alphagroup"
  ],
  "sub_mappingattr": "userName",
  "primTenant": false,
  "tok_type": "AT",
  "aud": "audience01",
  "ca_name": "abcdef1",
  "user_id": "a1b2c3d4e5f6g7h8i9j01k2l3m4n5o6p",
  "domain": "ordsdomain",
  "tenant_iss": "https://idcs-[Your unique Tenant Identifier].identity.oraclecloud.com:443",
  "resource_app_id": "abcdefghijk0123456789"
}
Now that you have a valid access token, you can test the two demo endpoints to review the expected behavior.
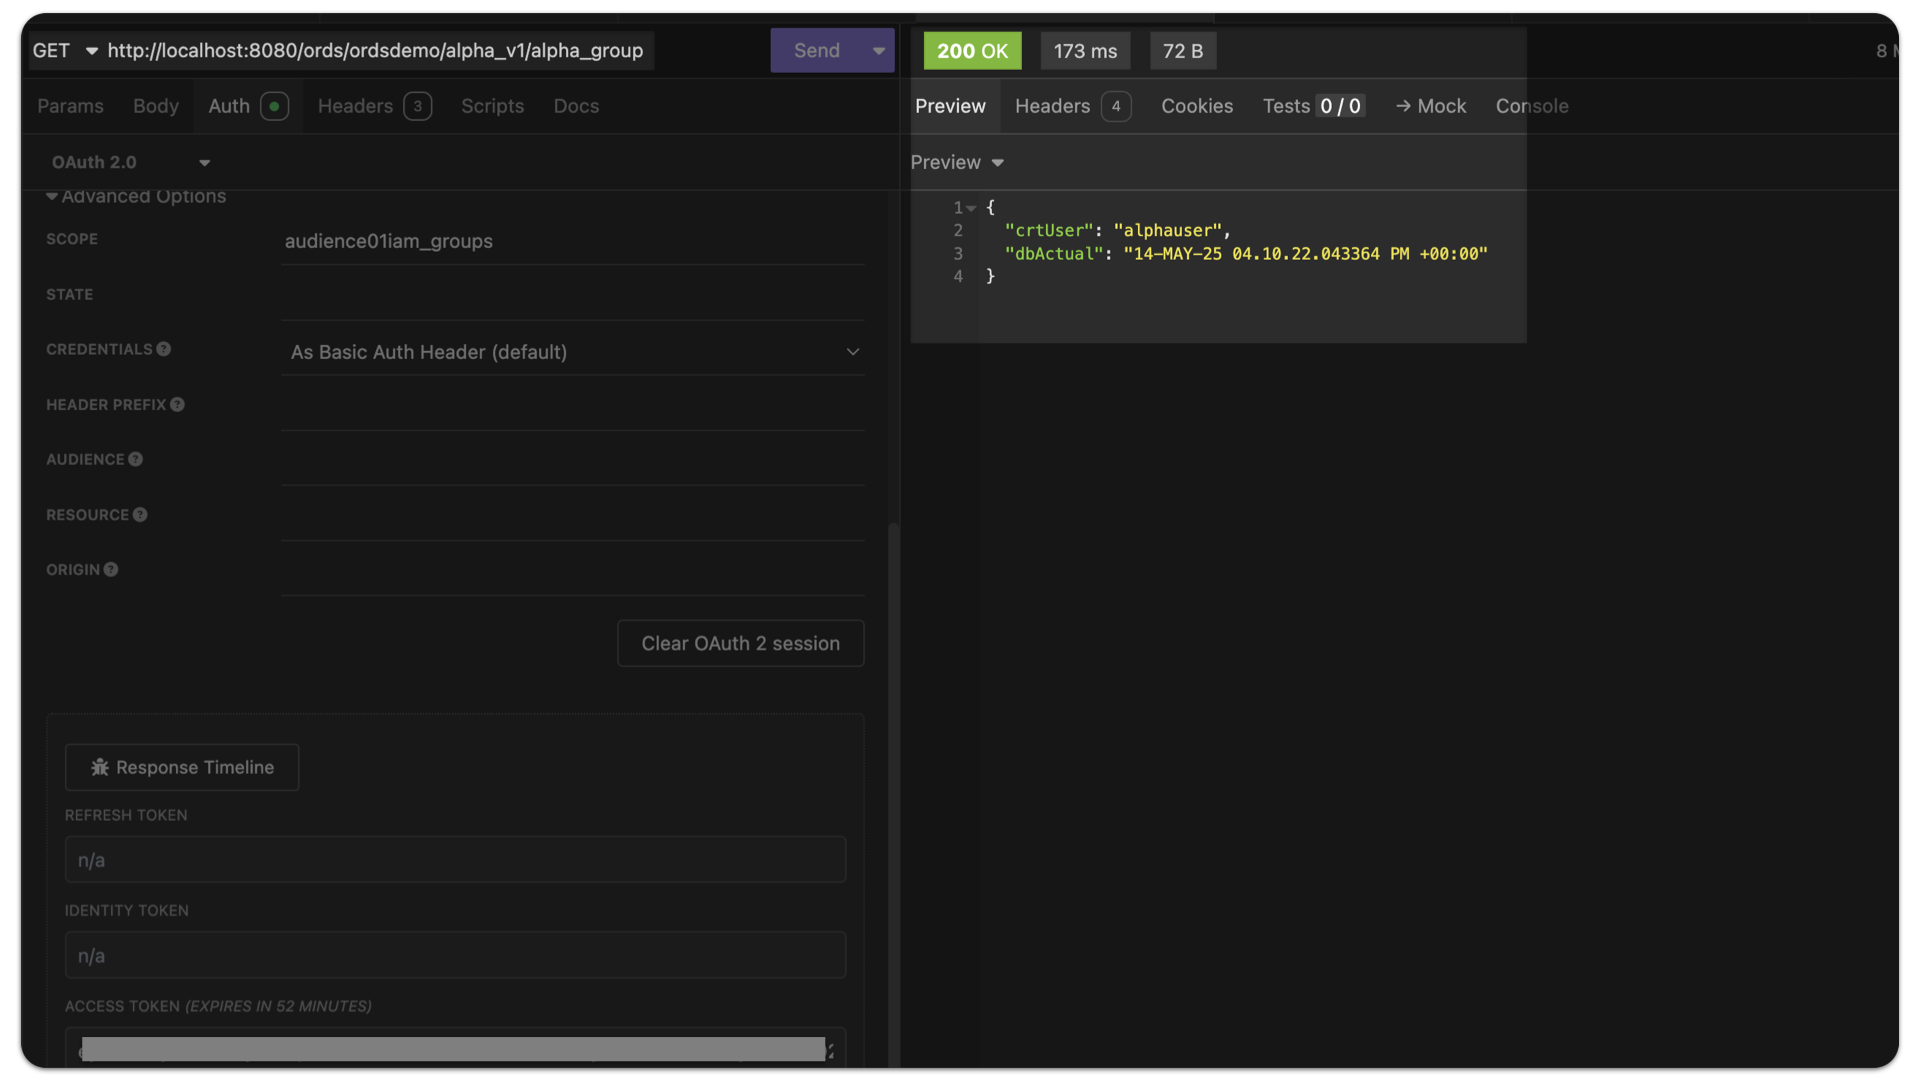
Issuing a GET request SUCCESS
First, issue a GET request to the /alpha_v1/alpha_group endpoint:
Success example curl command
curl --request GET \
  --url http://localhost:8080/ords/ordsdemo/alpha_v1/alpha_group \
  --header 'Authorization: Bearer [Replace with your JWT' \
Successful response
You should observe the following response:
HTTP/1.1 200 OK
< Content-Type: text/html;charset=utf-8
< X-ORDS_DEBUG: true
< ETag: " "
< Transfer-Encoding: chunked

{
   "crtUser": "alphauser",
   "dbActual": "14-MAY-25 04.10.22.043364 PM +00:00"
}
Issuing a GET request FAILURE
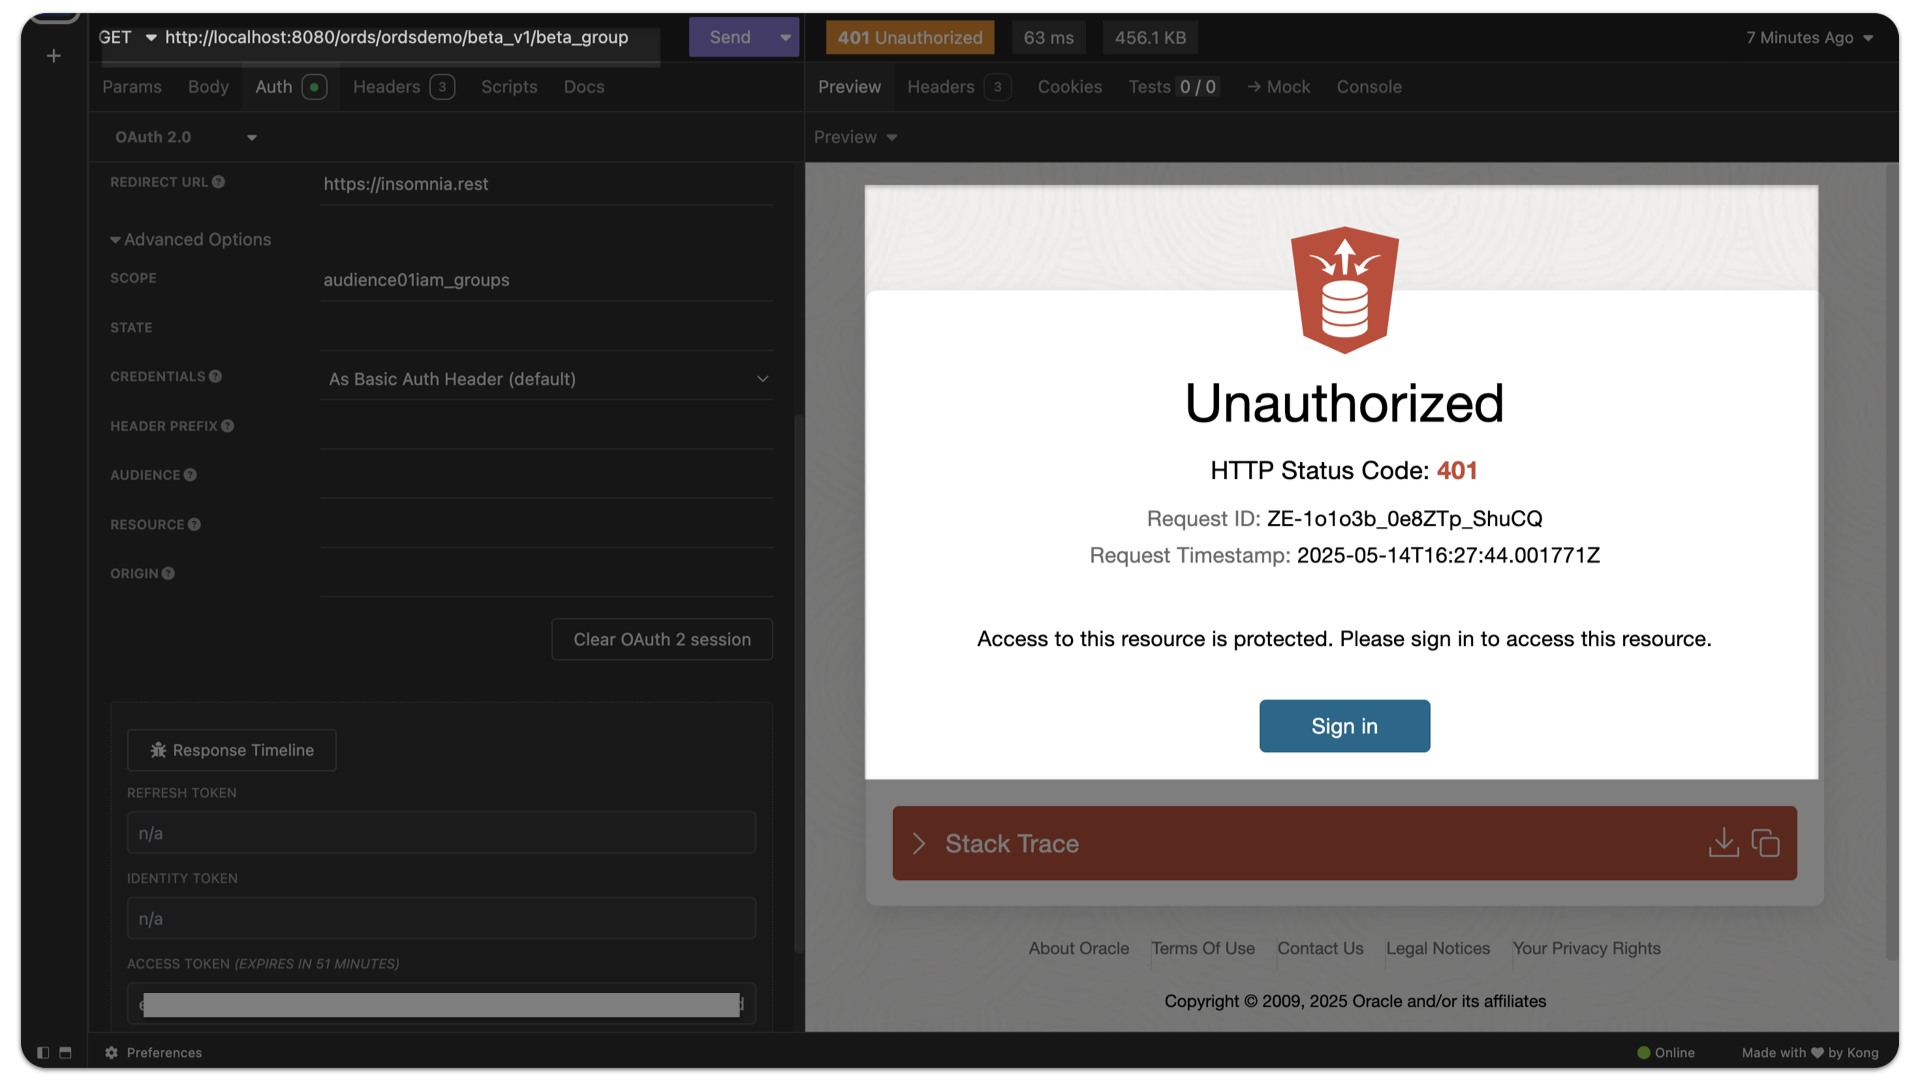
Next, you can optionally test the RBAC JWT using the Alpha User and the /ords/ordsdemo/beta_v1/beta_group endpoint. You can reuse the same JWT since it will remain valid for 3600 seconds (default).
Failure example curl command
curl --request GET \
  --url http://localhost:8080/ords/ordsdemo/beta_v1/beta_group \
  --header 'Authorization: Bearer [Replace with your JWT' \
Failed response
After issuing the GET request, you will recieve the following response in your console:
< HTTP/1.1 401 Unauthorized
< Content-Type: text/html
< WWW-Authenticate: Bearer realm="Oracle REST Data Services", error="invalid_token"
< Content-Length: 467009
Similarly, in the web browser you would see the following:
Wrap-up
By now, you should have a better understanding of how to:
- Create a custom claim from a Group in your Identity Domain’s Integrated Application
- Protect ORDS with a Role that matches a Custom Claim
- Create the requisite JWT Profile
- Navigate an OAuth2.0 Authorization Code grant type (for acquiring an OCI IAM JWT) using a testing tool such as Insomnia and
cURL
In the second part of this tutorial you’ll use a simple JavaScript-based single-page web application to demonstrate using OCI IAM RBAC JWTs with ORDS endpoints. Review part two now.
Resources
The following are helpful resources when working with ORDS and JWTs