Last fall we released fungible token support using Blockchain App Builder – a low-code development toolset for Oracle Blockchain Platform (OBP). We strongly believe that simplicity expedites innovation and we made the fungible token implementation simple – tailor a sample template, then generate, test, and deploy chaincode required for fungible token lifecycle. We saw partners and customers adopt fungible token implementations on Oracle Blockchain Platform to accelerate their business innovations – in loyalty/rewards solutions, micro-payments in blockchain ecosystem, and private digital currency use cases. Last month, we released non-fungible token (NFT) support using Blockchain App Builder.
Creating and managing the entire life cycle of a non-fungible token could be a complex application build with no native token support on Hyperledger Fabric. Now with NFT support in the Blockchain App Builder, OBP makes life simple for NFT application developers, who won’t require any specialized skills to create and manage the complete life cycle of a non-fungible token. For NFT implementation, Blockchain App Builder empowers the application developers to automatically generate ERC-721 compliant non-fungible token chaincode, deploy, test, and debug the NFT chaincode on local Hyperledger Fabric or on Oracle Blockchain Platform Cloud Services. By expediting the NFT chaincode development, we ensure that enterprises can implement the business use cases quicker and bring the NFT application to market faster.
In this post, we illustrate how to use the NFT capabilities by implementing a non-fungible token use case for NFT art collection marketplace.
The implementation of NFT can be done in 5 easy steps:
- Asset declaration in the specification template
- Generation of the NFT chaincode with all the core lifecycle methods (create, transfer, etc.)
- Creation of custom logic for the chaincode methods to handle additional marketplace functionality
- Storing the image and metadata on a decentralized storage platform using the InterPlanetary File System (IPFS)
- Testing of NFT chaincode with REST APIs
Example NFT Use Case
To illustrate the NFT implementation using Blockchain App Builder, I have selected a use case for NFT art collection marketplace. In the art collection marketplace, the network platform provider on-boards various museums. The museums mint or create the art tokens as NFTs and post the NFTs for sale in the marketplace. The museum that minted the token will become the owner of the token. They can put the NFTs on sale in the marketplace and allows clients to buy the NFTs. Clients can in turn keep them in their wallet or put them on sale in the marketplace for others to buy.
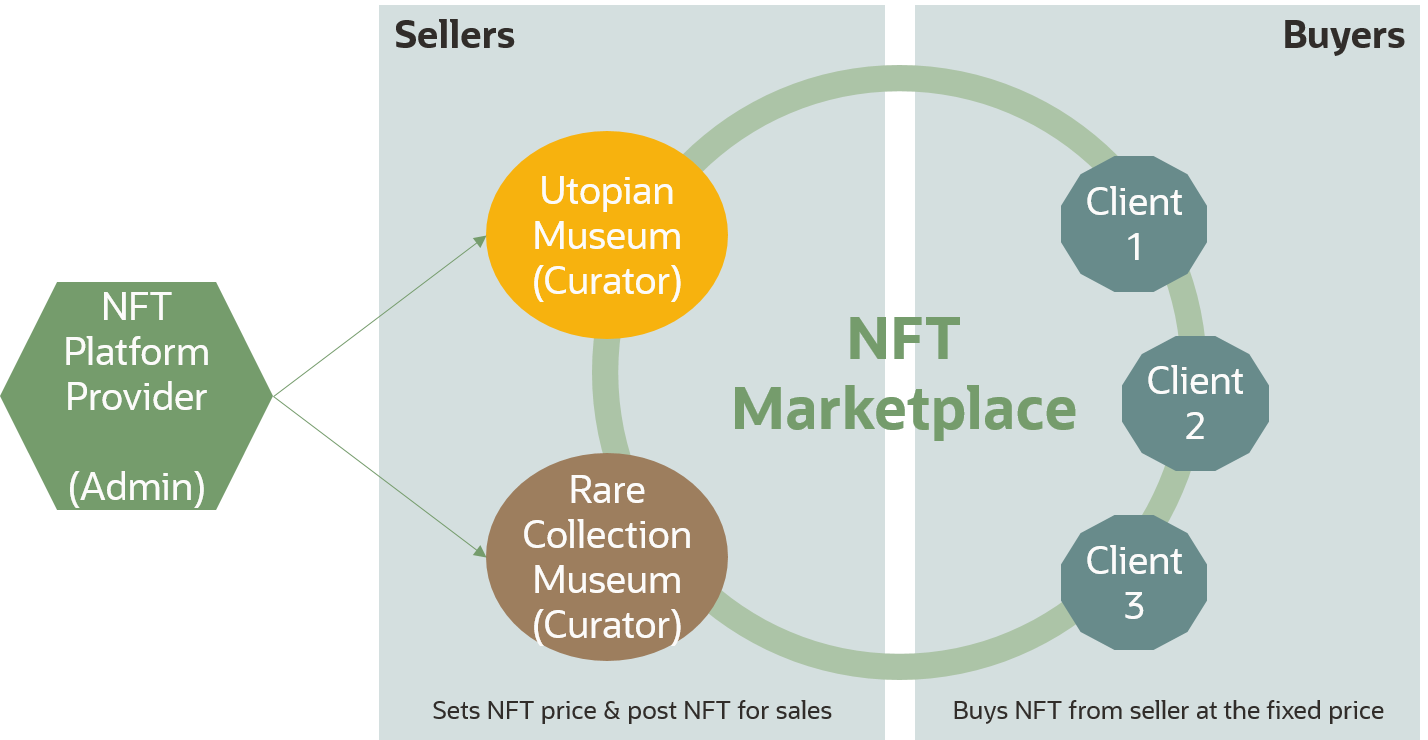
A buyer will purchase the NFT from the museum by paying the price using a payment gateway. Once the price has been paid, the buyer will become the new owner of the NFT. The buyer can also post the NFT in the marketplace to re-sell the NFT, enabling other buyers to purchase it. This particular flow is an example of how such a marketplace can operate. Other models, like, batch drops or set duration auctions can also be implemented. We also provide a solution playbook on the OCI Architecture Center that developers can leverage to create a fully customized solution leveraging OBP NFT support.
Specification Template
A sample template is included in the Blockchain App Builder’s Visual Studio Code (VSC) extension under Specifications, or you can download it from the OBP Console > Developer Tools in the Blockchain App Builder page. The specification template can be created in yaml or json. The template for NFT chaincode auto-generation consists of the following sections.
- Token model
- name: ArtCollection #Asset name
   type: token         # Asset type
   symbol: ART         # Token symbol
   standard: erc721+   # Token standard (extended version of ERC-721 spec)
   anatomy:
       type: nonfungible # Token type
       unit: whole       # Token unit
In the initial release of non-fungible token implementation, we support whole non-fungible token and ERC-721 with some extensions as token standard. Users can specify token asset name, token symbol, and the token standard (i.e., erc721+). The “+” symbol in token standard signifies that we support additional capabilities and methods beyond ERC-721 standard to make NFTs more dynamic and NFT application more flexible.
- Token behaviours
  behavior:
     - indivisible
     - singleton
     - mintable:
          max_mint_quantity: 20000
     - transferable
     - burnable
     - roles:
          minter_role_name: minter
Based on the selection of the token behaviours, the NFT life-cycle methods are auto-generated. For example, if you specify burnable behaviour then the method to burn the token will be auto-generated. In mintable behaviour you can specify the maximum number of NFTs that can be minted in this class, e.g., 20,000 in the example above. Note that each NFT is unique and managed based on its NFT ID, the maximum number here refers to the class named ArtCollection. In roles behaviour you can specify roles to be supported for minting and/or burning operations – in the example below we specify a “minter” role.
These methods operate on the following intrinsic attributes generated and maintained in the chaincode SDK:
- Token ID, Token URI
- Token Owner
- Created By, Create Timestamp
- Transferred By, Transferred Timestamp
- Burned By, Burned Timestamp
- Burned Status
In addition to the token data asset, we also generate and maintain Custodial Wallets on chain. These are identified by user’s OrgID (instance owner’s MSPId or custom enrollment ID for a client organization) and UserID, and can be managed by the generated methods and APIs.
-
Custom attributes
properties:  # Custom asset attributes for non-fungible token
     - name: price # attribute to set the price of the NFT in the marketplace
       type: number
     - name: on_sale_flag # status flag to indicate if the NFT’s for sale
       type: boolean
In addition to the intrinsic attributes, we extend the NFT for our use case with two custom attributes: Price, to specify the selling price of the NFT and On_Sale_Flag, to specify whether the NFT is available for sales in the marketplace. If On_Sale_Flag is true then the NFT can be posted for sale and will show up in the marketplace; otherwise it’s only visible in the minter’s or current owner’s wallet. The custom attributes can be updated by a current owner of the NFT.
-
Metadata attributes
metadata: # Optional metadata you can track on-chain. Can only be updated by the user creating the non-fungible token for the first time and only until the token has been transferred.
     - name: painting_name
       type: string
     - name: description
       type: string
     - name: image
       type: string
     - name: painter_name
       type: string
You have an option to maintain a copy of the metadata attributes on-chain to describe the NFT. In this example we define attributes like painting name, painter name etc. These can be specified when creating the token and updated by token creator / minter before transferring the token ownership to anyone else. Once the ownership has been transferred (e.g., the token has been sold), these attributes become fixed, unlike Custom attributes above, which a current owner can update as needed.
-
Custom methods
customMethods:
     - executeQuery
     - "sell(token_id: string, selling_price: number)" # Post the NFT in your wallet for sale
     - "buy(from_org_id: string, from_user_id: string, to_org_id: string, to_user_id: string, nonfungible_token_id: string, amount_paid: number)"  # Buy the NFT after paying the price using any payment gateways
These methods are specified here so that developers can add specific business functionalities through the custom methods. All of the other methods and APIs required to manage the NFT lifecycle from initialization to creation, transfer, and burning along with account create and roles management and various queries are generated automatically when you create the chaincode using this template. Note that executeQuery is a method that is also pre-generated to be exposed as an API for generic queries on the state database. The sell and buy methods are generated as function signatures where users can add custom business logic leveraging the underlying NFT SDK methods generated by the App Builder. The sample implementation of these is shown below, but it can be customized or replaced for your specific needs.
Generating Chaincode
Once the template has been tailored, you can generate the chaincodes in the App Builder. In the Visual Studio Code extension GUI click the “+” icon to the right of the Chaincodes section, which will bring up the pop up on the right where you can create the chaincode.
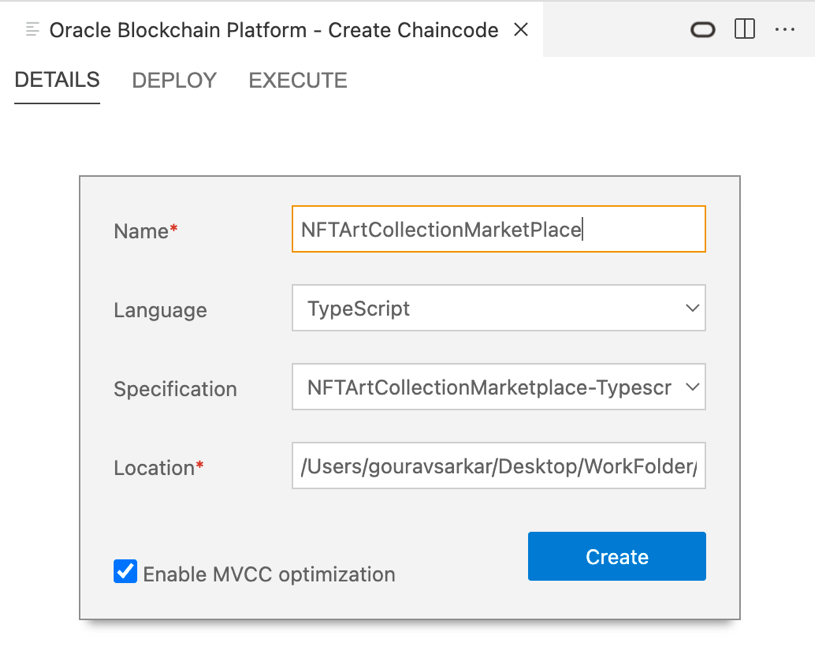
Simply fill in the chaincode name, select TypeScript in the language dropdown, pick your template from the dropdown list, fill in Location for scaffolding the project (only if generating TypeScript), select “Enable MVCC optimization” checkbox, and click “Create” button to scaffold the project and generate the chaincode. The specification file is specific to TypeScript since two custom method signatures are specified where parameter types are language specific. If you want to generate the chaincode in Go, then change the parameter specification and data type in the custom method signature to be compatible with Go (e.g., number type changes to int.)
Custom Methods
After scaffolding the project in TypeScript, the custom methods’ (i.e., sell and buy) logic needs to be updated in controller.ts file under src directory. The custom method “sell” will post the NFT for selling in the marketplace using the sample code below.
 @Validator(yup.string(), yup.number())
     public async sell(token_id: string, selling_price: number) {
         try {
             const token = await this.Ctx.ERC721Token.get(token_id);
             const t = new ArtCollection(token)
             t.price =  selling_price;
             t.on_sale_flag = true;
             await this.Ctx.ERC721Token.updateToken(t);
             let msg = `Token ID : '${token_id}' has been posted for saleelling in the marketplace'`;
             return {msg}
             } catch(error) {
                 throw new Error(error.message);
         }
     }
This sample code uses the Ctx.ERC721Token.get() SDK function to retrieve the token, updates the custom price and on_sale_flag properties, and then calls Ctx.ERC721Token.updateToken() function to persist the updated token in the ledger.
The “buy” custom method is called once the payment has been processed to transfer the ownership of the NFT from the current token owner to the new buyer.
@Validator(yup.string(), yup.string(), yup.string(), yup.string(), yup.string(), yup.number())
public async buy(from_org_id: string, from_user_id: string, to_org_id: string, to_user_id: string, nonfungible_token_id: string, amount_paid: number) {
try {
const token = await this.Ctx.ERC721Token.get(nonfungible_token_id);
const t = new ArtCollection(token);
let msg = `Token ID : ‘${nonfungible_token_id}’ has not been transferred’`;
if (t.on_sale_flag==true) {
if(t.price <= amount_paid) {
const from_account_id = await this.Ctx.ERC721Account.generateAccountId(from_org_id, from_user_id);
const to_account_id = await this.Ctx.ERC721Account.generateAccountId(to_org_id, to_user_id);
t.on_sale_flag = false;
await this.Ctx.ERC721Token.transferFrom(from_account_id, to_account_id, t);
msg = `Token ID : ‘${nonfungible_token_id}’ has been successfully transferred to UserID : ‘${to_user_id}’`;
} else {
throw new Error(`Token ID : ‘${nonfungible_token_id}’ has not been transferred to UserID : ‘${to_user_id}’ as the amount was not fully paid’`);
}
}
else {
throw new Error(`Token ID : ‘${nonfungible_token_id}’ is not posted for sell`)
}
return {msg};
} catch(error) {
throw new Error(error.message);
}
}
This sample first retrieves the token and checks its on_sale_flag as well as that amount paid covers the posted price. It then maps the seller and buyer account IDs from their orgID and userID information, and invokes Ctx.ERC721Token.transferFrom() SDK function to affect the transfer of the token from seller’s account to the buyer’s account.
The sample buy and sell custom methods in the generated chaincode can be updated by copying in this sample business logic.
Once you’ve copied these methods into the controller.ts and saved the chaincode, you can deploy it locally for testing in the Blockchain App Builder environment or to your Oracle Blockchain Platform instances using the Deploy tab. While deploying the NFT chaincode using Blockchain App Builder Visual Studio Code extension, you need to pass Org ID and User ID of the NFT admin to initialize the NFT chaincode. Once chaincode has been deployed, the NFT admin will be able to create the NFT accounts, assign NFT minter/burner roles to the users and will be able to add other admin users.
Storing File on InterPlanetary File System (IPFS)
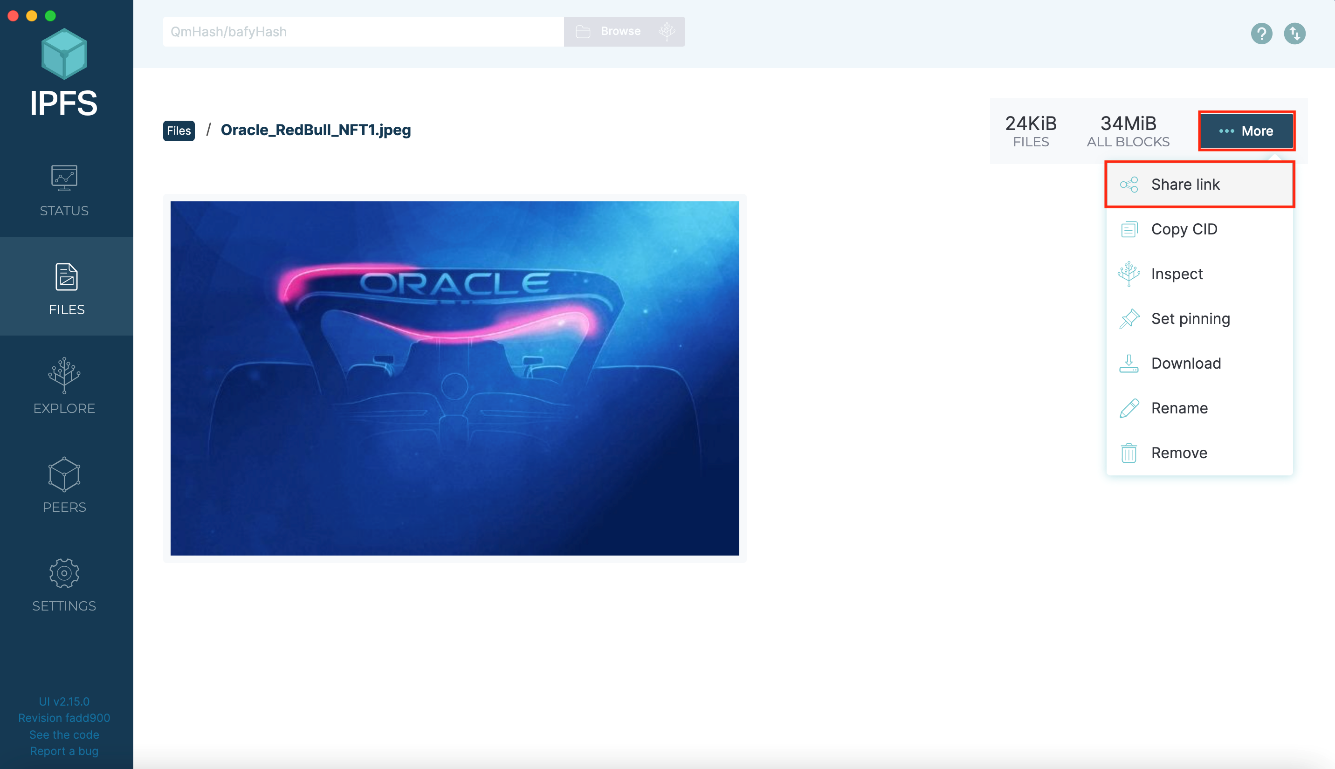
When creating the NFT, one of the key parameters is the tokenURI (Uniform Resource Identifier). This is a string that points to where the NFT assets can be found on the Web. Since many NFT assets are designed to have generally accessible content, one popular approach is to store the NFT asset files (e.g. image file or image metadata file) in a decentralized filesystem, such as IPFS, and then create a metdata JSON file also stored in IPFS. There are other options that may be appropriate depending on the nature of NFTs and the audience for whom they are intended, but in this example we will show how to perform a two-step process using IPFS Desktop. In the first step, museum NFT creators will upload the art image on the IPFS and retrieve a link that contains image hash.
In the second step, the museum NFT creators will create and upload a JSON file that includes the image metadata (e.g. painting name, painter name) and the image link that was created in the first step. The JSON file structure will be created during scaffolding of the NFT chaincode project.
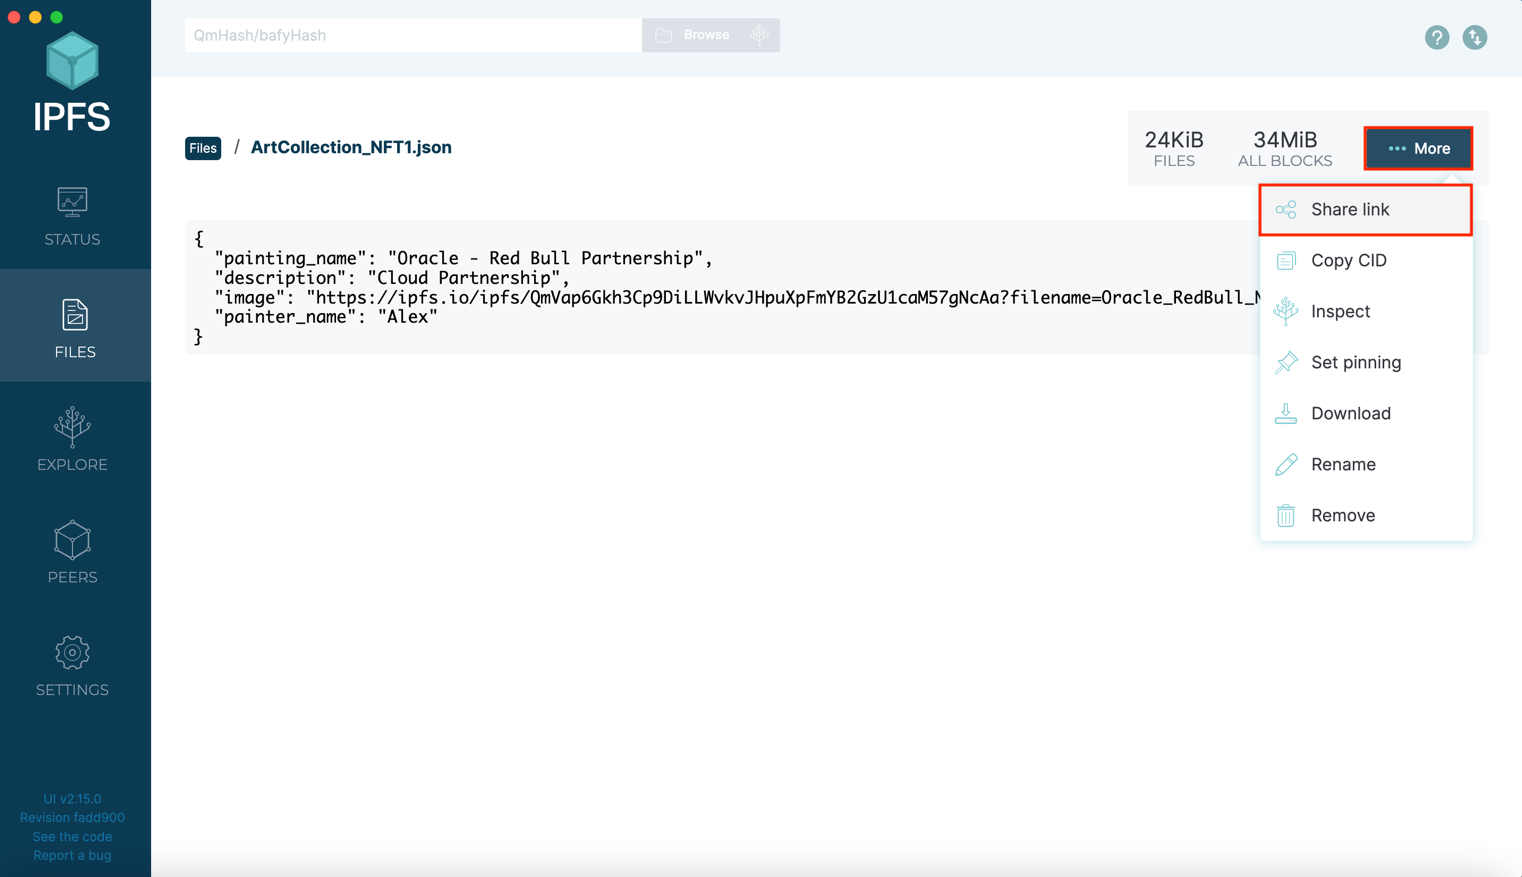
After uploading the JSON file to IPFS, we will get a link that contains JSON file hash and is used as the token URI during the NFT creation / minting.
Testing NFT Chaincode via REST APIs
Now that NFT chaincode has been deployed and we know how to create tokenURIs in IPFS, we can start testing the chaincode using REST APIs. For illustration, we’ll be using Postman – a popular test tools for REST APIs. Of course, these APIs can be easily integrated into a custom front-end, such as a Web or Mobile application. They can also be integrated with various enterprise systems that might want to leverage the NFT capabilities.
The chaincode testing can be done in 6 easy steps as shown in the diagram below.
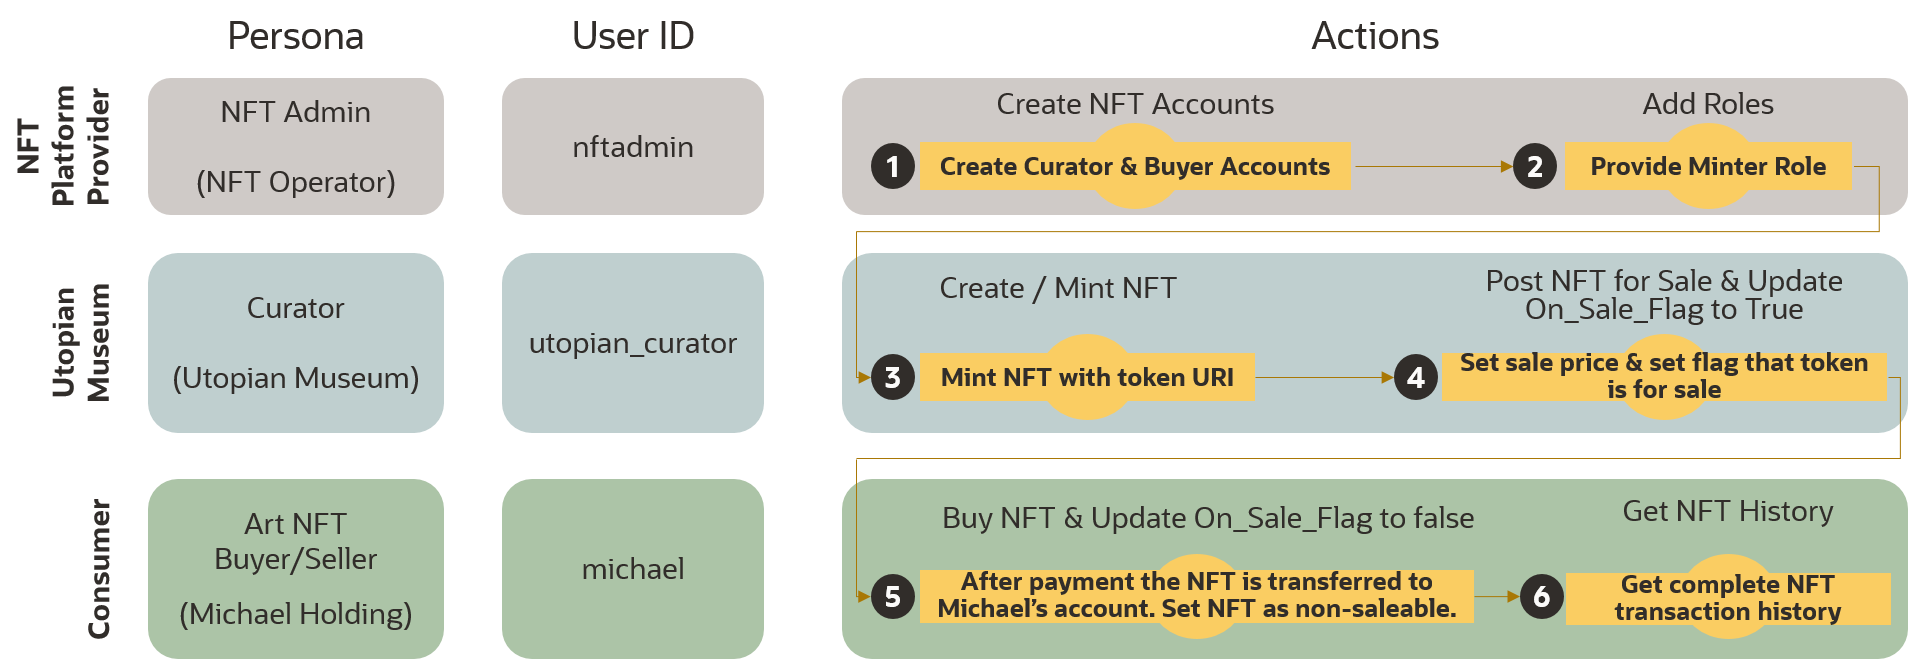
We will cover detailed instructions to set up the test identities and validate the key APIs using Postman in the follow up post.
In this post we have illustrated how to tailor an NFT template, add custom properties and custom methods, and automatically generate 30+ methods and their REST APIs that can be used to build a complete NFT application. All of the available methods generated from the template are documented in the TypeScript and the Go section in the documentation. These include all the lifecycle methods, numerous property queries, trasaction history, account-related functions, etc.
The museum art collection NFT illustrates the core process used to define, generate, and execute NFT chaincodes. The use cases are numerous and span both B2C and B2B ecosystems, for example, tracking negotiable logistics documents, such as electronic Bill of Lading, issuing and verifying educational certificates, tracking unique luxury goods through the distribution chain and even in the after-market, issuing and tracking electric vehicle battery passports, etc. The capabilities we demonstrated empower application developers and business users to prototype their use case and generate production ready NFT chaincode in a very short time, then iterate as they refine the properties and add any custom business logic. Our goal is to empower the application developers, consultants and business users to rapidly develop NFT use cases and increase their adoption by significantly reducing development cost. We welcome your questions / comments in the feedback section.