Oracle APEX 26.1 introduces Trigger Actions, a new way to define declarative behavior directly on buttons, menu entries, and Template Component actions. Trigger Actions enable developers to create interactive experiences without writing custom JavaScript.
Using familiar Dynamic Action patterns, developers can refresh regions, display messages, open dialogs, update page state, execute server-side logic, and support more advanced page interactions. Because the behavior is defined directly on the component, the interaction logic remains close to where it is used, making applications easier to understand and maintain.
By keeping common interactions low-code and component-centric, Trigger Actions improve maintainability while better aligning with modern Content Security Policy (CSP) requirements.
Declarative Actions Where Developers Need Them
Trigger Actions provide a declarative way for buttons, menu entries, and Template Component actions to perform work directly from the component itself. Common interactions no longer need to be expressed solely as navigation targets or implemented through inline JavaScript. Instead, developers can define behavior at the point where user interaction occurs, using familiar Dynamic Action patterns.
By keeping interaction logic close to the component that initiates it, Trigger Actions make applications easier to understand, maintain, and evolve. They also align more effectively with modern Content Security Policy (CSP) requirements. In addition, Trigger Actions extend APEX framework support for row context, session state, and action execution to the areas where developers most often build data-driven interactions. Inspired by community feedback, including FR-1983, Trigger Actions expand the original concept into a broader capability that enables developers to define action logic directly on the components they use every day.
How Trigger Actions Work
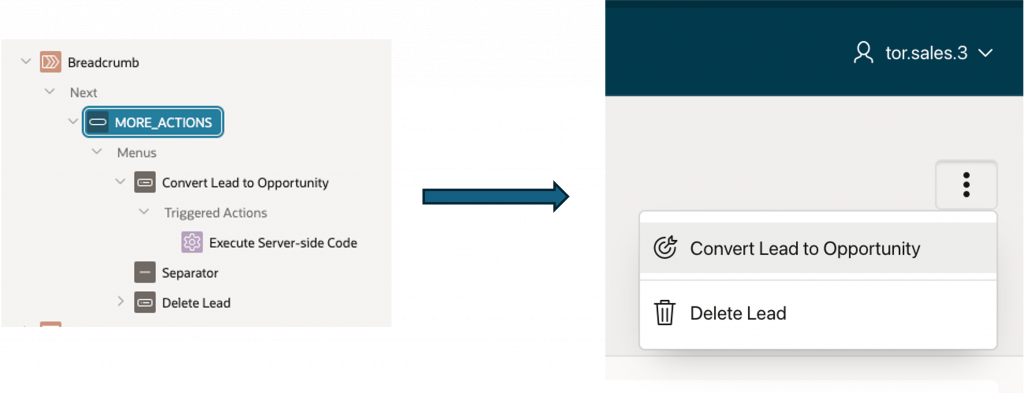
Trigger Actions are defined directly on the button, menu entry, or Template Component action that initiates the interaction. In Page Designer, selecting Trigger Action creates a Triggered Actions node beneath the component in the rendering tree, keeping the behavior closely associated with the component that invokes it.
Trigger Actions leverage familiar Dynamic Action action types, but with a simplified execution model. Because they execute when the component is activated, developers do not need to define a separate event or configure event-specific properties for common click-driven interactions. To better reflect this broader interaction model, the Link property group has been renamed to Behavior for Template Component actions and menu entries. This provides a clearer configuration experience, allowing components to navigate, open menus, or execute declarative action logic based on the behavior selected.
Buttons Now Support Declarative Menus
Buttons are getting more than just a new Trigger Action option. This is a broader enhancement to how button behavior is defined.
With Behavior set to Standard, buttons continue to support familiar actions such as page submit, redirect, and other single-action flows. But you can also set Behavior to Menu and define menu actions directly on the button.
That means a button is no longer limited to acting as a single submit or redirect control. It can now serve as a launcher for a set of menu actions, or use Trigger Action when you want action logic attached directly to the button.
Row context without the workarounds
For developers building data-driven applications with Template Components, Cards, or Interactive Reports, the real value is in row context support.
When a Trigger Action fires from a row-level action or menu entry, APEX automatically makes that row’s data available. Here’s how:
- Client-side access. Row values are temporarily set in a new in-memory session state so you can reference them with
$v('COLUMN_NAME')or&COLUMN_NAME.substitution syntax during action execution. They’re cleared automatically after the actions complete. - Server-side access. Use the familiar “Items to Submit” attribute to send column values to the server. Reference them in PL/SQL with
:COLUMN_NAMEsyntax, just as you would with page items. - Column chooser. A column picker appears in the property editor when your action is defined on a multi-row region. You control which columns are available on the client using “Available on Client” and “Value Protected” settings on each column.
- Checksum protection. Primary key values passed through the action URL are backed by checksums, and you can extend that protection to additional columns. This mirrors how Interactive Grid already secures row-level data.
This means you can build a “Delete” button on a Cards region, for example, that submits the row’s primary key to a PL/SQL process — all without writing a single line of JavaScript.
Built-in click throttling
Double-clicking is a habit that causes real problems in data-modification workflows. Trigger Actions address this automatically: once an action fires, subsequent clicks on the same row and button are blocked until the action set completes. This throttling is per-row, so clicking an action on a different row still works immediately.
There’s no visual indicator built in for the initial release — showing a spinner or disabling the button during execution is up to you. But the underlying protection against duplicate submissions is handled for you.
What’s supported in the initial release
The first phase covers the components developers use most:
- Buttons (with broader Behavior options, including Standard, Menu, and Trigger Action)
- Template Component Actions
- Menu Entries
- Native Cards actions
- Interactive Report template component column actions
Buttons retain their existing “Execute Validations” property, which also applies when the action type is set to “Trigger Action.”
Backward compatibility is preserved. The existing “Defined by Dynamic Action” option for event-based dynamic actions remains available. If a button has both event-based dynamic actions and Trigger Actions defined, both appear in the rendering tree.
See Trigger Actions in Action
Here’s a step-by-step example of how to use trigger actions in a real application.
Imagine a CRM Leads page where Leads is a report of type Content Row.
Now let’s see how to implement a delete action on this Content Row report to delete leads.
- Create the Action
- Open the CRM Leads page in Page Designer.
- Select the Leads region.
- Add a row-level action under the Leads report.
- Set Position to Primary Action.
- Set Template to Button.
- Set Label to Delete.
- Create the Triggered Actions
- In the action’s Behavior property group, choose Trigger Action.
- This adds a Triggered Actions node beneath the action in the rendering tree.
- Action 1: Confirm
- Under Triggered Actions, add the first action.
- Set Action Type to Confirm.
- Set Message to:
Are you sure you want to delete this lead? <br> &LEAD_SUBJECT. - In the LEAD_SUBJECT column attributes for the report, toggle Available on Client on. This makes the column value available on the client, so you can reference
&LEAD_SUBJECT.in the confirmation message and in any JavaScript execution.
- Action 2: Execute Server-side Code
- Add the second trigger action.
- Set Action Type to Execute Server-side Code.
- In Items to Submit, include
LEAD_IDso the selected row value is available on the server. - In the server-side code, enter:
delete from CRM_leads where lead_id = :LEAD_ID;
- Action 3: Refresh
- Add the third trigger action.
- Set Action Type to Refresh.
- Under Affected Elements, set Selection Type to Region.
- Set Region to Leads.
- Run the Page
- Save and run the page.
- Click the Delete action for a lead.
- APEX first shows the confirmation message, then deletes the selected lead, and finally refreshes the Leads report.
This flow shows the value of the feature. You can create a safe, contextual delete action directly in Page Designer without wiring up custom events or writing JavaScript, and then refresh the report automatically.
Why this matters for your applications
This feature removes one of the major friction points in building interactive, data-driven applications with Template Components and Cards. Instead of choosing between “redirect somewhere” and “write JavaScript,” you get the same declarative dynamic action model that has made APEX productive for years — just applied directly to the components where you need it most.
It also moves APEX closer to full CSP compliance by eliminating the need to embed JavaScript in URL targets. As your organization’s security requirements tighten, this declarative approach keeps your applications both functional and compliant.
If you’ve been encoding javascript: calls in link targets or creating elaborate workarounds with custom events and named actions, this is the feature you’ve been waiting for.