Oracle Cloud Infrastructure provides a powerful serverless computing platform called Functions. This platform allows you to run code without provisioning or managing servers. OCI Document Generator Function is ideal for executing tasks such as PDF generation, offering scalability, reliability, and cost-effectiveness.
Generating PDF documents dynamically is a common requirement for many businesses and organizations. Whether it’s generating reports, invoices, or any other type of document, having a streamlined process can significantly improve efficiency and productivity.
Oracle APEX is a powerful low-code development platform for building scalable and secure enterprise applications. Integrating OCI with Oracle APEX can streamline the document generation process within your applications.
In APEX 24.1, we can now easily integrate the Document Generator Service by configuring it as a remote print server. You can develop your printing templates in a Word document, which the PDF engine combines with your app data to render the final output.
In this blog post, we’ll explore how you can achieve seamless PDF generation using JSON for data representation and Oracle OCI Functions for execution.
We will understand how to:
- Create the Document Generator Function → Here, we will leverage the pre-built OCI Function for Document Generation.
- Fetch the details of OCI Object Storage → In this section, we will Fetch the Details of Object Storage required to create a Print Server in Oracle APEX.
- Setup User & Policies → In this section, we will see how to set up a User, Group, and policies to access the Document Generator and Object Storage.
- Create Database Credential → Here, we will understand how to Create an OCI Cloud Credential in the Oracle Database, allowing APEX to use Document Generator as a remote print server.
- Configure Print Server on APEX ADMIN → We will understand how to configure the Document Generator Function as a Print Server in Oracle APEX.
- Create and Configure Report Layout → We will learn how to create a Report Layout.
- Create and Configure Report Query → We will learn how to create a Report Query.
- Configuring the Report Layout on a Classic Report → In this section, we will learn how to integrate a Report Layout in Classic Reports.
- Use the New Declarative Page Process → Here, we will learn more details about the new Page Process.
- Use the New Dynamic Action → We will learn more details about the new Dynamic Action here.
- Use the New PL/SQL APIs: APEX_PRINT and APEX_HTTP → We will learn more details about the new PL/SQL APIs here.
Before diving into integrating the OCI Document Generator function with Oracle APEX, it’s essential to set up a compartment with a proper VCN and subnet. If your tenancy only includes the root compartment, follow the steps outlined in this document to create a new compartment. You can also check out the steps in this link to create and configure a VCN.
Create the Document Generator Function.
To create an OCI Function, follow the steps outlined in this documentation.
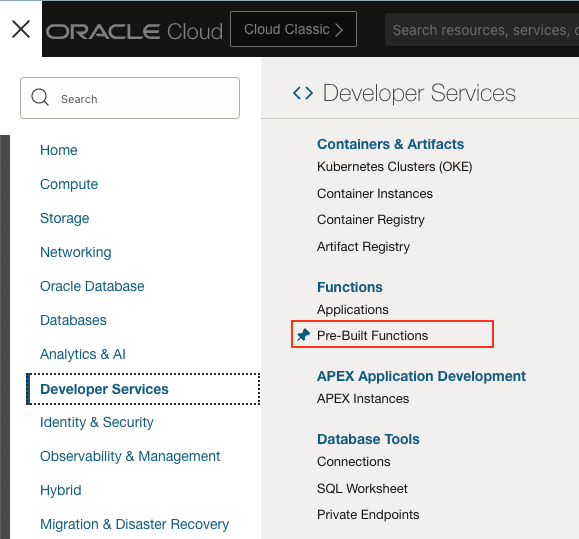
- From the OCI console, click the navigation menu and select Developer Services > Pre-Built Functions.
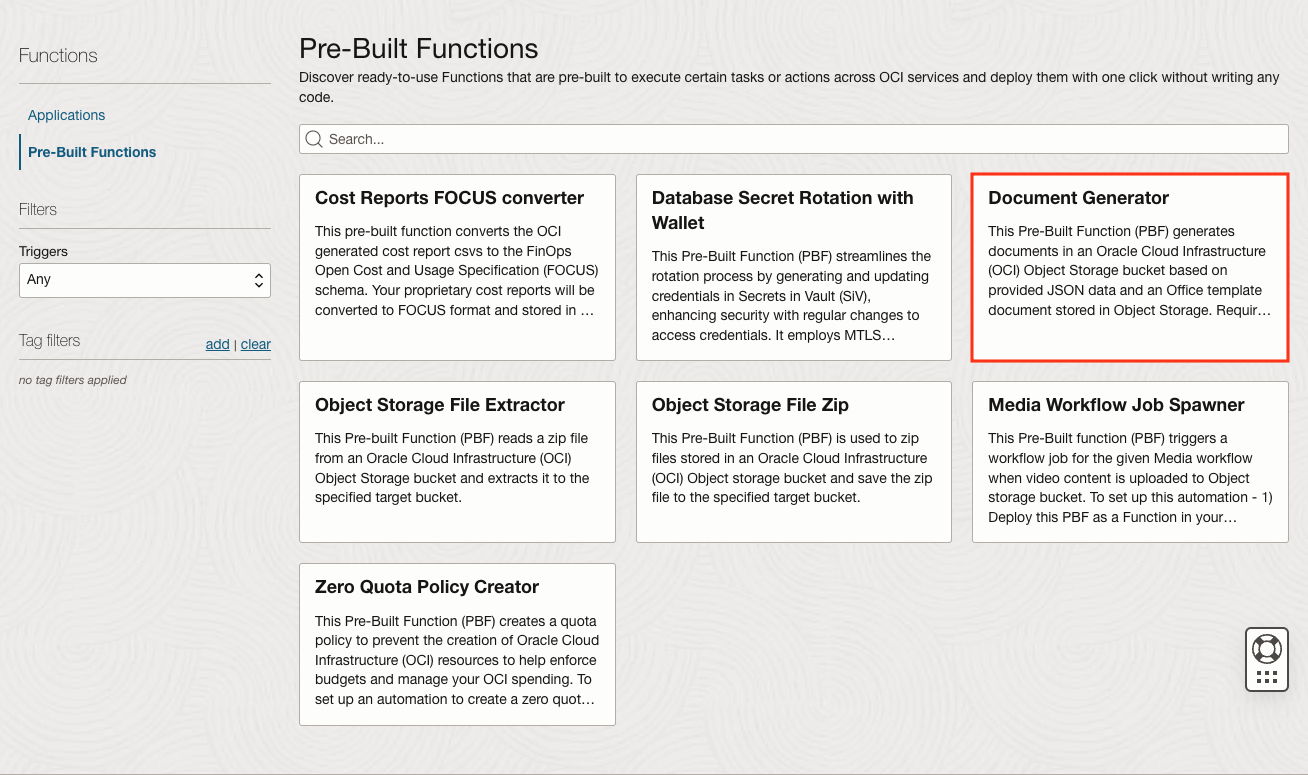
- In the Pre-Built Functions page, click on Document Generator, and then click Create function.
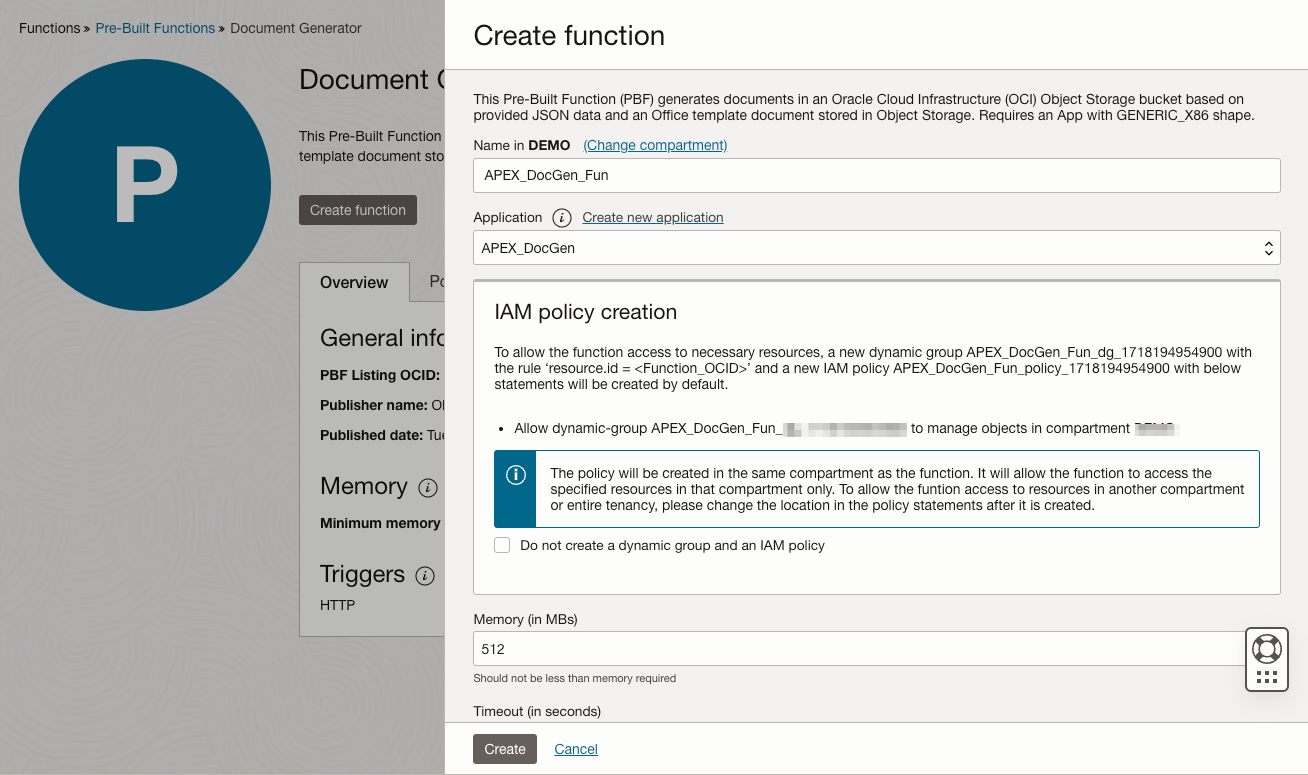
- Enter details for Name and Application. If there isn’t a suitable application in the current compartment, click Create new application. Finally, click Create.
Tip: When using Document Generator in production, you can enable provisioned concurrency to reduce initial provisioning time and ensure hot starts. - You can see that the function is now deployed in the application.
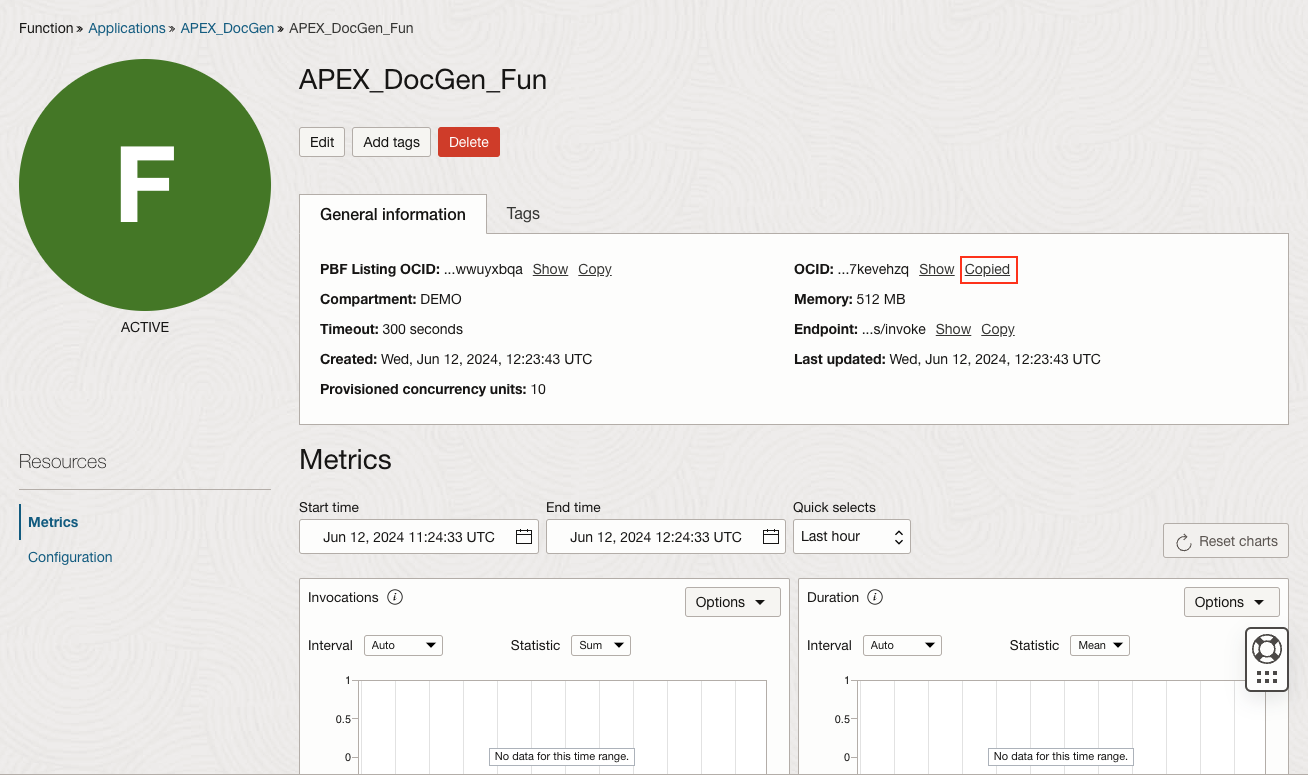
- From the newly Created Document Generator function, we need to Copy its OCID and Root EndPoint. We will use them while configuring the Document Generator as a Print Server on APEX.
- To obtain the root endpoint, copy the endpoint provided in the newly created function.
- For example, if the copied endpoint is: https://zdstjcuqpeq.us-ashburn-1.functions.oci.oraclecloud.com/20181201/functions/ocid1.fnfunc.oc1.iad.aadffdfddgrg2vckowd7kevehzq/actions/invoke
The root endpoint would be https://zdstjcuqpeq.us-ashburn-1.functions.oci.oraclecloud.com
Fetch the Details of OCI Object Storage
Since this function leverages the OCI Object Storage, the first step is to get the Namespace, OCID of the Object Storage Compartment, and the Root Endpoint.
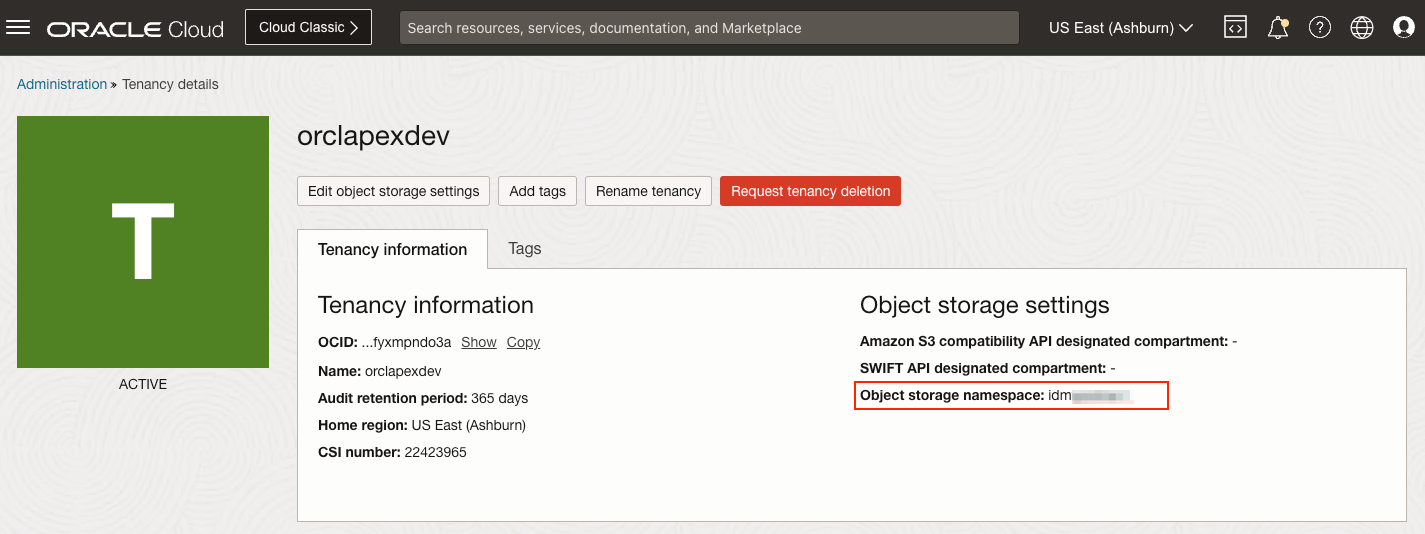
- To view your Object Storage namespace string, do the following:
Select the Profile menu on your OCI in the upper-right corner of the page, and then click Tenancy: <your_tenancy_name>. Your namespace string is listed under Object Storage Settings. Copy the namespace Details.
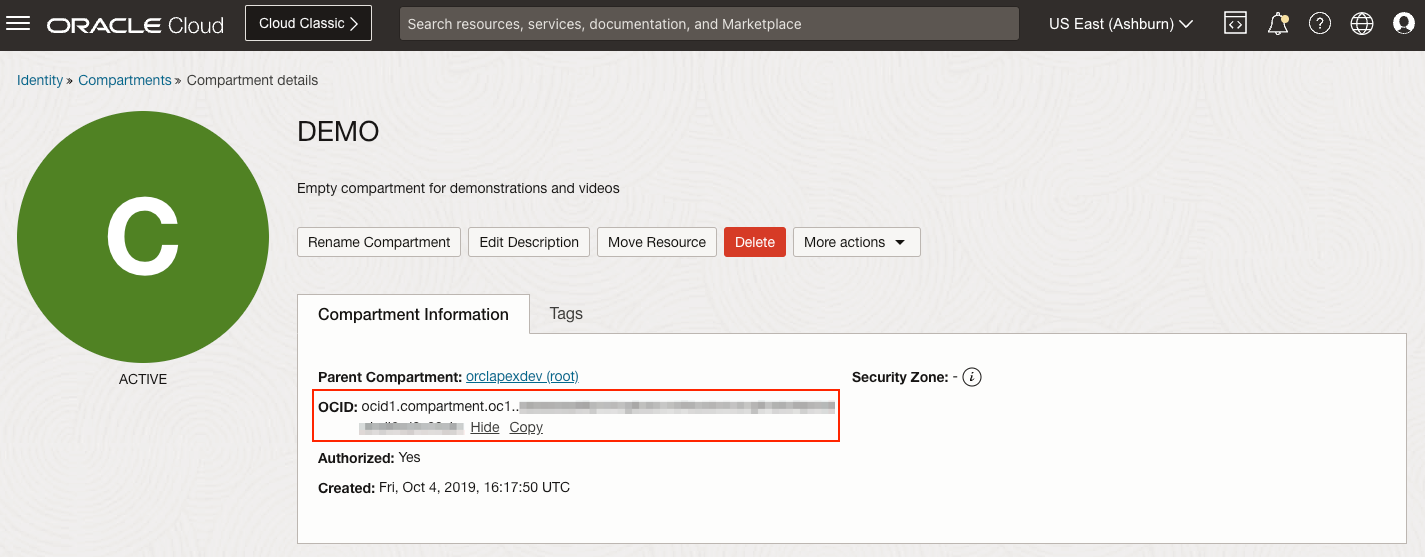
- To view your Compartment’s OCID, open the navigation menu, select Identity > Identity and Security, click Compartments, and copy the OCID to your clipboard.
- We also need to get the Root Endpoint of the Object Storage. You can find the endpoint of your Object storage based on your Region by following this link.
In this blog post, We use OCI hosted in the Ashburn region, and the API endpoint will be https://objectstorage.us-ashburn-1.oraclecloud.com
Set Up a User and Policies to access the Document Generator Function and Object Storage
The next essential step in integrating APEX with the OCI Document Generator service is to create a User on OCI whose API key will facilitate this communication. This ensures that APEX can securely and efficiently interact with the OCI Document Generator.
In this example, we will create a new user (DOCGEN_API_DEMO) and then generate an API key for accessing Oracle Cloud services. The user is then added to a newly created group (DOCGEN), and a policy is established to grant the necessary permissions. This includes generating and downloading an API key, which will be used to create a DBMS_CLOUD credential later. The final step ensures that the DOCGEN group has the appropriate access to manage functions within the tenancy.
Follow the steps below to Create a user on OCI, Generate the API Key, create a Group, and add the user to the newly created Group.
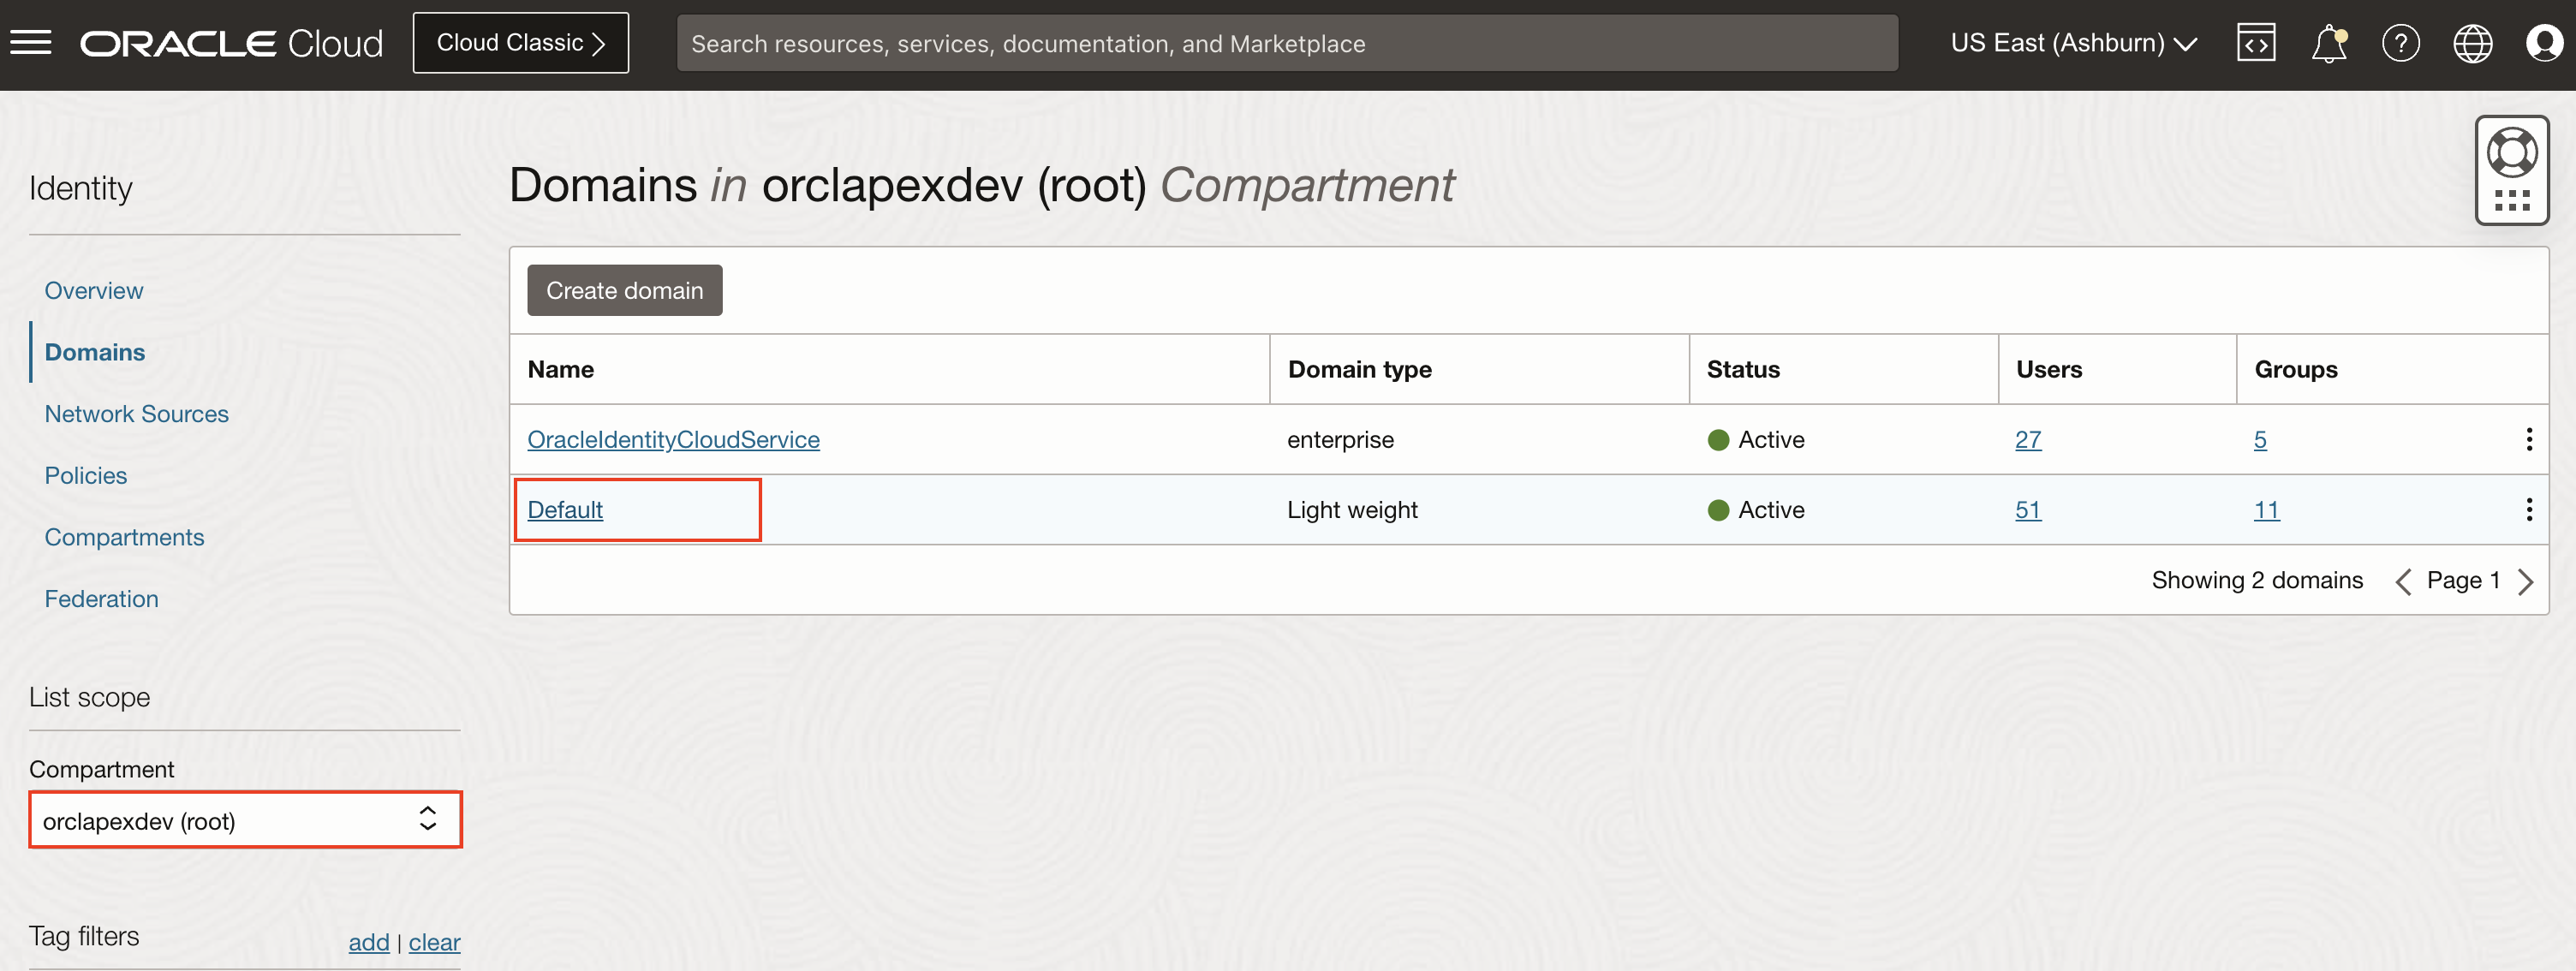
- Access Domains: Navigate to Identity & Security > Domains, select the root compartment, and click on Default Domain.
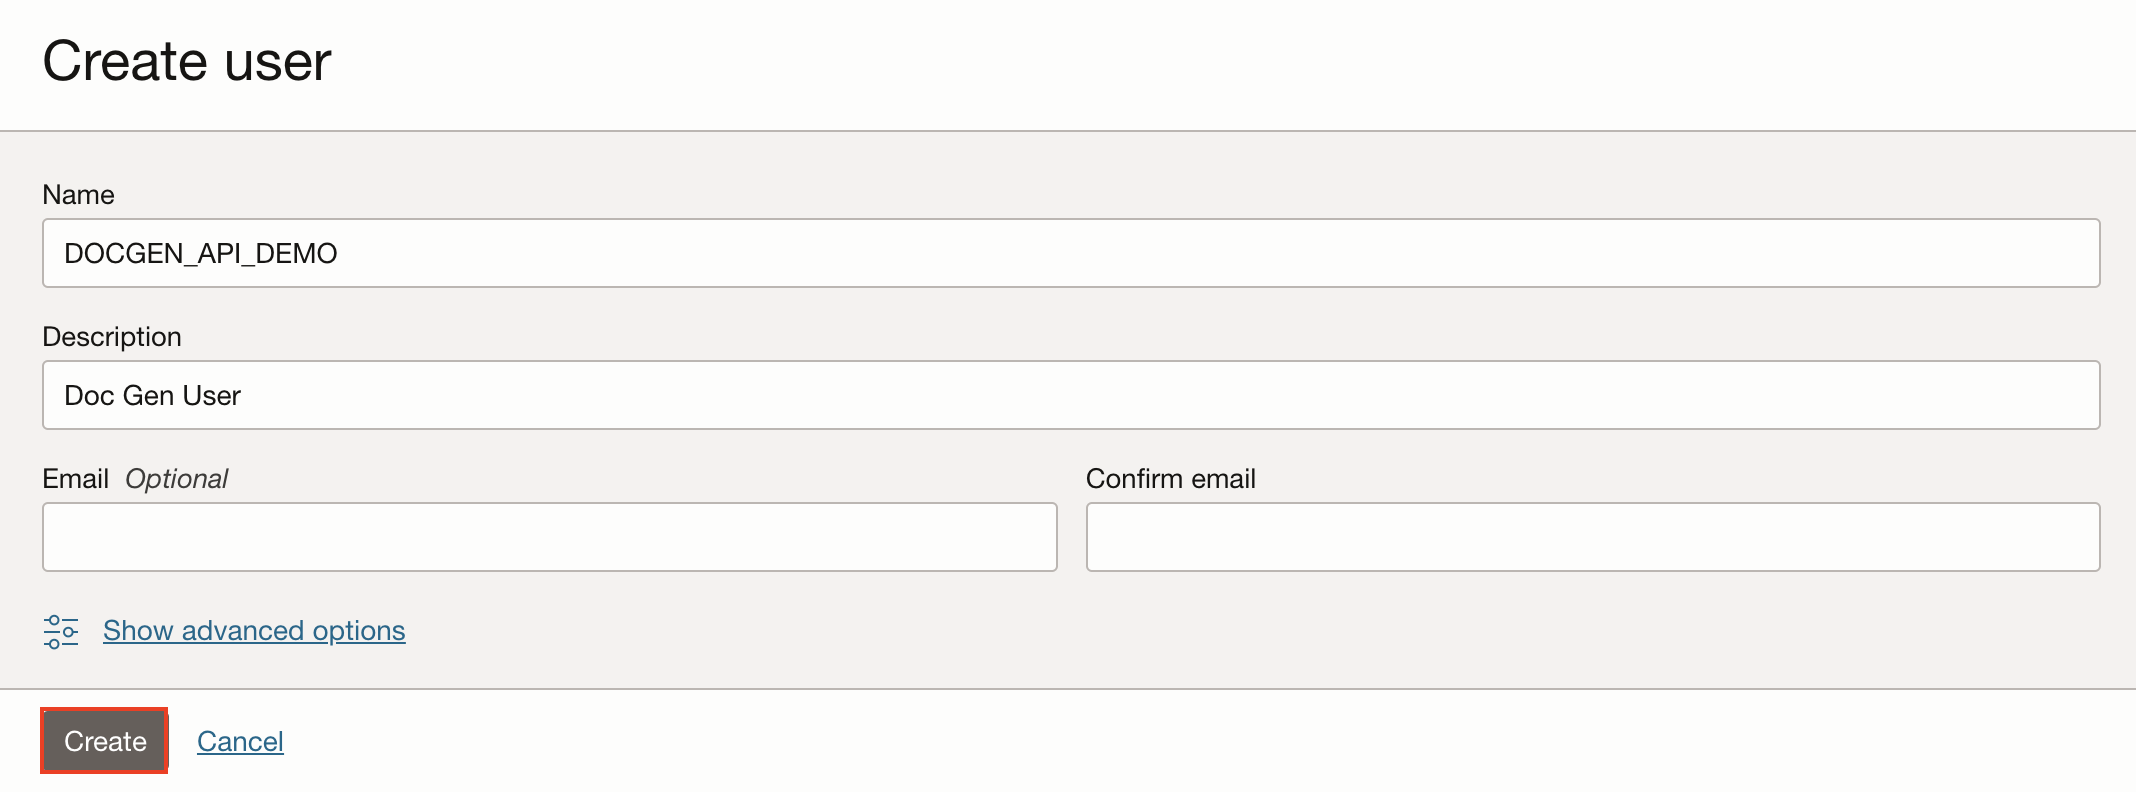
- Create a New User:
- Go to Users and click Create User.
- Fill in the Name and Description and click Create. We have used the username DOCGEN_API_DEMO.
- Generate API Key:
-
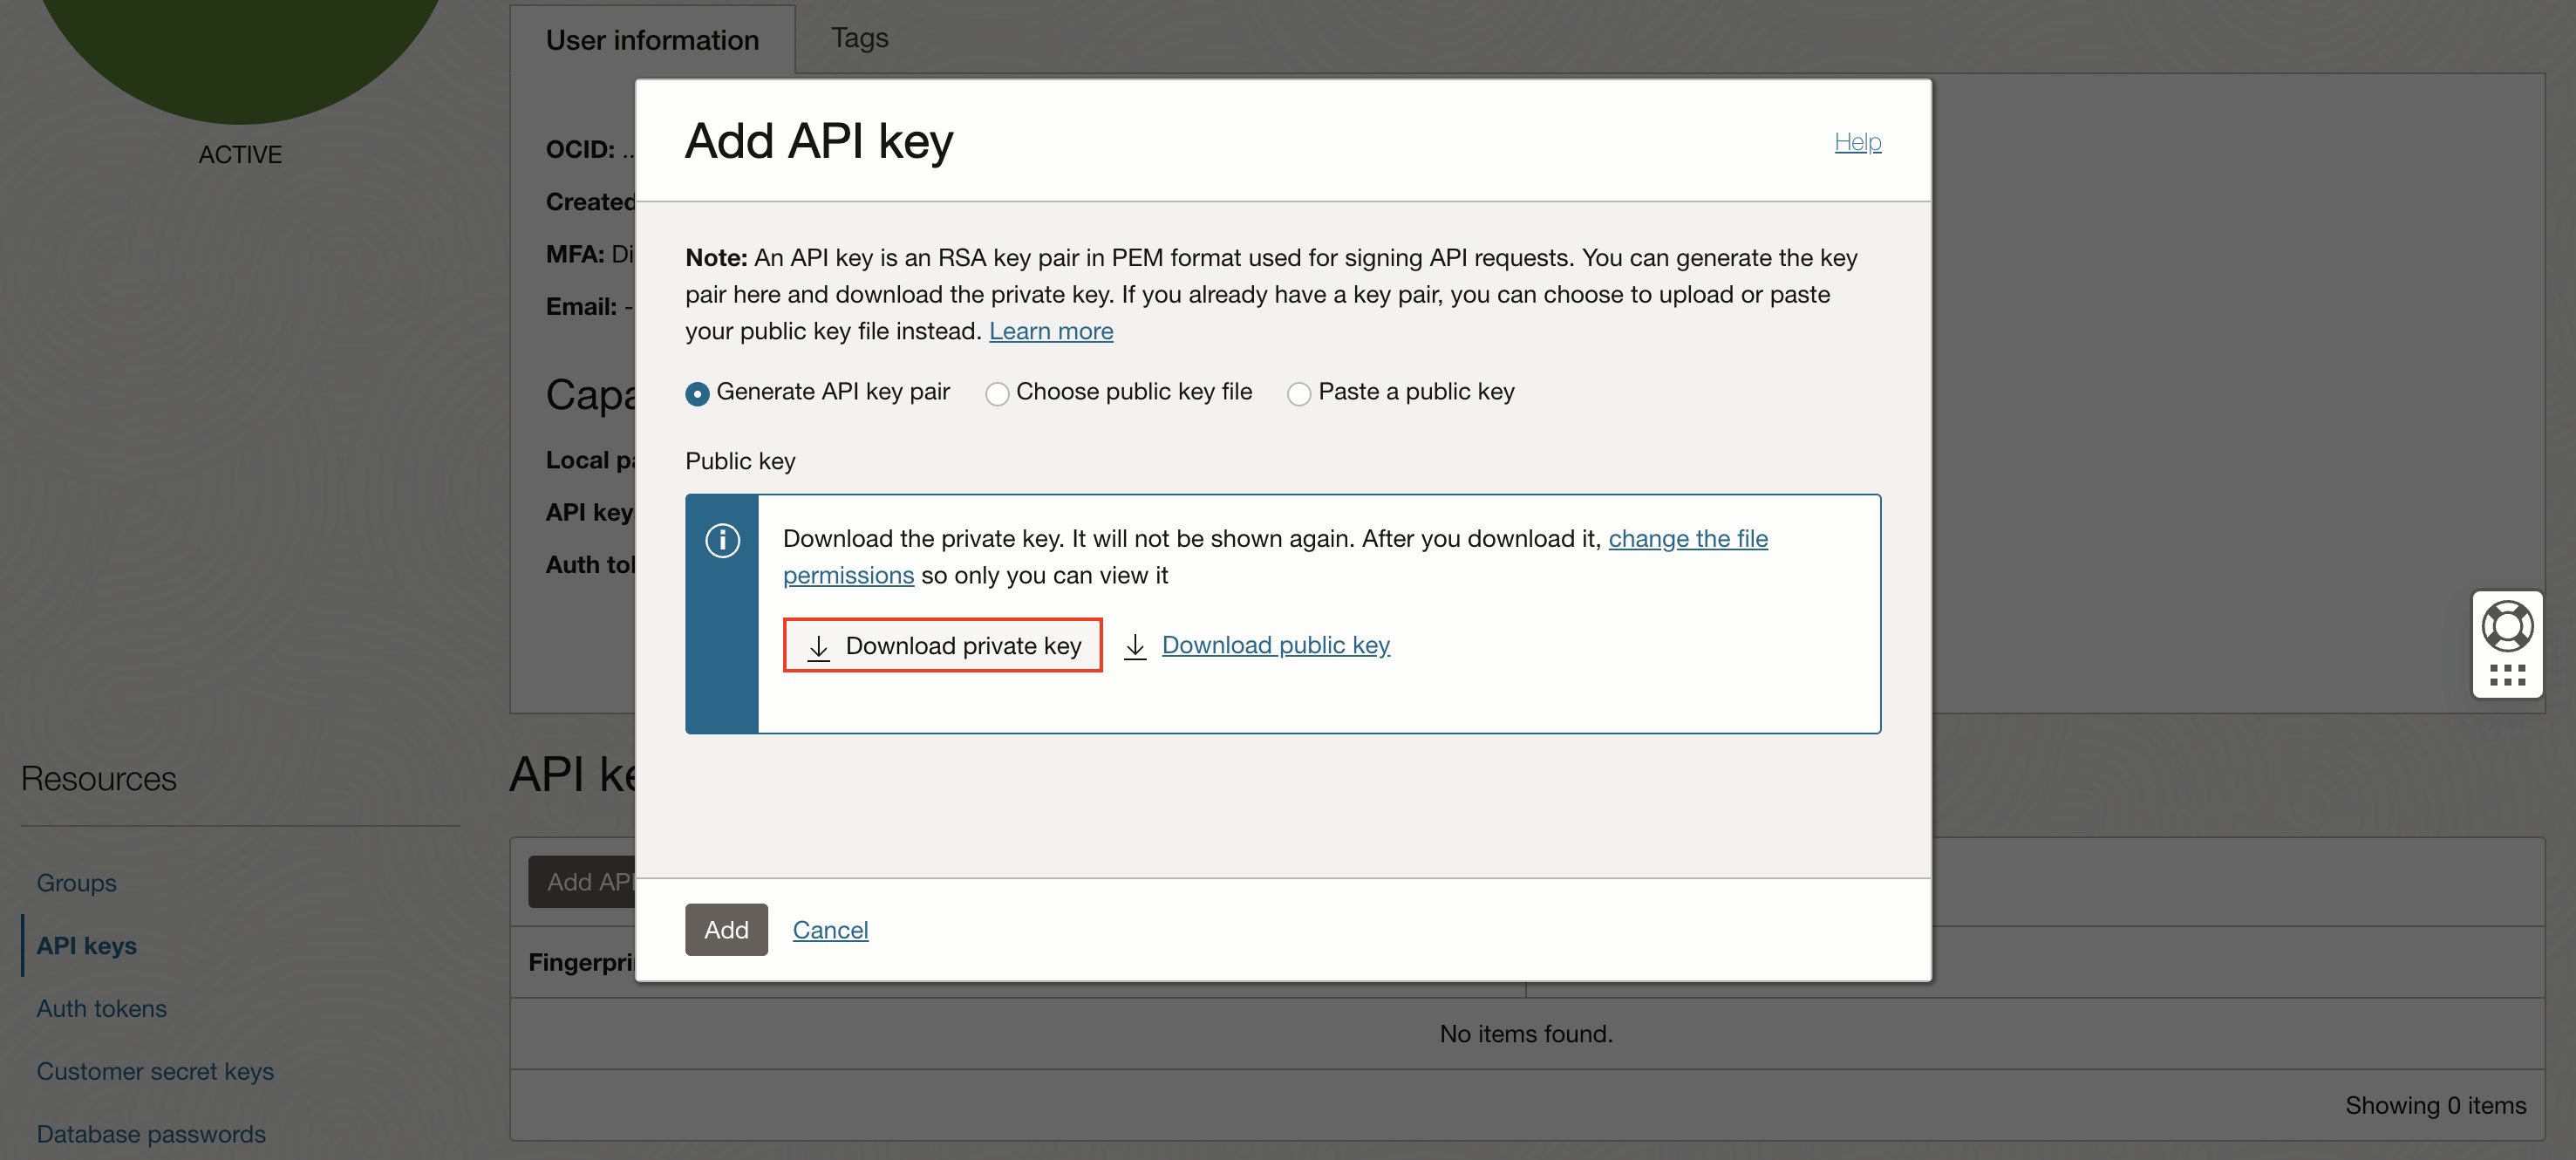
From the newly created user page, Go to API Keys, click Add API Key, and generate a key pair.
-
Download the private key, click Add, and then copy the configuration file preview.
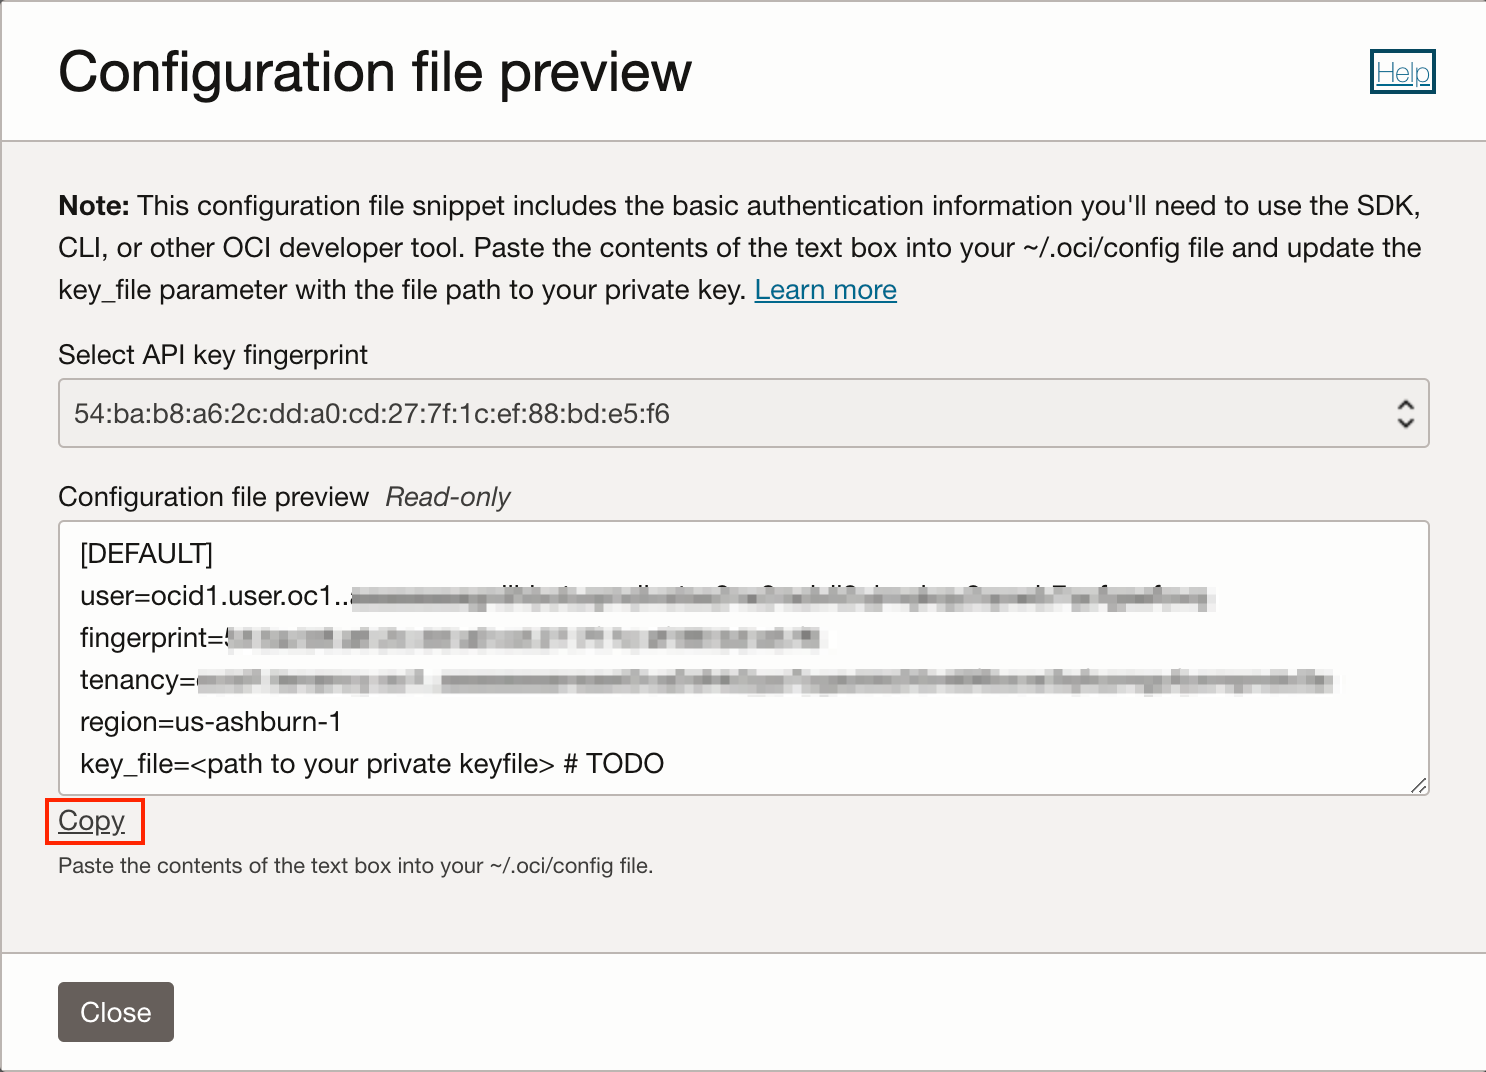
- Copy the User, Fingerprint, Tenancy, and Region details from the configuration file. We will use them to Create a Credential later.
-
- Create a Group:
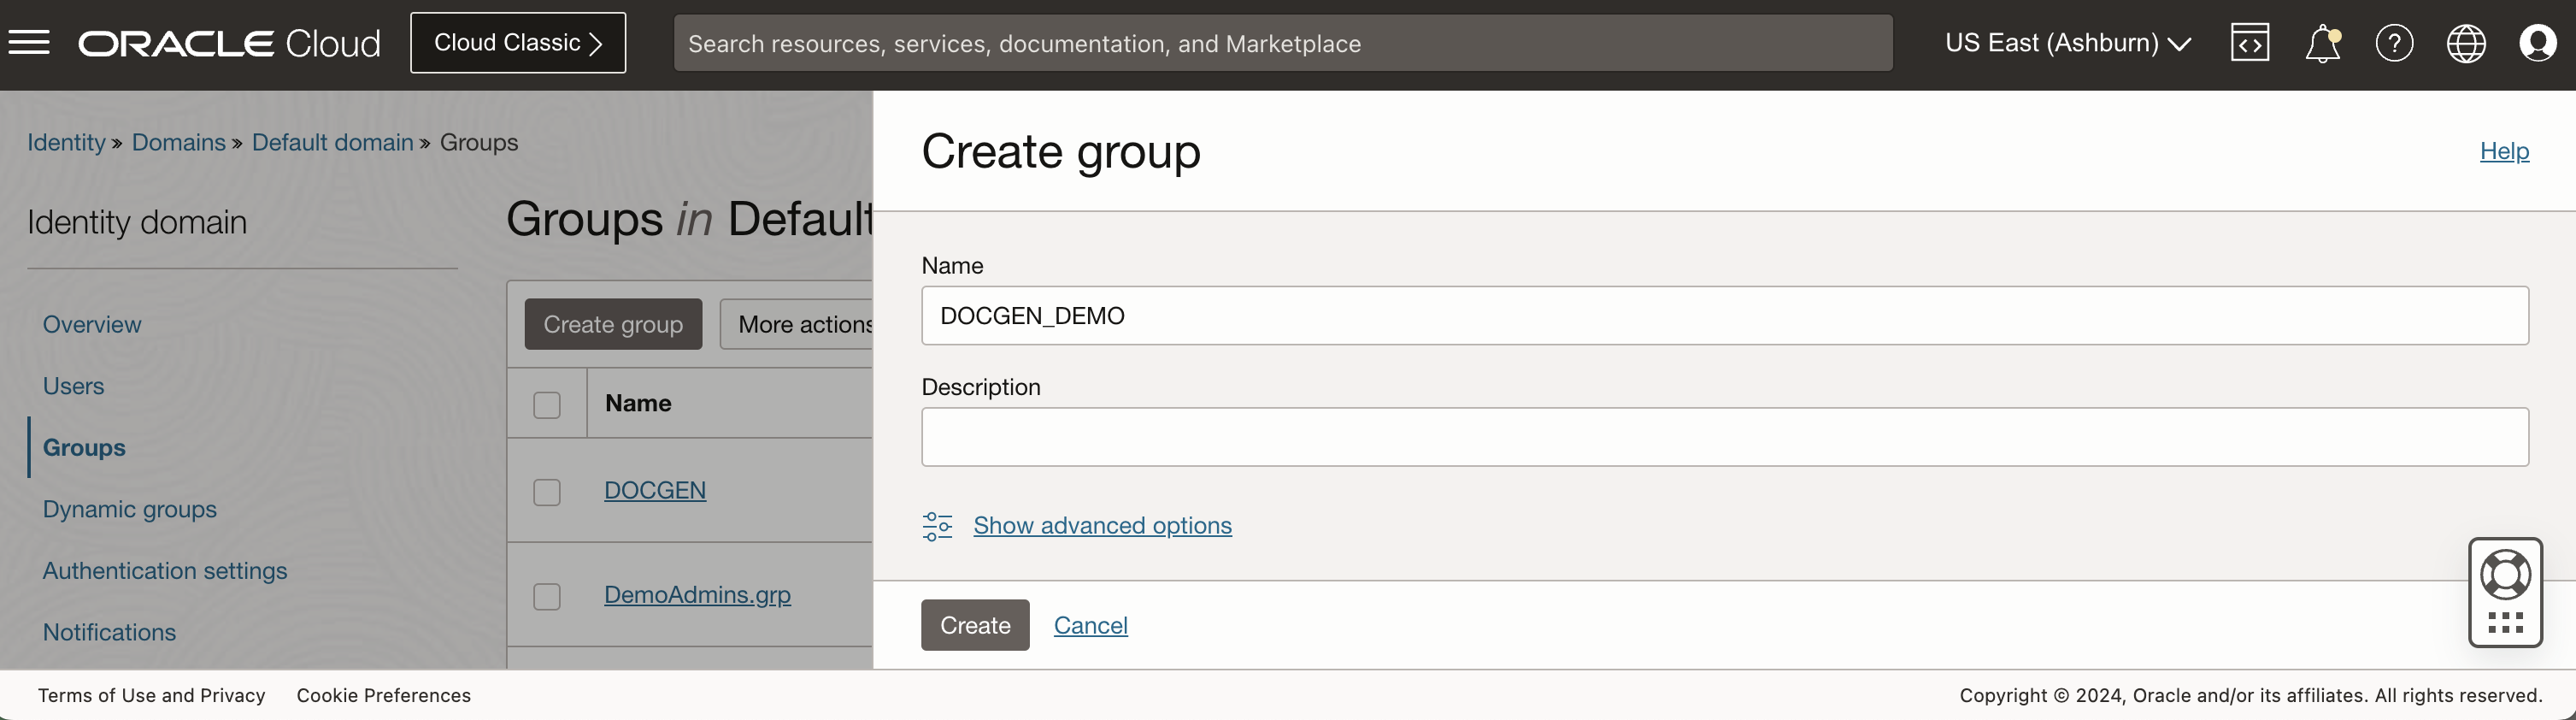
- Go to Groups and click Create Group.
- Fill in the Name and Description and click Create. We have used the User Name as DOCGEN_DEMO.
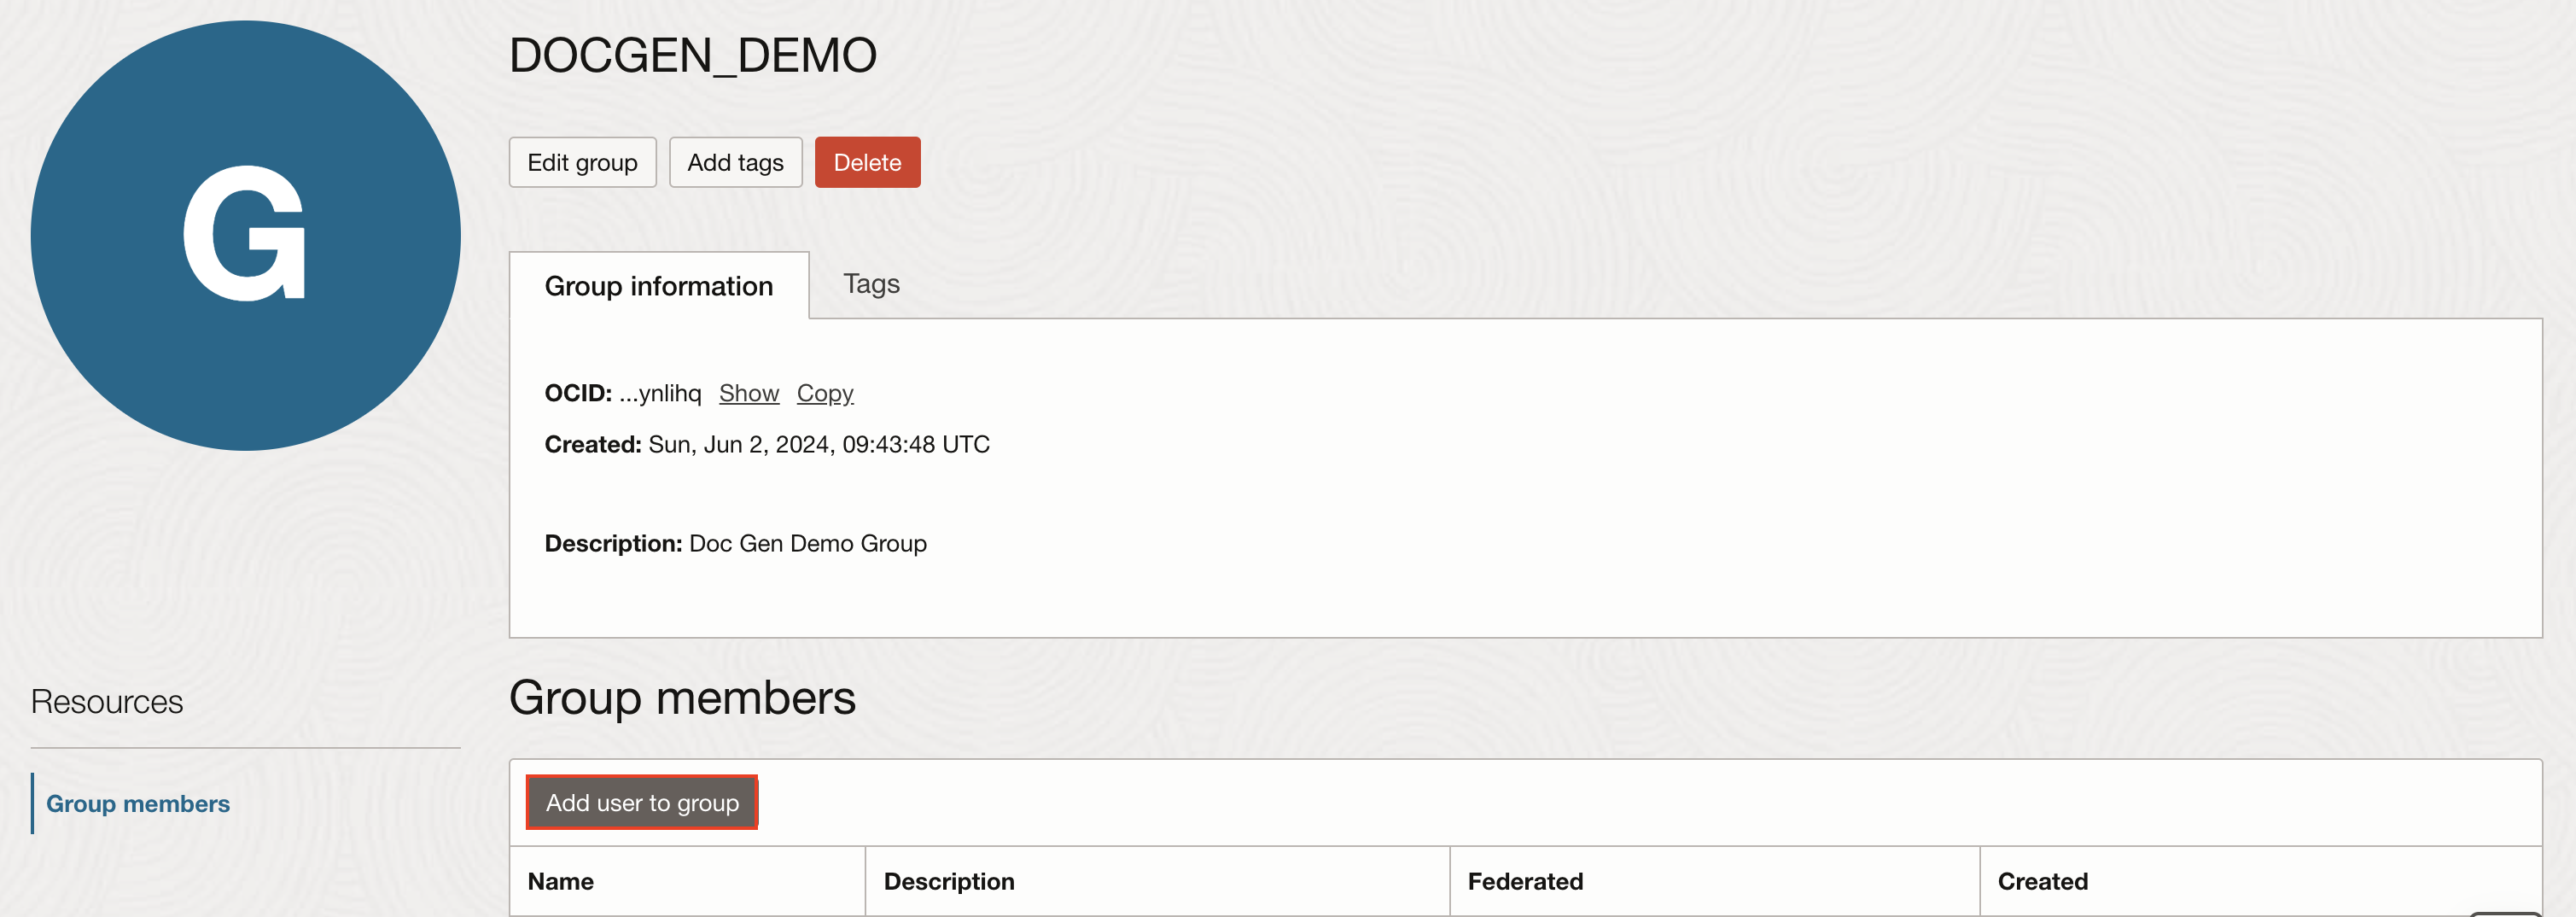
- Add User to Group:
- Click Add User to Group, select the newly created user (DOCGEN_API_DEMO), and add to the DOCGEN group.
- Click Add User to Group, select the newly created user (DOCGEN_API_DEMO), and add to the DOCGEN group.
- Create and Configure Policy:
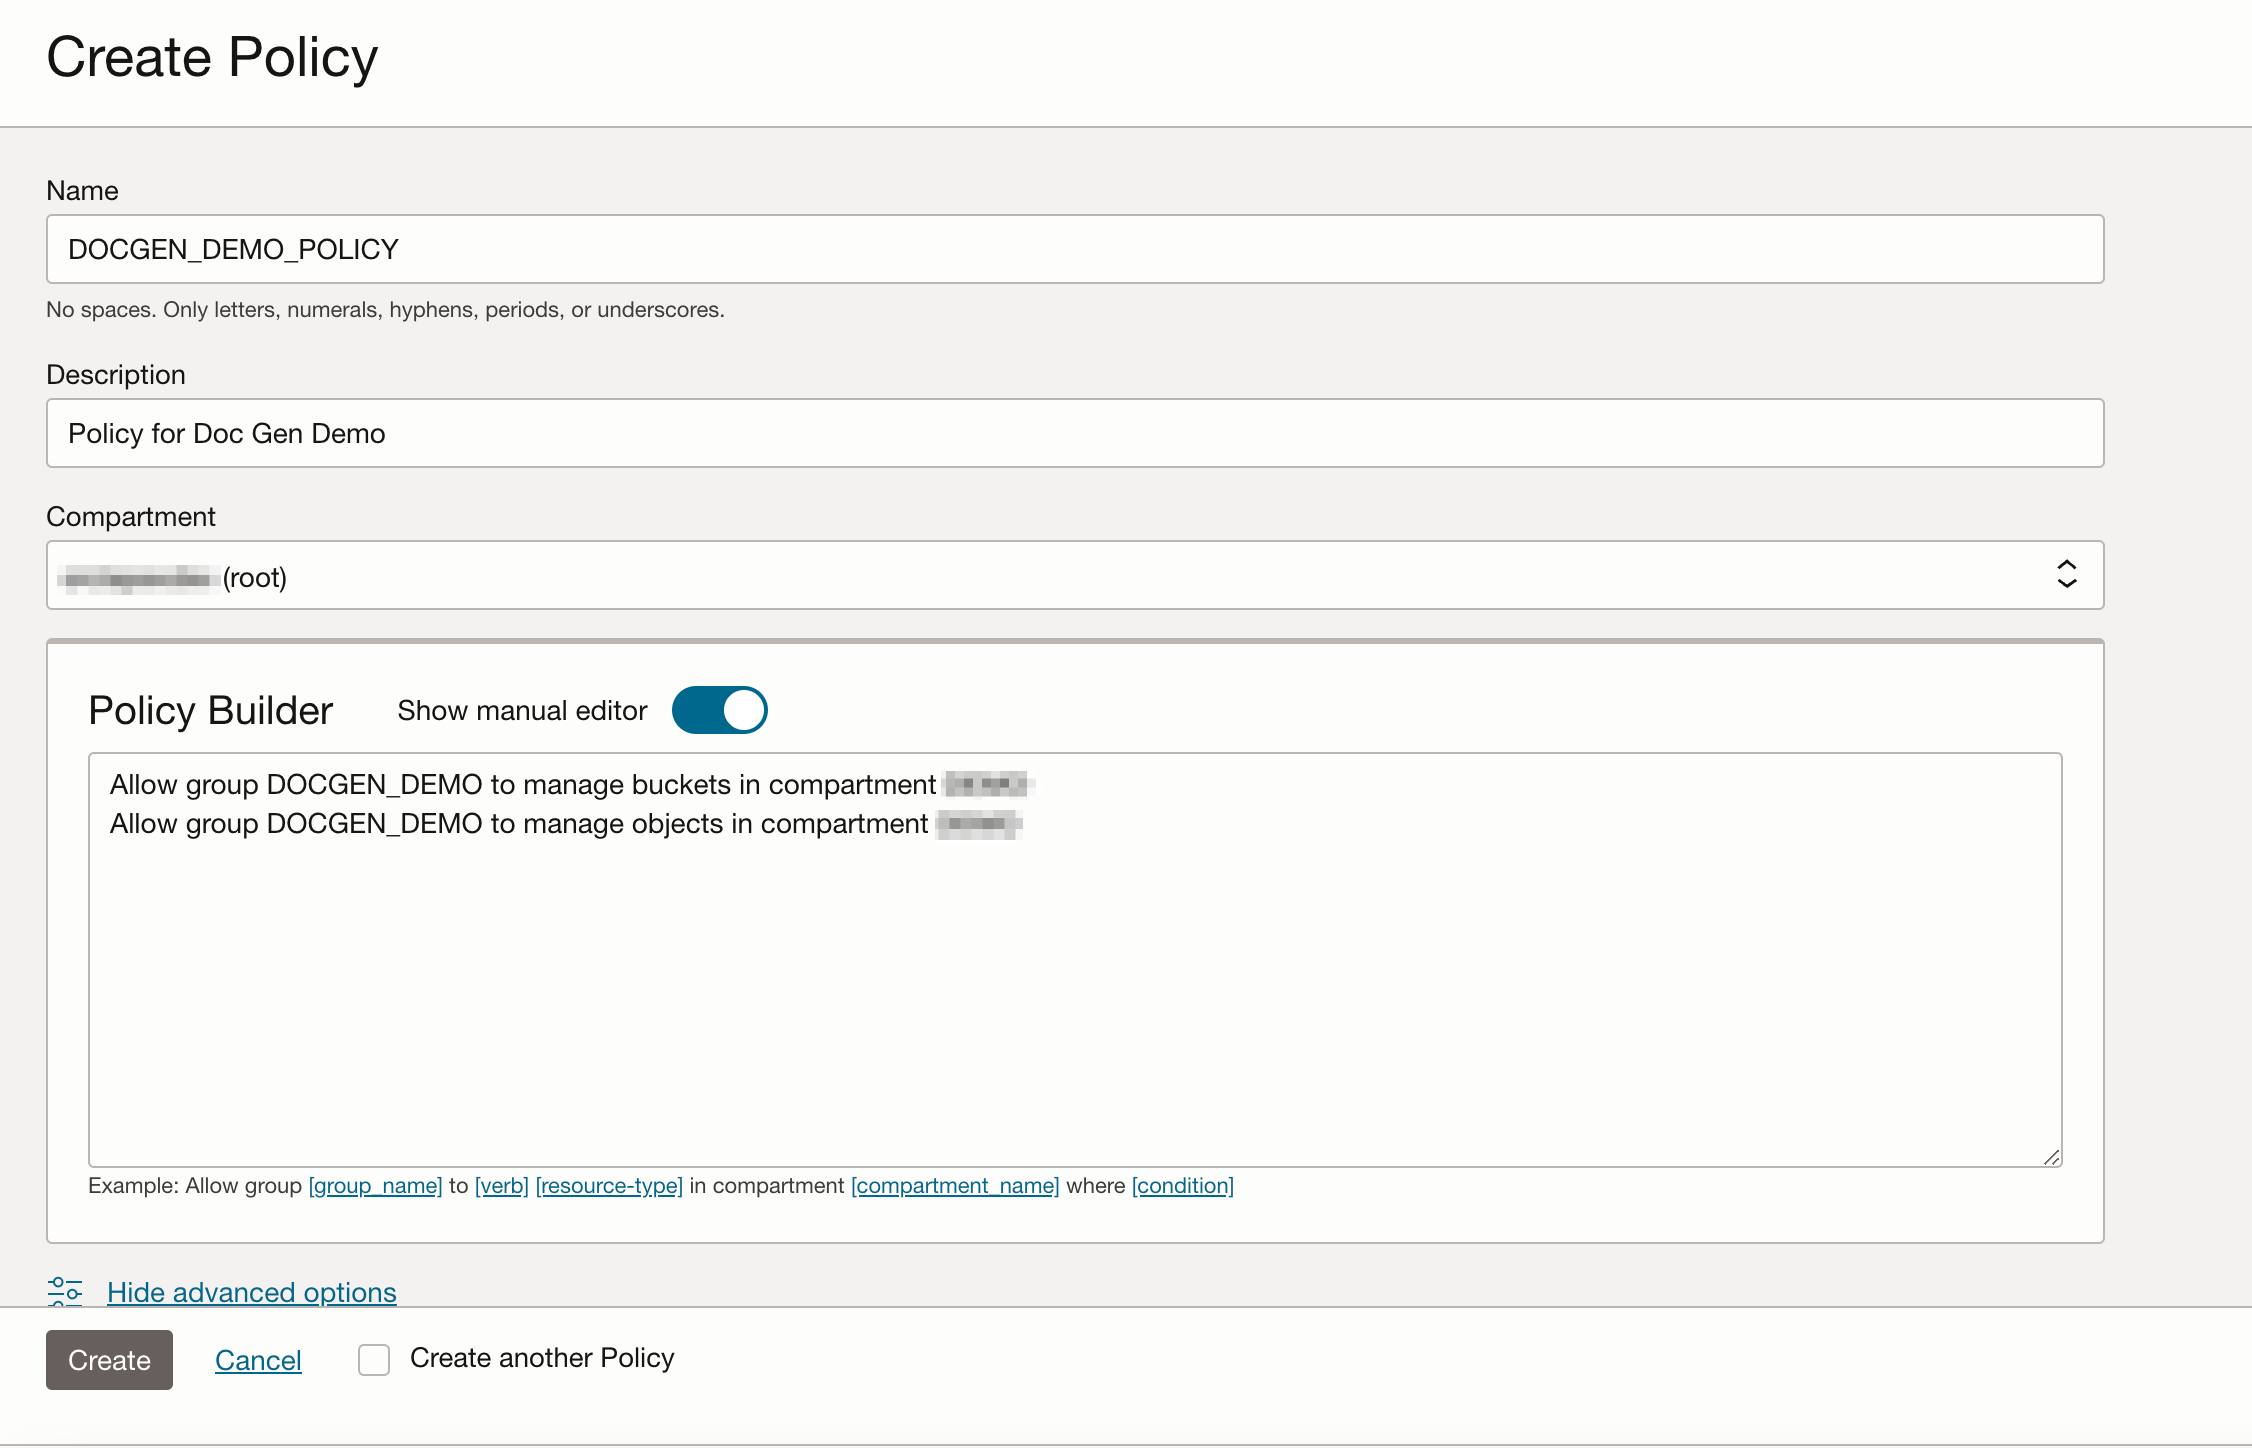
- Go to Policies, click Create Policy after filling out the Name and Description, and click Create. We have used the user’s Name as DOCGEN_DEMO_POLICY.
- Add Policies to manage Objects and Buckets in our Compartment.
Allow group DOCGEN_DEMO to manage buckets in compartment yourCompartment
Allow group DOCGEN_DEMO to manage objects in compartment yourCompartment
- Edit Policy Statements and add a new Policy to use functions-family in the Tenancy.
Allow group DOCGEN_DEMO to use functions-family in tenancy
Note: If you use a domain other than Default, please follow the syntax below to create Policies.
Allow group <identity_domain_name>/<group_name> to manage <resource-type> in compartment <compartment_name>
Create Database Credential
We need to store the cloud service credentials directly in the Oracle Database, allowing APEX to use Document Generator as a remote print server.
If you’re using APEX on Autonomous Database or the APEX Application Development Service, follow the steps below to set up your cloud credentials.
First, log in as the Admin User. Then, execute the following PL/SQL code:
BEGIN
  apex_instance_admin.CREATE_cloud_CREDENTIAL (
    p_credential_name   => 'DOCGEN_API',
    p_user_ocid         => '<ocid1.user.oc1...>',
    p_tenancy_ocid      => '<ocid1.tenancy.oc1...>',
    p_private_key       => '<private_key>',
    p_fingerprint       => '<fingerprint>'
  );
END;

Replace  <ocid1.user.oc1...>, <ocid1.tenancy.oc1...>, <private_key>, and <fingerprint> with the details we copied in the previous step. For p_private_key, open the previously downloaded Private Key file and copy everything between the ----BEGIN... and ----END... lines. Next, remove all line breaks to format the key as a single line. Finally, use this single line key in your PL/SQL code.
If you’re using APEX on Oracle Base Database Service or an on-premises database, you will need to follow additional steps.
- Refer to this documentation provided to install the DBMS_CLOUD package.
- After installing DBMS_CLOUD from the SYS User of your PDB, validate APEX using the following commands before creating the credential.
CONN / AS SYSDBA
ALTER SESSION SET CONTAINER=pdb1;

SET SERVEROUTPUT ON
EXEC SYS.validate_apex;
- Once validated, Create a Credential as mentioned above. Following these steps ensures that your APEX environment is properly configured to use cloud credentials, enabling seamless application integration and functionality.
Configure Print Server on APEX ADMIN
Next, we need to set up our environment in Oracle APEX. Log in as an APEX Administrator and configure the Document Generator pre-built function as your Print Server.
- Configure the Document Generator:
- Click Manage Instance. Navigate to Instance Settings.
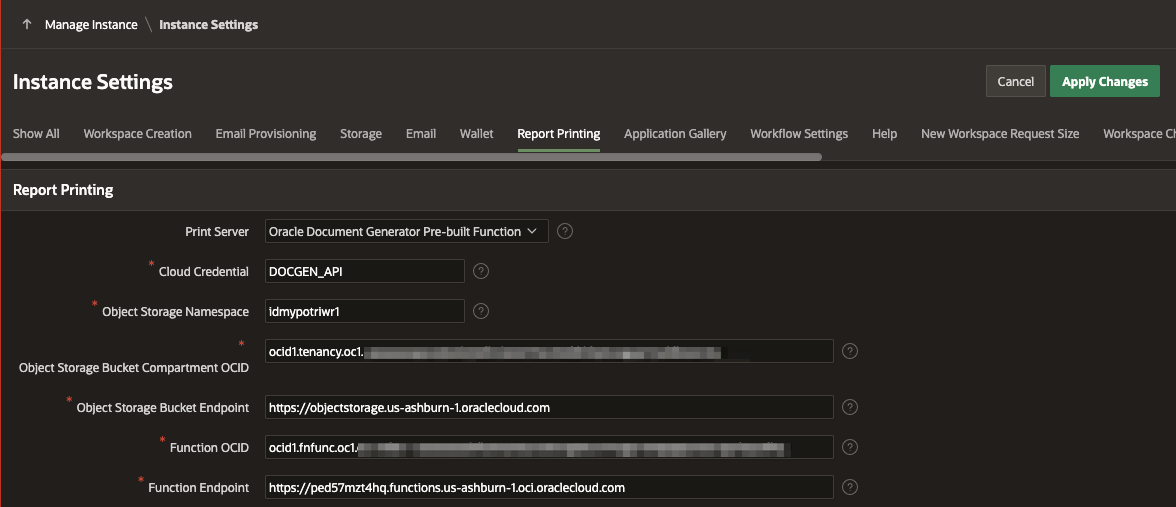
- Under the Report Printing tab, set up the Document Generator Function as your Print Server.
- In the Report Printing tab, select Print Server as “Oracle Document Generator Pre-built Function.”
- For Cloud Credential, enter the credential name under Cloud Credential. In our example, we called it DOCGEN_API
- Provide Object Storage Details like Object Storage Namespace, Object Storage Bucket Compartment OCID, and Object Storage Bucket Endpoint. You can find this information from the Fetch the Details of OCI Object Storage Details we copied int he above step.
- Add Document Generator Function Details. Provide the OCID of your Document Generator Function and its Root Endpoint.
After completing these steps, you are now set up to generate and manage PDF documents within Oracle APEX using the OCI Document Generator.
Create and Configure Report Layout
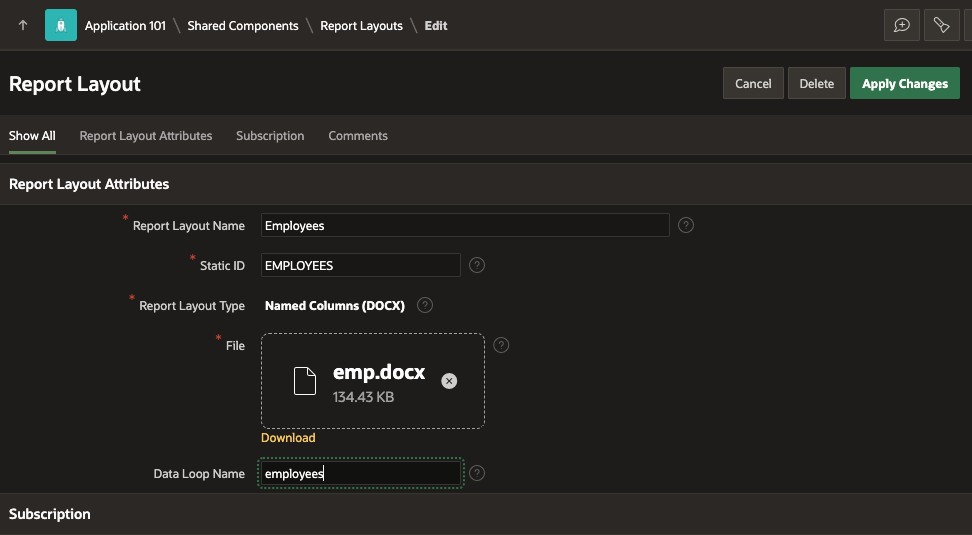
Integrating dynamic data into reports often involves using a template document (in .docx Format) when working with APEX applications. Let us assume that we have a template document named emp.docx, which our Document Generator Service utilizes to create PDFs. Before employing this template in our APEX application, whether in Classic Reports, Interactive Reports, or through a Button click, we must first upload/add it to the Report Layout.

For instance, consider a template like the one shown in the image above. This template includes a header with static text and an array named ‘Employees’ that loops over employee data, with several substitution names available. To ensure seamless integration with a Classic Report or an Interactive Report, ensure the loop attribute in your Report Layout and the Data Loop Name match the one in your Template Document (employees).
Follow the detailed steps outlined in this Document to create a new Report Layout. After creating the Report Layout, make sure to edit it and add the Data Loop Name, especially if your template includes looping.
Create and Configure Report Query
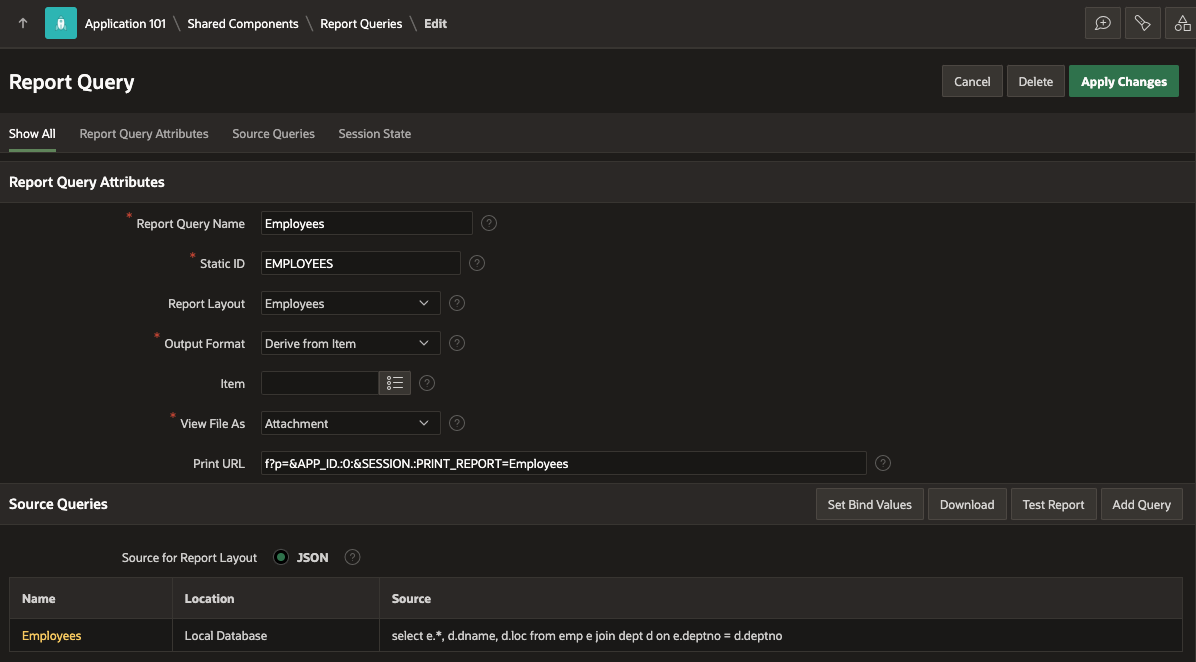
In Oracle APEX, a report query is a SQL query used to fetch and display data in a report. With APEX 24.1, we have enhanced the functionality of using the data source while creating a Report Query. The Data Source can now be a table, a SQL query, or a REST Data Source. The report query specifies the columns, data source, and any conditions or sorting. Report query can also include bind variables to retrieve values from the session, allowing for dynamic and context-sensitive data retrieval.
You then integrate these reports with an application using the Declarative Page Process and Dynamic Actions to make them available to users.
Follow the detailed steps outlined in this Document to create a new Report Query.
There are multiple ways to integrate the Document Generator Function with an APEX application.
Configuring the Report Layout on a Classic Report
This section will walk you through utilizing the “Employees” Report Layout we created earlier to generate custom PDFs for a Classic Report. We have used the below query to create a classic report.
select e.empno,
       e.ename,
       e.job,
       (select ename from emp m where m.empno = e.mgr) mgr,
       e.hiredate,
       e.sal,
       e.comm,
       d.dname,
       d.loc
  from emp e
  join dept d
    on e.deptno = d.deptno
First, please make sure that the Printing option is enabled in your Classic Report region. To do this, go to the Attributes tab of your Classic Report and confirm that Printing is Enabled. Next, navigate to the Printing tab, make sure that Format is set as PDF, and then from the list of available layouts under the Output section, select the “Employees” layout.
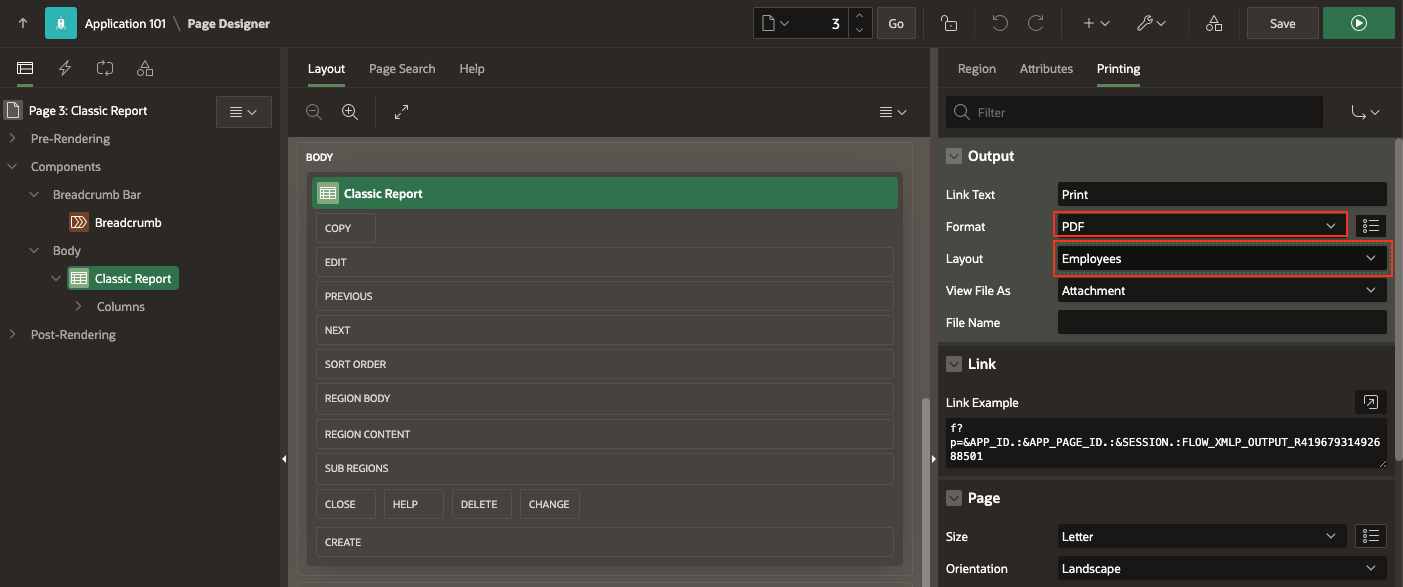
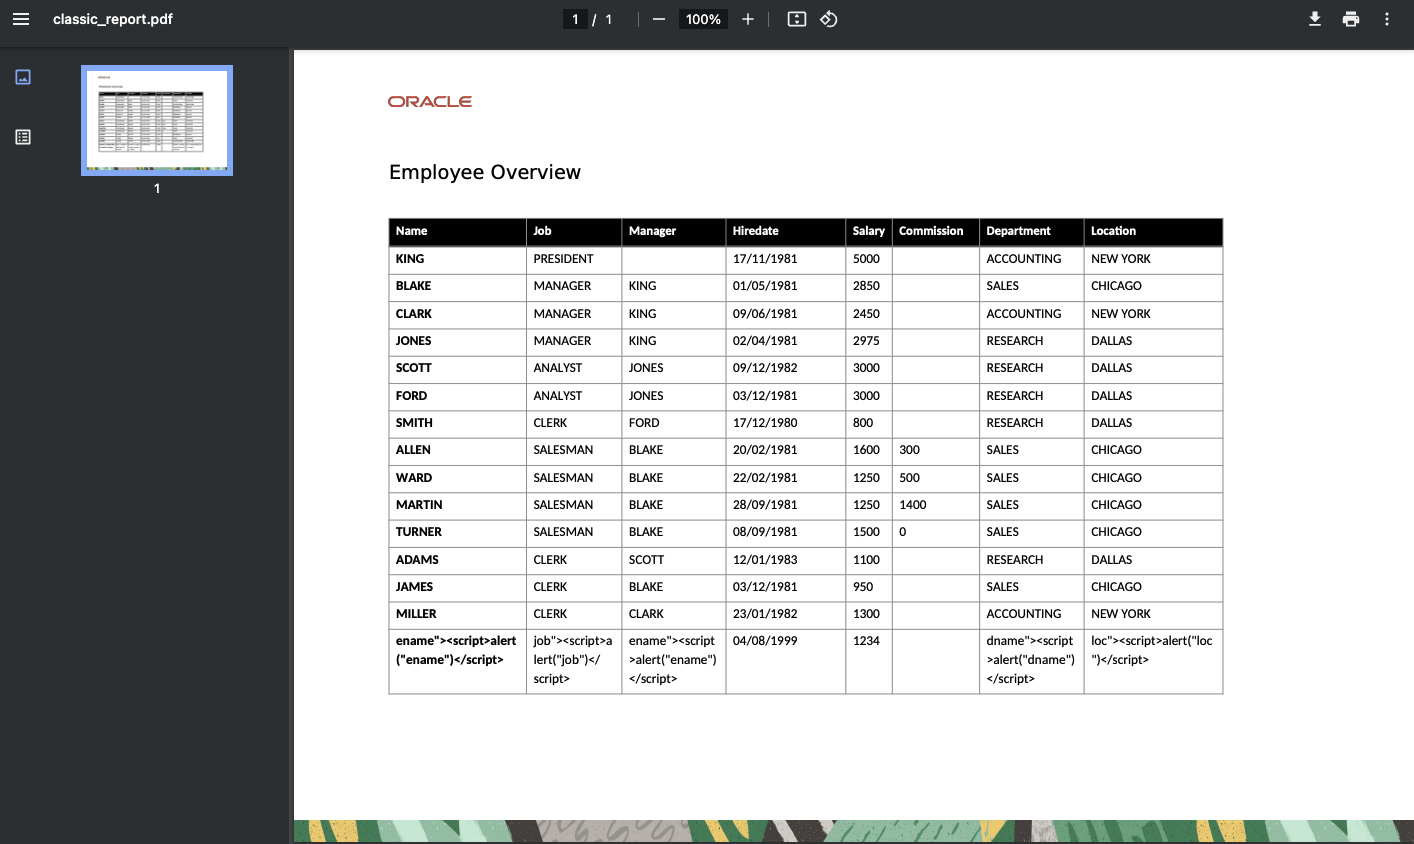
As an end user, once you click Print in your Classic Report, the application automatically invokes the Document Generator Prebuilt Function to download the PDF. This seamless integration lets you quickly generate and download custom PDFs using the predefined “Employees” Report Layout.
In the same way, you can follow similar steps for configuring Report Layouts to print Custom PDFs in Interactive Reports.
New Declarative Page Process
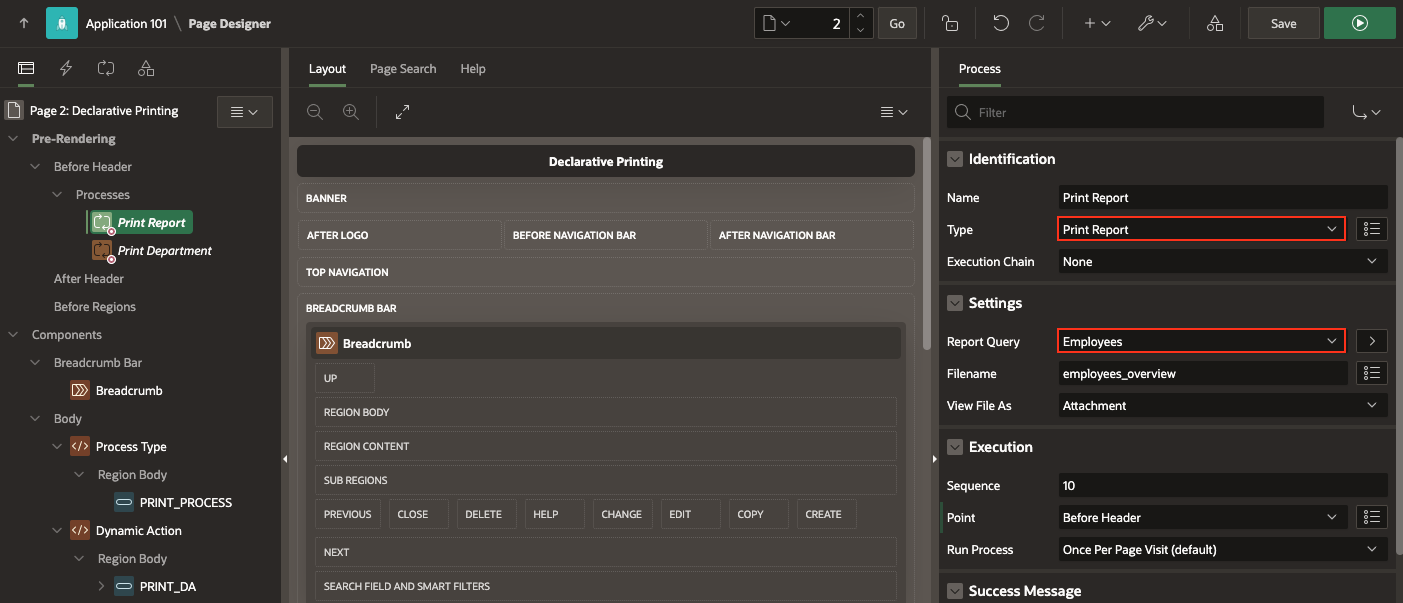
Oracle APEX 24.1 introduces a new Page Process Type called Print Report. This feature simplifies printing a Report Query.
The Print Report process can be utilized in the ‘Before Header’ position during Page Rendering or in Page Processing when the page-level attribute Reload on Submit is set to Always.
Creating this process is as straightforward as creating any other process.
How to Create a Print Report Process
- Navigate to the Pre-Rendering Section of your Page:
- In the left pane, go to the pre-rendering section.
- Right-click on Before Header and select Create Process.
- Configure the Process in the Property Editor:
- Under the Identification section, choose the type as Print Report.
- In the Settings section:
- Select the desired Report Query from the list of available values.
- Customize the Filename and set the View File As option according to your requirements.
New Dynamic Action
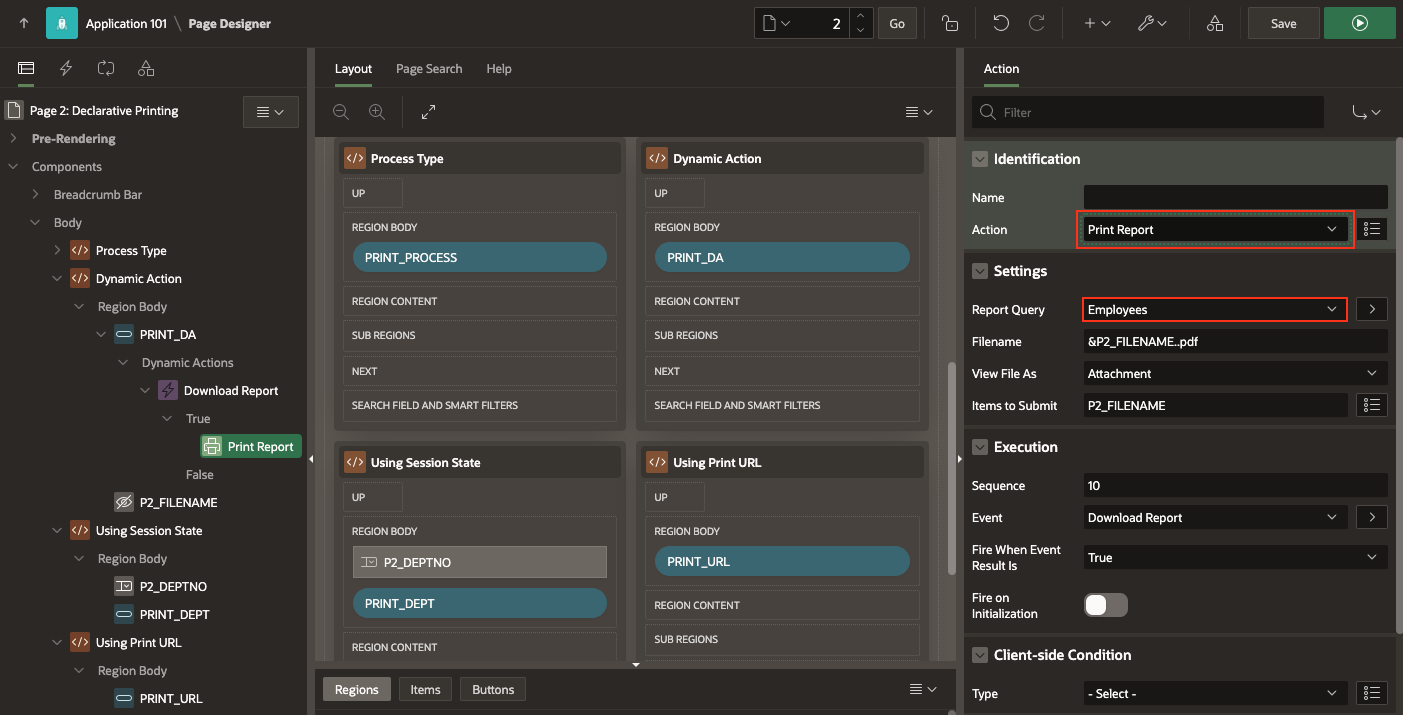
Oracle APEX 24.1 introduces yet another exciting new feature: the ability to print Report Queries using Dynamic Actions. This enhancement includes the New Dynamic Action Print Report, which allows you to download PDFs asynchronously.
How to Implement Print Report Action on a Button Click?
Let’s use an example to demonstrate how to use this feature. Imagine you have a button on your APEX page and want to download a PDF report when this button is clicked.
Here’s how you can achieve that:
- In the rendering tree, right-click on the button you want to use and select Create Dynamic Action. Right-click on the True Action and click Create TRUE Action.
- Under the Identification section, choose the Action as Print Report.
- In the Settings section:
- Select the desired Report Query from the list of available values.
- Customize the Filename and set the View File As option according to your requirements.
New PL/SQL APIs: APEX_PRINT and APEX_HTTP
APEX 24.1 also provides two new robust PL/SQL APIs, APEX_PRINT and APEX_HTTP. These Public APIs let you print reports using custom templates and data.
If you need a custom template that is not stored in the report layout or want to use custom data for printing, APEX_PRINT has got you covered. Let’s walk through a quick example.
APEX_HTTP: The APEX_HTTP package offers APIs for downloading files directly to the client. It supports downloading BLOB and CLOB data.
Note: These APEX_HTTP APIs will clear any previous output in the HTP buffer and call APEX_APPLICATION.STOP_APEX_ENGINE after the file is downloaded.
APEX_PRINT: The APEX_PRINT package is designed to work with remote print servers to generate documents based on templates and data.
Key functionalities of APEX_PRINT include:
- UPLOAD_TEMPLATE: Uploads a template to Oracle Cloud Infrastructure (OCI) Object Storage and returns its ID. This function is only usable when the Oracle Document Generator Pre-built Function is configured as the print server in the instance.
- GENERATE_DOCUMENT: This function generates a document from provided data and a template, returning it as a BLOB. It is essential for creating single documents with custom templates and relies on the same print server configuration as UPLOAD_TEMPLATE.
GENERATE_DOCUMENT offers multiple function signatures to accommodate various needs, whether generating a document from data and a template or generating a document as a BLOB using a predefined report query. - REMOVE_TEMPLATE: Deletes a template from OCI Object Storage.
Check out a sample PL/SQL code that accepts the Template from a File Browse item in the APEX application and generates the PDF using the PL/SQL APIs.
PL/SQL Code:
declare
    l_file      apex_application_temp_files%rowtype;
    l_id        number;
    l_pdf       blob;
    l_data      sys.json_object_t := sys.json_object_t();
begin

    select *
      into l_file
      from apex_application_temp_files
     where name = :P4_TEMPLATE;

    l_id := apex_print.upload_template(
                p_template => l_file.blob_content );

    l_data.put( 'name', 'Scott' );

    l_pdf :=
        apex_print.generate_document(
            p_data          => l_data.to_clob,
            p_template_id   => l_id );

    apex_print.remove_template( p_template_id => l_id );

    apex_http.download(
        p_blob          => l_pdf,
        p_content_type  => 'application/pdf',
        p_filename      => 'hello.pdf' );

    apex_application.stop_apex_engine;
end;
Learning Resources
Stay tuned for the Sample Application
Conclusion
Integrating Oracle APEX with OCI Document Generator Function provides a powerful solution for dynamic PDF generation. This integration not only enhances the capabilities of your APEX applications but also leverages the scalability, reliability, and cost-effectiveness of OCI Functions. Following the steps outlined in this blog post, you can create a streamlined, efficient process for generating PDFs that meet your business needs.
Start integrating Oracle APEX with OCI Document Generator Function today and experience the benefits of seamless, dynamic PDF generation!