Introduction:
In the digital transformation era, businesses constantly seek innovative solutions to enhance their processes and maximize efficiency. Oracle APEX and Oracle Cloud Infrastructure (OCI) Document Understanding have emerged as powerful tools to streamline data extraction and processing. In this blog post, we will explore the integration of Oracle APEX with OCI Document Understanding, highlighting the benefits and steps to incorporate these technologies seamlessly into your workflow.
Understanding OCI Document Understanding
OCI Document Understanding is an AI service that enables developers to extract text, tables, and other key data from document files through APIs and command-line interface tools. With OCI Document Understanding, you can automate tedious business processing tasks with prebuilt AI models and customize document extraction to fit your industry-specific needs.
Integrating Oracle APEX with OCI Document Understanding:
Oracle APEX is the world’s most popular enterprise low-code application platform that enables you to build scalable, secure web and mobile apps with world-class features that can be deployed anywhere – cloud or on-premises. By integrating Oracle APEX with OCI Document Understanding, organizations can create robust applications that automate document processing and leverage the power of machine learning for intelligent data extraction.
Before diving into the integration process of OCI Document Understanding with Oracle APEX, let’s explore how Document Understanding can enhance the Expense Reimbursement Application experience. Within this user-friendly app built with the Oracle APEX low-code platform, users effortlessly upload invoices by selecting the “Select an Invoice or Receipt” option. OCI Document Understanding then extracts form fields from the uploaded image or PDF file. With this functionality, users can streamline their expense management process with ease.
Once your document is processed, you will easily transition to a user-friendly page featuring the Cards Region, which displays critical information in an organized manner. Clicking on a card brings up a Pop-up Dialog page where you will find a clear comparison between your uploaded PDF and the output from OCI Document Understanding.

You can download the demo app here: Automatic_Invoice_HandlingDemo.sql
Prerequisites for Building this App
- An Oracle Cloud Infrastructure account.
- An OCI compartment. You can use the pre-configured tenancy root compartment or create your own.
- The logged-in user should have the necessary privileges to create and manage Autonomous Database instances in this compartment. You can configure these privileges via an OCI IAM Policy
Steps for Integration
- Adding API Keys in OCI Console
- Creating Web Credentials in Oracle APEX
- Create REST Data Source in your APEX App based on OCI Document Understanding REST APIs
- Uploading Invoice to OCI Object Storage using Invoke API
- Configuring the Automatic Row Processing to Insert a New Record into the Table
- Invoke the REST Data Source through a page process
- Parse the response and store the information in the database
Adding API Keys in OCI Console
In Oracle Cloud Infrastructure (OCI), API keys are used for secure authentication when accessing OCI resources through the API. OCI API keys consist of two parts: a public key and a private key.
You can use the Console to generate the private/public key pair. If you already have a key pair, you can upload the public key. When you use the Console to add the key pair, the Console also generates a configuration file preview snippet for you.
The configuration file preview snippet is generated with the following information:
- user – the OCID of the user for whom the key pair is being added.
- fingerprint – the fingerprint of the key that was just added.
- tenancy – your tenancy’s OCID.
- region – the currently selected region in the Console.
- key_file – the path to your downloaded private key file. You must update this value to the path on your file system where you saved the private key file.
Click here to learn how To generate an API signing key pair.
Creating Web Credentials in Oracle APEX
To integrate OCI Document Understanding with APEX, we create Web Credentials in APEX. Web Credentials securely store and encrypt authentication credentials for connecting to external REST services or REST-enabled SQL services.
These credentials are stored at the workspace level, making them accessible to all applications. We will use these credentials to interact with OCI Document Understanding APIs.
Learn how to Create Web Credentials by clicking here.
Understanding the OCI Document Understanding REST API
Oracle Cloud Infrastructure Document Understanding is an AI service that enables developers to extract text, tables, and other key data from document files through APIs and command-line interface tools. With OCI Document Understanding, you can automate tedious business processing tasks with prebuilt AI models and customize document extraction to fit your industry-specific needs.
The Oracle Cloud Infrastructure APIs are typical REST APIs that use HTTPS requests and responses. You can read more about it in the OCI Documentation
To perform DOCUMENT_CLASSIFICATION, you must prepare the API Endpoint with appropriate Oracle Cloud Infrastructure APIs. In this blog post, we use OCI hosted in the Ashburn region, and the API endpoint will be:
https://document.aiservice.us-ashburn-1.oci.oraclecloud.com/20221109/actions/analyzeDocument
Check out the documentation for more details on how to prepare API Endpoints for various OCI Services.
To perform different types of document analysis, we must send the Request Parameters in the JSON format as shown below.
{
  "compartmentId": "your Compartment OCID",
  "document": {
    "namespaceName": "your Object Storage Namespace",
    "bucketName": "your Bucket Name",
    "objectName": "your File Name",
    "source": "OBJECT_STORAGE"
  },
  "features": [
    {
      "featureType": "KEY_VALUE_EXTRACTION"
    }
  ]
}
WhereCompartmentId is the OCID for your compartment, the Features section tells the system what kind of document analysis you want to do. For instance, KEY_VALUE_EXTRACTION can be used to identify values for predefined keys in an invoice. For example, if an invoice includes a vendor name, total, and invoice ID, Document Understanding can identify these values and return them as a key-value pair. And DOCUMENT_CLASSIFICATION helps classify documents into different categories.
Configuring the OCI Document Understanding REST API as REST Data Source
In the previous steps, we understood how the OCI Document Understanding REST API works. Now, We can proceed to create a REST Data Source in Oracle APEX that connects to the OCI Document Understanding API endpoint.
The REST Data Source will be set up with the following parameters:
Rest Data Source Type: Oracle Cloud Infrastructure (OCI)
URL Endpoint: https://document.aiservice.us-ashburn-1.oci.oraclecloud.com/20221109/actions/analyzeDocument
Authentication: We use the web credentials created above.
The request to the OCI Document Understanding service analyzeDocument is an HTTP POST request. So, update the POST operation with the below settings:
{
  "compartmentId": "#COMPARTMENT_ID#",
  "document": {
    "namespaceName": "#NAMESPACE_NAME#",
    "bucketName": "#BUCKET_NAME#",
    "objectName": "#OBJECT_NAME#",
    "source": "OBJECT_STORAGE"
  },
  "features": [
    {
      "featureType": "#FEATURE_TYPE#"
    }
  ]
}
- Compose the Request Body Template with appropriate substitution Tags.
- For the Operation parameters, use the Synchronize with Body button to get all the substitutions defined in the Request Body Template as parameters.
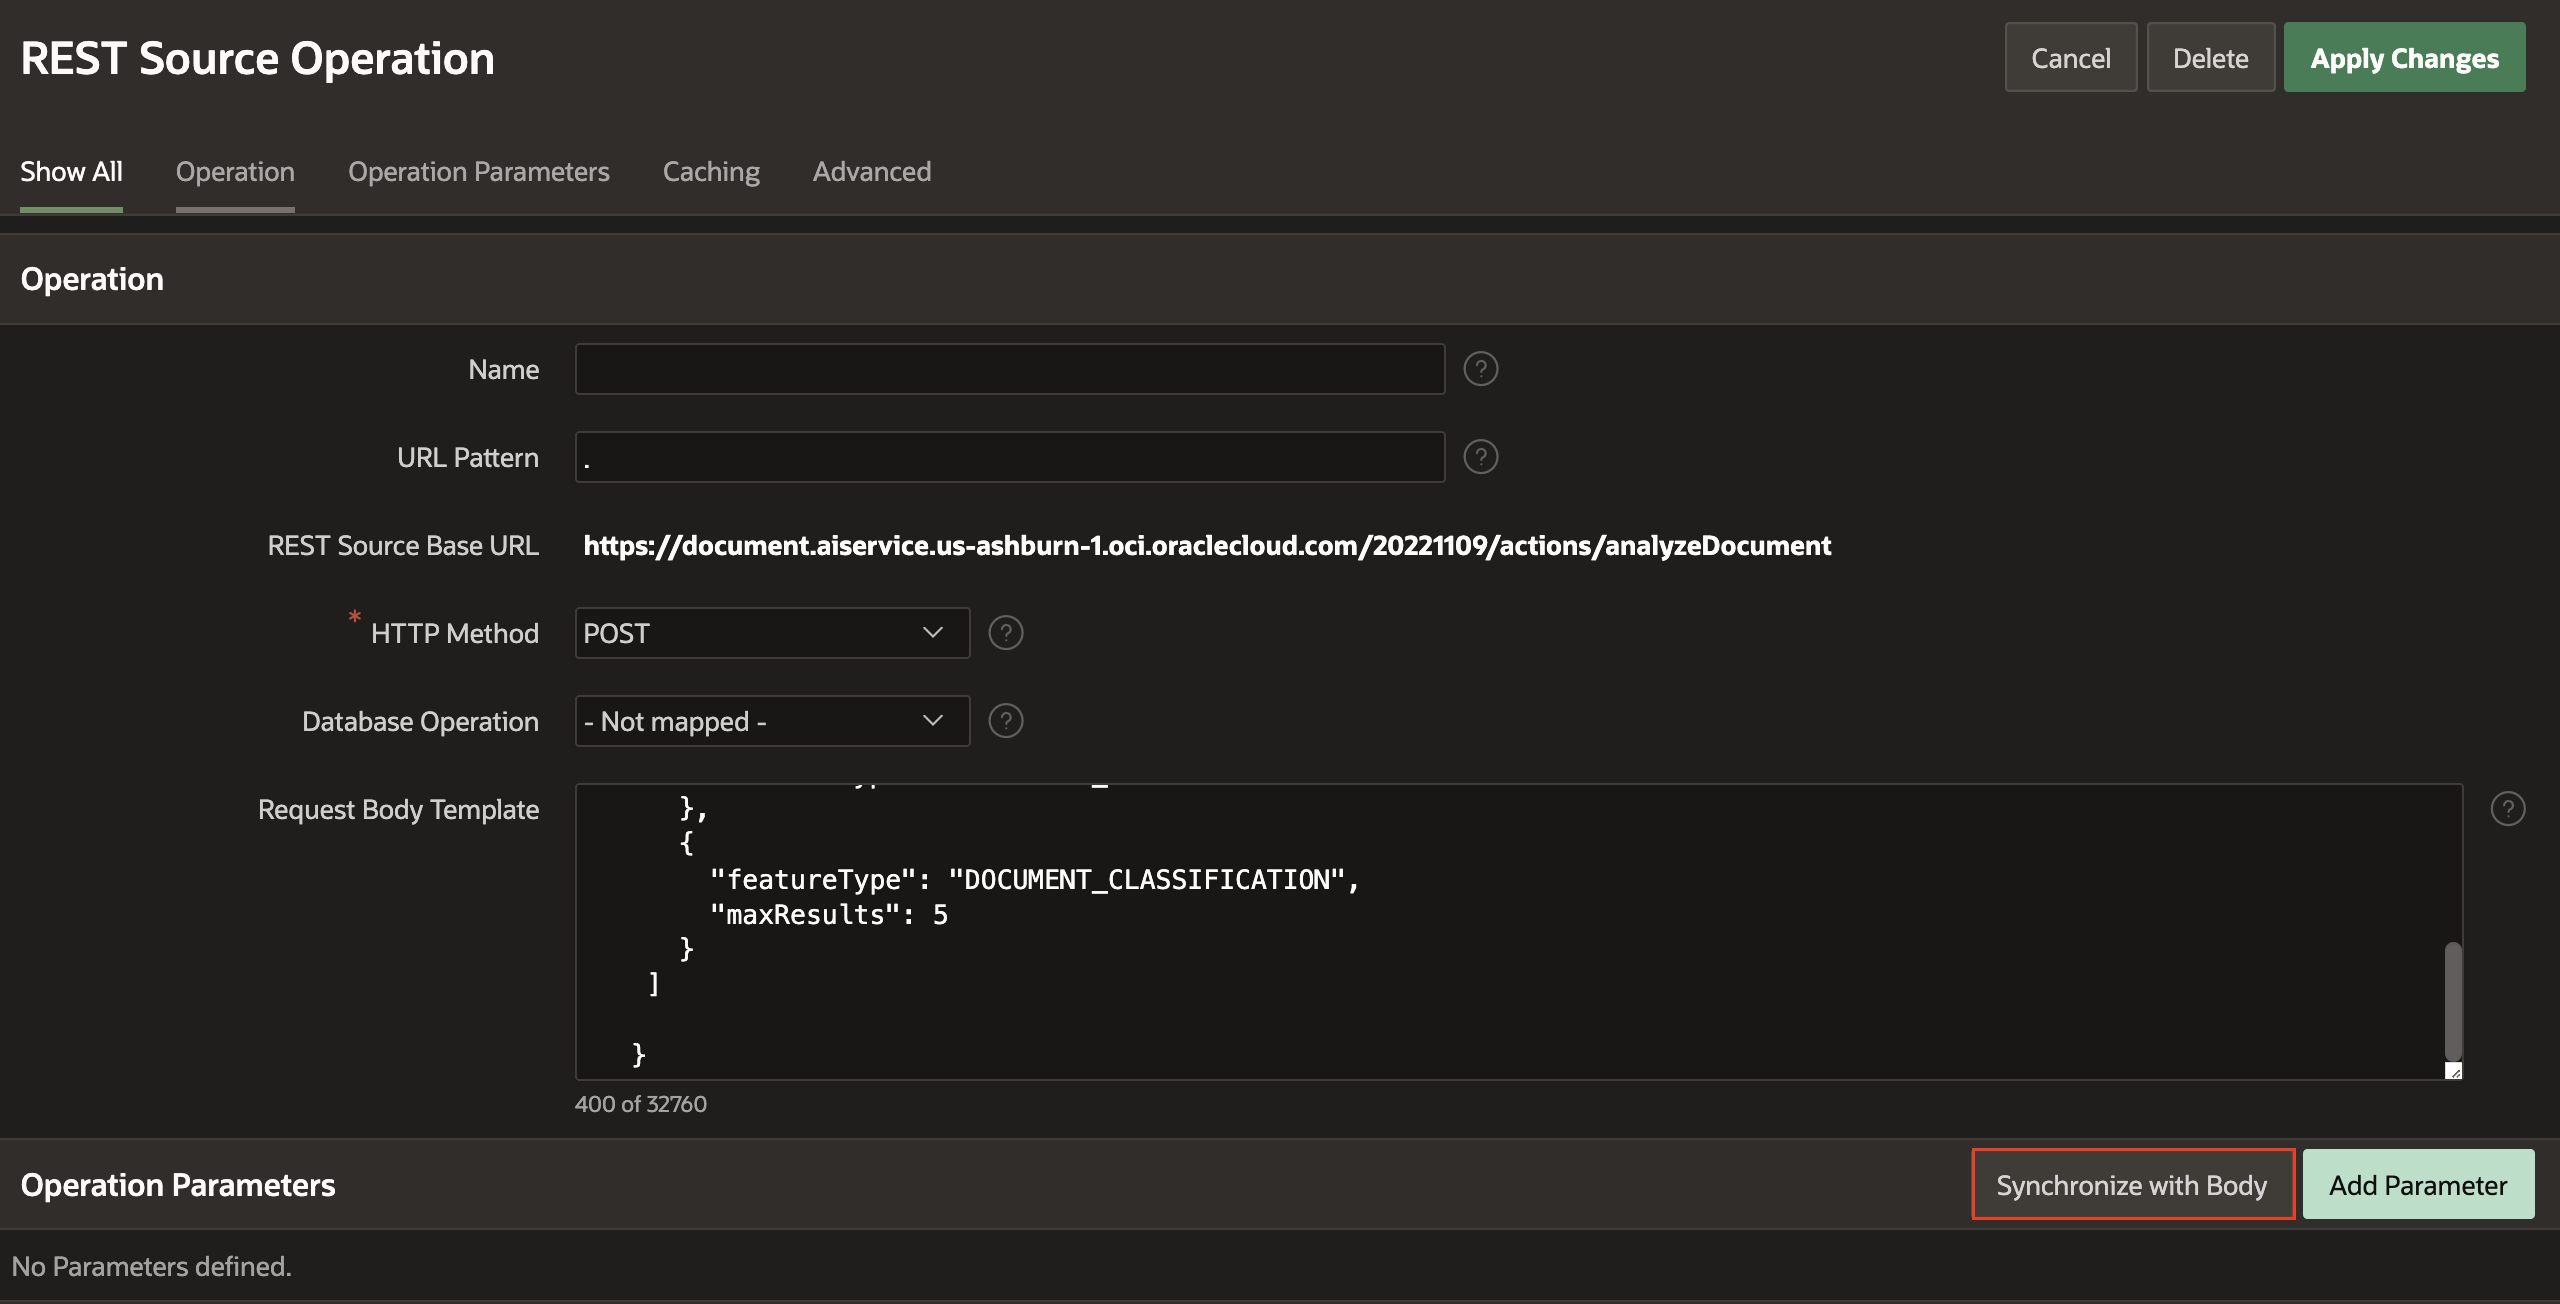
- Additionally, Create two Operation parameters:
- RESPONSE (Response Body) – to hold the JSON response from the POST request
- Content-Type (HTTP header) – It can be a static value defaulted to application/json
With the REST Data Source successfully configured, it’s time to invoke it from the page process when an invoice is uploaded.
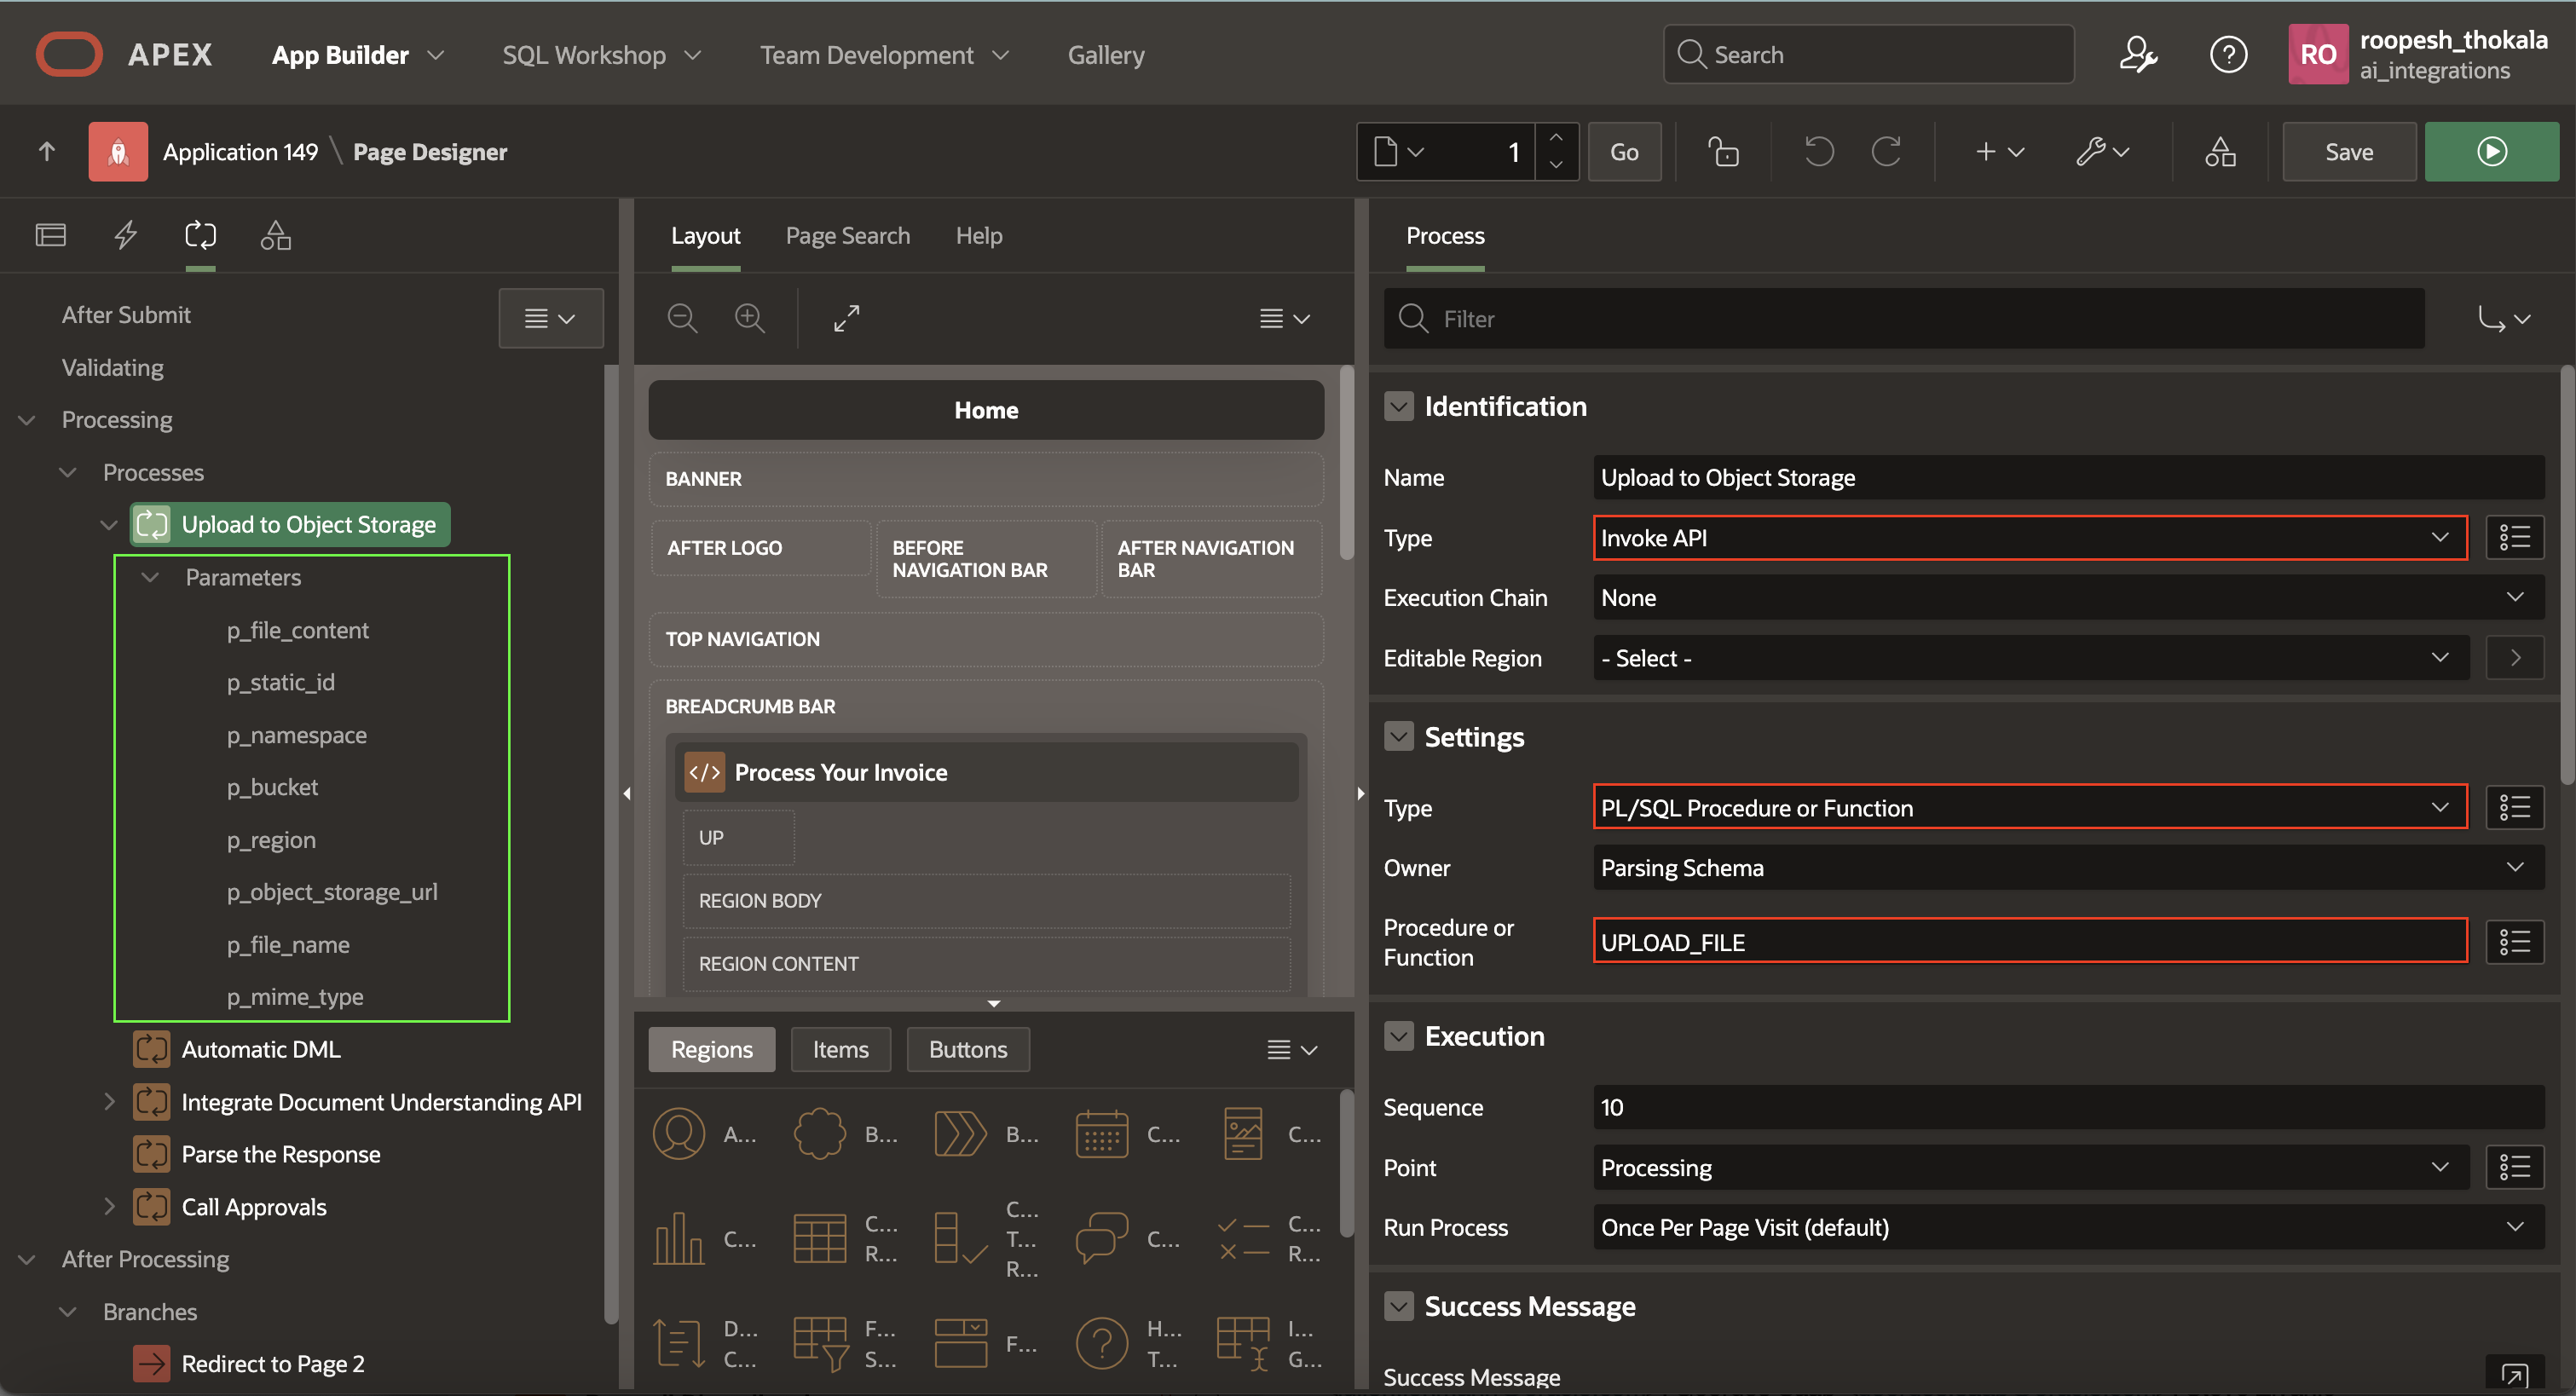
Uploading Invoice to OCI Object Storage using Invoke API
Before integrating APEX with OCI Document Understanding, you will need to upload the invoice to OCI Object Storage. There are multiple methods for sending files to OCI Object Storage. Below, I briefly describe two of the most effective methods.
If you are using APEX on an Autonomous Database, You can utilize the Procedure PUT_OBJECT available in the DBMS_CLOUD package. This procedure is overloaded. The procedure copies files from Oracle Database or APEX to the Cloud Object Storage in one form.
The other option, which works regardless of where your APEX instance is hosted, is to use REST APIs provided by OCI. We must create a page process to upload the file to the Object Storage.
Under the Processing tab, create a Process to invoke the PL/SQL Procedure using the Invoke API Process Type.
- Process Type: Invoke API
- Settings > Type: PL/SQL Procedure or Function
- Procedure or Function: Select UPLOAD_FILE
- The UPLOAD_FILE Procedure possesses a single input parameter and three output parameters. Please select the parameter and assign suitable Page Items from your form. For more details, refer to the PL/SQL Procedure code below.
CREATE OR REPLACE PROCEDURE UPLOAD_FILE (
    P_FILE_CONTENT       IN VARCHAR2,
    P_STATIC_ID          IN VARCHAR2,
    P_NAMESPACE          IN VARCHAR2,
    P_BUCKET             IN VARCHAR2,
    P_REGION             IN VARCHAR2,
    P_OBJECT_STORAGE_URL OUT VARCHAR2,
    P_FILE_NAME          OUT VARCHAR2,
    P_MIME_TYPE          OUT VARCHAR2
) IS
    L_OBJECT   BLOB;
    L_RESPONSE CLOB;
BEGIN
    SELECT
        BLOB_CONTENT,
        FILENAME,
        MIME_TYPE
    INTO
        L_OBJECT,
        P_FILE_NAME,
        P_MIME_TYPE
    FROM
        APEX_APPLICATION_TEMP_FILES
    WHERE
        NAME = P_FILE_CONTENT;

    P_OBJECT_STORAGE_URL := 'https://objectstorage.'
                            || P_REGION
                            || '.oraclecloud.com/n/'
                            || P_NAMESPACE
                            || '/b/'
                            || P_BUCKET
                            || '/o/'
                            || APEX_UTIL.URL_ENCODE(P_FILE_NAME);

    APEX_WEB_SERVICE.G_REQUEST_HEADERS(1).NAME := 'Content-Type';
    APEX_WEB_SERVICE.G_REQUEST_HEADERS(1).VALUE := P_MIME_TYPE;
    L_RESPONSE := APEX_WEB_SERVICE.MAKE_REST_REQUEST(P_URL => P_OBJECT_STORAGE_URL, P_HTTP_METHOD => 'PUT', P_BODY_BLOB => L_OBJECT, P_CREDENTIAL_STATIC_ID => P_STATIC_ID
    );

    IF APEX_WEB_SERVICE.G_STATUS_CODE != 200 THEN
        RAISE_APPLICATION_ERROR(-20000, 'Upload failed - ' || APEX_WEB_SERVICE.G_STATUS_CODE);
    END IF;

END UPLOAD_FILE;
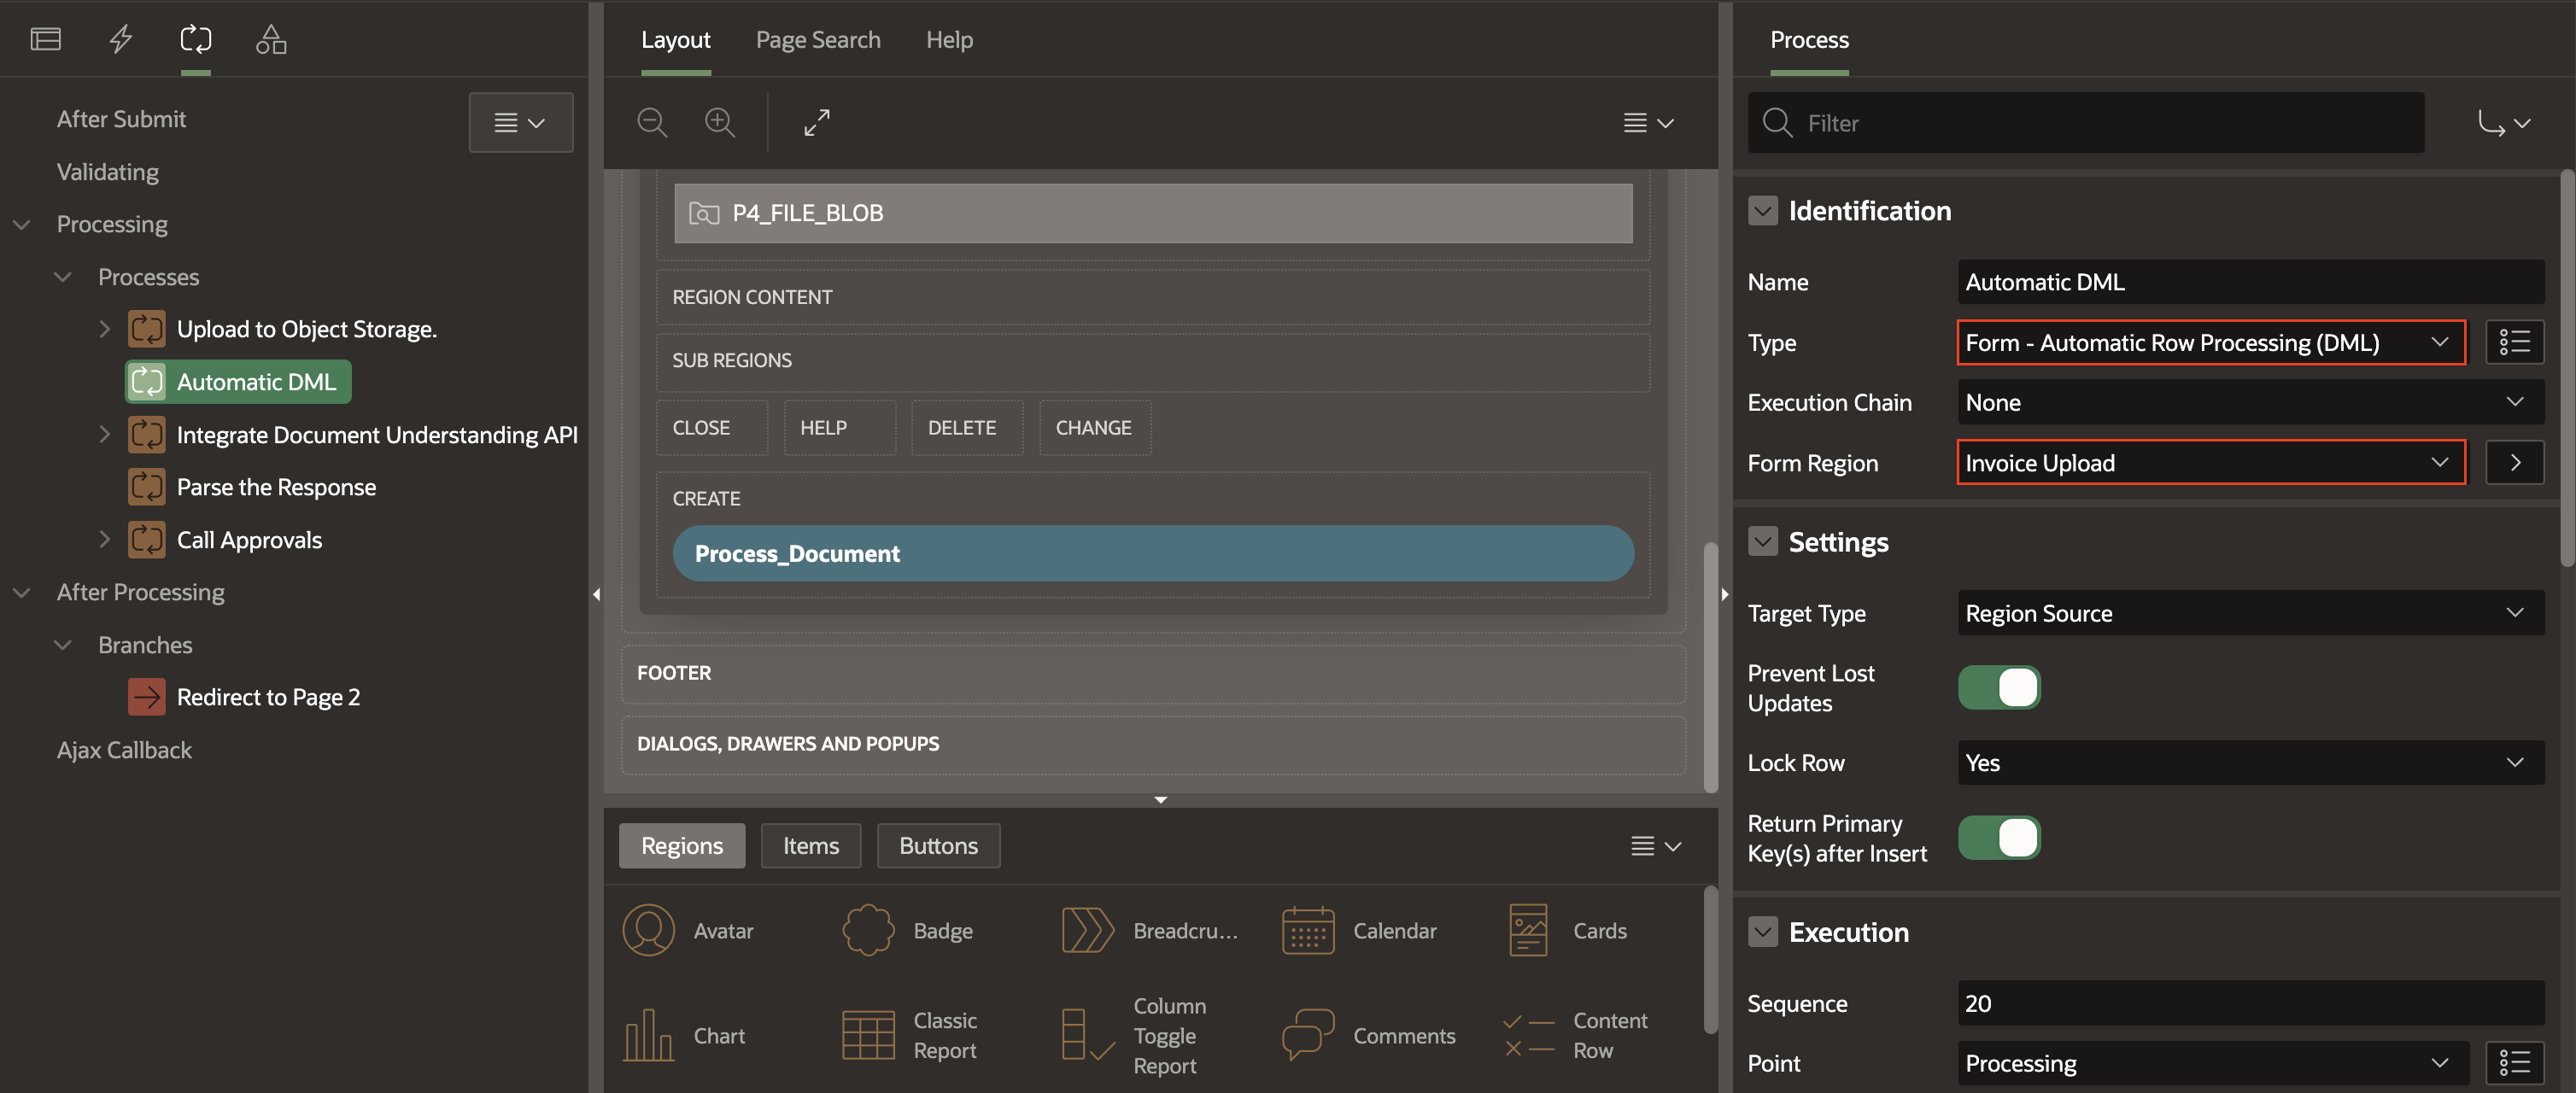
Configuring the Automatic Row Processing to Insert a New Record into the Table
Once the file has been uploaded to the object storage and the relevant values such as filename, mime_type, and object_storage_url have been obtained, the next step is to set up our page with a page process to handle the form
- Under the Processing tab, create a new Page Process below the Invoke API Process we created earlier.
- Process Type: Form – Automatic Row Processing (DML).
- Form Region: Invoice Upload
- Make sure that you have selected Database Action as SQL INSERT action while creating the Process Document button.
Invoke the OCI Document Understanding REST Data Source through a Page Process
With the file securely stored in Object Storage, we will utilize the OCI Document Understanding REST Data Source, which will process the file and provide us with a JSON response containing valuable information. To achieve this, we can use the Invoke API process type. This will enable us to call the OCI Document Understanding service and process the invoice as required.
- Create the second Process called “Invoke REST Data Source” with the following attributes:
- Process Type: Invoke API
- Settings > Type: REST Source
- Rest Source: Document Understanding API (Select the REST Data Source created above).
- Operation: Post. All the Operation parameters defined for this REST Data Source are displayed in the left pane under the process, and the appropriate Items are assigned automatically by default. Select each parameter and validate them. For Response, assign a value as below:
- RESPONSE: The OCI Document Understanding REST, Data Source call will return a JSON response, which can be captured using an OUT parameter. To achieve this, you should turn off the “Ignore Output” attribute. Doing so allows you to store the output into a page Item, for example, P1_RESPONSE, and access the response for further processing.
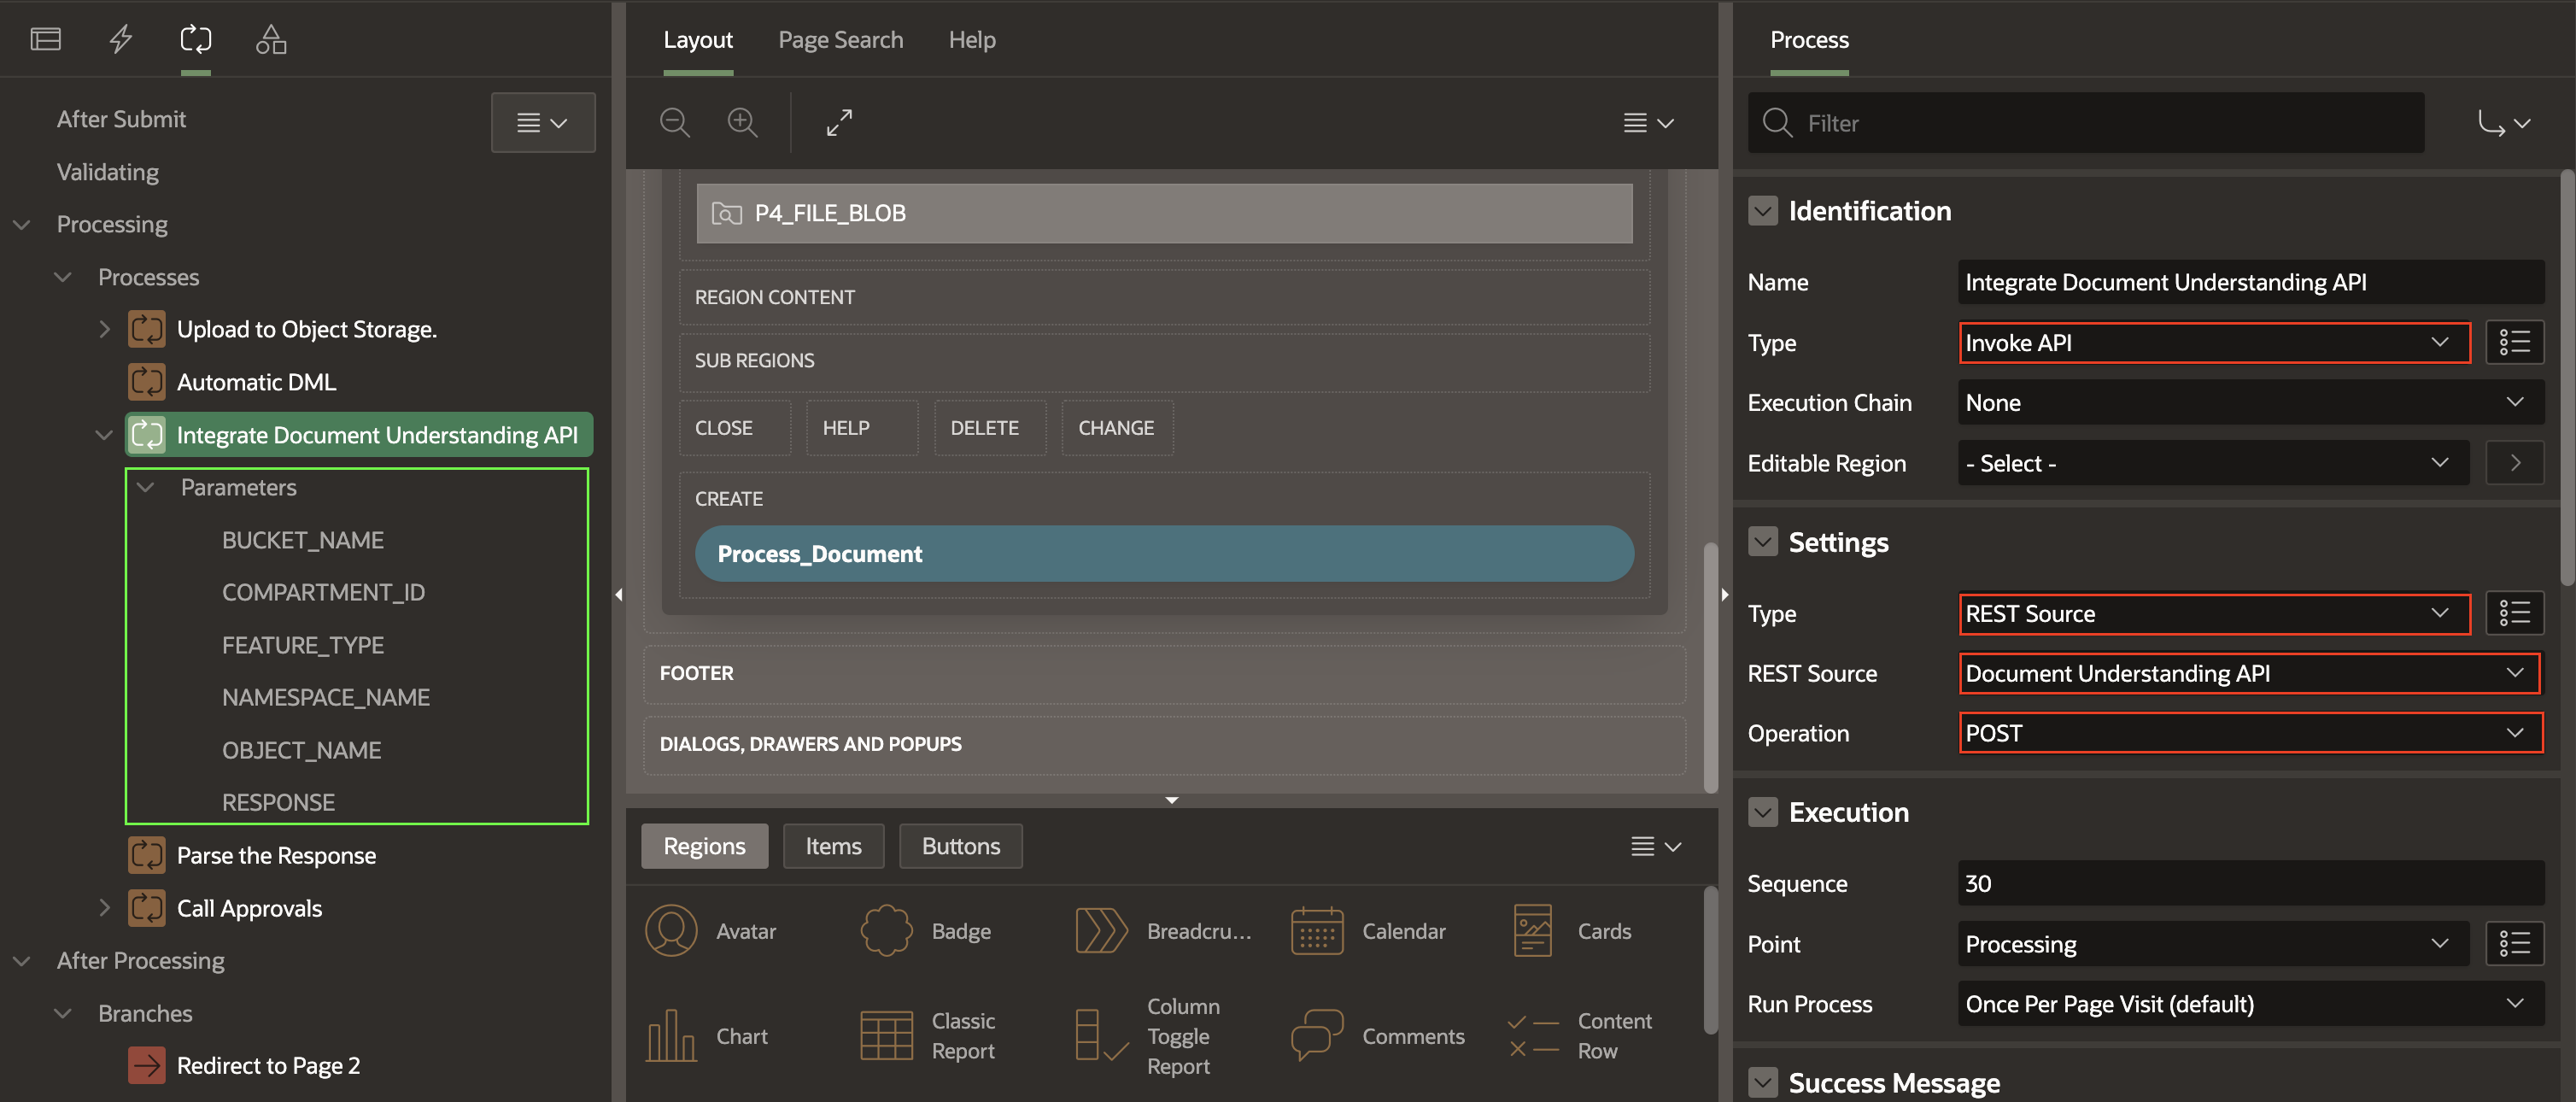
- RESPONSE: The OCI Document Understanding REST, Data Source call will return a JSON response, which can be captured using an OUT parameter. To achieve this, you should turn off the “Ignore Output” attribute. Doing so allows you to store the output into a page Item, for example, P1_RESPONSE, and access the response for further processing.
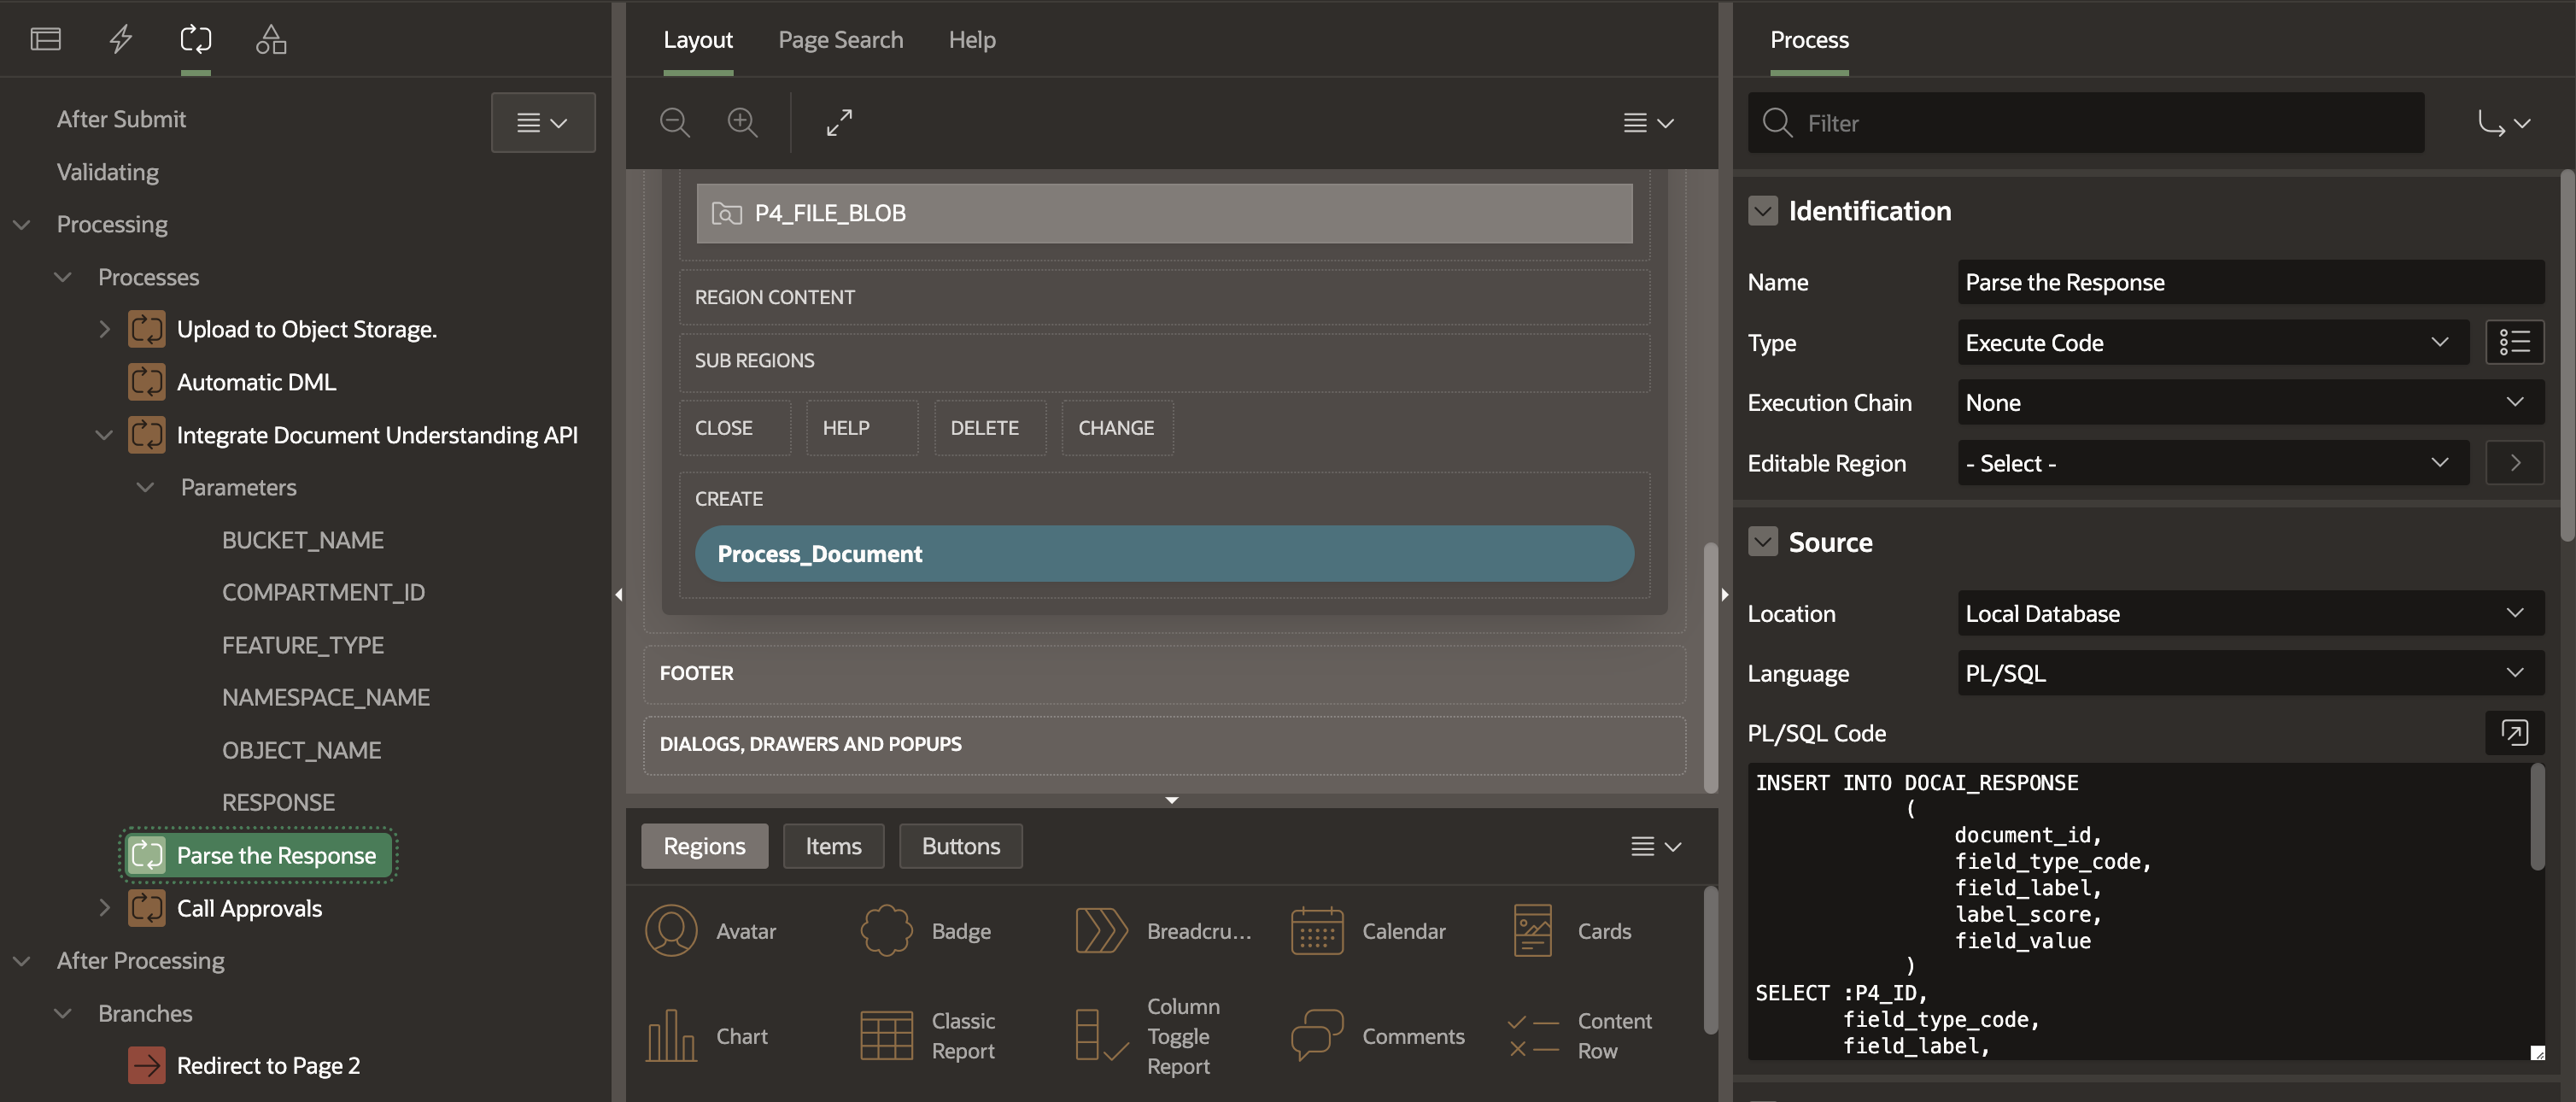
- Create a third process, parse the response, which can now parse the response stored on page Item P1_RESPONSE, and update the database table with the tags returned from the OCI AI Document Understanding Service. The tags thus stored in the DOCAI_RESPONSE can be displayed in a report.
     INSERT INTO DOCAI_RESPONSE (
    DOCUMENT_ID,
    FIELD_TYPE_CODE,
    FIELD_LABEL,
    LABEL_SCORE,
    FIELD_VALUE
)
    SELECT
        :P1_ID,
        FIELD_TYPE_CODE,
        FIELD_LABEL,
        LABEL_SCORE,
        FIELD_VALUE
    FROM
            JSON_TABLE ( :P1_RESPONSE, '$.pages[*]'
                COLUMNS (
                    PAGE_NUMBER NUMBER PATH '$.pageNumber',
                    NESTED PATH '$.documentFields[*]'
                        COLUMNS (
                            FIELD_TYPE_CODE VARCHAR2 ( 50 ) PATH '$.fieldType',
                            FIELD_LABEL VARCHAR2 ( 100 ) PATH '$.fieldLabel.name',
                            LABEL_SCORE NUMBER PATH '$.fieldLabel.confidence',
                            FIELD_VALUE VARCHAR2 ( 1000 ) PATH '$.fieldValue.value'
                        )
                )
            )
        JT
    WHERE
        JT.FIELD_TYPE_CODE = 'KEY_VALUE';
Conclusion
The integration of Oracle APEX with OCI Document Understanding represents a significant leap forward in automating document processing and data extraction. By combining the strengths of a low-code development platform with advanced machine-learning capabilities, organizations can unlock new levels of efficiency, accuracy, and agility in their business processes. Embrace the power of Oracle Cloud Infrastructure and APEX to propel your business into the future of intelligent document understanding and automation.
Useful Resources
- Learn more about AI Infrastructure, AI-powered apps, and customers using AI with Oracle APEX on the APEX + AI = Awesome! Web Page.
- Read detailed blog posts on AI integrations with Oracle APEX – Embracing the Future: Unleashing AI’s Power with Oracle APEX