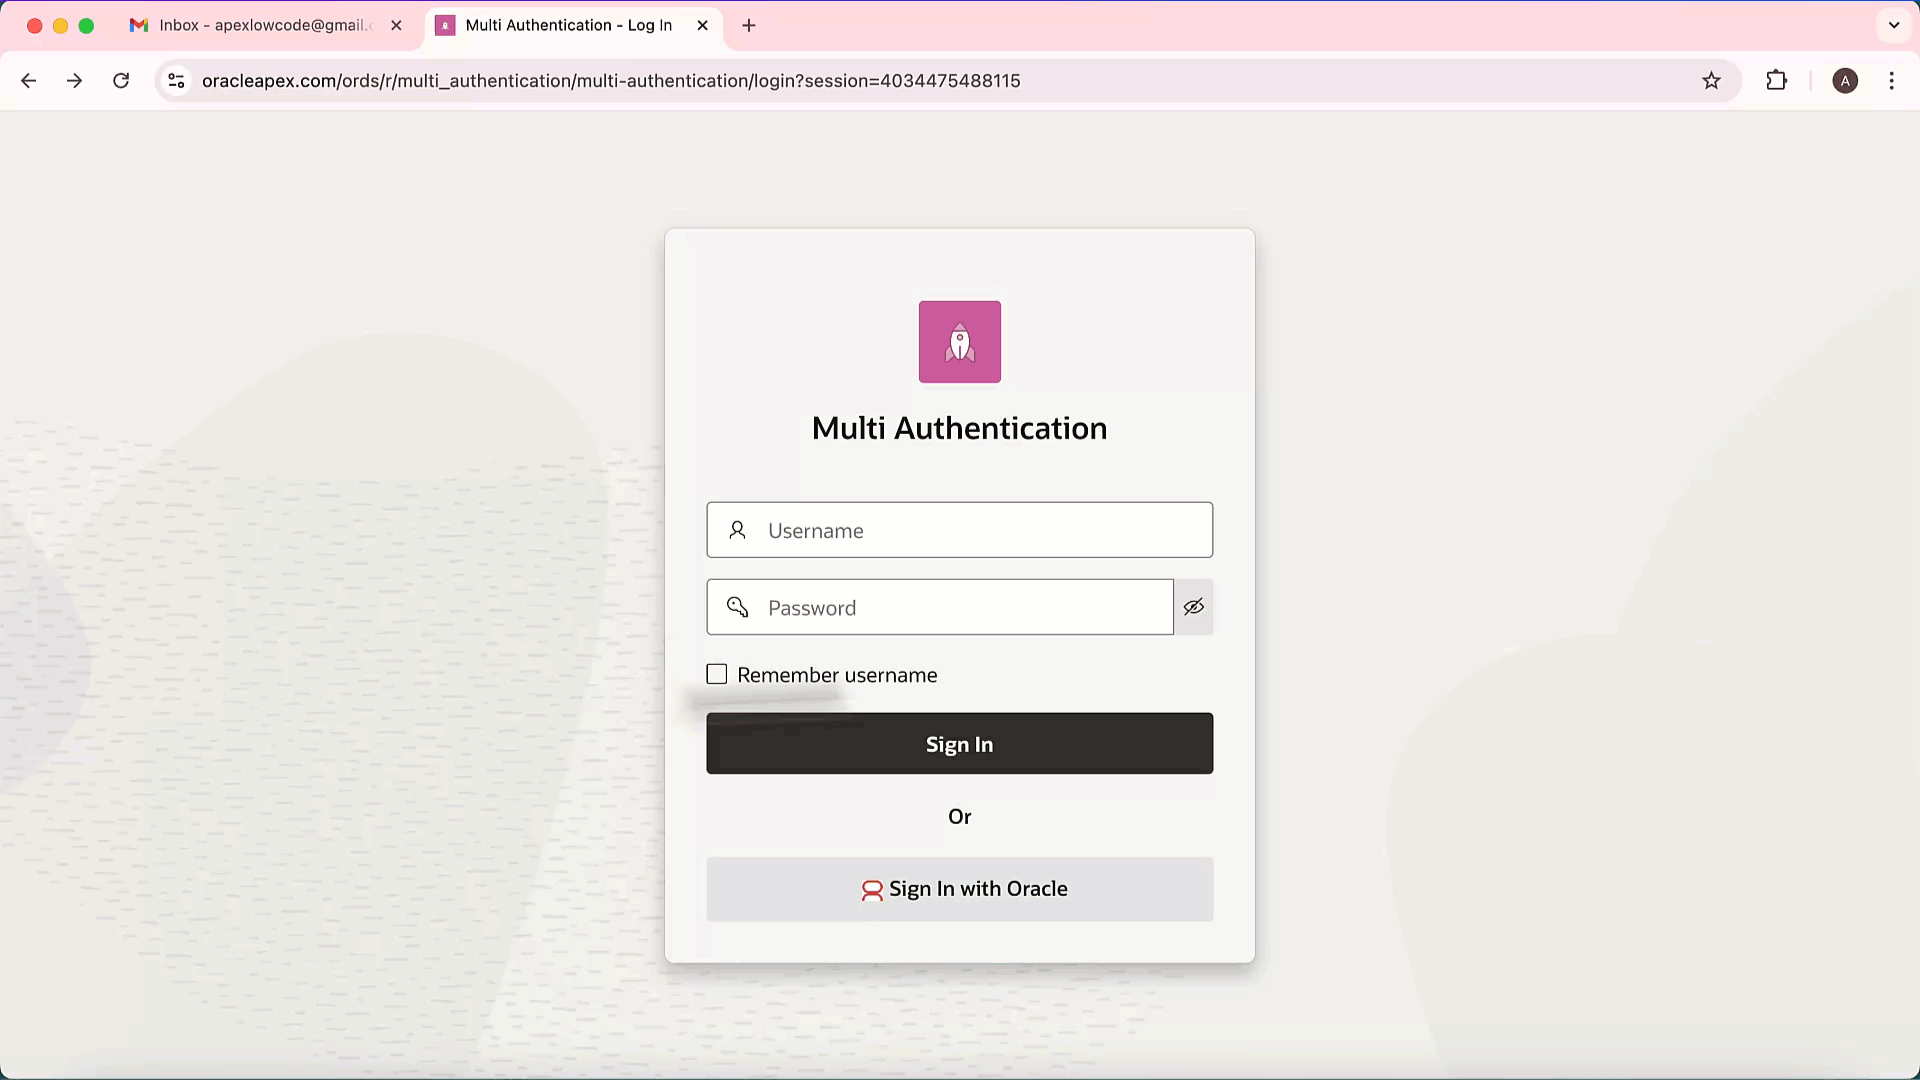
You determine how your application interacts with users. If all users have the same rights and privileges, they are referred to as public users. However, if your application must track each user individually, you must specify an authentication method.
Authentication establishes the identity of each user who accesses your application. Many authentication processes require that a user provide some type of credentials such as a user name and password. These credentials are then evaluated and they either pass or fail. If the credentials pass, the user has access to the application. Otherwise, access is denied.
Oracle APEX, the world’s most popular enterprise AI application platform, makes it easy to implement authentication right out of the box. It offers multiple authentication methods to suit different application needs. You can use built-in schemes like APEX accounts, database accounts, LDAP, SAML, or social sign-in through providers such as Google, Facebook, and Oracle IAM. For simple use cases, options like HTTP header, open door, or no authentication exist, while custom authentication lets you build your own logic for complete control over security. This flexibility means developers can choose the most suitable authentication strategy for their application’s needs.
In this blog, we’ll explore how to set up multi-authentication in Oracle APEX by combining two powerful methods: Social Sign-In with Oracle IAM (Passwordless + MFA), and a Custom authentication scheme backed by a local users table. By the end, you’ll see how both approaches can coexist within the same application, giving users the freedom to log in securely using the method that suits them best.
Why Multi-Authentication?
In real-world applications, not all users are alike. Some are internal employees with access to enterprise-grade IAM systems like Oracle IAM, while others might be external partners, contractors, or admins who don’t have IAM access.
For example:
- A sales rep logs in using their company’s Oracle IAM credentials with passwordless Multi-Factor Authentication (MFA).
- An admin or test user signs in using a secure, in-app custom username/password form.
Instead of building separate apps or compromising on security, multi-authentication lets you serve both securely under one roof.
To accommodate these, we will implement two separate authentication schemes in Oracle APEX and allow users to choose their login method on the login page.
Prerequisites
Before starting, ensure you have:
- An Oracle Cloud account with Oracle Identity and Access Management (IAM) enabled.
- An Oracle APEX workspace and application.
Create Passwordless Login using Oracle IAM + MFA
Start by configuring passwordless login using Oracle Identity and Access Management (IAM). This allows users to enter their email or username and verify themselves using a second factor, like a code sent to their mobile app – no password needed.
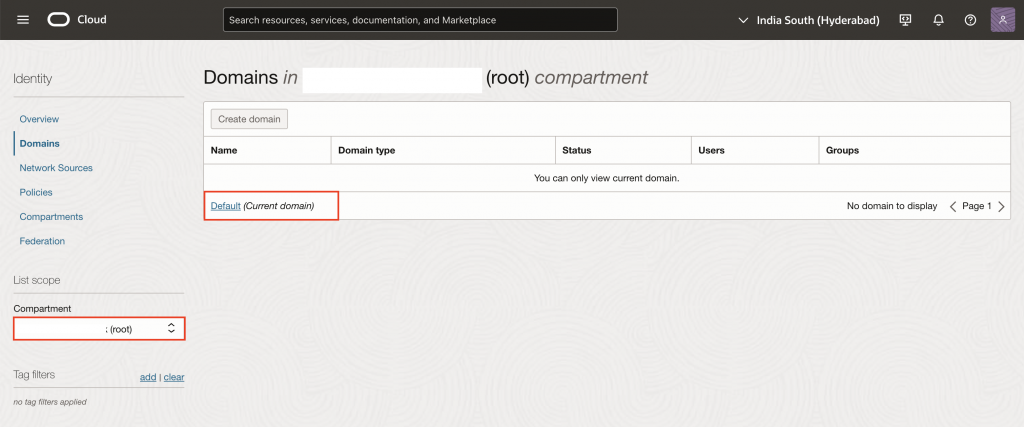
1. Log in to your Oracle Cloud Console, click on the hamburger menu on the top left corner of the screen and access Identity and Security → Domains and select the Default domain from the list shown.
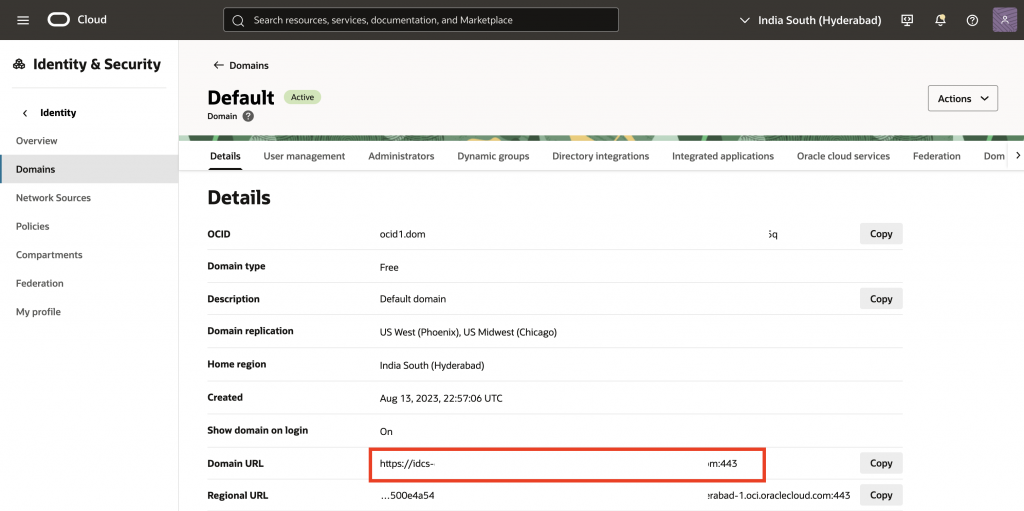
2. Copy the Domain URL – you will need it later to configure the Authentication Scheme in your APEX application.
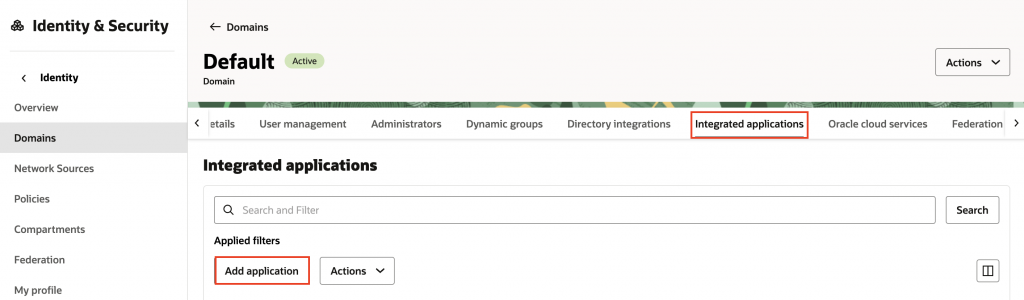
3. Navigate to Integrated applications and click the Add application button.
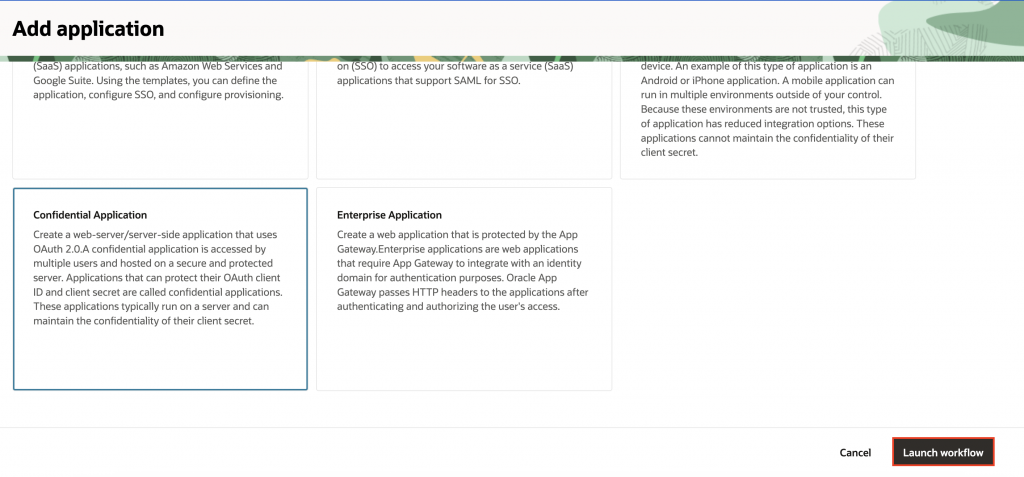
4. Click Confidential Application, then click Launch workflow.
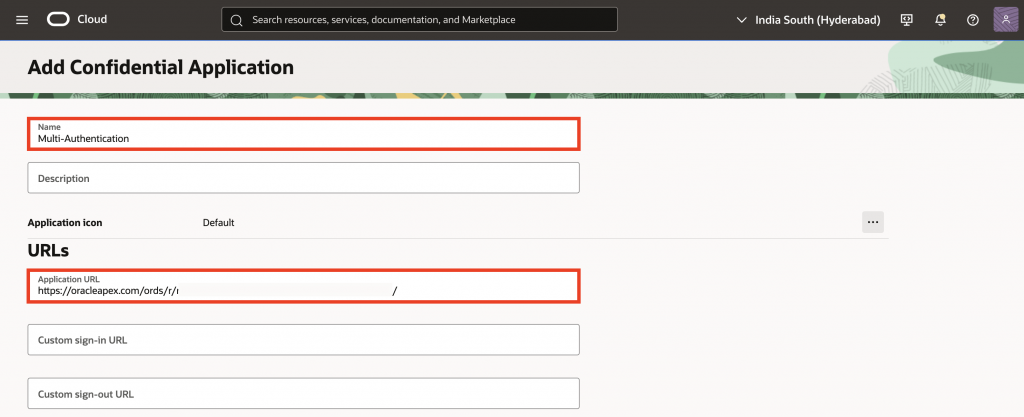
5. In the Add Confidential Application wizard:
- Enter a name for your Confidential application. In this example, I will use “Multi-Authentication“.
- Under URLs, for Application URL, add your app’s base URL. (e.g.,
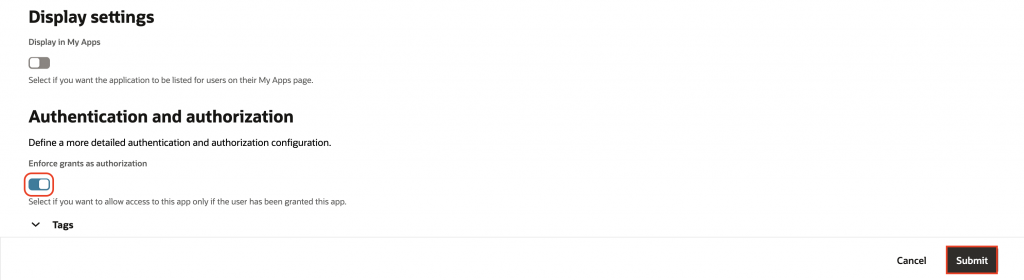
https://oracleapex.com/ords/r/apex/<workspace>/<app-alias>/). - Under Authentication and authorization, enable Enforce Grants as Authorization.
6. Click Submit.
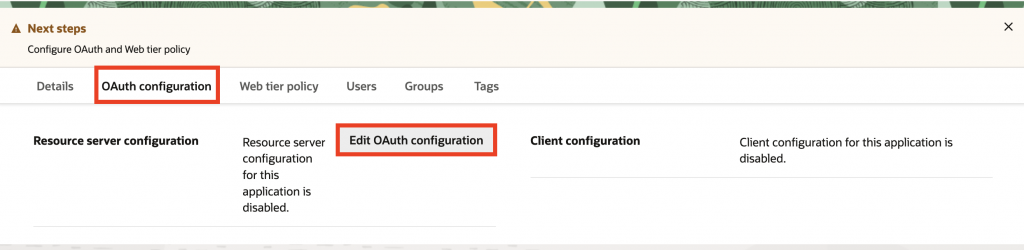
7. Once created, navigate to the OAuth configuration tab and click Edit OAuth configuration.
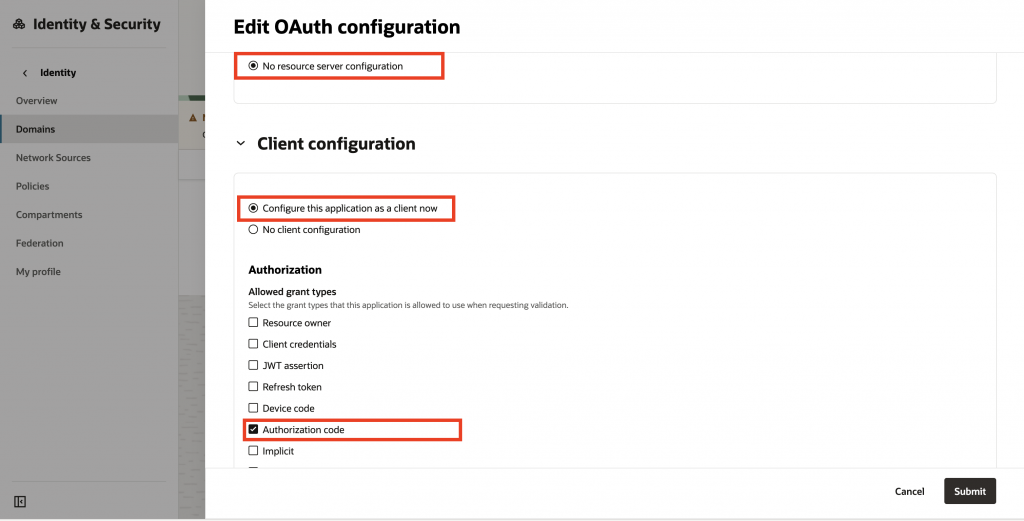
8. For Resource server configuration, select No resource server configuration. For Client configuration, select Configure this application as client now, select Authorization Code from the list of supported grant types, and scroll down to continue configuring the application.
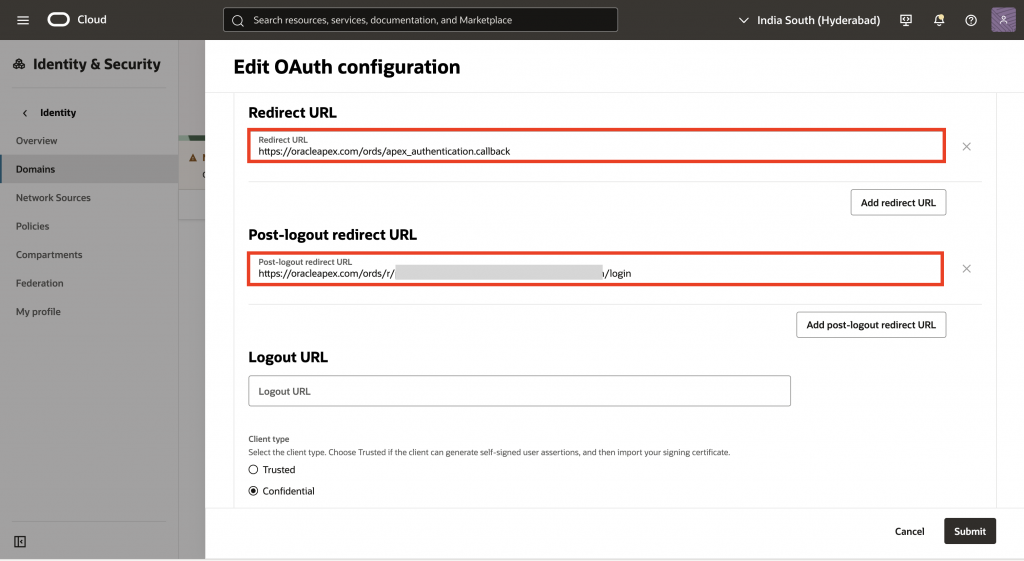
9. Scroll down to configure the Redirect URL. The Redirect URL consists of your APEX instance hostname and the fixed endpoint /ords/apex_authentication.callback. You can obtain this URL by running the following query in APEX SQL Workshop > SQL Command:
Select regexp_substr(APEX_AUTHENTICATION.get_callback_url, '^[^?]+') as redirect_url from dual;Note: If this URL does not match the configured Redirect URL, you will receive an invalid_url error when attempting to authenticate to your app. If your APEX instance hostname changes, you will need to update the existing Redirect URL or add another Redirect URL.
10. For Post Logout URL, enter the APEX app URL which the users should be redirected after logging out from the application, then click Submit.
This configuration enables Oracle APEX to securely initiate and manage OAuth 2.0-based user authentication through OCI IAM.
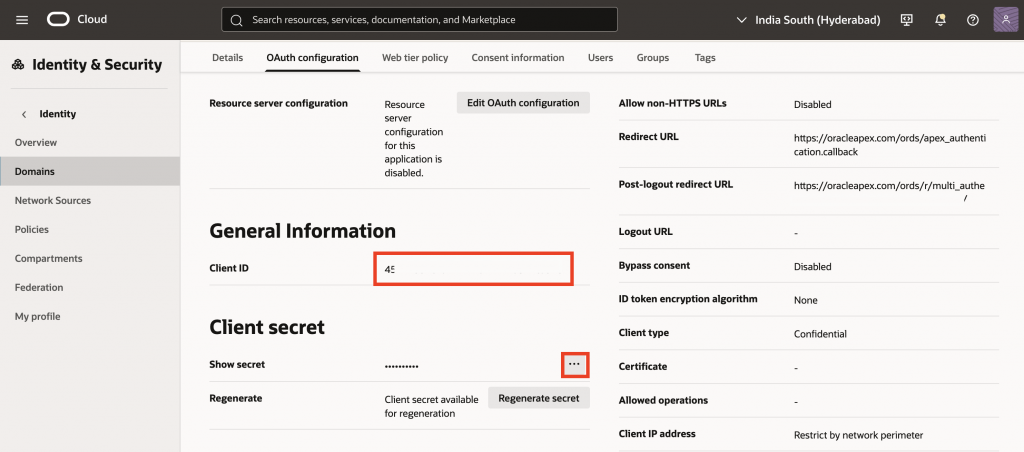
11. Once created, navigate to the OAuth configuration tab, copy the Client ID for the application, and reveal and copy the Client Secret – you will need these later to configure Web Credential in APEX.
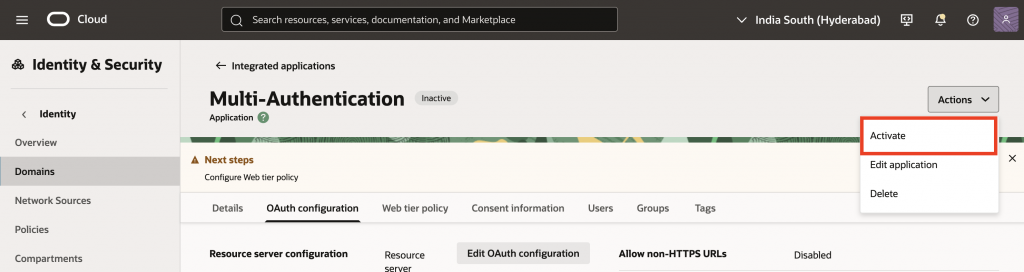
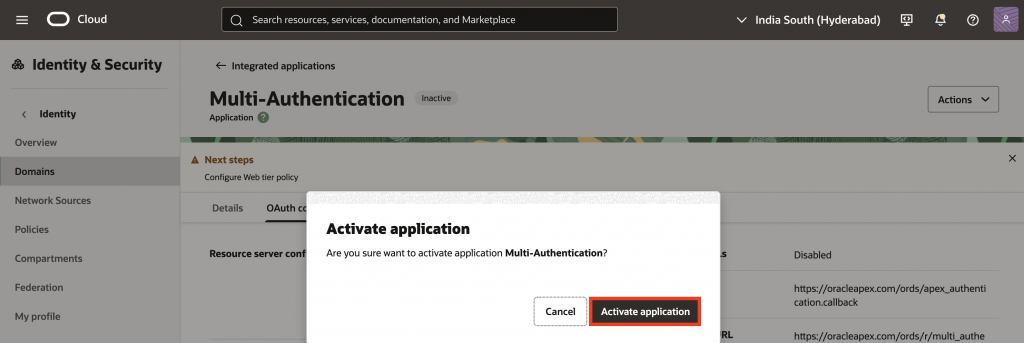
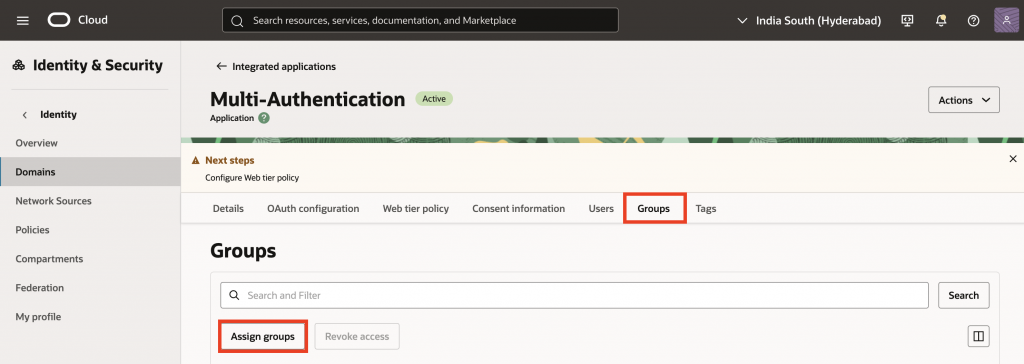
12. To activate the application, select Actions and click Activate. This will prompt you to confirm that you want to activate the application – confirm the dialog. After activation, the IAM Application can be used to authenticate with the IAM Identity Provider.
13. When activated, by default the application allows access to all users in the identity domain, this may be your intent for the integration; however, you may also want to restrict which users can sign in to that specific application. Follow these steps to restrict access.
Navigate to the Groups tab and click Assign groups. Select the groups you would like to grant access to this application and click Assign.
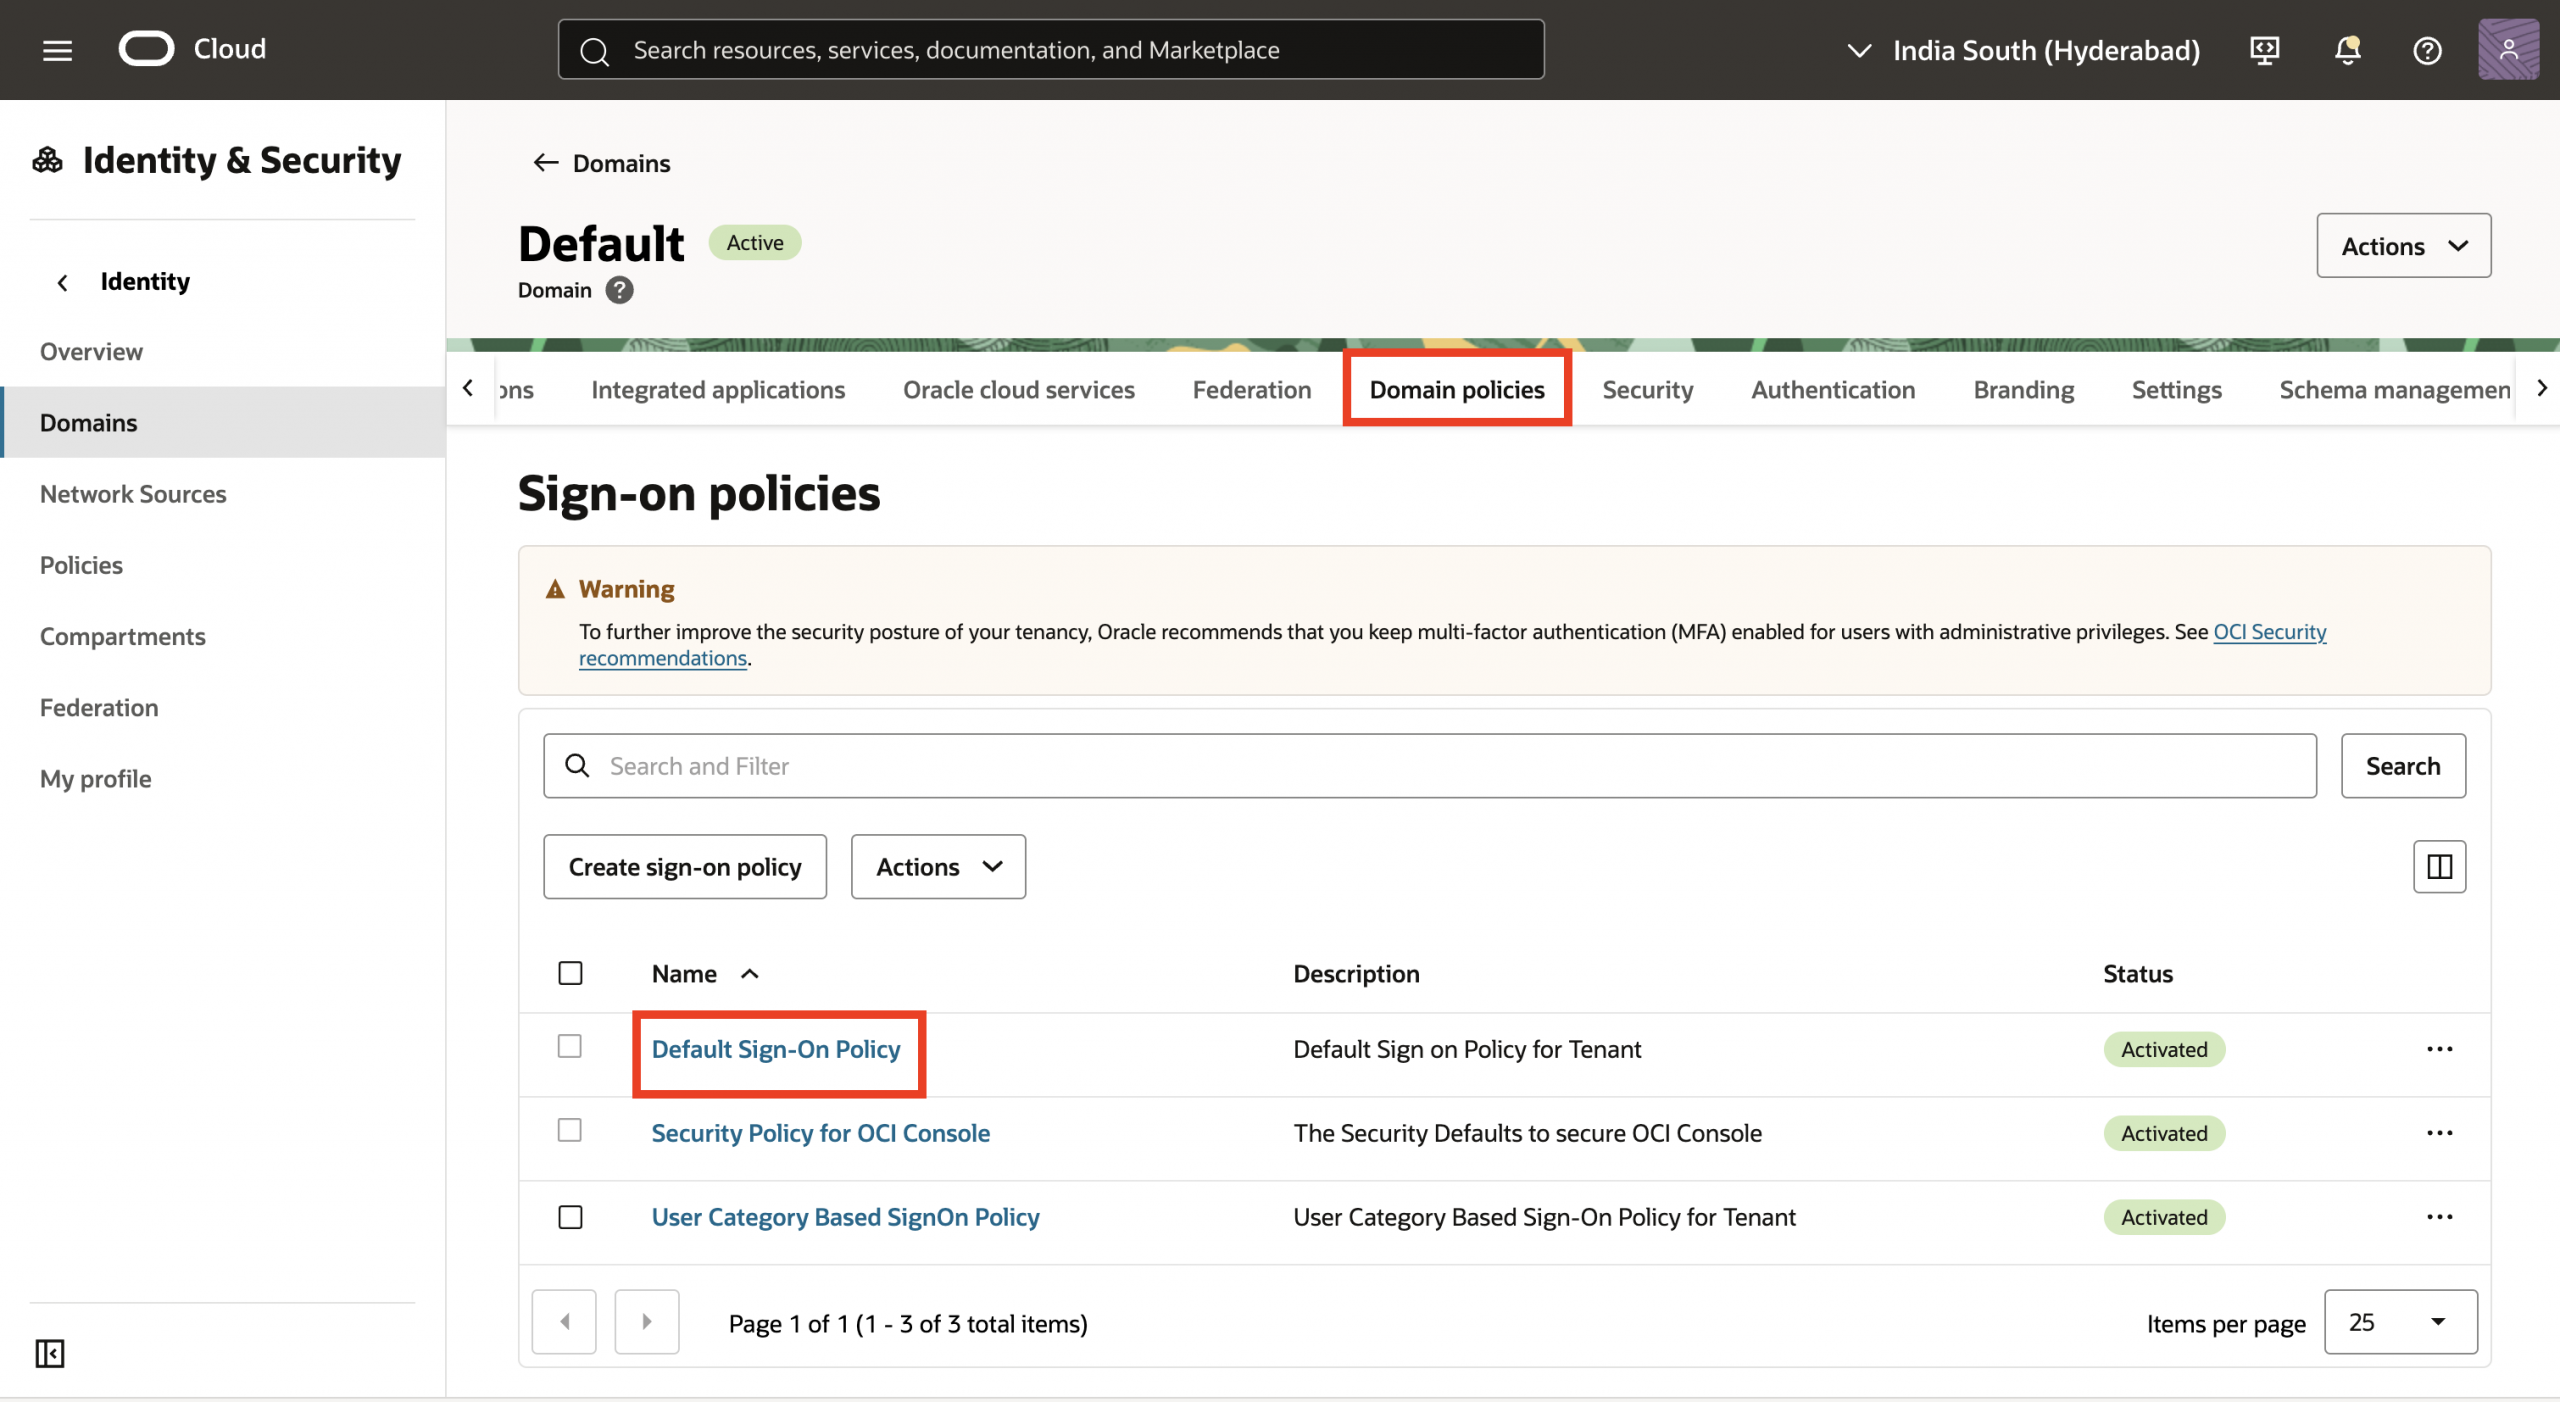
14. Navigate back to the Default Domain. To enable multi factor authentication, click Domain policies and select Default Sign-On Policy.

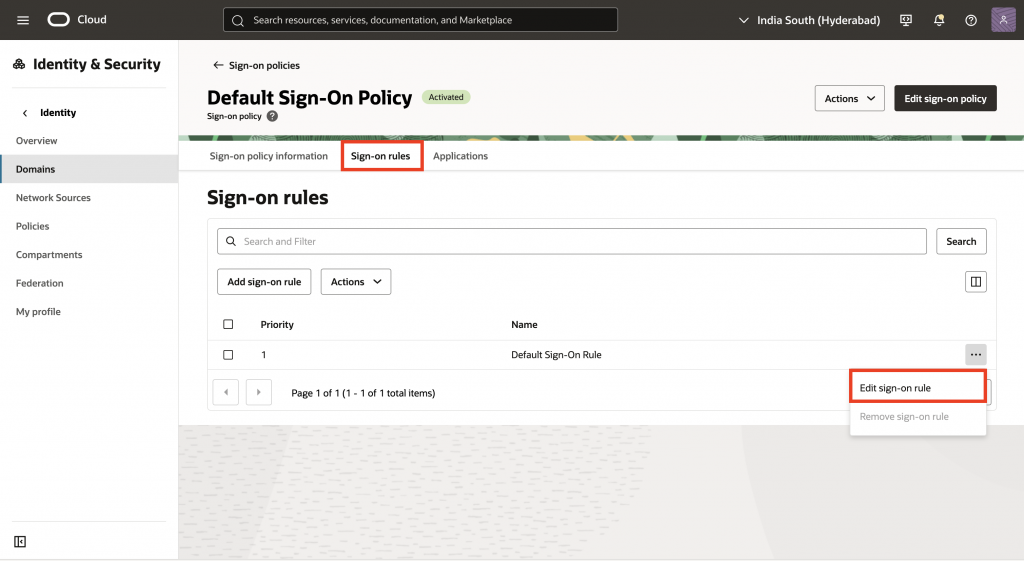
15. Go to Sign-on rules tab, edit the Default Sign-On Rule, and click Continue.
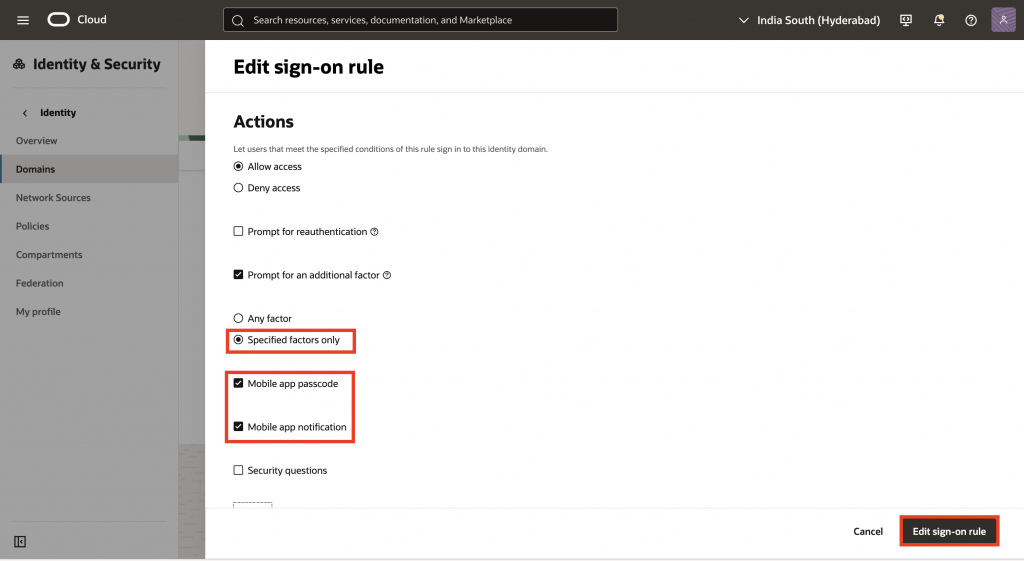
16. Under Actions, select Specifies factors only and enable Mobile app passcode( this also enable Mobile app notification), then click Edit sign-on rule.
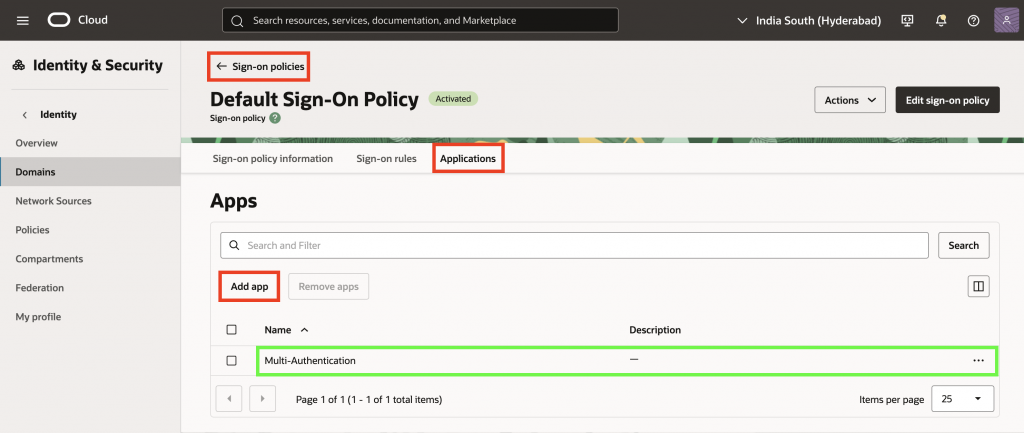
17. Navigate to the Applications tab, click Add app, and select your application.
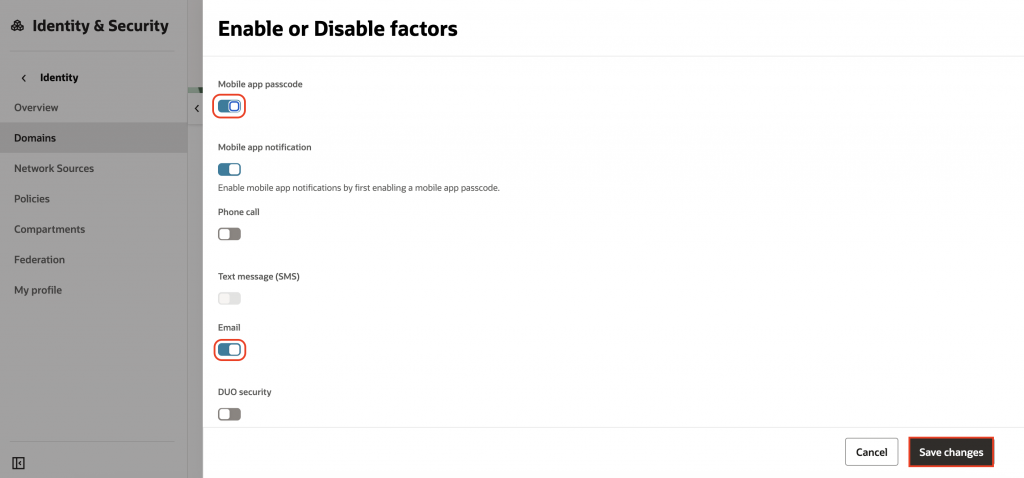
18. Navigate back to Default domain, go to Authentication tab, click Enable or Disable factors. Select your Multi-Factor Authentication (MFA) methods. For this example, we will enable Email and Mobile app passcode.
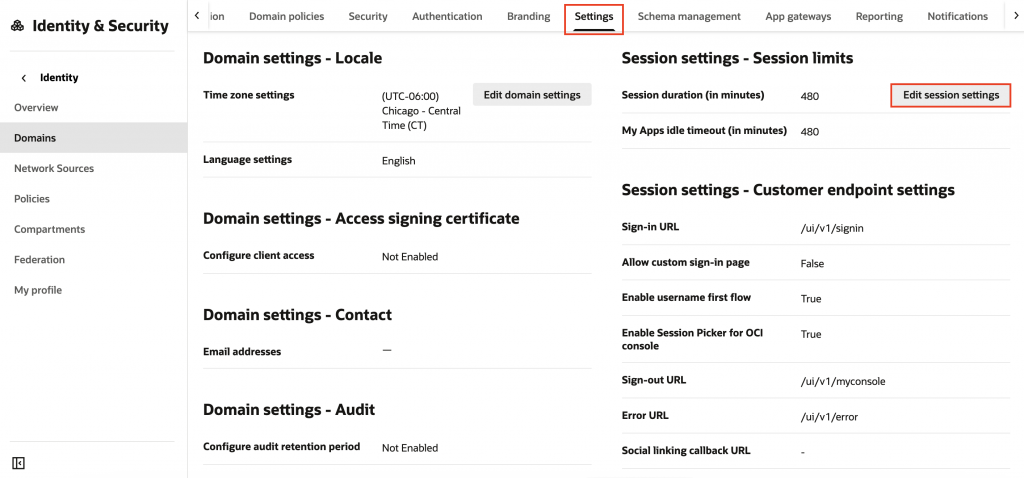
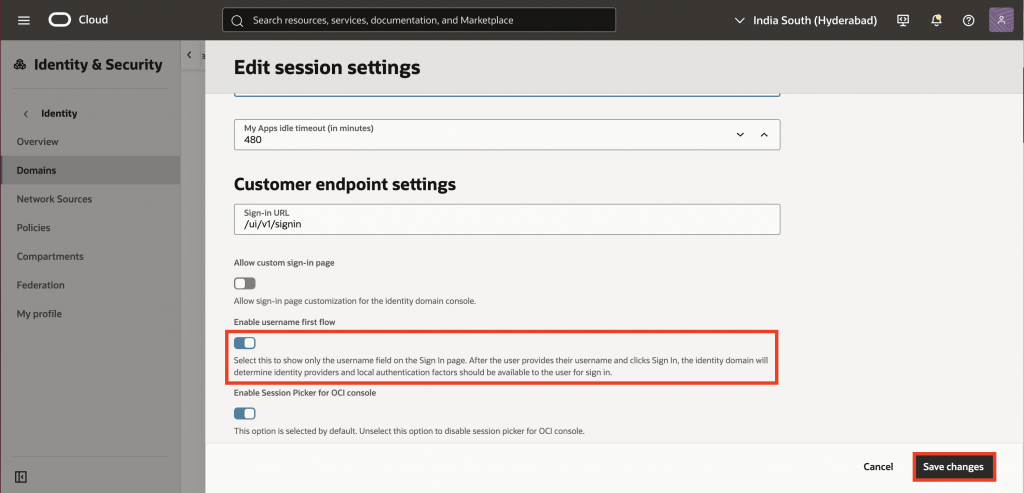
19. Under Settings, scroll down to Session Settings – Session Limits, click Edit session settings. Enable Username First Flow and click Save changes.
This feature allows users to enter their username first, followed by a second authentication factor without requiring a password.
20. Now that we’ve completed the configuration in the Oracle Cloud Console, it’s time to switch over to Oracle APEX.
Create Web Credentials in Oracle APEX
The next step is to create Web Credentials, a secure way to store your Client ID and Secret inside APEX. This allows your app to safely communicate with Oracle IAM as the Identity Provider,without exposing sensitive authentication details like secrets or tokens in your application logic.
First log in to your Oracle APEX workspace.
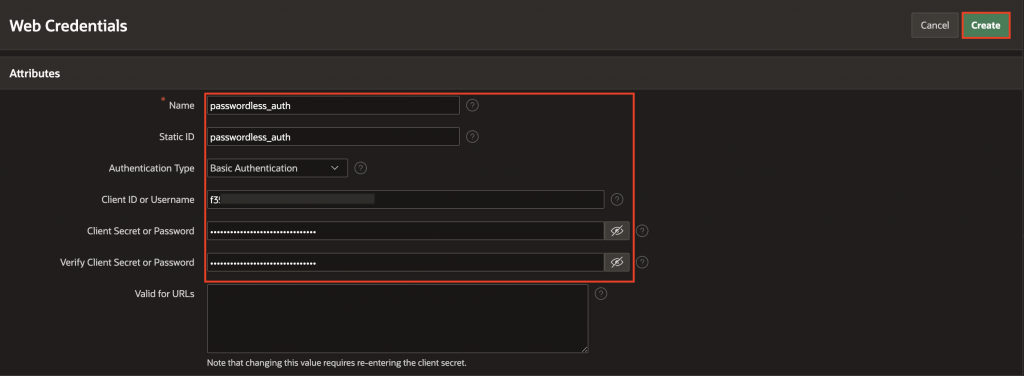
Navigate to App Builder > Workspace Utilities > Web Credentials. Click Create and fill in the following details:
- Name: passwordless_auth
- Authentication Type: Select Basic Authentication
- Client ID or Username: Paste client ID copied from the IAM application
- Client Secret or Password: Paste client secret copied from the IAM application
- Verify Client Secret or Password: Paste client secret copied from the IAM application
- Click Create.
With the Web Credentials securely stored, your Oracle APEX app is now ready to connect with Oracle IAM using OAuth2.
Configure a Social Sign-In Authentication Scheme
Let’s move on to the next step, creating the Authentication Scheme. This will define how APEX handles the login process using OpenID Connect, powered by Oracle IAM for secure, passwordless authentication.
Once the credentials are created, go to the application’s Shared Components > Authentication Schemes.
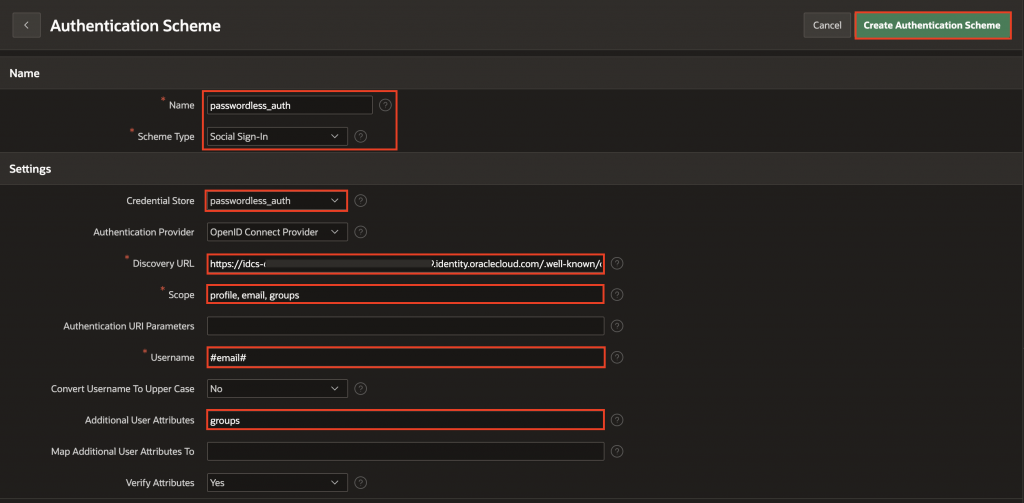
Click Create and fill in the following details:
- Name: Enter passwordless-auth
- Scheme Type: Social Sign-In
- Credential Store: Select the Web credentials created in the previous step
- Authentication Provider: Select OpenID Connect Provider
- Discovery URL: Enter the Domain URL copied from IAM application. For example: https://[idcs-service-url]/.well-known/openid-configuration/.
- Scope: profile, email, groups
- Username: #email#
- Additional User Attributes: groups
- Click Create Authentication Scheme to finish.
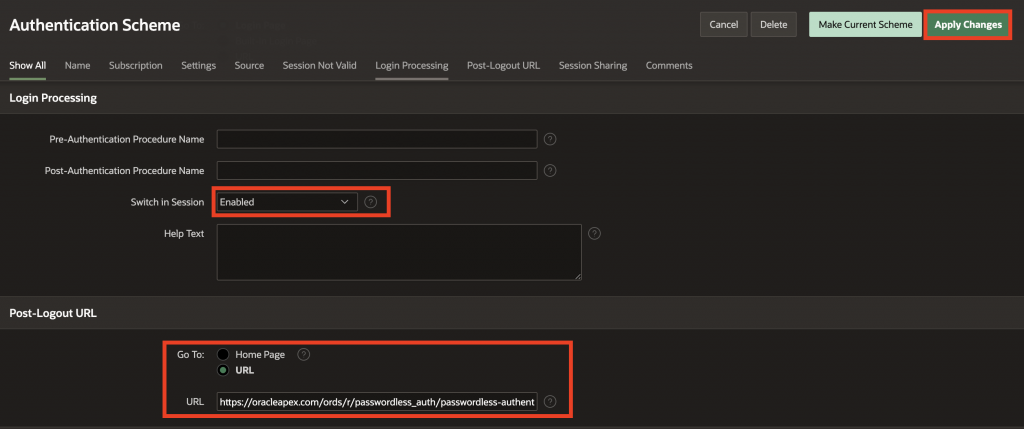
Go back to the passwordless-auth authentication scheme. Under Login Processing, enable Switch in Session. Next, in the Post-Logout URL setting, choose URL, enter the page you want users redirected to after logout, and then click Apply Changes.
And that’s it, you’ve successfully integrated Oracle IAM passwordless login into your Oracle APEX application!
Now, let’s move on to setting up the custom in-app authentication scheme.
Create a Custom In-App Authentication (Username & Password)
Custom In-App Authentication in Oracle APEX allows you to build a fully controlled login system using your own USERS table. By leveraging PL/SQL and APEX’s hashing utilities, you can securely authenticate users based on their email or username and manage roles, sessions, and access without relying on external identity providers.
From your Oracle APEX workspace, navigate to SQL Workshop and select SQL Commands. First, create a USERS table with columns for username, email, password, role, and timestamps. Copy and paste the code below into the code editor and click Run.
-- Create the USERS table
CREATE TABLE USERS (
USER_ID NUMBER PRIMARY KEY,
USERNAME VARCHAR2(100) NOT NULL,
EMAIL VARCHAR2(150) UNIQUE NOT NULL,
PASSWORD VARCHAR2(255) NOT NULL,
ROLE VARCHAR2(50) NOT NULL,
CREATED_AT DATE DEFAULT SYSDATE
);

-- Create a sequence for USER_ID
CREATE SEQUENCE USERS_SEQ START WITH 1 INCREMENT BY 1 NOCACHE NOCYCLE;
Next, to enable secure custom login logic in Oracle APEX using your own USERS table, we’ll create a PL/SQL package called CUSTOM_AUTHENTICATION. This package will handle secure custom login by validating a user’s email or username against hashed credentials stored in the USERS table. It uses APEX’s hashing utility to encrypt passwords, enhancing security by preventing attackers from recognizing reused passwords across different systems.
Copy and paste the package specification and body below into the code editor and click Run.
Specification:
Create or replace PACKAGE CUSTOM_AUTHENTICATION AS
-- global username holder
g_username VARCHAR2(1000);

-- hash password function
FUNCTION Hash_password (
p_email IN VARCHAR2, p_password IN VARCHAR2,
p_created_at IN DATE
) RETURN VARCHAR2;

-- main authentication function
FUNCTION Authenticate_user (
p_username IN VARCHAR2, p_password IN VARCHAR2
) RETURN BOOLEAN;
END CUSTOM_AUTHENTICATION;
/Body:
Create or replace PACKAGE BODY CUSTOM_AUTHENTICATION AS
FUNCTION Hash_password (
p_email IN VARCHAR2, p_password IN VARCHAR2,
p_created_at IN DATE
) RETURN VARCHAR2 IS encrp_password VARCHAR2(255);
BEGIN encrp_password := apex_util.get_hash(
apex_t_varchar2(
p_password,
p_email,
TO_CHAR(
p_created_at, 'YYYYMMDDHH24MISS'
)
),
FALSE
);
RETURN encrp_password;
END Hash_password;

FUNCTION Authenticate_user (
p_username IN VARCHAR2, p_password IN VARCHAR2
) RETURN BOOLEAN IS l_email users.email % TYPE;
l_password users.password % TYPE;
l_created_at users.created_at % TYPE;
l_hashed_password VARCHAR2(1000);

BEGIN -- always fetch email, password, created_at in one query
BEGIN
SELECT
email,
password,
created_at INTO l_email,
l_password,
l_created_at
FROM
users
WHERE
email = lower(p_username);
EXCEPTION WHEN NO_DATA_FOUND THEN RETURN FALSE;
-- user not found, return false
END;

-- compute hash and compare
l_hashed_password := Hash_password(
l_email, p_password, l_created_at
);
RETURN l_hashed_password = l_password;
EXCEPTION WHEN OTHERS THEN RETURN FALSE;
END Authenticate_user;
END CUSTOM_AUTHENTICATION;
/Note: This authentication scheme is for demonstration purposes only and should not be used in production applications without additional security enhancements.
After creating the package, we need to create a database trigger. We created a hash function in the CUSTOM_AUTHENTICATION package in Step 2. Now, using this trigger, whenever a user is created or their password is updated, the password will automatically be hashed before being stored in the database. This is why we’re creating this trigger – to ensure passwords are never stored in plain text. Copy and paste the trigger code below into the code editor and click Run.
Create or replace TRIGGER trg_users_biu
BEFORE INSERT
OR
UPDATE
ON users FOR EACH ROW BEGIN : NEW.email := LOWER(: NEW.email);
IF INSERTING
AND : NEW.created_at IS NULL THEN : NEW.created_at := SYSDATE;
END IF;

-- Hash password when inserting or when password changes
IF : NEW.password IS NOT NULL THEN IF INSERTING
OR (
UPDATING('password')
AND : NEW.password <> : OLD.password
) THEN : NEW.password := custom_authentication.hash_password(
: NEW.email, : NEW.password, : NEW.created_at
);
END IF;
END IF;

-- Auto-generate USER_ID if not provided (only on insert)
IF INSERTING
AND : NEW.user_id IS NULL THEN : NEW.user_id := users_seq.NEXTVAL;
END IF;
END;
/
Create a Custom Authentication Scheme
Now that the CUSTOM_AUTHENTICATION package is in place, it’s time to wire it into Oracle APEX using a Custom Authentication Scheme. Create a custom authentication scheme in APEX with PL/SQL logic to verify credentials against this table. A simple login form collects username and password, and the session is initiated just like any other scheme.
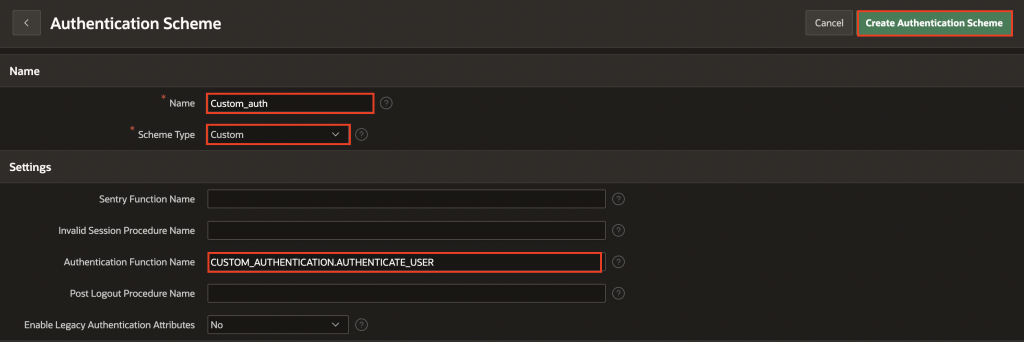
Navigate to Shared Components > Authentication Schemes. Click Create and fill in the following details:
- Name: Enter Custom_auth
- Scheme Type: Custom
- Settings > Authentication Function Name: CUSTOM_AUTHENTICATION.AUTHENTICATE_USER
- Click Create Authentication Scheme to finish.
Navigate back to custom_auth authentication scheme and click Make Current Scheme.
Enable Switch in Session for Authentication Schemes
We now have two authentication schemes:
- Custom Authentication (default, using the USERS table)
- Oracle IAM Passwordless Login (optional, via IAM + MFA)
Since the Custom Authentication scheme is active, users who enter their email and password on the login page will be authenticated using your in-app logic.
Now, to support multi-authentication, we’ll give users an additional option to log in using Oracle IAM. For this, we’ll use Oracle APEX’s powerful “Switch in Session” feature.
What is “Switch in Session”?
Think of Switch in Session as a simple mechanism that lets you tell APEX:
“For this login attempt, use a different authentication scheme instead of the current one.”
All it needs is a request value like APEX_AUTHENTICATION=passwordless_auth, and APEX will route the login process through your Oracle IAM scheme, without writing a single line of custom logic.
This allows you to offer multiple login paths on the same login page, while keeping the user experience clean.
To set it up:
Let’s add a button to allow users to explicitly trigger IAM-based login:
- Open your APEX login page in Page Designer.
- Add a new button named IAM_LOGIN with the label Sign in with Oracle IAM.
- Set the button action to Redirect to Page in this Application, and choose the page you want users to land on after login (e.g., page 1 or the dashboard).
- Under Advanced > Request, enter
APEX_AUTHENTICATION=IAM(replace IAM with the exact name of your Oracle IAM authentication scheme). - Optionally, use the Hot button template or add an icon to make this button stand out on the login page.
That’s it, when a user clicks the IAM login button, APEX will switch to that scheme, launch the OAuth2 flow with Oracle IAM, and bring them back once authenticated.
Conclusion
Bringing Oracle IAM into your APEX application makes logging in both secure and seamless, with enterprise-level identity management and multi-factor authentication built right in. At the same time, having a custom authentication option means you can still manage local users whenever you need to. Together, these approaches give you the best of both worlds – strong security with IAM and flexible access with custom login, so your APEX apps stay user-friendly while meeting different authentication needs.