This blog was originally published on Dec 23, 2021.
With every Oracle APEX release, we bring improvements to our built-in set of actions. In APEX 21.2, notable improvements have been made to the Alert and Confirm Dialogs.
In this blog post, I’ll explore these new enhancements so you can take advantage of them in your new or existing APEX applications.
Customizable Dialogs
Dynamic Actions provide a way to define complex client-side behavior declaratively. Developers can specify actions to be performed when a specific event occurs. The Alert and Confirm Dialogs now have an updated appearance and customize options for easily setting the style, title, icon, and even custom button labels.
To create either an alert or confirm dialog, follow these steps.
Create a page
- Create a Blank Page using the Create Page Wizard.
- For Name – enter Sample Customizable Dialogs anc click Next.
- For Navigation Preference, select Create a new navigation menu entry and click Next.
- Click Finish.
Create a button
- In Page Designer, right-click Components in the left pane.
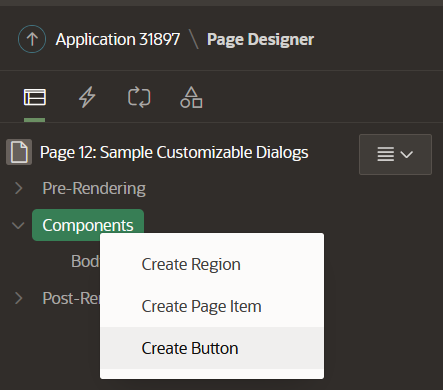
Fig 1. Create a Button. - In the Property Editor (right pane), enter the following:
- Under Identification section:
For Button Name – enter Delete
For Label – enter Delete Record
- Under Identification section:
Create a Dynamic Action
- Click the Dynamic Actions tab in the left pane.
- Under Dynamic Actions, right-click Events and select Create Dynamic Action.
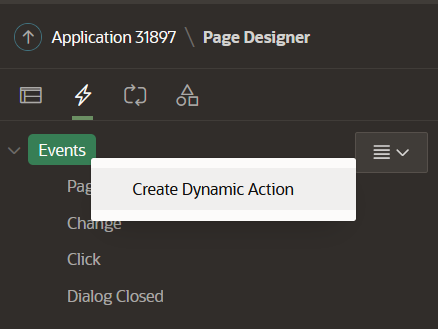
Fig 2. Create a Dynamic Action. - In the Property Editor (right pane), edit the following Dynamic Action attributes:
- Under Identification section:
For Name – enter Deleting a record. - Under When section:
Event – select Click
Selection – select Button
Button – select Delete.
- Under Identification section:
- In the left pane, navigate to the Show action created by default.
- In the Property Editor (right pane), edit the following attributes:
- Under Identification section:
For Action – select Confirm. If you prefer to create an alert action, please note that you will find OK Label attribute instead of Confirm and Cancel Label attributes. - Under Settings section:
For Title – enter Delete Record
For Message – Are you sure to delete this record?
For Style – select Danger
For Icon – optionally select a dialog icon
For CSS Classes – enter optional CSS Classes to be applied to the dialog container. This property can be useful for advanced use cases
For Confirm Label – enter Delete. If no label is provided, the value of text messageAPEX.DIALOG.OK(Ok in English) will be used
For Cancel Label – enter Cancel. If no label is provided, the value of text messageAPEX.DIALOG.CANCEL(Cancel in English) will be used.
- Under Identification section:
- Click Save and Run Page.
As an example, these are the attributes for the confirm dialog:

When users trigger the event, they will get a similar confirm dialog:
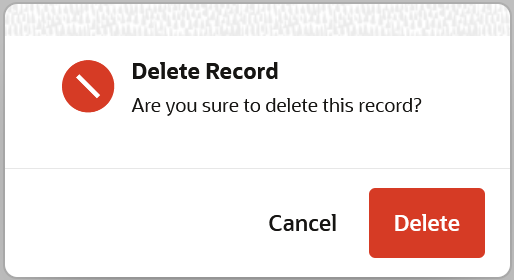
If users decide to click the Delete button, all the subsequent actions to the Confirm dialog will be executed. Otherwise, the dynamic action will be stopped.
Support for Template Directives
The dialog message supports HTML template directives, including client-side substitutions of item references for truly dynamic alerts.
Button Confirmation
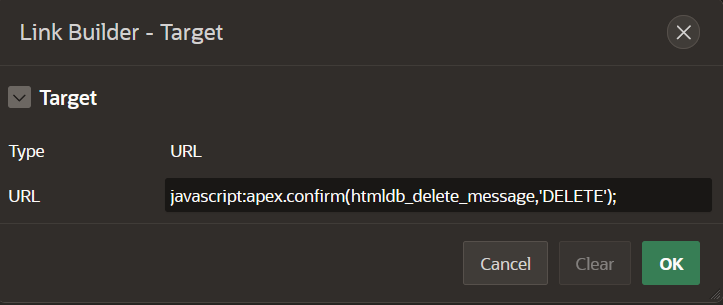
We have also simplified protecting a button’s action with a confirmation dialog. In previous versions of APEX, you would use the apex.confirm JavaScript function to protect the button’s behavior with a confirmation prompt. For example, to show a confirmation dialog after the Delete button has been clicked this was the setup by default:
As of APEX 21.2, you can trigger a confirmation dialog for any button by simply toggling the “Require Confirmation” property. In this case, the confirmation button in the dialog derives its label from the main button label.
Let’s review both support for template directives and button confirmation enhancements using a simple Form region. Please follow these steps:
For this example, you would need to install the EMP / DEPT Sample Dataset.
- Create a Report with Form page using the Create Page Wizard.
- Select Form and click Next.
- Select Report with Form and click Next.
- Enter the following and click Next.
- For Report Page Name – enter Employees
- For Form Page Name – enter Manage
- For Breadcrumb – select Breadcrumb.
- For Navigation Preference, select Create a new navigation menu entry and click Next.
- Enter the following and click Next.
- For Table / View Name – enter EMP.
- Enter the following and click Next.
- For Primary Key Column – select EMPNO (Number).
- Click Create.
Now you have two new pages: Report Page and Form Page. Let’s edit the Form Page and apply some changes to the Create button to ask the user to confirm the commission amount that employee will receive.
- Run the recently created page and click Create button.
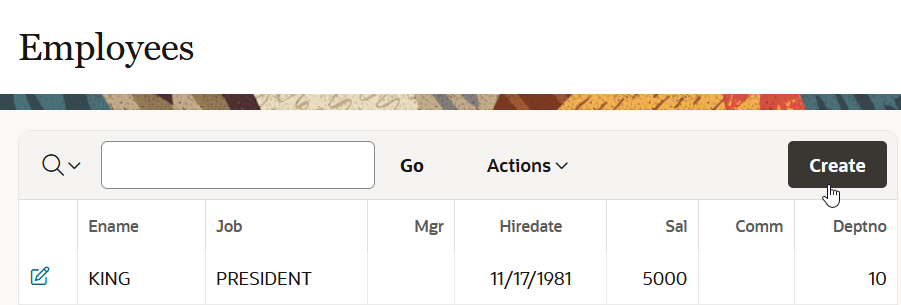
Fig 7. Employees Page in runtime - Navigate to Developer Toolbar (bottom of the page) and click Page X.
- In the left pane, navigate to Create button.
- In the Property Editor (right pane), enter the following:
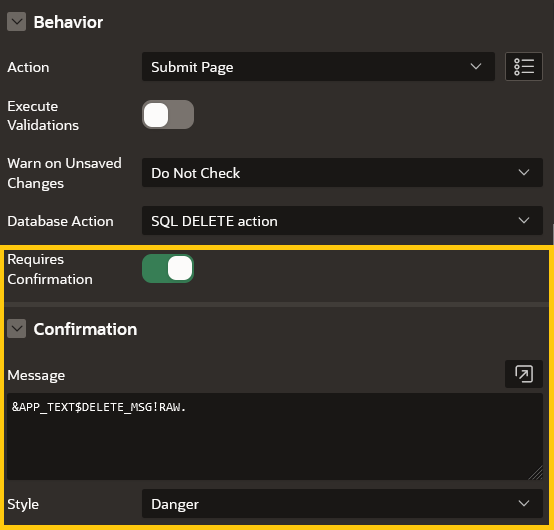
- Under Behavior section:
– Switch on the Requires Confirmation property. - Under Confirmation section:
– For Message – enter the following code:
{if !PX_COMM/}
 Are you sure that <strong>&PX_ENAME.</strong> will not receive a commission?
 {else/}
 Please confirm that <strong>&PX_ENAME.</strong> will receive &PX_COMM. USD as commission.
 {endif/}
Edit the following items with the page number you are working on:
– PX_COMM. If the page number is 3, the item name would be P3_COMM.
– PX_ENAME. If the page number is 3, the item name would be P3_ENAME.
– For Style – select Warning.
- Under Behavior section:
- Click Save and Run Page.
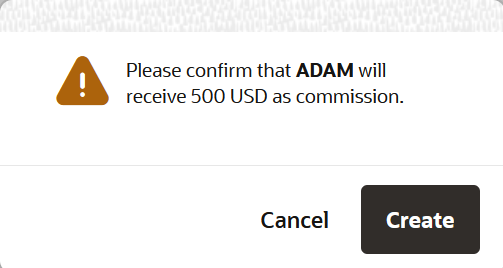
To create a new employee, enter some details like Name, Job, Salary and click Create. You will get this confirmation message, since the commission item is null.

If you enter a Commission value, let’s say 500 USD you will get the following confirmation message:
Explore more cases in the following video:
Test these new enhancements and other new features in APEX 21.2 on apex.oracle.com or download this release from apex.oracle.com/otn/.
