This blog was originally published on Feb 3, 2022.
The Oracle Autonomous Database (ADB) Vanity URL configuration can support multiple Oracle APEX applications and Oracle REST Data Services (ORDS) endpoints running on the same database and exposed on the public internet at different domain names. Here you will learn how to extend your Vanity URL configuration so it can serve multiple domains from the same ADB. This optional extension to the Vanity URL architecture enables you to get even more use out of your database.
Use Cases
Example use cases for multiple domain names include:
- Apps with distinct branding – You have different apps with their own distinct brand identities and domain names (e.g. www.example1.com, www.example2.com).
- Combined UI + API apps – Your app consists of interactive UI provided by APEX and public APIs provided by ORDS, and you want to expose these interfaces at separate subdomains such as www.example.com and api.example.com.
- Dev/test app copies – You have copies of a given app for production and dev/test usage, and you want to expose these copies on separate subdomains such as www.example.com (production environment) and beta.example.com (beta testing environment).
This is not an exhaustive list of all possible use cases. There are many similar use cases that can be supported by the following configuration. In addition, it can work for both APEX applications and ORDS REST endpoints running on ADB.
For demonstration purposes, this blog post will focus on the first use case above – where you have two APEX apps with distinct branding that you wish to expose at separate domains while running them on the same ADB. If you master this configuration, then you can easily adapt it to other scenarios.
Prerequisites
We will build on top of a prior Vanity URL configuration, so you must have a few things in place before proceeding. Begin by configuring a Vanity URL as described in the first two blog posts in this series (see here and here). You may also follow the third blog post in this series (see here), but it is not required for what you will do here. After you have a live Vanity URL configuration, complete the following additional prerequisites:
- Obtain another domain and certificate – Get another public domain name that you control and an SSL/TLS certificate bundle for it. This will be used to point to a new APEX application on your ADB. It will complement the original domain name that you configured in the first blog post.
- Create another DNS record – Create a DNS A Record for the new domain. Point it to the same Load Balancer public IP address as before.
- Deploy another APEX app – Ensure that you have at least two APEX apps deployed in your ADB. Initially, both apps should be reachable at the single domain that you configured before. In the following steps, we will divide these apps so that the first is reachable at your original domain and the second is reachable at your new domain.
Architecture Diagram
The diagram below illustrates our desired end state. It highlights important changes to the prior Vanity URL architecture. You can refer back to this diagram while configuring.
Note that for demonstration purposes, we will use the prior example domain and APEX application, named apex.example.com and ProjectTasks. We also will introduce a new example domain and APEX app, named www.example.net and BenefitChoice. Our objective will be for apex.example.com to expose only the ProjectTasks app and www.example.net to expose only the BenefitChoice app.

Step 1 – Update the Rule Set
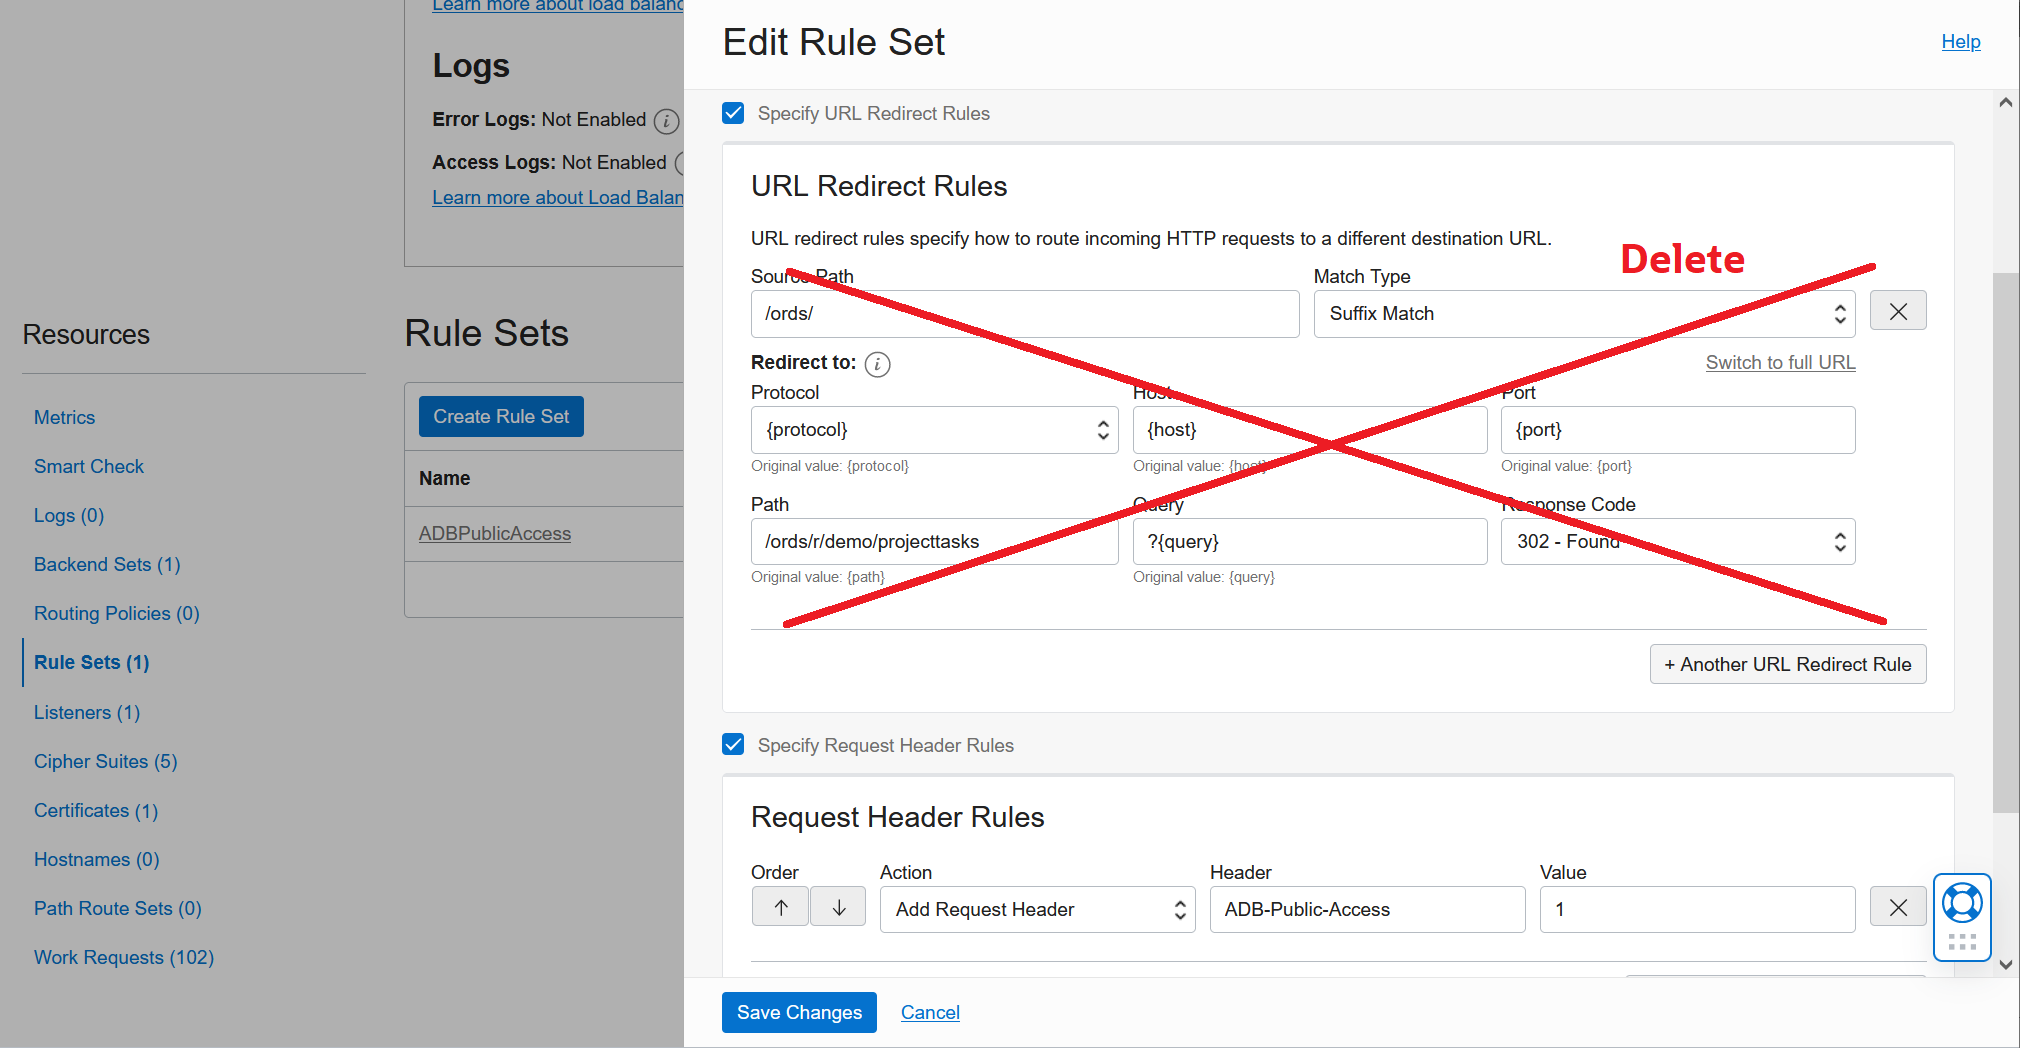
Starting from the details page of your Load Balancer, scroll down and open the Rule Set that you created before. If you followed the prior blog posts exactly, then it is named ADBPublicAccess. Locate your URL Redirect Rule that sets a default APEX application page. Take a moment to remember this rule, then delete it from the Rule Set. If you have added additional URL Redirect Rules to lock down your Vanity URL per the third blog post in this series, then you should be able to delete only this one rule. If it is the only URL Redirect Rule in existence, then you may need to uncheck the Specify URL Redirect Rules box to delete it. Save changes when done and wait for the Work Request to succeed.
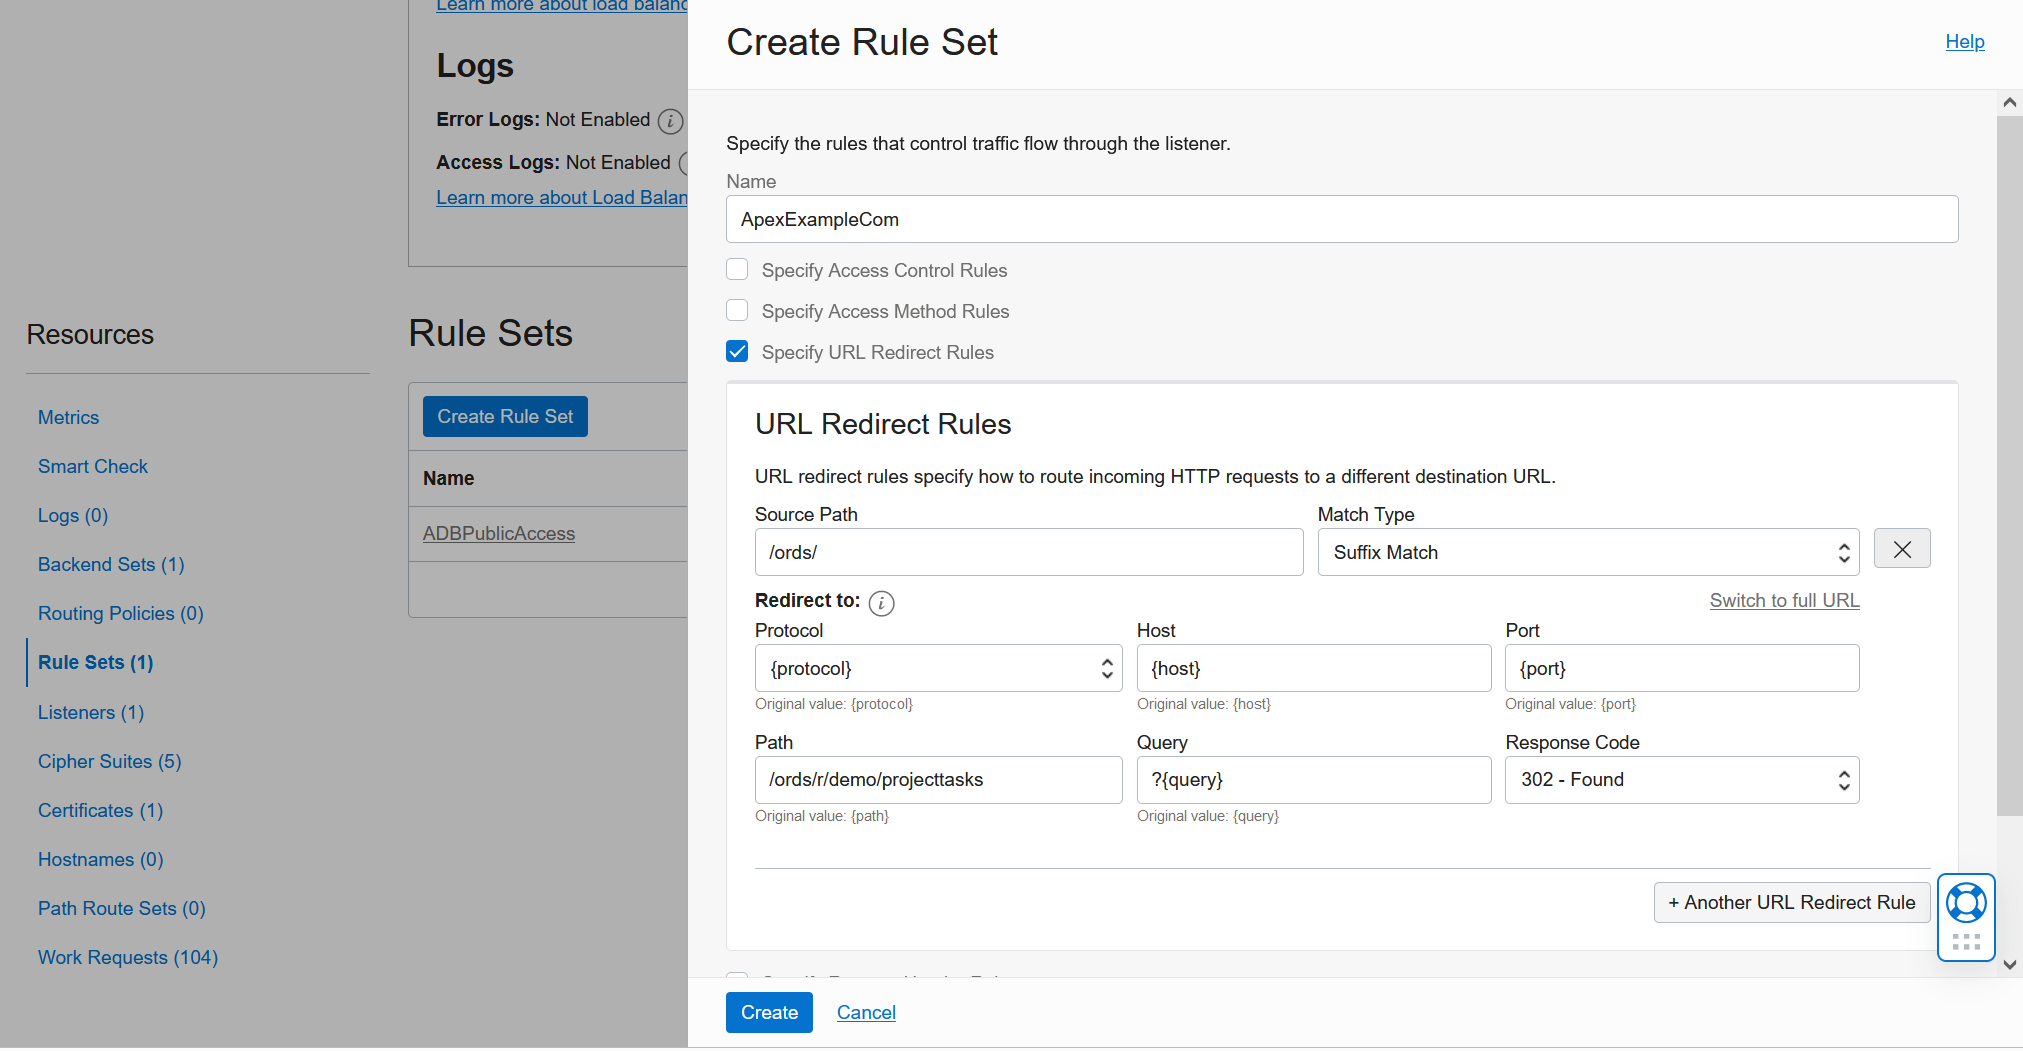
Create a new Rule Set containing the URL Redirect Rule that sets a default APEX app page for your original domain. This should be the same rule that you deleted above. Give this Rule Set a display name that refers to your original domain so it is easy to see which domain it is intended for. Save changes when done and wait for the Work Request to succeed.
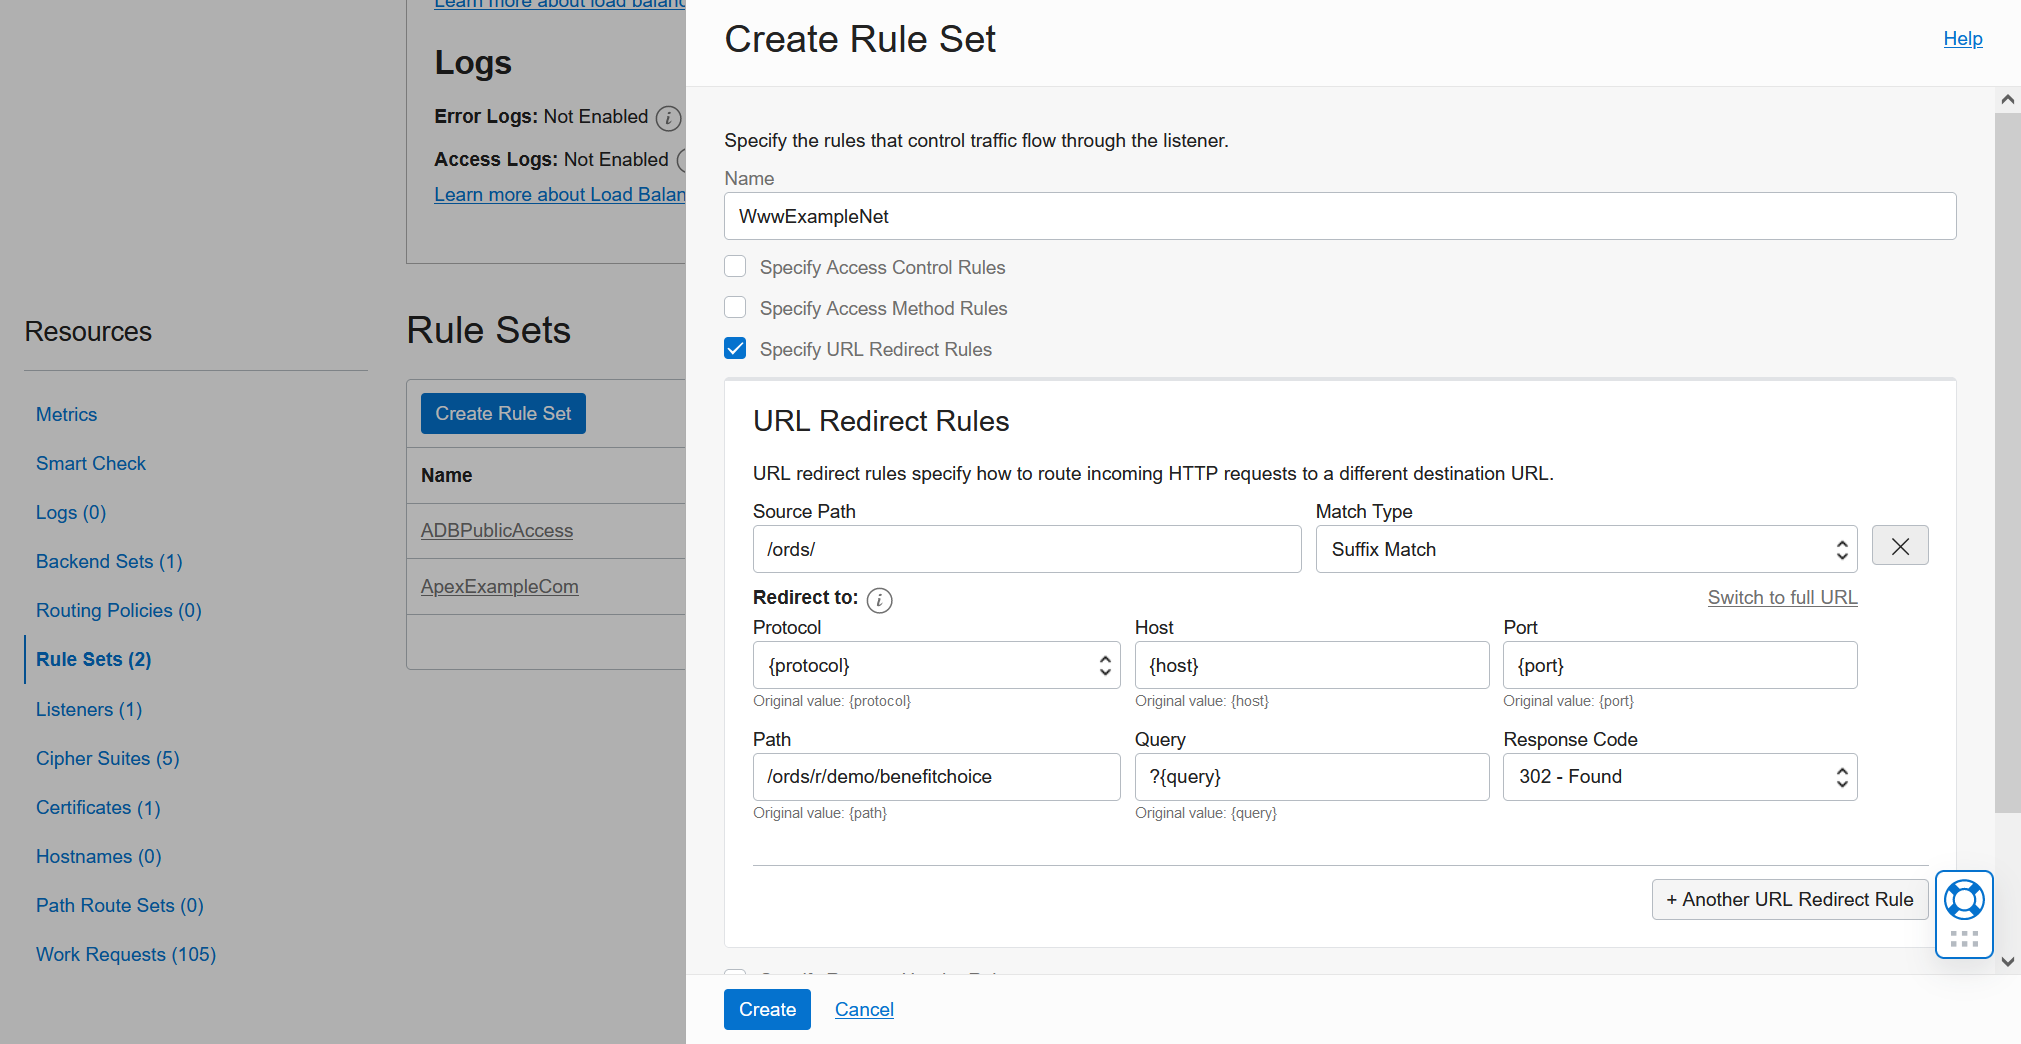
Create another new Rule Set, this time with a display name that refers to your new domain and a URL Redirect Rule that sets a default APEX app page for your new domain. Save changes when done and wait for the Work Request to succeed.
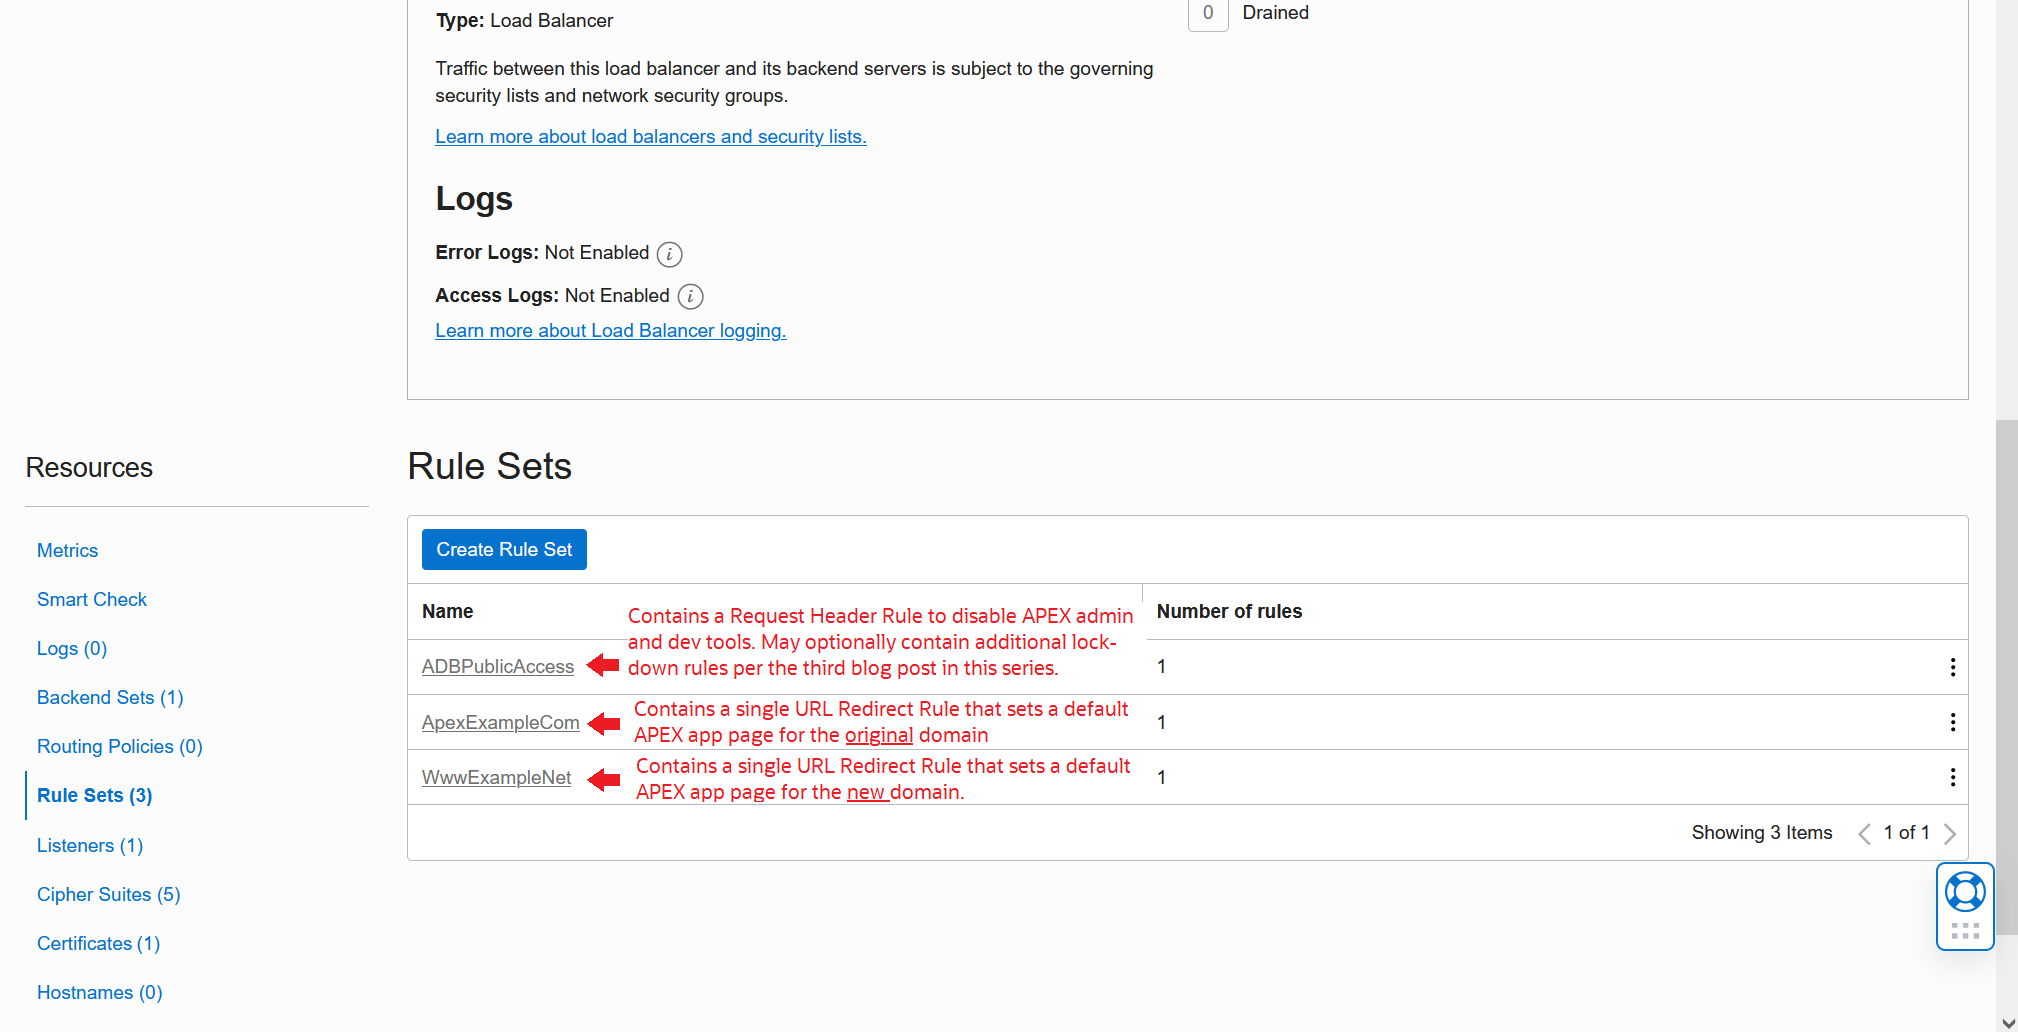
At the end of this step, you should have three Rule Sets in place. We will associate these Rule Sets with Listeners in a later step.
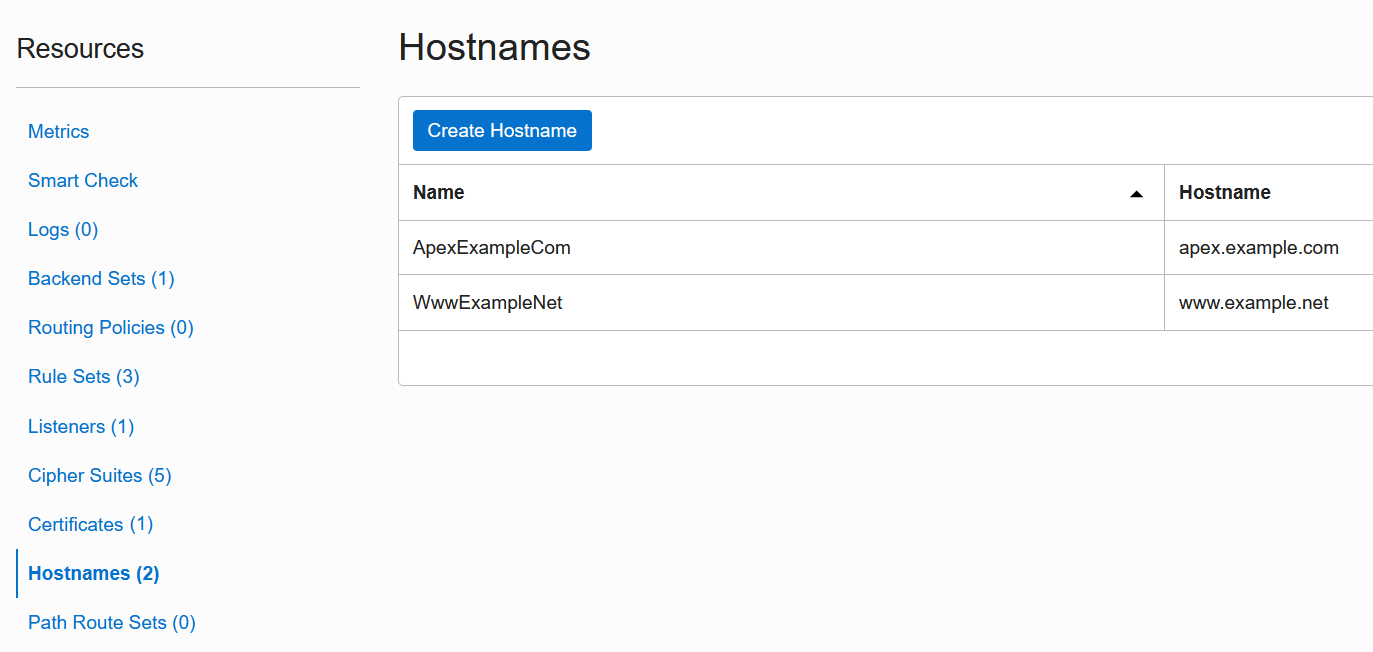
Step 2 – Create Hostnames
Back at the bottom of the Load Balancer details page, click on the Hostnames link. Create two new Hostname resources: one for your original domain, and one for your new domain. Refer to the relevant domains in the resource display names so it is easy to see which domain each resource is intended for. Save all changes when done and wait for all Work Requests to succeed.
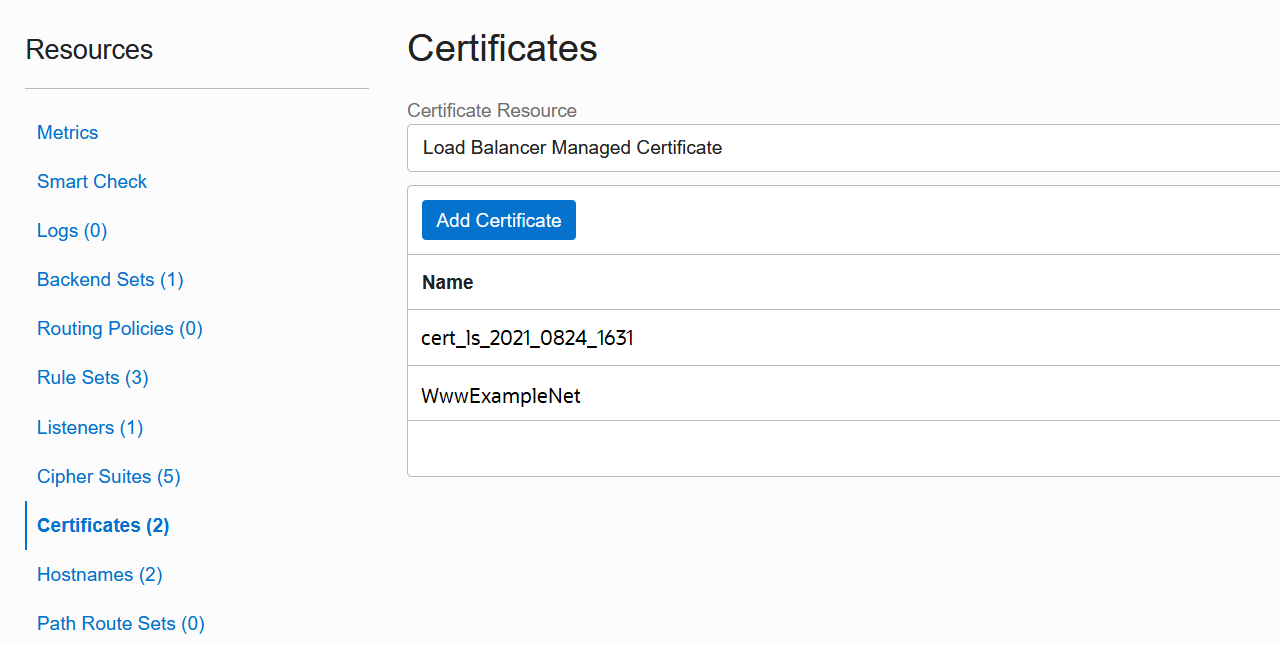
Step 3 – Upload New Certificate
Again at the bottom of the Load Balancer details page, click on the Certificates link. Create a new Certificate resource and upload the new SSL/TLS certificate bundle for your new domain into it. Give the Certificate resource a display name that refers to the new domain. Use native Load Balancer certificate management for this step. Leave the prior Certificate that you uploaded in the first blog post unchanged, disregarding its somewhat complex display name. Save changes when done and wait for the Work Request to succeed.
Note that Oracle Cloud Infrastructure (OCI) has recently released a more contemporary way to manage certificates centrally across different OCI services. It supports certificate renewal automation and more. However, because we started off in a previous blog post using the native Load Balancer certificate management, we continue using it here for continuity.
Step 4 – Update Existing Listener
Click on the Listeners link at the bottom of your Load Balancer details page and open your prior Listener for editing. We need to narrow what this Listener is listening to. In the optional Hostnames field, select the Hostname resource for your original domain from Step #2.
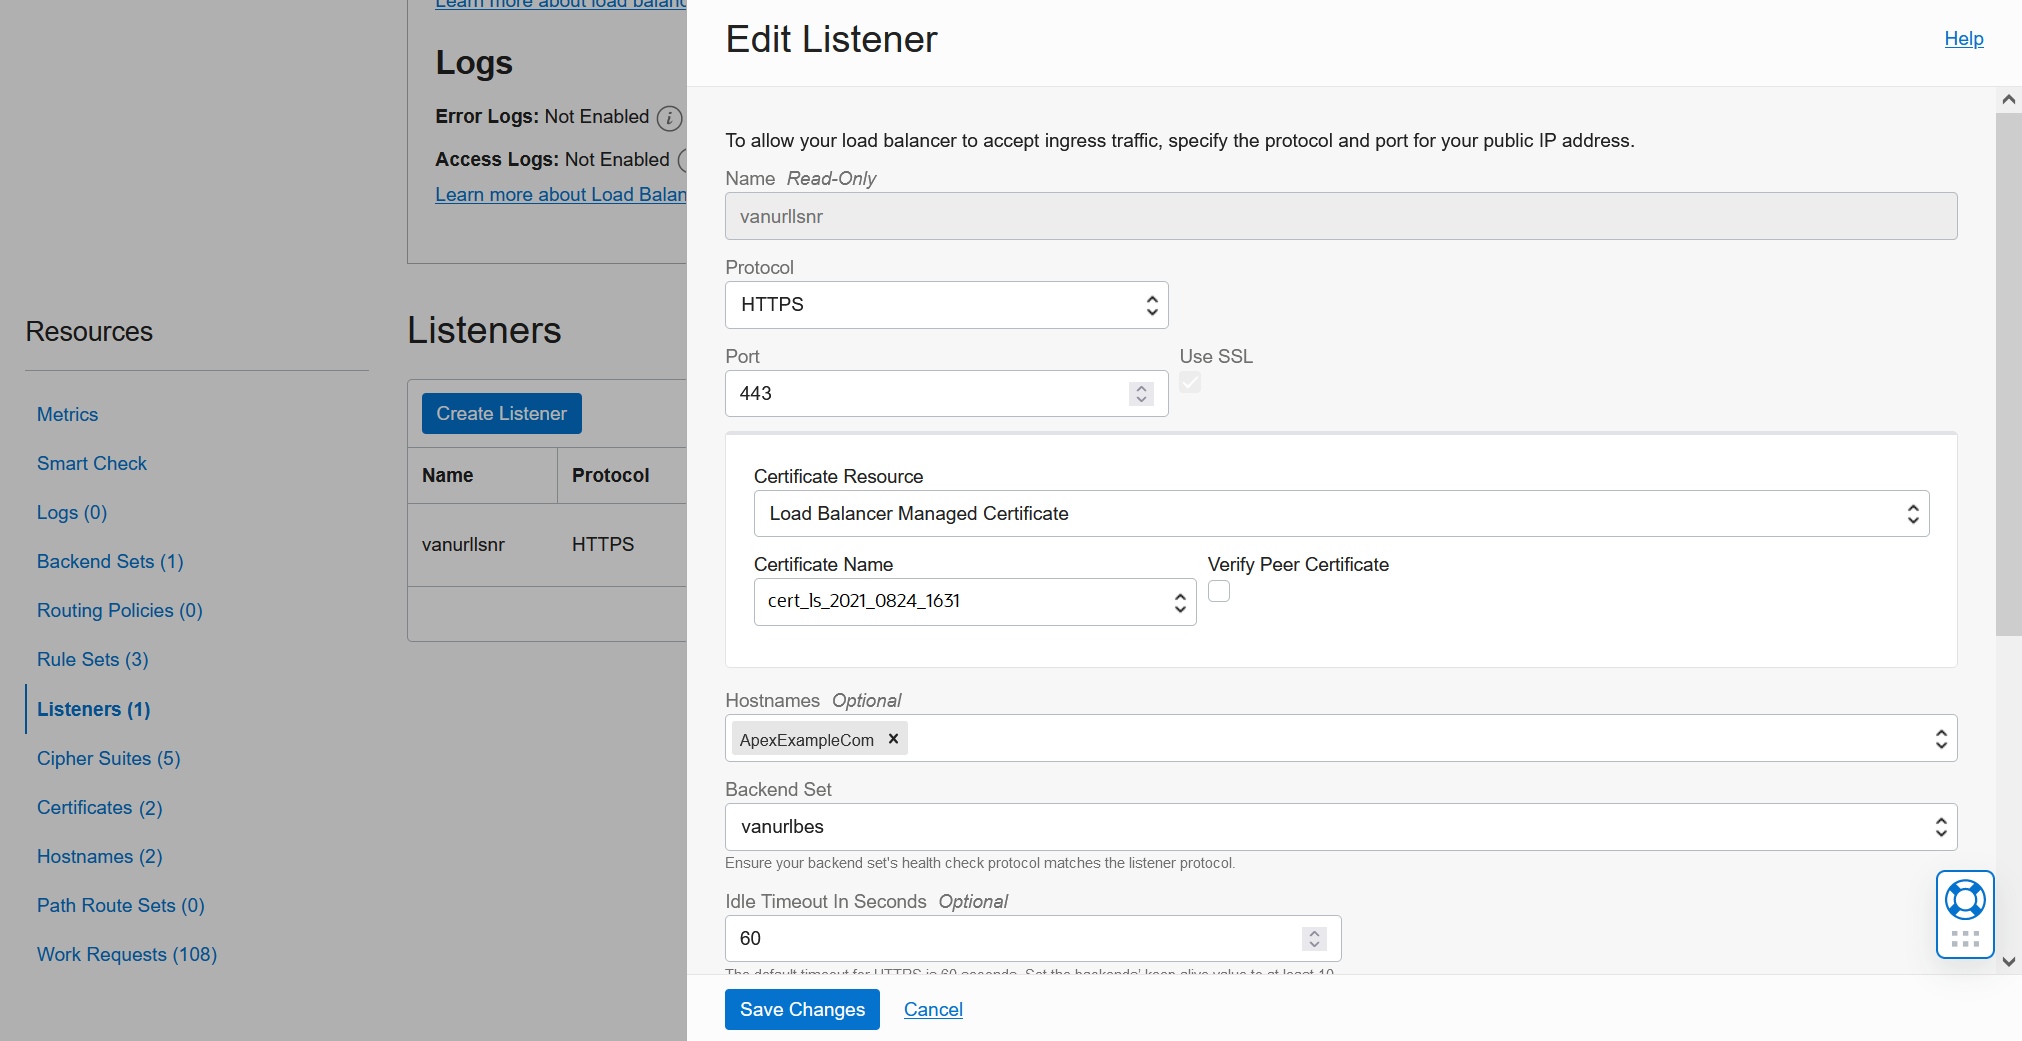
Next, add the Rule Set for your original domain from Step #1. The Listener should now be enforcing two Rules Sets.

Leave this Listener’s display name, which we set in the first blog post, unchanged. Disregard its somewhat generic name.
Save changes when done and wait for the Work Request to succeed.
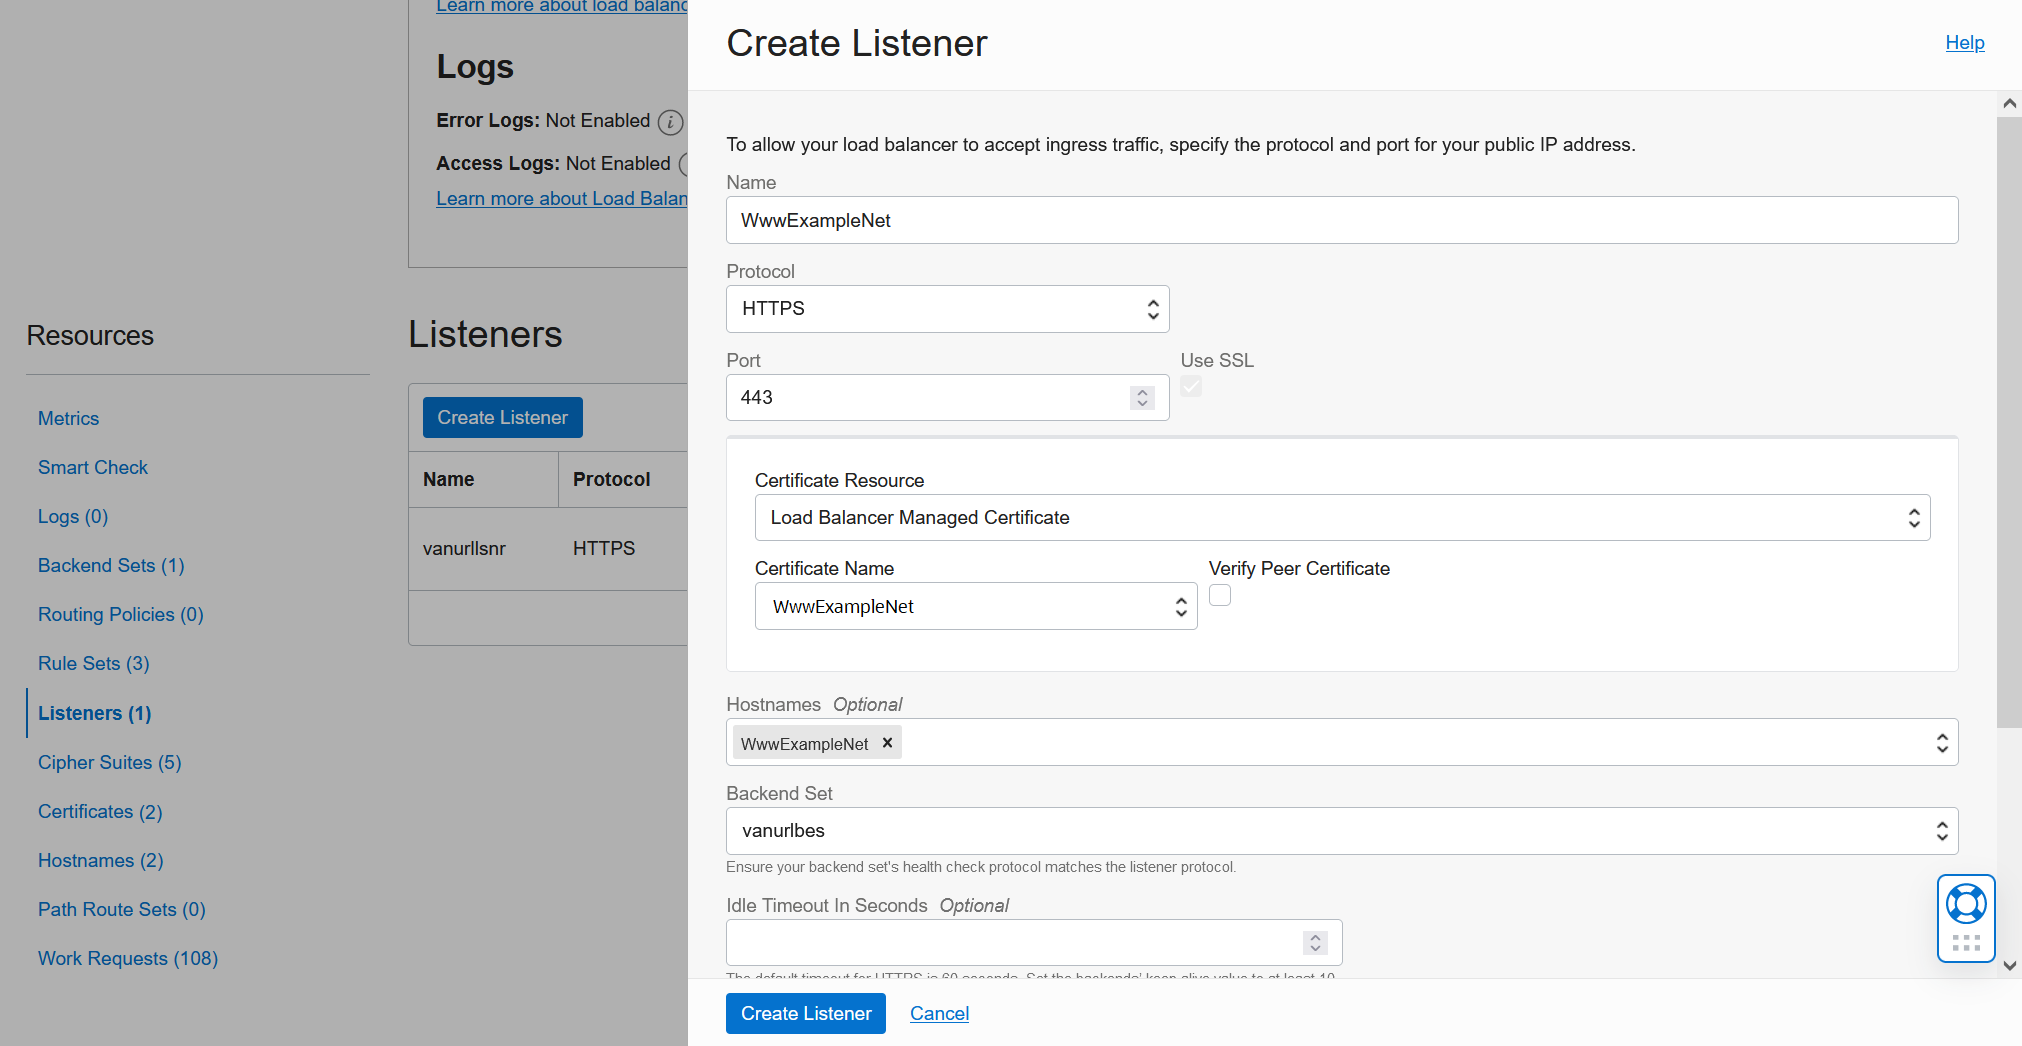
Step 5 – Create New Listener
At the top of the Listeners list, click on Create Listener. Give this new Listener a display name that refers to your new domain. Select HTTPS as the Protocol and 443 as the Port. In the Certificate Resource dropdown, select Load Balancer Managed Certificate, then select Certificate Name of the Certificate for your new domain from Step #3. In the optional Hostnames field, select the Hostname resource for your new domain from Step #2. Select the same Backend Set from prior blog posts. Note that you will not attach any Rule Sets to this Listener yet – we will do that in a later step. Save changes when done and wait for the Work Request to succeed.
Step 6 – Update APEX Apps
You now have a basic multi-Vanity URL configuration. However, if we stop here, this configuration will have an important flaw: users can access either APEX application at either of your domains. We want to expose only the original app at your original domain and only the new app at your new domain. To achieve this, we must add a short PL/SQL script to each app that executes during app initialization, detects the requested domain, and renders the app only when the correct domain is used.
Start by navigating to the APEX Workspace Sign-In page at your new domain. Because the Listener for this new domain has no Rules Sets assicated with it yet, you should be able to access the sign-in page at the domain’s base URL.
https://www.example.net
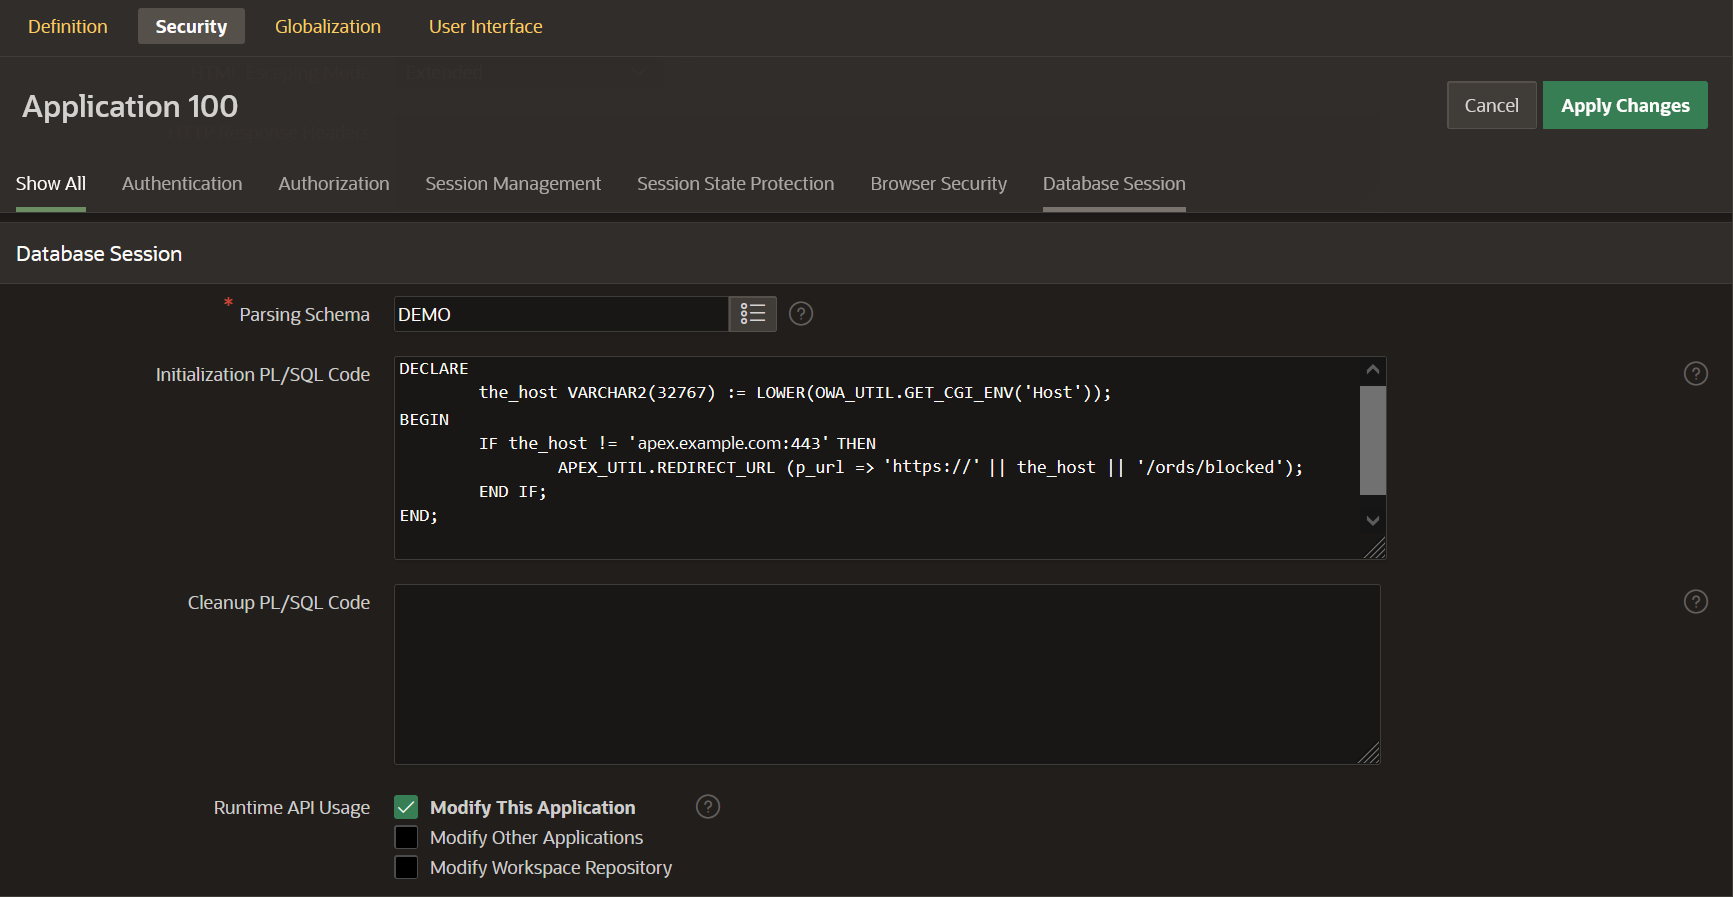
Sign in using your APEX Workspace, Username, and Password from the second blog post in this series. After signing-in, navigate to APEX App Builder, open your original app for editing, and click on its Edit Application Properties button. Under the Security tab, scroll down to Initialization PL/SQL Code. Copy the script below into this box, filling in the correct domain name where indicated. Click Apply Changes. Repeat this process for the new app as well. Sign out of the Workspace when done.
DECLARE
     the_host VARCHAR2(32767) := LOWER(OWA_UTIL.GET_CGI_ENV('Host'));
 BEGIN
     IF the_host != '<<correct domain for this app>>:443' THEN
         APEX_UTIL.REDIRECT_URL (p_url => 'https://' || the_host || '/ords/blocked');
     END IF;
 END;

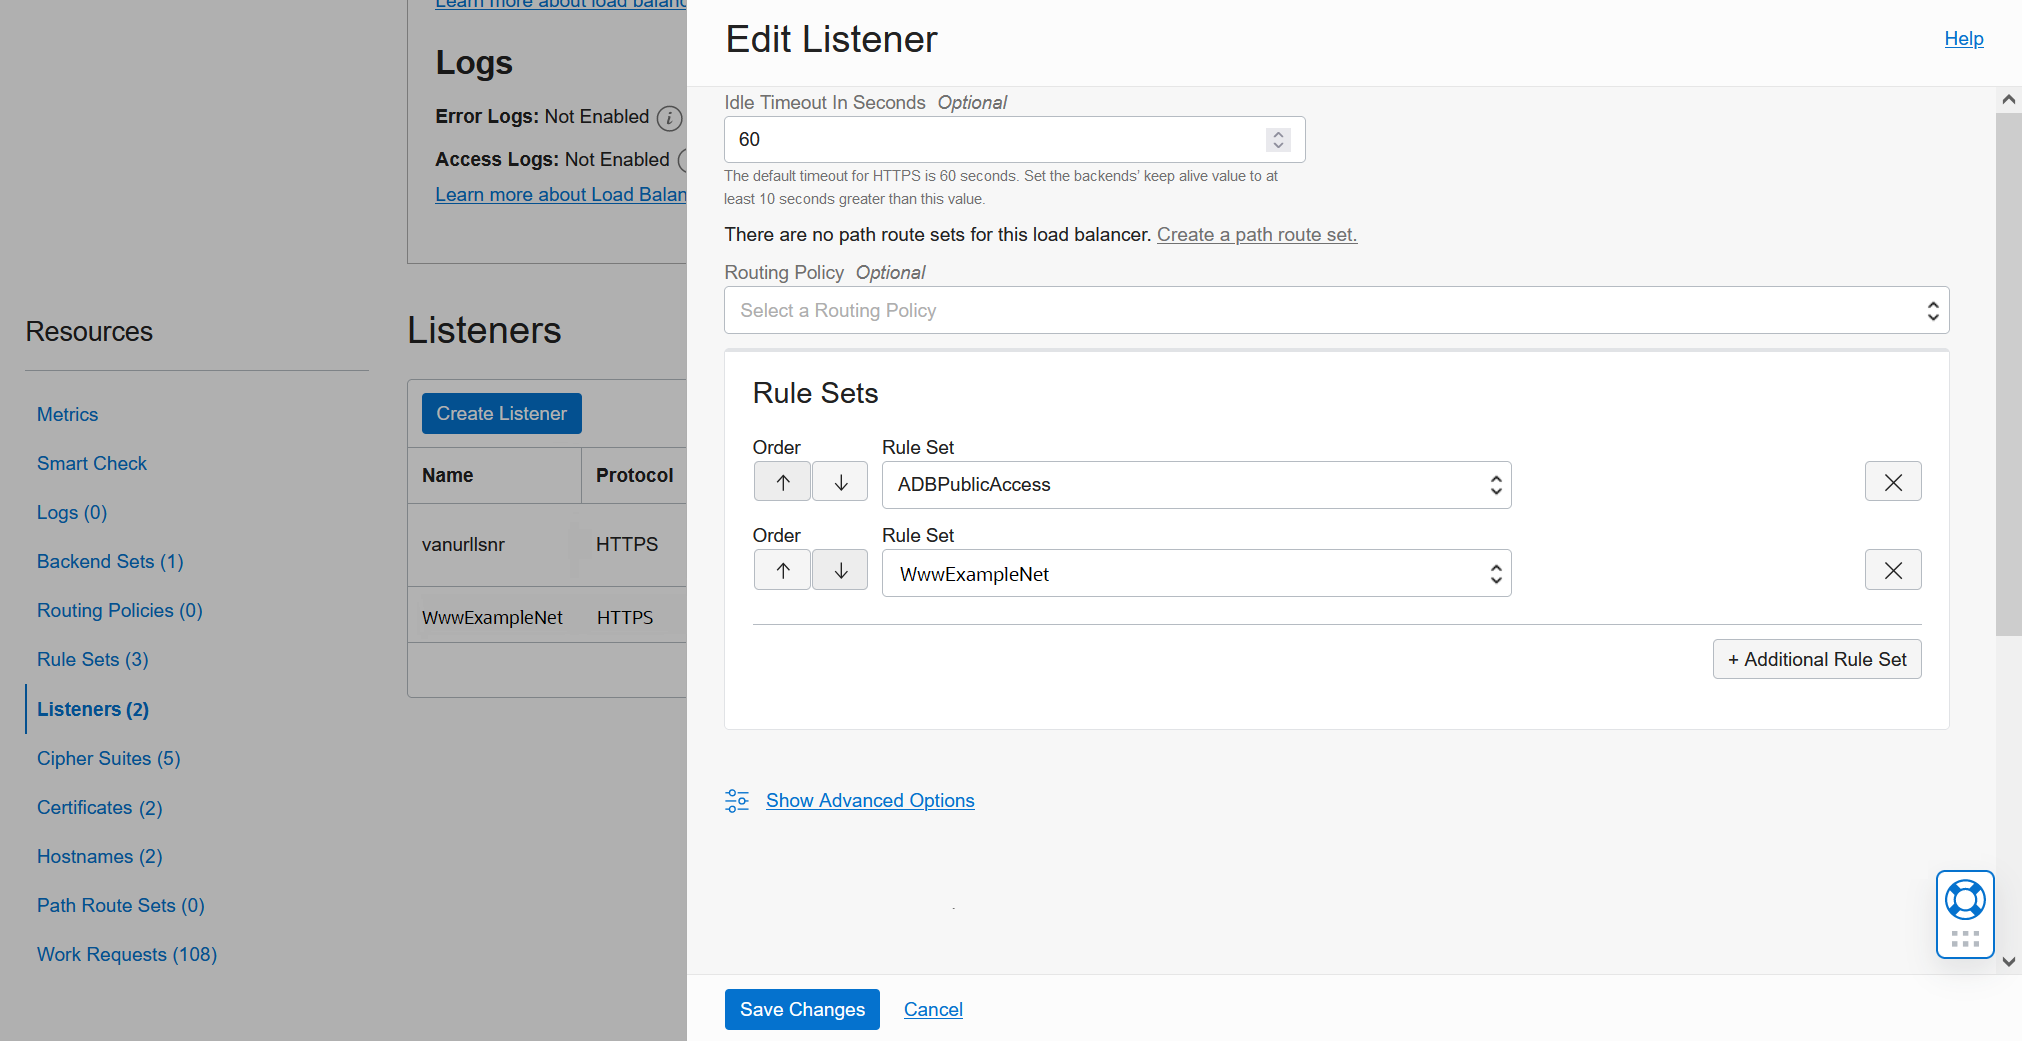
Step 7 – Edit New Listener
Go back to the Listener that you created in Step #5 and open it for editing. Add the Rule Set named ADBPublicAccess to it. Also, add the Rule Set for your new domain from Step #1. This sets a default APEX application page for the new domain. Save changes when done and wait for the Work Request to succeed.
Step 8 – Test
Open a web browser and navigate to both of your domains to verify that the multi-domain Vanity URL configuration is set up correctly. Try manually editing the APEX application aliases at the end of your URLs to ensure that each domain shows only its intended app. For example, test the following URLs:
- https://apex.example.com
- Should show the ProjectTasks app
- https://apex.example.com/ords/r/hrapps/benefitchoice
- Should return a 404 error and show /ords/blocked in the URL
- https://www.example.net
- Should show the BenefitChoice app
- https://www.example.net/ords/r/hrapps/projecttasks
- Should return a 404 error and show /ords/blocked in the URL
Conclusion
Serving multiple applications and domain names from the same database is an important optional extension to the Oracle Autonomous Database Vanity URL architecture. It is now possible to do this with a few changes to your Load Balancer and a short PL/SQL script added to your APEX apps.
Although this blog post focuses on one possible ADB Vanity URL extension, there are many ways that your Vanity URL configuration can be extended and adapted. For example, you can implement additional changes to make apps indexable by Internet search engines (SEO). Stay tuned for an upcoming blog post on this topic.
* * * * * * * * * * * * *
For a live demonstration of the multi-domain Vanity URL configuration, see this APEX Office Hours recording on YouTube:
Navigation Links for This Blog Series
Introducing Vanity URLs for APEX and ORDS on Oracle Autonomous Database
ADB Vanity URLs Part 2: Blocking APEX Developer and Administrator Tools
ADB Vanity URLs Part 3: Blocking ORDS-Provided Developer and Administrator Tools
ADB Vanity URLs Part 4: Multiple Domain Names