Overview
In the first blog post about APEX Workflow in 23.2, Simplify Business Process Management Using APEX Workflow, it was demonstrated how to build and run a sample Medical Appointment Workflow; the basic building blocks of APEX Workflow got introduced among with some Workflow management features like the Workflow Console and the Workflow plugin to start a new Workflow from a Page in the APEX application. This blog post goes a bit more into the details of this net new feature in APEX 23.2 and includes the following topics
- Workflow Development Lifecycle using Workflow Designer
- The role of the Workflow Owner and Workflow Administrator in the management of Workflows
This blog post covers Lifecycle Management and Error Handling topics related to the Medical Appointment examples.
Workflow Development Lifecycle
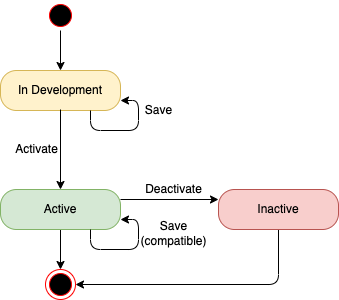
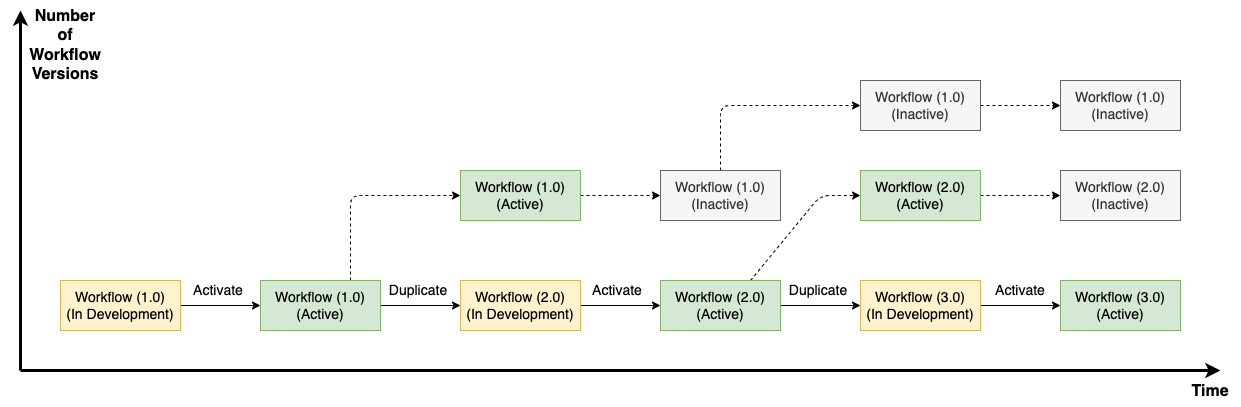
Workflow Versions in APEX follow a well-defined design-time lifecycle. It is important that APEX Workflow developers understand it since every action has far-reaching consequences both in development and production. The following state diagram shows the lifecycle is straightforward.
| Design-Time state | Description |
|---|---|
| In Development | When a new Workflow Version is initially created in Workflow Designer, its state is set to ‘In Development’. In this state, all editing capabilities are enabled for the Developer. A Workflow Version in state ‘In Development’ can be saved or activated for production. For this the Workflow Version must be valid. Before activating a version of the Workflow, a developer might want to test the Workflow. This can be done from within the APEX Developer Environment. There can be only ONE Workflow in state ‘In Development’. |
| Active | Workflows in ‘Active’ state are those enabled for production. In production APEX applications, the Workflow engine and start_workflow API consider Workflow Versions in ‘Active’ state only. There can be only ONE Workflow Version in ‘Active’ state. Workflow Versions in ‘Active’ state allow certain modifications that can be saved. An ‘Active’ Workflow Version can be deactivated so that it is no longer available for production. |
| Inactive | A Workflow Version in ‘Inactive’ state can not be further modified. We keep Workflow Versions in ‘Inactive’ state until the developer explicitly deletes them. WARNING: There might still be inflight workflow instances running on a Workflow Version in state ‘Inactive’. It is therefore advisable to double-check there are no running instances before deleting a Workflow Version in ‘Inactive’ state. |
Typical Workflow development scenario
Creating a new Workflow in Workflow Designer
A developer might choose to create a new Workflow. To create a new workflow, visit Shared Components > Workflows and click the ‘Create’ button.
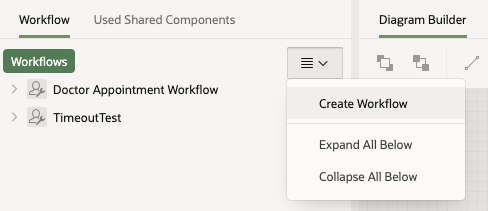
This will also create a new Workflow Version. If the application has existing workflows, new workflows might be created from the Diagram Builder directly as shown below
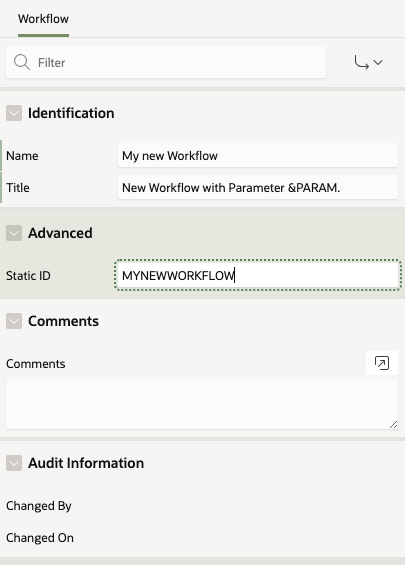
It is advisable to give the Workflow a meaningful name and static ID as the static ID is later required to start and manage the Workflow from Page Designer. Workflow parameter placeholders can be used for the title of the Workflow.
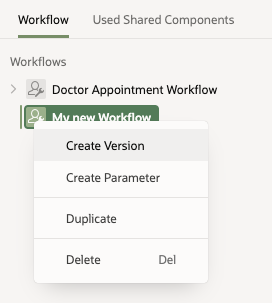
After a new Workflow has been created, a new Version of the Workflow can be created by right-click on the Workflow and select ‘Create Version’
Create Version of a Workflow
After the creation of the new version, its properties can be edited
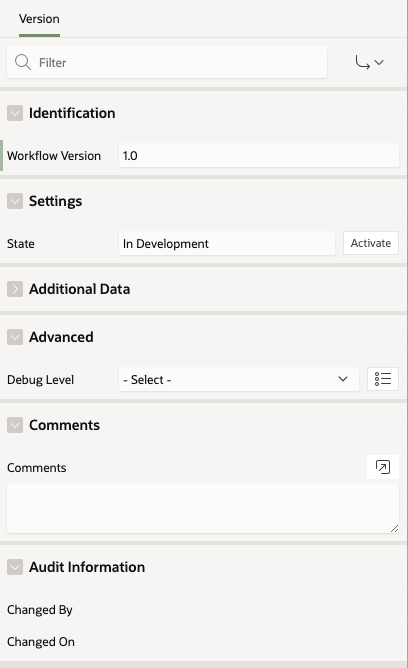
Couple of things to note here
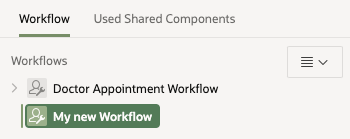
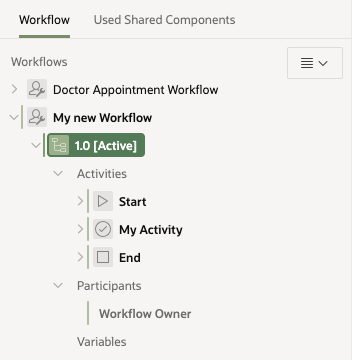
- A new Workflow Version starts in the ‘In Development’ state. A [Dev] label shows after the Workflow’s name in the Workflow Designer tree to reflect this.
- The Properties of the Workflow Version show the state of the Workflow Version as ‘In Development’. The Workflow could be activated from the properties
- For a Workflow in design-time state ‘In Development’ it is not necessary to configure Workflow Owners and Administrators as the developer has full control of the Workflow and is able to perform any action on the Workflow (for example suspending the Workflow instance, modify variables in Workflow Console etc.)
Once the Workflow is designed and valid, the developer might want to test the Workflow. So he can run the application from App Builder which eventually instantiates the Workflow from a Page and executes the Workflow.
Activating a Workflow for Production
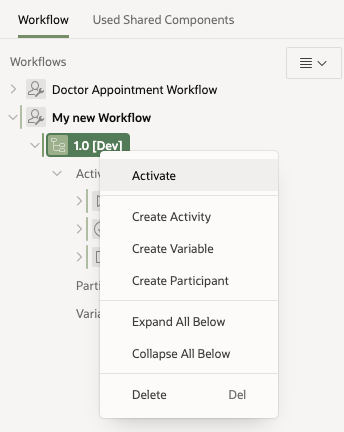
Once the Workflow is sufficiently tested by the Developer, it might be activated from Workflow Designer by
- Right-Click on the Workflow Version to open the context menu and select ‘Activate’
- Select the Workflow Version in the tree and click ‘Activate’ in the Property Settings (see screen shot above)
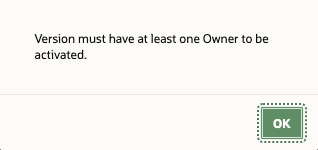
If the Workflow Version does not have at least one Workflow Owner configured, the Workflow Version is not activated. A popup window comes up asking the developer to configure at least one Owner of the Workflow before activating it.
Once everything is valid and at least one Owner configured for the Workflow Version, activating the Workflow Version should complete successfully. The developer is asked to confirm the activation.
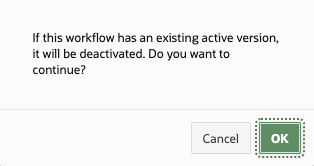
Activating a Workflow Version in Workflow Designer and Saving the activation does the following
- If there is no active Workflow Version for the Workflow, then activation will transition the Workflow Version to be activated to ‘Active’ design-time state. At this point, the Workflow Version is available for production
- If there is already an existing Active version of the Workflow, then this Workflow Version will be transitioned to ‘Inactive’ design-time state and the new Workflow Version will be activated (and transition to ‘Active’ state). It is important to understand that any in-flight instances of the now deactivated Workflow will continue to run on the ‘Inactive’ Workflow Version while new instances will be created on the now ‘Active’ Workflow Version
This completes a basic Workflow development lifecycle from where a new Workflow is created until a Workflow Version is activated for production. But how can the developer continue from here and work on new versions of the same Workflow, for example to add additional activities and/or change the flow of the existing Workflow?
Duplicate a Workflow Version
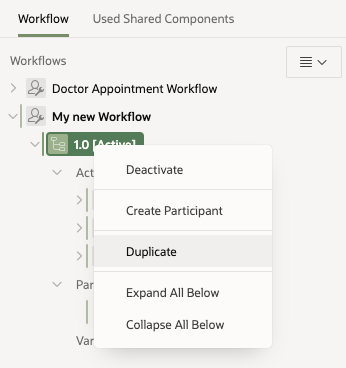
Workflow Versions can be duplicated (for example from Active Workflow Versions) to make further changes to the Workflow. For this, right click on the Workflow Version and select ‘Duplicate’.
![Duplicated version of the Workflow in [Dev] mode](/apex/wp-content/uploads/sites/15/2025/10/WF_blog_lcm_047.png)
You might want to specify a different Workflow Version name or number in the properties ‘Identification’ section of the Workflow Version like shown below
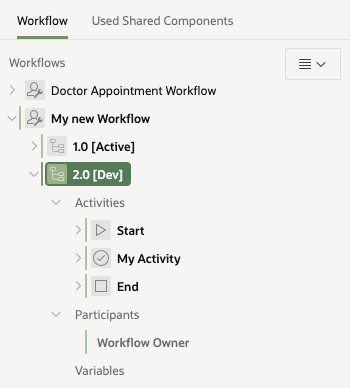
This will create an exact copy of the Workflow Version in ‘In Development’ design-time state. The developer might now apply any changes and test them from App Builder, the ‘Active’ version of the Workflow Version is not impacted by this as long as the developer choses to work with the ‘In Development’ version. Only when the developer choses to activate the modified duplicate, the existing ‘Active’ version of the Workflow will become ‘Inactive’ and the modified duplicate will become ‘Active’ when the developer next saves the workflow.
This completes the typical development lifecycle and shows how new Workflows can be brought into production by duplicate, modify, test, activate.
Customizing Active Workflow Versions
Once a Workflow Version is made ‘Active’ for production, restrictions regarding the modification of the Workflow Version are put in place. This is to avoid inconsistent behavior of in-flight instances. However, certain modifications can be performed with the Active Workflow Version as summarized in the table below –
| Editing | In Development | Active |
|---|---|---|
| Add new Activities | Yes | No |
| Remove existing Activities | Yes | No |
| Edit Start Activity | Yes | No |
| Edit End Activity | Yes | Yes, change end state Completed/Terminated |
| Add Participants | Yes | Yes |
| Add Workflow Variables | Yes | No |
| Add Activity Variables | Yes | Yes. This is useful in cases where a new parameter is needed in an Invoke API activity, Then the value for this new parameter might be sourced from a new activity variable. |
| Modify Execute Activity | Yes | Yes. The source code can be altered. |
| Modify Invoke API Activity | Yes | Yes. The package and procedure resp. function to invoke can be altered as well as the parameter binding. |
| Modify Human Task – Create Activity | Yes | Yes.
|
| Modify Send E-mail Activity | Yes | Yes |
| Modify Send Push Notification Activity | Yes | Yes |
| Modify Switch Activity | Yes | Yes. This is limited to edit the branch conditions. No new branches can be added or existing ones removed. Also the Switch Type can not be altered. However the Condition settings can be modified |
| Modify Wait Activity | Yes | Yes. The settings for Timeout Type can be altered. |
Summary
The Workflow Designer supports an iterative development process where Workflow Versions are created in ‘In Development’ design-time state, eventually get Activated for production and become ‘Inactive’ when new versions of the Workflow are created. Below diagram illustrates this iterative development process
Managing Workflows in Workflow Console
Workflows can be managed in the Workflow Console. Workflow Consoles can be created from the App Builder ‘Create Page’ wizard for various report contexts (aka workflow roles)
- Initiated by Me
A Workflow Console for Report Context ‘Initiated by Me’ will show all workflows in the APEX workspace that have been initiated (started) by the current logged in user.
- Workflow Owner
The Workflow Console for context ‘Workflow Owner’ shows all worfklows in the APEX workspace where the current logged in user is configured as a Workflow Owner.
- Workflow Administrator
The Workflow Console for report context ‘Workflow Administrator’ shows all workflows in the APEX workspace where the current logged in user is configured as a Workflow Administrator.
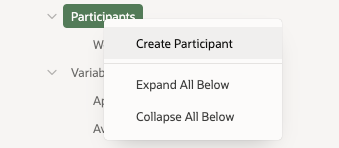
Participants of a Workflow can be created very similar to how they are configured in the Approvals Component. To create a Participant, open a Workflow Version in Workflow Designer and right-click on ‘Participants’ and then select ‘Create Participant’
This will add a new Participant and the settings of the new participant can be configured in the Properties section
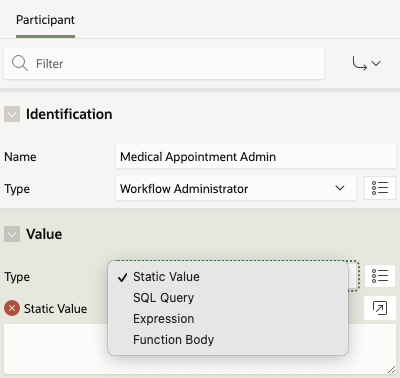
The Type of the participant can be either Workflow Owner or Workflow Administrator and the Value can be one of the following
- Static Value
- SQL Query
- Expression
- Function Body
Workflow Operations
Depending on the role, various operations are enabled for a Workflow (instance). The following table gives an overview of the operations and their availability depending on the role
| Operation | Initiated by Me | Workflow Owner | Workflow Administrator |
|---|---|---|---|
| Terminate Workflow | Yes | Yes | Yes |
| Retry Workflow | No | Yes | Yes |
| Suspend Workflow | No | No | Yes |
| Update Variables | No | No | Yes |
| Resume Workflow | No | No | Yes |
Managing Faulted Workflows
Lets assume a Workflow has been started but then, for some reason transitions to Faulted state because of some error as shown below
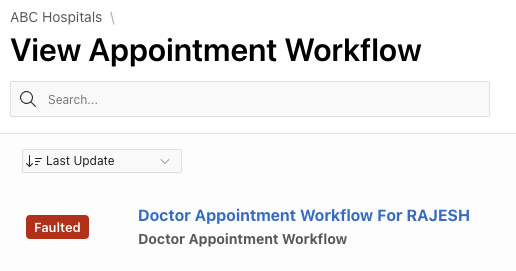
At this point it is not known what went wrong exactly, but the workflow shows up in ‘Faulted’ state in Workflow Console. To get further details click on the workflow
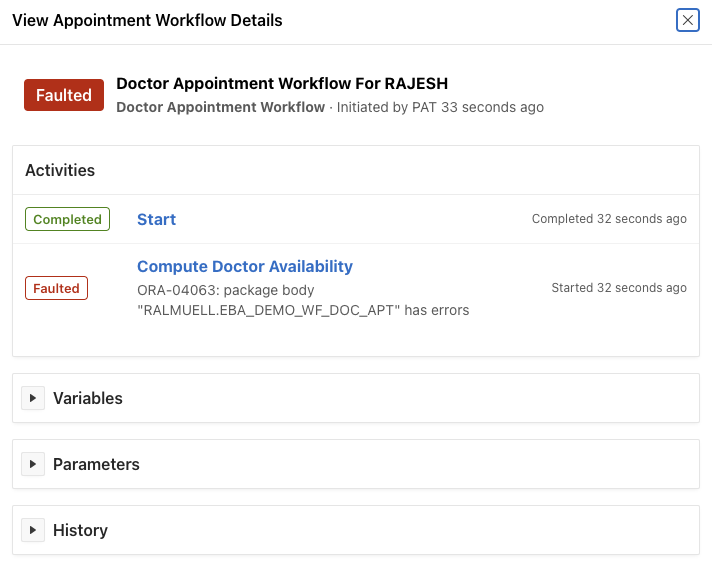
From the details page of the Workflow it is clear the Workflow failed in Activity ‘Compute Doctor Availability’ and it seems the issue is an PL/SQL package body with errors. Since the activity is implemented by an ‘Invoke API’ activity, the developer should look into the mentioned package and fix any errors and recompile the package body. From a Workflow perspective, the Workflow Owner or Administrator is now needed. The initiator of the workflow can’t do anything to make progress in the Workflow.
Retry Faulted Workflows
Login to a Workflow Console with report contex ‘Workflow Owner’ (if none exist create one in the same or a different application) as someone who is configured as Workflow Owner of the Doctor Appointment Workflow.

By clicking on the Faulted Workflow, the Owner sees additional operations that are enabled for the Workflow Owner.
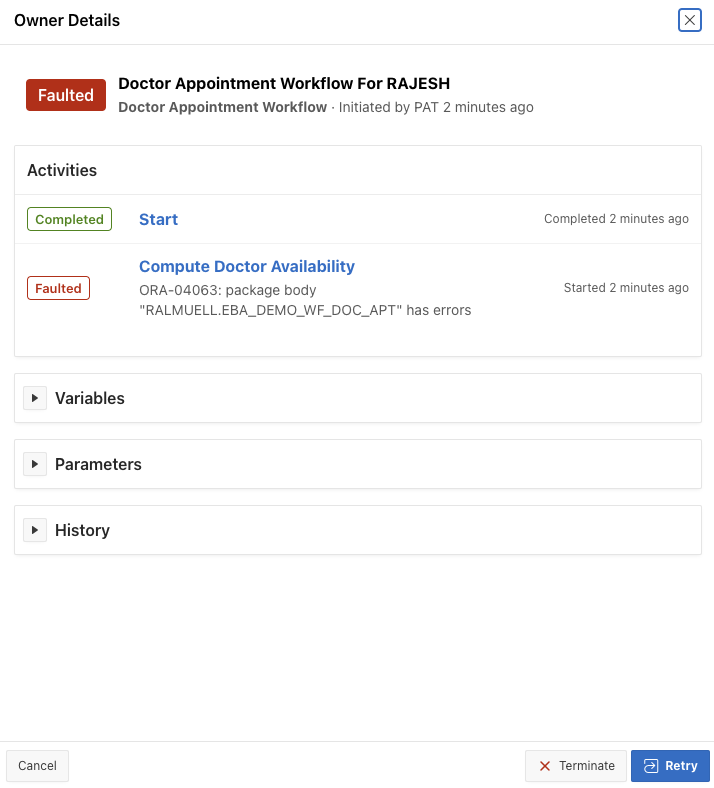
The Workflow Owner might decide to just Retry the Faulted Workflow. Unfortunatley in this situation, the error shows up again as seen from below detail page of the ‘Compute Doctor Availability’ activity.
At this point, the Workflow Owner should get in touch with a Developer to check the package body of EBA_DEMO_WF_DOC_APT to make sure it compiles successfully. Once this is done, the Workflow Owner might want to ‘Retry’ again. After the ‘Retry’, the Workflow is ‘Active’ again which is an indicator, that the retry was successful.

A quick check of the Workflow shows the following
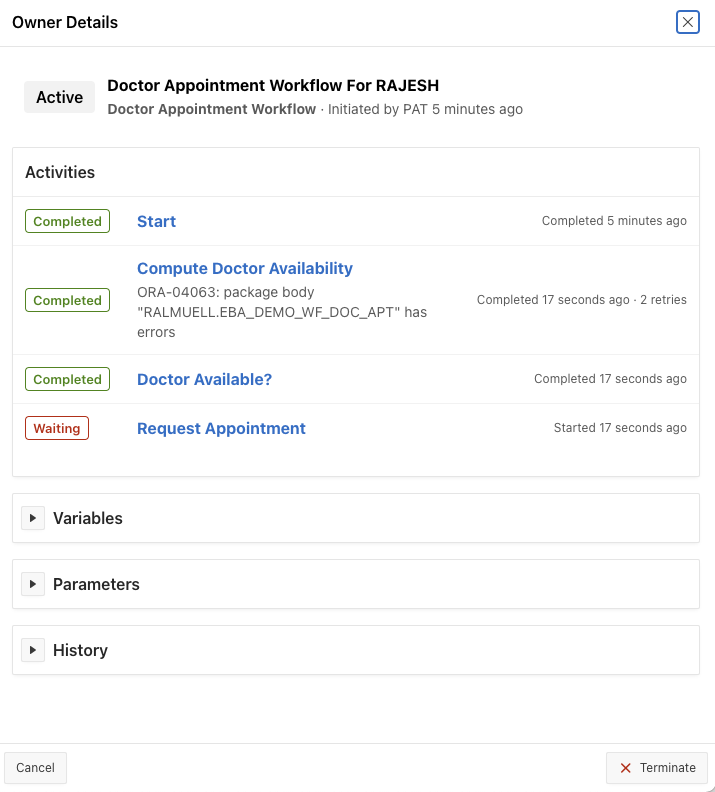
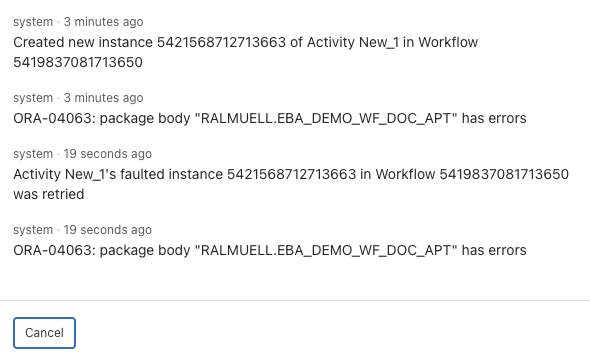
The ‘Compute Doctor Availability’ activity that caused the Workflow to fail earlier is now ‘Completed’ and the Workflow moved on and is now waiting for activity ‘Request Appointment’ to complete which is the normal behavior as this activity is an Approval Task and some Potential Owner needs to come to the Unified Task List and Approve or Reject the task for the Workflow to move on. The Workflow Owner might check the history of activity ‘Compute Doctor Availability’
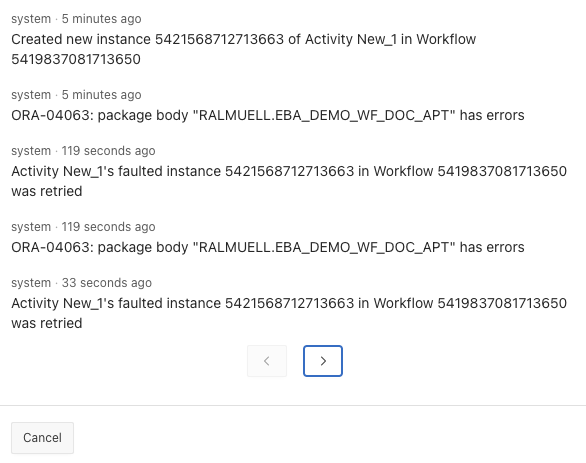
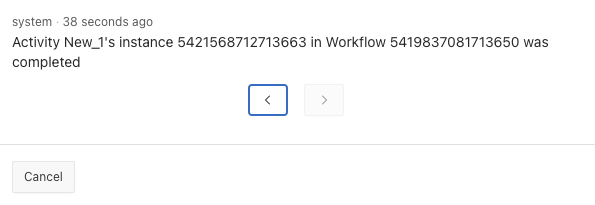
The history of the activity ‘Compute Doctor Availability’ shows that the activity was retried two times. The first retry resulted in a Faulted activity again while the second retry was successful and the activity completed.
Workflow Administrator
The Workflow Administrator has far reaching permissions on Workflows, it is a real super-user and therefore must be carefully chosen. Consider the following use case in the Doctor Appointment Workflow.
- The Workflow is started by Hospital Management person ‘Pat’ for patient Rajesh
- A Workflow Administrator comes in and decides the Appointment is approved no matter how the doctor decides
- As the Approver, the Workflow Administrator specifies ‘Hospital Management’
Below is the Doctor Appointment Workflow as seen by a Workflow Administrator. For this a Workflow Console with report context ‘Workflow Administrator’ must exist (can be created in the Medical Appointment or separate application).

By selecting the Workflow for Rajesh, the Workflow Details show up
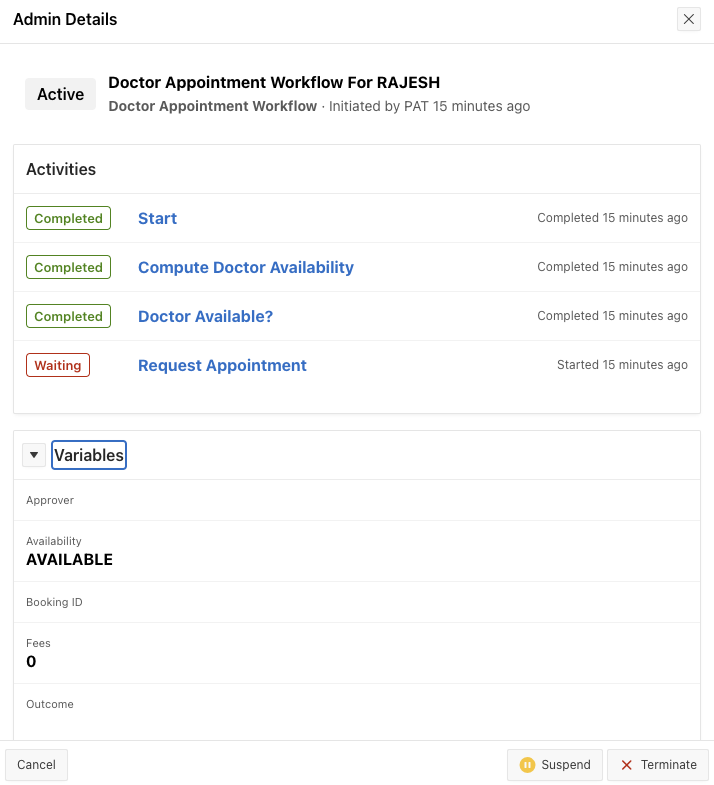
Also shown here are the Workflow Variables and their values. At this point, the Workflow is waiting for an Approval Task to complete with an Outcome (APPROVED or REJECTED) and Approver value. However the Workflow Administrator needs to jump in and steer the Workflow in a direction. Reasons for this are manifold, maybe the patient needs an urgent appointment at the requested time.
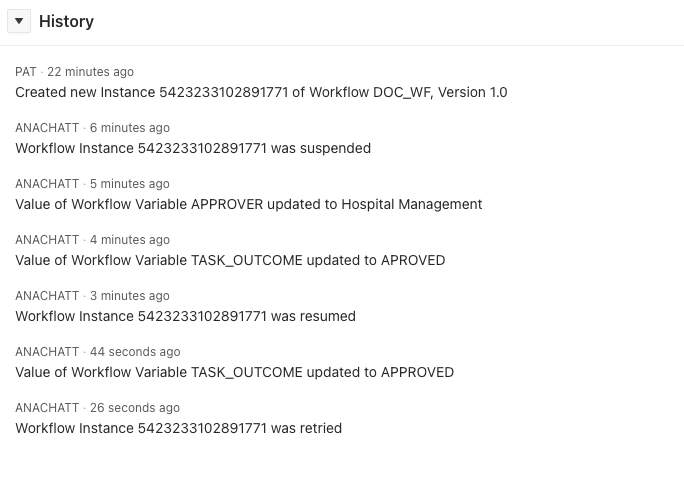
So in order to steer the Workflow in a certain direction, the Workflow Owner will first ‘Suspend’ the running Workflow after which the Workflow shows as ‘Suspended’ in the Workflow Console

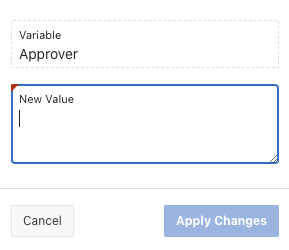
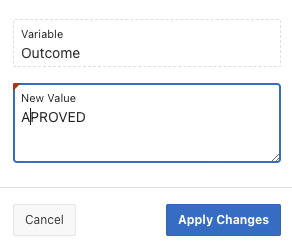
Now the Workflow Administrator can go in and perform the required changes to the Workflow by overriding some Workflow Variables
- Edit Workflow Variable ‘Approver’ and set it to value ‘Hospital Management’
- Edit Workflow Variable ‘Outcome’ and set it to value ‘APROVED’ (the typo here is intentional)
After this, the Workflow Administrator decides to ‘Resume’ the Workflow. The Workflow will transition to state ‘Active’ again. At this stage, the Workflow is still waiting for the Approval Task to complete. Now let’s assume a doctor is opening the Unified Task List; there the appointment request for patient Rajesh is shown which the doctor wants to reject because of an appointment with a friend that day. So the doctor checks the Task and choses to Reject it.
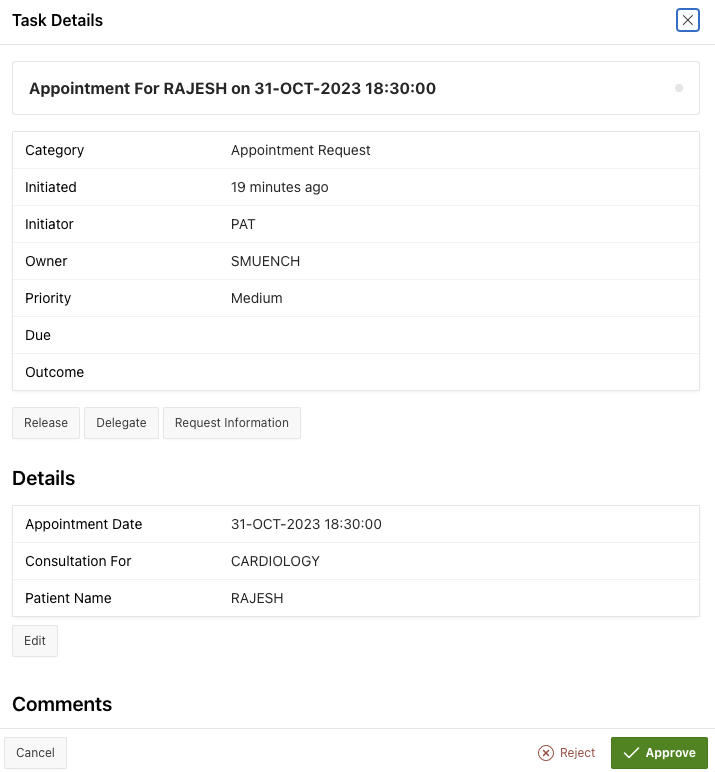
By rejecting the Task, the activity ‘Request Appointment’ is completed in the Workflow and the Workflow continues executing the next activities.

But wait, what happened? Why is the Workflow in a ‘Faulted’ state now, what went wrong?
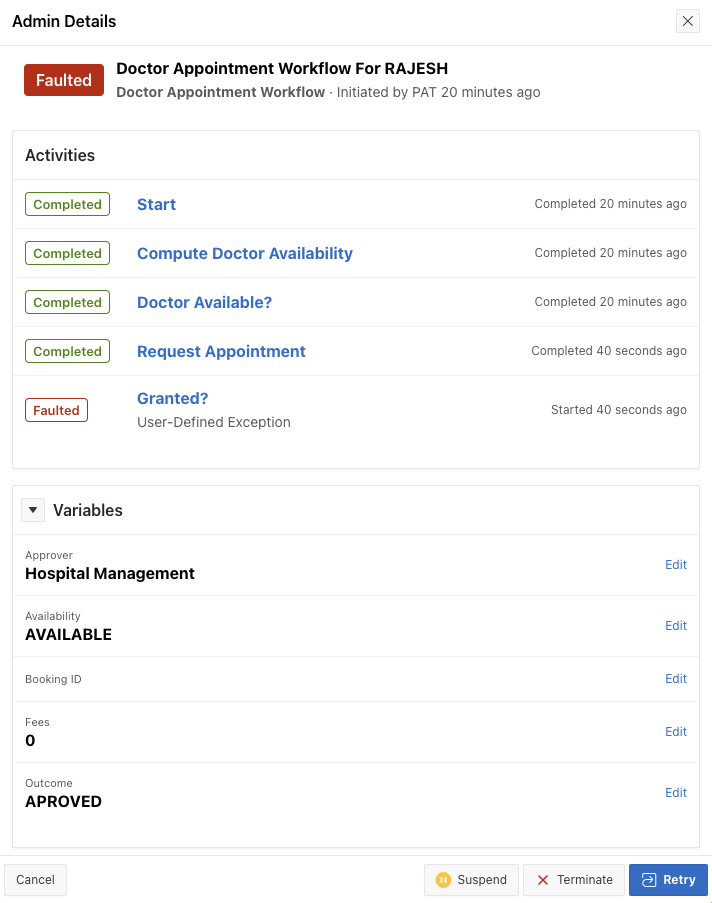
Now the Workflow Administrator comes in and makes couple of observations
- Variable value of ‘Approver’ is set to ‘Hospital Management’ as desired although the Task itself was approved by ‘SMUENCH’
- Variable value of ‘Outcome’ is set to ‘APROVED’ although SMUENCH Rejected the Task.
- But wait, there is a typo in ‘APROVED’ which should be ‘APPROVED’
- Because of the typo, the Switch activity ‘Granted’ is failing because this activity checks for ‘APPROVED’ and ‘REJECTED’ but not for ‘APROVED’
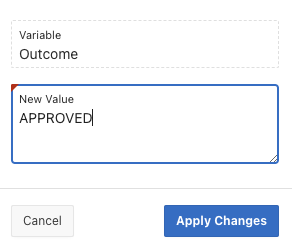
The fix for this is quite simple and the Workflow Administrator will do the following
- Edit Workflow Variable ‘Outcome’, correct the typo and set it’s value to ‘APPROVED’
- Retry the Workflow

The aftermath of activity ‘Granted?’ reveals the following:
- The activity was Faulted at some point
- After fixing the typo and modifying the variable ‘Outcome’ from ‘APROVED’ to ‘APPROVED’ the activity was retried and then completed successfully.
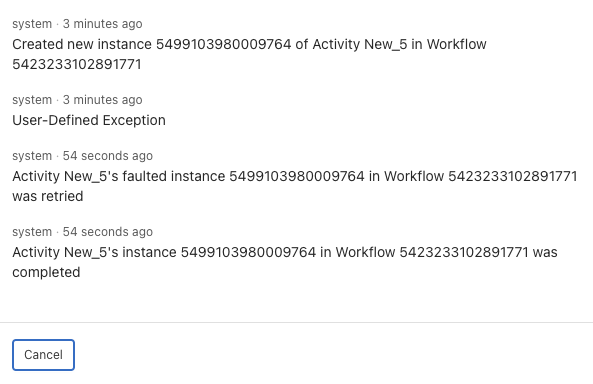
All of the above operations are persisted in the Audit Log of the Workflow for a complete history and to later have exact documentation what happened by whom and when.
API’s for the management of Workflows
The following public API’s are available in package APEX_WORKFLOW for the management of Workflows
| Public API | Description |
|---|---|
| set_log_level | Set the log level of a Workflow (instance). Log levels are constants of package wwv_flow_debug_api |
| update_variables | Updates (modifies) variables of a Workflow. Workflow Variables can be modified only when the Workflow is in ‘Suspended’ state. |
| suspend | Suspends a Workflow. |
| terminate | Terminates a Workflow |
| retry | Retries a Workflow in ‘Faulted’ state. |
| resume | Resumes a Workflow in ‘Suspended’ state. |
| terminate_faulted_workflows | Terminate all faulted workflows of an APEX application |
| refresh_participants | Re-calculates the participants of a Workflow based on the current active Workflow Version. This is useful in the case where participants (Owners, Administrators) got added in Workflow Designer and need to be considered in an active Workflow |
| remove_development_instances | This will remove (purge) all workflow instances for an application and workflow static ID that have been created in ‘DEV’ mode by a developer |
Public SQL Views for Workflow
APEX Workflow exposes public SQL Views for both the design-time metadata as well as the Workflow Runtime.
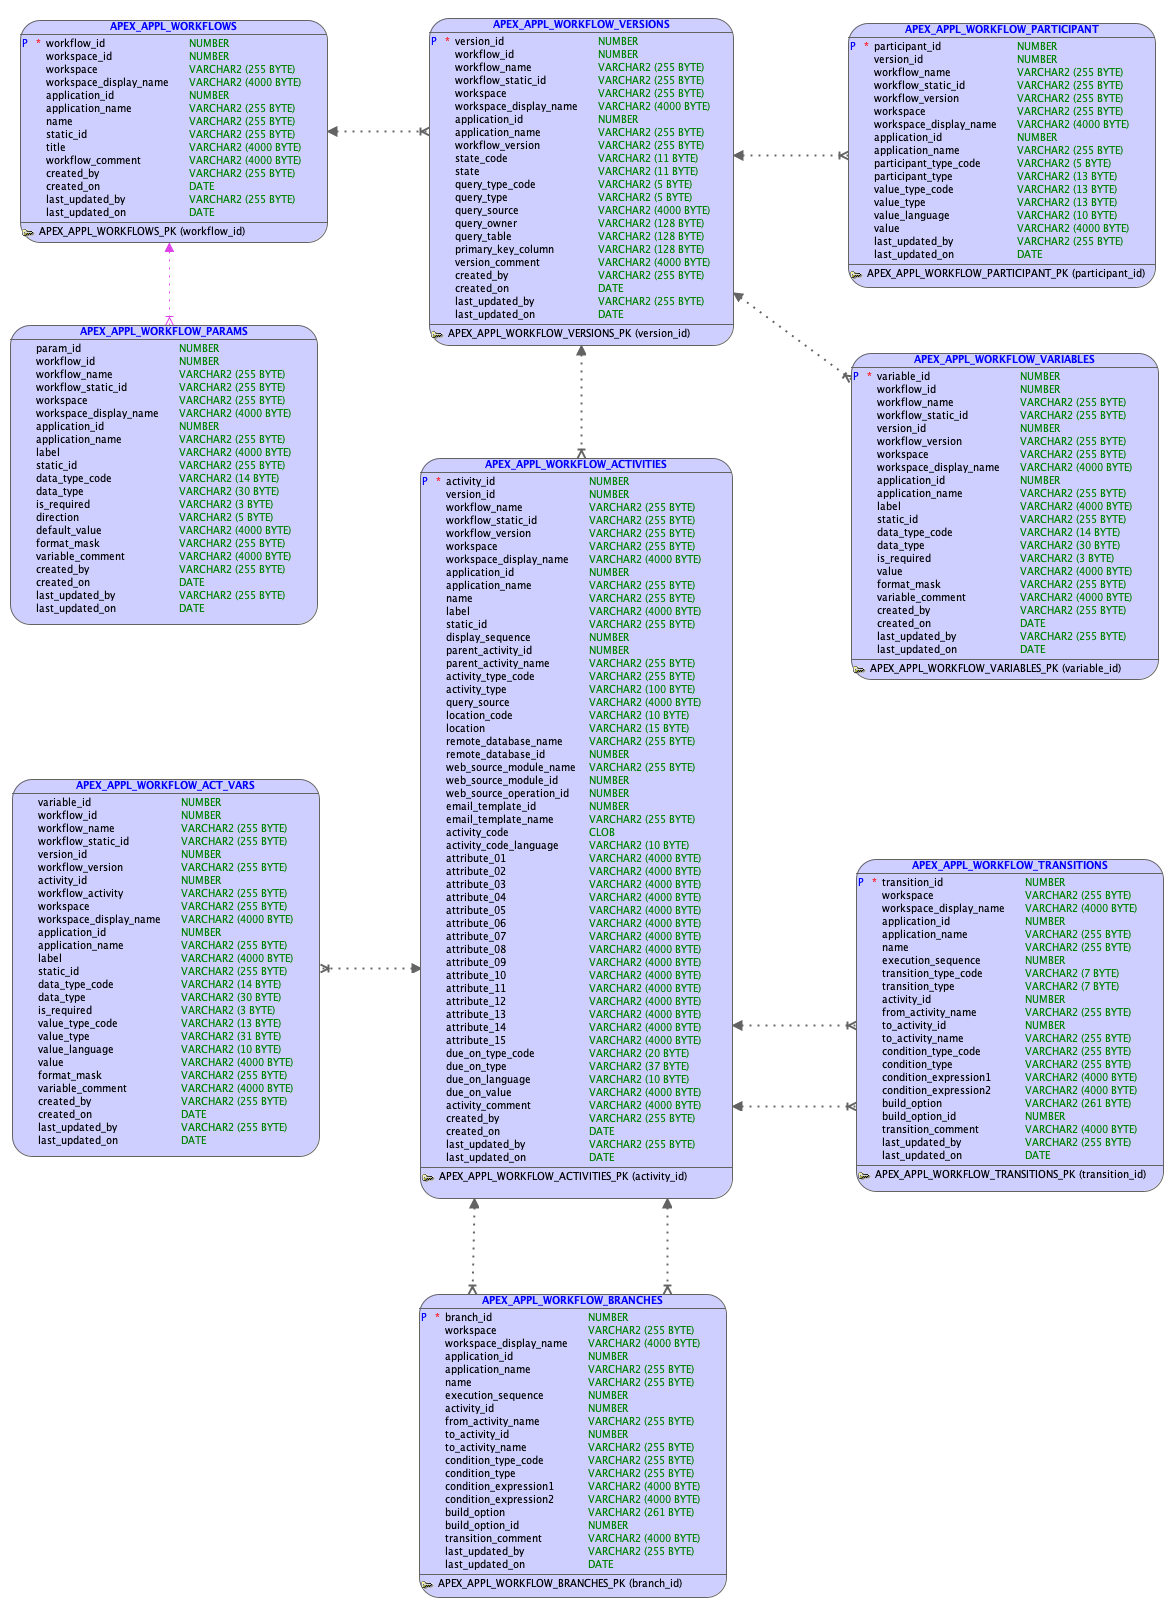
SQL Views for Workflow design-time metadata
The following diagram gives an overview of the design-time metadata and relationships
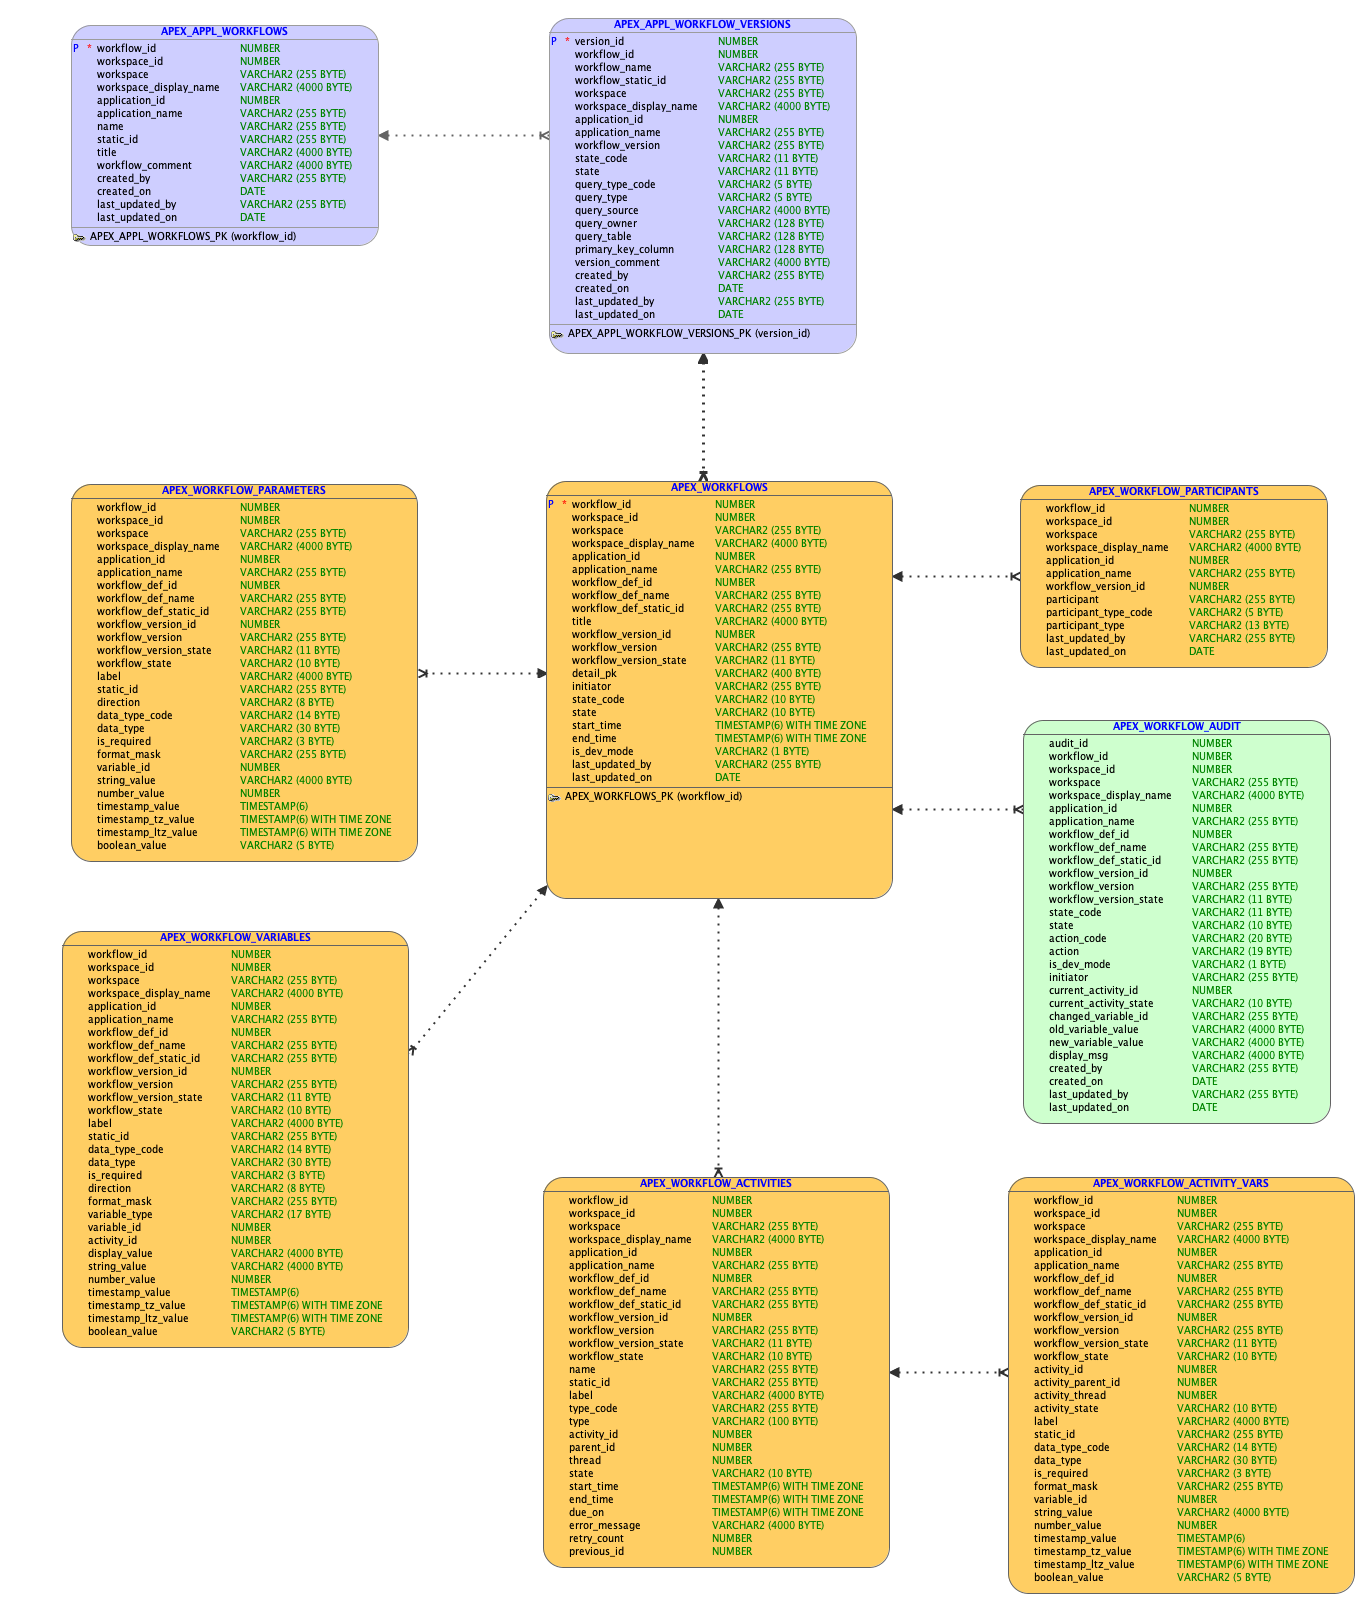
SQL Views for Workflow runtime data
Below ER diagram gives an overview of the Workflow runtime views
What did you learn?
In this blog you learned
- The complete Development Lifecycle of Workflows
- Workflow Versions in states ‘In Development’, ‘Active’ and ‘Inactive’ and the meaning of it
- Activating a Workflow Version for production
- Running a Workflow in ‘In Development’ state from App Builder
- Debugging into Faulted Workflows and retry Workflows as a Workflow Owner from the Workflow Console
- Suspending a Workflow, Updating Variables and Resuming a Workflow as a Workflow Administrator
What comes next?
In upcoming blog posts we’ll cover more advanced use cases, for example
- Implement simple Process Collaboration with APEX Workflow and Flows for APEX using Oracle Database 23c Transactional Event Queues
- Interoperability with external micro-services (for example Graal.cloud)