Oracle Cloud Infrastructure (OCI) Generative AI Agents is a fully managed service that combines large language models (LLMs) with retrieval-augmented generation (RAG) to deliver accurate, real-time answers from your enterprise data. It enables users to interact naturally with diverse knowledge bases and powers intelligent virtual agents that offer personalized, context-aware customer experiences.
Oracle APEX is the world’s most popular low-code application platform, designed to help developers quickly build and deploy secure, scalable web and mobile apps. It simplifies the development process, allowing you to focus on solving business problems while APEX handles the underlying complexities.
Integrating OCI Generative AI Agents with Oracle APEX allows developers to enhance their applications with intelligent, AI-driven chat interfaces. By connecting to knowledge bases stored in OCI Object Storage or Oracle Database 23ai, applications can provide users with accurate, context-aware responses derived from enterprise data.
What are OCI Generative AI Agents?
OCI Generative AI Agents is a fully managed service that combines large language models with AI tools to create intelligent virtual agents. Key features include multi-turn conversations, context retention, custom instructions, guardrails for data security, and optional human-in-the-loop. It supports tools like ready-to-use SQL Tools, ready-to-use RAG tools that work with knowledge bases, and the Custom Function Calling Tool. Typical use cases range from customer support to financial analysis and travel planning, offering AI-powered, context-aware responses drawn from enterprise data sources. For more details, visit the official documentation.
What is the Ready-to-use RAG Tool?
A RAG tool in Generative AI Agents retrieves information from one or more knowledge bases and aims to respond with relevant and context-aware information in natural language.
OCI Generative AI Agents RAG tool enables applications to provide accurate, context-aware responses by retrieving information from one or more knowledge bases and generating natural language answers. It supports various data onboarding methods and interaction channels, including chat interfaces and APIs. Key features include hybrid search capabilities (lexical and semantic), multi-turn conversations, content moderation options, and the ability to interpret data from two-axis charts and reference tables in PDFs. Additionally, it offers source attribution for every answer, ensuring transparency and accountability.
The RAG tool supports multiple knowledge base data types:
Service-Managed Option: OCI Object Storage files, allowing up to 1,000 text and PDF files of 100 MB each.
Bring Your Own (BYO) Options: Oracle Database 23ai vector search and OCI Search with OpenSearch ingested and indexed data.
This blog post covers integrating OCI Generative AI Agents RAG Tool with Oracle APEX by leveraging OCI Object Storage files as a knowledge base.
Prerequisites for Building this App
An Oracle Cloud Infrastructure account.
An OCI compartment. You can use the pre-configured tenancy root compartment or create your own.
The logged-in user should have the necessary privileges to create and manage Autonomous Database instances in this compartment. You can configure these privileges via an OCI IAM Policy
Steps for Integration
Create an Agent in OCI Generative AI Agents
Add API Keys in the OCI Console.
Create Web Credentials in Oracle APEX.
Manage Documents in OCI Object Storage with Invoke API
Create an Ingestion Job using OCI Ingestion Job REST APIs.
Configure and Invoke the Create Session REST API
Create and Customize Classic Report for the chat Interface.
Create Dynamic Actions to Integrate with OCI Generative AI Agents
1. Create an Agent in OCI Generative AI Agents
To create an agent in the Generative AI Agents service, follow the steps outlined below. Make sure you have the necessary permissions to manage the service before you begin.
Navigate to the OCI Console: Open the Console and select a region where Generative AI Agents is available, such as US Midwest (Chicago) or UK South (London). Go to the Agents list page and click Create agent.
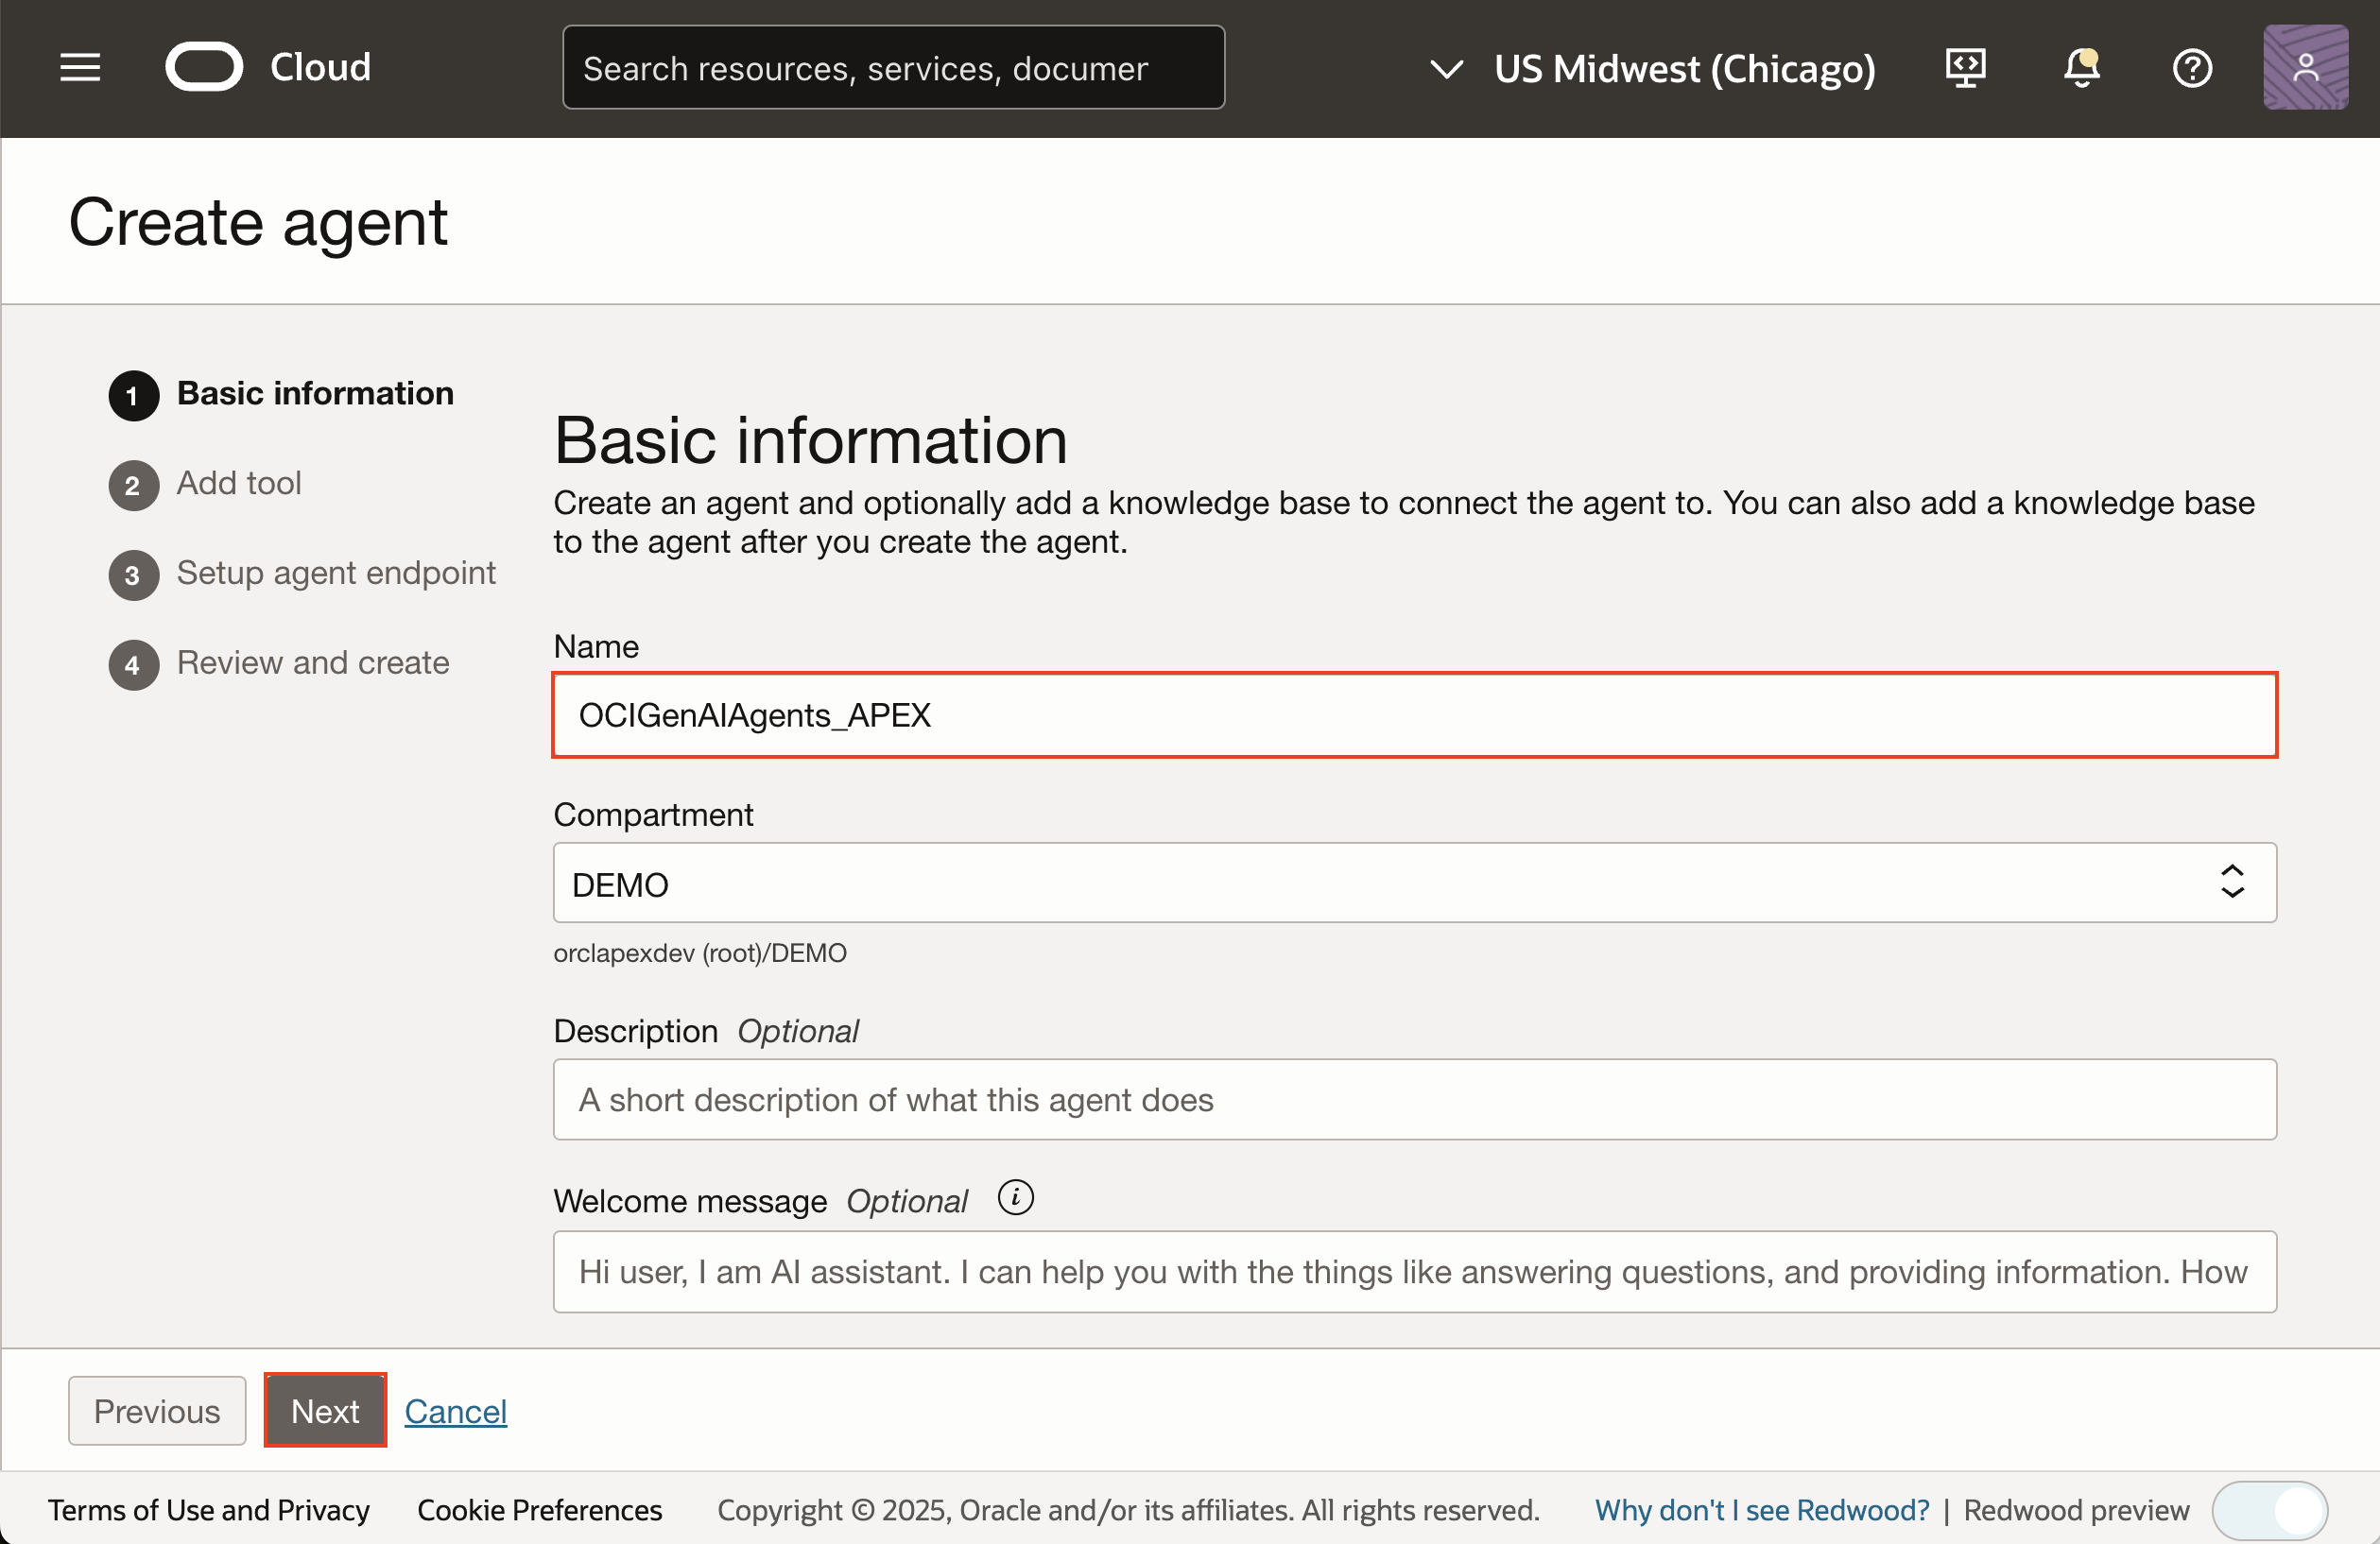
Under Basic Information, provide the following details:
Name: Must start with a letter or underscore. You can use letters, numbers, hyphens, or underscores (1–255 characters).
Compartment: Choose where to store your agent.
Description: (Optional) Add a short description.
Welcome Message: (Optional) Set a greeting users will see when starting a chat. If left blank, a default message appears.
Routing Instructions: (Optional) Guide how tools should be used. For example: “Always use the SQL tool first.”
Tags: (Optional) Add tags if needed. You must have tagging permissions.
Figure 1: Enter Basic Information for Creating Agent
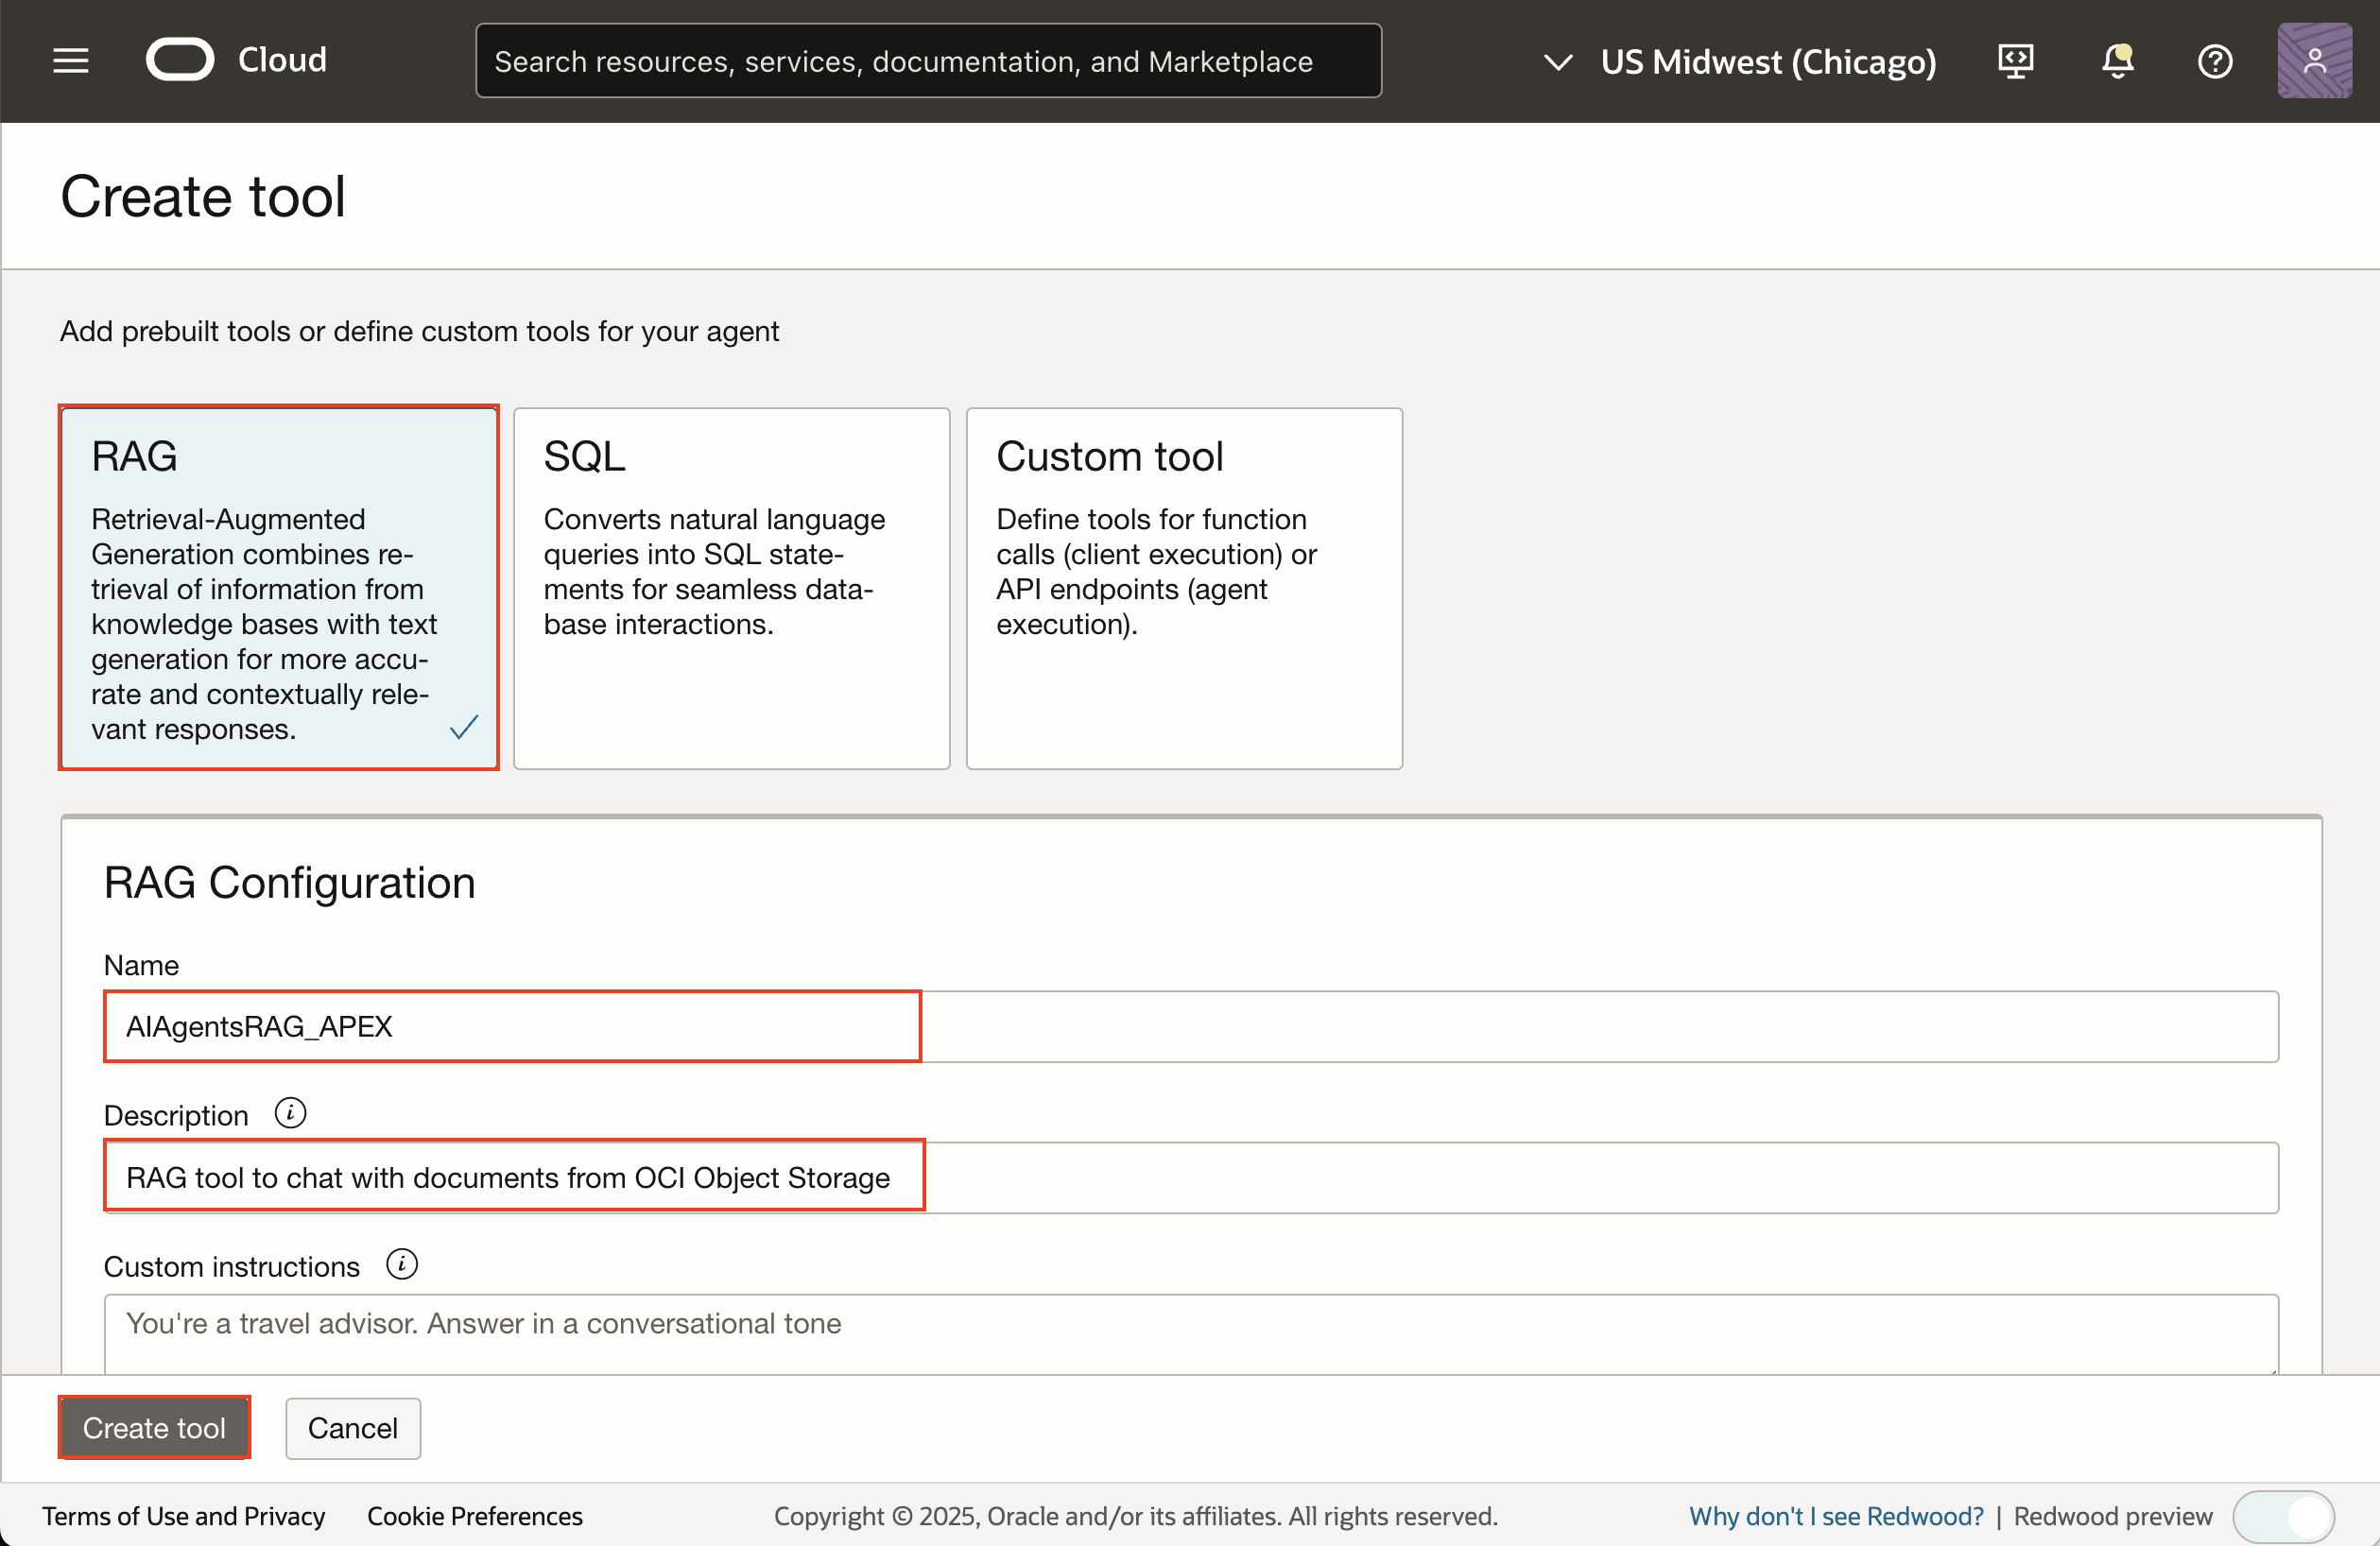
Set up the RAG tool for your agent.
Figure 2: Select RAG Tool
Note: This step does not create the tool itself – the tools are created after the agent setup. You can add more tools later if needed.
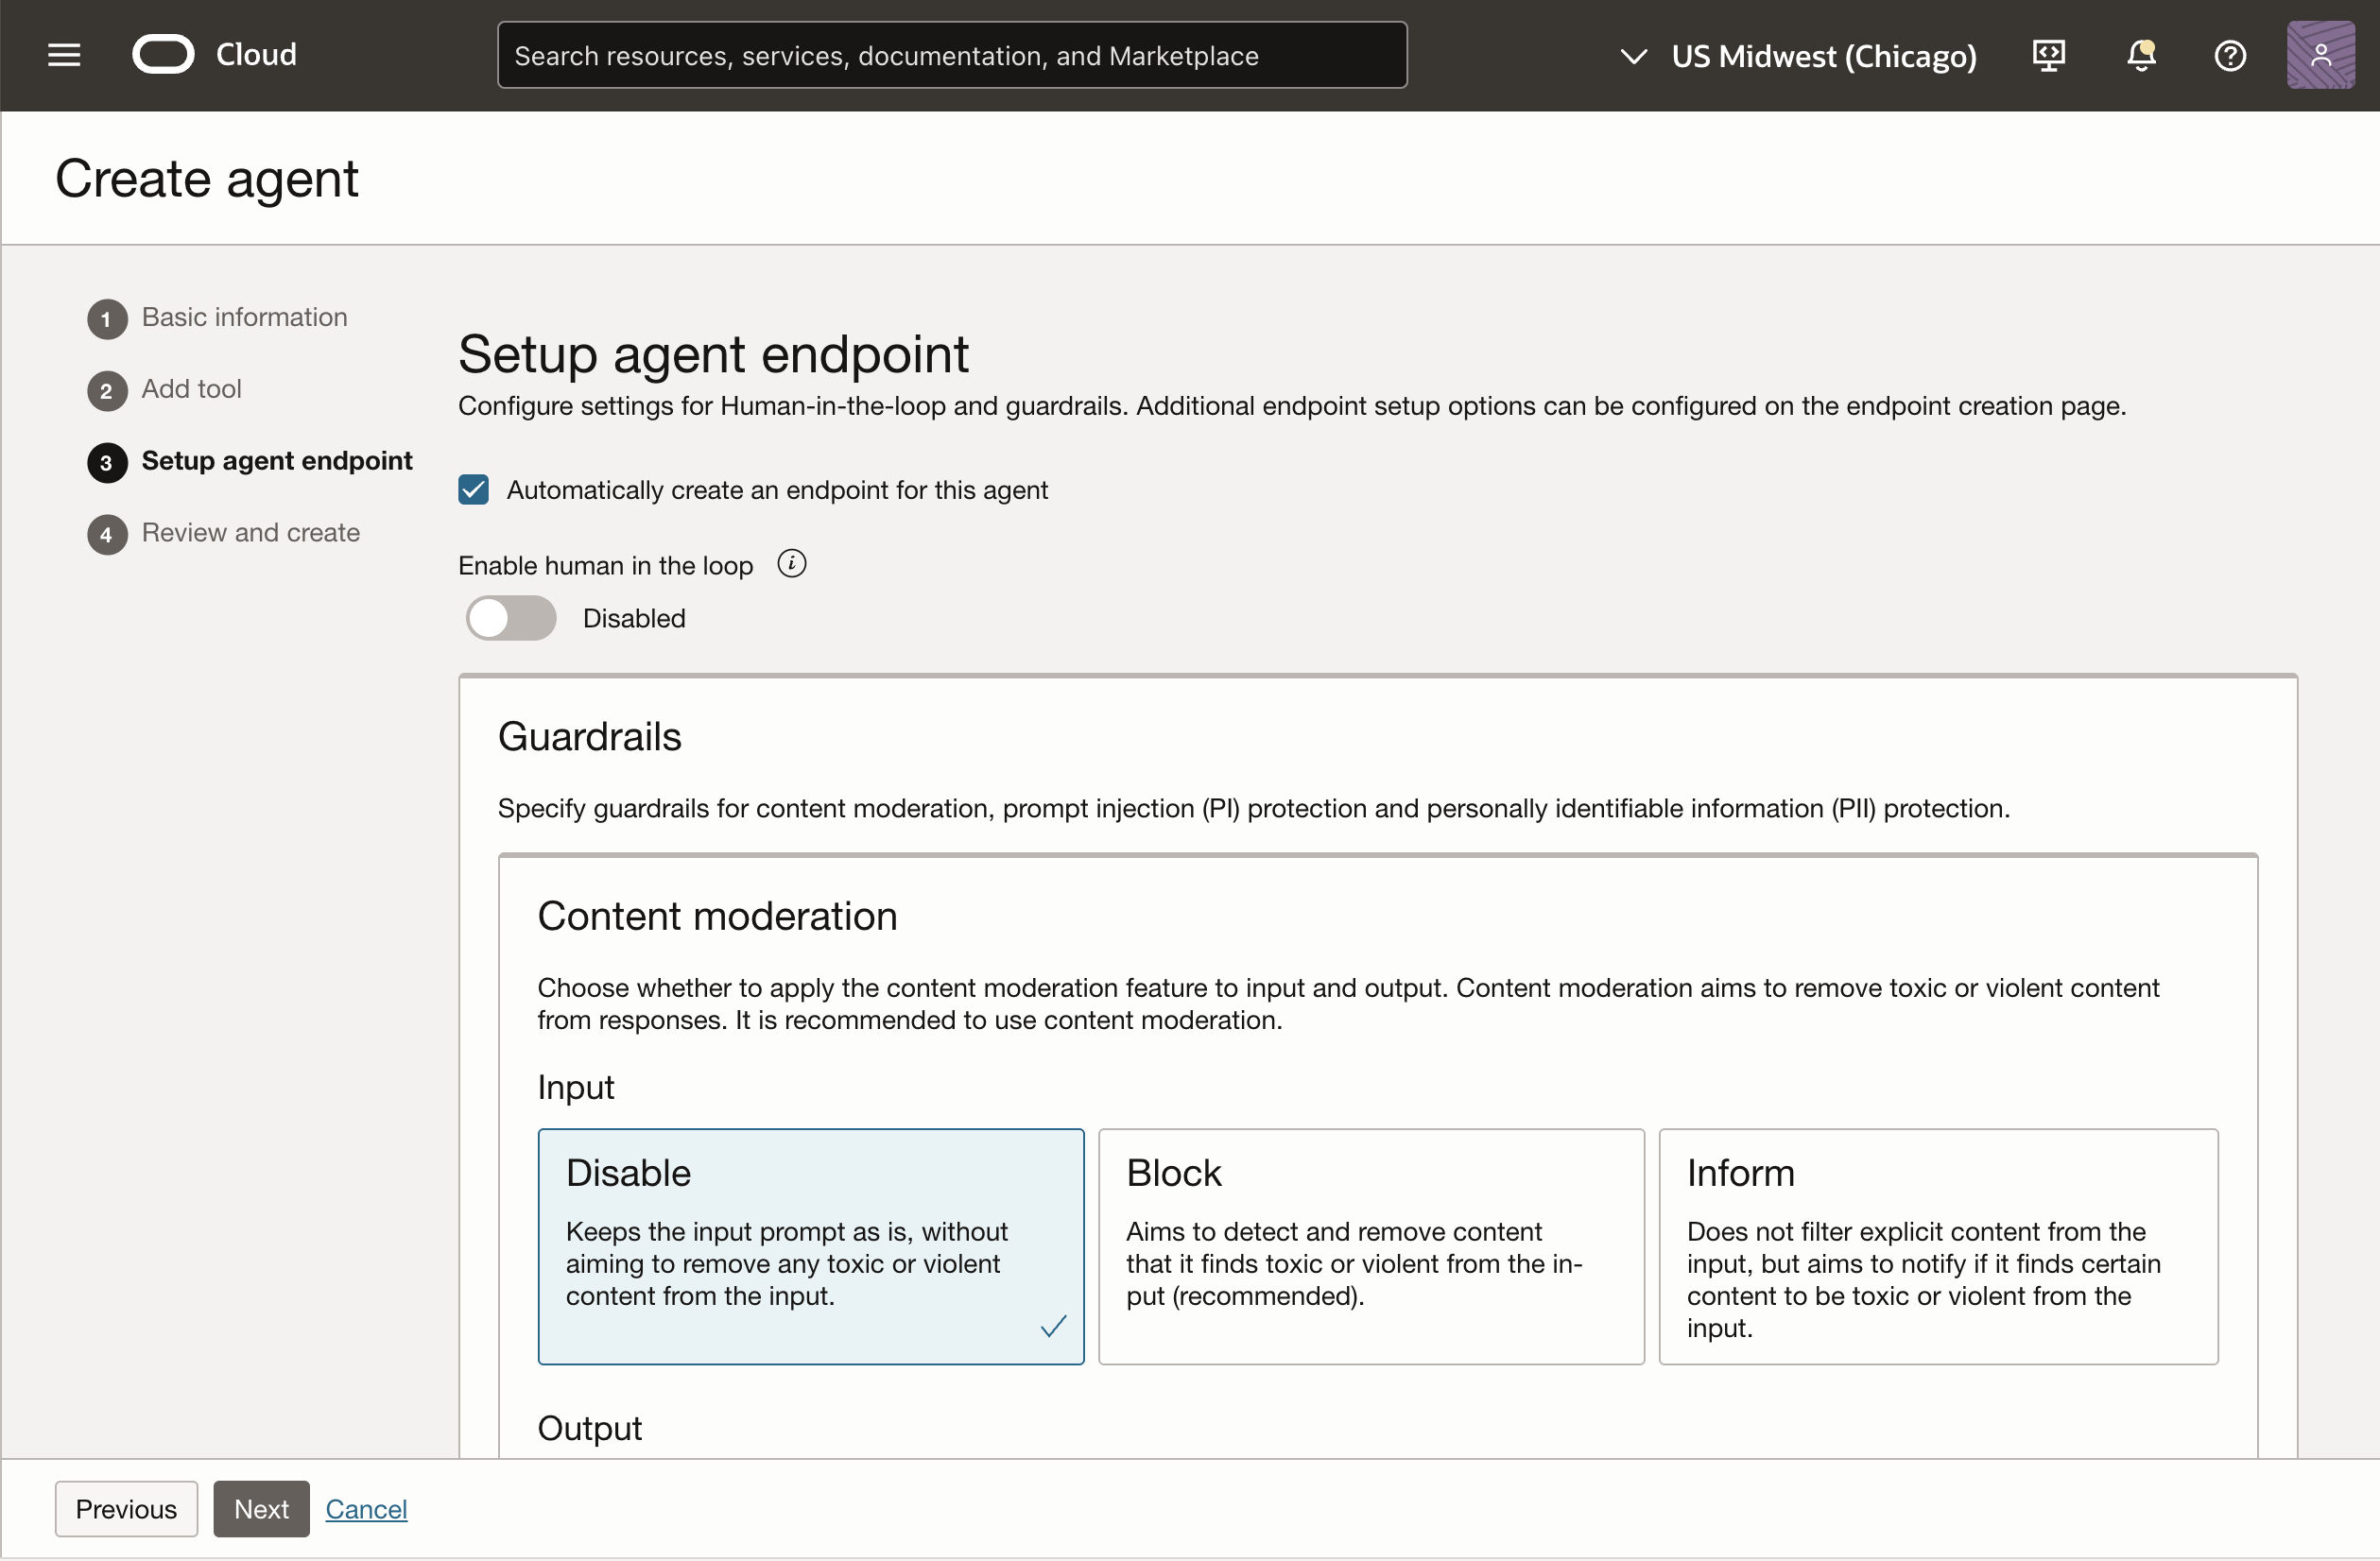
Set Up an Endpoint (Optional): You can automatically create an endpoint for the agent now. If you choose to do so, you can enable features like:
Human in the loop: Require human review before a response is finalized.
Content Moderation: Block, inform, or disable moderation for inputs and outputs.
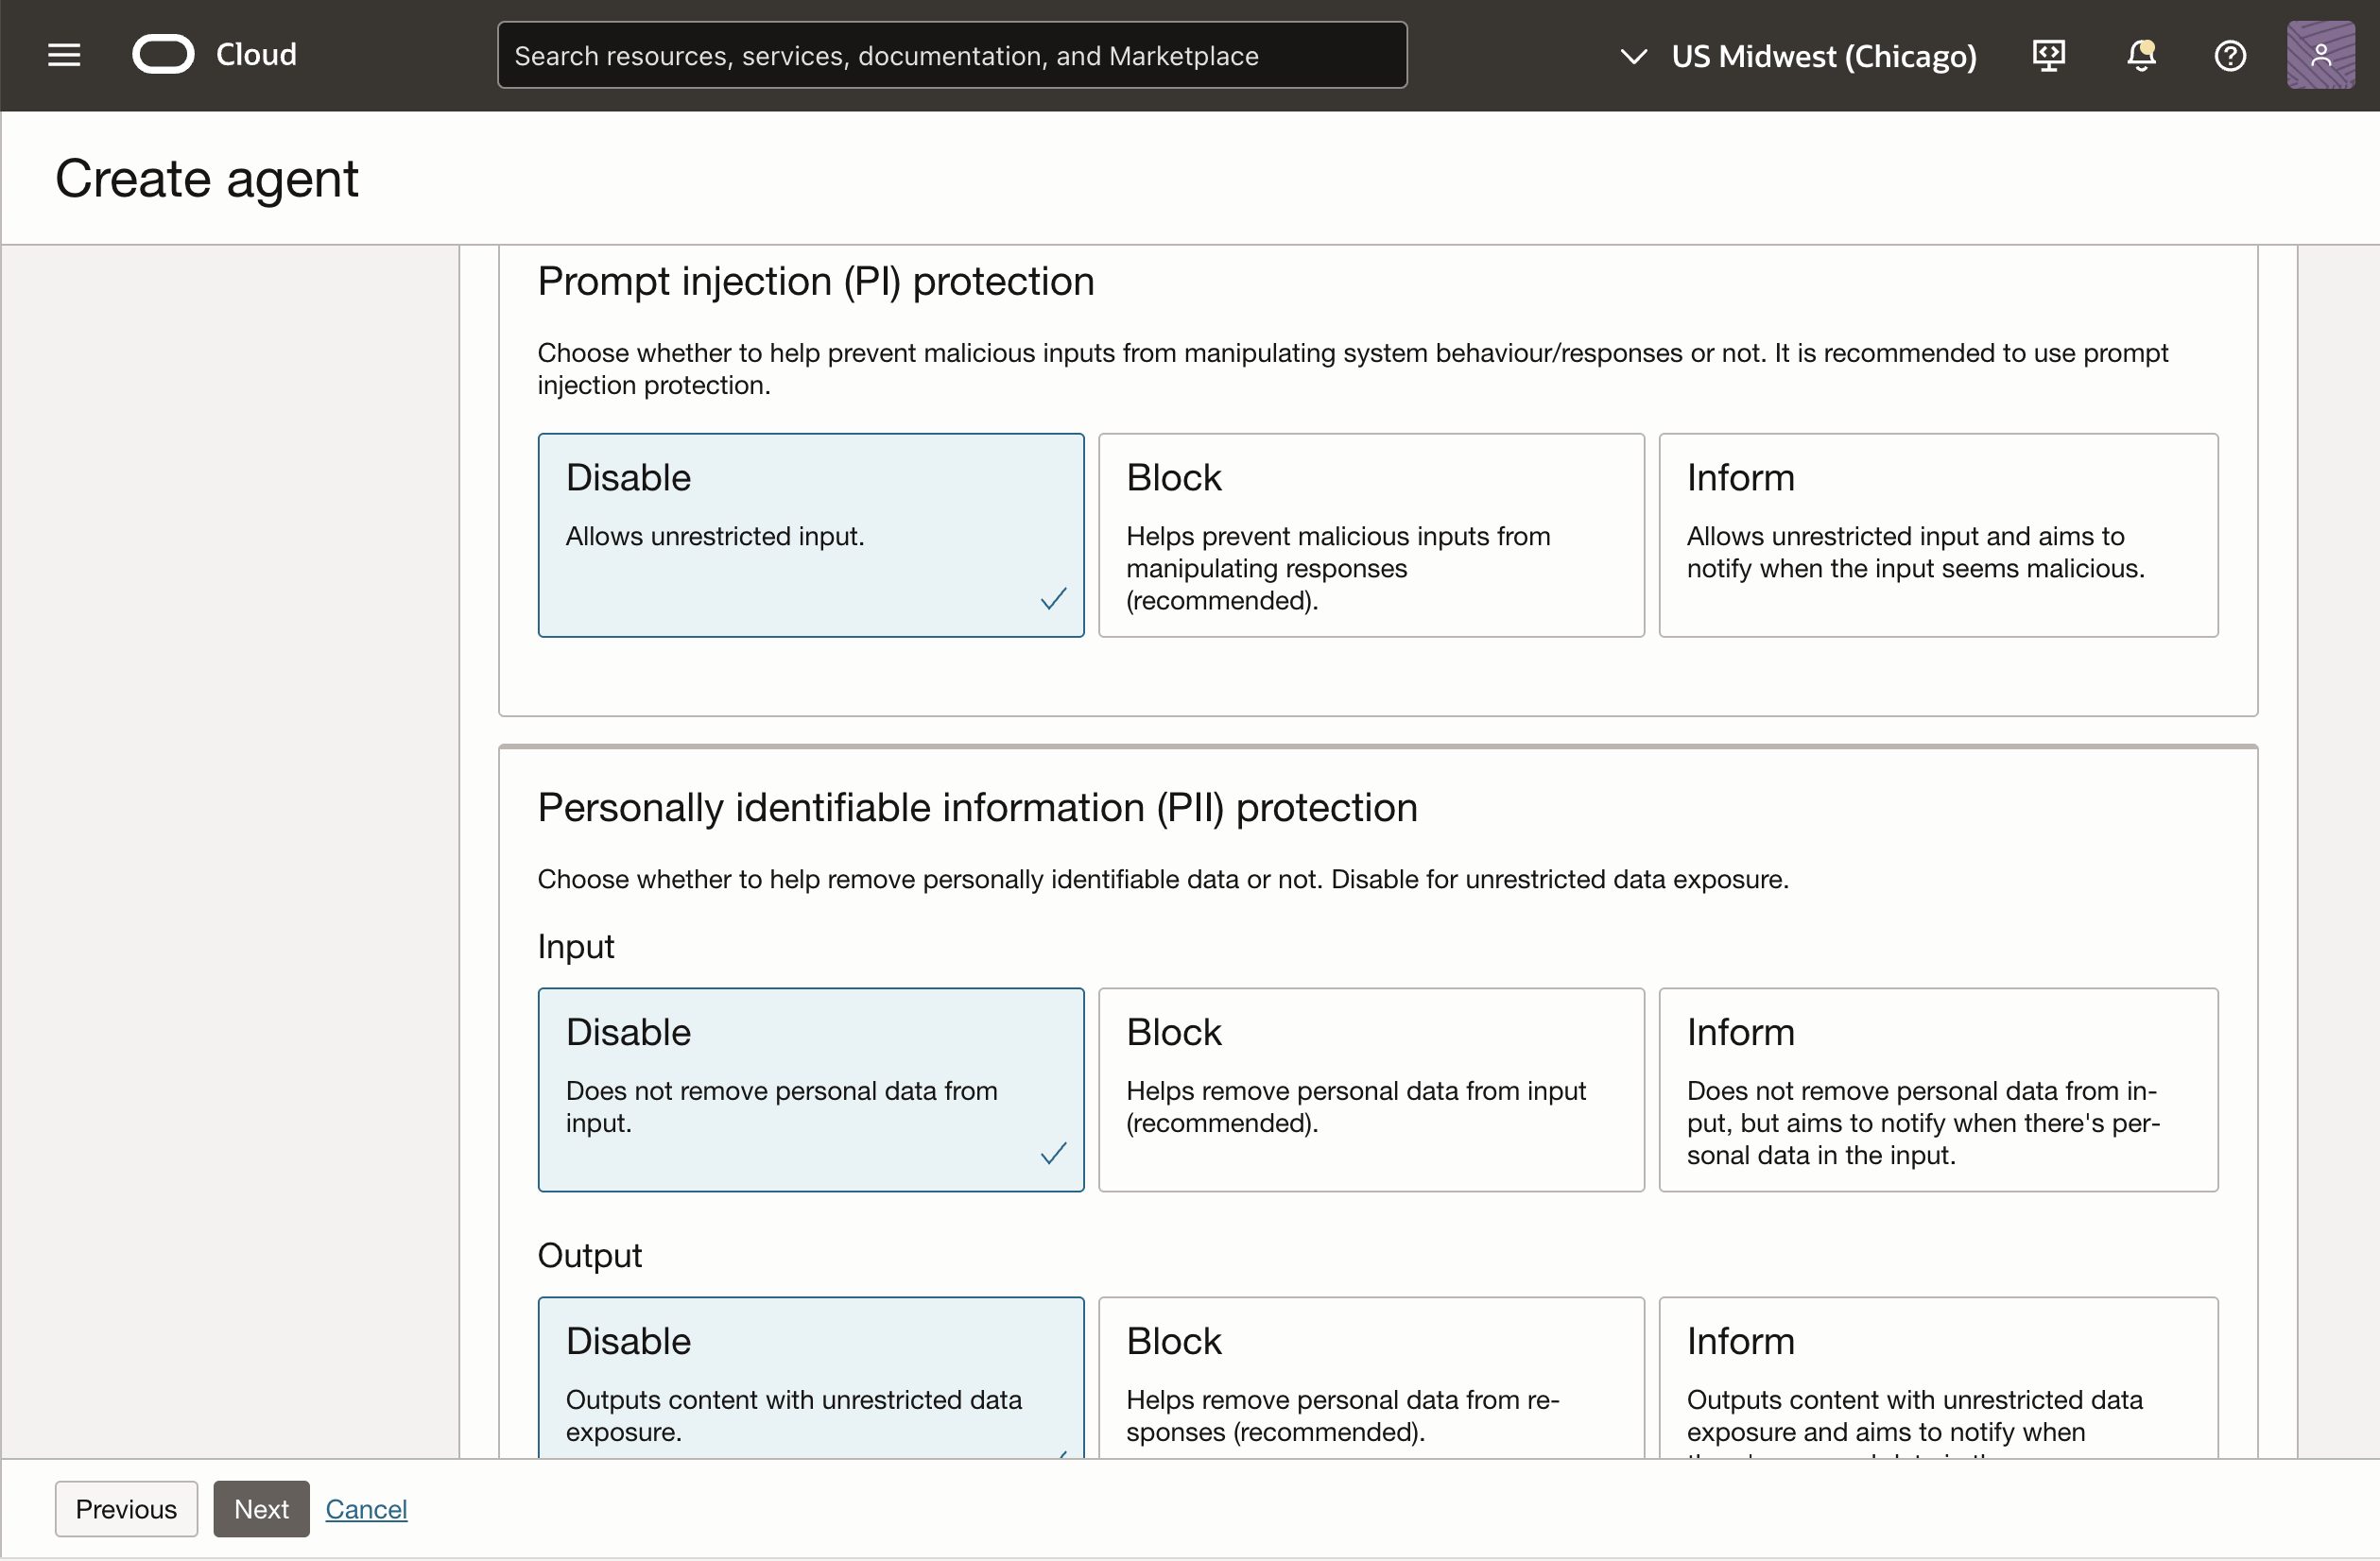
Prompt Injection (PI) Protection: Block or inform users about suspicious prompts.
PII Protection: Safeguard personally identifiable information in user prompts and responses.
Figure 3: Setup Agent endpoint – Guardrails
Figure 4: Setup Agent endpoint – Others
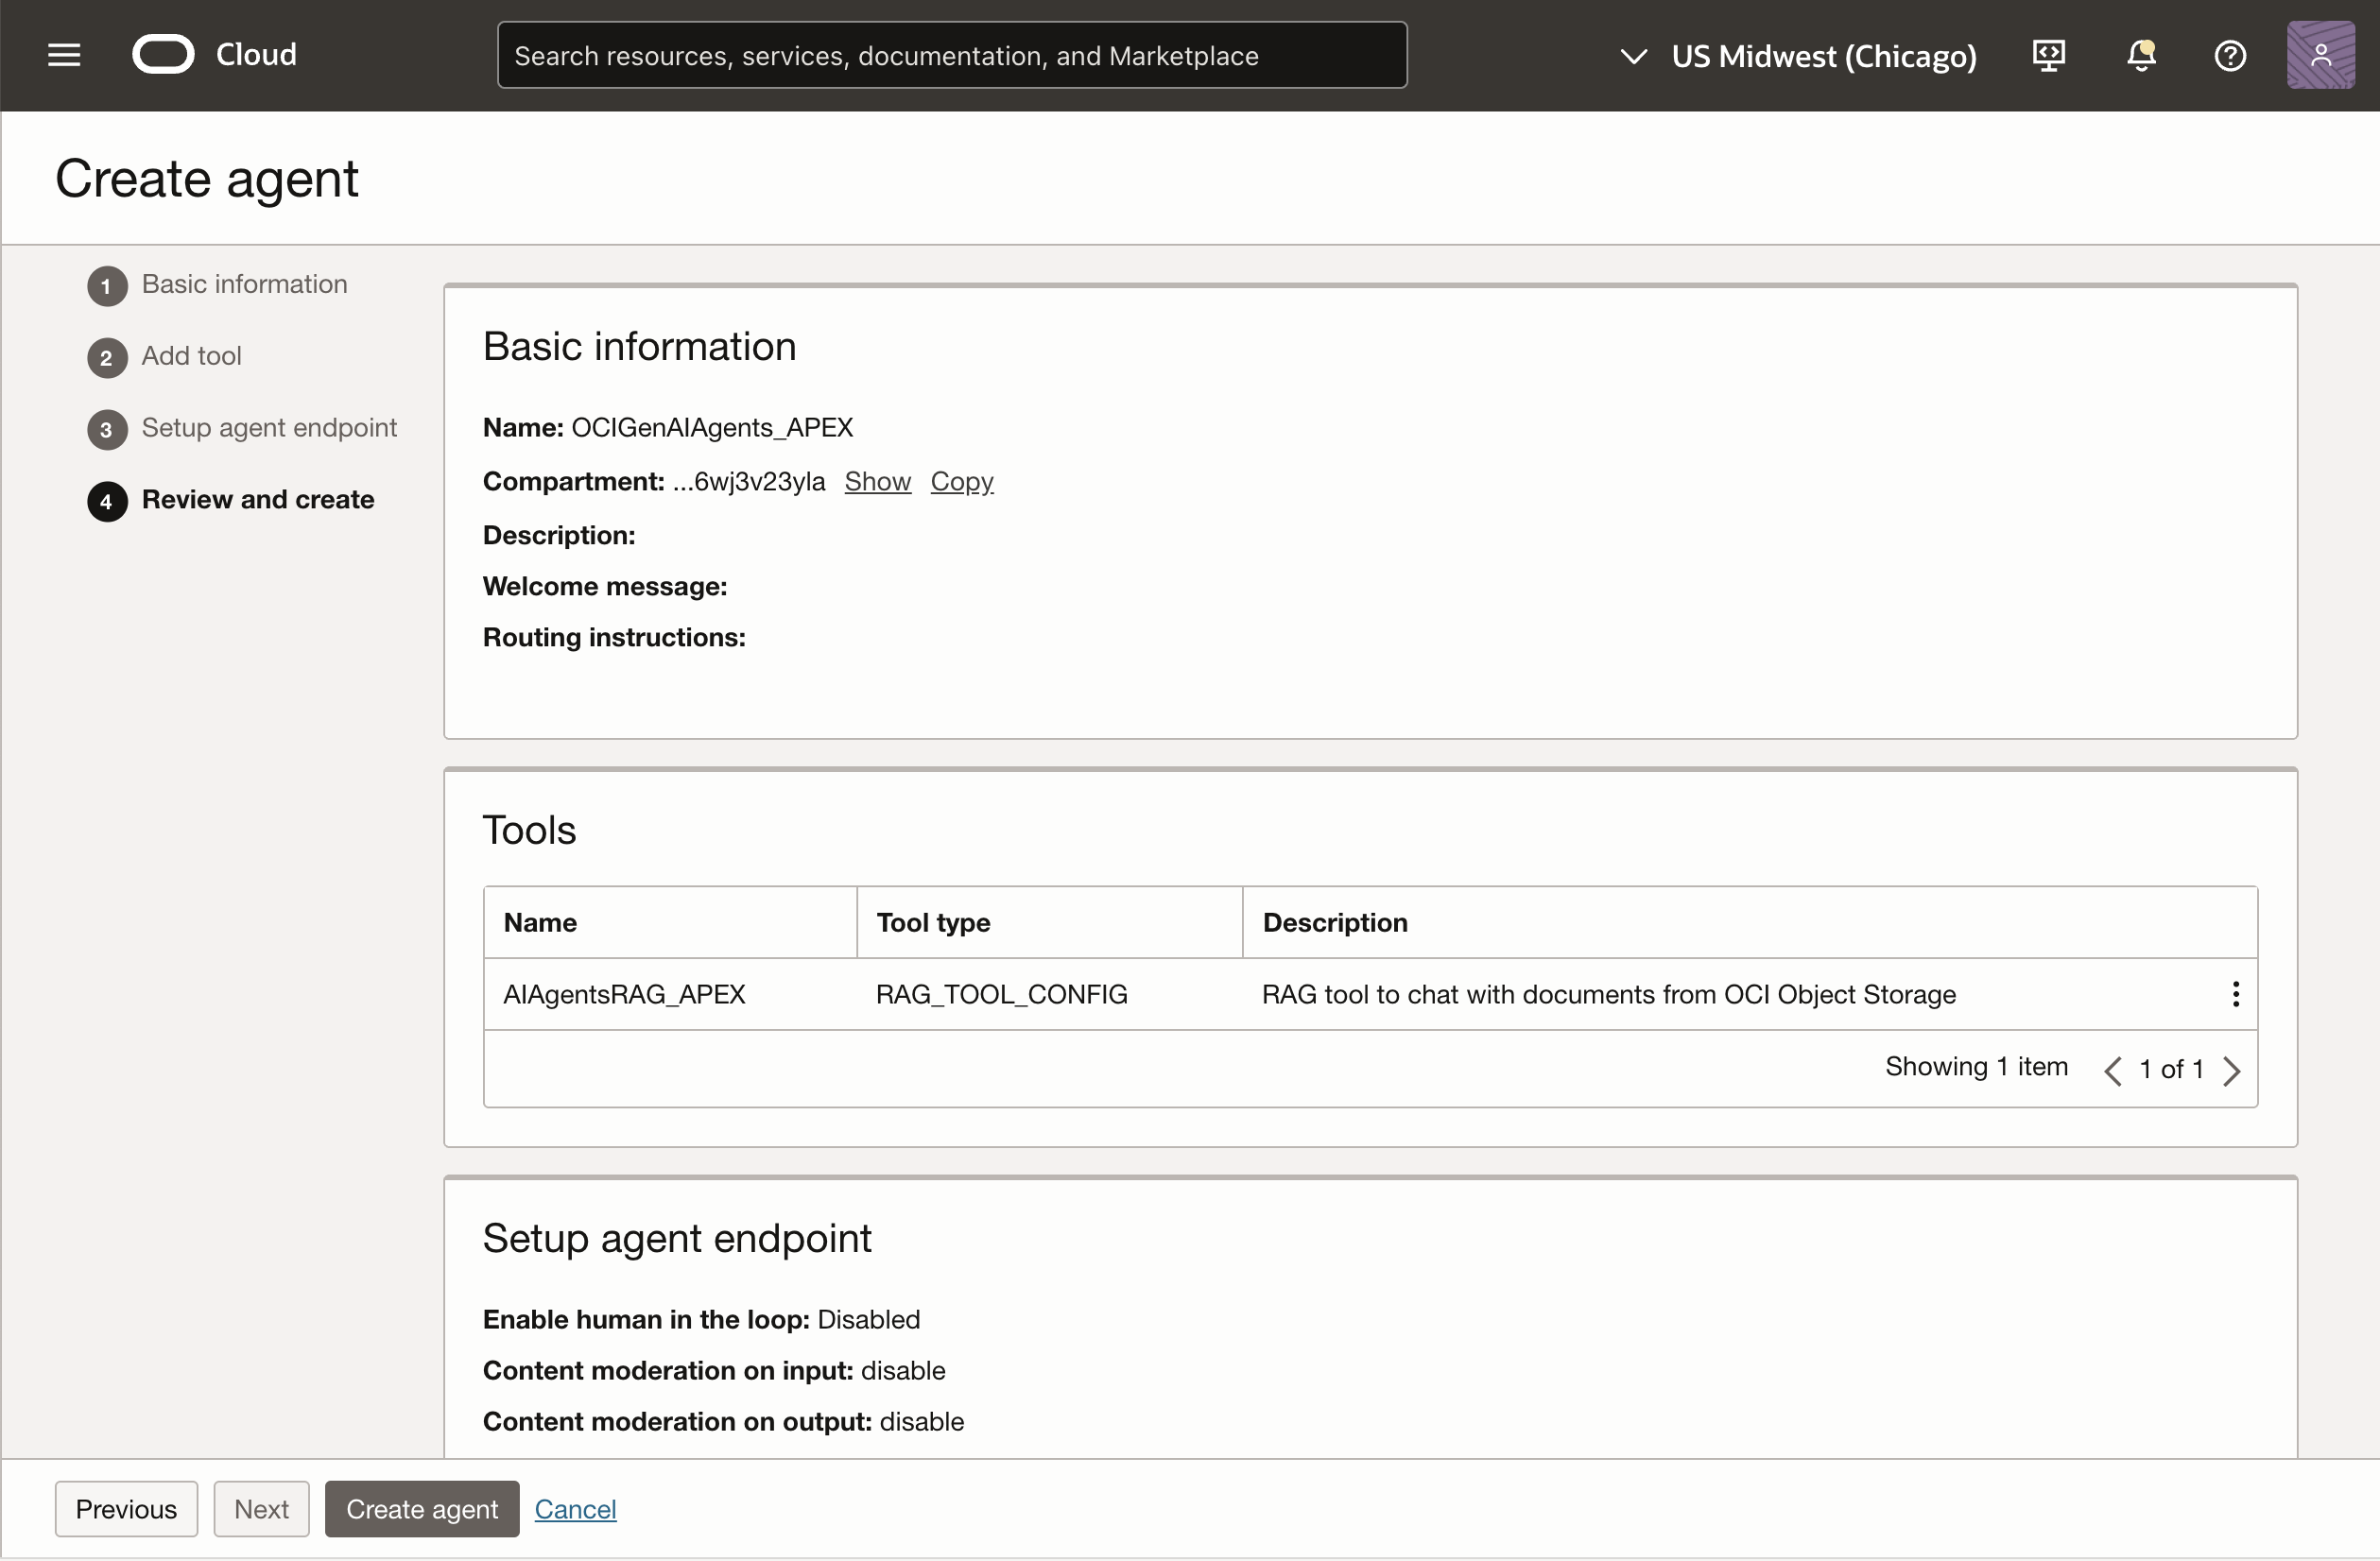
Review and Create: Check all the details. If you need to make changes, use the Previous button to update any section.
Figure 5: Review Create Agent Details
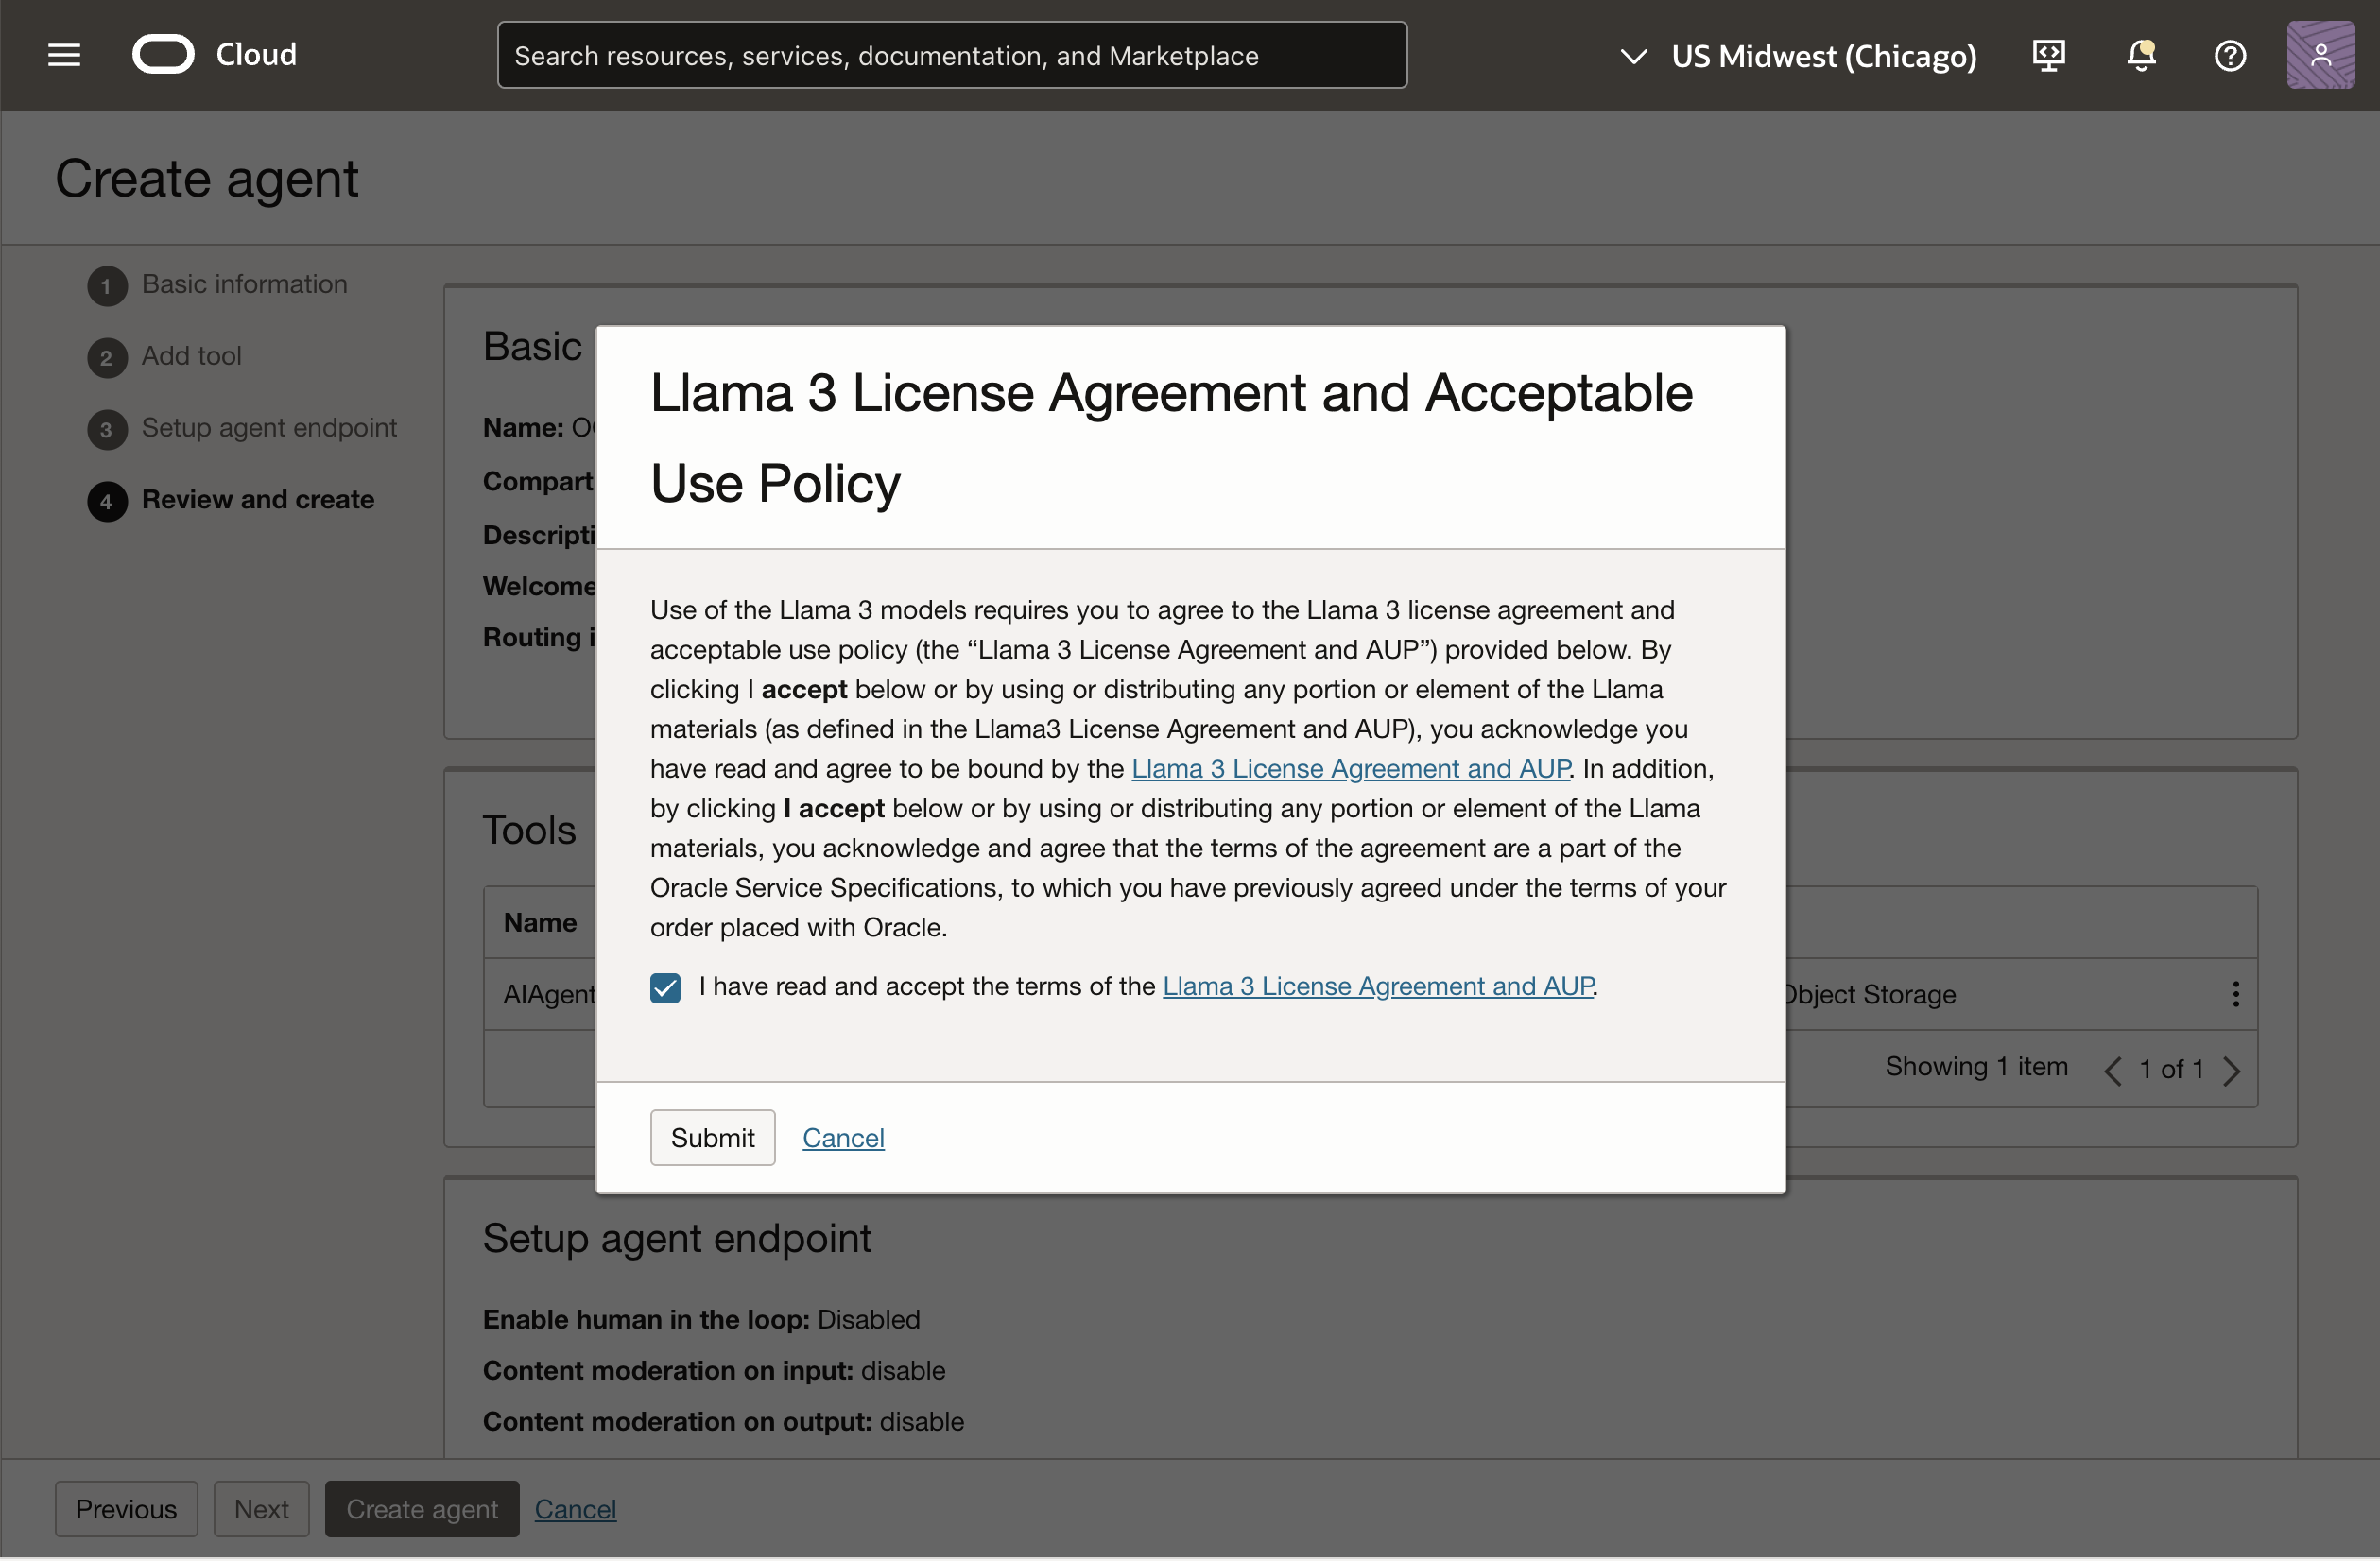
When ready, click Create agent, accept the Llama 3 License Agreement and Acceptable Use Policy, and submit.
Figure 6: Accept Llama 3 License Agreement
Note: Once the Generative AI Agent is created, to view agent details and copy the Agent Endpoint OCID, go to the Agents list, select an agent, open the Endpoints tab under Resources, and copy the OCID from the Endpoint Information section.
2. Adding API Keys on OCI Console
In Oracle Cloud Infrastructure (OCI), API keys are used to securely access resources via the API. Each key pair includes a public and private key. You can generate the pair in the OCI Console or upload an existing public key.
When you add a key through the Console, it provides a configuration file snippet with key details: user OCID, key fingerprint, tenancy OCID, selected region, and the path to your private key file (which you’ll need to update based on where it’s saved locally).
Click here to learn how to generate an API signing key pair.
3. Create Web Credentials in Oracle APEX
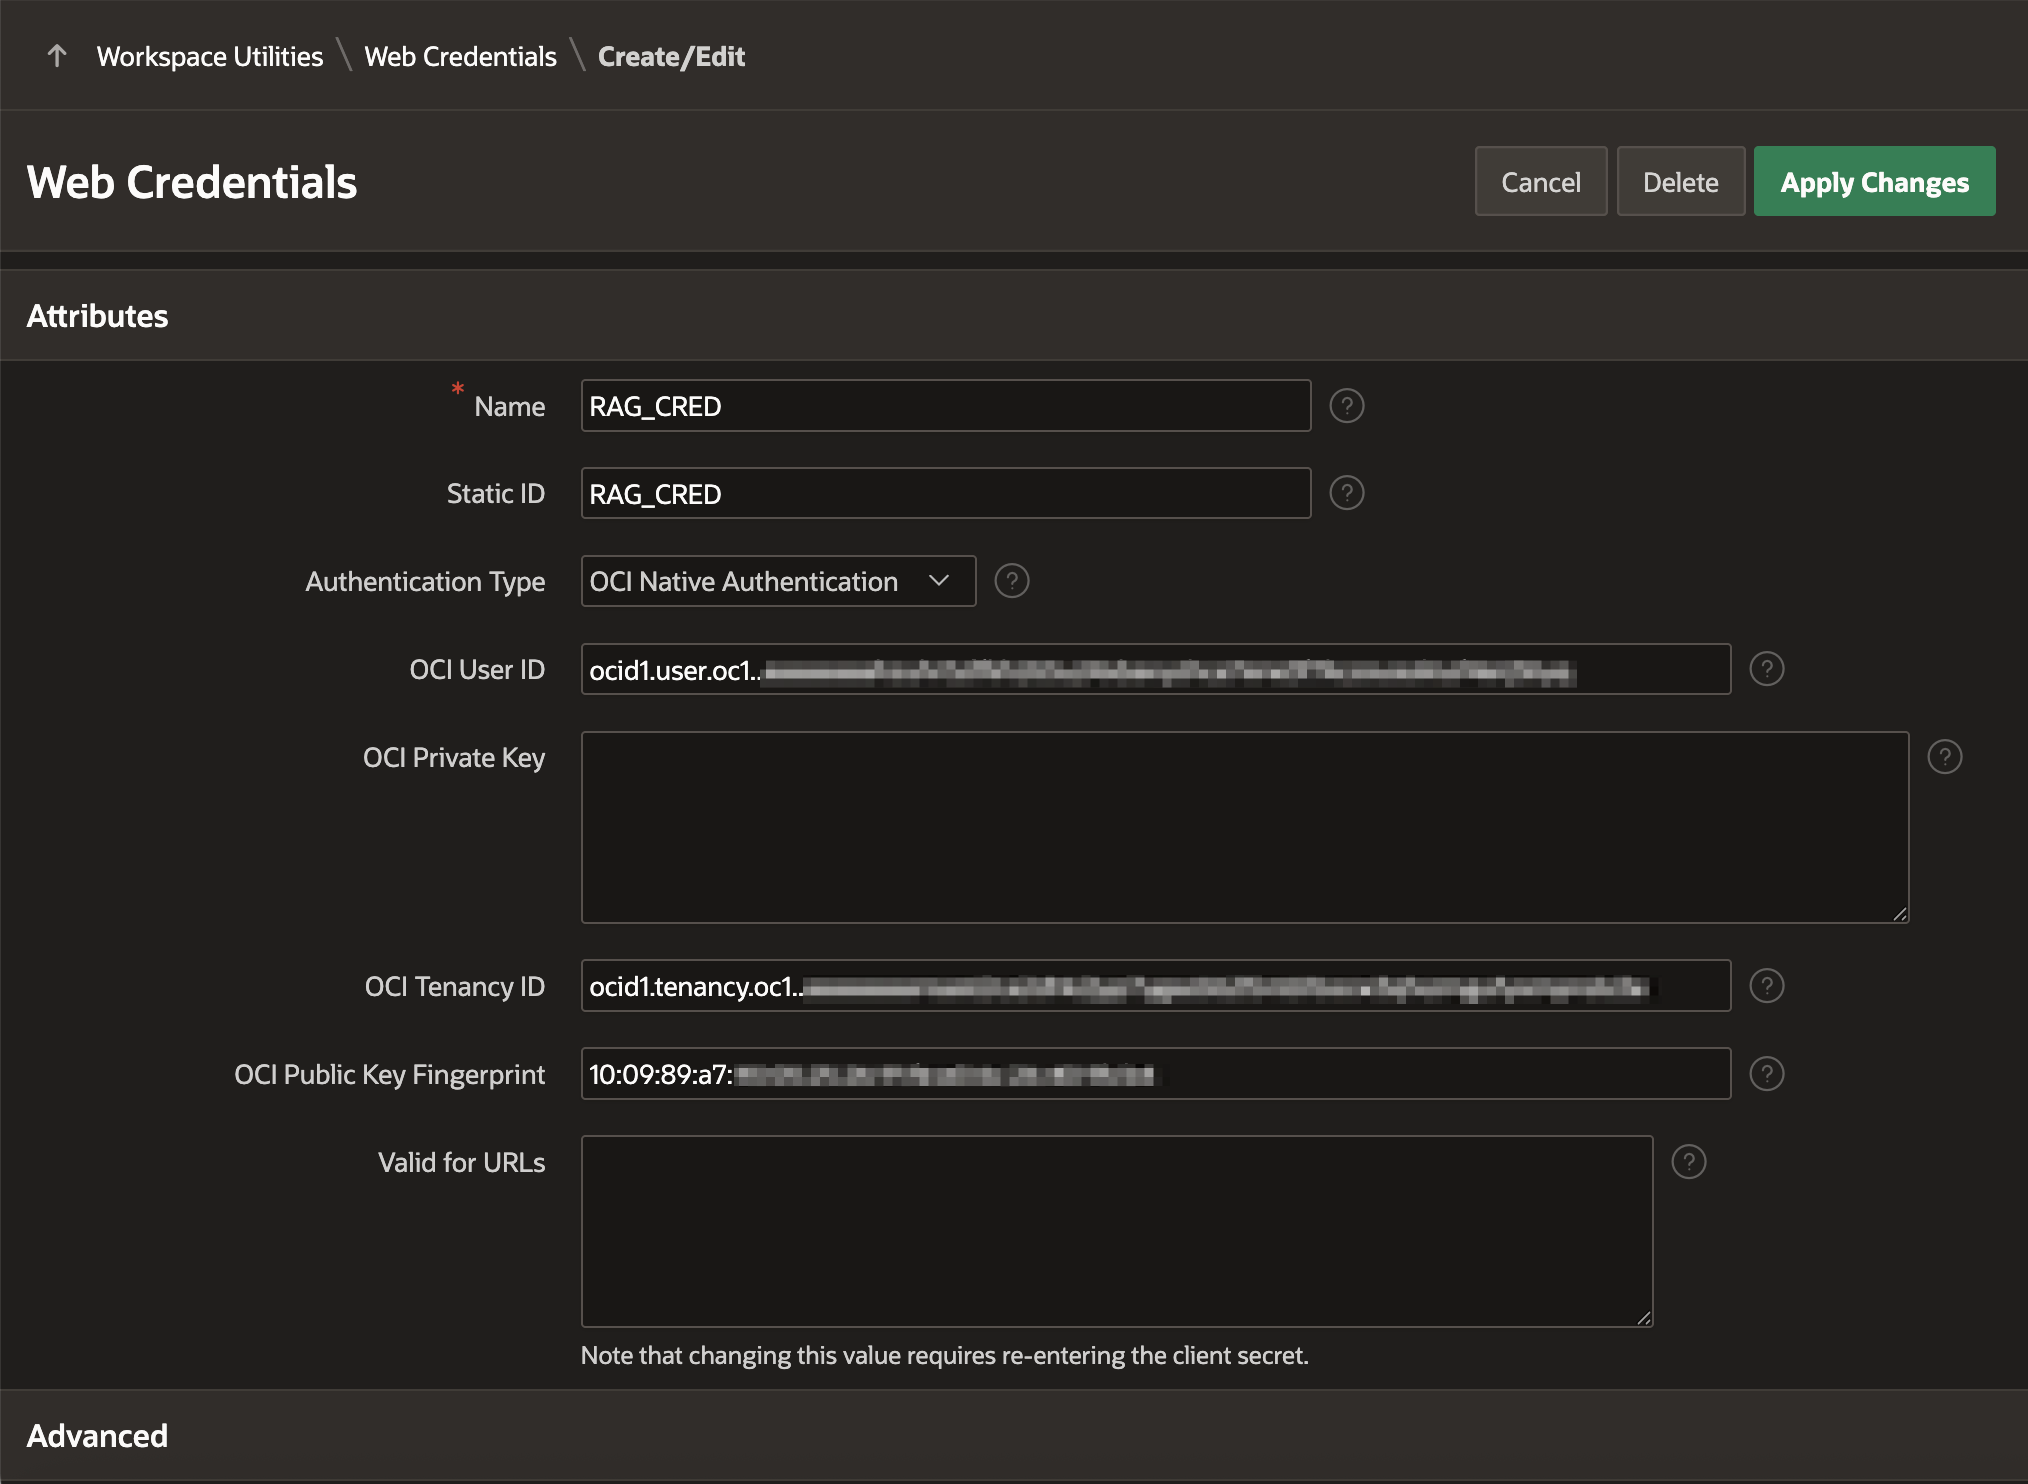
To integrate OCI Generative AI Agents with APEX, we create Web Credentials in APEX. Web Credentials securely store and encrypt authentication credentials for connecting to external REST services or REST-enabled SQL services.
These credentials are stored at the workspace level, making them accessible to all applications. We will use these credentials to interact with OCI Document Understanding APIs.
Learn how to Create Web Credentials by clicking here.
Figure 7: Create Web Credentials
4. Manage Documents in OCI Object Storage with Invoke API
In this blog post, since we are using OCI Object Storage files as a knowledge base, before integrating APEX with OCI Generative AI Agents, you must upload the documents to OCI Object Storage. You can send files to OCI Object storage using multiple methods. I am briefing two of the most effective methods below.
If you are using APEX on an Autonomous Database, you can utilize the Procedure PUT_OBJECT available in the DBMS_CLOUD package. This procedure is overloaded. The procedure copies files from Oracle Database or APEX to the Cloud Object Storage in one form.
The other option, which works irrespective of where your APEX instance is hosted, is by using REST APIs provided by OCI. We must create a page process to upload the file to the Object Storage.
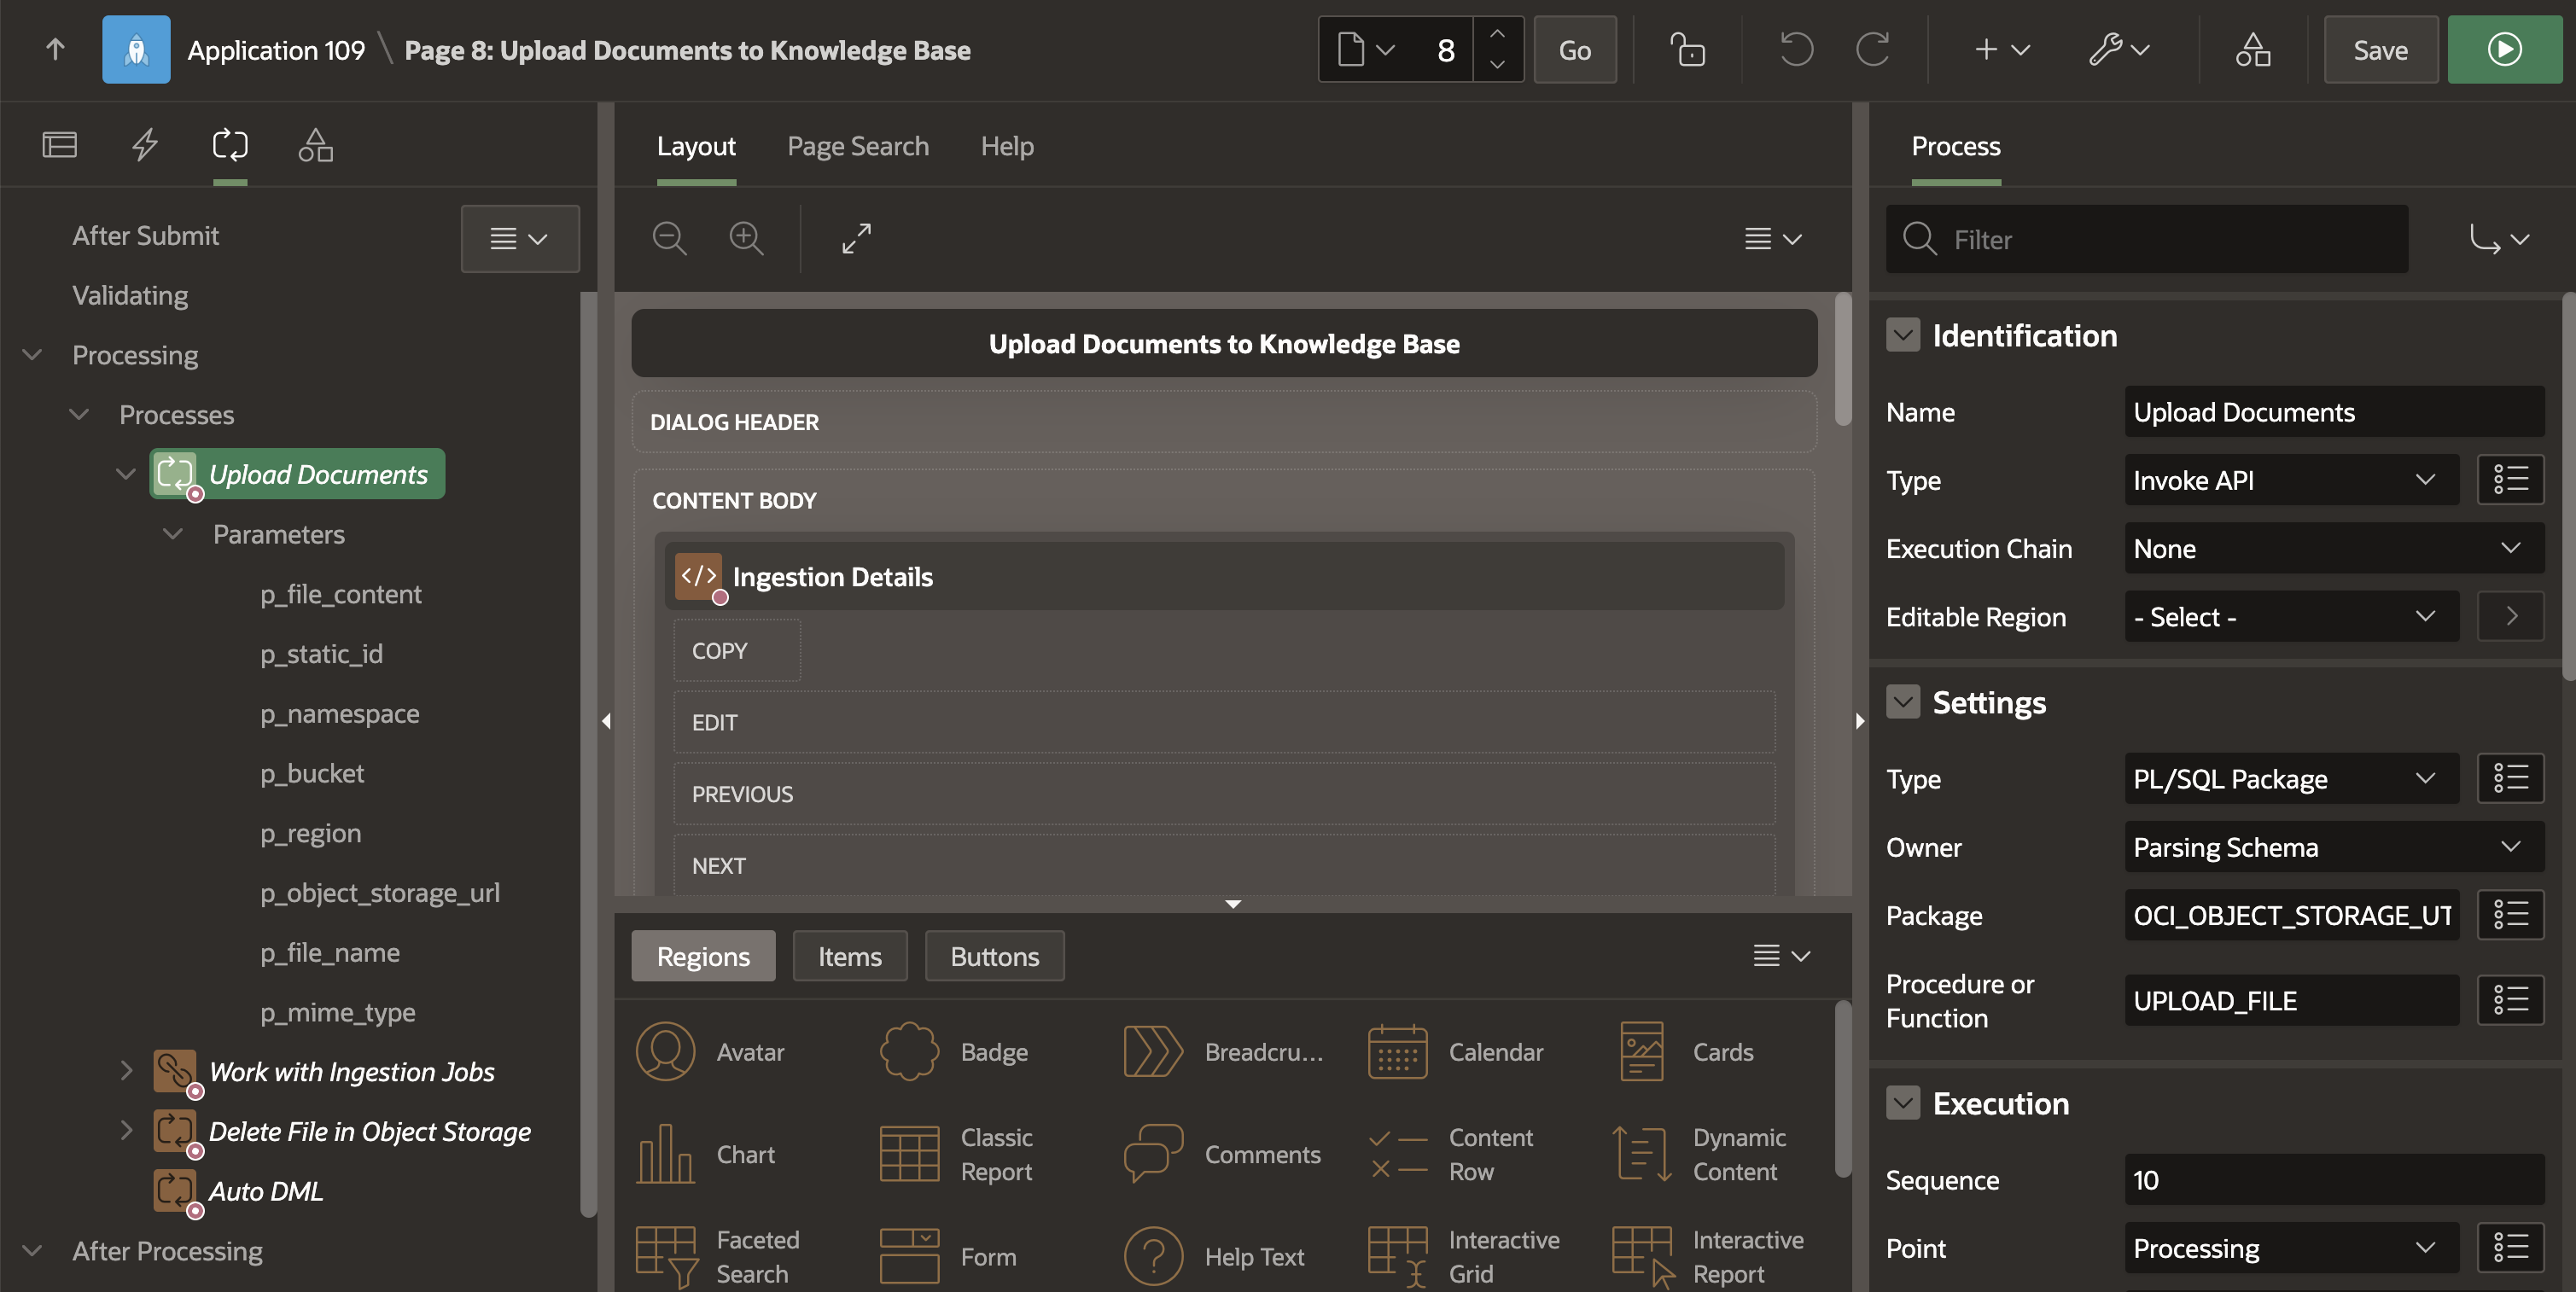
To handle the file upload logic, navigate to the Processing tab of your Application page and create a new process using the Invoke API process type. Set the following configuration:
Process Type: Invoke API
Settings > Type: PL/SQL Package
Package: OCI_OBJECT_STORAGE_UTILS
Procedure or Function: UPLOAD_FILE
The UPLOAD_FILE procedure accepts one input parameter and returns three output parameters. Make sure to map each parameter to the appropriate Page Items from your form. Click here to download OCI_OBJECT_STORAGE_UTILS Package.
Figure 8: Process to Upload Documents
5. Create an Ingestion Job using OCI Ingestion Job REST APIs
When you create a data source, you specify the location of the data files. To make those files usable by an agent, you must download them into the agent’s associated knowledge base, a process known as data ingestion. Data ingestion is a process that extracts data from data source documents, converts it into a structured format suitable for analysis, and then stores it in a knowledge base.
You can interact with the service through a chat interface or API and manage all key components—such as agents, data sources, knowledge bases, and endpoints—using the Generative AI Agents API.
To Learn more about how to create a Data Ingestion Job, refer API Docs page.
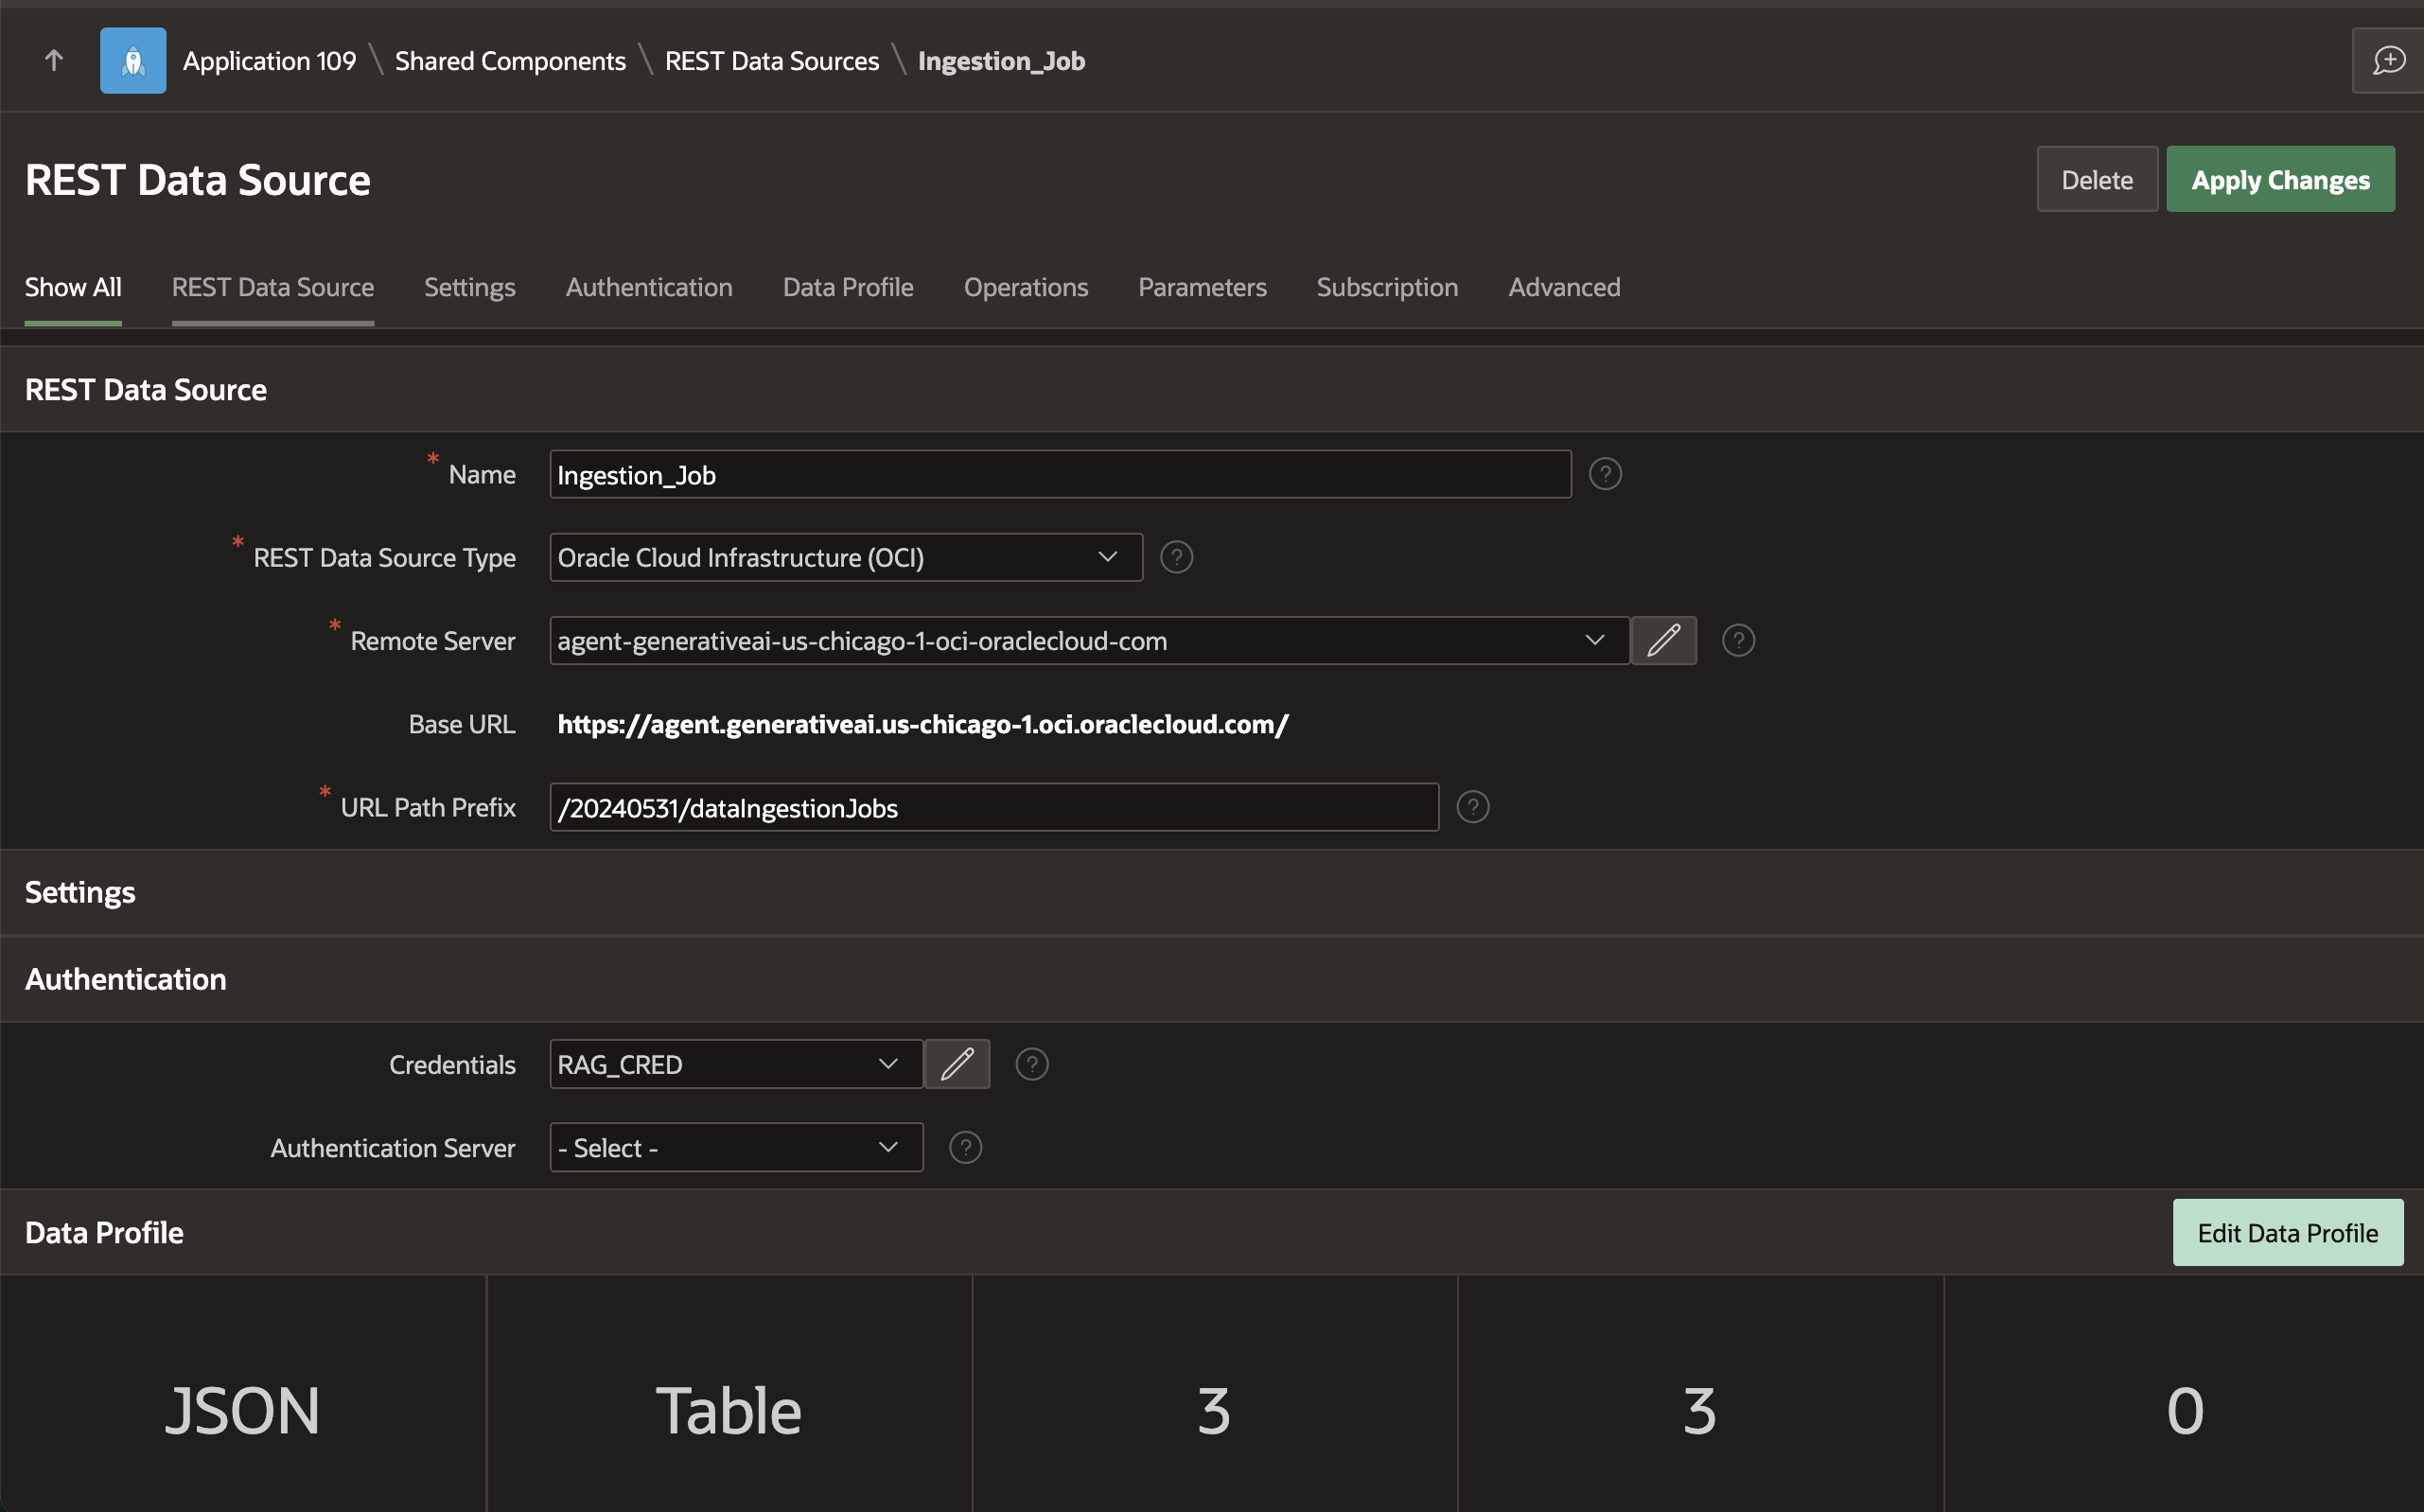
In the previous steps, we understood how the OCI Generative AI Agents Data Ingestion REST API works. Now, we can proceed to create a REST Data Source in Oracle APEX that connects to the OCI Data Ingestion REST APIEndpoint.
The REST Data Source will be set up with the following parameters:
Rest Data Source Type: Oracle Cloud Infrastructure (OCI)
Authentication: We use the web credentials created above.
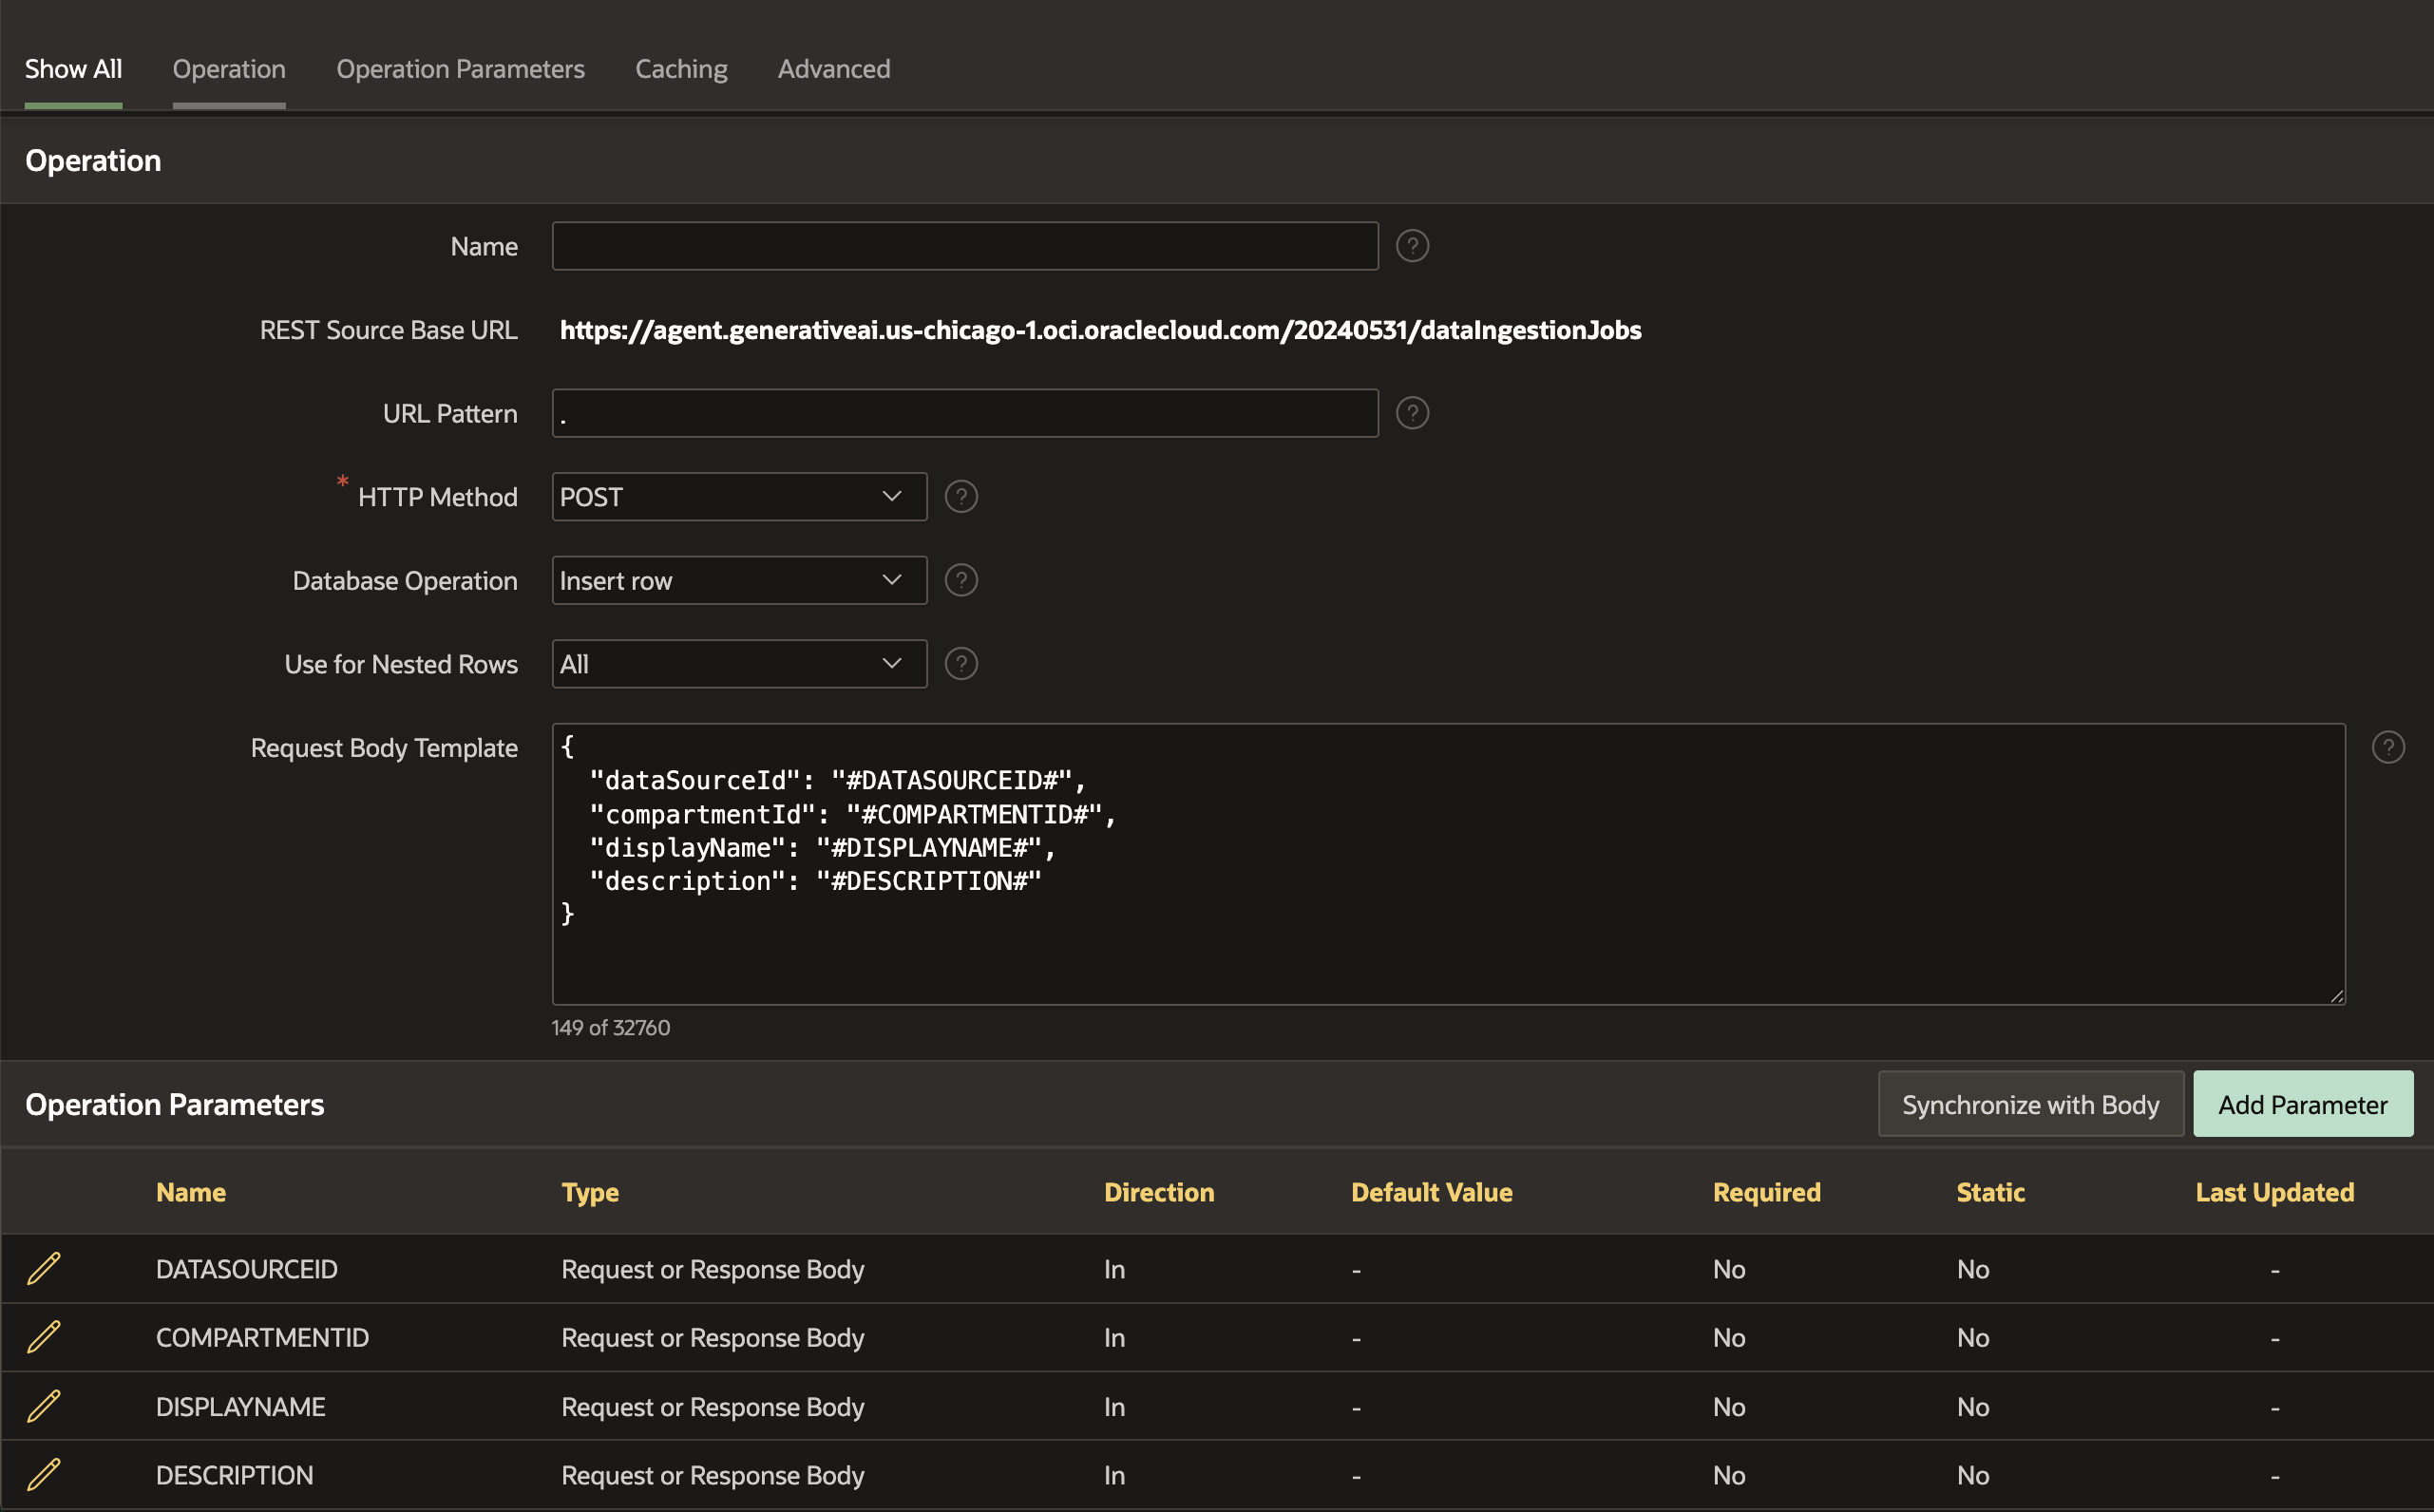
The request to the OCI Generative AI Agents Data Ingestion Job CreateDataIngestionJob is an HTTP POST request. So, update the POST operation with the below settings:
Compose the Request Body Template with appropriate substitution Tags.
{
  "dataSourceId": "#DATASOURCEID#",
  "compartmentId": "#COMPARTMENTID#",
  "displayName": "#DISPLAYNAME#",
  "description": "#DESCRIPTION#"
}
For the Operation parameters, use the Synchronize with Body button to get all the substitutions defined in the Request Body Template as parameters
Additionally, create two Operation parameters:
RESPONSE (Response Body) – to hold the JSON response from the POST request
Content-Type (HTTP header) – It can be a static value, defaulted to application/json
With the REST Data Source successfully configured, it’s time to invoke it from the page process when an invoice is uploaded.
Figure 9: Create IngestionJob REST API
Figure 10: Configure POST Operation for IngestionJob API
5.1. Invoke the Data Ingestion Job REST Data Source through a Page Process
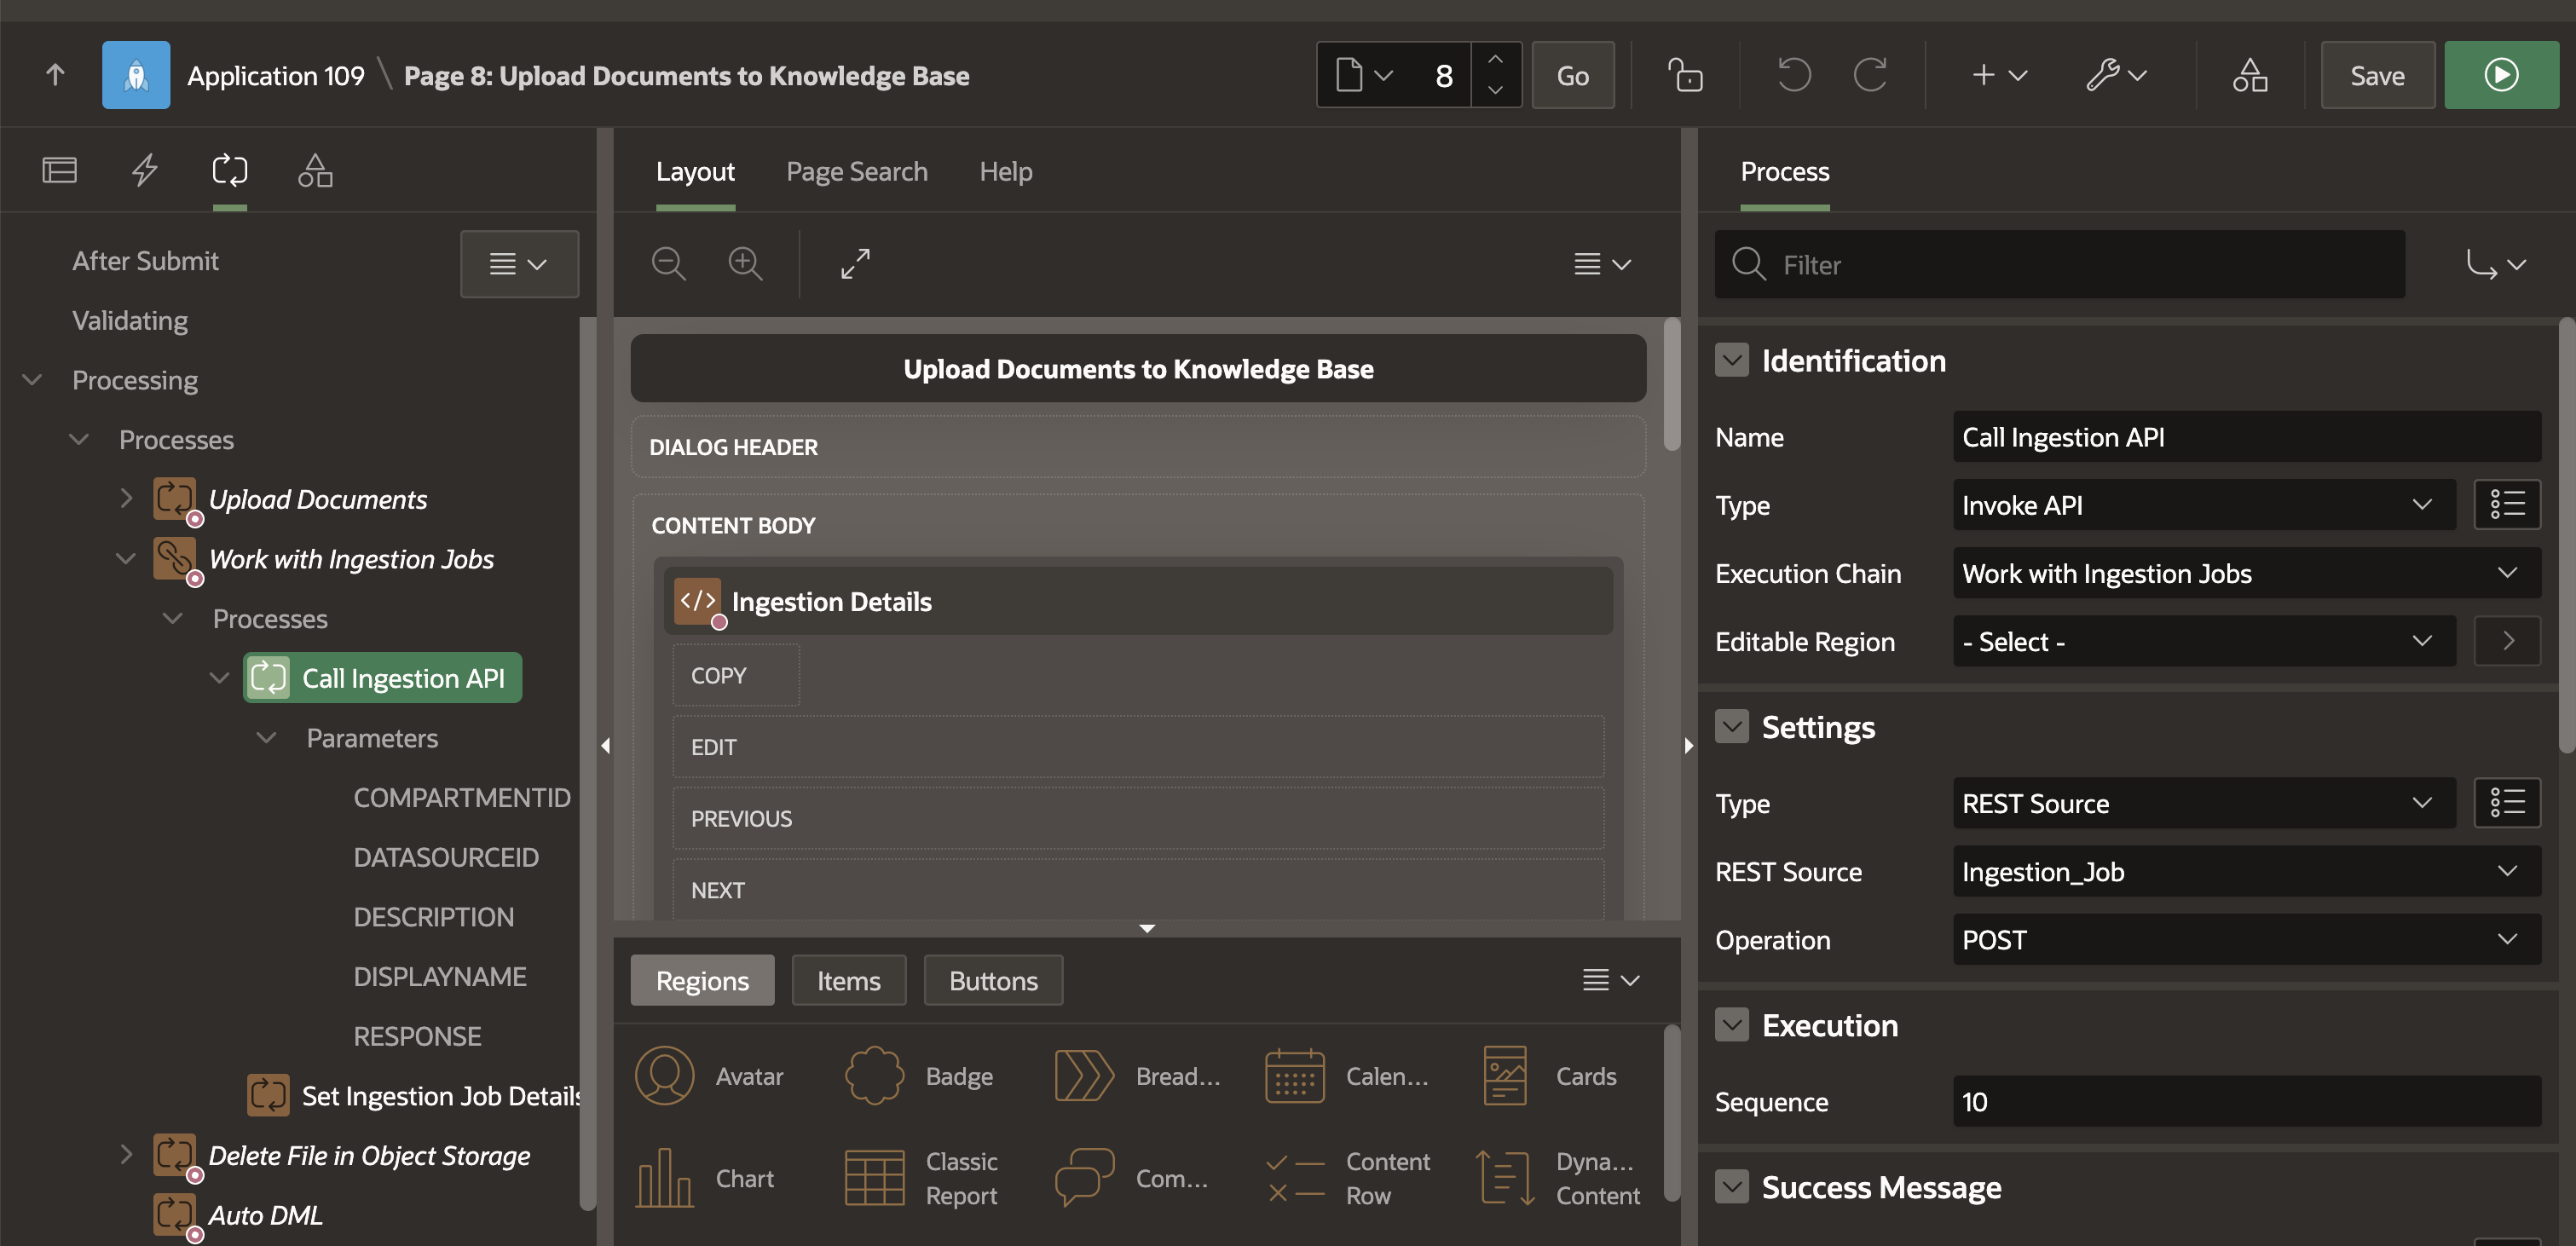
With the documents securely stored in Object Storage, we will utilize the OCI Generative AI Agents Data Ingestion REST Data Source, which will make those files usable by an agent. To achieve this, we can use the Invoke API process type.
Create the second Process called Invoke Data Ingestion REST API with the following attributes:
Process Type: Invoke API
Settings > Type: REST Source
Rest Source: (Select the REST Data Source created above)
Operation: POST. All the Operation parameters defined for this REST Data Source are displayed in the left pane under the process, and the appropriate Items are assigned automatically by default. Select each parameter and validate them. For Response, assign a value as below:
RESPONSE: The OCI Generative AI Agents Data Ingestion REST Data Source call will return a JSON response, which can be captured using an OUT parameter. You should turn off the “Ignore Output” attribute to achieve this. Doing so allows you to store the output into a page Item, for example, P5_ING_RESPONSE, and access the response for further processing.
Create a third process, parse the response, which can now parse the response stored on page Item P5_ING_RESPONSE, and update the page item with the Session ID returned from the Data Ingestion Job REST API.
SELECTjt.Status, jt.job_id into:P5_INGESTION_RESPONSE, :P5_DATA_ING_JOB_ID FROMJSON_TABLE( :P5_ING_RESPONSE, '$' COLUMNS ( Status VARCHAR2(50) PATH '$.lifecycleState', job_id varchar2(300) PATH '$.id' ) ) jt
Figure 11: Invoke Ingestion Job API from a Page Process
Pro Tip: Use Oracle APEX Automation to periodically check ingestion job status via the GetDataIngestionJob API and update your database table automatically.
6. Understand OCI Generative AI Client APIs for Chat Sessions
OCI Generative AI Agents support several ways to onboard your data, and then allow you and your customers to interact with your data using a chat interface or API. Use the Generative AI Agents Client API to create and manage client chat sessions.
A session is an interactive conversation initiated through an API between a user and an agent. It consists of a series of exchanges in which the user submits prompts and the agent responds with relevant information or actions. The session maintains context throughout the interaction to ensure coherent and continuous responses, effectively supporting a seamless user experience.
This guide covers the two main APIs involved in the chat workflow:
Create a chat session
Send messages to the agent
6.1. Create a Chat Session
A chat session helps maintain the context of a conversation between the user and the agent. This is essential for multi-turn interactions where the user asks follow-up questions.
To create a session, use the following endpoint:
POST /20240531/agentEndpoints/{agentEndpointId}/sessions
Request body:
{ "displayName": "Support Chat", "description": "Session for customer support" }
Replace {agentEndpointId} with the OCID of your agent endpoint.
You can find the OCID in the OCI Console under the Agent Endpoint Information tab.
The response will include a sessionId, which is required to send messages with context.
6.2. Send a Message to Generative AI Agents
Once a session is created, you can start chatting with the agent using the following API:
POST /20240531/agentEndpoints/{agentEndpointId}/actions/chat
Request body:
{ "sessionId": "ocid1.generativeai.session.oc1..example", "shouldStream": true, "userMessage": "What are the latest project updates?" }
sessionId is optional. If you omit it, the chat will be stateless and not retain any prior context.
shouldStream lets you control whether the response is streamed in real time.
userMessage is the input sent to the agent.
To learn more about the Generative AI Agents Client API, you can refer to the documentation here.
7. Configure and Invoke the Create Session REST API
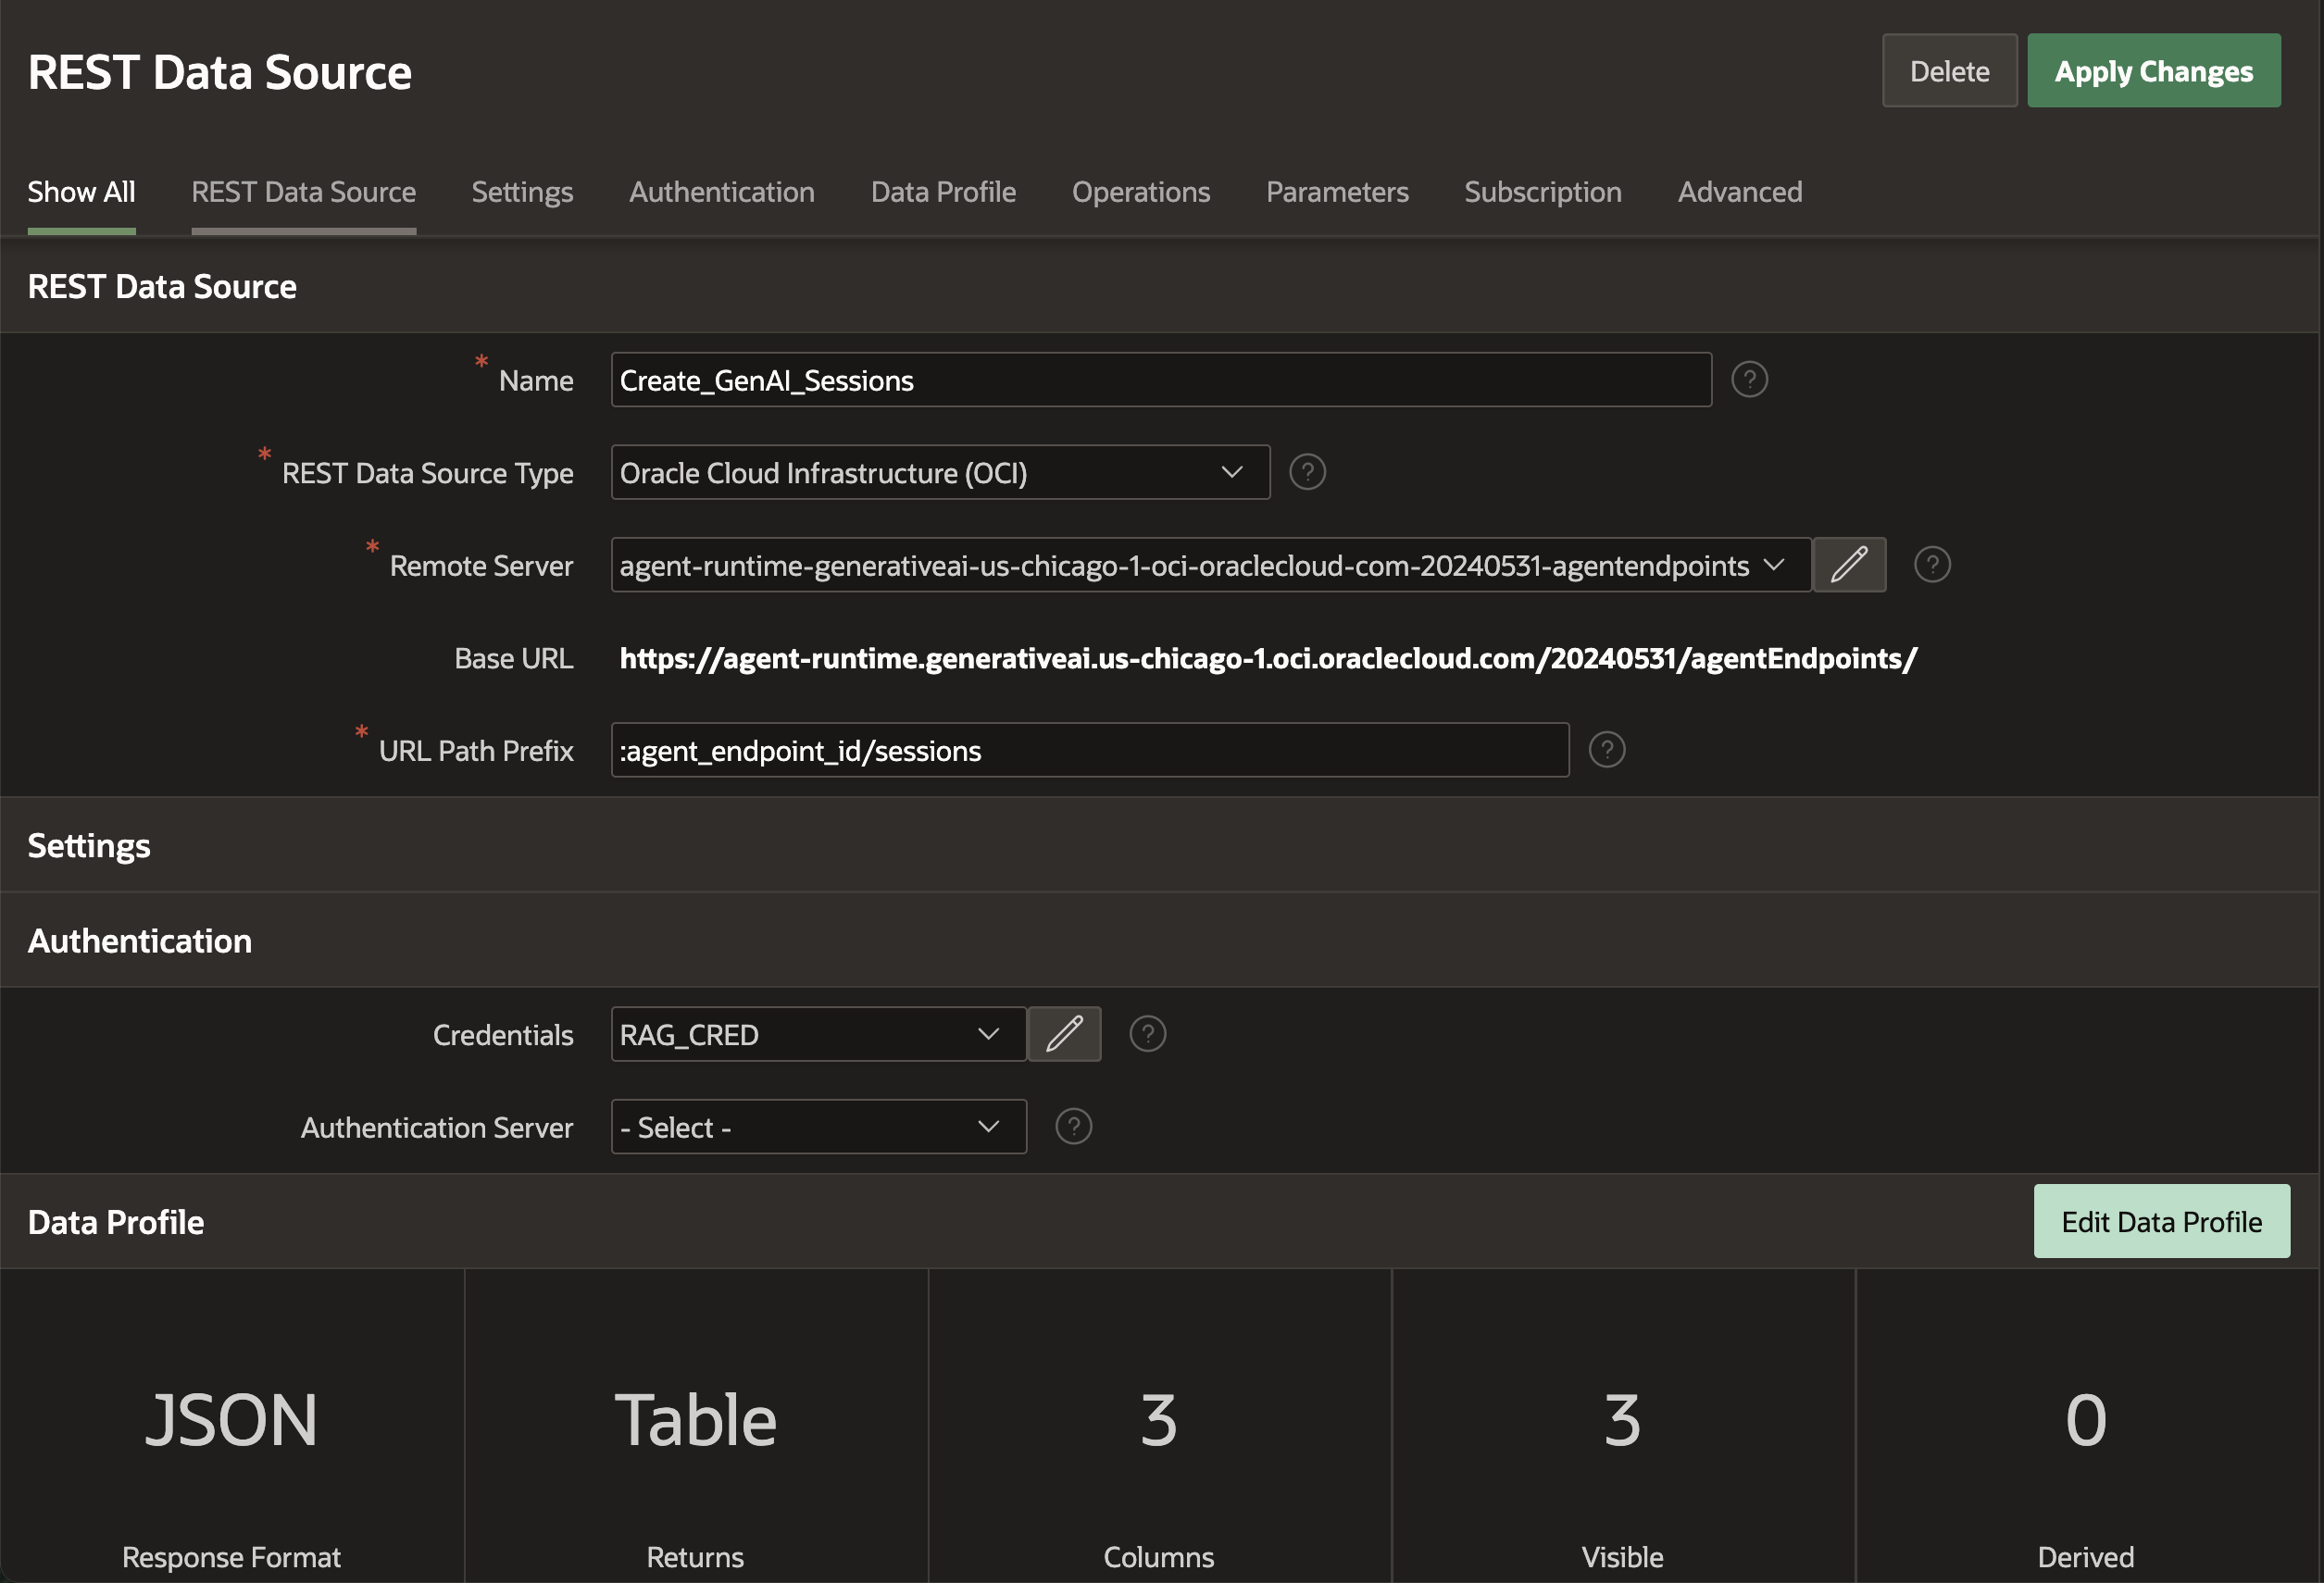
In the previous steps, we understood how the OCI Generative AI Agents Create Session REST API works. Now, we can proceed to create a REST Data Source in Oracle APEX that connects to the OCI Create Session REST APIEndpoint.
The REST Data Source will be set up with the following parameters:
The request to the OCI Generative AI Agents client CreateSession is an HTTP POST request. So, update the POST operation with the below settings:
Compose the Request Body Template with appropriate substitution Tags. { "displayName": "#AGENT_NAME#", "description": "#DESCRIPTION#" }
For the Operation parameters, use the Synchronize with Body button to get all the substitutions defined in the Request Body Template as parameters
Additionally, create two Operation parameters:
RESPONSE (Response Body) – to hold the JSON response from the POST request
Content-Type (HTTP header) – It can be a static value, defaulted to application/json
With the REST Data Source successfully configured, it’s time to invoke it from the Pre-rendering Page process.
Figure 12: Create Generative AI Agent Sessions REST API
7.1. Invoke the OCI Generative AI Agent Create Session REST Data Source through a Page Process
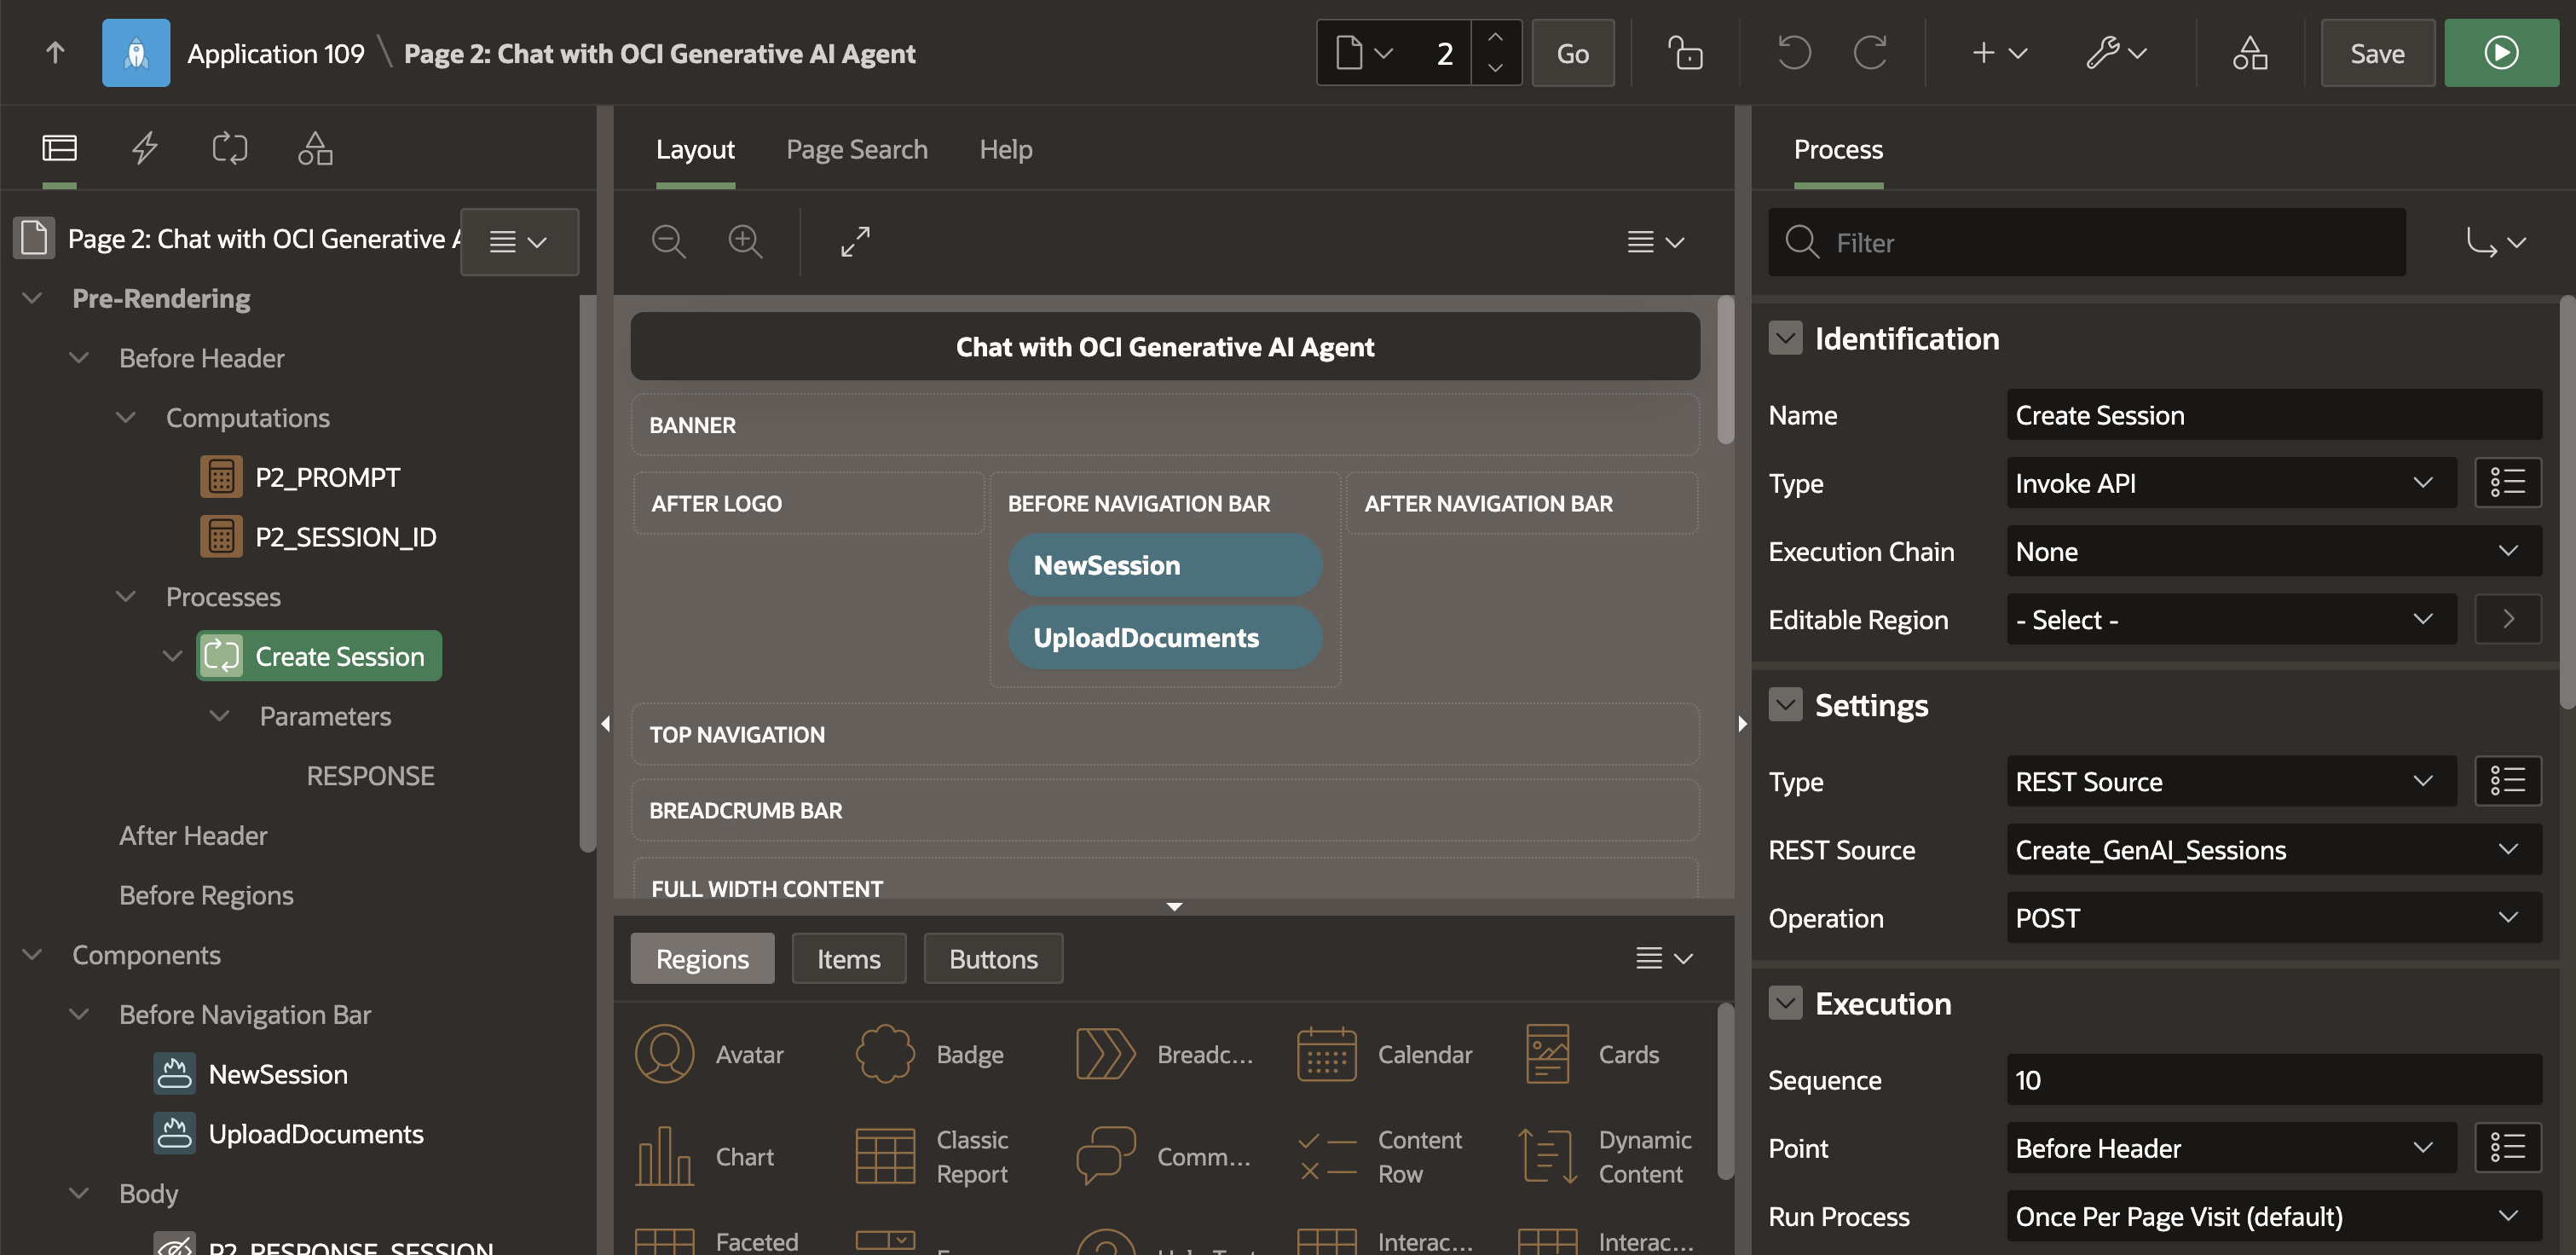
To create a session with the OCI Generative AI Agent directly from an APEX page, you will create a Pre-rendering -> Before Header process with the Invoke API type. First, make sure that we have a Create Session API. Then, add a new process under Pre-Rendering > Before Header in your page, choose Invoke API, set the type to REST Source, and select Create Session API as the source with the POST operation. For the RESPONSE Parameter, uncheck Ignore Output to capture the response, and map it to a page item like P2_RESPONSE_SESSION.
To extract the session ID from the JSON response, create a hidden page item P2_SESSION_ID and use this SQL query as its default value:
SELECT ID FROM JSON_TABLE(:P2_RESPONSE_SESSION, '$' COLUMNS ( ID VARCHAR2(4000) PATH '$.id' ) ) JT;
This query pulls the ID field from the JSON response and stores it in P2_SESSION_ID, allowing your app to reuse the session for interacting with the Generative AI Agent Chat API.
Figure 13: Invoke Create Session API from a Pre-Rendering Process
8. Create and Customize Classic Report for the Chat Interface
To create a chatbot-style interface in Oracle APEX, use a Classic Report region and under Classic Report Attributes, set the Appearance > Template to Comments. This template formats each row like a chat message, complete with user icons and message bubbles.
Here’s a sample SQL query to drive the Chat Interface:
SELECT CONV_ID, -- Converstation ID USER_NAME, -- Name of the commenter COMMENT_TEXT, -- Message/AI Response content COMMENT_DATE, -- Timestamp of the comment -- User initials for avatar APEX_STRING.GET_INITIALS(USER_NAME) ASUSER_ICON, -- Show View Citations for AI Agent response CASEIS_OWN WHEN'Yes'THENNULL ELSE'View Citations' ENDASACTIONS, -- 'Edit' link for own comments to edit the User Prompt CASEIS_OWN WHEN'Yes'THEN '<a href="#" class="set-value" data-ct="' || REPLACE(COMMENT_TEXT, '"', '"') || '">Edit</a>' ELSENULL ENDASACTIONS_2, NULLASATTRIBUTE_1, NULLASATTRIBUTE_2, NULLASATTRIBUTE_3, NULLASATTRIBUTE_4, -- CSS class for own comment styling CASEIS_OWN WHEN'Yes'THEN't-Chat--own' ELSENULL ENDASCOMMENT_MODIFIERS FROM RAG_CHATBOT WHERE SESSION_ID = :P2_SESSION_ID ORDERBY COMMENT_DATE ASC
This query pulls messages from the RAG_CHATBOT table and adds a few enhancements:
User initials are shown using apex_string.get_initials.
Actions like “View Citations” or “Edit” are conditionally displayed based on message ownership.
The comment_modifiers column applies the t-Chat–own class to highlight the current user’s messages.
8.1. Styling
The template uses built-in APEX CSS:
t-Chat provides the base chat layout.
t-Chat–own styles messages sent by the current user, usually aligning them to the right and using a different background.
Figure 14: Create and Customize Classic Report
8.2. Add Page Item for Prompt and a Submit Button
To improve the layout and usability of the chat interface, we’ll add a subregion that neatly organizes the prompt input field and the send button. This helps keep related UI elements grouped together, making the interface cleaner and easier to manage.
Create a Sub-Region with Name Buttons under Chat with OCI Generative AI Agent. Then, configure the subregion as follows in the Property Editor:
Type: Static Content
Template: Blank with Attributes
This new subregion will hold both the prompt input field and the send button.
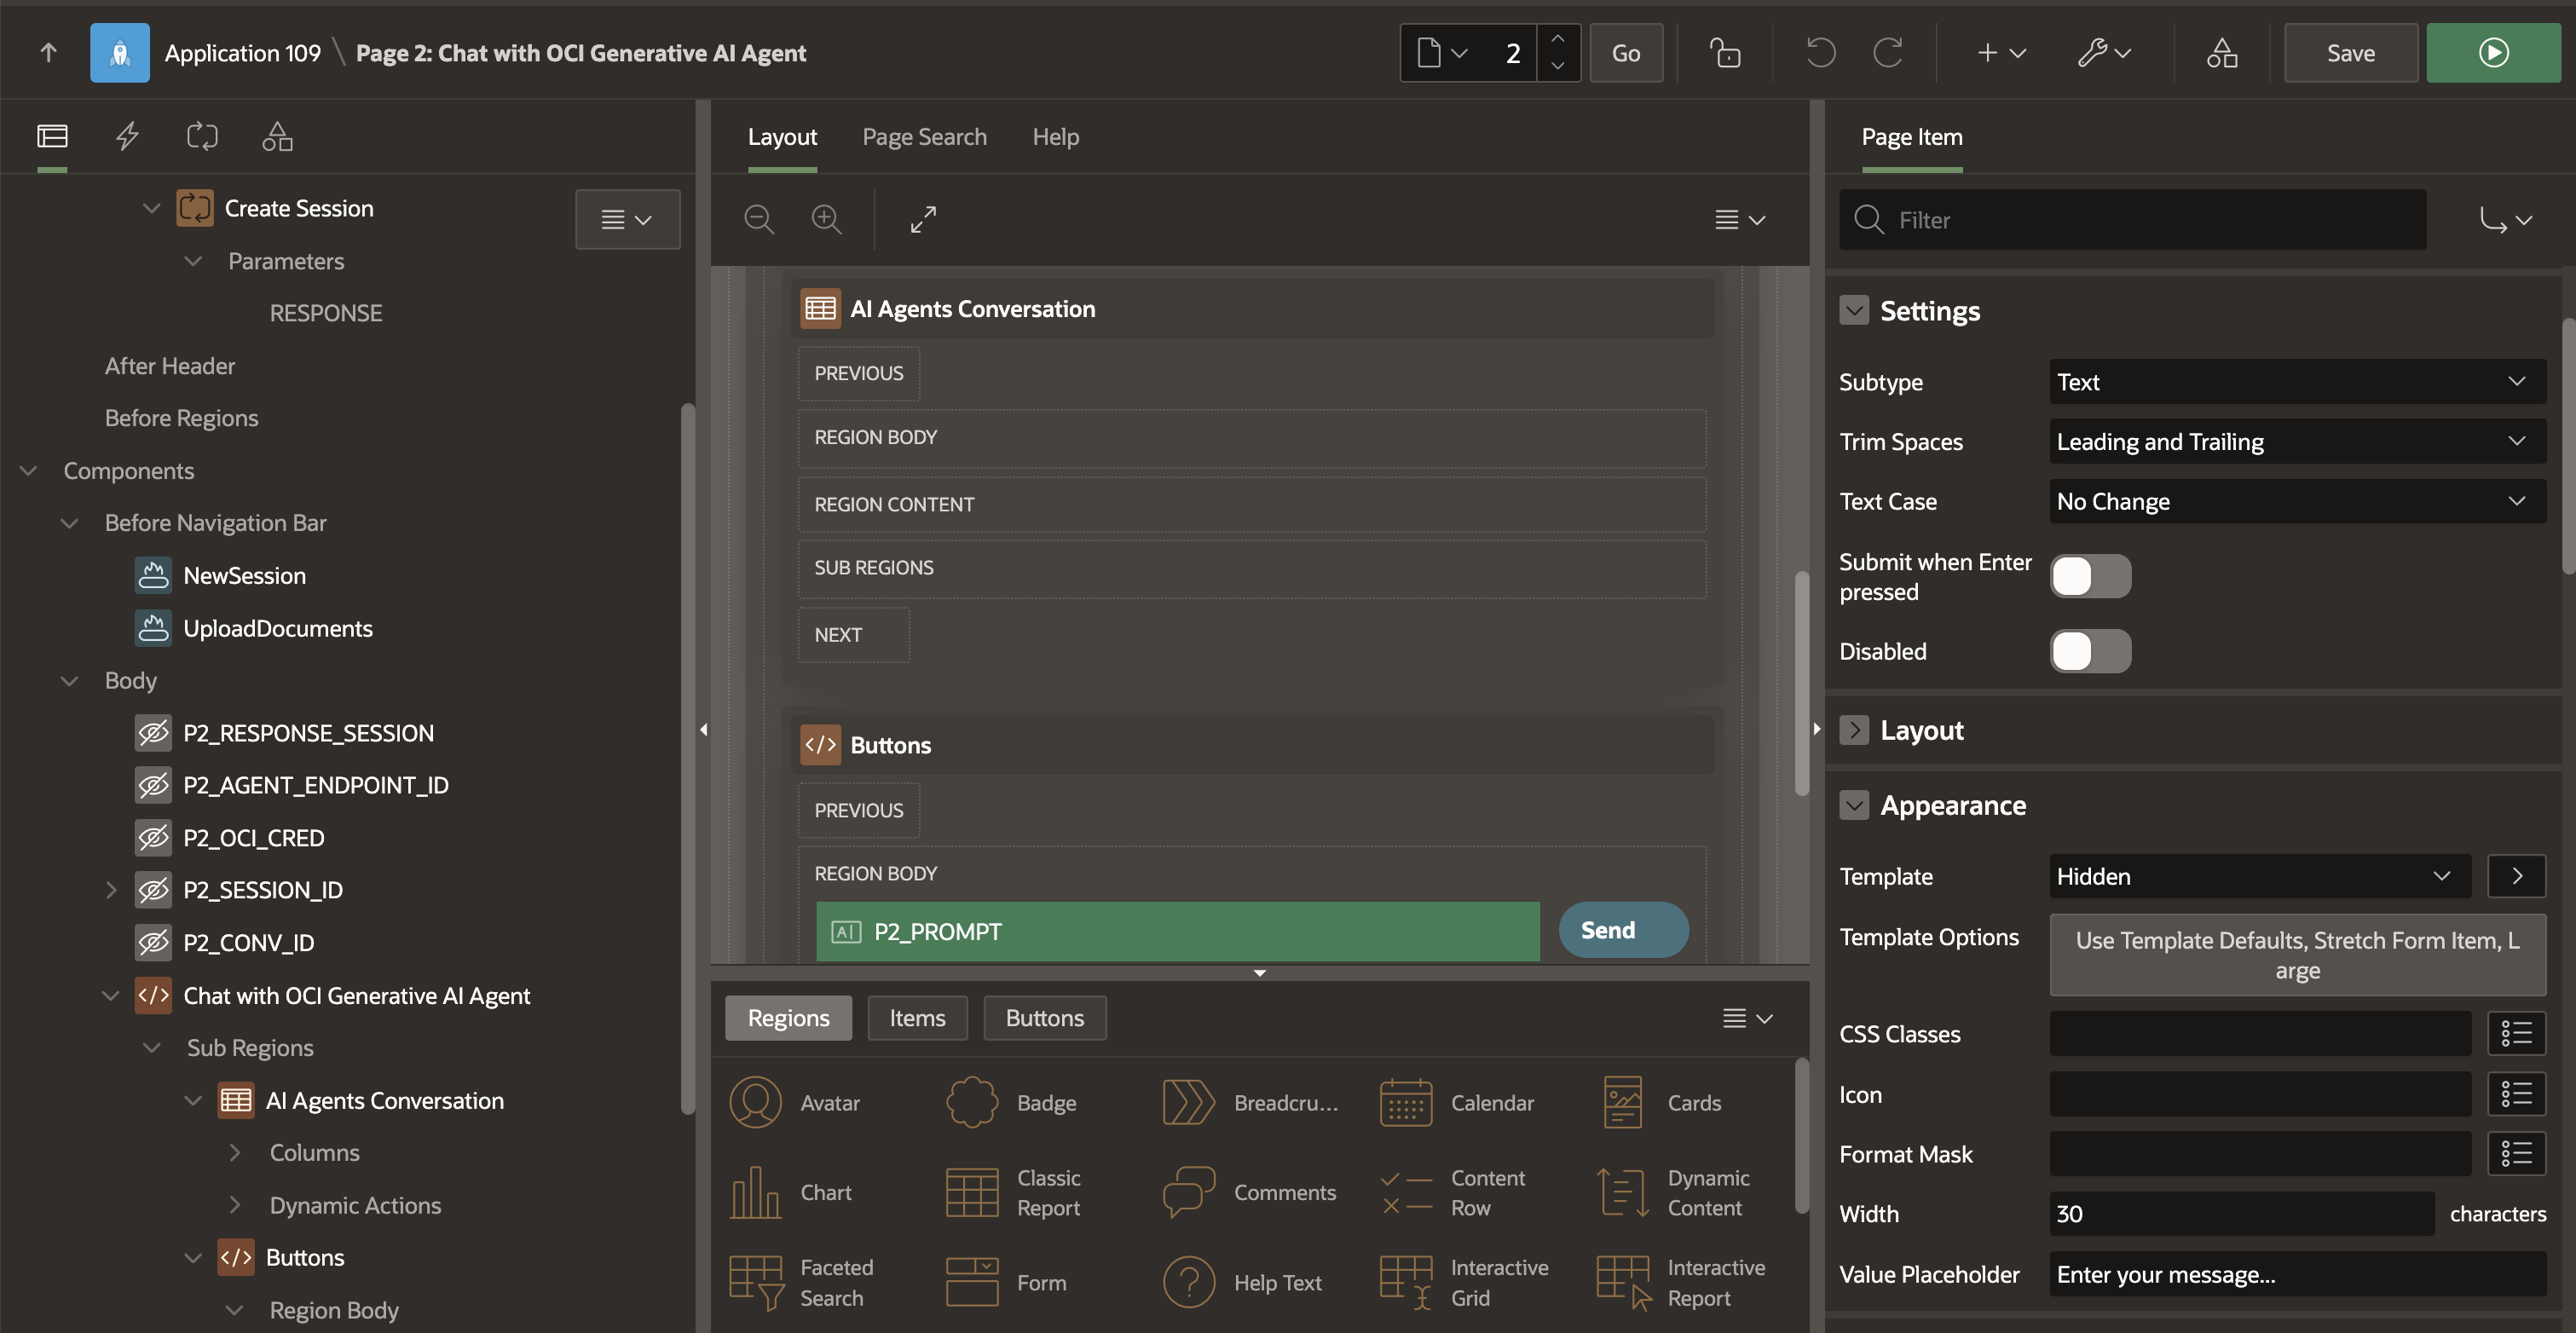
8.3. Adding the Prompt Input Field
Inside the Buttons subregion, create a new page item with these settings:
Name: P1_PROMPT
Type: Text Field
Placeholder: Enter your message…
This text field allows users to type in their message. The Text Message template and large size provide a modern, spacious input area that aligns with the chat interface style.
Figure 15: Add Prompt Input Item
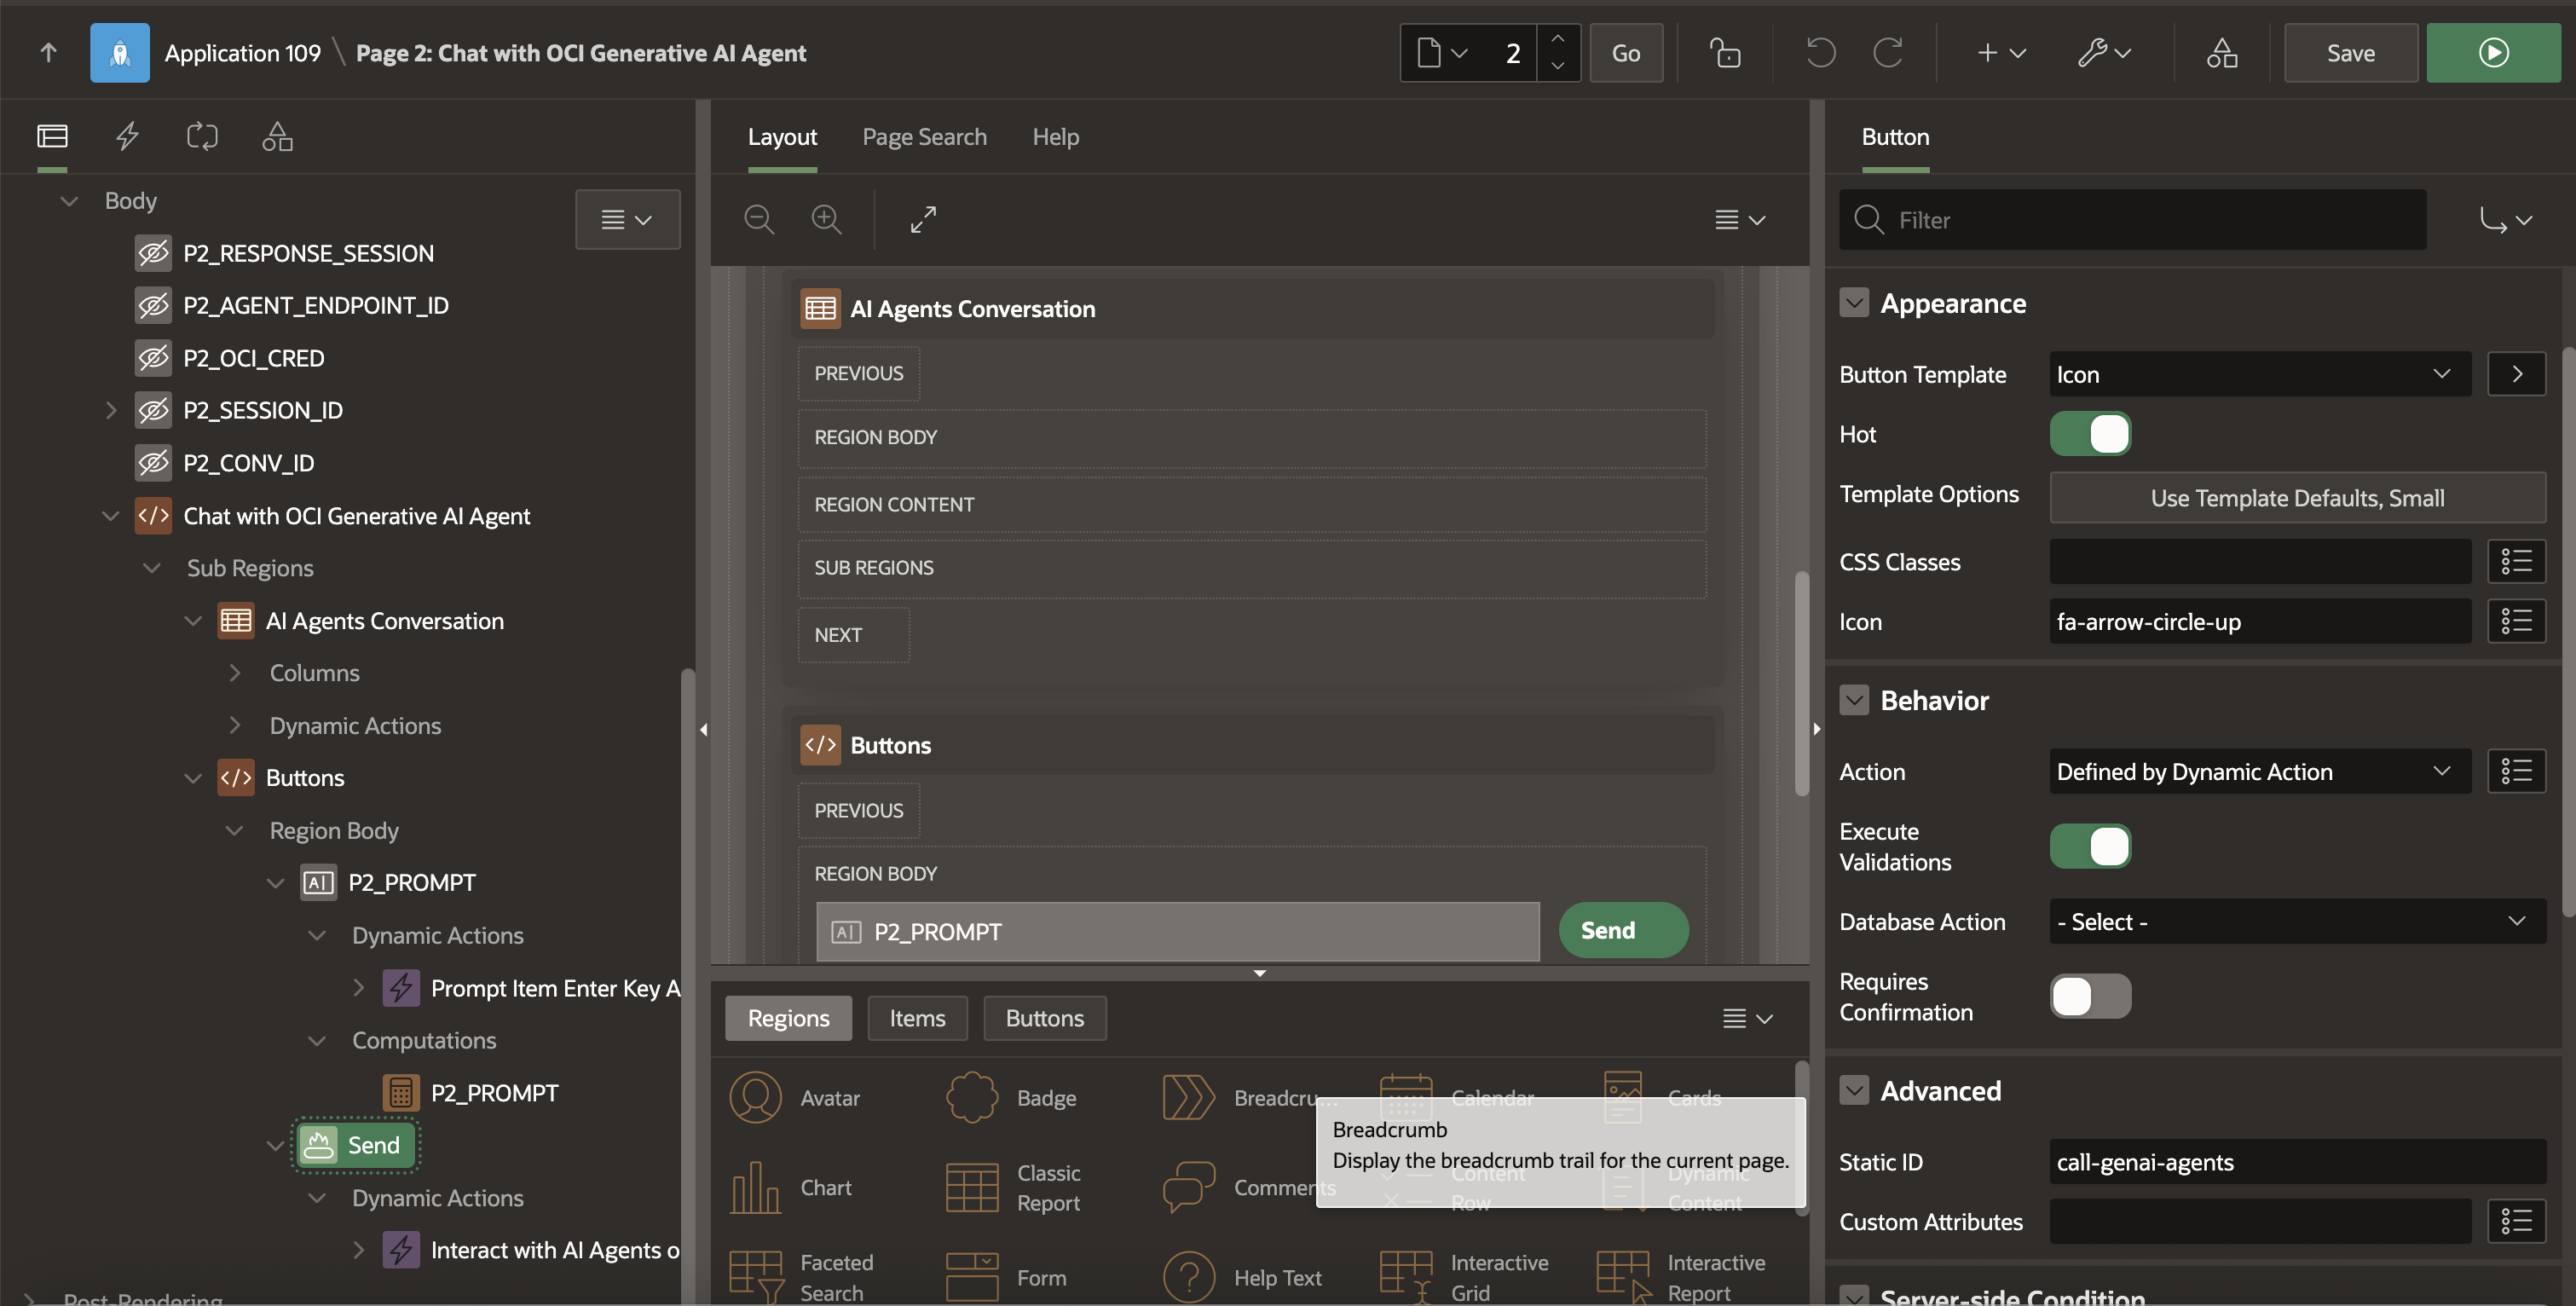
8.4. Add the Send Button
Within the Buttons subregion, add a new button with the following properties:
Name: Send
Icon: fa-arrow-circle-up
Static ID: call-genai-agents
This button will trigger the chat logic when clicked, sending the user’s message to the generative AI agent.
Figure 16: Add a send button to call Generative AI Agents
9. Create Dynamic Actions to Integrate with OCI Generative AI Agents
In this step, we will set up Dynamic Actions on the Send button that enables your Oracle APEX application to send user input to an AI agent, save the conversation, and display the AI’s response seamlessly.
9.1. Save the User’s Message to the Database
Create a dynamic action on the Send button that only runs if the user has typed something in the input field (P1_PROMPT), and inserts the user’s input/prompt into the RAG_CHATBOT table using a PL/SQL block. This stores the user’s message along with the current session details, helping maintain a conversation history.
Figure 17: Create Dynamic Action to Insert User Prompts to database
Note: To signal that the system is processing the request, create another Dynamic Action to refresh the Classic Report region and add a loading spinner. This visual feedback keeps users informed while the AI generates its response.
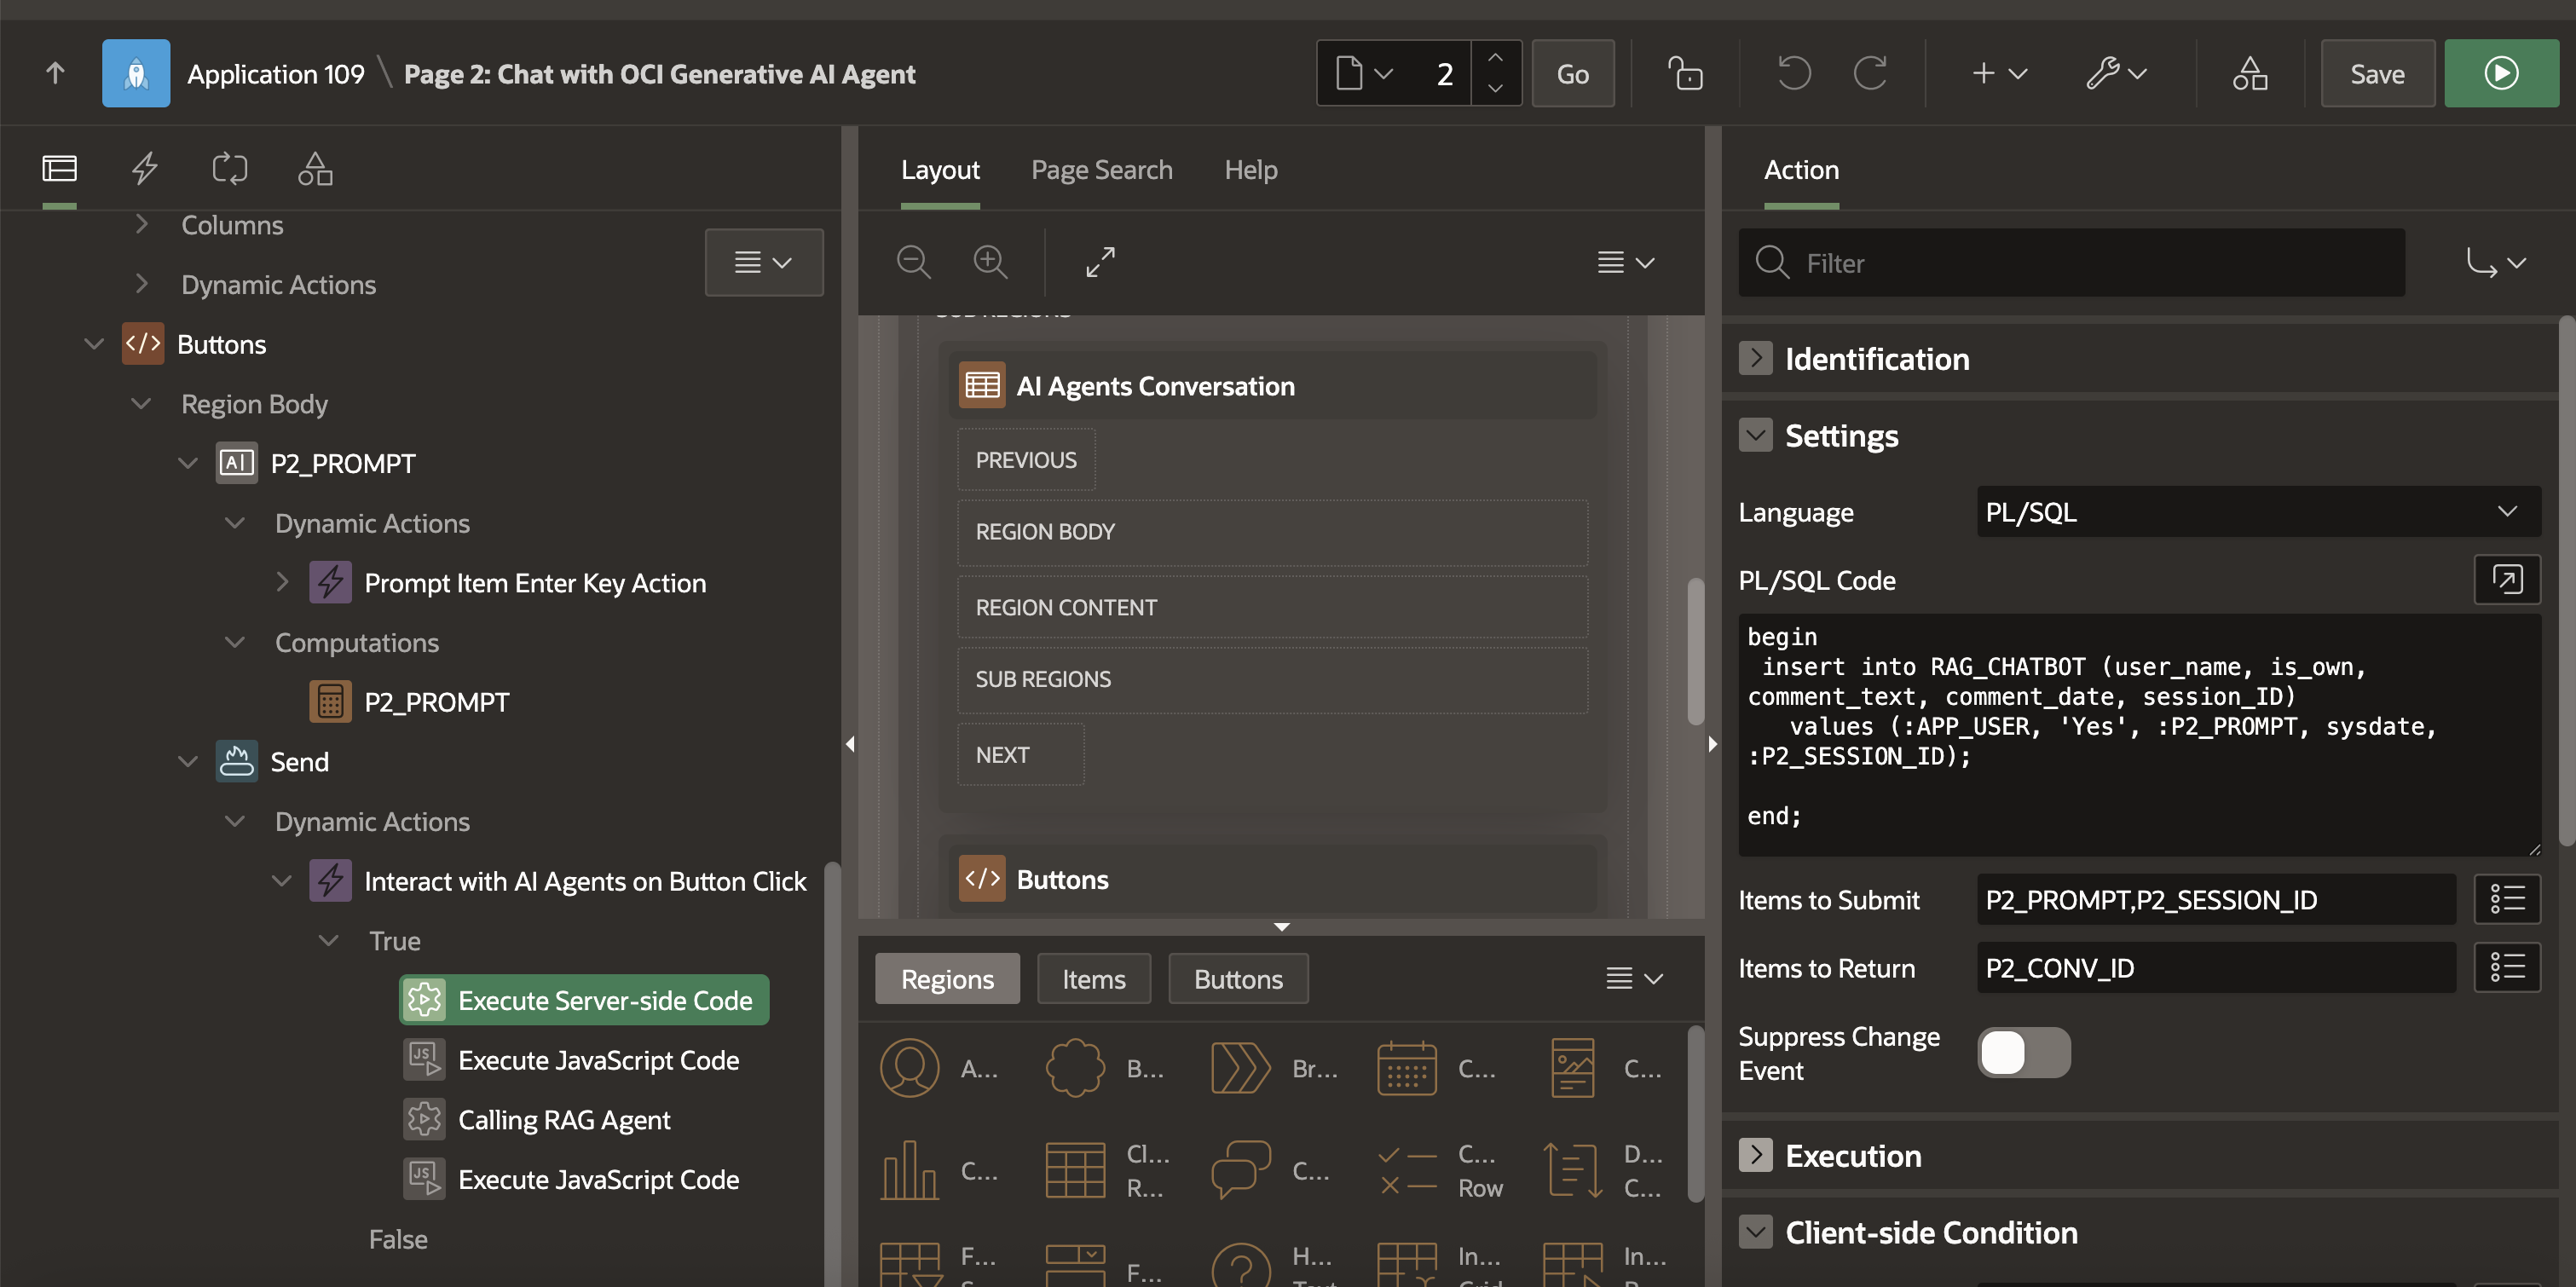
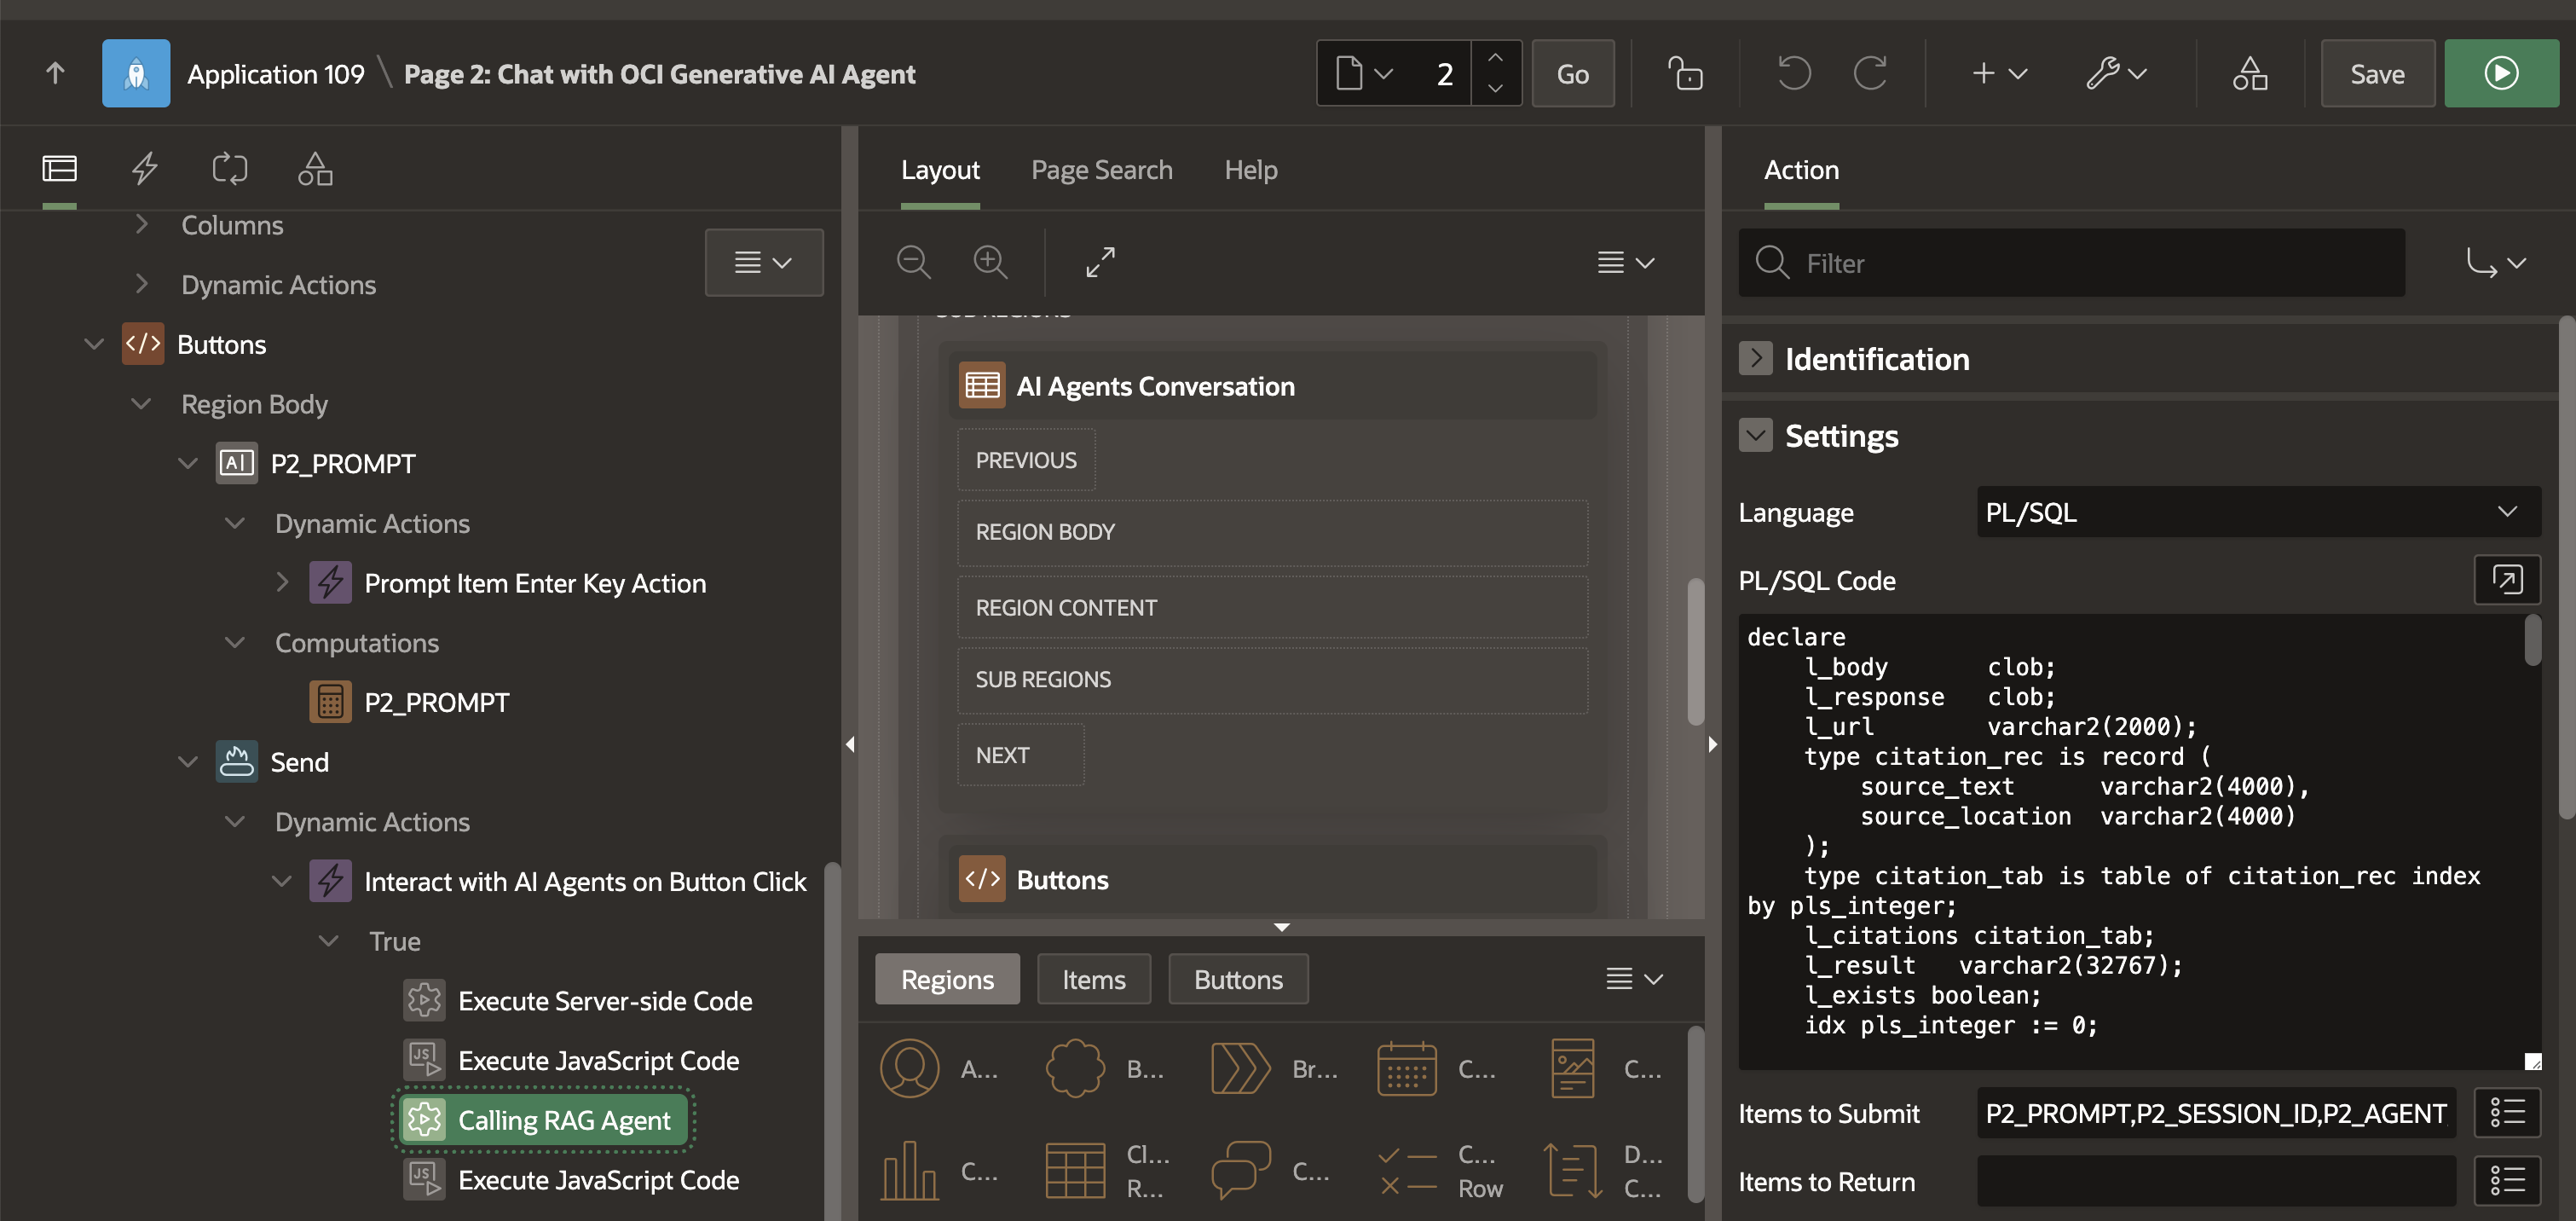
9.2. Send the User’s Prompt to the AI Agent and Process the Response
The key step is calling the AI agent’s REST API endpoint. Create another Dynamic Action for the Send Button of Type Execute Server-side Code. The PL/SQL block block constructs a JSON payload including the session ID and userprompt, then performs a POST request to the AI service. The AI JSON response is parsed and inserted back into the RAG_CHATBOT table as an AI response, ensuring the conversation remains continuous.
In addition to the AI’s textual response, the PLSQL code Inserts any citations or text references provided by the AI in a dedicated RAG_CITATIONS table.
Figure 18: Create Dynamic Action to call OCI Generative AI Agents Chat API
Note: Add a True Action to execute JavaScript that refreshes the chat region, clears and refocuses the input field, re-enables it, and removes any loading overlays to complete the interaction cycle.
You can download the app export of the above demo application from here : APEX-OCI-AI-Agents.zip
Conclusion
Integrating OCI Generative AI Agents with Oracle APEX brings the power of conversational AI directly into your applications, using your own enterprise data. It allows you to build intelligent, chat-based interfaces that respond in real time with context-aware answers, without needing deep expertise in AI or complex backend systems.
Useful Resources
Learn more about AI Infrastructure, AI-powered apps, and customers using AI with Oracle APEX on the APEX + AI = Awesome! Web Page.
Stay tuned for a Hands-On Lab and a Sample Application
Authors
Roopesh Thokala
Principal Product Manager, Oracle APEX
Roopesh Thokala is a Principal Product Manager at Oracle APEX. He is responsible for Product Management activities for APEX, including APEX on Autonomous Databases and APEX Services on OCI and Multicloud, with a strong focus on the JAPAC Region. He excels in customer evangelism and takes pride in promptly resolving customer issues. Prior to his role in the APEX Team, Roopesh served as an APEX Developer, Solution Engineer, and Solution Architect. He also actively supports various Oracle APEX user groups across the JAPAC region.