Prerequisites:
- Docker images:
- WebLogic Server (weblogic-12.2.1.3:latest).
- WebLogic Kubernetes Operator (weblogic-operator:latest)
- Traefik Load Balancer (traefik:1.4.5)
- A workstation with Docker and kubectl, installed and configured.
- The Oracle Container Engine for Kubernetes on OCI. To setup a Kubernetes managed service on OCI, follow the documentation Overview of Container Engine for Kubernetes.
- OCI Container Engine for Kubernetes nodes are accessible using ssh.
- The Oracle Cloud Infrastructure Registry to push the WebLogic Server, Operator, and Load Balancer images.
Prepare the WebLogic Kubernetes Operator environment
To prepare the environment, we need to:
- ·Test accessibility and set up the RBAC policy for the OCI Container Engine for the Kubernetes cluster
- Set up the NFS server
- Upload the Docker images to the OCI Registry (OCIR)
- Modify the configuration YAML files to reflect the Docker images’ names in the OCIR
Test accessibility and set up the RBAC policy for the OKE cluster
To check the accessibility to the OCI Container Engine for Kubernetes nodes, enter the command:
kubectl get nodes
The output of the command will display the nodes, similar to the following:
NAME STATUS ROLES AGE VERSION
129.146.109.106 Ready node 5h v1.9.4
129.146.22.123 Ready node 5h v1.9.4
129.146.66.11 Ready node 5h v1.9.4
In order to have permission to access the Kubernetes cluster, you need to authorize your OCI account as a cluster-admin on the OCI Container Engine for Kubernetes cluster. This will require your OCID, which is available on the OCI console page, under your user settings. For example, if your user OCID is ocid1.user.oc1..aaaaaaaac26kw7qvuij7i6fadabklqfb7svyuhpitedmguspv6ht67i5l32q, the command would be:
kubectl create clusterrolebinding my-cluster-admin-binding --clusterrole=cluster-admin --user=ocid1.user.oc1..aaaaaaaac26kw7qvuij7i6fadabklqfb7svyuhpitedmguspv6ht67i5l32q
Set up the NFS server
In the current GA version, the OCI Container Engine for Kubernetes supports network block storage that can be shared across nodes with access permission RWOnce (meaning that only one can write, others can read only). At this time, the WebLogic on Kubernetes domain created by the WebLogic Server Kubernetes Operator, requires a shared file system to store the WebLogic domain configuration, which MUST be accessible from all the pods across the nodes. As a workaround, you need to install an NFS server on one node and share the file system across all the nodes.
Note: Currently, we recommend that you use NFS version 3.0 for running WebLogic Server on OCI Container Engine for Kubernetes. During certification, we found that when using NFS 4.0, the servers in the WebLogic domain went into a failed state intermittently. Because multiple threads use NFS (default store, diagnostics store, Node Manager, logging, and domain_home), there are issues when accessing the file store. These issues are removed by changing the NFS to version 3.0.
In this demo, the Kubernetes cluster is using nodes with these IP addresses:
Node1: 129.146.109.106

Node2: 129.146.22.123

Node3: 129.146.66.11
In the above case, let’s install the NFS server on Node1 with the IP address 129.146.109.106, and use Node2 (IP:129.146.22.123)and Node3 (IP:129.146.66.11) as clients. Log in to each of the nodes using ssh to retrieve the private IP address, by executing the command:
ssh -i ~/.ssh/id_rsa opc@[Public IP of Node]

ip addr | grep ens3
~/.ssh/id_rsa is the path to the private ssh RSA key.
For example, for Node1:
ssh -i ~/.ssh/id_rsa opc@129.146.109.106

ip addr | grep ens3

Retrieve the inet value for each node. For this demo, here is the collected information:
| Nodes: |
Public IP |
Private IP |
| Node1 (NFS Server) |
129.146.109.106
|
10.0.11.3
|
| Node2 |
129.146.22.123
|
10.0.11.1
|
| Node3 |
129.146.66.11
|
10.0.11.2
|
Log in using ssh to Node1, and install and set up NFS for Node1 (NFS Server):
- sudo su -
- yum install -y nfs-utils
- mkdir /scratch
- chown -R opc:opc /scratch
- vi /etc/exports
- systemctl restart nfs
- exit
Edit the /etc/exports file to add the internal IP addresses of Node2 and Node3:
/scratch 10.0.11.1(rw)
/scratch 10.0.11.2(rw)
Log in using ssh to Node2:
ssh -i ~/.ssh/id_rsa opc@129.146.22.123
- sudo su -
- yum install -y nfs-utils
- mkdir /scratch
- vi /etc/fstab
- mount /scratch
- exit
Edit the /etc/fstab file to add the internal IP address of Node1:
10.0.11.3:/scratch /scratch nfs nfsvers=3 0 0
Repeat the same steps for Node3:
ssh -i ~/.ssh/id_rsa opc@129.146.66.11
- sudo su -
- yum install -y nfs-utils
- mkdir /scratch
- vi /etc/fstab
- mount /scratch
- exit
Edit the /etc/fstab file to add the internal IP address of Node1:
10.0.11.3:/scratch /scratch nfs nfsvers=3 0 0
Upload the Docker images to the OCI Registry
Build the required Docker images for WebLogic 12.2.1.3 and WebLogic Kubernetes Operator. Pull the Traefik Docker Image from the Docker Hub repository, for example:
docker login

docker pull traefik:1.4.5
Tag the Docker images, as follows:
docker tag [Name Of Your Image For Operator]  phx.ocir.io/weblogicondocker/weblogic-kubernetes-operator:latest

docker tag [Name Of Your Image For WebLogic Domain]  phx.ocir.io/weblogicondocker/weblogic:12.2.1.3

docker tag traefik:1.4.5 phx.ocir.io/weblogicondocker/traefik:1.4.5
Generate an authentication token to log in to the phx.ocir.io OCIR Docker repository:
Log in to your OCI dashboard. Click ‘User Settings’, then ‘Auth Tokens’ on the left-side menu.

Save the generated password in a secured place.
Log in to the OCIR Docker registry by entering this command:
docker login phx.ocir.io
When prompted for your username, enter your OCI tenancy name/oci username. For example:
docker login phx.ocir.io
Username: weblogicondocker/myusername Password: Login Succeeded
Create a Docker registry secret. The secret name must consist of lower case alphanumeric characters:
kubectl create secret docker-registry <secret_name> --docker-server=<region>.ocir.io --docker-username=<oci_tenancyname>/<oci_username>

--docker-password=<auth_token> --docker-email=example_email
For example, for the PHX registry create docker secret ocisecret:
kubectl create secret docker-registry ocisecret --docker-server=phx.ocir.io --docker-username=weblogicondocker/myusername --docker-password= _b5HiYcRzscbC48e1AZa --docker-email=myusername@oracle.com
Push Docker images into OCIR:
docker push phx.ocir.io/weblogicondocker/weblogic-kubernetes-operator:latest

docker push phx.ocir.io/weblogicondocker/weblogic:12.2.1.3

docker push phx.ocir.io/weblogicondocker/traefik:1.4.5
Log in to the OCI console and verify the image:
- Log in to the OCI console. Verify that you are using the correct region, for example, us-phoenix-1.
- Under Containers, select Registry. The image should be visible on the Registry page.
- Click on image name, select ‘Actions’ to make it ‘Public’

Modify the configuration YAML files to reflect the Docker image names in the OCIR
Our final steps are to customize the parameters in the input files and generate deployment YAML files for the WebLogic cluster, WebLogic Operator, and to use the Traefik load balancer to reflect the image changes and local configuration. We will use the provided open source scripts: create-weblogic-operator.sh and create-weblogic-domain.sh.
Use Git to download the WebLogic Kubernetes Operator project:
git clone https://github.com/oracle/weblogic-kubernetes-operator.git

Modify the YAML inputs to reflect the image names:
cd $SRC/weblogic-kubernetes-operator/kubernetes
Change the ‘image’ field to the corresponding Docker repository image name in the OCIR:
./internal/create-weblogic-domain-job-template.yaml:   image: phx.ocir.io/weblogicondocker/weblogic:12.2.1.3
./internal/weblogic-domain-traefik-template.yaml:      image: phx.ocir.io/weblogicondocker/traefik:1.4.5
./internal/domain-custom-resource-template.yaml:       image: phx.ocir.io/weblogicondocker/weblogic:12.2.1.3
./create-weblogic-operator-inputs.yaml:         weblogicOperatorImage: phx.ocir.io/weblogicondocker/weblogic-kubernetes-operator:latest
Review and customize the other parameters in the create-weblogic-operator-inputs.yaml and create-weblogic-domain-inputs.yaml files. Check all the available options and descriptions in the installation instructions for the Operator and WebLogic Domain.
Here is the list of customized values in the create-weblogic-operator-inputs.yaml file for this demo:
targetNamespaces: domain1

weblogicOperatorImage: phx.ocir.io/weblogicondocker/weblogic-kubernetes-operator:latest

externalRestOption: SELF_SIGNED_CERT

externalSans: IP:129.146.109.106
Here is the list of customized values in the create-weblogic-domain-inputs.yaml file for this demo:
domainUID: domain1

t3PublicAddress: 0.0.0.0

exposeAdminNodePort: true

namespace: domain1

loadBalancer: TRAEFIK

exposeAdminT3Channel: true
weblogicDomainStoragePath: /scratch/external-domain-home/pv001
Note: Currently, we recommend that you use Traefik and the Apache HTTP Server load balancers for running WebLogic Server on the OCI Container Engine for Kubernetes. At this time we cannot certify the Voyager HAProxy Ingress Controller due to a lack of support in OKE.
The WebLogic domain will use the persistent volume mapped to the path, specified by the parameter weblogicDomainStoragePath. Let’s create the persistent volume directory on the NFS server, Node1, using the command:
ssh -i ~/.ssh/id_rsa opc@129.146.109.106 "mkdir -m 777 -p /scratch/external-domain-home/pv001"
Our demo domain is configured to be run in the namespace domain1. To create namespace domain1, execute this command:
kubectl create namespace domain1
The username and password credentials for access to the Administration Server must be stored in a Kubernetes secret in the same namespace that the domain will run in. The script does not create the secret in order to avoid storing the credentials in a file. Oracle recommends that this command be executed in a secure shell and that the appropriate measures be taken to protect the security of the credentials.
To create the secret, issue the following command:
kubectl -n NAMESPACE create secret generic SECRET_NAME

  --from-literal=username=ADMIN-USERNAME

  --from-literal=password=ADMIN-PASSWORD
For our demo values:
kubectl -n domain1 create secret generic domain1-weblogic-credentials --from-literal=username=weblogic --from-literal=password=welcome1
Finally, run the create script, pointing it at your inputs file and the output directory:
./create-weblogic-operator.sh –i create-weblogic-operator-job-inputs.yaml -o /path/to/weblogic-operator-output-directory
It will create and start all the related operator deployments.
Run this command to check the operator pod status:

Execute the same command for the WebLogic domain creation:
./create-weblogic-domain.sh –i create-weblogic-domain-job-inputs.yaml -o /path/to/weblogic-domain-output-directory

To check the status of the WebLogic cluster, run this command:
bash-4.2$ kubectl get pods -n domain1

Let’s see how the load balancer works. For that, let’s access the WebLogic Server Administration Console and deploy the testwebapp.war application. In the customized inputs for the WebLogic domain, we have specified to expose the AdminNodePort. To review the port number, run this command:

Let’s use one of the node’s external IP addresses to access the Administration Console. In our demo, it is http://129.146.109.106:30701/console. Log in to the WebLogic Server Administration Console using the credentials weblogic/welcome1.

Click ‘Deployments’, ‘Lock&Edit’, and upload the testwebapp.war application. Select cluster-1 as a target and click ‘Finish’, then ‘Release Configuration’. Select the ‘Control’ tab and click ‘Start serving all requests’. The status of the deployment should change to ‘active’.

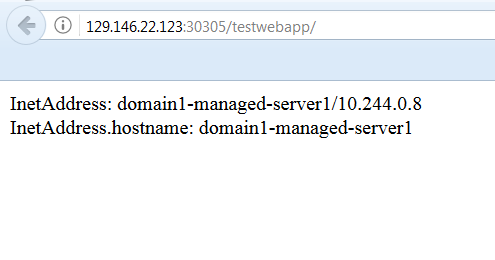
Let’s demonstrate load balancing HTTP requests using Traefik as Ingress controllers on Kubernetes clusters. To check the NodePort number for the load balancer, run this command:

The Traefik load balancer is running on port 30305. Every time we access the testwebapp application link, http://129.146.22.123:30305/testwebapp/, the application will display the currently used Managed Server’s information.

Another load of the same URL, displays the information about Managed Server 1.
Because the WebLogic cluster is exposed to the external world and accessible using the external IP addresses of the nodes, the authorized WebLogic user can use the T3 protocol to access all the available WebLogic resources by using WLST commands. With a firewall, you have to run T3 using tunneling with a proxy (use T3 over HTTP; turn on tunneling in the WLS Server and then use the “HTTP” protocol instead of “T3”). See this blog for more details. If you are outside of the corporate network, you can use T3 with no limitations.
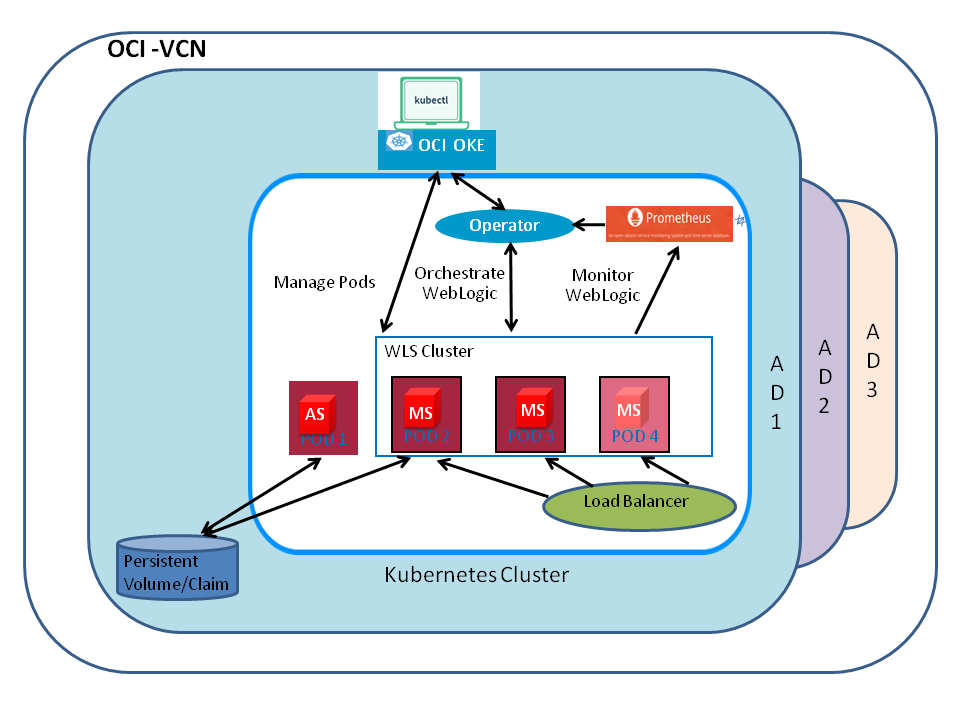
Summary
In this blog, we demonstrated all the required steps to set up a WebLogic cluster using the OCI Container Engine for Kubernetes that runs on the Oracle Cloud Infrastructure and load balancing for a web application, deployed on the WebLogic cluster. Running WebLogic Server on Kubernetes in OCI Container Engine for Kubernetes enables users to leverage WebLogic Server applications in a managed Kubernetes environment, to integrate WebLogic Server applications with other cloud applications, and to evolve their usage of WebLogic Server and expand their usage of Kubernetes. We are also publishing a series of blog entries that describe in detail, how to run the operator, how to stand up one or more WebLogic domains in Kubernetes, how to scale up or down a WebLogic cluster manually or automatically using the WebLogic Diagnostics Framework (WLDF) or Prometheus, how the Operator manages load balancing for web applications deployed in WebLogic clusters, and how to provide integration for managing operator logs through Elasticsearch, Logstash, and Kibana.