ChartFields (CFs) play an important role in Peoplesoft Inventory transactions by recording the financial entries that will post to the General Ledger associated to the Inventory Business Unit. At present, the Mobile Inventory Express Issue transaction displays only 5 available key ChartFields open for the user to override if needed. However, there is no provision to override other ChartFields both at Header and Line level on the mobile Express Issue transaction. In the Classic version of the Express issue transaction, all ChartFields can be viewed and also be edited.
Many customers have expressed a need to open up more accounting fields in Mobile Inventory transactions and also make it easier to enter the new or override values. To address this request, we have enhanced very frequently used transaction…. the Mobile Inventory Express Issue transaction. We have added the capability to enter and override accounting details with a ChartField template and Accounting Tag functionality.
A ChartField template enables users to configure the accounting ChartFields they want to enable on the transaction for manual input. A better option for users is to leverage the Accounting Tag capability as it helps users by defaulting the ChartField values into the Header and Line Accounting details fields, thus helping to reduce data entry and avoid errors by keying in an incorrect account.
We have also enabled the use of the Accounting Tag to the Classic version of the Express Issue transaction in order to have a consistent user experience when switching between Mobile and workstation entry.
In this blog I shall explain how to setup and use ChartField Display Templates and Accounting Tags.
Steps to setup Chart field (CF) Display Template:
Create a new CF display template and define the ChartField name. By configuring the ChartField Display Options, you can Hide/Unhide the ChartFields
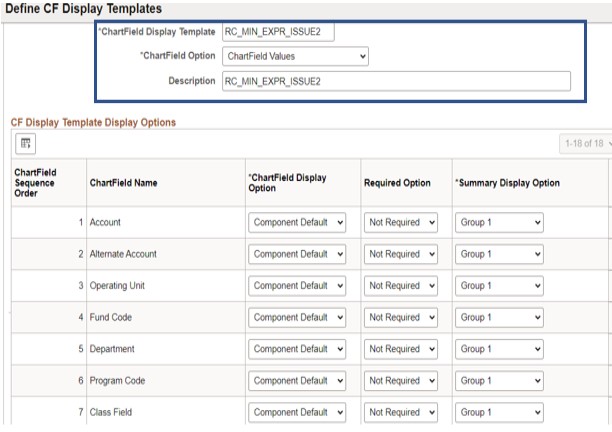
Figure 1: Define ChartField Display Templates
Assign the CF template to Mobile Inventory Express Issue Component and define necessary permission
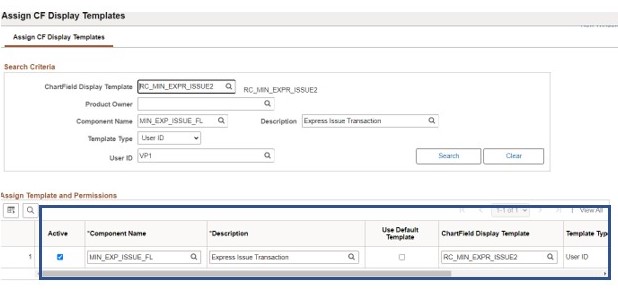
Figure 2: Assign ChartField Display Templates and Permissions to a Component
Steps to setup Accounting Tags:
You can Create your own Inventory and Mobile Inventory Accounting tags and define the ChartField values you wish to default into the transaction. In the setup page, select the product as “Inventory” and “Mobile Inventory” so the Accounting Tag is available in both the products. The defined ChartField value from the Accounting Tag gets defaulted in the Express Issue transaction when chosen
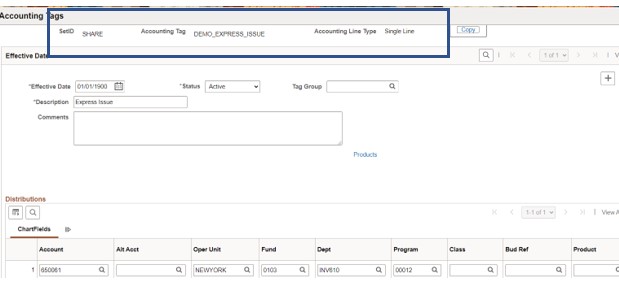
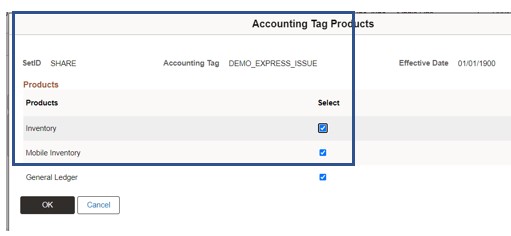
Figure 3: Define Accounting Tags for Inventory and Mobile Inventory
Steps to use the new functionality in the Express Issue transaction
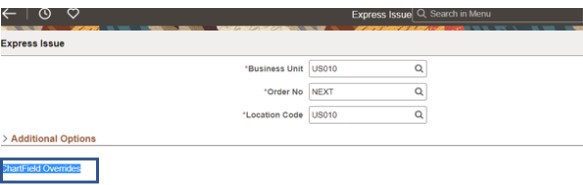
Login to Express Issue transaction using your mobile device. Click on the header level Chart field Overrides.
The ChartFields are displayed in each tab based on the configuration in the ChartField Display Template.
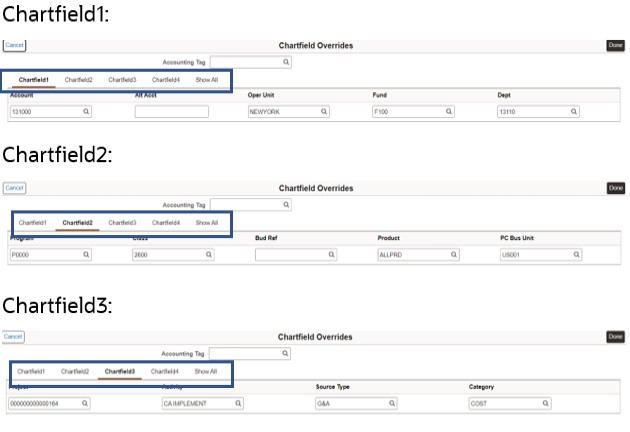
The CF values gets defaulted based on accounting tag selection.

Figure 4: Using ChartField Templates and Accounting Tags for Overrides of Accounting Data
Go to Line Level and click on ChartField Overrides to override the values defaulted from the Header level value for each Line.
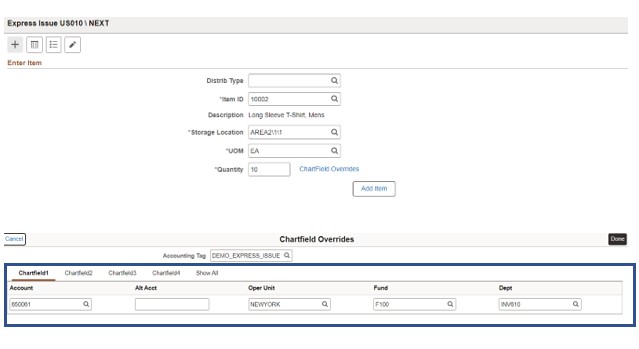
Figure 5: Using ChartField Templates and Accounting Tags for Overrides of Accounting Data
We hope that implementation of this feature in Inventory and Mobile Inventory would provide a more flexible, efficient and error free data entry experience while entering/changing accounting details.
If you want to read more about setting up Accounting Tag and using in eProcruement Fluid Requistion, click here