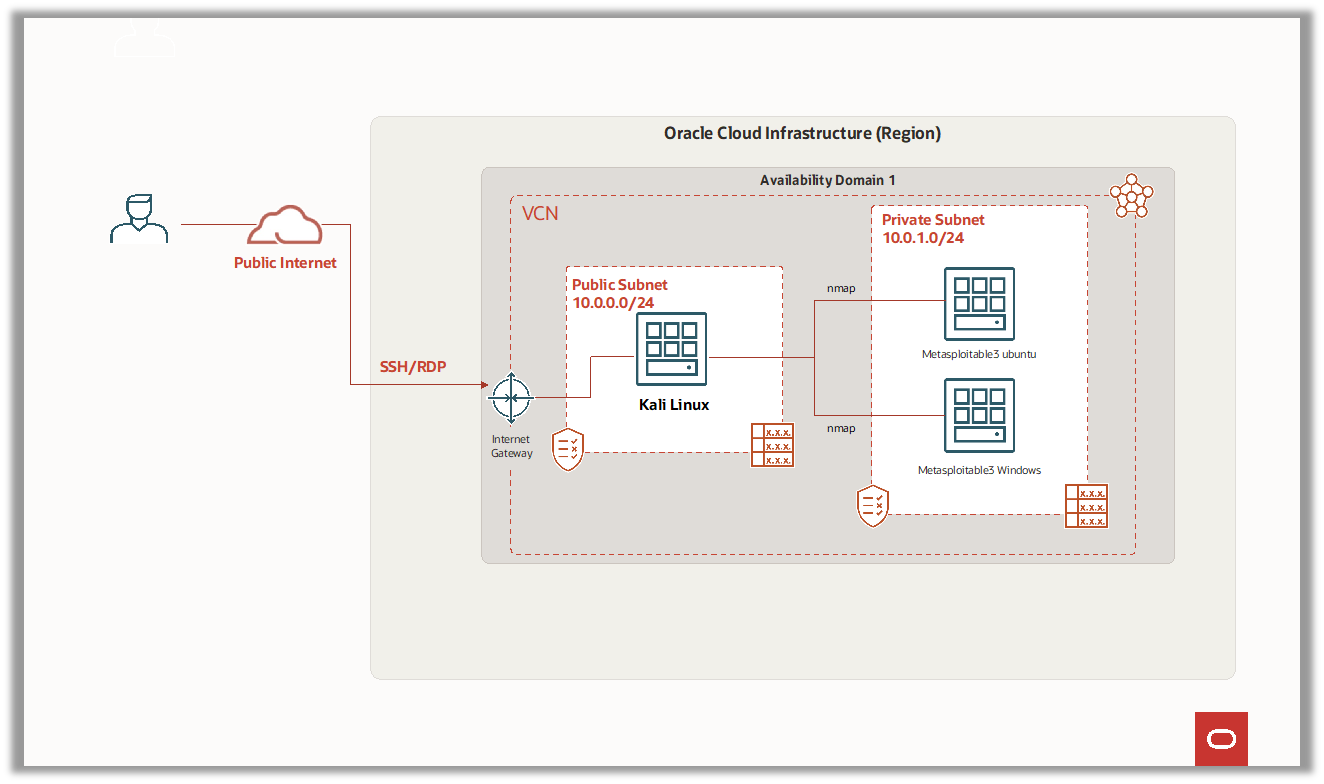
This blog will guide you through the process of setting up a Penetration Testing (PenTest) lab on Oracle Cloud Infrastructure (OCI). A PenTest lab is like a playground where security professionals can learn and practice their skills for keeping cloud environments secure. With this lab, you can practice Penetration Testing in a secure and controlled environment before trying it out on real-world situations.
This blog post is intended for security professionals, Penetration Testers, Security Analysts, System Administrators, ethical hackers, and anyone interested in learning more about cloud security through hands-on practice in a simulated environment.
Here are the steps we will follow to set up the PenTest lab on OCI:
- Create a Virtual Cloud Network (VCN):
A VCN is a private network that spans the entire OCI infrastructure. It provides a secure and isolated environment for your cloud resources. We will create a VCN, a public subnet, and a private subnet for our PenTest lab.
- Provision Kali Linux and configure SSH and RDP for Kali Linux:
Kali Linux is a popular operating system for Penetration Testing. We will provision a Kali Linux instance on the public subnet, enable SSH and RDP, and configure inbound security rules to allow access.
- Setup Metasploitable VMs on a private subnet:
Metasploitable is an intentionally vulnerable virtual machine that can be used for Penetration Testing. We will download Metasploitable images for Ubuntu and Windows, upload them to OCI object storage, create custom images, and provision Metasploitable instances on the private subnet.
- Test the environment:
We will establish an SSH or RDP session for Kali Linux, retrieve the IP addresses of the Metasploitable instances, test connectivity by pinging them, and use nmap to gather information on open ports. This will help us verify that our environment is set up correctly and ready for Penetration Testing.
Task 1: Create a Virtual Cloud Network (VCN)
- Sign into your Oracle Cloud Infrastructure (OCI) account
- From the navigation menu, select Networking, then click Virtual Cloud Network.
- In the left navigation pane, under List Scope, select your working compartment
- Click on Start VCN Wizard
- Select Create VCN with Internet Connectivity and click Start VCN Wizard.
- On the Configuration page, enter the following:
- Name: Pen-Test-Lab-VCN
- Compartment: Select your working <compartment name>
- Note: Leave all the other options in their default settings.
- Click Next
- Verify the details on the Review and Create page
- Click Create to start creating the VCN and its resources.
- Click View Virtual Cloud Network to verify the creation of the VCN and its resources.
- Ensure to open all ports and protocols on the private and public subnets security lists. These settings will be changed later.
Figure 1: Steps for creating VCN
Task 2: Provision Kali Linux and configure SSH and RDP for Kali linux
Task 2.1: Provision Kali Linux
- From the navigation menu, select Compute, and then click Instances.
- Click Create Instance. On the Create Instance dialog box, provide the following details:
- Name: Enter Kali-Linux-VM-01
- Create in compartment: Select your working <compartment name>
- Placement: Availability Domain AD1
- Note: If Service limit error is displayed, choose a different Availability Domain.
- Image: Click Change Image.
- Select Marketplace
- Search Kali Linux, select Check box and click Select Image.
- Shape: Keep default
- Networking: Select VCN Pen-Test-Lab-VCN and Public Subnet
- Public IP address: Assign a public IPv4 address.
- Generate (or upload) SSH Keys:
- Click Generate a key pair for me.
- Click Save private key. This will save the private key to your local workstation and rename it KaliLinuxVM-priv-01.key.
- Note: Leave all the other options in their default settings.
- Click Create.
- Default Kali Linux OS Credentials
- Username: debian
- Password: debian
Figure 2: Steps to provision Kali Linux
Task 2.2: Enable SSH on Kali Linux
Enabling SSH on Kali Linux is essential for remote access to the instance. By default, SSH is disabled on Kali Linux, but it can be enabled by connecting to the serial console using the Cloud Shell integration provided by Oracle Cloud Infrastructure (OCI).
- On the instance details page in the Oracle Cloud Infrastructure Console, under Resources, click Console connection.
- Click Launch Cloud Shell connection. This action displays the Cloud Shell in a “drawer” at the bottom of the Console.
- Enter any keystroke and hit enter, and you will get the Kali Linux shell prompt.
- Enter Kali Linux username and password to login
- Username: debian
- Password: debian
- Use sudo -i to get root user prompt.
- Update system’s trusted keys list used to verify the integrity and authenticity of Kali Linux packages during the installation process:
- $ wget https://archive.kali.org/archive-key.asc -O /etc/apt/trusted.gpg.d/kali-archive-keyring.asc
- Update the package list on your Kali Linux
- apt-get update -y
- Install the OpenSSH server on your Kali Linux
- apt-get install ssh
- service ssh start
- service ssh status
- To test the SSH connection to your Kali Linux machine from a local machine, you can use the following command in the terminal on your local machine:
-
- ssh -i /path/to/private-ssh-key debian@public-ip-of-kali-linux
-
Task 2.3: Enable RDP on Kali Linux
To enable RDP on Kali Linux and access its GUI, you can follow these steps:
- Install the xrdp package by running the following command:
- sudo apt-get install xrdp
- Start the xrdp service by running the following command:
- systemctl start xrdp
- systemctl status xrdp
- Install and Open the RDP port (3389) in your firewall by running the following command:
- apt-get install ufw
- ufw allow from any to any port 3389 proto tcp
- To Install video driver, run the following command:
- apt-get install xserver-xorg-video-all
- After the installation of RDP is complete, reboot Kali Linux and RDP to PUBLIC_IP:3389
Task 3: Setup Metasploitable3 VMs on a private subnet
To conduct penetration testing, we will use the Metasploitable3 image, which is intentionally designed to be vulnerable. We will create two Metasploitable images: one for Ubuntu and the other for Windows. All of these VMs will be set up on a private subnet, without any public endpoints. The main goal of provisioning these VMs is to perform penetration testing.
- Download Rapid7’s preconfigured Metasploitable3 Ubuntu 14.04 image and Metasploitable3 Windows 2008
- Link: https://app.vagrantup.com/rapid7/
- Download the images for VirtualBox.
- After downloading, extract the images by running the following command:
- tar -xvf <Downloaded-image-filename>
- Replace the file name with the Ubuntu and Windows image filenames, one at a time.
- Uplaod .vmdk file to OCI bucket
- Log in to your OCI account and create an OCI storage bucket for Metasploitable images.
- Click Upload Object.
- In the Upload Objects dialog box, move the metasploitable images from the directory. Alternatively, you can use select files, navigate to the directory containing the metasploitable images, and select .vmdk files for both Ubuntu and Windows.
- Click Upload Objects
- The Upload Objects dialog box shows a percent complete indicator. Wait while the metasploitable image files are uploaded.
- Create Custom Image
- In the Oracle Cloud Console, navigate to Compute > Custom Images.
- Click Import image.
- In the Import Image dialog box:
- Name: <<Any appropriate name>>
- Operating System: Linux (Ubuntu image)
- Select Import from Object storage bucket.
- From the Bucket in … dropdown, select the bucket you created.
- From the Object dropdown select the uploaded .vmdk file for Ubuntu.
- From Launch Mode select Emulated mode.
- Click Import Image.
- Wait while the image is imported.
- Repeat the above steps for Metasploitable3 Windows, ensuring the following parameters are different:
- Operating System: Windows
- Operating system version: Server 2008 R2 Standard
- Create Instance
- Navigate to Compute > Custom Images.
- Click the Action Menu (three dots) in the row with the newly added metasploitable Ubuntu or Windows image and choose Create Instance.
- In the Create Instance page,
- Name: Enter name such as metasploitable3 Ubuntu/Windows.
- Shape: Select Default
- Under Networking:
- VCN: Select your VCN
- Subnet: Select private subnet
- Select No SSH keys
- Click Create
- Repeat the above steps for both the Ubuntu and Windows images.

Figure 3: Steps to create a custom images
Task 4: Test the environment
In order to confirm that our environment is set up correctly and ready for penetration testing, we will perform a series of tests. First, we will establish an SSH or RDP session for Kali Linux (in my case, I have obtained an SSH session). After that, we will retrieve the private IP addresses of both Metasploitable instances and test connectivity by pinging them. If there is no ICMP reply, we will ensure that all ports and protocols are opened on both the private and public subnet security lists.
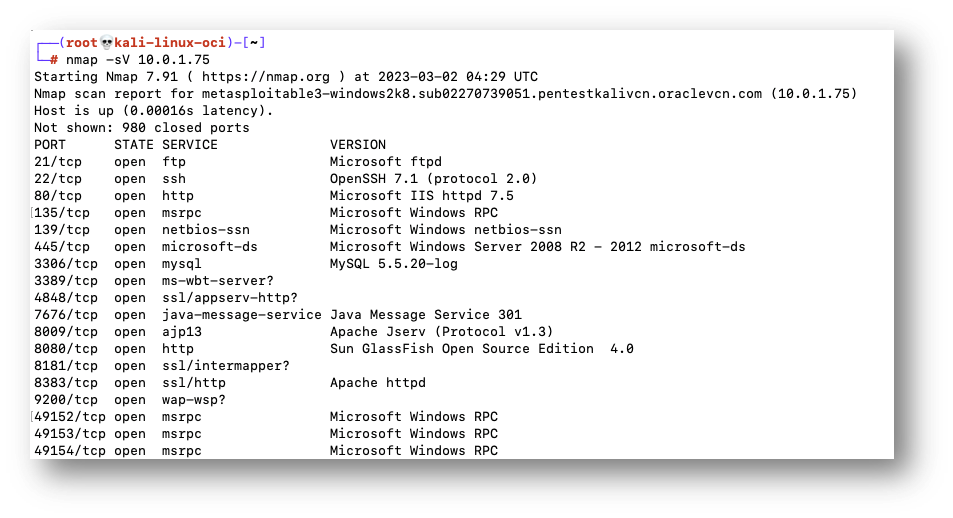
Once we have confirmed that connectivity is established, we will use nmap to gather information on open ports for both Metasploitable instances. This command identifies the software and version information of the services running on open ports.
Here are the steps to test the environment:
- SSH to Kali Linux
- ssh -i /path/to/private-ssh-key debian@public-ip-of-kali-linux
- Get the private IP addresses of both the Metasploitable instances and ping
- ping <<private-ip-address>
- If there is no ICMP reply, ensure all ports and protocols are open on the private and public subnet security lists.
- ping <<private-ip-address>
- NMAP Metasploitable instances
- For Ubuntu Instance
nmap -sV <<private-ip-address-ubuntu>>
- For Ubuntu Instance
-
- For Windows Instance
nmap -sV <<private-ip-address-windows>>
- For Windows Instance
So, now you got a detailed guide for creating a Penetration Testing lab on Oracle Cloud Infrastructure (OCI) by setting up a Virtual Cloud Network (VCN), provisioning Kali Linux, and Metasploitable VMs. By following these steps, security professionals can simulate real-world attacks and improve their skills and understanding of cloud security. This PenTest lab on OCI can also be used to test and validate security controls and configurations, ensuring a more secure cloud environment. We will continue to explore more attack scenarios and advanced techniques in upcoming blogs.