Oracle Cloud Infrastructure (OCI) Full Stack Disaster Recovery manages the transition of infrastructure, platforms, and applications between OCI regions from around the globe with a single click using OCI Console, CLI, and REST API.
Before you can start using Full Stack DR, you need to configure proper Identity and Access Management (IAM) permissions. This blog walks you through creating the IAM components needed to securely operate Full Stack DR while maintaining control over your OCI resources. For more details refer to best practices of IAM in OCI.
In this blog post, we will go through the process of an OCI administrator creating various OCI IAM components like dynamic groups, policies, users, and groups which are required to use Full Stack DR and to interact with OCI core services. Refer to OCI IAM documentation to understand more about various IAM components.
Two Approaches: Resource Principal vs. Standard Groups
There are two ways to configure IAM for Full Stack DR. Oracle recommends the Resource Principal approach as the primary method.
| Aspect | Resource Principal (Recommended) | Standard User/Group Policies |
|---|---|---|
| What authenticates? | OCI resources themselves (DRPGs, compute instances, container instances) authenticate to perform DR service operations | A named OCI user authenticates to perform DR operations |
| Human Console and CLI access | Human operators continue to use the OCI Console and CLI normally. Resource principal handles service-to-service calls, not human logins. | Human operators use the OCI Console and CLI normally with their user credentials |
| Credential management | No API keys to create, rotate, or manage for service-to-service calls | User API keys must be maintained and rotated |
| Required for | Automatic DR, Policy Advisor etc | Granting human operators permission to interact with Full Stack DR resources |
| Setup involves | Dynamic group + dynamic group policies | User + group + group policies |
| Oracle recommendation | Primary approach for service operations | Required in addition, for human operator access to the Console and CLI |
Oracle recommends configuring Resource Principal as the primary approach for Full Stack DR. Standard user/group policies are supported today, but will be deprecated in a future release. To ensure a smooth transition and access to all current and upcoming features, we strongly encourage you to set up Resource Principal now.
Why Resource Principal Is the Recommended Approach
Resource principal authentication lets the Full Stack DR service and your compute instances authenticate to OCI services without embedding or managing user credentials. Here is why Oracle recommends it as the primary setup:
- No credential lifecycle to manage. There are no API keys to generate, distribute, rotate, or worry about expiring at the wrong moment during a DR event.
- Required for advanced features. Capabilities like Automatic DR (event-driven plan execution), the Policy Advisor are dependent on resource principal being configured.
- Follows OCI security best practices. Resource principals enforce least-privilege, service-to-service authentication scoped to specific compartments.
- Eliminates a common failure point. During a real DR event, you do not want a plan execution to fail because a user API key expired or was accidentally deleted. Resource principals remove that risk entirely.
Step 1: Create a Dynamic Group
A Dynamic Group lets you group OCI resources as principal actors. Full Stack DR uses dynamic groups to let DRPG resources, compute instances, and container instances authenticate and perform operations during plan execution.
a. Login to the OCI console with administrator credentials and select your home region.
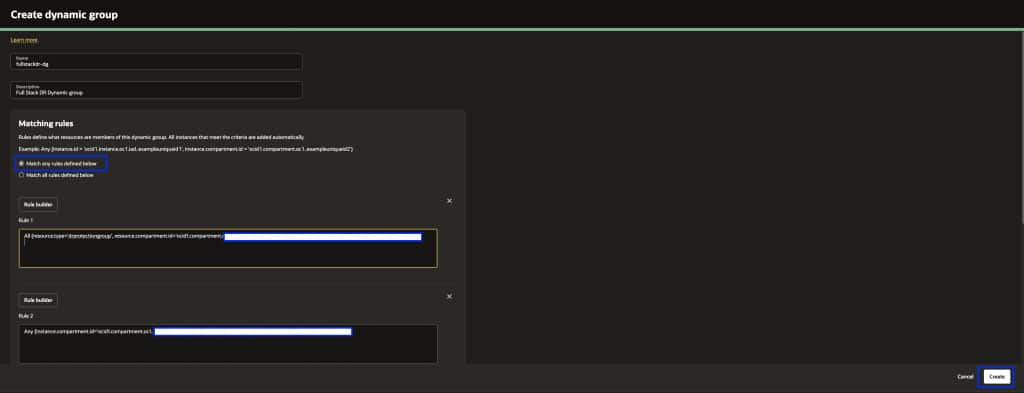
b. From the menu, navigate to Identity & Security → Domains → Default Domain → Dynamic Groups → Create Dynamic Group. Provide a Name and Description.
c. Under Matching Rules, select Match any rules defined below and add the rules individually based on your member types.
Dynamic Group Matching Rules
Important: Rule 1 is mandatory for every Full Stack DR setup. Rules 2 through 4 are added based on the member types in your DR Protection Group.
Rule 1: All {resource.type='drprotectiongroup', resource.compartment.id='dr_protection_group_compartment_ocid'}

Rule 2: Any {instance.compartment.id = 'instance_compartment_ocid'}

Rule 3: All {resource.type='computecontainerinstance', resource.compartment.id='mysql_compartment_ocid'}

Rule 4: All {resource.type='computecontainerinstance', resource.compartment.id='oke_cluster_compartment_ocid'}
When to include each rule:
- Rule 1 (DRPG) — Always required. This is the core resource principal used for DR configuration and execution. Include this for every setup. Add a separate rule per compartment if you have multiple DR Protection Groups for different application stacks across different compartments. See example below.
- Rule 2 (Compute instances): Include if you have Moving or Non-Moving compute instance members in your DRPG. Also needed for user-defined plan groups that run scripts on instances. Add a separate rule per compartment if your compute instances span multiple compartments. See example below.
- Rule 3 (MySQL container instances): Include if you have MySQL HeatWave DB System members. DR configuration and execution for MySQL runs through container instances.
- Rule 4 (OKE container instances): Include if you have OKE cluster members. DR operations for OKE also run through container instances.
If your resources span multiple compartments, add a separate rule per compartment. For example:
# Multiple DRPG compartments (Rule 1)
All {resource.type='drprotectiongroup', resource.compartment.id='compartment_ocid_1'}
All {resource.type='drprotectiongroup', resource.compartment.id='compartment_ocid_2'}

# Multiple compute compartments (Rule 2)
Any {instance.compartment.id = 'compartment_ocid_1'}
Any {instance.compartment.id = 'compartment_ocid_2'}
If your MySQL and OKE resources share the same compartment, Rules 3 and 4 can be combined into a single rule.
d. Click Create to save the Dynamic Group, please make sure to select “Match any rules defined below”
For more details on writing matching rules, refer to Writing Matching Rules to Define Dynamic Groups and OCI Full Stack Resource Principal.
Step 2: Create IAM Policies for the Dynamic Group
Now create the policies that grant the dynamic group the permissions it needs to manage resources during DR operations.
a. Login to the OCI console with administrator credentials and select your home region.
b. From the menu, navigate to Identity & Security → Policies → Create Policy. Provide a Name, Description, select your Compartment, enable Show manual editor, and add the policy statements.
All Policy Statements (Consolidated)
The simplest way to get started is to apply the full consolidated set of policy statements below. This covers all supported member types. Replace each placeholder value with your actual dynamic group name and compartment names.
Allow dynamic-group dynamic_group_name to manage disaster-recovery-family in compartment dr_protection_group_compartment_name
Allow dynamic-group dynamic_group_name to manage object-family in compartment object_storage_bucket_compartment_name
Allow dynamic-group dynamic_group_name to use tag-namespaces in tenancy
Allow dynamic-group dynamic_group_name to read all-resources in tenancy
Allow dynamic-group dynamic_group_name to manage instance-family in compartment instance_compartment_name
Allow dynamic-group dynamic_group_name to manage instance-agent-command-execution-family in compartment instance_compartment_name
Allow dynamic-group dynamic_group_name to manage instance-agent-command-family in compartment instance_compartment_name
Allow dynamic-group dynamic_group_name to manage instance-agent-plugins in compartment instance_compartment_name
Allow dynamic-group dynamic_group_name to manage virtual-network-family in compartment network_compartment_name
Allow dynamic-group dynamic_group_name to manage volume-family in compartment volume_group_compartment_name
Allow dynamic-group dynamic_group_name to manage file-family in compartment file_system_compartment_name
Allow dynamic-group dynamic_group_name to manage database-family in compartment database_compartment_name
Allow dynamic-group dynamic_group_name to manage autonomous-database-family in compartment autonomous_database_compartment_name
Allow dynamic-group dynamic_group_name to manage autonomous-container-databases in compartment autonomous_container_database_compartment_name
Allow dynamic-group dynamic_group_name to manage mysql-family in compartment mysql_compartment_name
Allow dynamic-group dynamic_group_name to manage load-balancers in compartment load_balancer_compartment_name
Allow dynamic-group dynamic_group_name to manage network-load-balancers in compartment network_load_balancer_compartment_name
Allow dynamic-group dynamic_group_name to read secret-family in compartment vault_compartment_name
Allow dynamic-group dynamic_group_name to read vaults in compartment vault_compartment_name
Allow dynamic-group dynamic_group_name to manage cluster-family in compartment oke_cluster_compartment_name
Allow dynamic-group dynamic_group_name to manage cluster-virtualnode-pools in compartment oke_cluster_compartment_name
Allow dynamic-group dynamic_group_name to manage compute-container-family in compartment oke_cluster_compartment_name
Allow any-user to manage objects in compartment object_storage_bucket_compartment_name where all { request.principal.type = 'workload', request.principal.namespace = 'brie', request.principal.service_account = 'brie-creator', request.principal.cluster_id = 'cluster_ocid'}
Allow any-user to manage objects in compartment object_storage_bucket_compartment_name where all { request.principal.type = 'workload', request.principal.namespace = 'brie', request.principal.service_account = 'brie-reader', request.principal.cluster_id = 'cluster_ocid'}
Allow dynamic-group dynamic_group_name to read fn-app in compartment function_compartment_name
Allow dynamic-group dynamic_group_name to read fn-function in compartment function_compartment_name
Allow dynamic-group dynamic_group_name to use fn-invocation in compartment function_compartment_name
Allow dynamic-group dynamic_group_name to manage integration-instance in compartment oic_compartment_name
Note: If you use a domain other than the default, specify the domain in the group reference using the format
domainname/dynamicgroupname. The twoany-userstatements for OKE Virtual Node Pools are only needed if your OKE clusters use Virtual Node Pools.
Granular Policies by Member Type
If your environment follows strict least-privilege governance, or your resources span many compartments with different owners, you can apply only the statements relevant to your specific member types instead of the full consolidated set above. Use the breakdown below as your reference.
Common Policies (Required for All Setups)
Allow dynamic-group dynamic_group_name to manage disaster-recovery-family in compartment dr_protection_group_compartment_name
Allow dynamic-group dynamic_group_name to manage objects in compartment dr_protection_group_compartment_name
Allow dynamic-group dynamic_group_name to manage object-family in compartment object_storage_bucket_compartment_name
Allow dynamic-group dynamic_group_name to use tag-namespaces in tenancy
Allow dynamic-group dynamic_group_name to read all-resources in tenancy
Common Resource Policies (Networking and Vault)
Applicable across multiple member types including Compute Instances, Autonomous DB, Load Balancers, File Systems, and OKE Clusters:
Allow dynamic-group dynamic_group_name to use virtual-network-family in compartment network_compartment_name
Allow dynamic-group dynamic_group_name to use subnets in compartment network_compartment_name
Allow dynamic-group dynamic_group_name to use vnics in compartment network_compartment_name
Allow dynamic-group dynamic_group_name to use network-security-groups in compartment network_compartment_name
Allow dynamic-group dynamic_group_name to use private-ips in compartment network_compartment_name
Allow dynamic-group dynamic_group_name to use public-ips in compartment network_compartment_name
Allow dynamic-group dynamic_group_name to read vaults in compartment vault_compartment_name
Allow dynamic-group dynamic_group_name to read secret-family in compartment vault_compartment_name
1. Compute Instances (Moving and non-moving)
Allow dynamic-group dynamic_group_name to manage instance-family in compartment instance_compartment_name
Allow dynamic-group dynamic_group_name to manage volume-family in compartment volume_group_compartment_name
Allow dynamic-group dynamic_group_name to manage virtual-network-family in compartment instance_compartment_name
Allow dynamic-group dynamic_group_name to manage instance-agent-command-execution-family in compartment instance_compartment_name
Allow dynamic-group dynamic_group_name to manage instance-agent-command-family in compartment instance_compartment_name
Allow dynamic-group dynamic_group_name to manage instance-agent-plugins in compartment instance_compartment_name
2. Volume Groups
Allow dynamic-group dynamic_group_name to manage volume-family in compartment volume_group_compartment_name
(Include Vault policies from Common Resource Policies above)
3. File Systems (FSS)
Allow dynamic-group dynamic_group_name to manage file-family in compartment file_system_compartment_name
(Include Vault policies from Common Resource Policies above)
4. Object Storage Buckets
Allow dynamic-group dynamic_group_name to manage object-family in compartment object_storage_bucket_compartment_name
5. Oracle Database (Base DB, ExaDB-D, ExaDB-XS, ExaDB-C@C)
Allow dynamic-group dynamic_group_name to manage database-family in compartment database_compartment_name
(Include Vault policies from Common Resource Policies above)
6. Oracle Autonomous Database (Serverless)
Allow dynamic-group dynamic_group_name to manage autonomous-database-family in compartment autonomous_database_compartment_name
(Include Vault policies from Common Resource Policies above)
7. Oracle Autonomous Container Database (ADB on Dedicated Exadata)
Allow dynamic-group dynamic_group_name to manage autonomous-container-databases in compartment autonomous_container_database_compartment_name
(Include Vault policies from Common Resource Policies above)
8. Load Balancers
Allow dynamic-group dynamic_group_name to manage load-balancers in compartment load_balancer_compartment_name
9. Network Load Balancers
Allow dynamic-group dynamic_group_name to manage network-load-balancers in compartment network_load_balancer_compartment_name
10. MySQL HeatWave DB Systems
Allow dynamic-group dynamic_group_name to manage mysql-family in compartment mysql_compartment_name
Allow dynamic-group dynamic_group_name to manage compute-container-family in compartment mysql_compartment_name
11. OKE Clusters
Allow dynamic-group dynamic_group_name to manage cluster-family in compartment oke_cluster_compartment_name
Allow dynamic-group dynamic_group_name to manage cluster-virtualnode-pools in compartment oke_cluster_compartment_name
Allow dynamic-group dynamic_group_name to manage compute-container-family in compartment oke_cluster_compartment_name
Allow dynamic-group dynamic_group_name to manage object-family in compartment object_storage_bucket_compartment_name
If using OKE with Virtual Node Pools, additionally add:
Allow any-user to manage objects in compartment object_storage_bucket_compartment_name where all { request.principal.type = 'workload', request.principal.namespace = 'brie', request.principal.service_account = 'brie-reader', request.principal.cluster_id = 'cluster_ocid'}
Allow any-user to manage objects in compartment object_storage_bucket_compartment_name where all { request.principal.type = 'workload', request.principal.namespace = 'brie', request.principal.service_account = 'brie-creator', request.principal.cluster_id = 'cluster_ocid'}
12. Oracle Integration (OIC) Instances
Allow dynamic-group dynamic_group_name to manage integration-instance in compartment compartment_name13. User-Defined Steps (Run Command / Object Storage Scripts)
Allow dynamic-group dynamic_group_name to manage instance-agent-command-execution-family in compartment instance_compartment_name
Allow dynamic-group dynamic_group_name to manage instance-agent-command-family in compartment instance_compartment_name
Allow dynamic-group dynamic_group_name to manage instance-agent-plugins in compartment instance_compartment_name
Allow dynamic-group dynamic_group_name to manage objects in compartment object_storage_bucket_compartment_name
14. OCI Functions (User-Defined Step Type: FUNCTIONS)
Allow dynamic-group dynamic_group_name to read fn-app in compartment function_compartment_name
Allow dynamic-group dynamic_group_name to read fn-function in compartment function_compartment_name
Allow dynamic-group dynamic_group_name to use fn-invocation in compartment function_compartment_name
For the complete reference, see the Full Stack DR Resource Principals documentation and Policies for Other Services Managed by Full Stack DR.
Step 3: Verify Full Stack DR Access (Resource Principal)
You have now set up the resource principal prerequisites. To verify:
a. Login to the OCI console and select your home region.
b. From the menu, navigate to Migration and Recovery → Disaster Recovery → DR Protection Groups.
c. You should now be able to create a DR Protection Group, add members, and start working with Full Stack DR.

Tip: Use the Policy Advisor
Starting with the October 2025 release, Full Stack DR includes a built-in Policy Advisor. After you add members to your DR Protection Group, the Policy Advisor automatically analyzes the resource types in the group and generates the exact dynamic group matching rules and policy statements you need.
You can click the “Copy Policy Statements” button to copy the recommended statements, review them against your governance requirements, and create or update the corresponding IAM policies and dynamic groups in your tenancy.
This is especially helpful when your DRPG has many different member types across multiple compartments. Instead of manually assembling the right set of policies, the Policy Advisor gives you a tailored, copy-ready set of statements.
For more details, refer to the Full Stack DR October 2025 Enhancements blog post.
Standard User, Group, and Policies for Human Operator Access
For DBAs, Cloud Architects, and DevOps engineers who need to interact with Full Stack DR through the OCI Console or CLI (creating DRPGs, modifying plans, triggering plan executions, reviewing execution logs), you also need a user, group, and user-based policies. This is separate from resource principal — resource principal handles service-to-service authentication, while this section covers human operator access.
1. Create a User
a. Login to the OCI console with administrator credentials and select your home region.
b. From the menu, navigate to Identity & Security → Domains → Default Domain → User Management → Create user. Provide First name, Last name, and Email, then click Create.
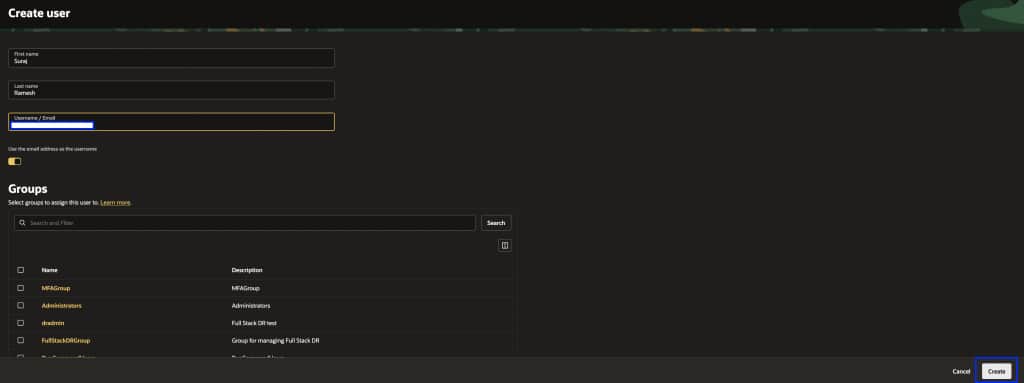
The user will receive an email to activate their account and must follow the instructions to complete activation.
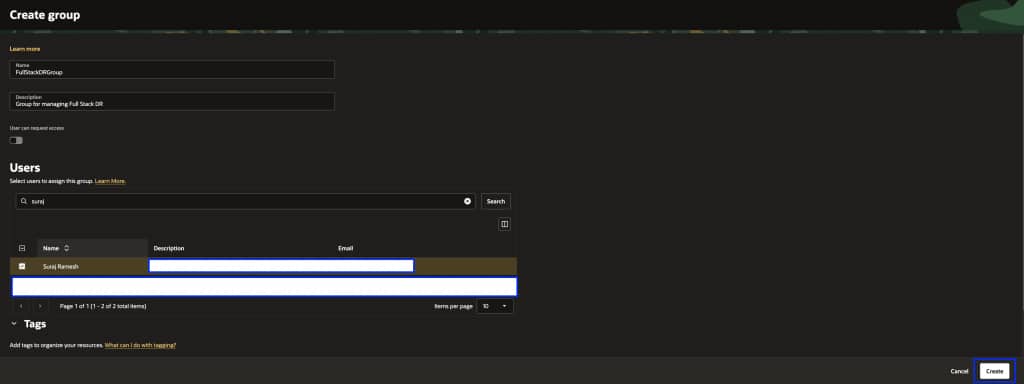
2. Create a Group
a. From the menu, navigate to Identity & Security → Domains → Default Domain → User Management → Create group. Provide a Name and Description, select the user created above, and click Create.
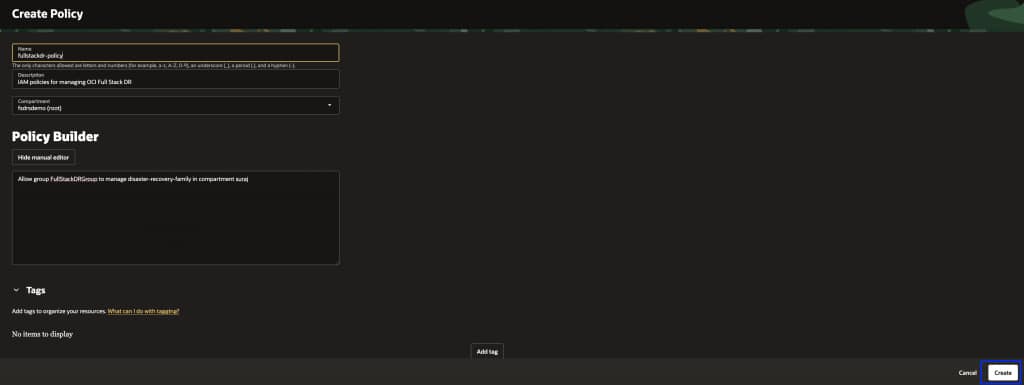
3. Create Policies for the Group
From the menu, navigate to Identity & Security → Policies → Create Policy. Select the appropriate compartment, enable Show manual editor, and add the policies below.
Core Full Stack DR access:
Allow group FullStackDRGroup to manage disaster-recovery-family in compartment compartment_name
If you need granular access scoped to specific Full Stack DR resource types (for example, allowing some users to only read DR plans without executing them), refer to the Full Stack DR policies documentation for the available individual resource types.
Policies for other OCI services:
Full Stack DR orchestrates disaster recovery by interacting with various OCI services like Compute, Databases, Block Storage, Object Storage, Functions, Vaults, and Virtual Cloud Networks. Add the policies below based on the member types in your DR Protection Group:
Allow group FullStackDRGroup to manage object-family in compartment compartment_name
Allow group FullStackDRGroup to manage database-family in compartment compartment_name
Allow group FullStackDRGroup to manage autonomous-database-family in compartment compartment_name
Allow group FullStackDRGroup to manage instance-family in compartment compartment_name
Allow group FullStackDRGroup to manage instance-agent-command-family in compartment compartment_name
Allow group FullStackDRGroup to manage instance-agent-command-execution-family in compartment compartment_name
Allow group FullStackDRGroup to manage volume-family in compartment compartment_name
Allow group FullStackDRGroup to read virtual-network-family in compartment compartment_name
Allow group FullStackDRGroup to use subnets in compartment compartment_name
Allow group FullStackDRGroup to use vnics in compartment compartment_name
Allow group FullStackDRGroup to use network-security-groups in compartment compartment_name
Allow group FullStackDRGroup to use private-ips in compartment compartment_name
Allow group FullStackDRGroup to read fn-app in compartment compartment_name
Allow group FullStackDRGroup to read fn-function in compartment compartment_name
Allow group FullStackDRGroup to use fn-invocation in compartment compartment_name
Allow group FullStackDRGroup to use tag-namespaces in compartment compartment_name
Allow group FullStackDRGroup to read vaults in compartment compartment_name
Allow group FullStackDRGroup to read secret-family in compartment compartment_name
Allow group FullStackDRGroup to manage load-balancers in compartment compartment_name
Allow group FullStackDRGroup to manage network-load-balancers in compartment compartment_name
Allow group FullStackDRGroup to manage file-family in compartment compartment_name
Allow group FullStackDRGroup to manage mysql-family in compartment compartment_name
Allow group FullStackDRGroup to manage cluster-family in compartment compartment_name
Allow group FullStackDRGroup to manage integration-instance in compartment compartment_name
Refer to the complete list of services managed by Full Stack DR and adjust the policies based on the member types you are protecting.
4. Verify Access
Login to the OCI console with the user credentials created above and navigate to Migration and Disaster Recovery → Disaster Recovery → DR Protection Groups. You should now be able to access Full Stack DR.
Prerequisite: Prepare Compute Instances for Run Command
Full Stack DR uses the OCI Run Command feature to perform tasks like running iSCSI commands, executing user-defined scripts, and mounting file systems. This step is mandatory regardless of whether you configured Resource Principal or Standard User/Group policies. You must complete this on every compute instance that is a member of a DR Protection Group. Skipping this step will result in plan execution failures even if your IAM policies are correctly configured.
Connect to the compute instance and run the appropriate commands below to provide the ocarun user with admin access.
For Linux:
echo "ocarun ALL=(ALL) NOPASSWD:ALL" > /etc/sudoers.d/101-oracle-cloud-agent-run-command
systemctl restart oracle-cloud-agent
For Windows (PowerShell version >= 5.1):
Add-LocalGroupMember -Group "Administrators" -Member "NT SERVICE\OCARUN"
Restart-Service -Name OCARUN -Force
For Windows (PowerShell version < 5.1):
net localgroup Administrators /add "NT SERVICE\OCARUN"
Restart-Service -Name OCARUN -Force
Learn More
If you haven’t seen OCI Full Stack Disaster Recovery in action yet, ask your Oracle Cloud Infrastructure account team to set up a demonstration today. For more information, including documentation, pricing, customer success stories, videos, tutorials, and hands-on labs, visit Full Stack Disaster Recovery.
Additional Resources
- OCI Full Stack Disaster Recovery
- Full Stack Disaster Recovery Documentation
- Resource Principals for Full Stack DR
- Policies for Other Services Managed by Full Stack DR
- Full Stack DR October 2025 Enhancements (Policy Advisor, Automatic DR)
Feel free to connect with me directly on LinkedIn, X, and Bluesky.