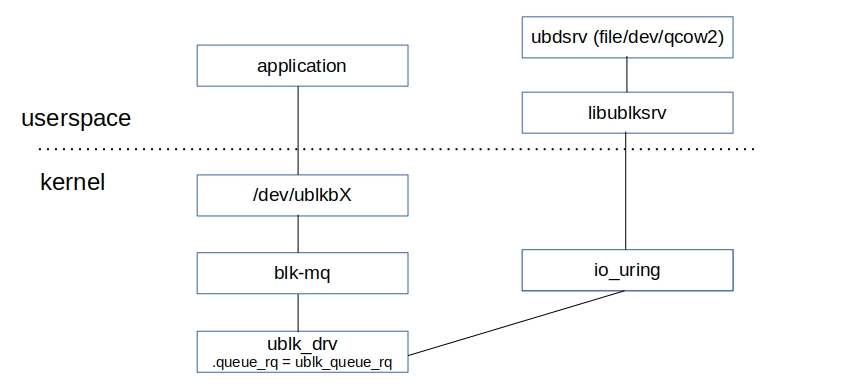
The userspace block device driver (ublk) has been recently introduced into the upstream Linux kernel in order to support the implementation of the generic userspace block device/driver. It helps move the IO logic into userspace. A userspace application will be able to communicate with a userspace block device/driver (e.g., ubdsrv daemon) via blk-mq, the ublk driver and io_uring.
One significant use case is that the user will be able to access a qcow2 image file via /dev/ublkbX.
The diagram below describes the ublk framework. The .queue_rq implementation of the ublk driver is ublk_queue_rq().
In this article, we demonstrate how to setup the ublk environment on Oracle Linux 8 (on a VM in Oracle Cloud Infrastructire (OCI)), providing a hands-on experience of the ublk framework. We are not going to cover the mechanisms behind ublk, instead concentrating on how to build and create ublk disks.
Step 1. Create an OCI VM
Create an OCI instance with Oracle Linux 8. We chose to create a VM with 32 VCPUs to facilitate faster building of the kernel. Also please also ensure to select Paravirtualized networking when creating your instance.
Step 2. Configure yum
Once your instance is created, enable the yum repository ol8_codeready_builder in order to install the necessary prerequisite packages.
$ sudo yum-config-manager --enable ol8_codeready_builder

$ cat /etc/yum.repos.d/oracle-linux-ol8.repo
... ...
[ol8_codeready_builder]
name=Oracle Linux 8 CodeReady Builder ($basearch) - Unsupported
baseurl=https://yum$ociregion.$ocidomain/repo/OracleLinux/OL8/codeready/builder/$basearch/
gpgkey=file:///etc/pki/rpm-gpg/RPM-GPG-KEY-oracle
gpgcheck=1
enabled=1
... ...
Now install the required packages:
$ sudo yum install -y git gcc-toolset-10 autoconf automake \
autoconf-archive libtool openssl-devel flex bison ncurses-devel patch
Step 3. Configure gcc
In order to use gcc-10 we need to enable the gcc-toolset-10 software collection:
$ scl enable gcc-toolset-10 bash
Please double check that the gcc version is 10.3.1.
$ gcc -v
... ...
gcc version 10.3.1 20210422 (Red Hat 10.3.1-1.2.0.1) (GCC)
To ensure this software collection is enabled permanently across logins, add the above scl command to /etc/profile.
Step 4. Download source code
Download source code for liburing, ubdsrv and linux-6.0:
$ git clone https://github.com/axboe/liburing
$ git clone https://github.com/ming1/ubdsrv
$ wget https://mirrors.edge.kernel.org/pub/linux/kernel/v6.x/linux-6.0.tar.xz
Step 5. Build and install liburing
liburing >= 2.2 is required. Therefore, we are going to build from the mainline liburing source code. We want to specifically build the version at commit 0d4fdb416718 – Do not always expect multishot recv to stop posting events.
$ cd liburing
$ git checkout -b 0d4fdb416718_build 0d4fdb416718
$ ./configure --libdevdir=/usr/lib64 --libdir=/usr/lib64
$ make
$ sudo make install
Step 6. Patch ubdsrv
ubdsrv uses gettid() which is not available on Oracle Linux 8, therefore we need to patch ubdsrv in order to replace gettid() references with syscall(SYS_gettid). The below patch is applied on top of commit 1fbc00fc4454 – Rearrange comment lines at start of scripts.
Please copy and paste the below patch into a file, e.g., ubdsrv.patch. We are going to use that patch in the next step.
diff --git a/include/ublksrv.h b/include/ublksrv.h
index 3895f61..d18813f 100644
--- a/include/ublksrv.h
+++ b/include/ublksrv.h
@@ -44,6 +44,15 @@
 extern "C" {
 #endif

+#include <unistd.h>
+#include <sys/syscall.h>
+
+#ifndef SYS_gettid
+#error "SYS_gettid unavailable on this system"
+#endif
+
+#define gettid() ((pid_t)syscall(SYS_gettid))
+
 #include "ublk_cmd.h"

 #define    MAX_NR_HW_QUEUES 32
Step 7. Build ubdsrv
Checkout ubdsrv at commit 1fbc00fc4454 – Rearrange comment lines at start of scripts:
$ cd ubdsrv
$ git checkout -b 1fbc00fc4454_build 1fbc00fc4454
Now lets apply the patch mentioned in step 6 (e.g. ubdsrv.patch) to replace all gettid() references with syscall(SYS_gettid):
$ patch -p1 < ../ubdsrv.patch
Now we can build ubdsrv:
$ autoreconf -i
$ LDFLAGS=-lpthread ./configure
$ make
Now we’ve built ./ublk, we can show how it relies on libublksrv. This is not a problem as we will be consuming the version contained directly in the kernel.
$ ./ublk help
ublk add -t {null|loop|qcow2} -n DEV_ID -q NR_HW_QUEUES -d QUEUE_DEPTH -u URING_COMP -g NEED_GET_DATA
           loop: -f backing_file [--buffered_io]
            default is direct IO to backing file
           qcow2: -f backing_file
ublk del -n DEV_ID [-a | --all]
ublk list [-n DEV_ID]

$ ldd .libs/lt-ublk
    linux-vdso.so.1 (0x00007ffe57aa5000)
    libublksrv.so.0 => /home/opc/ubdsrv/lib/.libs/libublksrv.so.0 (0x00007f392ce5e000)
    libpthread.so.0 => /lib64/libpthread.so.0 (0x00007f392ca50000)
    liburing.so.2 => /lib64/liburing.so.2 (0x00007f392ce50000)
    libstdc++.so.6 => /lib64/libstdc++.so.6 (0x00007f392c6bb000)
    libm.so.6 => /lib64/libm.so.6 (0x00007f392c339000)
    libgcc_s.so.1 => /lib64/libgcc_s.so.1 (0x00007f392c120000)
    libc.so.6 => /lib64/libc.so.6 (0x00007f392bd5b000)
    /lib64/ld-linux-x86-64.so.2 (0x00007f392cc70000)
Step 8. Install linux-6.0
In addition to the default kernel config settings, we will be enabling the following options:
* Support x2apic
* Virtio-scsi support
* Virtio network driver
* XFS filesystem support
* iSCSI Initiator over TCP/IP
* iSCSI Boot Sysfs Interface
* Userspace block driver (Experimental)
Extract the Linux kernel source we downloaded and apply the additional config options:
$ tar xvf linux-6.0.tar.xz
$ cd linux-6.0/
$ make defconfig

$ scripts/config --file ".config" -e CONFIG_X86_X2APIC \
-m CONFIG_SCSI_VIRTIO -m CONFIG_VIRTIO_NET \
-m CONFIG_XFS_FS -m CONFIG_ISCSI_TCP \
-m CONFIG_ISCSI_BOOT_SYSFS -m CONFIG_BLK_DEV_UBLK

$ make olddefconfig
Now it’s time to build the kernel. The option -j32 is provided to indicate we want to run 32 jobs in parallel during the build. This number usually reflects the number of CPUs available, which in our case is 32. If for instance you had 8 CPUs available, you could specify -j8.
$ make -j32 > /dev/null
$ sudo make modules_install
$ sudo make install
Increase the loglevel to 7, and re-generate grub. This helps diagnose if any hang/panic events occured during kernel boot.
$ cat /etc/default/grub
GRUB_TIMEOUT=5
GRUB_DISTRIBUTOR="$(sed 's, release .*$,,g' /etc/system-release)"
GRUB_DEFAULT=saved
GRUB_DISABLE_SUBMENU=true
GRUB_DISABLE_RECOVERY="true"
GRUB_ENABLE_BLSCFG=true
GRUB_TERMINAL="console"
GRUB_CMDLINE_LINUX="crashkernel=auto LANG=en_US.UTF-8 console=tty0 console=ttyS0,115200 rd.luks=0 rd.md=0 rd.dm=0 rd.lvm.vg=ocivolume rd.lvm.lv=ocivolume/root rd.net.timeout.carrier=5 netroot=iscsi:169.254.0.2:::1:iqn.2015-02.oracle.boot:uefi rd.iscsi.param=node.session.timeo.replacement_timeout=6000 net.ifnames=1 nvme_core.shutdown_timeout=10 ipmi_si.tryacpi=0 ipmi_si.trydmi=0 libiscsi.debug_libiscsi_eh=1 loglevel=7 ip=single-dhcp crash_kexec_post_notifiers"

root# grub2-mkconfig > /boot/efi/EFI/redhat/grub.cfg
Reboot into the new kernel, and once rebooted check the kernel version to ensure we are booted into the one we just built:
$ uname -r
6.0.0
Step 9. Test ublk
Create a raw image file:
$ sudo modprobe ublk_drv
$ dd if=/dev/zero of=/home/opc/disk.raw bs=1M count=100 oflag=direct
Lets now return to the folder containing ubdsrv source code in order to create a ublk disk with the below command. Notice we assign 8 queues to the ublk disk:
$ sudo ./ublk add -t loop -f /home/opc/disk.raw -q 8
dev id 0: nr_hw_queues 8 queue_depth 128 block size 4096 dev_capacity 204800
    max rq size 524288 daemon pid 4377 flags 0x0 state LIVE
    queue 0: tid 4379 affinity(0 8 9 24 25 )
    queue 1: tid 4380 affinity(1 10 11 26 27 )
    queue 2: tid 4381 affinity(2 12 13 28 29 )
    queue 3: tid 4382 affinity(3 14 15 30 31 )
    queue 4: tid 4383 affinity(4 16 17 )
    queue 5: tid 4384 affinity(5 18 19 )
    queue 6: tid 4385 affinity(6 20 21 )
    queue 7: tid 4386 affinity(7 22 23 )
    target {"backing_file":"/home/opc/disk.raw","dev_size":104857600,"direct_io":1,"name":"loop","type":1}
Once created we will now have the device /dev/ublkb0, on which we can create our ext4 file system:
$ ls /sys/block/ublkb0/mq/
0  1  2  3  4  5  6  7

$ sudo mkfs.ext4 /dev/ublkb0
mke2fs 1.45.6 (20-Mar-2020)
Discarding device blocks: done
Creating filesystem with 25600 4k blocks and 25600 inodes

Allocating group tables: done
Writing inode tables: done
Creating journal (1024 blocks): done
Writing superblocks and filesystem accounting information: done
Summary
In this article we demonstrate how to build and setup the ublk environment on Oracle Linux 8. As ublk was only recently integrated into the upstream Linux kernel, we provide guidance on how to build liburing and ubdsrv, including how to patch ubdsrv so that it will build on Oracle Linux 8. As a result we help developers gain a hands-on experience of using ublk. Although our usage of an OCI VM instance is not necessary, it does provide an easy means of setting up the ublk environment.