How to deploy Oracle Linux on Oracle Cloud Infrastructure with an nginx web server configured for HTTPS(SSL/TLS) using a certificate from Let’s Encrypt!
In this post, I describe the steps to deploy Oracle Linux with a web server on Oracle Cloud Infrastructure (OCI), serving up content via HTTPS (SSL/TLS) using nginx and a certificate generated with Let’s Encrypt, a free, automated, and open certificate authority (CA), run for the public’s benefit.
Our Oracle Linux yum server has a repository with packages from the EPEL Fedora Special Interest Group. For this project, I’ll install nginx Certbot to do an automated SSL setup from our EPEL repository. I’ll set up the compute instance and Virtual Cloud Network (VCN) using Terraform and the Terraform provider for OCI. To streamline on premise setup and make it self container, I’m using Oracle VM VirtualBox and an Oracle Linux Vagrant box along with a Vagrantfile and a script I put on Github.
Outline of steps required
The following is a broad outline of the steps you will perform.
- Set up your on premises environment with Terraform and the Terraform OCI Provider
- Modify Terraform configuration file to adjust identifiers specific to your environment: Region, Tenancy, Compartment, User ID, etc.
- Initalize Terraform and review the Terraform plan
- Apply the Terraform configuration to deploy a Compute node, Virtual Cloud Network, Internet Gateway, Security Lists, etc
- Associate your hostname with the Public IP address
- SSH to the newly launched Compute Node on OCI
- Configure Yum to use yum server local to your region
- Install nginx, certbot and the certbot nginx plugin
- Verify web server is running
- Run certbot to generate a certificate and configure nginx for SSL/HTTPS
- Verify web server is serving up content via HTTPS
1. Set up your on premises environment with Terraform and the Terraform OCI Provider
Terraform and the Terraform OCI provider are available in the Oracle Linux yum server Developer repository, ol7_developer. The instructions to set up required keys and OCIDs for Terraform to communicate with the OCI API are in this documentation. For this blog post, I’m using an Oracle Linux Vagrant box set up via a Vagrantfile and provisioning script I’ve posted on Github.
From my Macgit clone https://github.com/totalamateurhour/terraform-oci-vagrant cd terraform-oci-vagrant vagrant up vagrant ssh
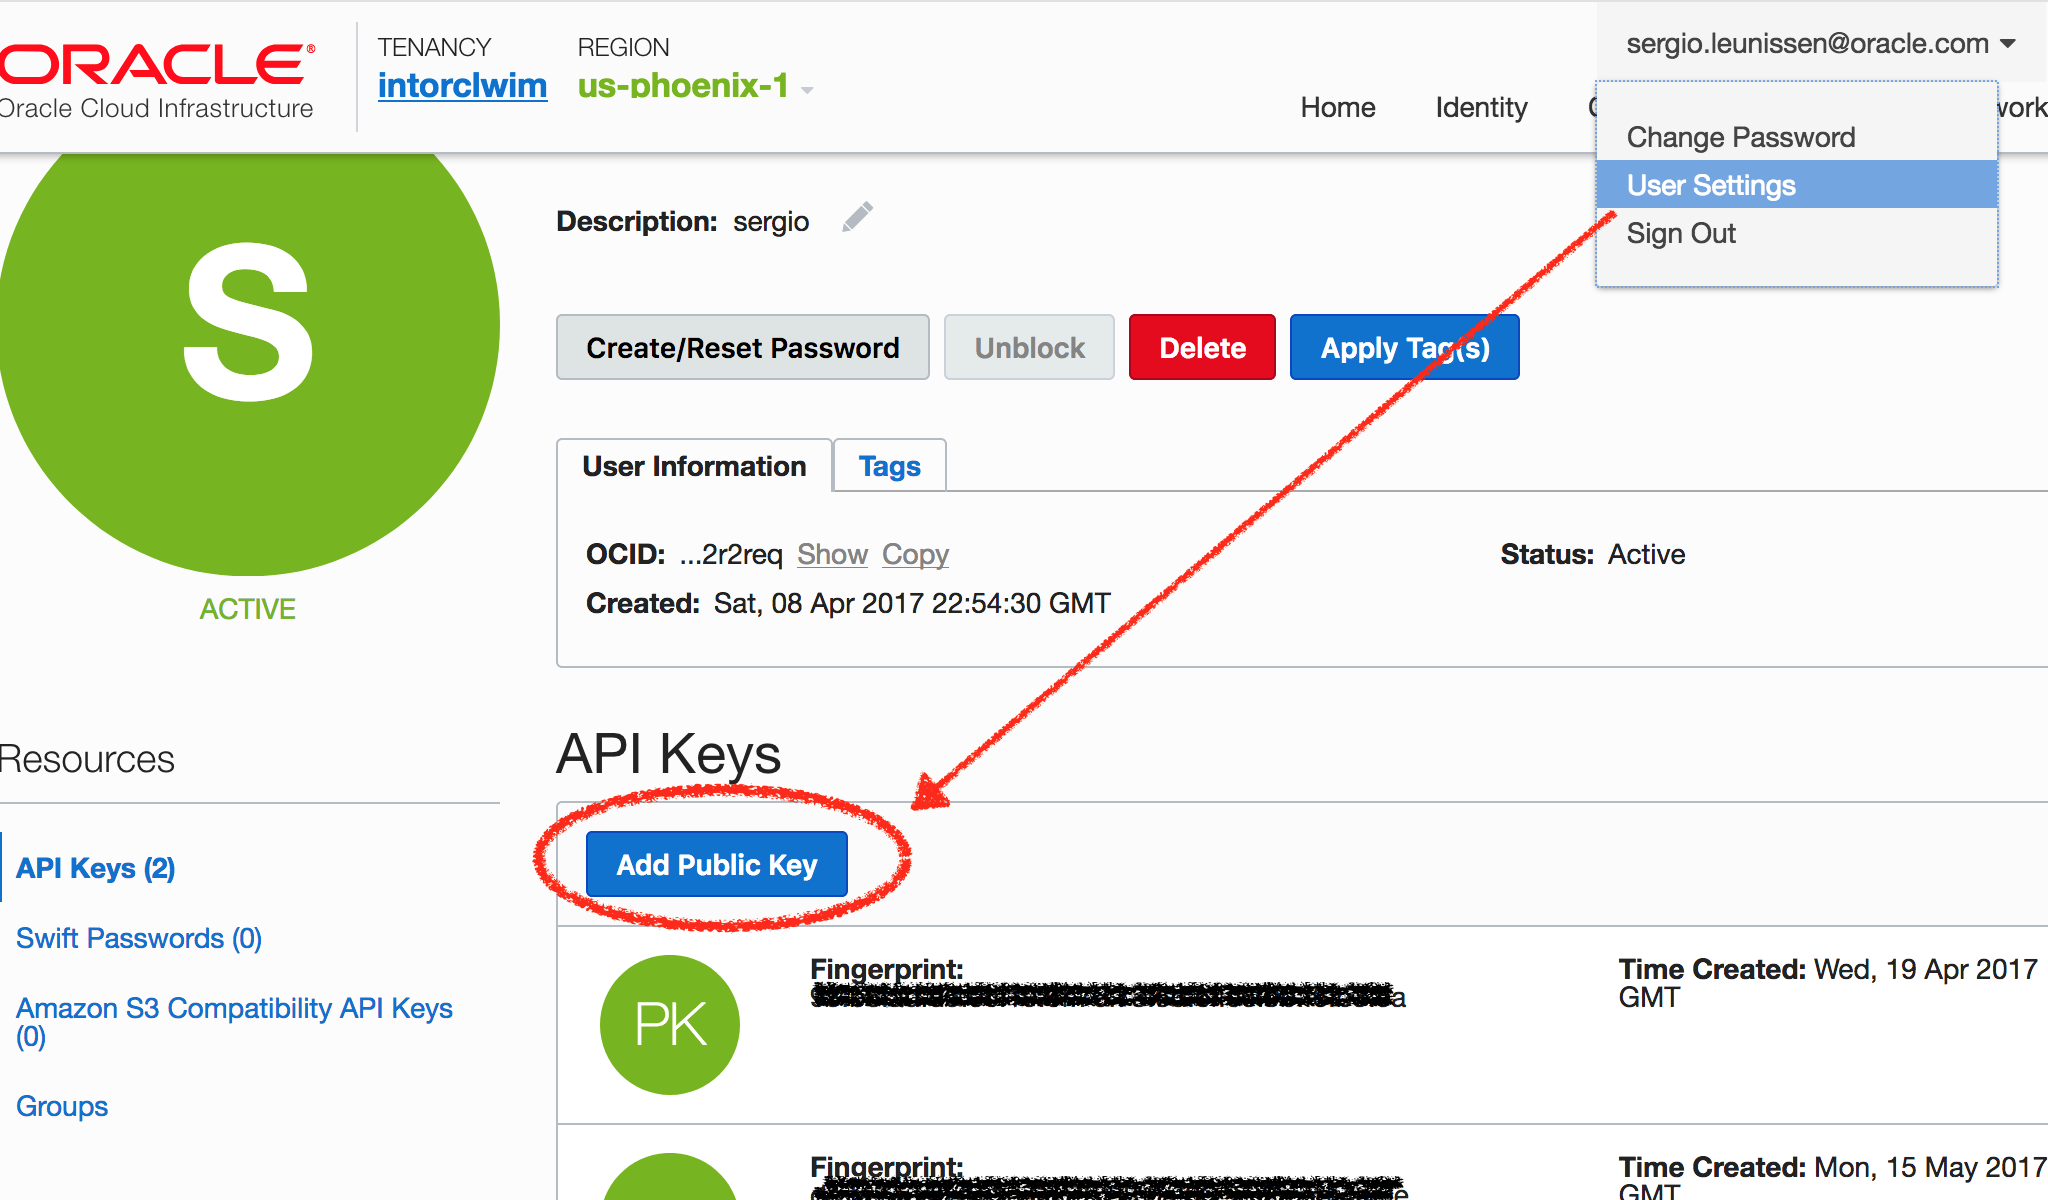
Copy the Public Key output at the end of the Vagrant box provisioning and upload it by Signing in to the Console and pasting it under User Settings > API Keys. See this documentation, if needed.
2. Modify Terraform configuration file to adjust identifiers specific to your environment
All the edits you need to make are in this terraform.tfvars.template file.
Place yourself in the OCI_letsencrypt directory and make a copy of the terraform.tfvars.template and call it terraform.tfvars. Edit the placeholder values for these variables:
- tenancy_ocid
- user_ocid
- fingerprint
- compartment_ocid
- region (if you are not in the us-phoenix-1 Region)
cd /vagrant/OCI_letsencrypt
cp terraform.tfvars.template terraform.tfvars
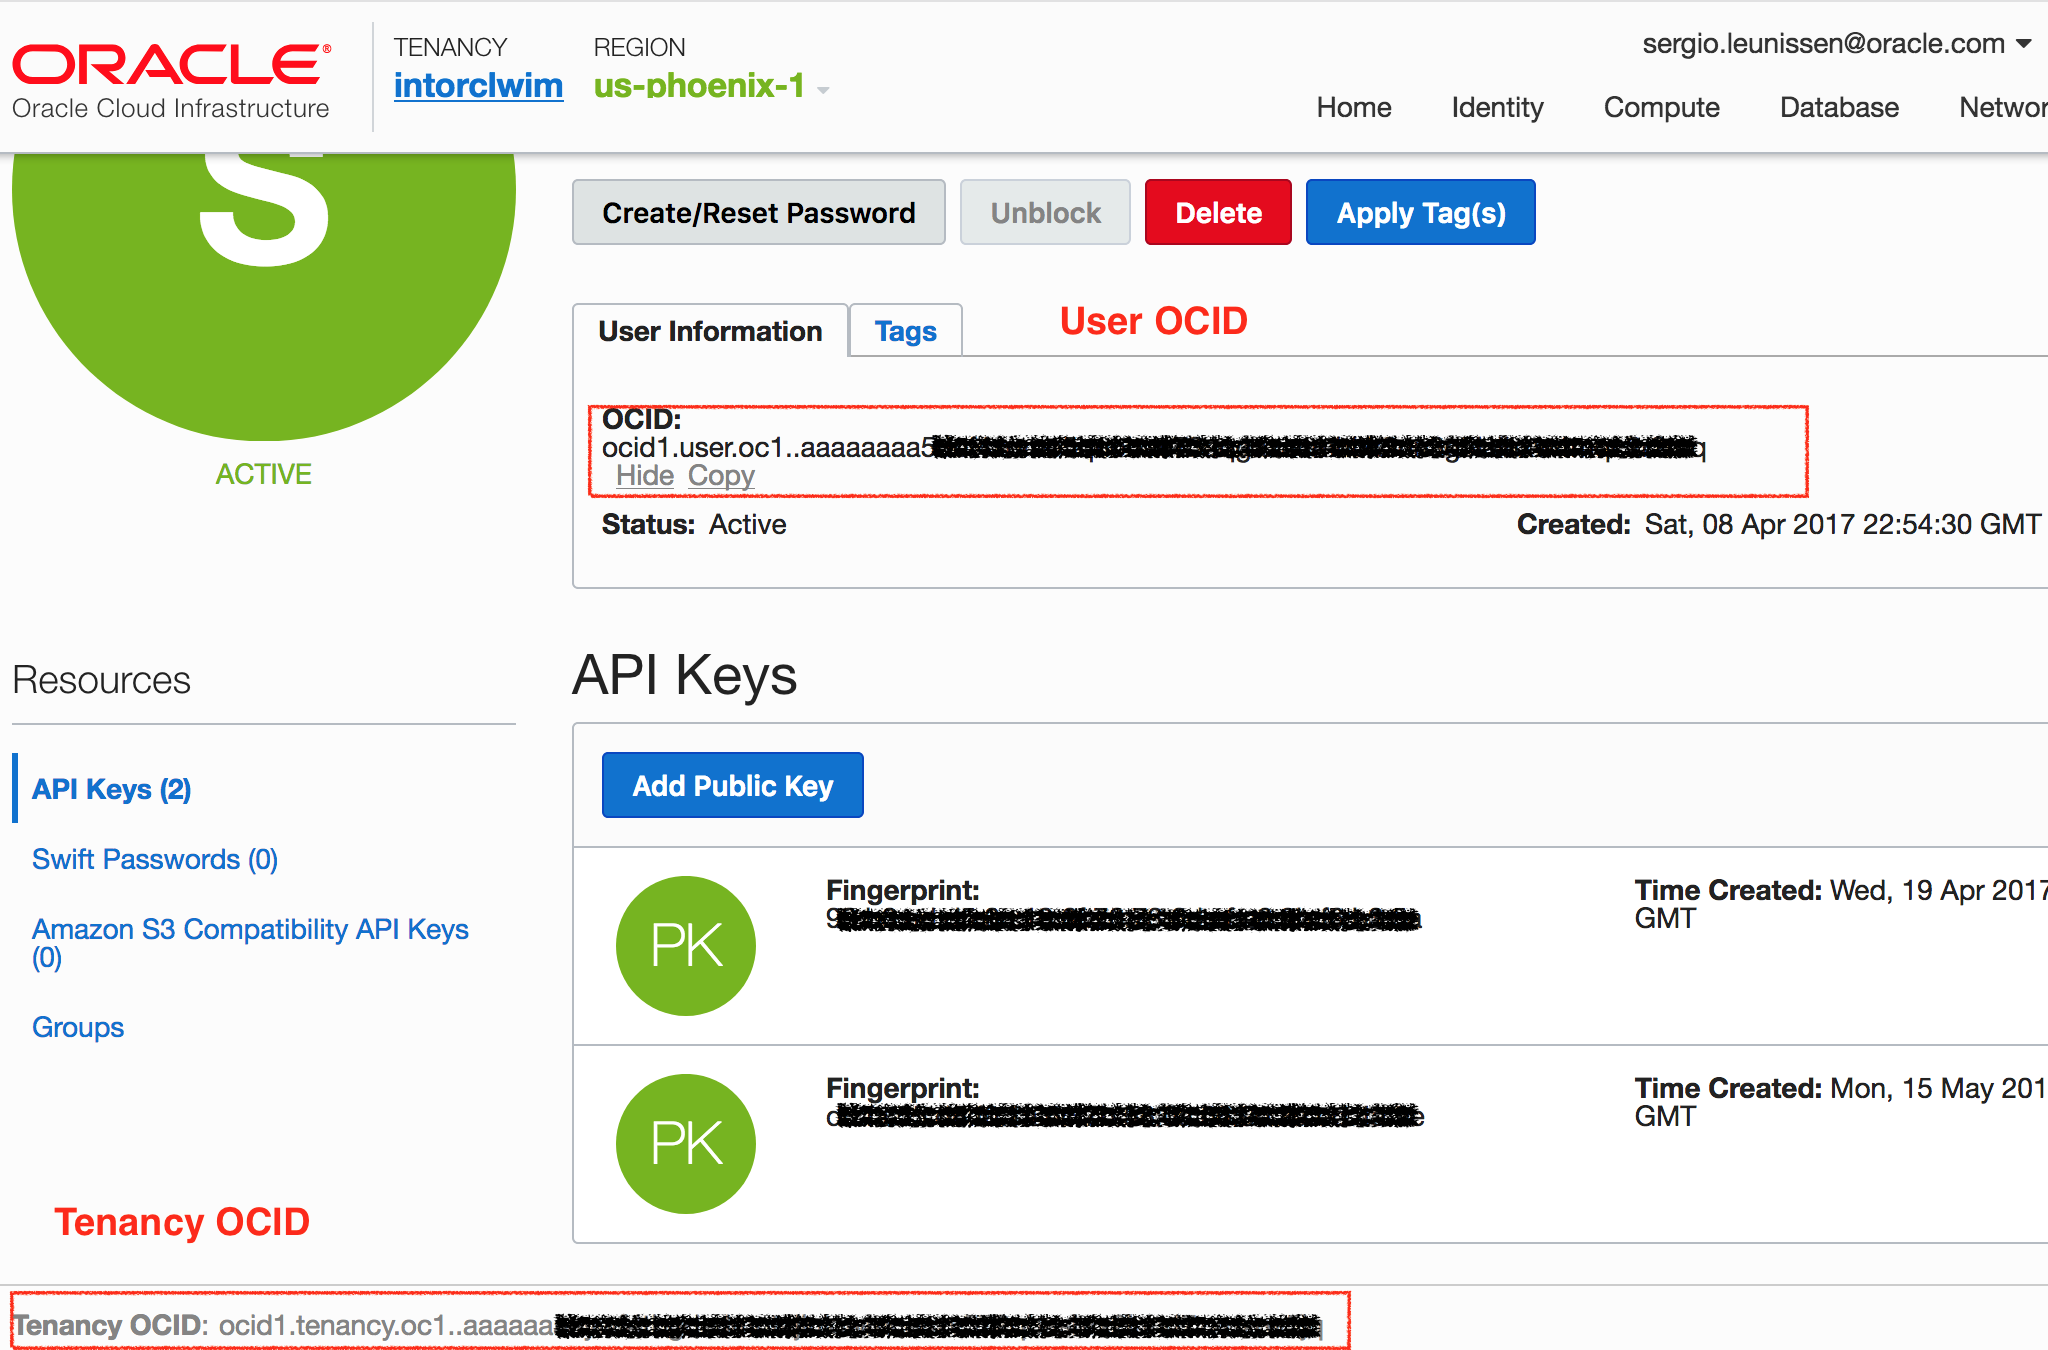
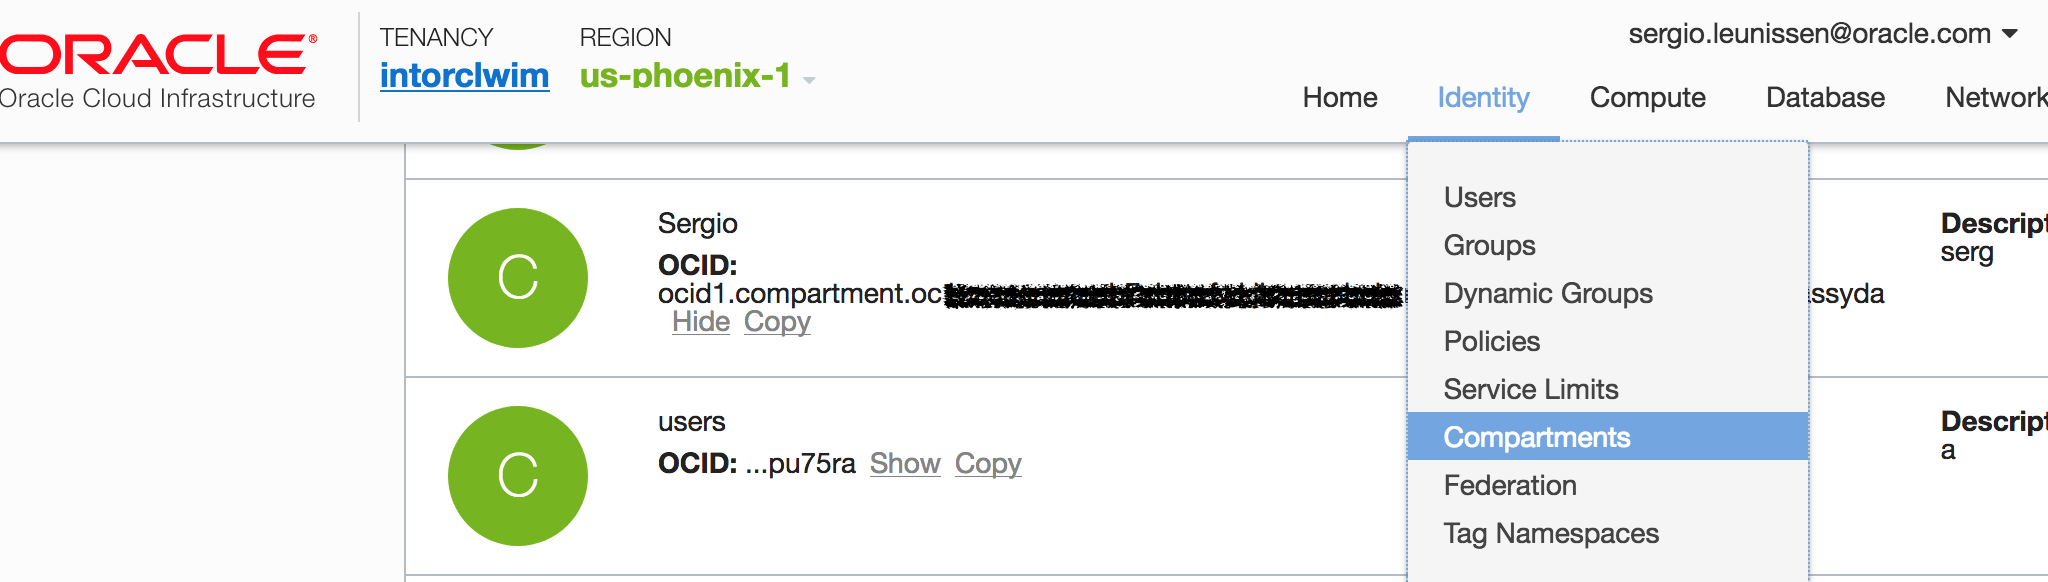
You can find your Tenancy OCID at the bottom of every page on the Console and your User OCID under User Settings > User Information > Show. See figure 2. Look for your Compartment OCID under Identity > Compartments, see figure 3.
The fingerprint is shown after vagrant up completes. Run this command to show it again:
openssl rsa -pubout -outform DER -in ~/.oci/oci_api_key.pem | openssl md5 -c
Save your changes to terraform.tfvars
3. Initalialize Terraform
terraform init
You should see this among the output
Initializing provider plugins...

Terraform has been successfully initialized!
3. Run Terraform plan and review
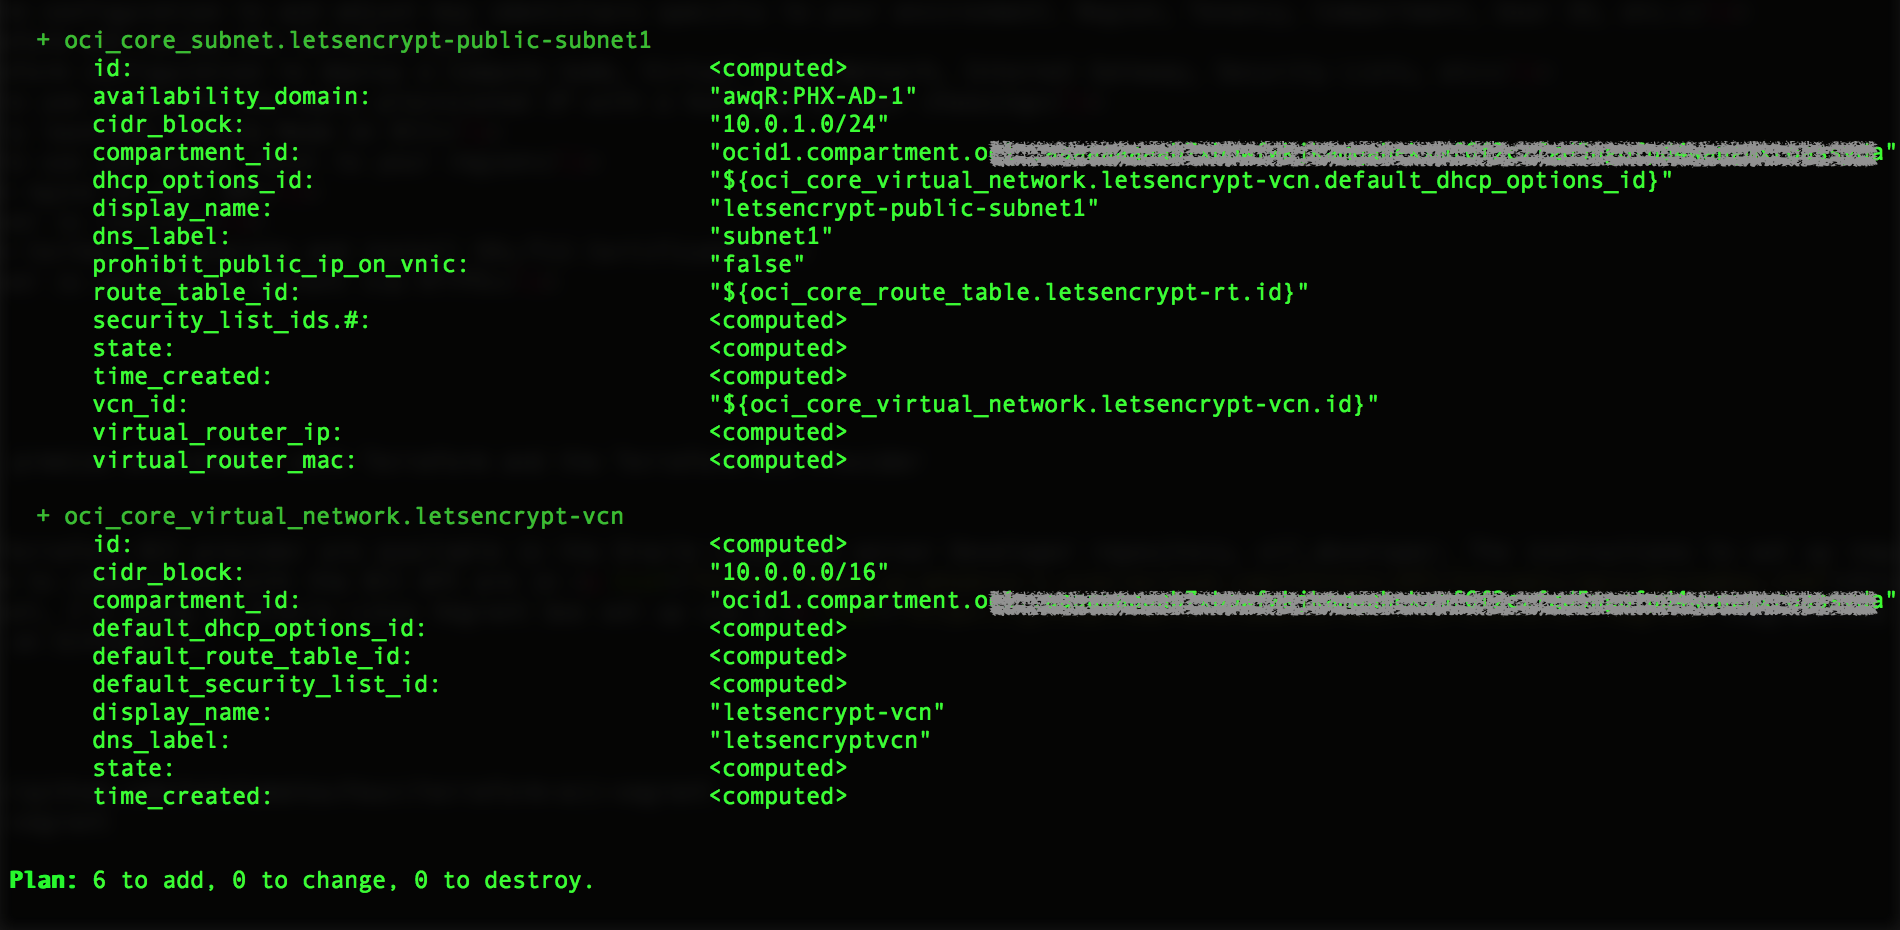
When instructed to create a plan, Terraform will look for files with a .tf extension and build graph of the infrastructure components it is going to deploy on Oracle Cloud Infrastructure. The interesting parts of our Terraform configuration are in 02_vcn.tf, in which the Virtual Cloud Network (VCN) is defined, along with a public Subnets, an Internet Gateway, a Route Table. The network configuration also features Security Lists that allow inbound TCP traffic on port 80 and, because I am an optimist, port 443.
In 03_instance_ol7.tf, a compute instance is defined based on VM shape attached to the public Subnet. Also, the public IP that is assigned to the instance is defined as an output.
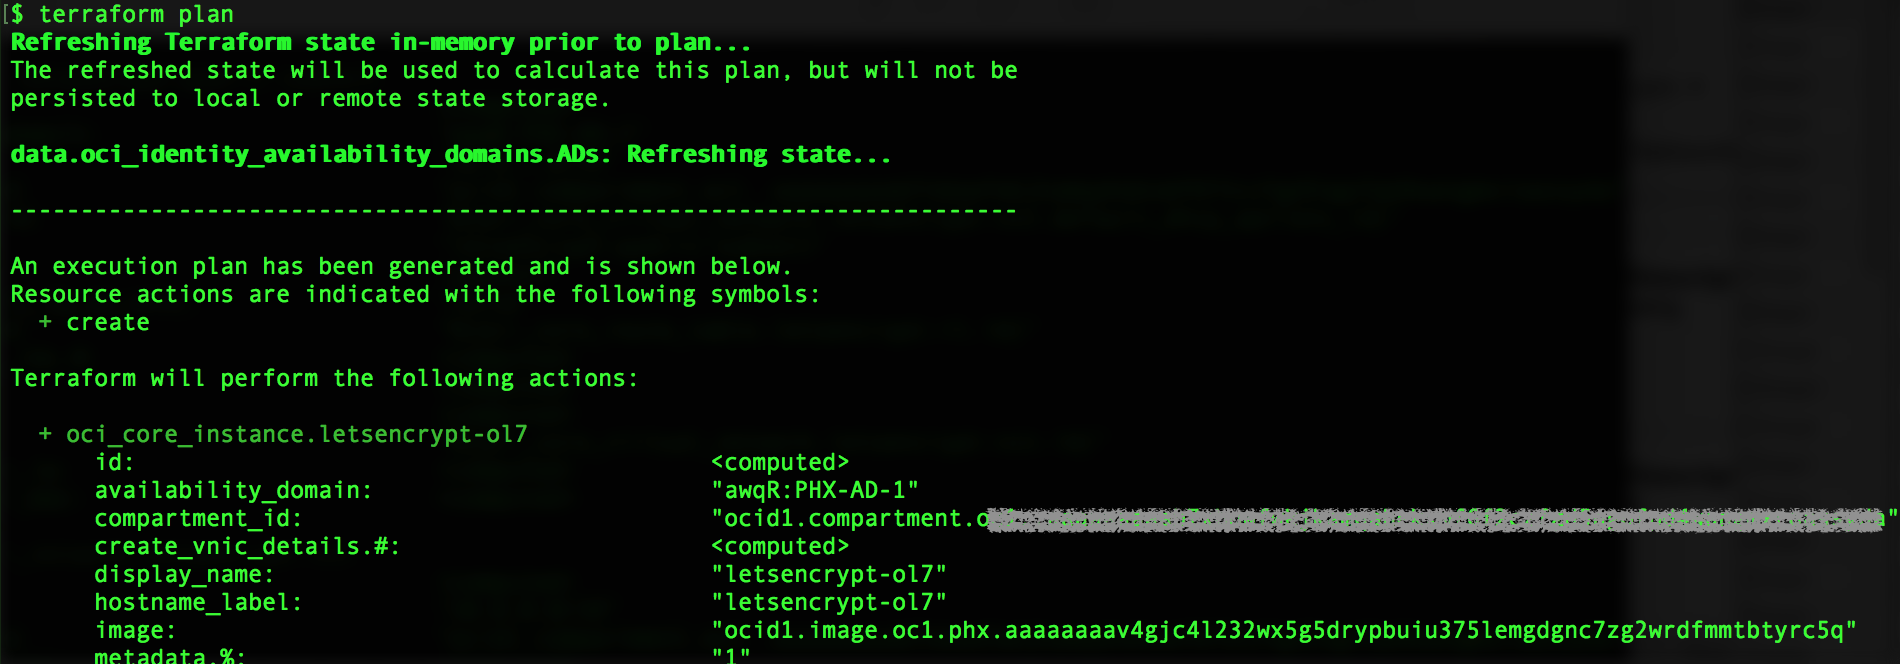
terraform plan
You should see output similar to figures 4 and 5 below.
4. Create the infrastructure using Terraform apply
Run terraform apply to deploy the infrastructure on OCI. You’ll be asked to confirm with “yes”.
terraform apply
Upon successful completion, you will see output similar to the following:
...
oci_core_instance.letsencrypt-ol7: Still creating... (10s elapsed)
oci_core_instance.letsencrypt-ol7: Still creating... (20s elapsed)
oci_core_instance.letsencrypt-ol7: Creation complete after 25s (ID: ocid1.instance.oc1.phx.abyh......a6...ebgk7jbtm7gurofns........wkiuha)

Apply complete! Resources: 6 added, 0 changed, 0 destroyed.

Outputs:

 Public IP of instance  = [
    1xx.xxx.xxx.29
]
$
For this example I’m using an Ephemeral Public IP address, which is automatically assigned at compute instance creation time and exists for the lifetime of the instance. In the real world you would use a Reserved Public IP. You can read more about that here.
5. Associate your hostname with the Public IP address
Make sure you can nslookup or dig your hostname and that it resolved to the Public IP address assigned to your OCI instance.
SSH to the newly launched Compute Node on OCI
It will take about a minute for the instance to launch. You can verify that it’s running via the web console. Use the following command to ssh to your newly provisioned instance with the default opc user via its Public IP:
ssh -i ~/.ssh/id_rsa_ol7oci -l opc <PUBLIC IP>
[opc@letsencrypt-ol7 ~]$
6. Enable Oracle Linux Yum mirrors local to your region
Each OCI region has local Oracle Linux yum server mirrors for speedy access to packages without incurring networking costs. Currently, the following mirrors exist for access from inside each OCI region only:
- http://yum-fra.oracle.com
- http://yum-ash.oracle.com
- http://yum-phx.oracle.com
As of this writing the Oracle Images provided by OCI launch with the external Oracle Linux yum server configured. To change this for my region:
sudo su -
cd /etc/yum.repos.d
mv public-yum-ol7.repo public-yum-ol7.repo.bak
wget -O yum-phx-ol7.repo http://yum-phx.oracle.com/yum-phx-ol7.repo
exit
$
7. Install nginx, certbot and the certbot nginx plugin
The yum repo file we just deployed has the following repositories enabled:
ol7_UEKR4
ol7_addons
ol7_developer
ol7_developer_EPEL
ol7_latest
ol7_optional_latest
ol7_preview
This comes in handy as nginx and certbot and python2-certbot-nginx — the tools we will use to generate a certificate and configure nginx — are in the EPEL repository. Note that due to a dependency conflict for pyOpenSSL, you need to disable the ol7_developer repo temporarily. To install nginx and certbot and the certbot nginx plugin:
sudo yum --disablerepo="ol7_developer" -y install nginx certbot python2-certbot-nginx
8. Start nginx and verify you can access test page
To verify that nginx installed correctly and has a proper configuration, run nginx -t as root.
$ sudo nginx -t
nginx: the configuration file /etc/nginx/nginx.conf syntax is ok
nginx: configuration file /etc/nginx/nginx.conf test is successful
$
Next, we need to ensure we can reach nginx on port 80 as running in the OCI instance. You may recall that our security list allows inbound traffic on port 80 and 443. But we also need to make sure the firewall on the instance itself allows it by adding the http service to the public zone and making it permanent. While we are at it, let’s take care of the https service as well. Don’t forget to reload the firewall after adding the services!
$ sudo firewall-cmd --permanent --zone=public --add-service=http
success
$ sudo firewall-cmd --permanent --zone=public --add-service=https
success
$ sudo firewall-cmd --reload
success
To start nginx:
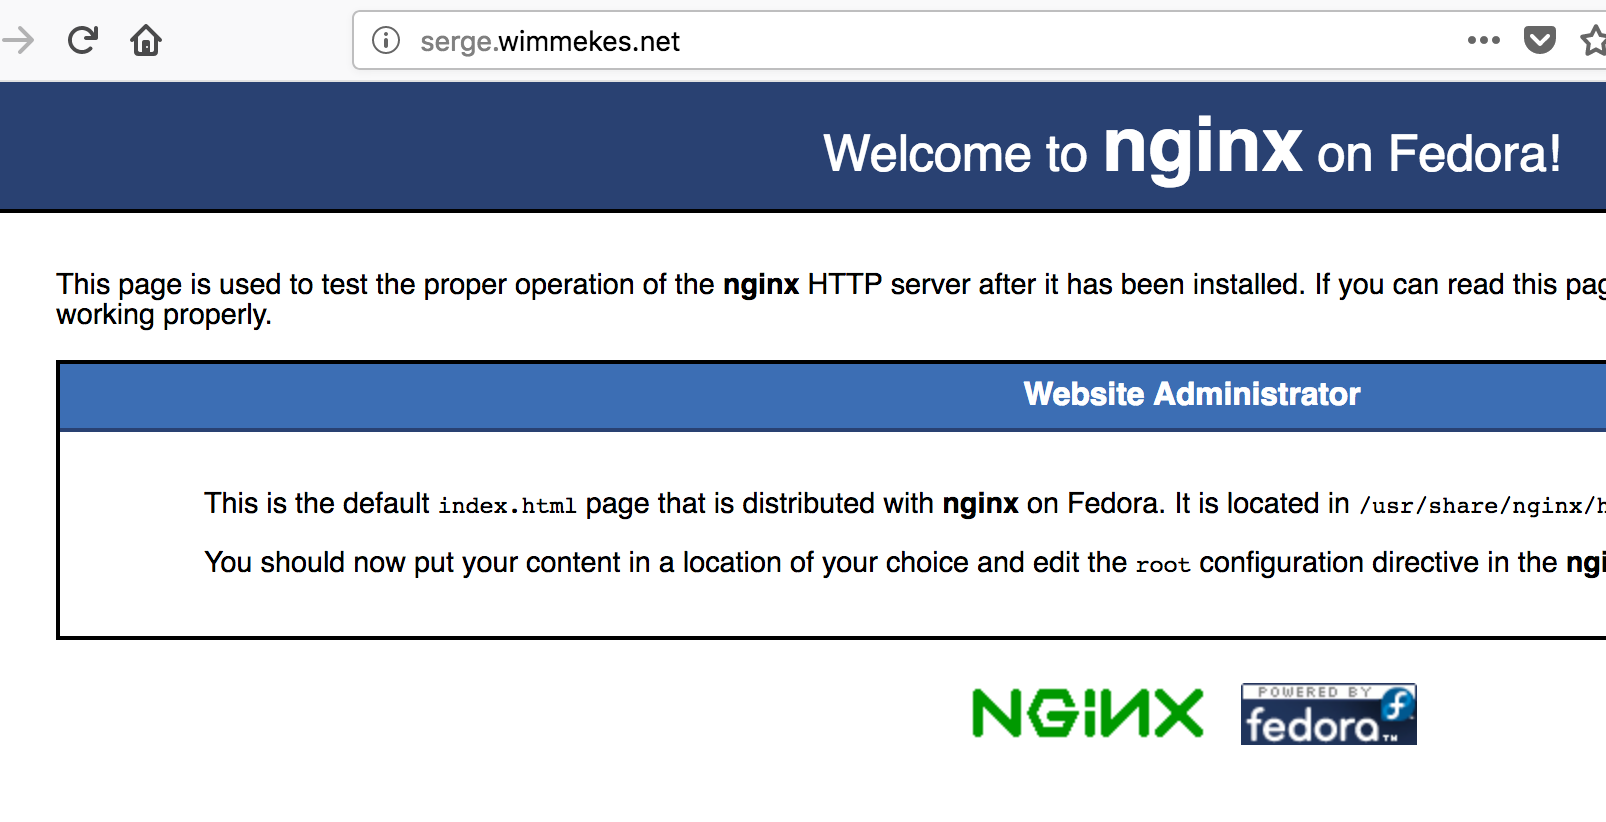
$ sudo systemctl start nginx
You should be able to point your browser to the hostname you’ve associated with the Public IP of your OCI instance and see the test page.
9. Run certbot to generate a certificate and configure nginx for SSL/HTTPS
Before we can generate a certificate and set up nginx for SSL, we need to add our fully qualified domain name to the nginx configuration file. As root, edit the file /etc/nginx/nginx.conf
sudo vi /etc/nginx/nginx.conf
Look for this section, and replace the underscore with your fully qualified domain name.
    server {
        listen       80 default_server;
        listen       [::]:80 default_server;
        server_name  _;
        root         /usr/share/nginx/html;
In my case it looks like this:
    server {
        listen       80 default_server;
        listen       [::]:80 default_server;
        server_name  serge.wimmekes.net;
        root         /usr/share/nginx/html;
Certbot includes plugins to automate the configuration of various HTTP servers. From the Cerbot web site:
Certbot is an easy-to-use automatic client that fetches and deploys SSL/TLS certificates for your webserver. Certbot was developed by EFF and others as a client for Let’s Encrypt and was previously known as “the official Let’s Encrypt client” or “the Let’s Encrypt Python client.” Certbot will also work with any other CAs that support the ACME protocol.To configure nginx for HTTPS/SSL run the cerbot command as follows. Here, Certbot validates your web server by creating a temporary file for your requested domainin a known location. Then the Let’s Encrypt validation server makes HTTP requests to validate that the DNS for each requested domain resolves to the server running certbot. Follow the prompts to finish the configuration. I opted to have nginx automatically redirect traffic on port 80 to port 443.
$ sudo certbot --authenticator webroot -w /usr/share/nginx/html --installer nginx
Saving debug log to /var/log/letsencrypt/letsencrypt.log
Plugins selected: Authenticator webroot, Installer nginx
Starting new HTTPS connection (1): acme-v01.api.letsencrypt.org

Which names would you like to activate HTTPS for?
-------------------------------------------------------------------------------
1: serge.wimmekes.net
-------------------------------------------------------------------------------
Select the appropriate numbers separated by commas and/or spaces, or leave input
blank to select all options shown (Enter 'c' to cancel): 1
Obtaining a new certificate
Performing the following challenges:
http-01 challenge for serge.wimmekes.net
Using the webroot path /usr/share/nginx/html for all unmatched domains.
Waiting for verification...
Cleaning up challenges
Deployed Certificate to VirtualHost /etc/nginx/nginx.conf for set(['serge.wimmekes.net'])

Please choose whether or not to redirect HTTP traffic to HTTPS, removing HTTP access.
-------------------------------------------------------------------------------
1: No redirect - Make no further changes to the webserver configuration.
2: Redirect - Make all requests redirect to secure HTTPS access. Choose this for
new sites, or if you're confident your site works on HTTPS. You can undo this
change by editing your web server's configuration.
-------------------------------------------------------------------------------
Select the appropriate number [1-2] then [enter] (press 'c' to cancel): 2
Redirecting all traffic on port 80 to ssl in /etc/nginx/nginx.conf

-------------------------------------------------------------------------------
Congratulations! You have successfully enabled https://serge.wimmekes.net

You should test your configuration at:
https://www.ssllabs.com/ssltest/analyze.html?d=serge.wimmekes.net
-------------------------------------------------------------------------------

IMPORTANT NOTES:
 - Congratulations! Your certificate and chain have been saved at:
   /etc/letsencrypt/live/serge.wimmekes.net/fullchain.pem
   Your key file has been saved at:
   /etc/letsencrypt/live/serge.wimmekes.net/privkey.pem
   Your cert will expire on 2018-05-13. To obtain a new or tweaked
   version of this certificate in the future, simply run certbot again
   with the "certonly" option. To non-interactively renew *all* of
   your certificates, run "certbot renew"
 - If you like Certbot, please consider supporting our work by:

   Donating to ISRG / Let's Encrypt:   https://letsencrypt.org/donate
   Donating to EFF:                    https://eff.org/donate-le

[opc@letsencrypt-ol7 ~]$
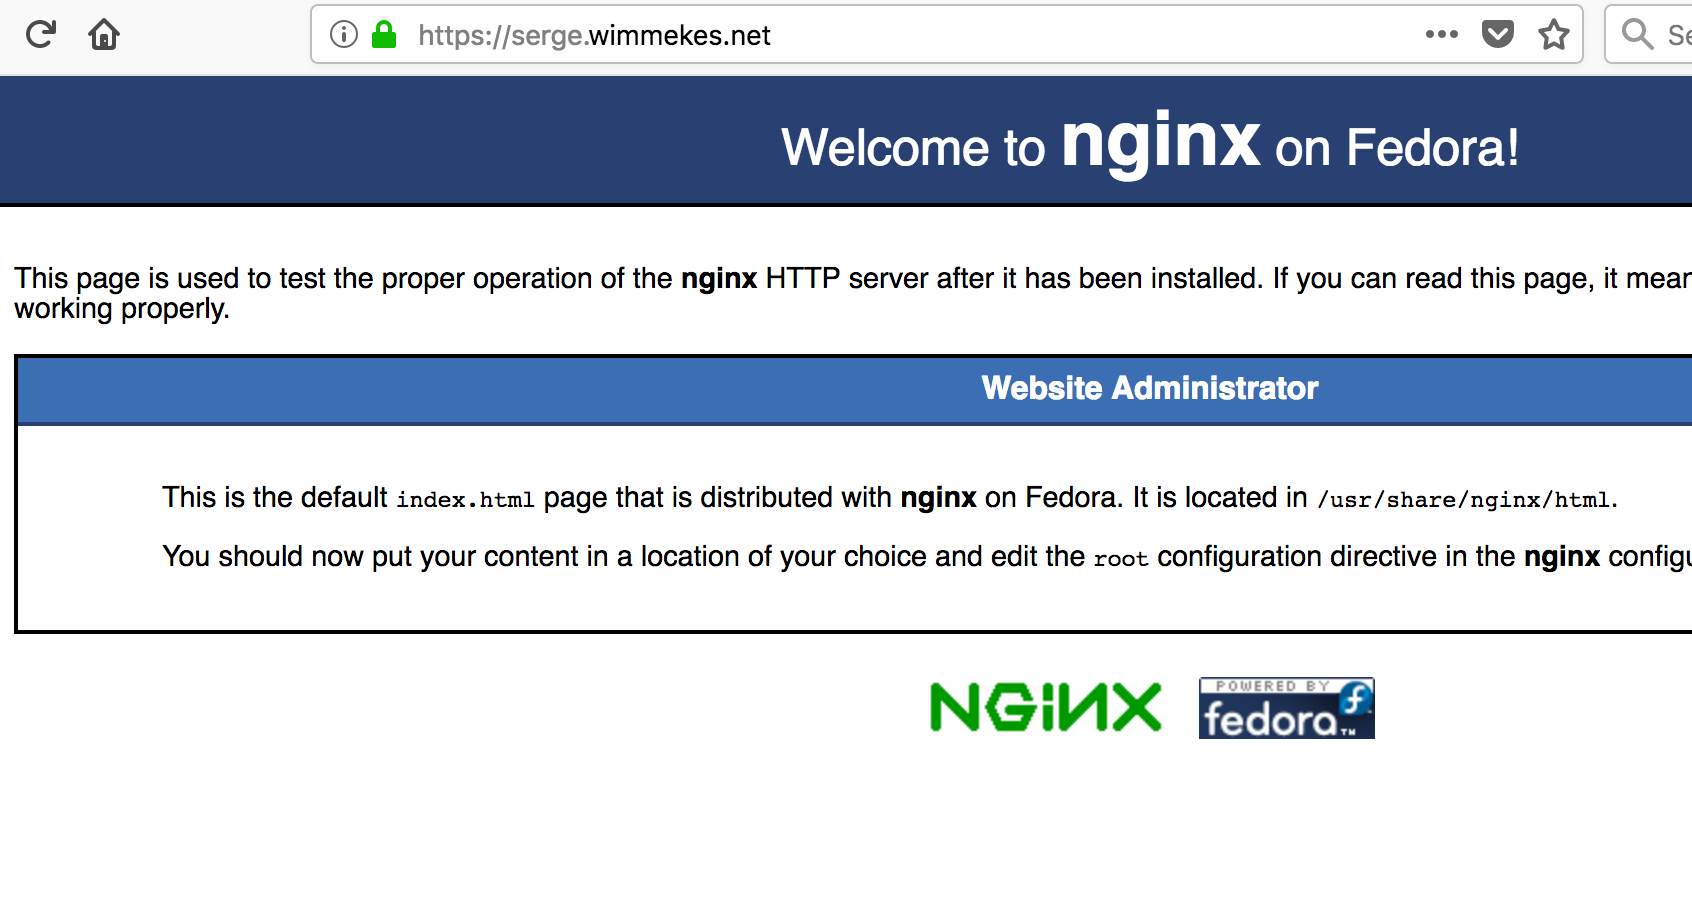
You can get a full report on the status of your SSL-enabled web server using this web site: https://www.ssllabs.com/ssltest/analyze.html?d=<your hostname here>
Conclusion
In this post I demonstrated how, using a default Oracle Linux image and packages available from a local yum server, you can set up an nginx web server and configure it to communicate via SSL/TLS on Oracle Cloud Infrastructure.
For more Oracle Cloud Infrastructure how to’s like this one, see: Oracle Cloud Infrastructure Community. For questions and ideas about Oracle Linux, see: Oracle Linux Community.