Originally published March 9, 2022
Introduction
Many customers require database clones to use in dev/test or potentially production support environments that are space-efficient and utilize Exadata performance such as Smart Scan, Storage Indexes, Persistent Memory Accelerators. For this Exadata offers the Sparse Clone|Snapshot functionality. If you’re unfamiliar with Sparse Snapshots on Exadata, take a quick read of the introduction in this blog post – Exadata PDB Sparse Clones.
Most, if not all, organizations also require disaster protection for their production database and replicate this database using Active Data Guard to a secondary data center.
So the question becomes, how can we combine both Sparse Clones|Snapshots, and Data Guard to provide point-in-time or “up to date” Test Masters|Parents that can be used to subsequently create read/write Sparse Clones for the aforementioned dev/test and production support use cases?
The good, and (hopefully) obvious news, is that combining both technologies is easy to do! To be clear – we’re going to focus on Exadata Sparse Standby in this post. In an upcoming post, we’ll cover creating Sparse Snapshots|Clones from a Test Master in more detail.
At a high level, using a standby database allows us to have a second (don’t use your actual DR database) Data Guard Standby database that serves as the ultimate grand-parent in a chain of sparse standby snapshots (specific points in time that make sense in your development context).
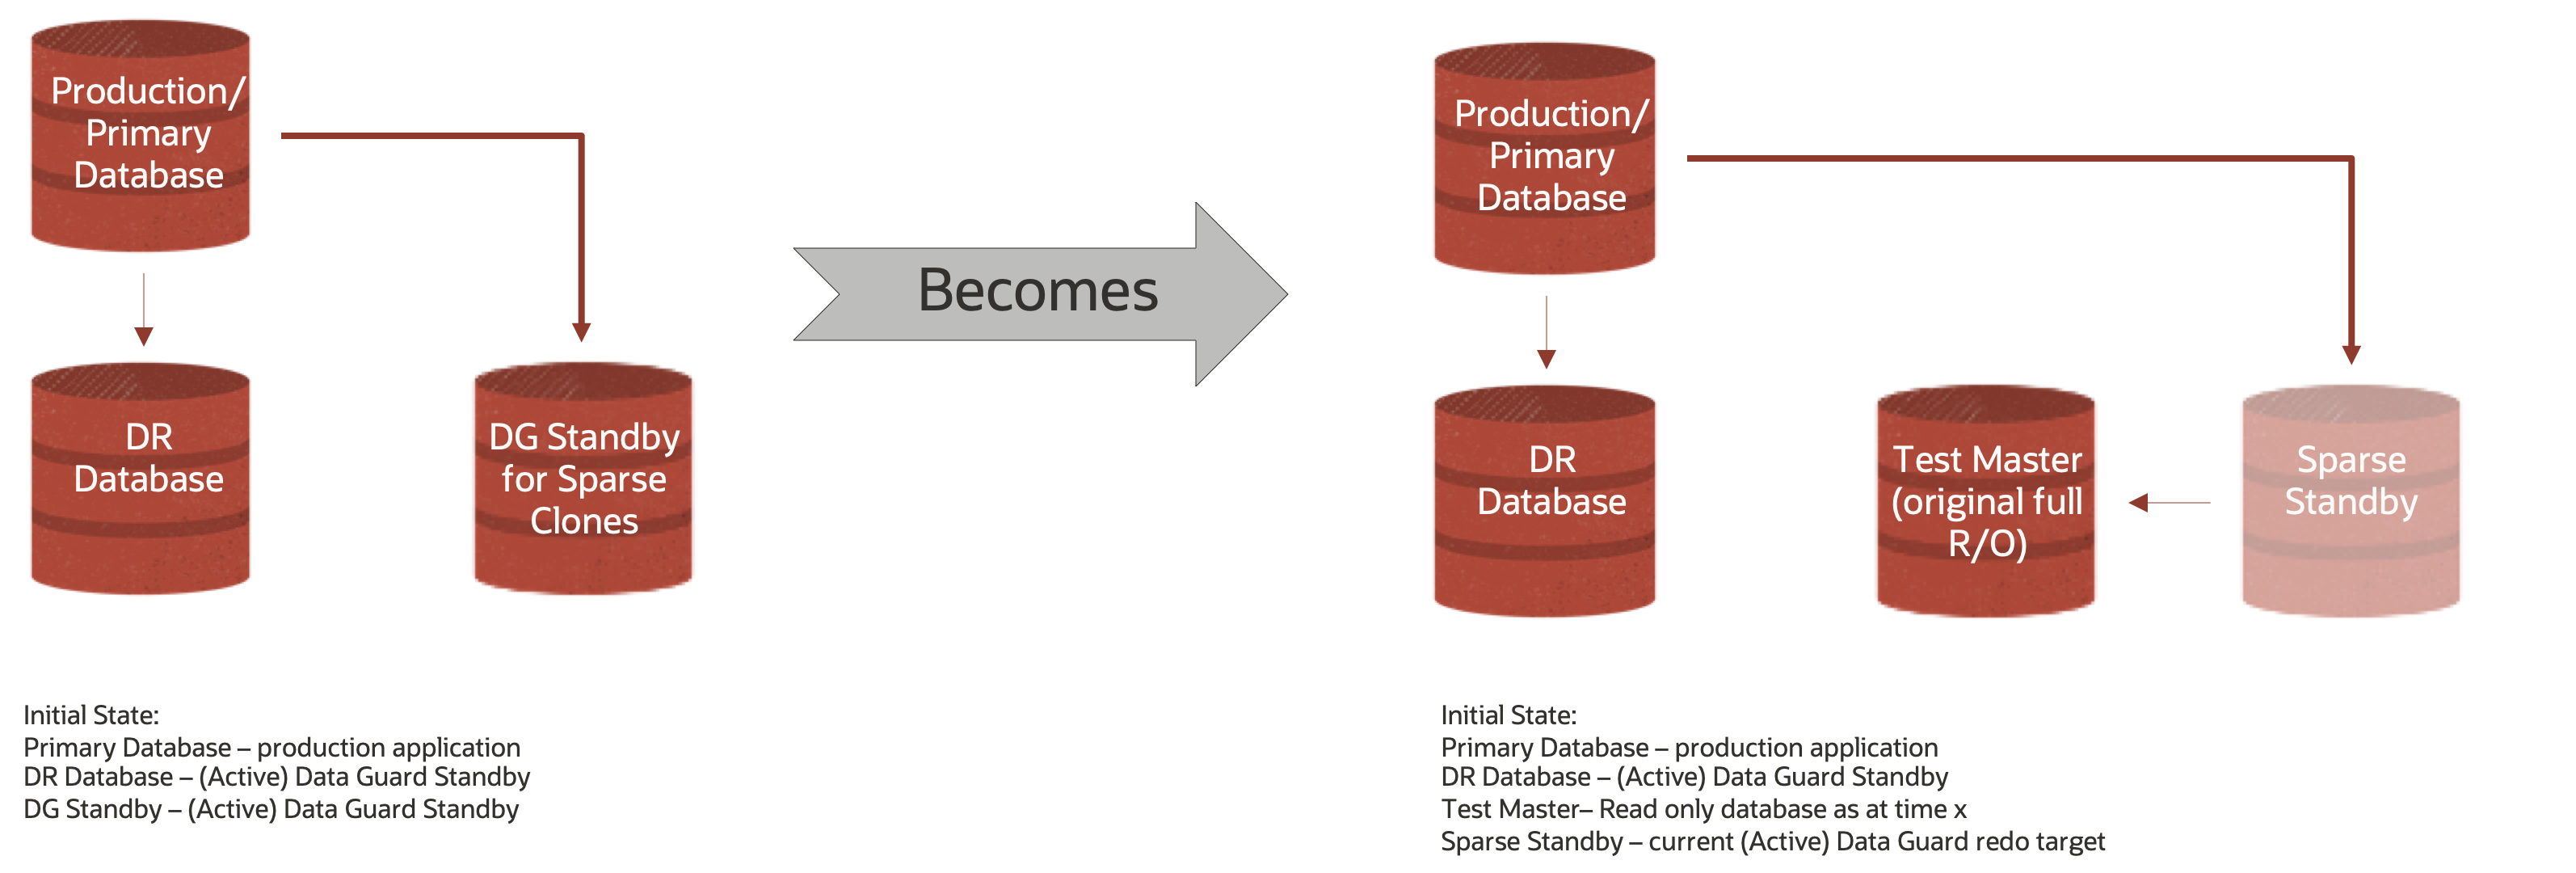
The below graphic shows a initial state whereby you would have two (2) Active Data Guard Standby targets – one for DR and the other for Sparse Clones
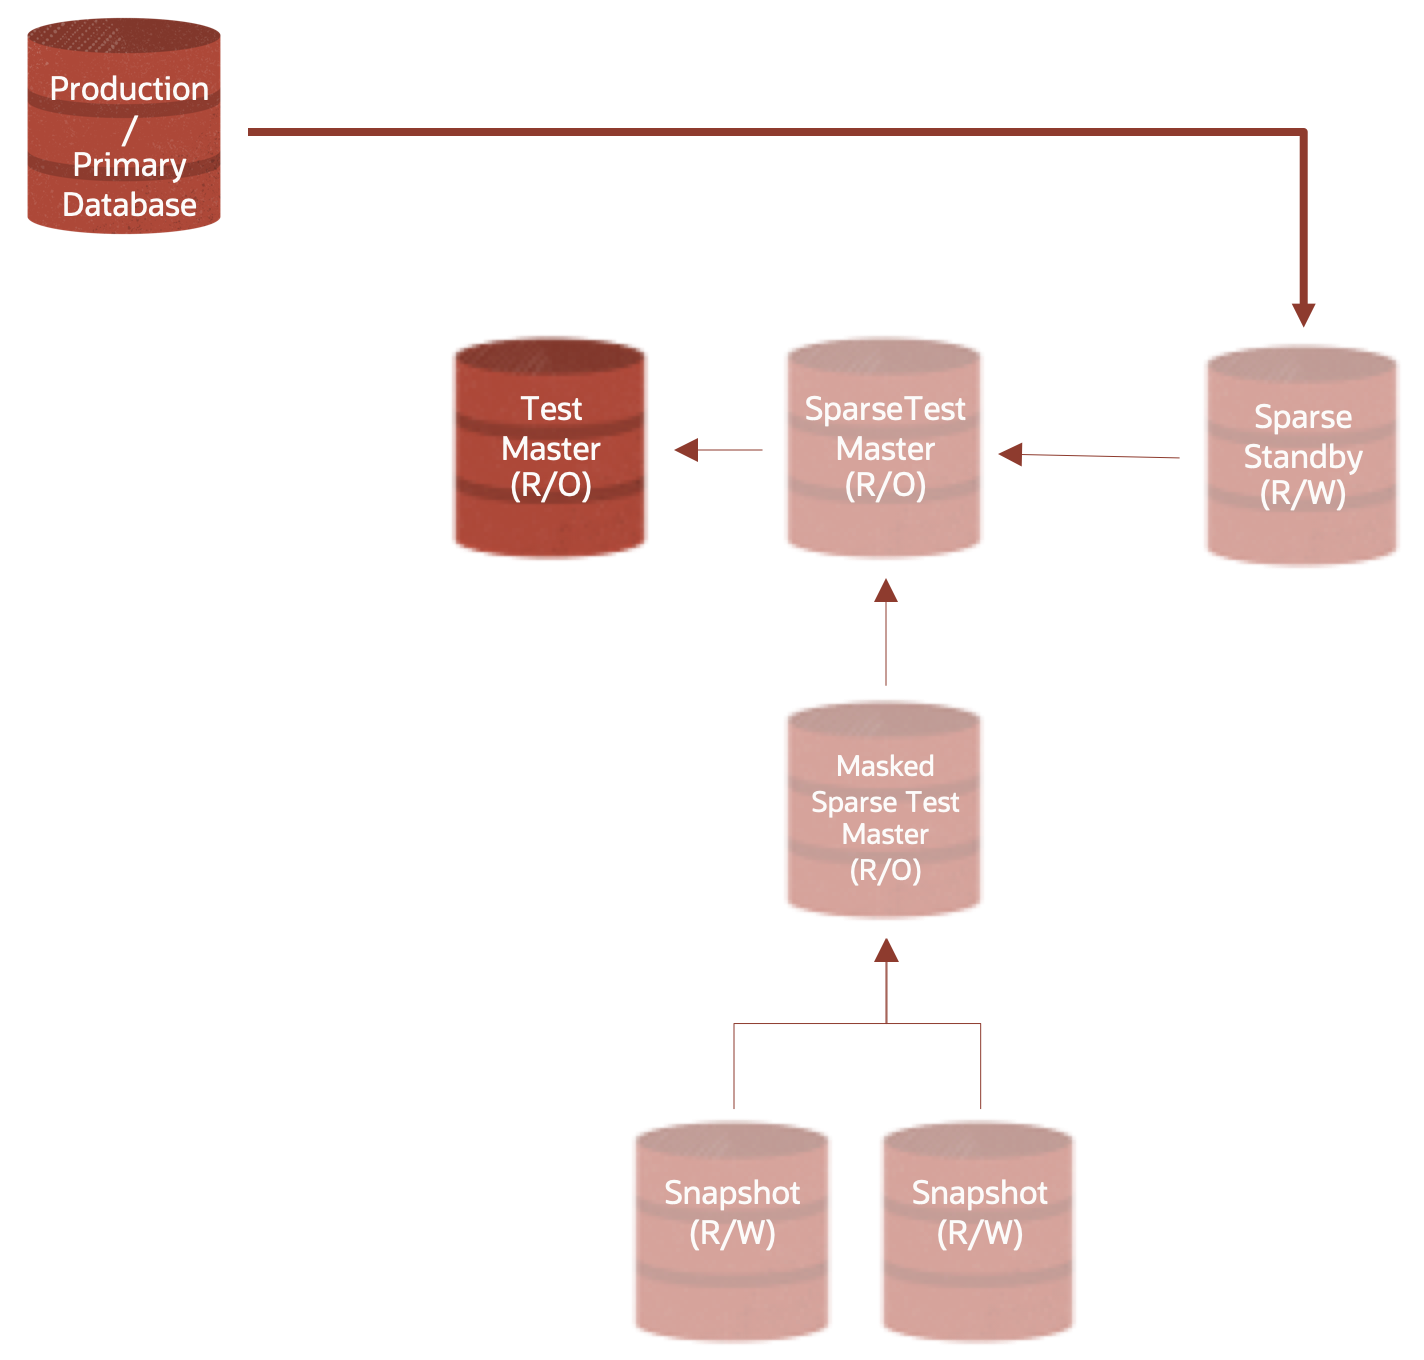
These Test Masters and Sparse Test Masters in turn serve as the parents to subsequent clones.
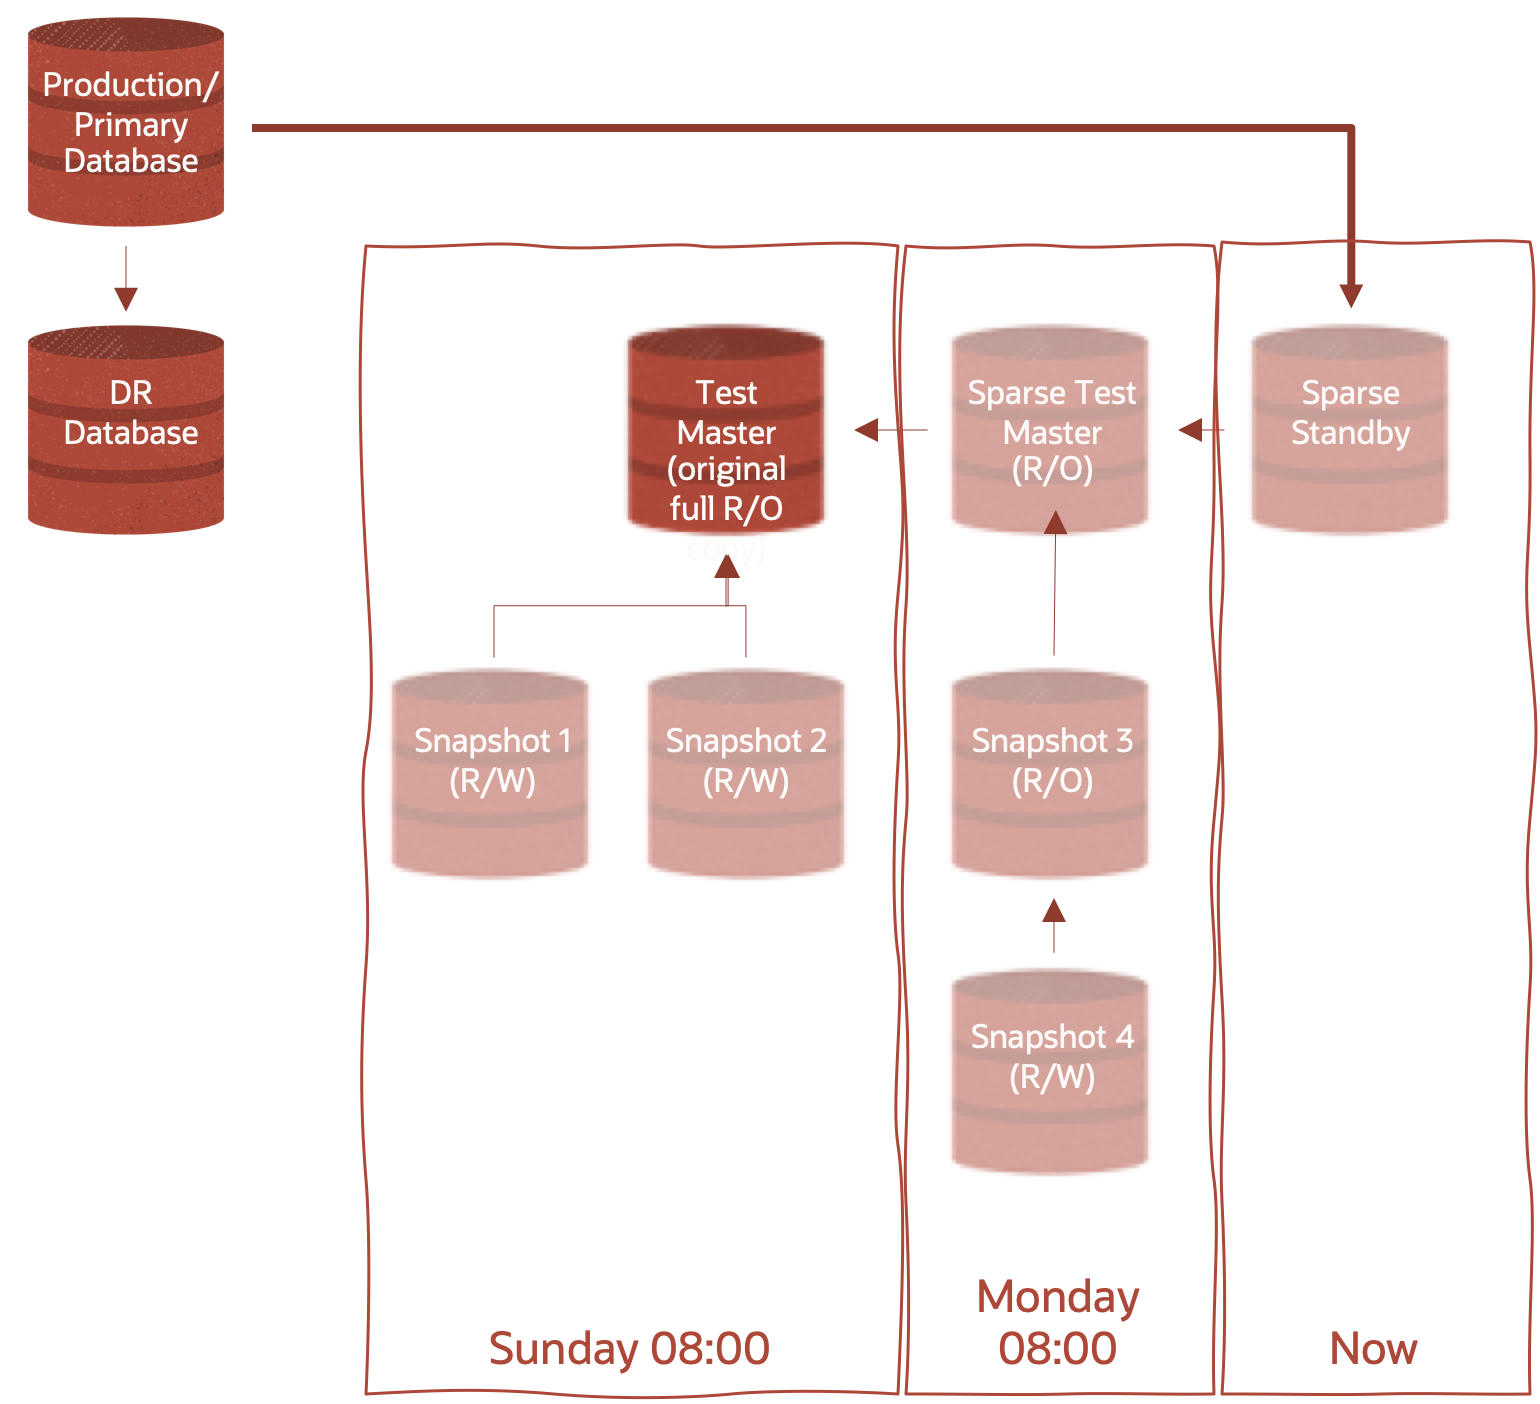
Before progressing further, let’s add a term to our lexicon – hierarchical clones. Introduced in Oracle Database 12.2.0.1 (12cR2), hierarchical clones – or clones of clones – are the underlying concept of both the diagrams above and of creating sparse standbys. Hierarchical clones enhance the space efficiency of our snapshots by enabling a sparse snapshot to point to another sparse snapshot, which points to yet another sparse snapshot, which may finally point to the full test master. This also applies to the standby database – in the diagram above, at 8am each day, create new sparse datafiles for the standby instance to write redo data into and the previous day becomes a read-only test master we can then create hierarchical sparse clones off for our dev/test or production support operations.
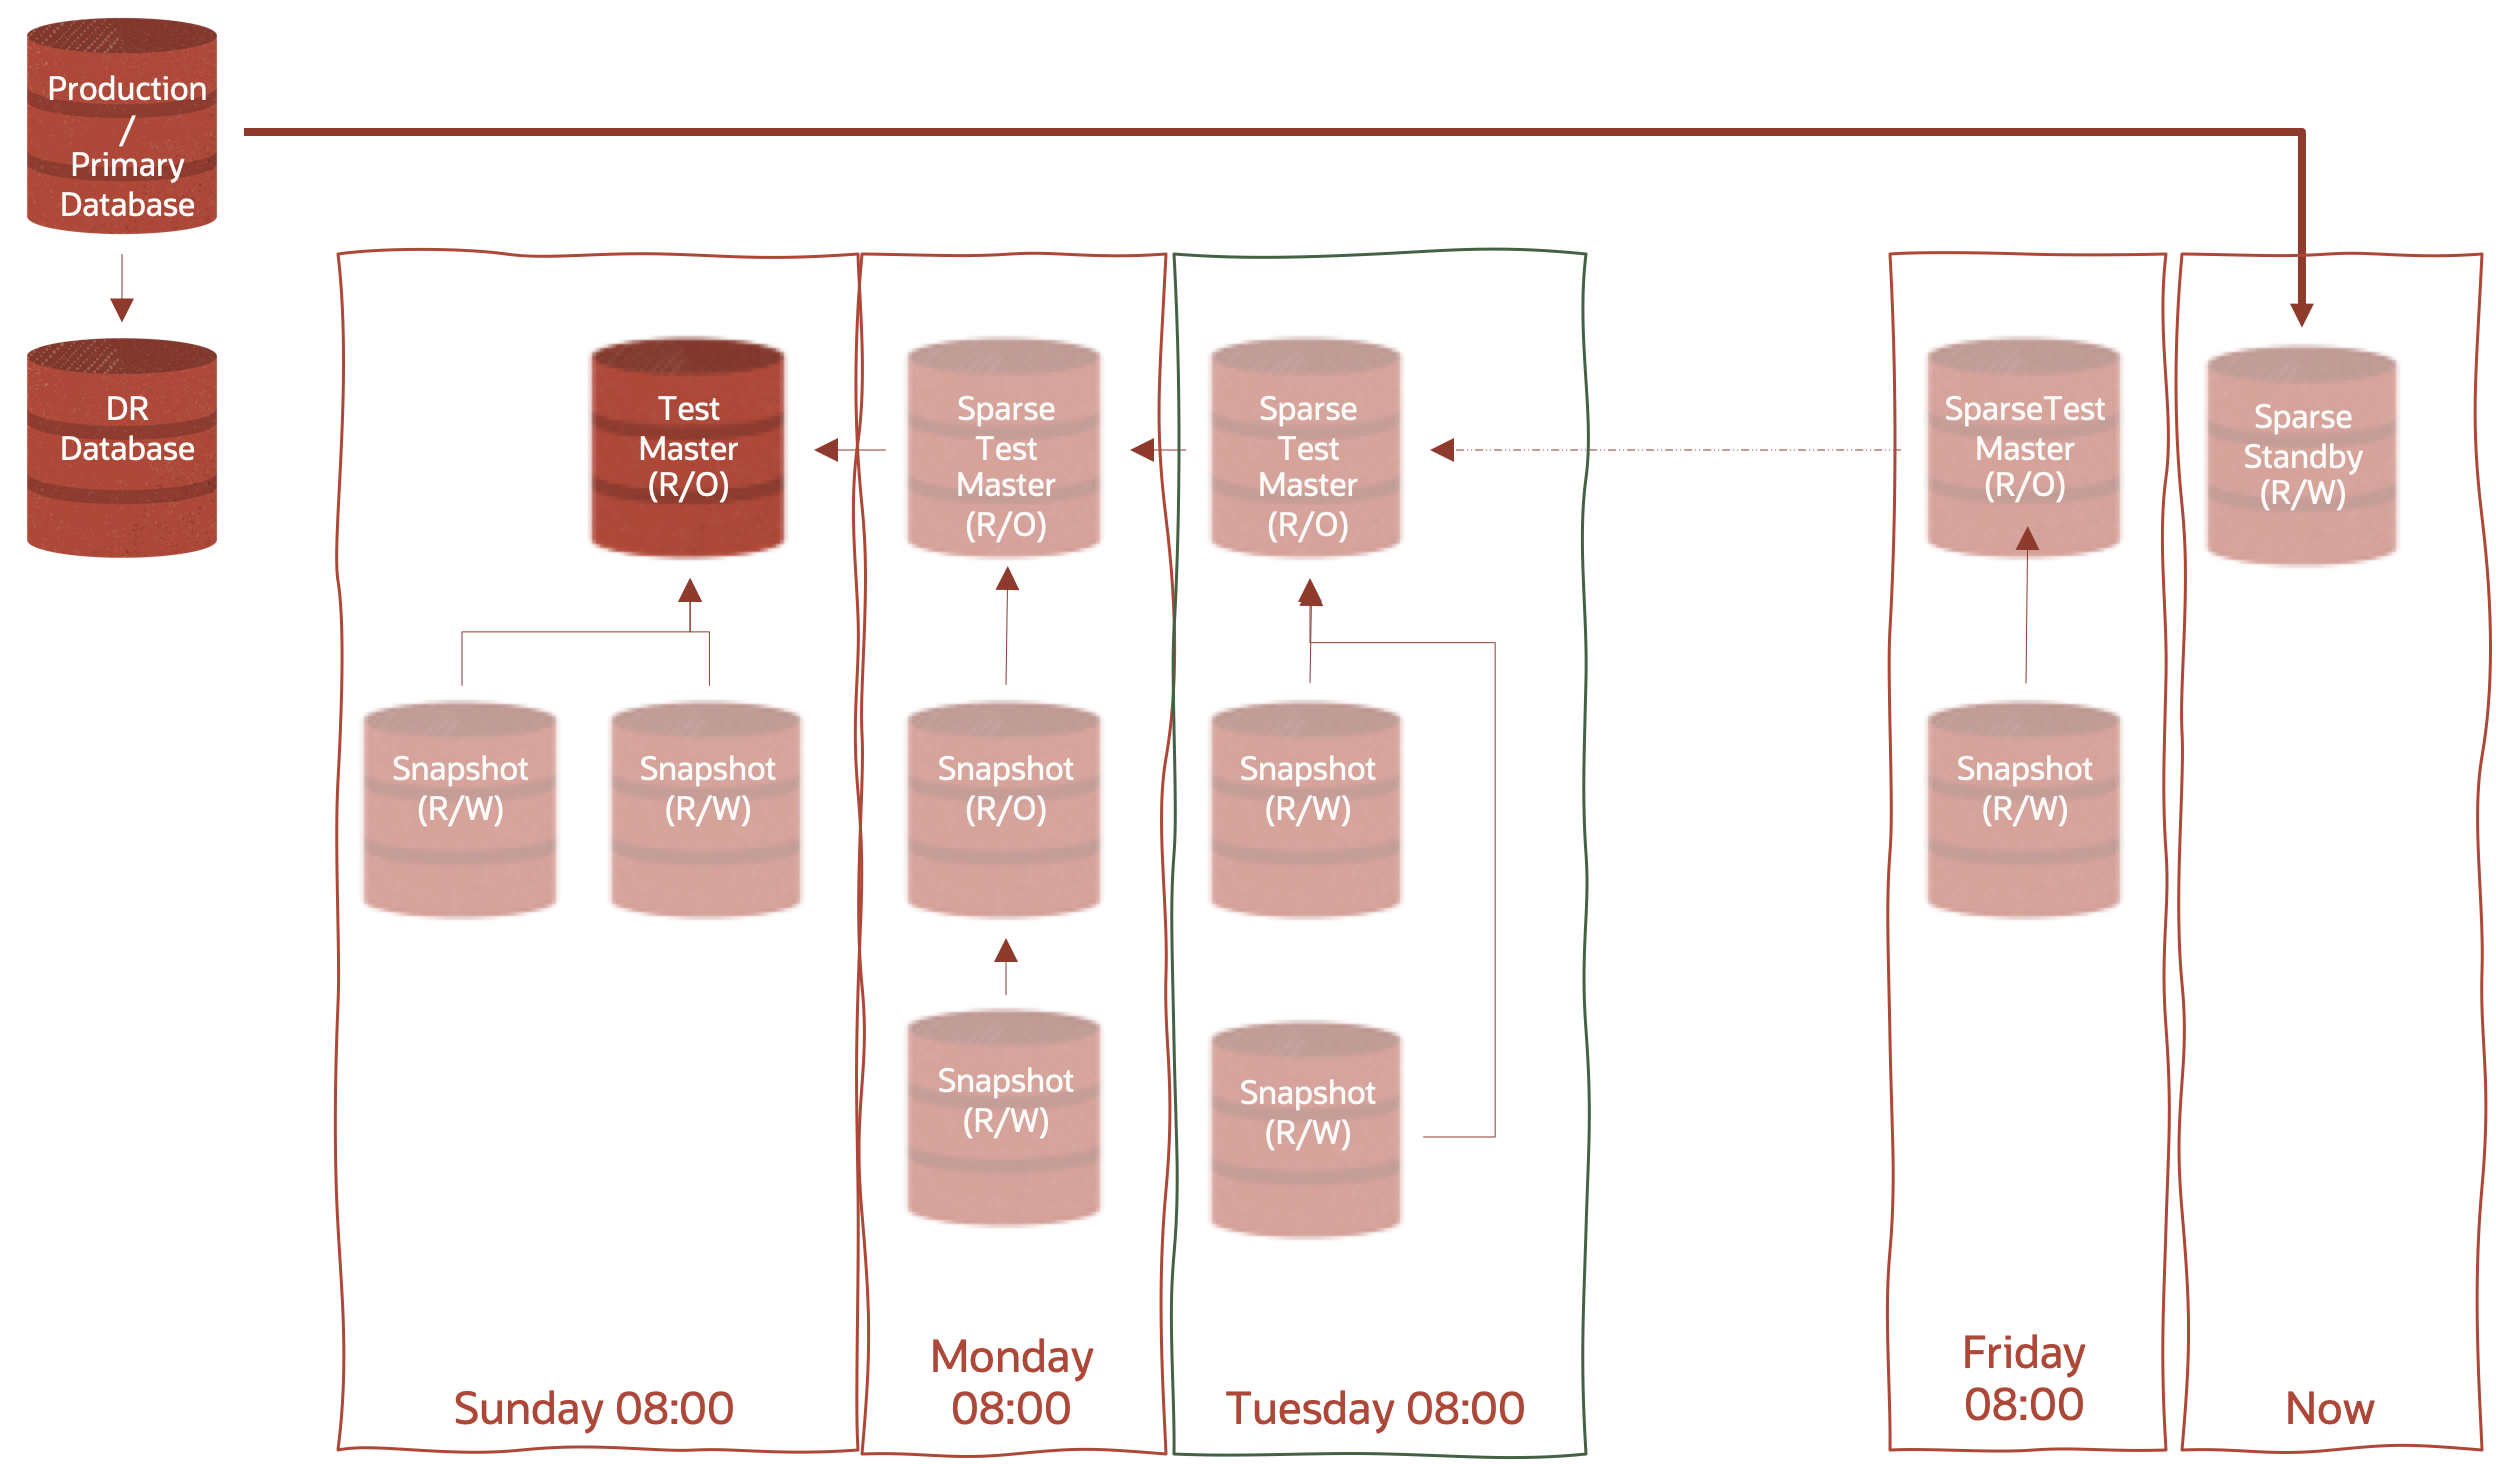
If we continue to create new Sparse Standby Databases, and more Hierarchical Sparse clones, we could extend the above image to something like the following – in this case, we’re creating a new Sparse Standy Database each day at 8:00 am.
Saving Bandwidth
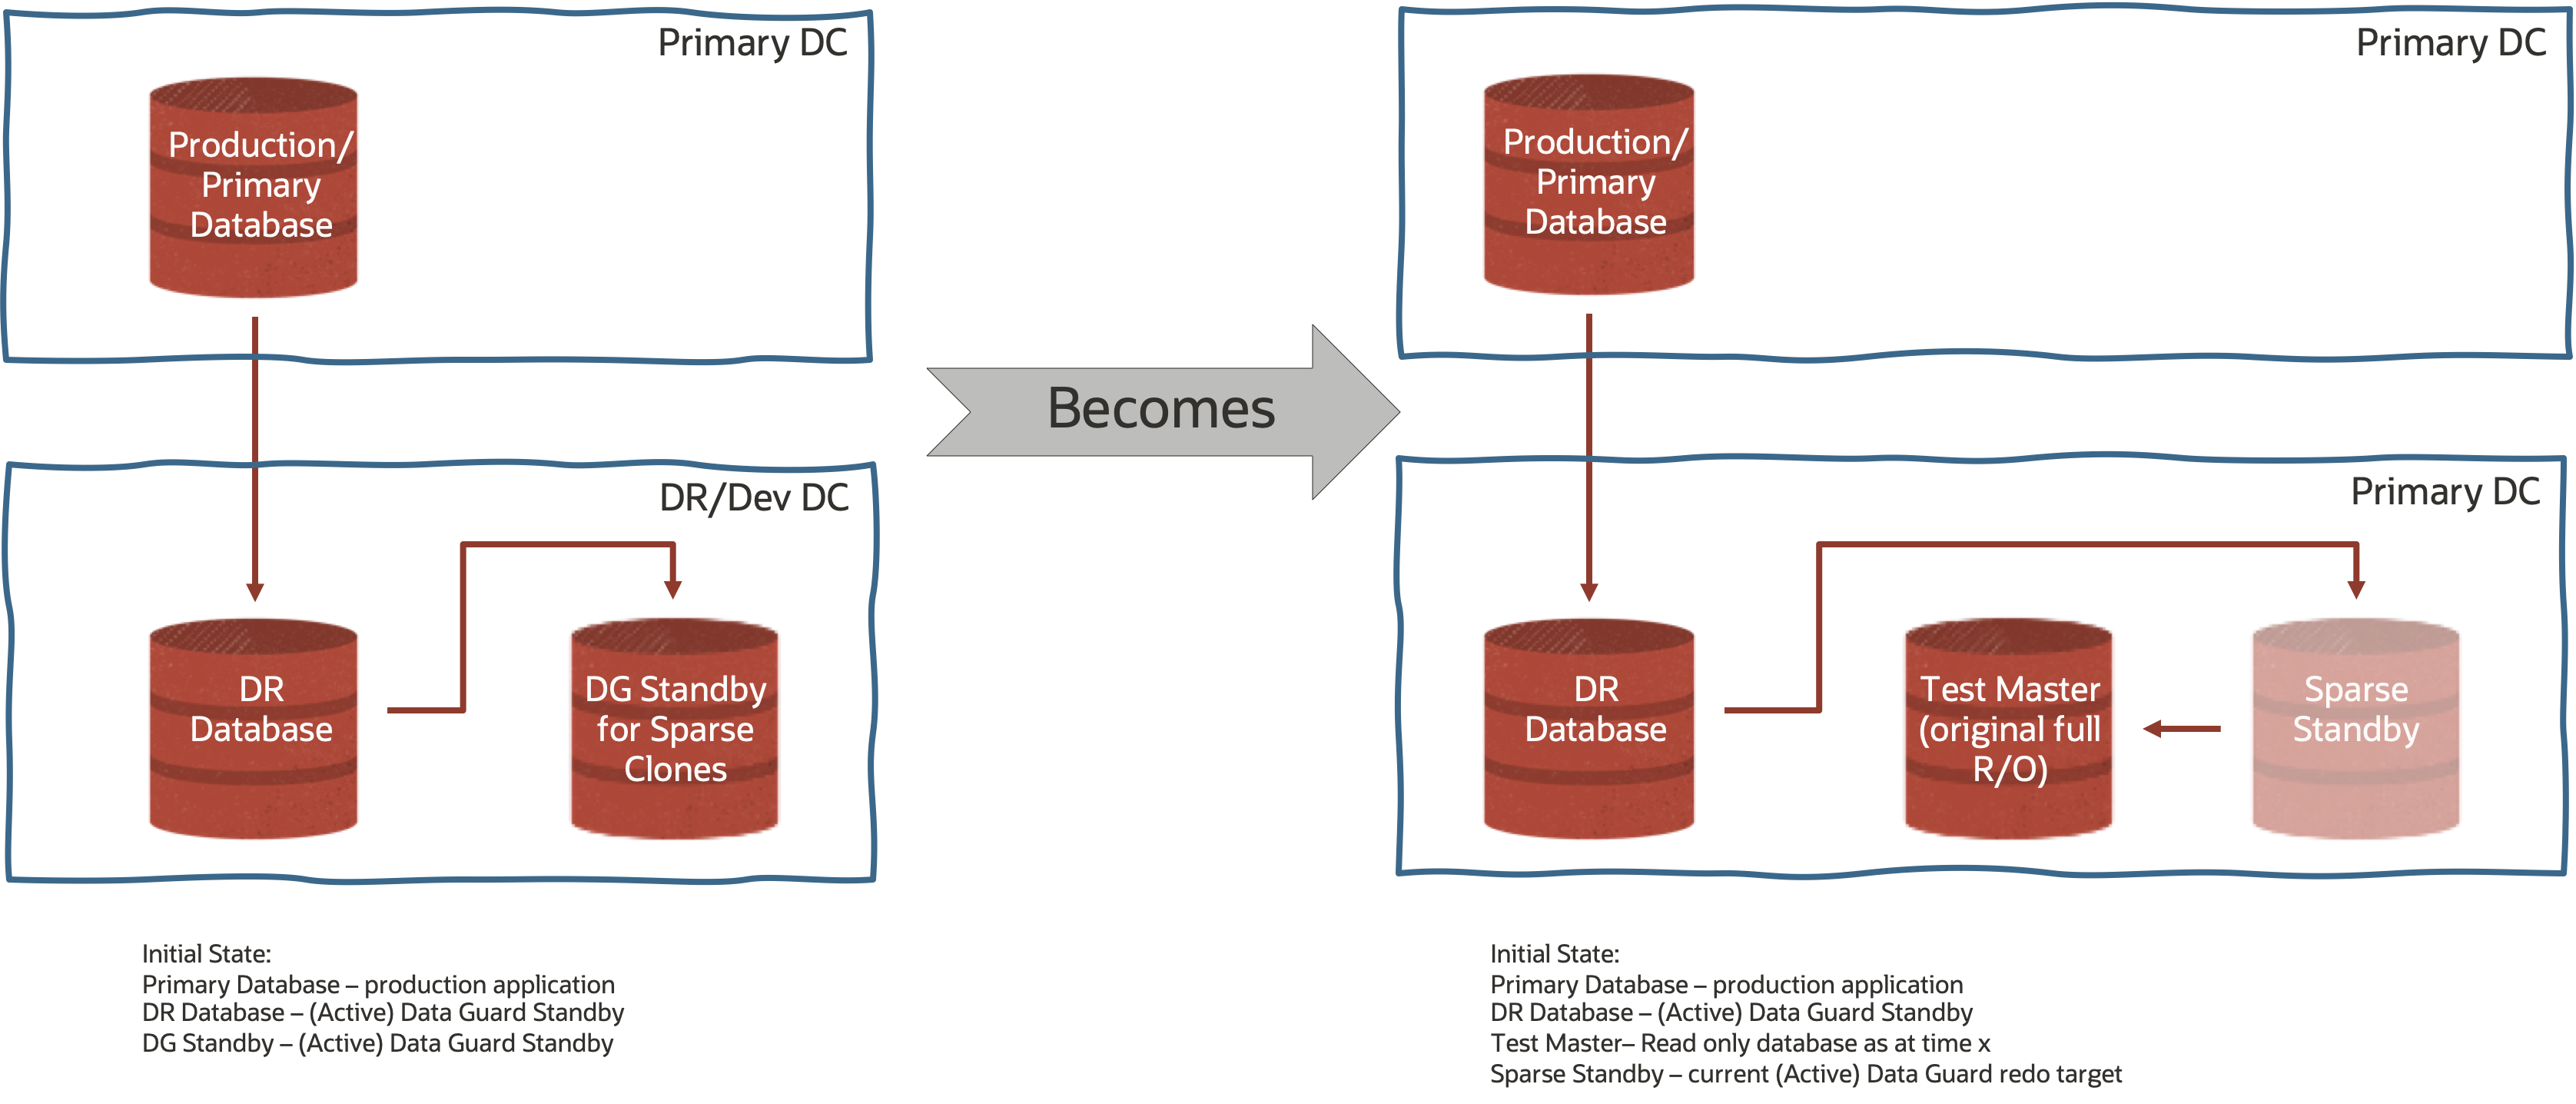
Its worth pointing out here that the diagrams above are somewhat abstract in nature – meaning that I am making no assumptions about where the primary and two standby databases physically reside or the network connectivity between them. Depending on the environment you are working in, it may be quite reasonable to send redo from the primary to two different standby databases in the same data center – even the same DR/Standby Exadata Database Machine. You may however, want to minimize the amount of traffic between two data centers to reduce cost of data transfer by reducing the amount of data transferred – for this you could use Cascaded Data Guard – a Standby Database that receives its redo from a Standby Database which receives its redo from the Primary. Such a topology may look something like this.
Sparse Standby Database
Staying with the Standby tier, let’s walk through how we create a new set of sparse datafiles. We begin with our initial setup – Primary (Production), DR (Active Data Guard Standby) and DG Standby for Sparse Clones (Active Data Guard Standby).
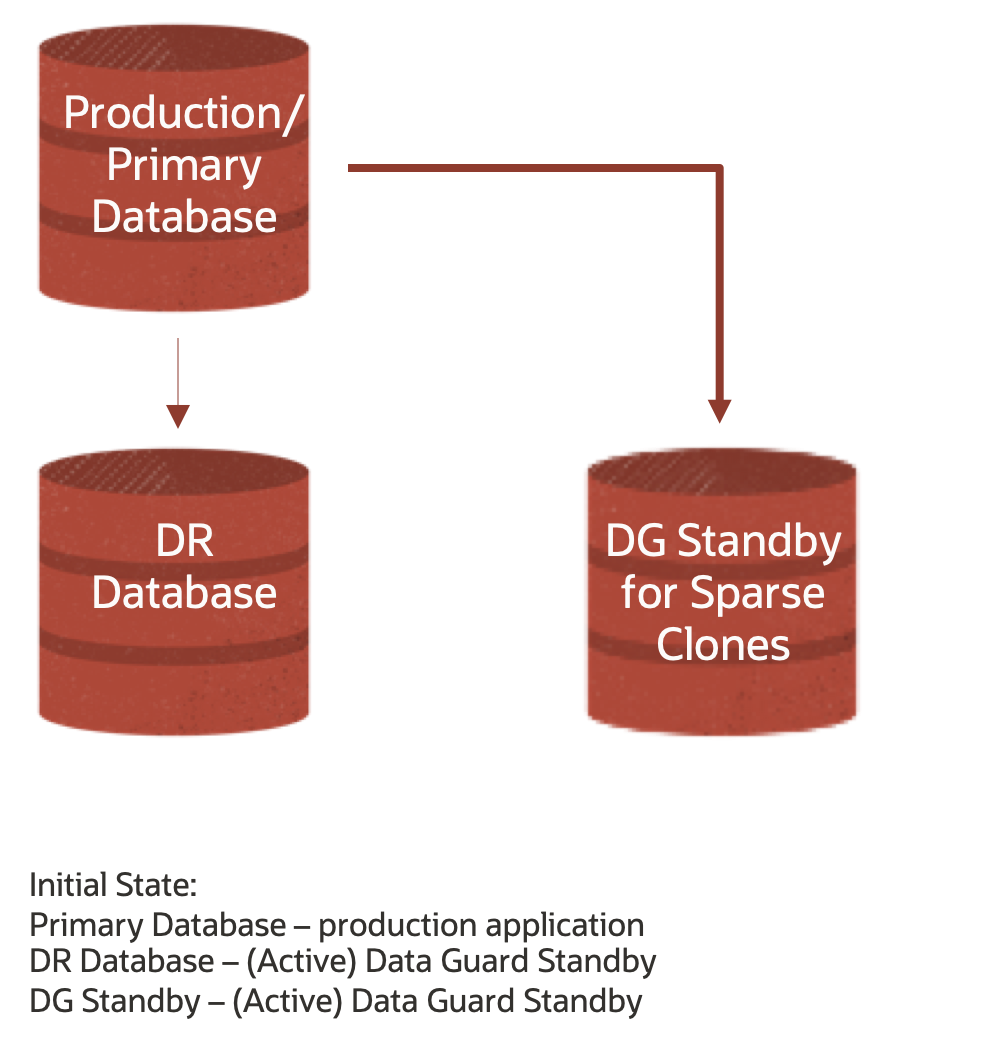
We’re going to leave any discussion of creating Data Guard Standby Databases for another time (this is both already well documented and widely blogged about). We’re also going to assume that you have already created 1) a SPARSE diskgroup; 2) enabled access control in both the DATA AND SPARSE diskgroups (see here for details); and 3) set the ownership datafiles that constitute the DG Standby for Sparse Clones (database on the right-hand side) to the process owner of the instance (probably oracle – see here for details).
The process of taking a snapshot of the standby is relatively straightforward:
- Stop Redo Apply on the DG Standby for Sparse Clones (not your actual DR database – we don’t want to compromise the disaster recovery position)
- Shutdown the Standby Database
- Change the ACLs for the standby database datafiles to be READ ONLY
- Create a sparse clone of the standby database which points back to the original standby datafiles you just set to READ ONLY
- Restart the Standby Database
- Restart Redo Apply
Let’s assume that the DR database is just going to tick away and do what DR databases – offload backups, read-only (even read mostly) workloads, enable standby first database patching, etc AND be ready to failover to in the event of a disaster – and remove it from use case for the sake of simplicity. Lets also rename the Primary and the DR Standby for Sparse Clones to “pridb” and “stbydb” respectively – note these are the db_unique_name as both are RAC databases.
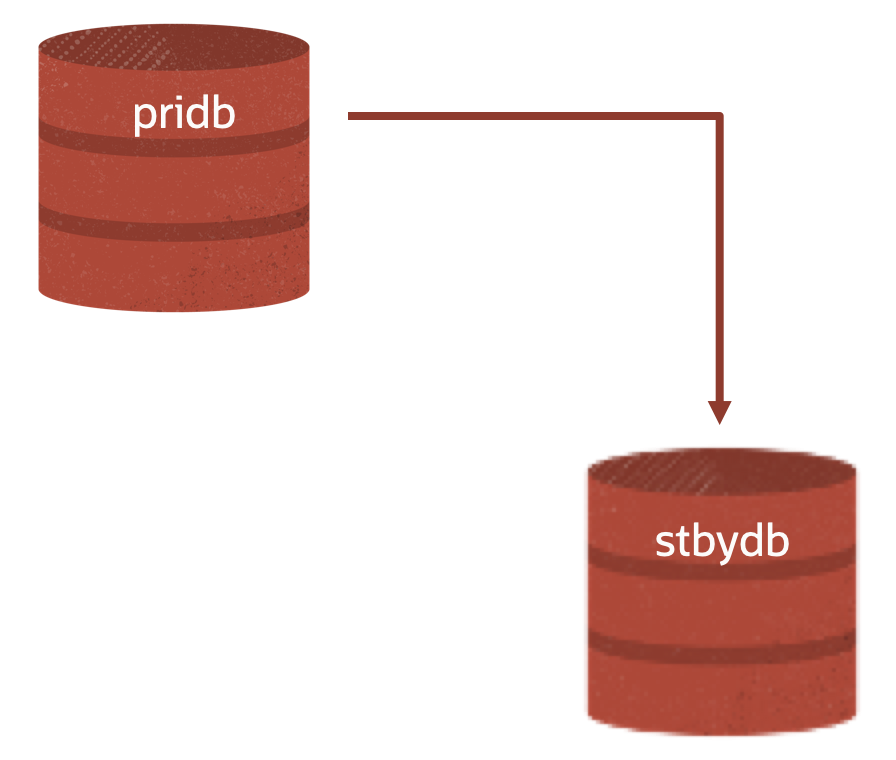
Given that stbydb is an (Active) Data Guard Standby, the db_name for both the standby AND the primary is cdb19.
Inspecting Data Guard Broker also gives us some useful information – namely that our two databases are in-sync with no Transport or Apply Lags:
DGMGRL> show database stbydb

Database - stbydb

  Role:               PHYSICAL STANDBY
  Intended State:     APPLY-ON
  Transport Lag:      0 seconds (computed 0 seconds ago)
  Apply Lag:          0 seconds (computed 1 second ago)
  Average Apply Rate: 4.00 KByte/s
  Real Time Query:    ON
  Instance(s):
    stbydb1 (apply instance)
    stbydb2

Database Status:
SUCCESS
Stop Redo Apply on the DG Standby for Sparse Clones
So let’s proceed with Step 1
This is a relatively simple step, one which stops the standby instance (instances if you are on 18c and higher using the Multi-Instance Redo Apply or MIRA feature) from applying redo data received by the RFS process. RFS still receives these vectors and writes them to the Standby Redo Logs for future use. Stopping the redo from being applied is crucial as the database needs to be in a consistent state before we can create a sparse snapshot. Stopping redo apply is as simple as changing the database state in Data Guard Broker
DGMGRL> edit database stbydb set state='APPLY-OFF';
Before we move on to step 2, we need to create SQL script that performs the sparse clone operation.
Using SQL similar to the following – changing the names of the DATA and SPARSE disk groups as appropriate, and changing the x at the end of the second parameter to be a meaningful number (we’ve used ascending numbers starting from 0 so that you know how many time periods along the chain you are.
set newpage 0 linesize 999 pagesize 0 feedback off heading off echo off space 0 tab off trimspool on
SPOOL rename_files.sql
select 'EXECUTE dbms_dnfs.clonedb_renamefile ('||''''||name||''''||','||''''||replace(replace(name,'.','_'),'DATA/','SPARSE/')||'_Tx'''||');' from v$datafile;
EXIT
– you will generate a series of statements that look like this for each data file in your database (both the CDB and all its PDBs)
EXECUTE dbms_dnfs.clonedb_renamefile ('+DATA/STBYDB/DATAFILE/system.257.865863315','+SPARSE/STBYDB/DATAFILE/system_257_865863315_T0');
Put this file somewhere safe for execution in Step 4.
You should also generate a script to change the permissions on the current standby datafiles to READ ONLY.
set newpage 0 linesize 999 pagesize 0 feedback off heading off echo off space 0 tab off trimspool on
SPOOL set_datafiles_read_only.sql
SELECT distinct 'ALTER DISKGROUP '||substr(name,2,regexp_instr(name,'\/')-2)||' set permission owner=read only, group=read only, other=none for file '''||name||''';' from v$datafile;
EXIT
The output of which looks like this, again for every datafile in your database:
ALTER DISKGROUP DATAC1 set permission owner=read only, group=read only, other=none for file ‘+DATA/STBYDB/DATAFILE/system.257.865863315’;
We’ll use this script in step 3
Shutdown the Standby Database
Being seasoned Exadata and Oracle Database professionals, this should be bread and butter for all of us! Just make sure you are in the correct environment – and working with the Standby Database. This step is non-trivial however – consistent datafiles are crucial for Exadata Sparse Snapshots and for the Test Masters to be opened as read only databases.
$ORACLE_HOME/bin/srvctl stop database -d stbydb -o normal
Change the ACLs for the standby database datafiles to be READ ONLY
Next, we head into ASM and run the script set_datafiles_read_only.sql script we generated in Step 1. If you have configured your environment using role separation, or are using Exadata Cloud Service or Exadata Cloud@Customer, you’ll need to switch to the ASM/GI OS user – usually ‘grid’ – and start sqlplus as sysasm.
$ORACLE_HOME/bin/sqlplus / as sysasm
@set_datafiles_read_only.sql
exit
This will execute all those ‘ALTER DISKGROUP … SET PERMISSION OWNER=READ ONLY…’ statements in ASM and prevent the datafiles from being written to.
Create a sparse clone of the standby database which points back to the original standby datafiles you just set to READ ONLY
We can now restart one Standby Instance in MOUNT mode and then create the new sparse datafiles that Data Guard will write updates into. Note here that we are reusing the controlfile, parameterfile, instance(s) and Data Guard configuration , we are just telling the database to write new data to sparse datafiles.
$ORACLE_HOME/bin/srvctl start instance -db stbydb -instance sybydb1 -o mount
We the connect to the instance and execute our rename_files.sql script. It is at this point that the Sparse Standby datafiles are created and the controlfile is updated.
$ORACLE_HOME/bin/sqlplus / as sysdba
@rename_files.sql
exit
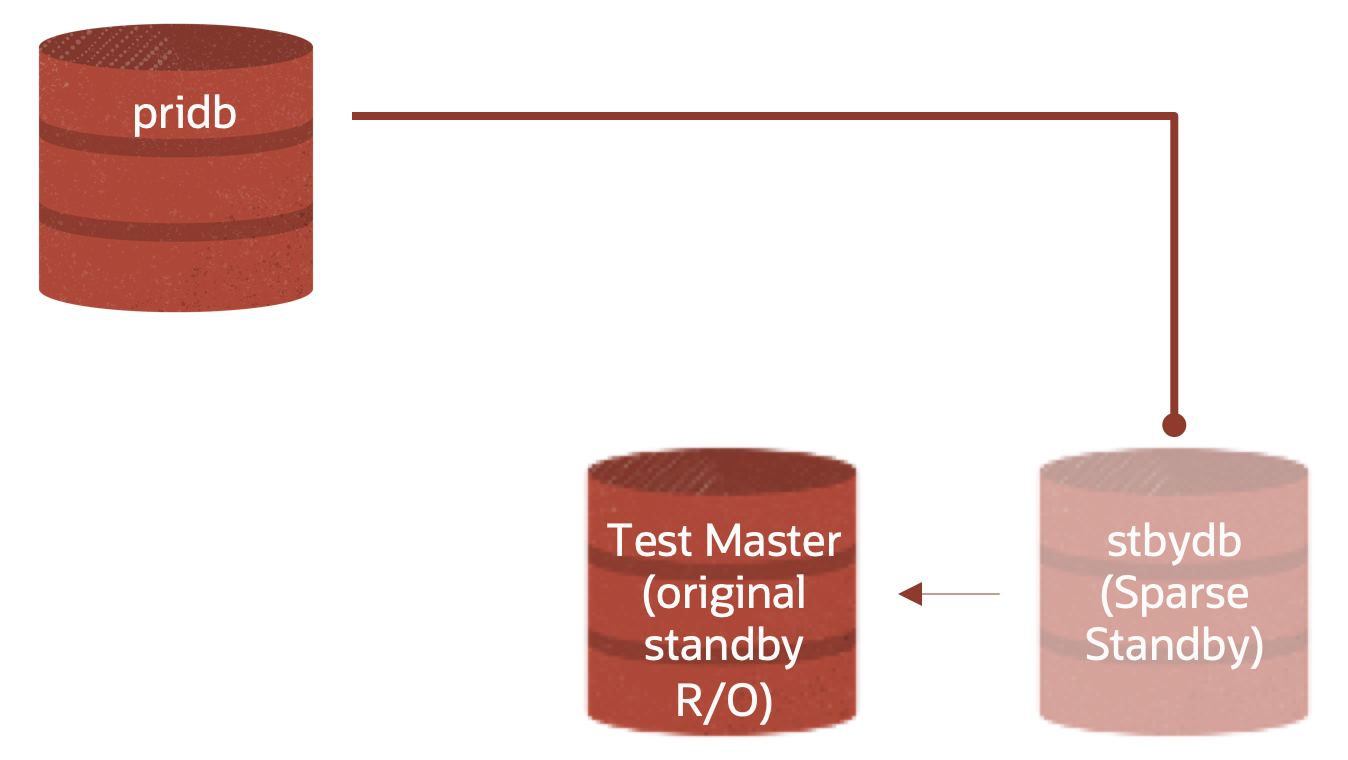
At this point we have the following. Note that the connector from the pridb into stbydb is terminated by a round terminator and not an arrow, this is to indicate that REDO APPLY is still OFF at this point.
Restart the Standby Database
We can now open the standby database
$ORACLE_HOME/bin/sqlplus / as sysdba
alter database open read only;
exit
And then start any other instances associated with the database (we’re assuming this is a RAC Standby Database)
$ORACLE_HOME/bin/srvctl start instance -db stbydb -instance stbydb2
Restart Redo Apply
Finally, we restart redo apply using Data Guard Broker
DGMGRL> edit database stbydb set state='APPLY-ON';
And check our configuration. It should look like this again.
DGMGRL> show database stbydb

Database - stbydb

  Role:               PHYSICAL STANDBY
  Intended State:     APPLY-ON
  Transport Lag:      0 seconds (computed 0 seconds ago)
  Apply Lag:          0 seconds (computed 1 second ago)
  Average Apply Rate: 4.00 KByte/s
  Real Time Query:    ON
  Instance(s):
    stbydb1 (apply instance)
    stbydb2

Database Status:
SUCCESS
The time needed to return to this state will depend on how much redo was accumulated in the time between stopping and restarting redo apply in Step 4.
Next Steps
So what do you do now? As you saw above, creating Sparse Standby Databases is just the beginning of a database cloning strategy. On a regular basis – monthly, weekly, daily, multiple times a day – you may repeat the process above to create new Sparse Standby datafiles and a new Sparse Test Masters.

You can then also create Sparse Clones and Hierarchical Sparse Clones from any of the READ ONLY Test Masters and Sparse Test Masters as needed bringing us back to the complete vision we saw earlier.

Final comments
You should keep the number of links in a chain – that is a sparse datafile → sparse datafile → … → regular datafile in the DATA diskgroup to less than 10. This is a pragmatic recommendation as each block that is not found in one sparse file, means a subsequent IO is required to its parent file and so on until the initial datafile is reached. So, if you have a Sparse Standby that has eight (8) sparse clones or sparse standby datafiles between it and the initial datafile, you could be performing up to 10 read IOs IF the block you want to read (and potentially update) hasn’t been written to a sparse datafile somewhere in between.
If required, and we don’t know of any environment where this isn’t true, you can incorporate Data Masking into the overall scenario by either converting the Standby Database into a Data Guard Snapshot (different usage of the word Snapshot) Standby, or by masking data in a Sparse Clone directly and then creating Hierarchical Clones from the Masked Sparse Test Master.
You will also need to consider either refreshing the initial Standby for Sparse Clone Database – using RMAN – and/or creating a new “full” standby to start the whole process from the start while at the same time disconnecting the first series of Sparse Standby and any sparse clones from receiving new redo vectors from the primary database.
Resources & Further Reading
In addition to the above, you may find the following useful:
Exadata System Software User Guide – Chapter 3 – Administering ASM
Exadata System Software User Guide – Chapter 9 – Exadata Snapshots
Exa-Byte: Using OEDACLI to create ASM Diskgroups
Conclusion
With any luck, this gives you a working overview of how Exadata Sparse Standby Snapshots works and the potential they have for enabling development, testing, and production support teams to have access to current (and secure) data using Exadata Sparse Snapshots.
Database clones – thin provisioning or database virtualization even – may be one of the largest opportunities for capital expenditure and operational cost savings. Sparse clones are one way in rapidly thin provision databases. There are others that may fit your use case, but from Exadata technology standpoint, Sparse Clones provide an optimal way to create sparse clones AND leverage the underlying Exadata features (Smart Scan, Storage indexes, PMEM data and commit accelerators etc..)
If you find this blog interesting or need further assistance, please reach out to Alex (@alex_blyth) or myself (@marutis)

