Originally published December 2, 2021
Introduction
Exadata Sparse Clones (also known as Exadata Sparse Snapshots) is a native feature of Exadata that enables the creation of thinly provisioned databases – both pluggable and full – for non-production purposes like development and testing. The key point to make here is that Sparse Clones on Exadata are database aware – that is to say, deeply integrated with both the Exadata System Software and the Oracle Database – as we will explore during this post.
Database clones are needed to allow organizations to test and develop against production-like database environments. Sometimes the volume of data is important, other times less so. Sometimes each developer should have (or wants) a separate environment for their work before code is moved into system test, integration, performance test environments. Some use cases for database clones may have nothing to do with development or testing – at least not in the IT sense of these terms – some organizations may want to furnish their analysts with a database for what/if analysis or model training, tuning, etc without impacting their production database. Source
In the context of PDB Sparse Clones, each PDB effectively has access to all the data within its parent, and only the changed data is written to the Sparse PDB datafiles. The upshot of this is that you can provide databases that have production sized data (masked in the parent for security) and access all the performance features of Exadata – win-win!
As I mentioned, we can create sparse clones of PDBs or “full” databases, meaning either non-CDB (11gR2 – 19c) Databases or a CDB and all its associated PDBs (12cR1 – 21c). I’m going to focus solely on PDBs in this post and cover full database clones in a future walkthrough.
Before we begin, let’s cover off a little prework that needs to be done. First, we need a SPARSE ASM diskgroup on our Exadata. As the name hopefully suggests, the SPARSE diskgroup is going to house the Sparse clone (and clones of clones, and clones of clones of clones…) that we create.
But why do we need a separate ASM diskgroup? I’m glad you asked. A Sparse diskgroup on Exadata executes specific code that links the thinly provisioned (sparse) datafiles we will be creating for our clones, with their fully provisioned datafiles parents that belong to the PDB we are cloning – we’re going to call this the PARENT. The PARENT is a regular PDB and is typically located on the diskgroup. Sparse diskgroups use sparse grid disks which have a physical size (like regular grid disks) and a virtual size.
Be aware, however, that the maximum aggregate physical size for sparse grid disks on a single cell disk is 4TB and the corresponding maximum aggregate virtual size per grid disk is 100TB.
For example, on a single X9M High Capacity Storage Server, we could have a single 4TB Sparse grid disk per cell disk giving us 48TB physically allocated to sparse grid disks, which would equate to up to 1200TB of virtual space – best practice is to use a 10:1 (virtual to physical) ratio, giving us 480TB of virtual space. Note I am NOT accounting for ASM redundancy yet – we still need to mirror the sparse diskgroup(s) just like any other diskgroup and we (Oracle) recommend High Redundancy. Meaning on a Quarter rack of Exadata X9M High Capacity, we could allocate up to 48TB physical and 480TB virtual space for our sparse diskgroups using our best practice 10:1ratio.
How much physical and virtual space do I need? I hear you asking… Good question – the Chapter 10 of the Exadata System Software Users Guide has a great guide with formulas that will help you determine these answers.
How do you create a sparse diskgroup? At this juncture, I’m going to direct you to MOS Note – 2176737.1. This note will show you how to resize an existing diskgroup and its grid disks to make space for the sparse grid disks and diskgroup. Creating new grid disks and diskgroups is covered in Chapter 3 of the Exadata System Software Users Guide. You can also use OEDACLI to achieve the same outcome – which will automatically apply the best practice for virtual space sizing. Take a read of this post for a quick run though using OEDACLI to create new griddisks and ASM Diskgroups.
I mentioned that the sparse datafiles are “linked” to their parent datafiles. Let’s take a quick look at the structure of a sparse datafile.
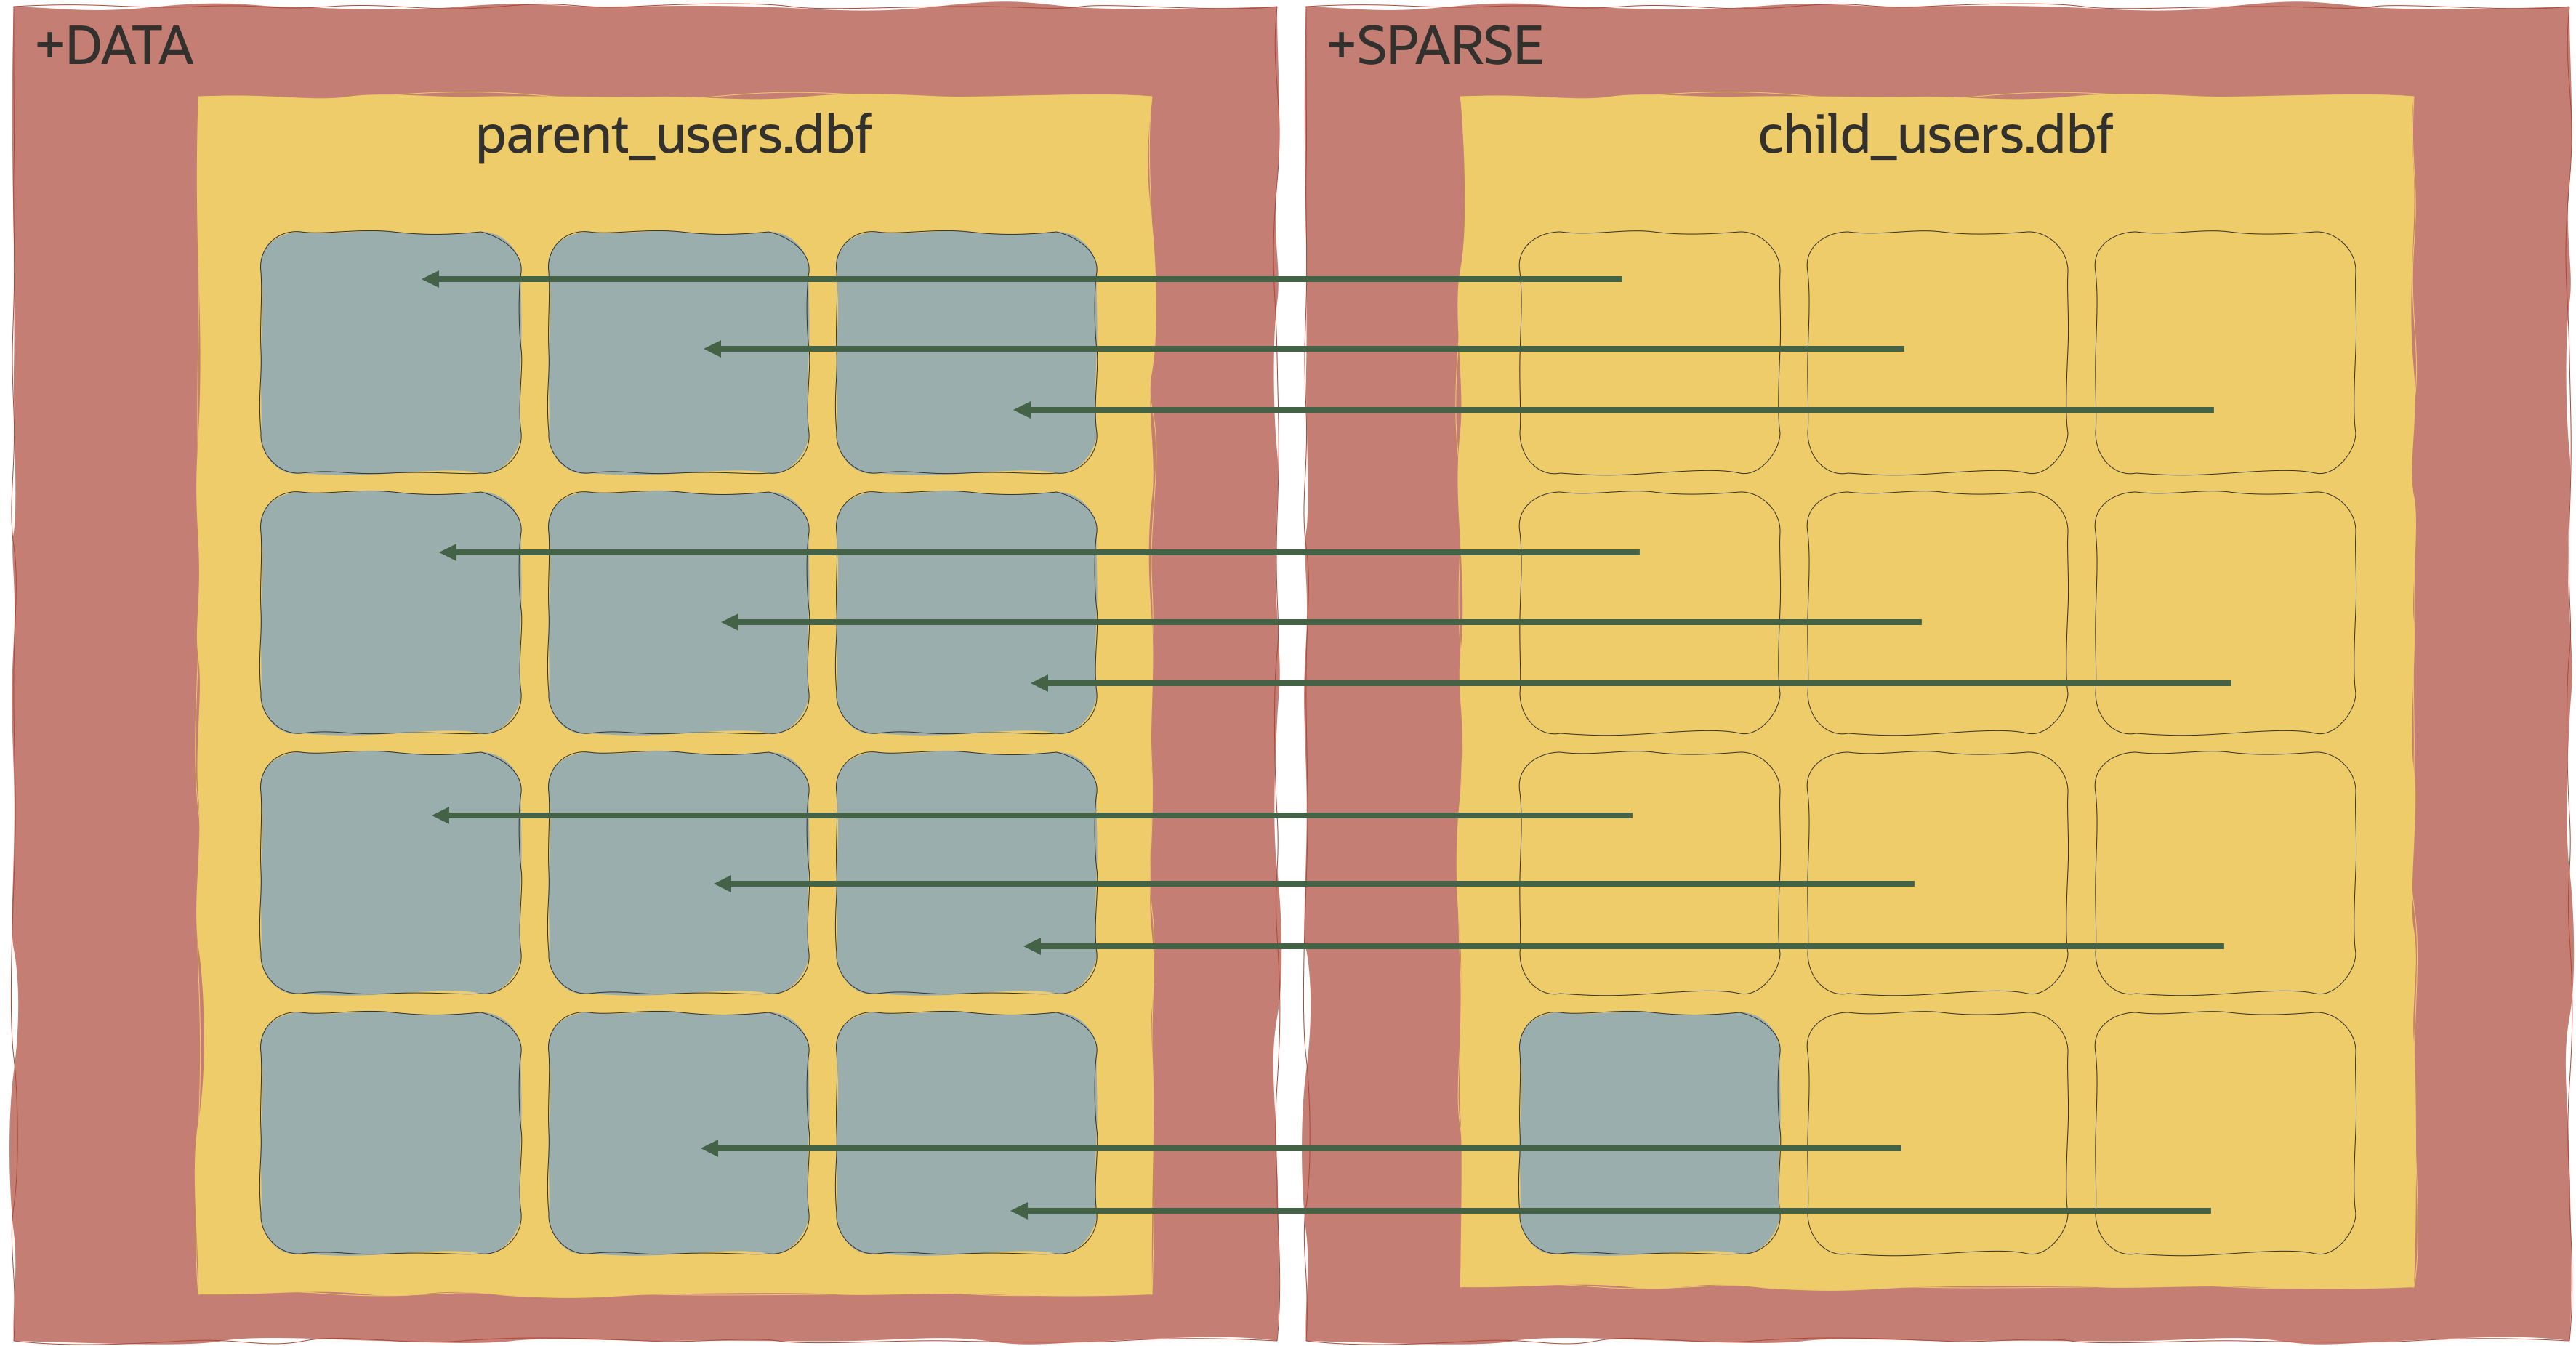
What you will hopefully notice is that each of the Oracle blocks on the right-hand side (represented by blue outlines) has a pointer to a real Oracle block on the left-hand side (represented by the blue blocks). This is indicating when a read is requested for a block on the sparse diskgroup, ASM will point that read to the real block if it isn’t present on the sparse diskgroup. You’ll also notice that there is a “real” block in the bottom left of the child_users.dbf file. When a write to a sparse datafile occurs, the original block from the parent is copied to the sparse diskgroup by DBRW and any future head of that block comes from the sparse diskgroup.
So before we get our hands dirty creating Sparse PDB Clones, you can already see the space-efficiency of Exadata Sparse Clones!
Before going any further, I need to make one thing clear – any database or PDB that is acting as a parent (Test Master in the old terminology) must be Read Only. If you look again at the diagram above, if the source blocks in the parent were changed, we’d have to copy that block into the sparse diskgroup which will erode the space efficiency. I alluded to “clones of clones” earlier (also known as hierarchical clones), meaning that a Sparse Clone can also be a Parent to further sparse clones. This would be for the purposes of say, masking data or deploying a schema change that you then want picked up by all clones below that point.
Now let’s “map” out what we are going to do for the remainder of the post.
- Set up access control in the DATAC1 & +SPARSC1 Diskgroups
- Create a PDB to act as the Parent (Test Master).
- Inject some data into the Parent
- Close and re-open Parent READ ONLY
- Create a Sparse Clone PDB from the Parent
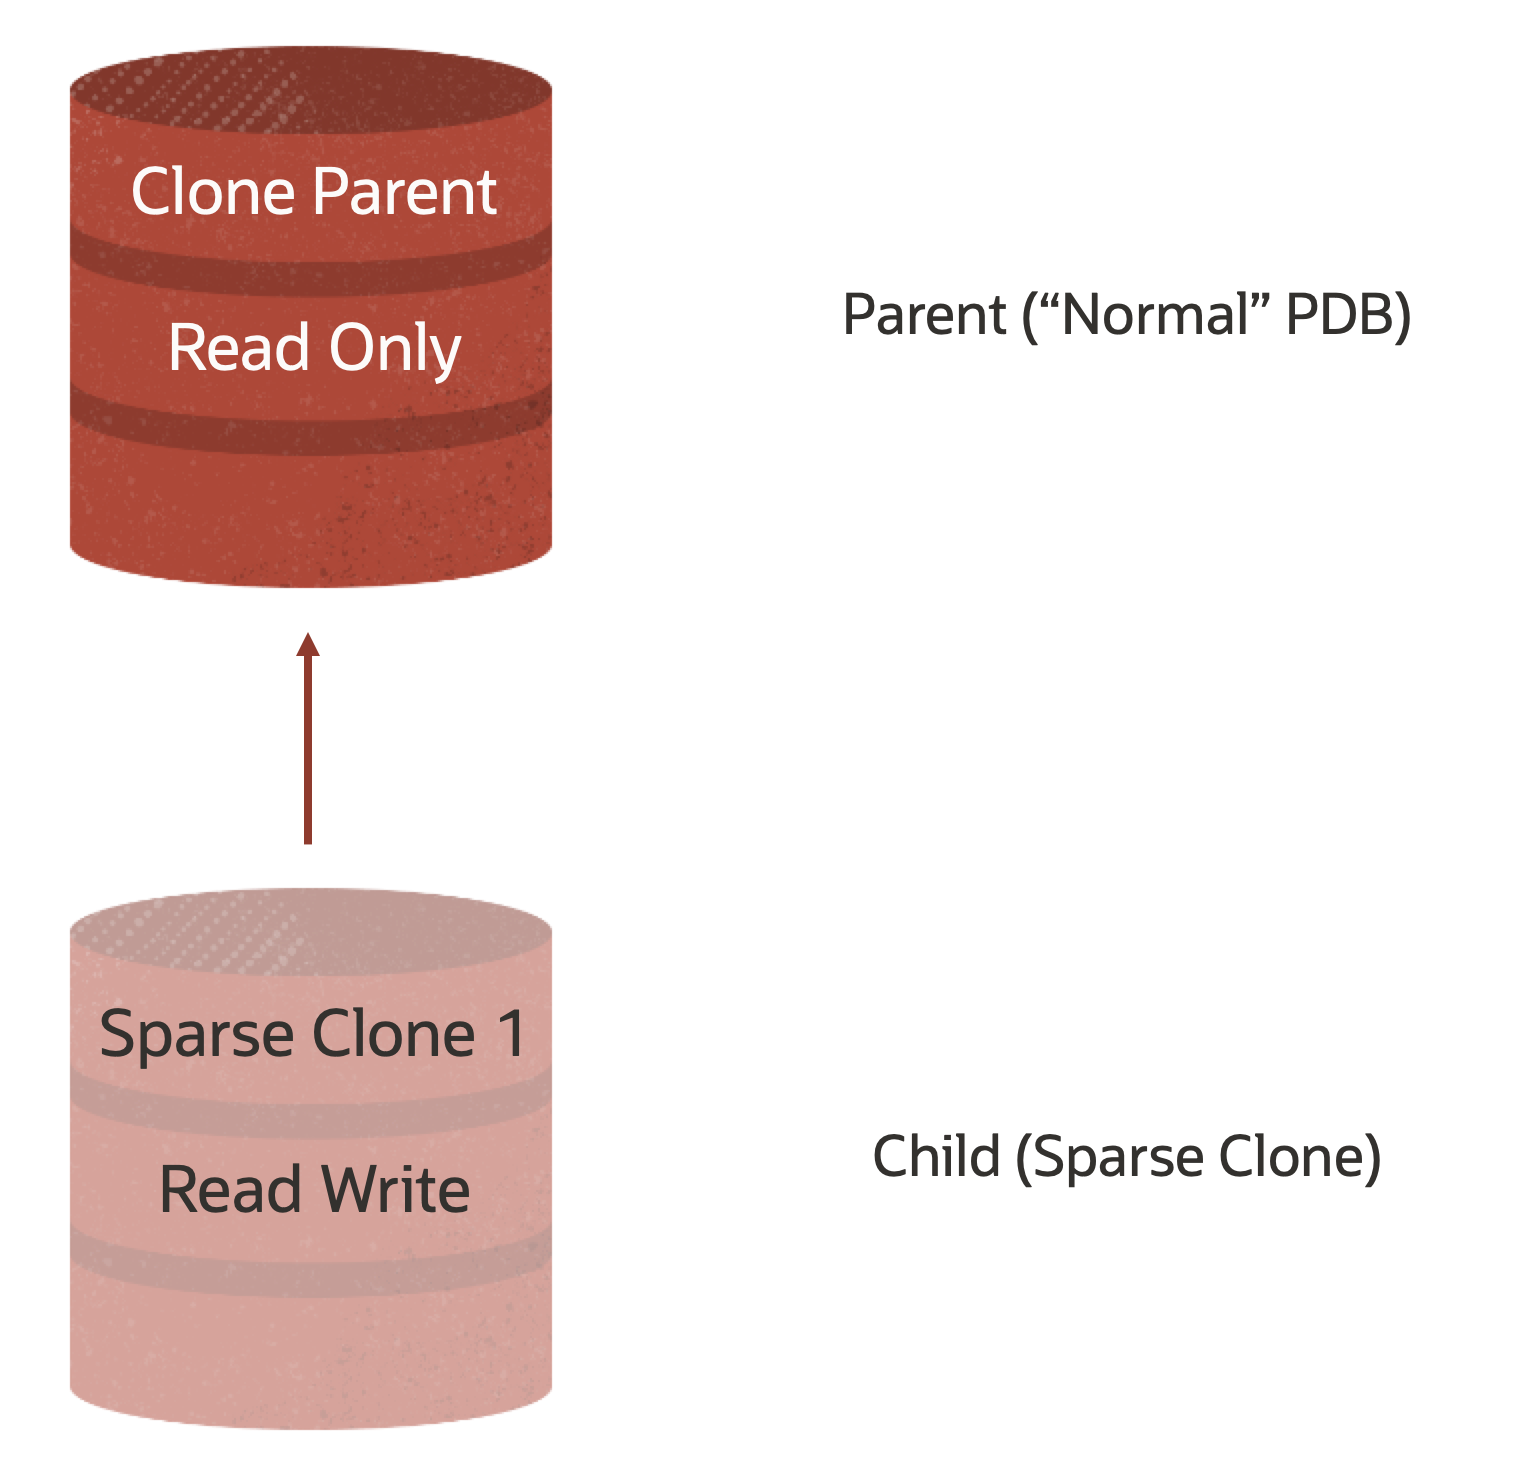
At this point, we should have the following structure – note that I am not showing the CDB in this view.
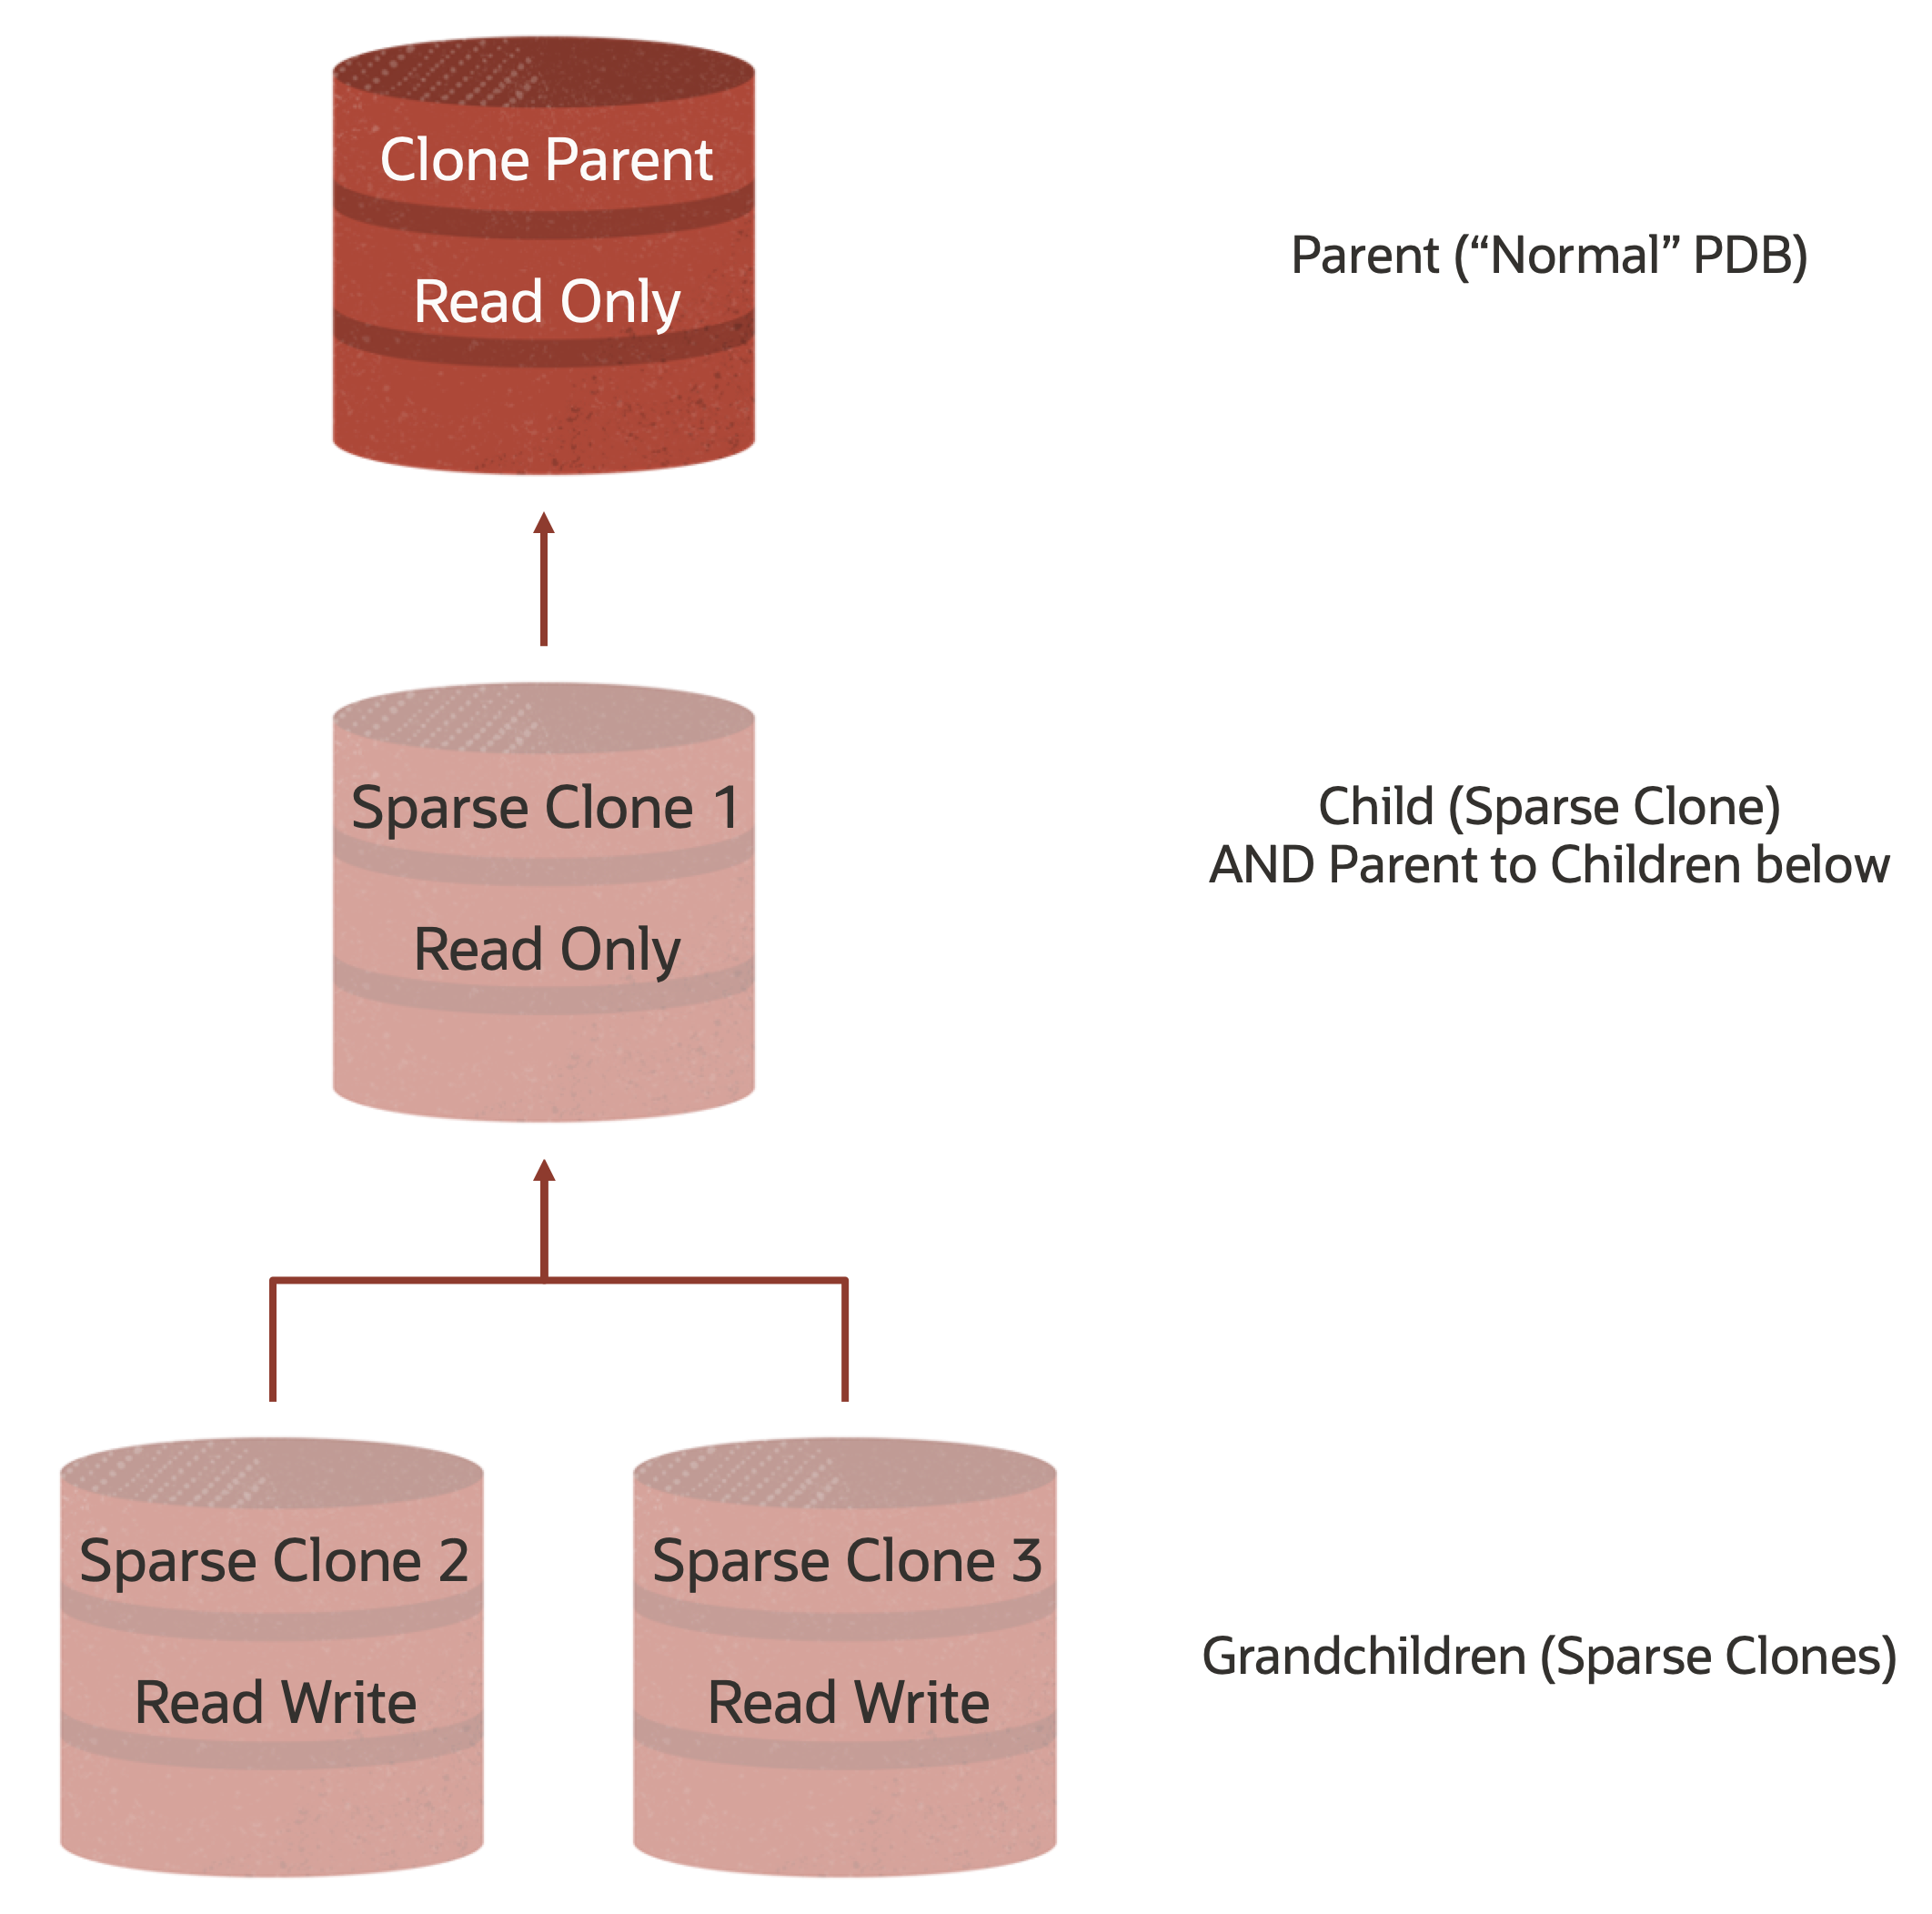
We are then going to repeat the process and create two more Clones, this time hierarchical clones that use the first Sparse Clone as their Parent.
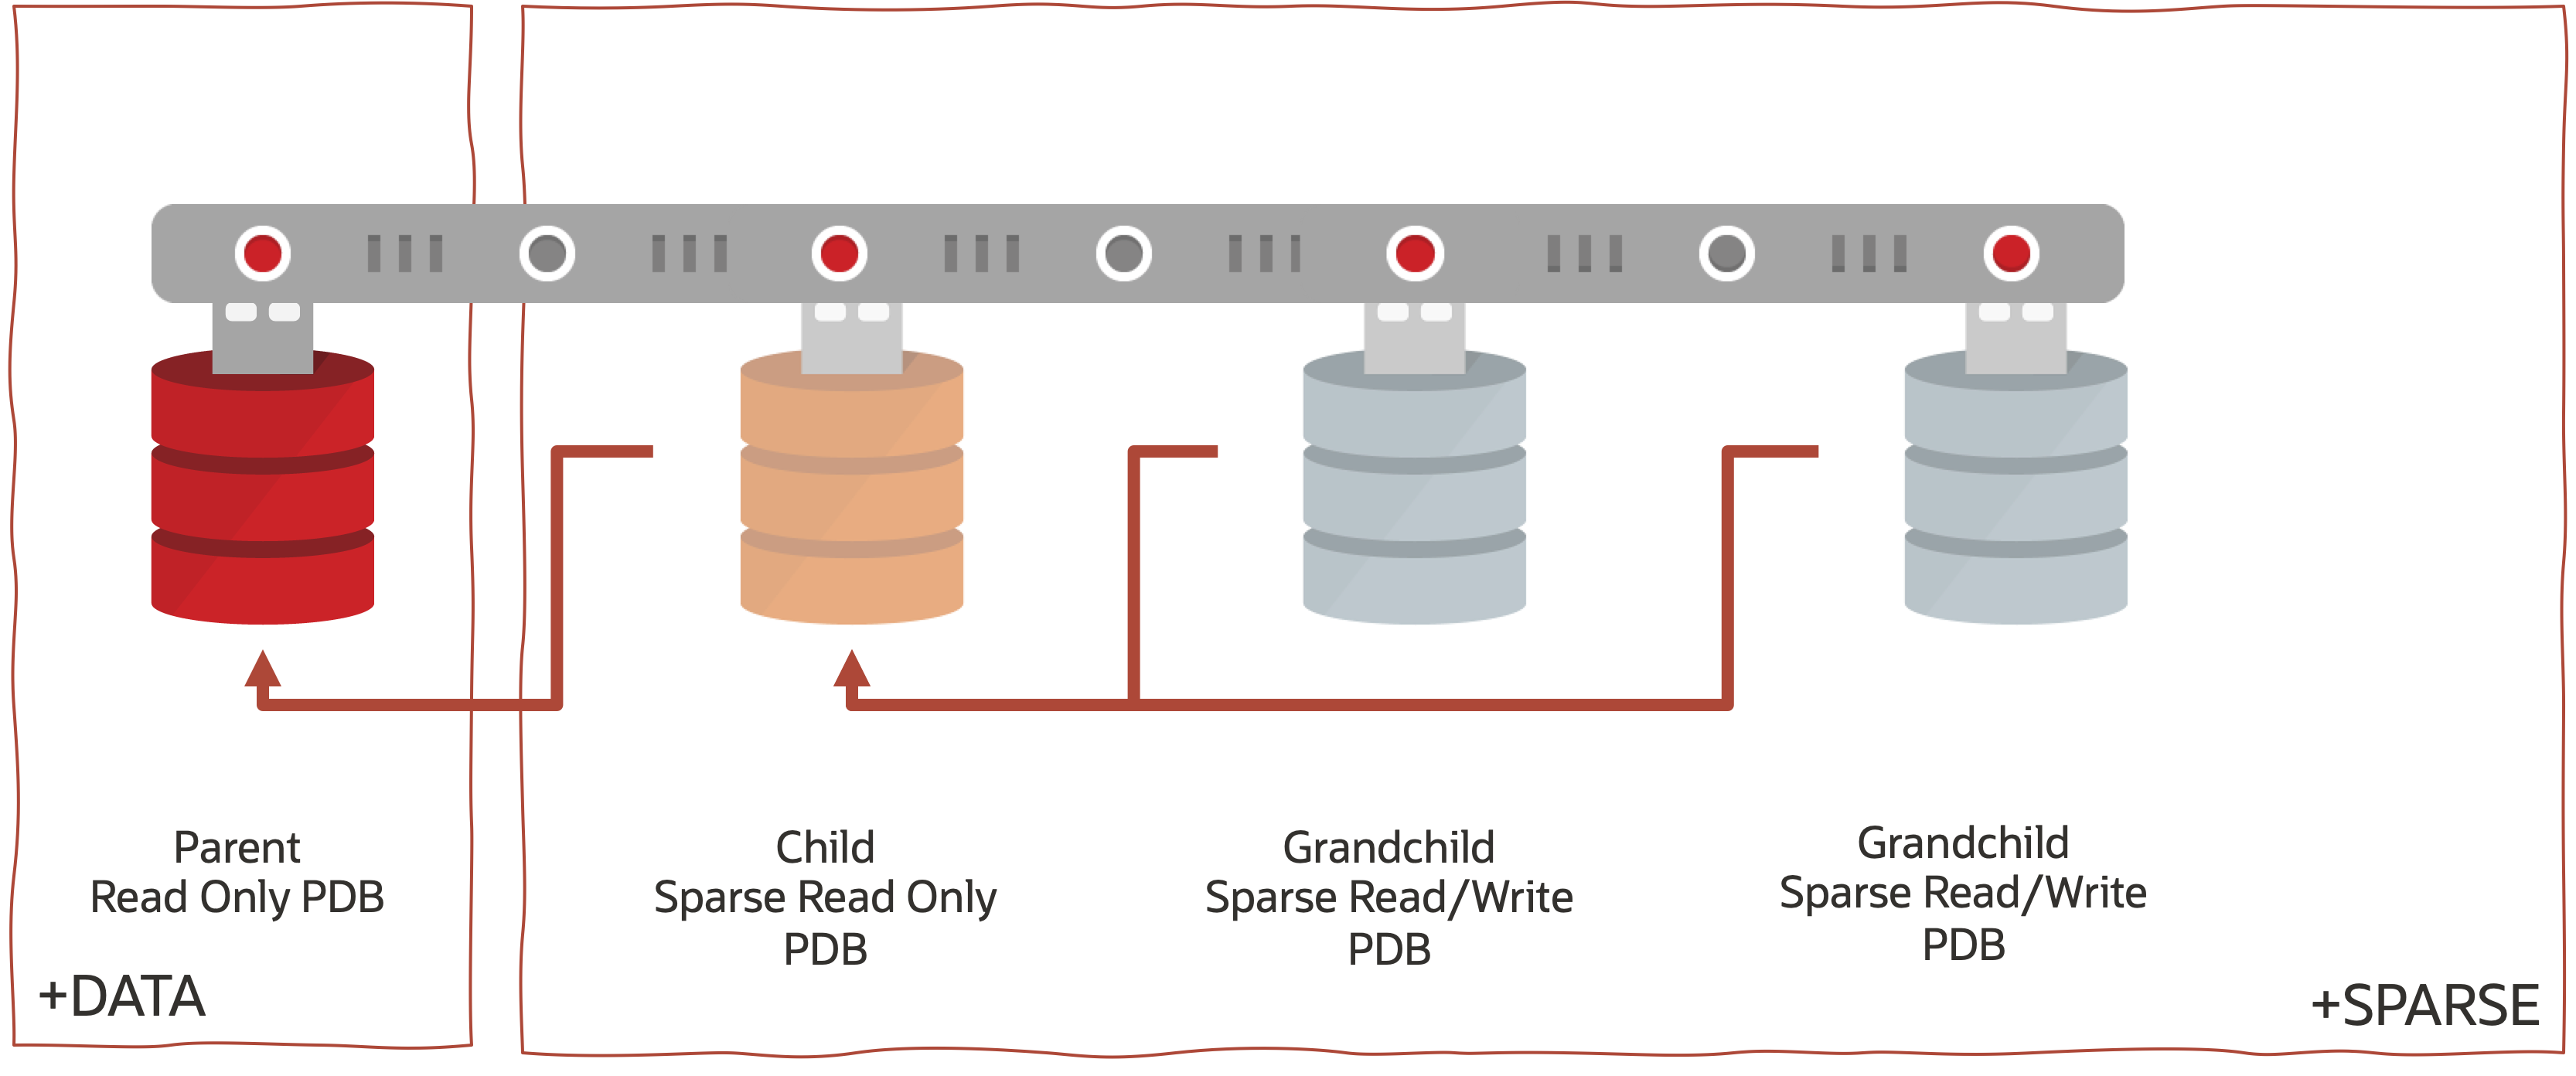
Putting this in the context of a the Oracle Multitenant architecture we will end up with the following – the red lines denoting the IO path from each sparse PDB clone all the way back to the Parent PDB in the DATA diskgroup:
Lets (finally) begin.
ASM Access Control
Sparse Clones require that we set up ASM Access control for the diskgroups that we will be housing Clone Parents. In our case, as we are planning on creating some hierarchical clones, we need to do this in both the +DATAC1 AND +SPARSC1 Diskgroups.
To do this, we go connect to the ASM instance:
sqlplus / as sysasmand run set the access_control.enabled attribute to TRUE
SQL> alter diskgroup DATAC1 set attribute 'access_control.enabled' = 'true';
SQL> alter diskgroup SPARSC1 set attribute 'access_control.enabled' = 'true';
While we are here, we also need to tell ASM who owns any newly created file in the diskgroups – would be hard to enforce access control if no owner is assigned.
SQL> alter diskgroup DATAC1 add user 'oracle';
SQL> alter diskgroup SPARSC1 add user 'oracle';
Next, we tell ASM who owns the datafiles for the existing CDB and PDBs we are working with. Connecting to the CDB$ROOT, we can use the following SQL to generate the required alter diskgroup commands
SQL> select 'alter diskgroup '||substr(file_name,2,regexp_instr(file_name,'\/')-2)||' set ownership owner=''oracle'' for file '''||file_name||''';' as cmd from containers(dba_data_files);This should give you something similar to:
alter diskgroup DATAC1 set ownership owner='oracle' for file '+DATAC1/CDB1DB5/DATAFILE/system.262.1081269351';
alter diskgroup DATAC1 set ownership owner='oracle' for file '+DATAC1/CDB1DB5/DATAFILE/sysaux.264.1081269355';
alter diskgroup DATAC1 set ownership owner='oracle' for file '+DATAC1/CDB1DB5/DATAFILE/undotbs1.266.1081269357';
alter diskgroup DATAC1 set ownership owner='oracle' for file '+DATAC1/CDB1DB5/DATAFILE/undotbs2.270.1081269377';
alter diskgroup DATAC1 set ownership owner='oracle' for file '+DATAC1/CDB1DB5/DATAFILE/users.271.1081269377';
alter diskgroup DATAC1 set ownership owner='oracle' for file '+DATAC1/CDB1DB5/DATAFILE/soe_ts.286.1081323253';
alter diskgroup DATAC1 set ownership owner='oracle' for file '+DATAC1/CDB1DB5/DATAFILE/otn_ts2.289.1085263559';
alter diskgroup DATAC1 set ownership owner='oracle' for file '+DATAC1/CDB1DB5/D05FA6C6D11BF1F7E053CE421F0A656F/DATAFILE/system.402.1088159855';
alter diskgroup DATAC1 set ownership owner='oracle' for file '+DATAC1/CDB1DB5/D05FA6C6D11BF1F7E053CE421F0A656F/DATAFILE/sysaux.401.1088159855';
alter diskgroup DATAC1 set ownership owner='oracle' for file '+DATAC1/CDB1DB5/D05FA6C6D11BF1F7E053CE421F0A656F/DATAFILE/undotbs1.411.1088159855';
alter diskgroup DATAC1 set ownership owner='oracle' for file '+DATAC1/CDB1DB5/D05FA6C6D11BF1F7E053CE421F0A656F/DATAFILE/data_ts.412.1088159877';
These alter diskgroup commands then get executed back in ASM
sqlplus / as sysasm
SQL*Plus: Release 21.0.0.0.0 - Production on Thu Nov 11 20:51:46 2021
Version 21.3.0.0.0
Copyright (c) 1982, 2021, Oracle.  All rights reserved.

Connected to:
Oracle Database 21c Enterprise Edition Release 21.0.0.0.0 - Production
Version 21.3.0.0.0
SQL> alter diskgroup DATAC1 set ownership owner='oracle' for file '+DATAC1/CDB1DB5/DATAFILE/system.262.1081269351';
Diskgroup altered.
SQL> alter diskgroup DATAC1 set ownership owner='oracle' for file '+DATAC1/CDB1DB5/DATAFILE/sysaux.264.1081269355';
Diskgroup altered.
... - Truncated for readability
SQL> alter diskgroup DATAC1 set ownership owner='oracle' for file '+DATAC1/CDB1DB5/D05FA6C6D11BF1F7E053CE421F0A656F/DATAFILE/undotbs1.411.1088159855';
Diskgroup altered.
SQL> alter diskgroup DATAC1 set ownership owner='oracle' for file '+DATAC1/CDB1DB5/D05FA6C6D11BF1F7E053CE421F0A656F/DATAFILE/data_ts.412.1088159877';
Diskgroup altered.
Create a “normal” PDB and add some data
There are a plethora of ways that we might create the PDB we will use as the ultimate parent of our sparse PDBs. We can use PDB Hot Clones from a production database, GoldenGate, Data Guard, Goliath Snail (not a real product, but maybe it should be).
In this instance, we are going to create our PDB the way Patrick Wheeler intended:
SQL> create pluggable database PARENT_PDB admin user admin identified by welcome1;

SQL> alter pluggable database PARENT_PDB open;
This will create and open (read/write) a pluggable database called PARENT_PDB in the +DATAC1 diskgroup. How do I know it’s going to be in the +DATAC1 diskgroup? Because the db_create_file_dest parameter tells me so
SQL> show parameter db_create_file_dest

NAME                                 TYPE        VALUE
------------------------------------ ----------- ------------------------------
db_create_file_dest                  string      +DATAC1
Alrighty then, let’s add some data. Really this is so we can satisfy ourselves that the PDB has some data other than the dictionary AND that cloning the PDB does what it should and direct IO to it if it’s not found in the SPARSE Diskgroup.
SQL> alter session set container=PARENT_PDB;

SQL> create tablespace data_ts datafile '+DATAC1' size 100M autoextend on next 100M maxsize 1G ;

SQL> create table sample_table tablespace data_ts as select * from dba_objects;

SQL> commit;
At this point, we have the following PDBs in our CDB
SQL> show pdbs

CON_ID     CON_NAME                       OPEN MODE  RESTRICTED
---------- ------------------------------ ---------- ----------
2          PDB$SEED                       READ ONLY  NO
4          PARENT_PDB                     READ WRITE NO
We’re now going to close and reopen the PARENT_PDB PDB in Read-Only mode thereby preparing it to be Clone Parent for our subsequent Sparse Clones. Note the very last line in the output below (I think the rest of the output is pretty self explanatory) – PARENT_PDB is now Open READ ONLY
SQL> alter session set container=cdb$root;

Session altered.

SQL> alter pluggable database PARENT_PDB close IMMEDIATE instances=all;

Pluggable database altered.

SQL> show pdbs

CON_ID     CON_NAME                       OPEN MODE  RESTRICTED
---------- ------------------------------ ---------- ----------
2          PDB$SEED                       READ ONLY  NO
4          PARENT_PDB                     MOUNTED


SQL> alter pluggable database PARENT_PDB open read only instances=all;

Pluggable database altered.

SQL> show pdbs

CON_ID     CON_NAME                       OPEN MODE  RESTRICTED
---------- ------------------------------ ---------- ----------
2          PDB$SEED                       READ ONLY  NO
4          PARENT_PDB                     READ ONLY  NO
Before we go creating any new PDBs, its worth noting that the ‘alter pluggable database <db_name> open read only’ command not only tells the CDB that the PDB is read only, but it also instructs ASM to modify the file permissions for the datafiles to also be set to Read Only. This is a safety feature designed to prevent someone from deleting or otherwise manipulating the datafiles directly in ASM. Remember that the Parent PDB need not be OPEN to have IO directed at it from a SPARSE PDB, so we need to make sure the files are there even if the PDB is only in MOUNT state.
And we finally arrive at the moment you’ve been waiting for – creating our first SPARSE PDB! Oh, the anticipation!!!!
SQL> create pluggable database CHILD_PDB from PARENT_PDB create_file_dest='+sparsc1' SNAPSHOT COPY;

SQL> alter pluggable database CHILD_PDB open instances=all;

SQL> show pdbs

CON_ID     CON_NAME                       OPEN MODE  RESTRICTED
---------- ------------------------------ ---------- ----------
2          PDB$SEED                       READ ONLY  NO
4          PARENT_PDB                     READ ONLY  NO
5          CHILD_PDB                      READ WRITE NO
As you can see, creating a SPARSE PDB is VEEEEEEERRRRRRRRYYYYYYYYY similar to creating a regular PDB. But wait!!! Whats that create_file_dest and snapshot copy business? Thats new…
Not really, create_file_dest in the instance simply overrides the same parameter from the init.ora parameters – in this case, I’m telling the database to use the +SPARSE diskgroup. But when this is used in combination with the SNAPSHOT COPY command, we are telling the database to create a SPARSE CLONE. SNAPSHOT COPY is used to instruct the database to create a thin clone of the PDB using the storage snapshots – on Exadata, that means using either SPARSE diskgroups, or ACFS (but that’s for another day).
If we interrogate both the PARENT_PDB and CHILD_PDB PDBs, we can check that the same data exists in both
SQL> alter session set container=PARENT_PDB;

Session altered.


SQL> select count(*) from sample_table;

  COUNT(*)

----------

     24489

SQL> alter session set container=CHILD_PDB;

Session altered.

SQL> select count(*) from sample_table;

  COUNT(*)

----------

     24489
We can insert some more data into CHILD_PDB – just in case you don’t believe me – and try to do the same in the READ ONLY PARENT_PDB PDB. No prizes for guessing what’s going to happen.
SQL> alter session set container=CHILD_PDB;

Session altered.

SQL> insert into sample_table select * from sample_table;

24489 rows created.

SQL> commit;

Commit complete.


SQL> select count(*) from sample_table;

  COUNT(*)
----------
     48978

SQL> alter session set container=PARENT_PDB;

Session altered.

SQL> insert into sample_table select * from sample_table;

insert into sample_table select * from sample_table

            *

ERROR at line 1:

ORA-16000: database or pluggable database open for read-only access

SQL> rollback;

Rollback complete.
Alright, I can tell you’re impressed but need more! Ok, you got it.
Let’s get to the penultimate phase – creating Hierarchical Clones. Or Clones of clones if you’ve forgotten what hierarchical clones means. We’re going to use our CHILD_PDB PDB as the parent of our next level of Sparse PDBs, so we need to prepare it and re-open it READ ONLY, just like we did with the PARENT_PDB PDB.
SQL> alter session set container=cdb$root;

Session altered.

SQL> show pdbs

CON_ID     CON_NAME                       OPEN MODE  RESTRICTED
---------- ------------------------------ ---------- ----------
2          PDB$SEED                       READ ONLY  NO
4          PARENT_PDB                     READ ONLY  NO
5          CHILD_PDB                      READ WRITE NO

SQL> alter pluggable database CHILD_PDB close immediate instances=all;

Pluggable database altered.

SQL> alter pluggable database CHILD_PDB open read only instances=all;

Pluggable database altered.

SQL> show pdbs

CON_ID     CON_NAME                       OPEN MODE  RESTRICTED
---------- ------------------------------ ---------- ----------
2          PDB$SEED                       READ ONLY  NO
4          PARENT_PDB                     READ ONLY  NO
5          CHILD_PDB                      READ ONLY  NO
Next we create a new PDB, called G_CHILD_PDB1, using the SPARSE diskgroup and the SNAPHOT COPY command
SQL> create pluggable database G_CHILD_PDB1 from CHILD_PDB create_file_dest='+sparsc1' SNAPSHOT COPY;

Pluggable database created.

SQL> alter pluggable database G_CHILD_PDB1 open instances=all;

Pluggable database altered.

SQL> show pdbs

CON_ID     CON_NAME                       OPEN MODE  RESTRICTED
---------- ------------------------------ ---------- ----------
2          PDB$SEED                       READ ONLY  NO
4          PARENT_PDB                     READ ONLY  NO
5          CHILD_PDB                      READ ONLY  NO
6          G_CHILD_PDB1                   READ WRITE NO
And, we’ll create a second one, called G_CHILD_PDB2, while we’re here so our two developer friends can have one each.
SQL> create pluggable database G_CHILD_PDB2 from CHILD_PDB create_file_dest='+sparsc1' SNAPSHOT COPY;

Pluggable database created.

SQL> alter pluggable database G_CHILD_PDB2 open instances=all;

Pluggable database altered.

SQL> show pdbs

CON_ID     CON_NAME                       OPEN MODE  RESTRICTED
---------- ------------------------------ ---------- ----------
2          PDB$SEED                       READ ONLY  NO
4          PARENT_PDB                     READ ONLY  NO
5          CHILD_PDB                      READ ONLY  NO
6          G_CHILD_PDB1                   READ WRITE NO
7          G_CHILD_PDB2                   READ WRITE NO
And that’s it, we’ve done what we intended to do and we now have a hierarchy of thinly provisioned PDBs that logically looks like this:
But how can I check that I hear you ask? With SQL!!! Well, two SQLs to be precise. In the documentation, the SQL you run in ASM gives you the ASM path for the SYSTEM tablespace – which is great, but because ASM doesn’t know the PDB name (I’m on a system using Oracle Managed FIles and so should you), the only meaningful way of determining which PDB is which is to grab the GUID in the path and then double-check that against CDB_PDBS back in the database. Using this two step approach allows us to match the PDB_NAME with its GUID in the datafile name
set serveroutput ON
set echo off
spool report_hierarchy.sql

DECLARE
    c1_pdb_name cdb_pdbs.pdb_name%type;
    c1_guid cdb_pdbs.guid%type;
    cursor c1 is select guid, pdb_name from cdb_pdbs;
BEGIN
    dbms_output.put_line('SELECT (case REGEXP_SUBSTR(snapshotfilename, ''[^/"]+'', 1, 3)');
    open c1;
    LOOP
        fetch c1 into c1_guid, c1_pdb_name;
            exit when c1%notfound;
        dbms_output.put_line('when '''||c1_guid||''' then '''||c1_pdb_name||'''');
        end loop;
    dbms_output.put_line('END) PARENT,');
    close c1;
    dbms_output.put_line('(case REGEXP_SUBSTR(clonefilename, ''[^/"]+'', 1, 3)');
    open c1;
    LOOP
        fetch c1 into c1_guid, c1_pdb_name;
            exit when c1%notfound;
        dbms_output.put_line('when '''||c1_guid||''' then '''||c1_pdb_name||'''');
        end loop;
    dbms_output.put_line('END) CHILD');
    close c1;
    dbms_output.put_line('FROM v$clonedfile');
    dbms_output.put_line('WHERE LOWER(snapshotfilename) LIKE ''%system.%''');
    dbms_output.put_line('START WITH snapshotfilename NOT IN (SELECT clonefilename FROM v$clonedfile)');
    dbms_output.put_line('CONNECT BY LOWER(clonefilename) = PRIOR (snapshotfilename);');
END;
/

spool off

!sed -i '/^PL/d;/^SQL/d;/^ [ |1-2][0-9]/d;/^Elapsed/d' report_hierarchy.sql
This first SQL (and its little sed friend down the bottom) create an SQL statement to run in ASM that will give you the parent/child relationship of the PDBs in the CDB and results in something like the following which you then run in ASM (sqlplus / as sysasm):
SELECT (case REGEXP_SUBSTR(snapshotfilename, '[^/"]+', 1, 3)
when 'CA2F5B57BD25C5ACE053CE421F0A7AF3' then 'PDB$SEED'
when 'D0CDC89E51BA85AEE053CE421F0AE0C3' then 'PARENT_PDB'
when 'D0CDC89E51D385AEE053CE421F0AE0C3' then 'CHILD_PDB'
when 'D0CE5E3D74814A66E053CE421F0ADF05' then 'G_CHILD_PDB1'
when 'D0CE5E3D74854A66E053CE421F0ADF05' then 'G_CHILD_PDB2'
END) PARENT,
(case REGEXP_SUBSTR(clonefilename, '[^/"]+', 1, 3)
when 'CA2F5B57BD25C5ACE053CE421F0A7AF3' then 'PDB$SEED'
when 'D0CDC89E51BA85AEE053CE421F0AE0C3' then 'PARENT_PDB'
when 'D0CDC89E51D385AEE053CE421F0AE0C3' then 'CHILD_PDB'
when 'D0CE5E3D74814A66E053CE421F0ADF05' then 'G_CHILD_PDB1'
when 'D0CE5E3D74854A66E053CE421F0ADF05' then 'G_CHILD_PDB2'
END) CHILD
FROM v$clonedfile
WHERE LOWER(snapshotfilename) LIKE '%system.%'
START WITH snapshotfilename NOT IN (SELECT clonefilename FROM v$clonedfile)
CONNECT BY LOWER(clonefilename) = PRIOR (snapshotfilename);
The output of which looks like:
PARENT         CHILD
-------------- ---------------
PARENT_PDB     CHILD_PDB
CHILD_PDB      G_CHILD_PDB1
               G_CHILD_PDB2
And shows that CHILD_PDB is the child of PARENT_PDBE and G_CHILD_PDB1 & G_CHILD_PDB2 are children of CHILD_PDB.
Resources & Further Reading
In addition to the above, you may find the following useful:
Exadata System Software User Guide – Chapter 3 – Administering ASM
Exadata System Software User Guide – Chapter 10 – Exadata Snapshots
Blog Post: Exadata Snapshots: Simple, Secure, Space Efficient
Blog Post: ASM Cluster File System Snapshots on Exadata
Exa-Byte: Using OEDACLI to create ASM Diskgroups
Conclusion
At last, we reach the conclusion! What have we learned? Hopefully, I’ve given you a good overview of creating Sparse PDB Clones – first from a regular PDB in the +DATAC1 diskgroup, and then a further two hierarchical Sparse PDB Clones from that one. Database clones are useful for all manner of development and testing use-cases – especially when you realize that the Exadata features (Smart Scan, Backup offload, Storage Indexes, Flash and Persistent Memory caching to name just a small but significant few) are all available.
As I mentioned all the way at the top of the post – this is just one way of creating clones on Exadata. In future posts, we’ll cover off Full Database Sparse Clones, ACFS Snapshots, and some other features related to database clones that I find interesting. But what do you find interesting and want more insight into? Let Gavin and I know at @GavinAtHQ and @alex_blyth