In this post, you learn how to create a simple REST API backend and connect to a NoSQL database table. You use Node.js and the Oracle NoSQL Database library to connect to the NoSQL table in Oracle Cloud Infrastructure (OCI). The REST API backend supports creating, listing, and deleting tasks from the table.
Create a NoSQL database table
To create a NoSQL database table, sign in to the OCI Console, and follow these steps:
- Open the navigation menu, and click NoSQL Database.
- From the Compartment list, select your compartment.
- Click Create table.
- Select Simple input.
- Under Reserved Capacity, enter the following values:
- For Read capacity, enter 10.
- For Write capacity, enter 10.
- For Disk storage, enter 1.
Read and write units are defined as throughput for up to 1 KB of data per second. Multiple factors impact the read and write capacity units – record size, data consistency, secondary indexes, and so on. You can read more about it in Estimating Capacity.
- For Name, enter tasks.
- Under Primary key columns, enter the following values:
- For Column name, enter id.
- For Type, select Long.
- Under Columns, add the title column:
- For Column name, enter title.
- For Type, select String.
- Click Another column, and add the description column:
- For Column name, enter description.
- For Type, select String.
- Click Another column, and add the completed column:
- For Column name, enter completed.
- For Type, select Boolean.
- Click Create table.


Create an API signing key
To connect to the NoSQL table, you need to provide credentials. These credentials include the RSA key pair, public key fingerprint, the tenancy’s OCID, and the user’s OCID.
To create the RSA key pair and upload the public key to the OCI Console, follow the instructions in the documentation.
In addition to these credentials, you need the OCID of the compartment in which you created the NoSQL table. You can get the compartment OCID in the OCI Console by selecting Identity from the main menu and clicking Compartments.
You can get the public key fingerprint by clicking the Profile icon, selecting User Settings, and clicking the API Keys link under Resources.
The following Javascript code snippet shows how you connect to the NoSQL table using by using the NoSQLClient class and the credentials:
const client = new NoSQLClient({
    region: Region.US_ASHBURN_1,
    serviceType: ServiceType.CLOUD,
    compartment:
        'ocid1.compartment.oc1..example',
    auth: {
        iam: {
            tenantId:
                'ocid1.tenancy.oc1..example',
            userId:
                'ocid1.user.oc1..example',
            fingerprint: '12:34:56:78:90:ab:cd:ef:12:34:56:78:90:ab:cd:ef',
            passphrase: '',
            privateKeyFile: 'oci_api_key.pem',
        },
    },
});
You could also use the Oracle NoSQL Database Cloud Simulator, which simulates the cloud service and lets you write and test your application locally without accessing OCI. To learn more about the simulator and to download it, see Developing in Oracle NoSQL Database Cloud Simulator.
Create the REST API backend
You use Node.js and Express to create the REST API backend. After you install and download Node.js and npm, open a terminal window, and create the application as follows:
- Create the application folder:
$ mkdir tasks-app && cd tasks-app- Initialize the project:
$ npm init -yThis command creates a minimal package.json file.
- Install the dependencies:
$ npm install express body-parser oracle-nosqldb --save
npm notice created a lockfile as package-lock.json. You should commit this file.
npm WARN tasks-app@1.0.0 No description
npm WARN tasks-app@1.0.0 No repository field.

+ body-parser@1.19.0
+ express@4.17.1
+ oracle-nosqldb@5.2.3
added 51 packages from 38 contributors and audited 51 packages in 3.015s
found 0 vulnerabilities
Before writing the code, let’s look at the endpoints we want to support and how we can use the Oracle NoSQL Database library to interact with the NoSQL table.
The following table shows the list of endpoints we want to implement in the API.
| Endpoint | Method | Description |
|---|---|---|
| / | POST | Creates a new task |
| / | GET | Returns all tasks |
| /:id | GET | Returns a task by ID |
| /completed | GET | Returns all completed tasks |
| /uncompleted | GET | Returns all uncompleted tasks |
| /:id | DELETE | Deletes a task by ID |
Create a task
To create a task in the NoSQL table, use the put method on the NoSQLClient client. Here’s a snippet for creating a task in the table:
const result = await client.put("tasks", {
          id: 1,
          title: "My first task",
          description: "This is my first task",
          completed: false,
      });
The result object contains the response details (capacity consumed) and a property called success, which indicates whether the put was successful. Here’s an example of the response from the put method:
{"consumedCapacity":{"readUnits":0,"readKB":0,"writeUnits":1,"writeKB":1},"success":true,"version":{"type":"Buffer","data":[...]}}Retrieve tasks
To read data from the table, you can use SQL statements and the query method. Here’s an example that shows how to get all tasks from the table:
const result = await client.query(`SELECT * FROM tasks`);The rows property on the result object contains all results from the query.
Delete task
To delete a single task from the table, you can use the delete method and provide the task’s ID. If you want to delete more tasks, you could use deleteMany and provide an array of IDs.
Here’s an example of deleting a task with its ID set to 1:
const result = await client.delete("tasks", { id: 1 });Like when inserting data, the delete result object contains the success and consumed capacity:
{"consumedCapacity":{"readUnits":2,"readKB":1,"writeUnits":1,"writeKB":1},"success":true}Putting it together
Create an index.js file in the tasks-app folder. In this file, connect to the NoSQL table, and create all the REST endpoints.
Copy the following contents to your index.js file:
Be sure to set the correct values for compartment, tenantId, userId, fingerprint, and privateKeyFile.
Finally, install the dependencies by running npm install and then run the application with node index.js. You should see an output like this:
$ node src/index.js
Tasks API listening at http://localhost:3000
To test the API, open another terminal window, and create a task using curl:
$ curl -X POST -d '{"id": 1, "title": "My first task", "description": "This is my first task", "completed": false }' -H 'content-type: application/json' localhost:3000
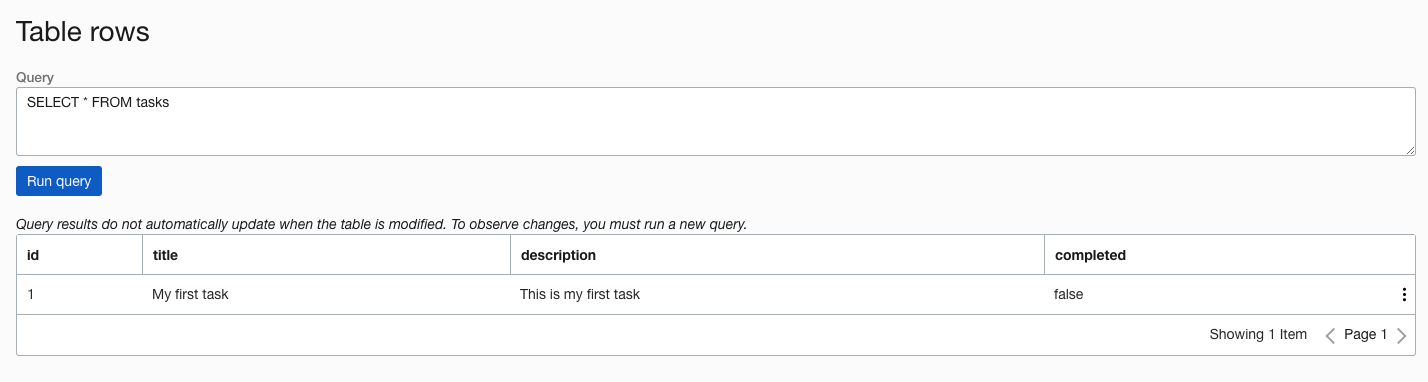
{"result":true}You can then view the inserted data in the OCI Console.
- In the Console, go to the NoSQL Database page.
- From the list, click the tasks table.
- Click the Table rows in the sidebar.
- Click Run query to retrieve the data.

You can switch back to the terminal and get the same task by calling the API:
$ curl http://localhost:3000
[{"id":1,"title":"My first task","description":"This is my first task","completed":false}]
Conclusion
In this post, you learned how to use NoSQL tables in OCI. You created a simple Node.js REST API that connects to the NoSQL table and creates, retrieves, and deletes records from the table.
References
- Oracle NoSQL Database Library for Node.js
- Estimating Capacity for Oracle NoSQL Database
- Required Keys and OCIDs
- Developing in Oracle NoSQL Database Cloud Simulator
Every use case is different. The only way to know if Oracle Cloud Infrastructure is right for you is to try it. You can select either the Oracle Cloud Free Tier or a 30-day free trial, which includes US$300 in credit to get you started with a range of services, including compute, storage, and networking.