Introduction
In NetSuite, there are two SuiteCloud project types in creating customizations using the SuiteCloud Development Framework (SDF) – Account Customization Projects and SuiteApp Projects. The former is intended to customize accounts that you own whether it is production, development, and sandbox. The latter is intended to create SDF SuiteApps for distribution purposes to target NetSuite accounts and is mainly used by SuiteCloud Developer Network (SDN) members. This article focuses on the SuiteApp Project’s end-result – the SuiteApp Zip Archive.
The SuiteApp ZIP Archive is the final product of your SuiteApp project. Also referred to as the SDF Project ZIP file, it contains the NetSuite customizations, scripts, dependencies, and preferences that you later upload and manage in SuiteApp Control Center (SACC) and distribute as SuiteApp versions. Each custom object is represented as an XML file which can be created manually or imported from NetSuite to an IDE using the SuiteCloud SDK. Let’s dive in and discuss its contents and what’s important for a successful upload in SACC.
First things first
Before creating a SuiteApp project and generating your SuiteApp Zip Archive, you must be familiar with NetSuite, SuiteCloud Development Framework (SDF), and SuiteApp Control Center.
Another requirement is to have a Publisher ID. As a member of the SDN program, you are issued and registered a unique Publisher ID as it is part of your SuiteApp Application ID which is a fully qualified name with the following notation:
<publisherid>.<projectid>
Example:
com.netsuite.myfirstproject
Without the Publisher ID and Application ID, you can’t create a SuiteApp Project.
If you need help getting started and setting up your NetSuite account and SuiteCloud SDK CLI/IDE, you can visit our SDN Technical Onboarding website and download our in-depth SuiteCloud IDE and CLI tutorials. (see here)
Show me the Zip!
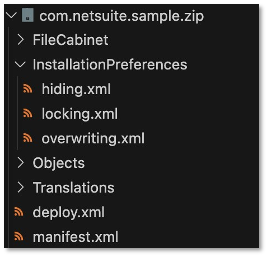
Whether a SuiteApp Zip Archive is generated via SuiteCloud SDK using CLI/IDE or manually, knowing the project structure and contents of the Zip file is key. Here’s what you can find inside.
Manifest and Deploy
Let’s discuss, by far, the two most important files in this project which are the manifest.xml and deploy.xml, both of which are located at the SuiteApp Zip Archive’s root folder. Many times, these two can be overlooked and are the causes of failed or improper SuiteApp Zip file upload attempts in SuiteApp Control Center.
The manifest.xml file contains the project metadata, framework version, and any dependencies on features, records, or files.
<manifest projecttype="SUITEAPP">
  <publisherid>com.netsuite</publisherid>
  <projectid>sample</projectid>
  <projectname>My First Sample Project</projectname>
  <projectversion>1.0.0</projectversion>
  <frameworkversion>1.0</frameworkversion>
  <dependencies>
    <features>
      <feature required="true">CUSTOMRECORDS</feature>
      <feature required="true">SERVERSIDESCRIPTING</feature>
      <feature required="false">MAILMERGE</feature>
    </features>
  </dependencies>
</manifest>
Note that the concatenation of the publisherid and projectid means that the Application ID of this SuiteApp is com.netsuite.sample. Using the SuiteCloud SDK, this Application ID becomes the package name of your SuiteApp Zip Archive and will be used to identify your SuiteApp in the SuiteApp Control Center. Every SuiteApp project will have their unique Application ID so make it as pertinent as possible.
For the dependencies, you can set the required attribute of a feature to true to specify that, as it implies, the feature is required for your SuiteApp to successfully install in target NetSuite accounts. Dependencies can be added manually or automatically from the IDE or CLI with SuiteCloud SDK. Keep in mind that when adding dependencies, ensure that you only add the features that you need. Mistakenly adding unneeded features may lead to unnecessary validation issues on target NetSuite accounts.
The deploy.xml file references the file paths used in the SuiteCloud project.
<deploy>
    <files>
        <path>~/FileCabinet/SuiteApps/com.netsuite.sample/*</path>
    </files>
    <objects>
        <path>~/Objects/*</path>
    </objects>
    <translationimports>
        <path>~/Translations/*</path>
    </translationimports>
</deploy>
By default, it is configured to deploy all supported files in the FileCabinet/SuiteScripts, Objects, and Translations folder (with the asterisk (*) in path) wherein the root path of the project is represented with a tilde (~). The deploy file can be customized but you need to watch out for order validation errors. This can be prevented by ensuring that NetSuite component dependencies are deployed afterwards.
You also must be mindful on which folder you place your project files especially when adding them manually as they serve a particular purpose. Files and SuiteScripts to be deployed to the File Cabinet in the target NetSuite account must be in the File Cabinet folder. Your SuiteCloud project XML definitions of SDF custom objects must be in the Object folder. Lastly, translated language strings (to other languages) must be in the Translation Files folder in XLIFF format.
Hide, Lock and Overwrite
Building a SuiteApp project and installing them in other NetSuite accounts for end users’ consumption is awesome, but what about the source codes? How do I protect them? Installation Preferences is the answer.
In SuiteCloud projects, you can set installation preferences to have your custom objects and scripts hidden, locked, and/or overwritten. This allows you to configure what customizations the end users can see/modify and what needs to be overwritten/preserved in their NetSuite accounts. More importantly, setting these preferences protects your intellectual property and prevent tampering that can cause your SuiteApp to not work as expected.
Hiding and locking of custom objects and scripts can be applied to one or all files in a defined path. You can either overwrite or preserve all or some existing data in the target account as well. Once you know what preferences to apply in your custom objects and scripts, defining the paths and files in the XML is straightforward.
Hiding.xml
The example below hides all files except the MainScript.js file.
<preference type="HIDING" defaultAction="HIDE">
    <apply action="UNHIDE">
       <path>~/FileCabinet/SuiteApps/com.netsuite.sample/MainScript.js</path>
    </apply>
</preference>
Adding the appliesTo attribute with the value FILES together with a wildcard path applies the action to the files under the path.
<preference type="HIDING" defaultAction="HIDE">
    <apply action="UNHIDE">
       <path appliesTo="FILES">~/FileCabinet/SuiteApps/com.netsuite.sample/*</path>
    </apply>
</preference>
Locking.xml
The example below locks all files except the customrecord_assets object and MainScript.js file
<preference type="LOCKING" defaultAction="LOCK">
    <apply action="UNLOCK">
        <object>customrecord_assets</object>
        <path>~/FileCabinet/SuiteApps/com.netsuite.com/MainScript.js</path>
    </apply>
</preference>
Overwriting.xml
<preference type="OVERWRITING">
    <!-- Overwrite all scriptdeployments except for the ones specified with the action tag PRESERVE. -->
    <scriptdeployments defaultAction="OVERWRITE">
            <scriptdeployment scriptid="customscript_ue_mainform.customdeploy_ue_mainform" action="PRESERVE" />
    </scriptdeployments>

    <!-- Preserve all instances of customrecord_assets except for the ones with the action tag OVERWRITE. -->
    <customrecordtypes>
        <customrecordtype scriptid="customrecord_assets">
            <instances defaultAction="PRESERVE">
                <instance scriptid="customrecord_instance_assets" action="OVERWRITE" />
            </instances>
        </customrecordtype>
    </customrecordtypes>
</preference>
A few last tips
- The SuiteCloud SDK offers CLI support for Node.js and Java. It is highly recommended to use them when packaging your SuiteApp project. You can use the following commands:
Node.js: suitecloud project:package
Java: sdfcli package -d <Destination Path> -p <Project Path> - When generating the SuiteApp Zip Archive manually, ensure that the source folder (src/) is omitted from the folder structure. The contents of the source folder must be in the root folder of the SuiteApp Zip Archive file.
- Limit the size of your project – maximum SuiteApp Zip Archive size is 50MB
- Protect your intellectual property – utilize the hiding and locking preferences.