SDF Authentication Methods
When configuring an SDF project, you’ll need to connect to a NetSuite account, and there are two methods to achieve this. The first is the browser-based authentication: inputting account details via the SDF extension in your editor, or using command line prompts, which then redirects you to your default browser for login completion. The second method involves creating an integration record in NetSuite and generating tokens for the process.
In this article, we’ll delve into the Token-Based Authentication method, guiding you on its setup. We’ll also highlight scenarios where this authentication method might be more favorable than its counterpart.
NetSuite Token Based Authentication (TBA)
Token-Based Authentication (TBA) uses encrypted, machine-generated codes to verify a user’s identity. The tokens are unique to a NetSuite User, Role and Application (Integration) and is protected by an algorithm, which ensures NetSuite Servers can identify a token that has been tampered with and block the authentication attempt. TBA can only be used for RESTlets and Web Service integrations.
What do you need to setup TBA?
SuiteCloud Extension for Visual Studio Code
The SuiteCloud Extension for Visual Studio code is an extension that enables SuiteCloud Platform Developers to harness the power of the SuiteCloud Development Framework (SDF) from Visual Studio Code. After creating a SuiteCloud Project in SuiteCloud Extension for VS Code, developers will need to Setup NetSuite Accounts in the extension. The extension will utilize NetSuite’s TBA to communicate with the NetSuite Account. The extension will give the developer two choices to setup the Tokens for TBA: Browser-based authentication (Three Step Authorization Flow) and Save a TBA token issued in NetSuite.
Required Enabled Features in NetSuite Account
The following NetSuite Account features are needed to be enabled to utilize Token-based Authentication with the SuiteCloud Extension for Visual Studio Code:
- SOAP Web Services
- Token-Based Authentication
- SuiteCloud Development Framework
These features can be enabled by NetSuite administrators by navigating to Setup > Company > Enabled Features.
First Time Setup
During first time setup, the NetSuite Administrator will need to Enable the “SuiteCloud Development Integration” Application or Integration Record. NetSuite administrators can find the Integration Record by navigating to Setup > Integration > Integration Management > Manage Integrations.
If the “SuiteCloud Development Integration” integration record is not in the list, the developer needs to setup the Tokens for TBAusing Browser-based authentication which should fail, but auto-install the integration record in the NetSuite Account.
The enabling process is only required for Accounts with the “Require approval during auto-installation of integration” preference checked (by default and best practice) under Setup > Integration > Integration Management > Manage Integrations > Set Preferences. When the “SuiteCloud Development Integration” integration record has been enabled, there is no need to go through this step again.
Creating TBA Tokens for Administrators
With the “SuiteCloud Development Integration” integration record enabled in the NetSuite Account, developers can now setup the Tokens for TBA using Browser-based authentication (Three step authorization flow) or Save a TBA Token issued in NetSuite. For this article, we will be using the latter option: Save a TBA Token issued in NetSuite.
We will start by navigating to the Home tab with the ![]() icon and look for the Settings portlet.
icon and look for the Settings portlet.
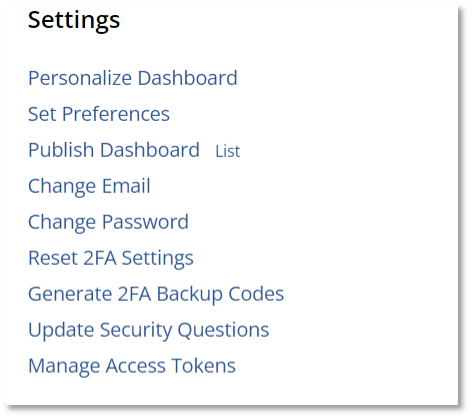
By default, the Settings portlet should be in the lower left of the Home tab.
We are interested in the Manage Access Tokens link so please go ahead and navigate to it which will take us to the My Access Tokens page.

This page will list down all the Tokens associated to your Role in the current NetSuite Account. Each token can be viewed and edited. Editing existing tokens will only let you rename the Token and set the token inactive or Revoke the token. Viewing existing tokens will only show you the Application Name (Integration Record), the User and role it is associated to you and the name of the Token.
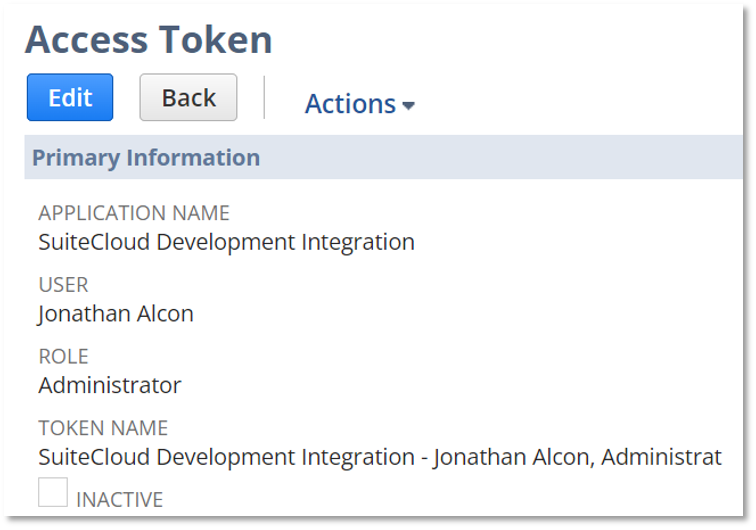
The Token Id and Token Secret will only be displayed on the initial creation of the Token which we will be doing next by clicking the “New My Access Token” button from the “My Access Tokens” page.
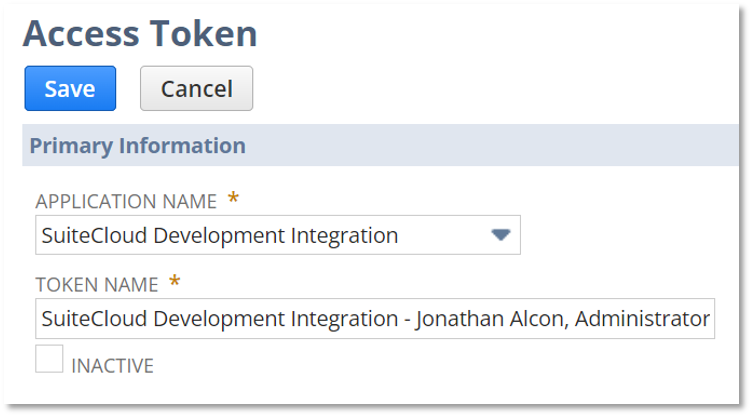
Here we will be given two fields to populate: Application Name and Token Name.
I have populated the Application Name field with the “SuiteCloud Development Integration” which the SuiteCloud Extension for Visual Studio Code uses. The Token Name will be filled automatically by default when selecting an Application Name which we can edit now or later. For the purposes of this article, we will leave this field with the system generated value.
Saving the Access Token for the first time will display the Token Id and Token Secret which we will be using in SuiteCloud Extension by Visual Studio Code.

For now, find a secure place to store your new Token Id and Token Secret. It is important that you secure the generated Token Id/Secret because this is associated to an Administrator role.
Now what’s left to do is to save the generated Token Id/Secret in SuiteCloud Extension for Visual Studio Code to complete with the authentication process
I would like to emphasize that whenever you generate a new Token ID/Secret using this method, it is important that you secure the generated Token Id/Secret because this is associated to an Administrator role. The Token Id/Secret will only be displayed on the initial creation of the Token and losing them will require you to generate new ones.
TBA vs Browser-based authentication
Having discussed the setup, one might wonder, “Why opt for this approach?” The rationale for these two methods stems from the distinction between attended versus unattended login methods. Consider situations involving Continuous Integration, where a virtual environment on a Repository Hosting Server triggers every SDF command to:
- Connect to the NetSuite account,
- Execute tests, and
- Deploy the solution back to the NetSuite account.
These tasks kick into action automatically upon pushing your code to the repository. As they run without human oversight, it’s vital to ensure a secure NetSuite connection without exposing passwords.
