Pre-requisites
- NPM (Node 15+)
- Go 1.18+
- OJET CLI (V15+)
What is Wails ?
- Wails is a project that helps building cross-platform desktop applications by combining Go and web technologies. We can easily build applications with the flexibility and power of Go, combined with a rich and modern frontend.
- Though it sounds like “ElectronJS”, but it works without embedding chrome, hence it is lightweight and fast.
- It comes with CLI tool which makes it easier to generate, build & bundle apps. Using a single command, we can package a project into single binary executable native to respective platform.
- It allows calling Go methods from JavaScript, as if they existed in frontend.
A standard wails application consists of 2 distinct parts:
- application logic written in Go
- frontend UI consisting of HTML/CSS/JS
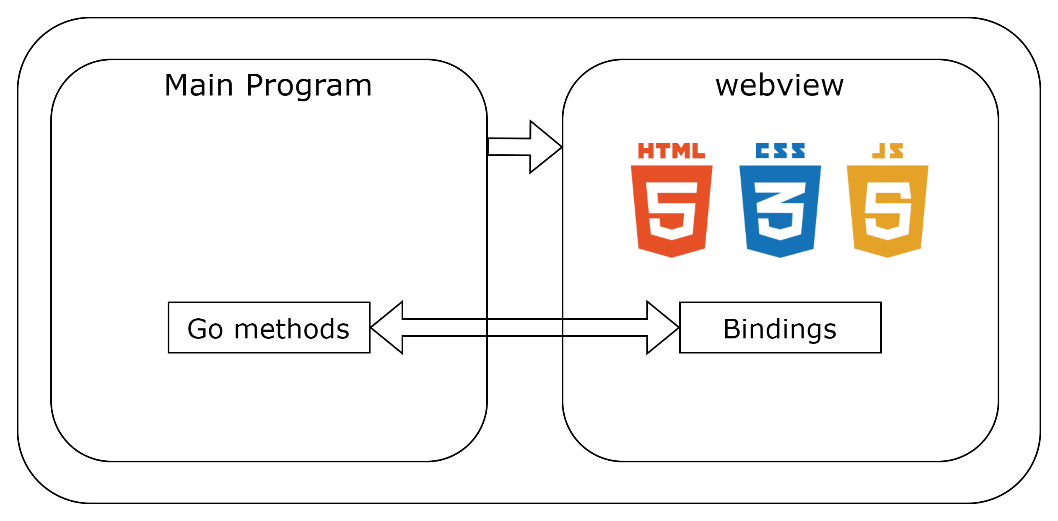
When the main program starts, it creates a webview, and inside this webview window, it renders all HTML/CSS/JS. All the Go methods live in Go main program and using bindings, we can call these methods from our JavaScript code. There is a unified event-based communication system as well. Events can be produced or consumed either in Go or JavaScript and we can send data along with that.
Project Setup
- Install wails CLI: open terminal and install the latest wails CLI tool using the “go install” command:
go install github.com/wailsapp/wails/v2/cmd/wails@latest
- Generate a new wails project using “wails init” command:
wails init -n todos_app
This will generate the directory structure as shown below:
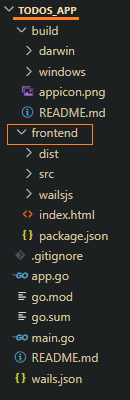
- “frontend” directory contains all the UI related code. Currently, this contains template for simple HTML/CSS/JS files.
Delete this “frontend” directory as we will generate a new OJET project here. From within the todos_app directory, scaffold a new project using OJET CLI:ojet create frontend --template=basic --typescript --webpack
-
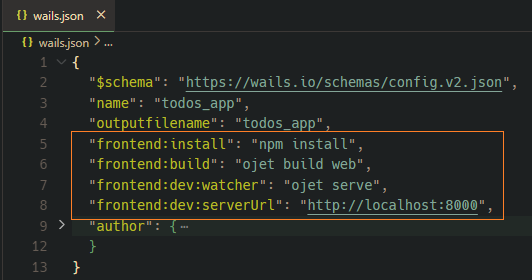
Update wails.json file to make it work with JET CLI: at root of the project, there is wails.json file where we can do project level configurations such as output file name, build command for frontend and so on. Update build, watcher and serverUrl properties as below:
-
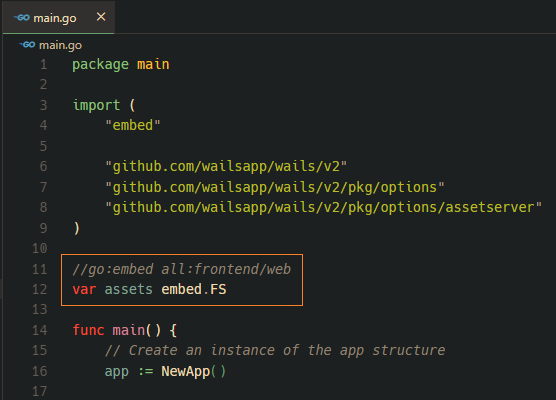
Wails uses go:embed feature which is used for embedding files and folders into the application binary. Wails embeds all build frontend assets using this. In our case, when we build a JET app, “web” directory is generated, and we want wails to embed this web folder. So, in main.go file, update the embed path as shown below:
-
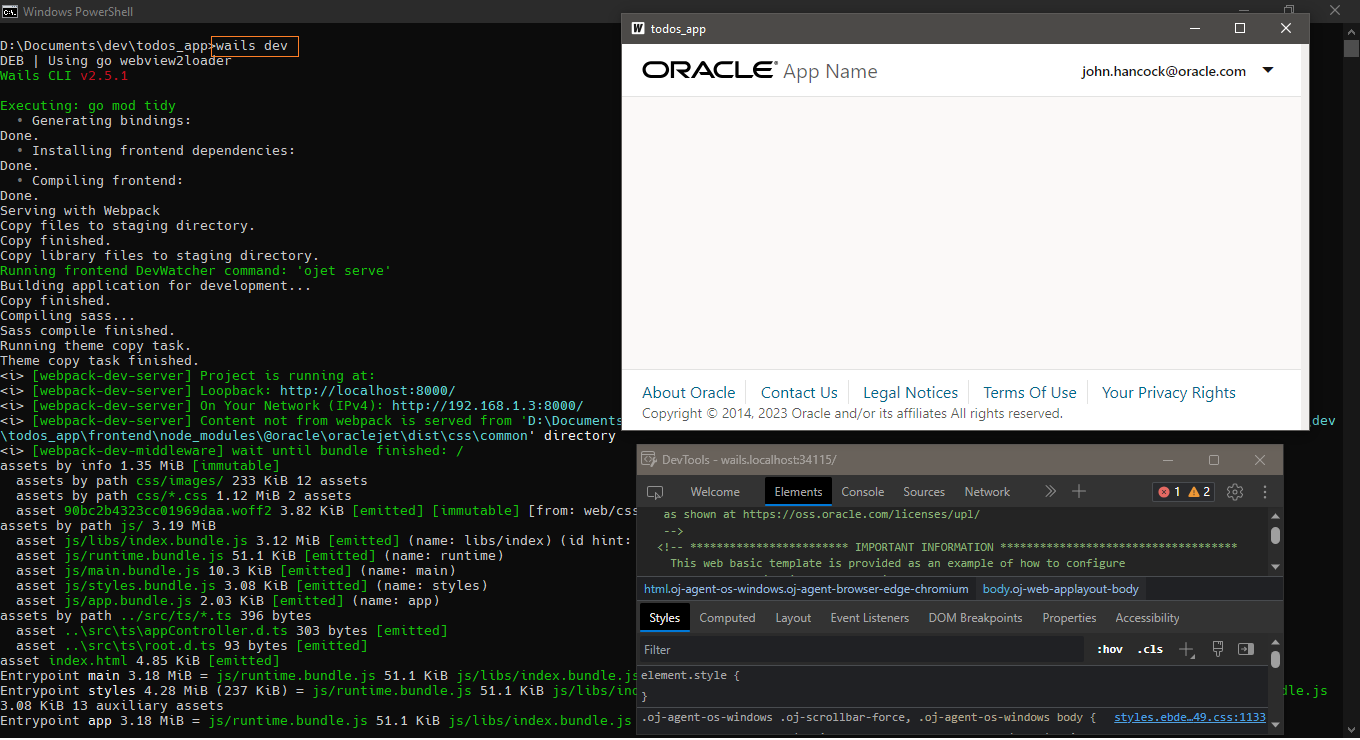
All the setup is done, and we can now run the application using “wails dev” command. It will automatically build and serve the JET app and launch desktop app. Though it is a desktop app, while in development mode, we can still debug in the same way using right click and inspect:
As the setup is done, we will create a simple todos app to manage a list of todo items. User can add or remove todos from UI (OJET) and from backend (Go), we will store and retrieve this data from JSON file. Let’s start by writing the backend logic.
Backend Code (Golang)
If we open main.go file, here we can do the application configuration. Here we are setting height, width and disabling resize. Complete list of options is available here:
https://wails.io/docs/reference/options
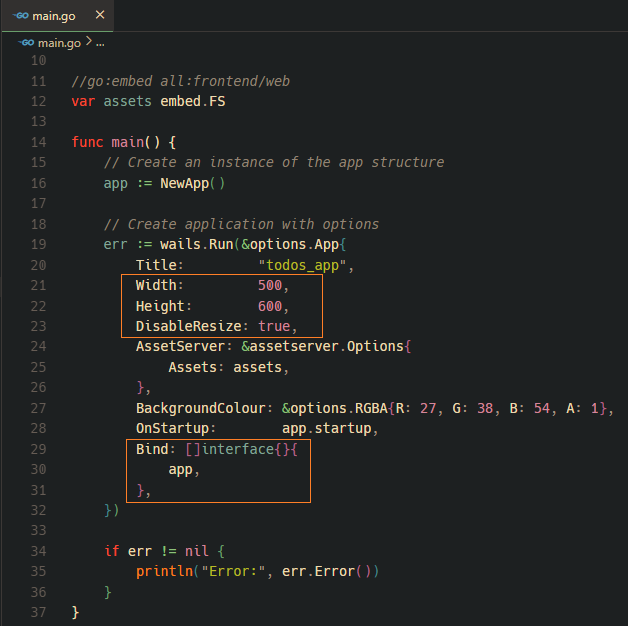
Note that one of the options is “Bind”. It takes a slice of structs and all the public methods of these structs will be exposed to the frontend. By default, app struct is exposed which is already defined in app.go file. We will write methods on this struct and then invoke from OJET UI. Update the file “app.go”:
// =========
// app.go
// =========

package main

import (
  "context"
  "encoding/json"
  "os"
  "path/filepath"

  "github.com/wailsapp/wails/v2/pkg/runtime"
)

type App struct {
  ctx      context.Context
  fileName string
}

func NewApp() *App {
  return &App{}
}

func (a *App) startup(ctx context.Context) {
  a.ctx = ctx
  userDir, _ := os.UserHomeDir()
  appDir := filepath.Join(userDir, "todos_app")
  _ = os.Mkdir(appDir, os.ModePerm)
  a.fileName = filepath.Join(appDir, "todos.json")

  runtime.EventsOn(ctx, "saveAll", func(data ...interface{}) {
    if data != nil && data[0] != nil {
      todos := []byte(data[0].(string))
      os.WriteFile(a.fileName, todos, 0644)
    }
  })
}

func (a *App) GetAllTodos() []string {
  var todos []string
  content, err := os.ReadFile(a.fileName)
  if err != nil {
    return nil
  }
  err = json.Unmarshal(content, &todos)
  if err != nil {
    return nil
  }
  return todos
}
- we have attached one public method to App struct – GetAllTodos(). This method will be exposed as JavaScript function returning a promise which we will consume on UI.
- There is another private method attached to App – startup(). Here we are setting the path to store the JSON file (using os.UserHomeDir()). We are also registering an event “saveAll” which will write the data at <USER_HOME_DIR>/todos_app/todos.json file.
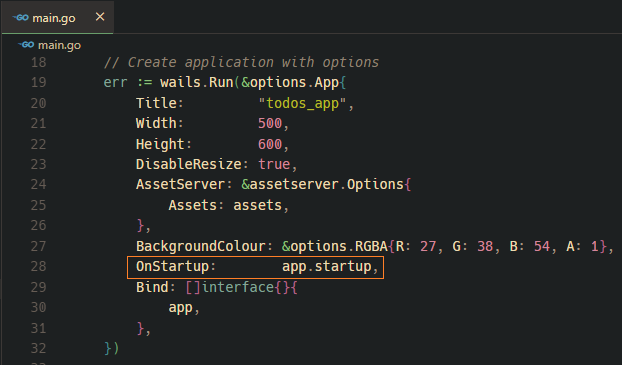
Configure the startup method in application configuration as shown below in main.go file:
We are done with Go code and now we can generate bindings for frontend using below command:
wails generate module
this will generate both JS and TS typedef files under “frontend/wailsjs” directory as shown below:
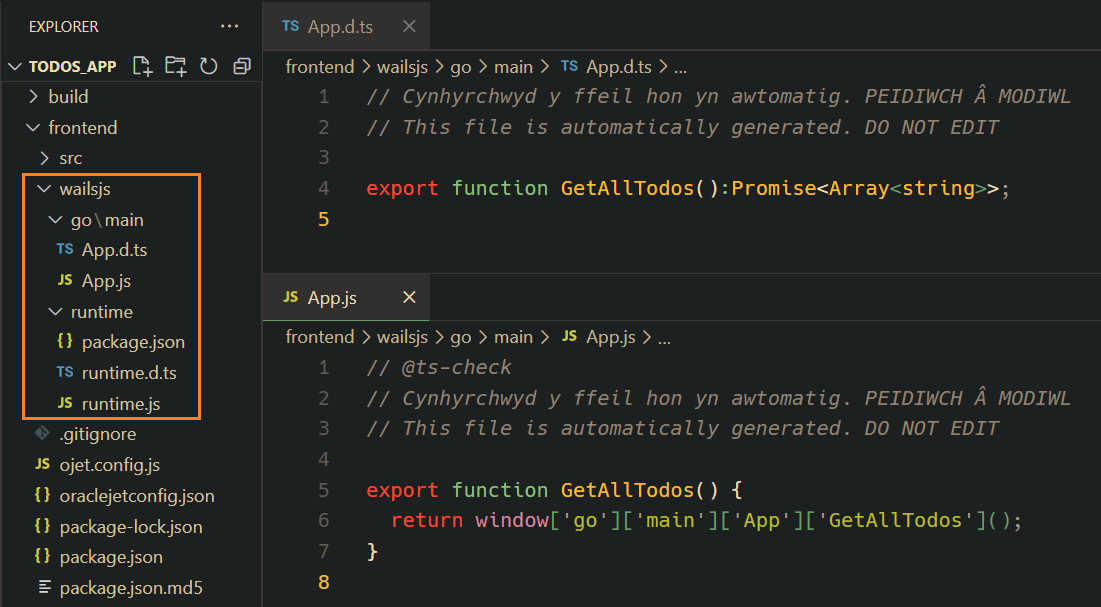
As we can see, public method GetAllTodos() is now exposed as async function to be used at frontend.
Frontend Code (OJET)
In the UI, we will create below components:
- an <oj-input-text> field and a button for user to add a new todo item
- <oj-list-view> component to show list of all todos
- for each <oj-list-item>, a todo text and a button to delete the todo item
- “Save All” button on the header to persist data to JSON file
// =========
// appController.ts
// =========
import * as ko from 'knockout';
import Context = require('ojs/ojcontext');
import 'ojs/ojbutton';
import { ojButton } from 'ojs/ojbutton';
import 'ojs/ojinputtext';
import 'ojs/ojlistitemlayout';
import 'ojs/ojlistview';
import ArrayDataProvider = require('ojs/ojarraydataprovider');
import * as App from './../../wailsjs/go/main/App';
import * as Runtime from './../../wailsjs/runtime/runtime';

class RootViewModel {
  newTodo = ko.observable('');
  todos = ko.observableArray<string>([]);
  readonly todosDP = new ArrayDataProvider(this.todos);

  constructor() {
    Context.getPageContext().getBusyContext().applicationBootstrapComplete();
    this.fetchTodos();
  }

  private fetchTodos = async () => {
    const data = await App.GetAllTodos();
    if (data) this.todos(data);
  };

  handleAddTodo = (_: ojButton.ojAction) => {
    if (this.newTodo() && this.newTodo().trim()) {
      this.todos.push(this.newTodo());
      this.newTodo('');
    }
  };

  handleDeleteTodo = (todo: string) => {
    const idx = this.todos().findIndex((item) => item === todo);
    if (idx !== -1) this.todos.splice(idx, 1);
  };

  handleSaveAll = (_: ojButton.ojAction) => {
    Runtime.EventsEmit('saveAll', JSON.stringify(this.todos()));
  };
}
export default new RootViewModel();
As shown above, in the appController:
- we are importing App and Runtime from the generate module bindings
- using App, we are invoking App.GetAllTodos() async function. This will call Go code to read data from todos.json file
- using Runtime, we are calling Runtime.EventsEmit() function. To this, we are passing the event name and complete todos list as JSON string
- handleAddTodo() and handleDeleteTodo() are simply adding and removing elements from the todos observableArray
Below is body section of index.html file:
<body class="oj-web-applayout-body">
 <div id="globalBody" class="oj-web-applayout-page">
  <header role="banner" class="oj-web-applayout-header">
   <div class="oj-web-applayout-max-width oj-flex-bar oj-sm-align-items-center">
    <h2 class="oj-web-applayout-header-title">Todos App</h2>
    <div class="oj-flex-bar-end">
     <oj-button class="oj-button-sm" chroming="borderless"
on-oj-action="[[handleSaveAll]]">Save</oj-button>
    </div>
   </div>
  </header>
  <div role="main" class="oj-web-applayout-max-width oj-web-applayout-content">
   <div class="oj-flex oj-sm-justify-content-space-around oj-sm-margin-2x-vertical">
    <div class="oj-flex-item">
     <oj-input-text aria-label="new todo" value="{{newTodo}}"
             label-edge="none" placeholder="enter todo...">
     </oj-input-text>
    </div>
    <div class="oj-flex-item oj-sm-flex-initial oj-sm-padding-2x-horizontal">
     <oj-button chroming="callToAction" on-oj-action="[[handleAddTodo]]">Add</oj-button>
    </div>
   </div>

   <oj-bind-if test="[[todos().length > 0]]">
    <p>
     <strong>
      <oj-bind-text value="[['Todos remaining: ' + todos().length]]"></oj-bind-text>
     </strong>
    </p>
   </oj-bind-if>
   <div>
    <oj-list-view id="todos" data="[[todosDP]]"
      selection-mode="single" class="oj-listview-item-padding-off">
     <template slot="itemTemplate" data-oj-as="item">
      <oj-list-item-layout>
       <span class="oj-typography-body-md oj-text-color-primary">
        <oj-bind-text value="[[item.data]]"></oj-bind-text>
       </span>
       <oj-button slot="action" chroming="borderless"
        on-oj-action="[[function(){ handleDeleteTodo($current.data); }]]">✖</oj-button>
      </oj-list-item-layout>
     </template>
    </oj-list-view>
   </div>
  </div>
 </div>
</body>
Building the executable
Build the application using wails build command (from project root directory i.e., todos_app):
wails build
run the executable file generated under build/bin directory: todos_app\build\bin\todos_app.exe:
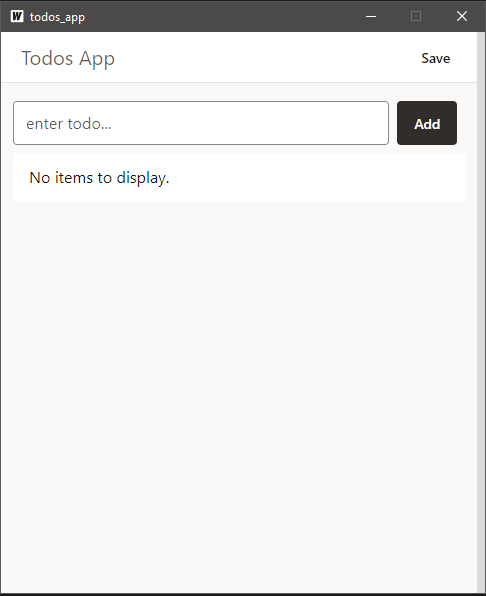
Add few todo items using the Add button and those will render as shown below in <oj-list-view>:

Clicking on save will create todos.json file under <USER_HOME_DIR>/todos_app as shown below:
<img alt="Clicking on save will create todos.json file under /todos_app ” height=”234″ src=”/wp-content/uploads/sites/129/2025/11/image11.png” width=”549″>
Photo by Mario Gogh on Unsplash.