You have finally gotten your ducks in a row to future proof your data storage, and uploaded all your necessary production data into Oracle Cloud’s object store. Splendid! Now, how do you get this data into your Autonomous Database?
Here I provide some practical examples of how to copy over your data from the OCI object store to your Autonomous Data Warehouse (ADW). You may use a similar method to copy data into your Autonomous Transaction Processing (ATP) instance too. We will dive into the meanings of some of the widely used parameters, which will help you and your teams derive quick business value by creating your Data Warehouse in a jiffy! An extremely useful feature of the fully managed ADW service is the ability to copy data lying in your external object store quickly and easily.
The DBMS_CLOUD.COPY_DATA API procedure enables this behavior of copying (or loading) your data into your database from data files lying in your object store, enabling your ADW instance to run queries and analyses on said data.
A few pre-cursor requirements to get us running these analyses:
-
Make sure you have a running ADW instance with a little storage space, a credentials wallet and a working connection to your instance. If you haven’t done this already you can follow Lab 1 in the ADB Quickstart workshop.
-
Use this link to download the data files for the following examples. You will need to unzip and upload these files to your Object Store. Once again, if you don’t know how to do this, follow Lab 3 Step 4 in ADB Quickstart workshop, which uploads files to a bucket in the Oracle Cloud Object Store, the most streamlined option. You may also use AWS or Azure object stores if required, you may refer to the documentation for more information on this.
-
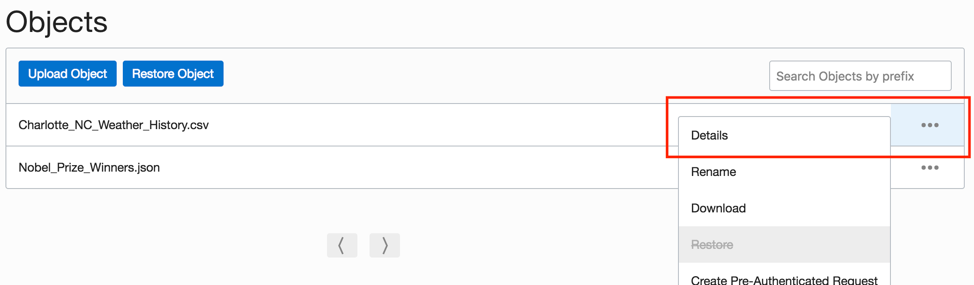
You will provide the URLs of the files lying in your object store to the API. If you already created your object store bucket’s URL in the lab you may use that, else to create this, use the URL below and replace the placeholders <region_name>, <tenancy_name> and <bucket_name> with your object store bucket’s region, tenancy and bucket names. The easiest way to find this information is to look at your object’s details in the object store, by opening the right-hand menu and clicking “Object details” (see screenshot below).
https://objectstorage.<region_name>..oraclecloud.com/n/<tenancy_name>/b/<bucket_name>/o/
-
Have the latest version of SQL Developer installed (ADW requires at least v18.3 and above).
Comma Separated Value (CSV) Files
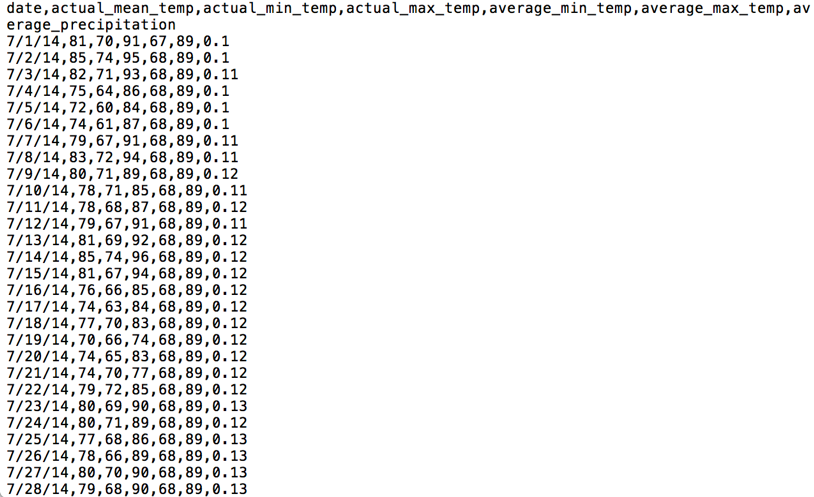
CSV files are one of the most common file formats out there. We will begin by using a plain and simple CSV format file for Charlotte’s (NC) Weather History dataset, which we will use as the data for our first ADW table. Open this Weather History ‘.csv’ file in a text editor to have a look at the data. Notice each field is separated by a comma, and each row ends by going to the next line. (ie. Which implies a newline ‘\n’ character). Also note that the first line is not data, but metadata (column names).
Let us now write a script to create a table, with the appropriate column names, in our ADW instance, and copy over this data file lying in our object store into it. We will specify the format of the file as CSV. The format parameter in the DBMS_CLOUD.COPY_DATA procedure takes a JSON object, which can be provided in two possible formats.
format => '{"format_option" : “format_value” }'

format => json_object('format_option' value 'format_value'))
The second format option has been used in the script below.
set define on

define base_URL = <paste Object Store or SWIFT URL created above here>

create table WEATHER_REPORT_CSV (REPORT_DATE VARCHAR2(20),

    ACTUAL_MEAN_TEMP NUMBER,

    ACTUAL_MIN_TEMP NUMBER,

    ACTUAL_MAX_TEMP NUMBER,

    AVERAGE_MIN_TEMP NUMBER,

    AVERAGE_MAX_TEMP NUMBER,

    AVERAGE_PRECIPITATION NUMBER(5,2));


begin

 DBMS_CLOUD.COPY_DATA(

   table_name =>'WEATHER_REPORT_CSV',

   credential_name =>'OBJ_STORE_CRED',

   file_uri_list =>

     '&base_URL/Charlotte_NC_Weather_History.csv',

   format =>

   json_object('type' value 'csv',

                 'skipheaders' value '1',

                 'dateformat' value 'mm/dd/yy'));

end;
/
Let us breakdown and understand this script. We are first creating the WEATHER_REPORT_CSV table with the appropriate named columns for our destination table. We are then invoking the “COPY_DATA” procedure in the DBMS_CLOUD API package and providing it the table name we created in our Data Warehouse, our user credentials (we created this in the pre-requisites), the object store file list that contains our data, and a format JSON object that describes the format of our file to the API.
The format parameter is a constructed JSON object with format options ‘type’ and ‘skipheaders’. The type specifies the file format as CSV, while skipheaders tells the API how many rows are metadata headers which should be skipped. In our file, that is 1 row of headers. The ‘dateformat’ parameter specifies the format of the date column in the file we are reading from; We will look at this parameter in more detailed examples below.
Great! If this was successful, we have our first data warehouse table containing data from an object store file. If you do see errors during this copy_data process, follow Lab 3 Step 12 in the ADB Quickstart Workshop to troubleshoot them with the help of the necessary log file. If required, you can also drop this table with the “DROP TABLE” command.
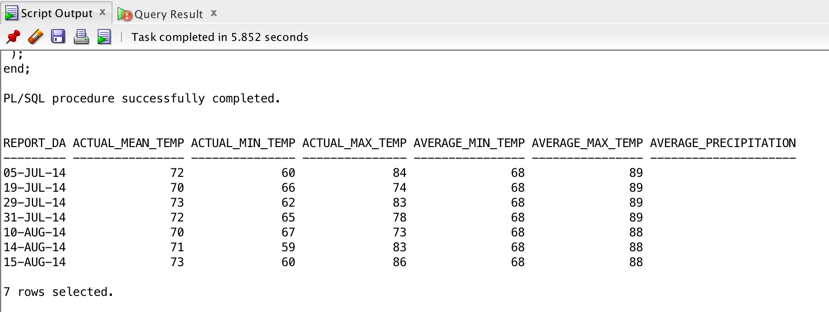
On running this copy data without errors, you now have a working data warehouse table. You may now query and join the WEATHER_REPORT_CSV with other tables in your Data Warehouse instance with the regular SQL or PL/SQL you know and love. As an example, let us find the days in our dataset during which it was pleasant in Charlotte.
SELECT * FROM WEATHER_REPORT_CSV where actual_mean_temp > 69 and

  actual_mean_temp < 74;

Tab Separated Value (TSV) Files
Another popular file format involves tab delimiters or TSV files. In the files you downloaded look for the Charlotte Weather History ‘.gz’ file. Unzip, open and have look at the “.tsv” file in it in a text editor as before. You will notice each row in this file is ended by a pipe ‘|’ character instead of a newline character, and the fields are separated by tabspaces. Oftentimes applications you might work with will output data in less intelligible formats such as this one, and so below is a slightly more advanced example of how to pass such data into DBMS_CLOUD.

Let’s run the following script:
create table WEATHER_REPORT_TSV (REPORT_DATE VARCHAR2(20),

    ACTUAL_MEAN_TEMP NUMBER,

    ACTUAL_MIN_TEMP NUMBER,

    ACTUAL_MAX_TEMP NUMBER,

    AVERAGE_MIN_TEMP NUMBER,

    AVERAGE_MAX_TEMP NUMBER,

    AVERAGE_PRECIPITATION NUMBER(5,2));


begin

  DBMS_CLOUD.COPY_DATA(

    table_name =>'WEATHER_REPORT_TSV',

    credential_name =>'OBJ_STORE_CRED',

    file_uri_list =>'&base_URL/Charlotte_NC_Weather_History.gz',

    format => json_object(

                          'removequotes' value 'true',

                          'dateformat' value 'mm/dd/yy',

                          'delimiter' value '\t',

                          'recorddelimiter' value '''|''',

                          'skipheaders' value '1'

                          )

 );

end;

/


SELECT * FROM WEATHER_REPORT_TSV where actual_mean_temp > 69 and

  actual_mean_temp < 74;
Let us understand the new parameters here:
-
‘ignoremissingcolumns’ value ‘true’: Notice there is no data for the last column “AVERAGE_PRECIPITATION”. This parameter allows the copy data script to skip over columns from the column list, that have no data in the data file.
-
‘removequotes’ value ‘true’: The first column ‘date’ has data surrounded by double quotes. For this data to be converted to an Oracle date type, these quotes need to be removed. Note that when using the type parameter for CSV files as we did in the first example, this removequotes option is true by default.
-
‘dateformat’ value ‘mm/dd/yy’: If we expect a date column to be converted and stored into an Oracle date column (after removing the double quotes of course), we should provide the date column’s format. If we don’t provide a format, the date column will look for the database’s default date format. You can see the dateformat documentation here.
-
‘delimiter’ value ‘\t’: Fields in this file are tab delimited, so the delimiter we specify is the special character.
-
‘recorddelimiter’ value ”’|”’: Each record or row in our file is delimited by a pipe ‘|’ symbol, and so we specify this parameter which separates out each row. Note that unlike the delimiter parameter, the recorddelimiter must be enclosed in single quotes as shown here. A nuance here is that the last row in your dataset doesn’t need the record delimiter when it is the default newline character, however it does for other character record delimiters to indicate the end of that row. Also note that since ADW is LINUX/UNIX based, source data files with newline as record delimiters, that have been created on Windows, must use “\r\n” as the format option. Both these nuances will likely have updated functionality in future releases.
-
‘rejectlimit’ value ‘1’: We need this parameter here to fix an interesting problem. Unlike with the newline character, if we don’t specify a pipe record delimiter here at the very end of the file, we get an error because the API doesn’t recognize where the last row’s, last column ends. If we do specify the pipe record delimiter however, the API expects a new line because the record has been delimited, and we get a null error for the last non-existent row. To fix situations like this, where we know we might have one or more problem rows, we use the reject limit parameter to allow some number of rows to be rejected. If we use ‘unlimited’ as our reject limit, then any number of rows may be rejected. The default reject limit is 0.
-
‘compression’ value ‘gzip’: Notice the .tsv file is zipped into a gzip “.gz” file, which we have used in the URL. We use this parameter so the file will be unzipped appropriately before the table is created.
As before, once this is successful, the table structure has been created following which the data is loaded into the table from the data file in the object store. We then proceed to query the table in your Data Warehouse.
Field Lists – For more Granular parsing options:
A more advanced feature of the DBMS_CLOUD.COPY_DATA is the Field_List parameter, which borrows it’s feature set from the Field_List parameter of the Oracle Loader access driver. This parameter allows you to specify more granular information about the fields being loaded. For example, let’s use “Charlotte_NC_Weather_History_Double_Dates.csv” from the list of files in our object store. This file is similar to our first CSV example, except it has a copy of the date column in a different date format. Now, if we were to specify a date format in the format parameter, it would apply to universally to all date columns. With the field_list parameter, we can specify two different date formats for the two date columns. We do need to list all the columns and their types when including the field_list; Not mentioning any type parameters simply uses default Varchar2 values.
create table WEATHER_REPORT_DOUBLE_DATE (REPORT_DATE VARCHAR2(20),

    REPORT_DATE_COPY DATE,

    ACTUAL_MEAN_TEMP NUMBER,

    ACTUAL_MIN_TEMP NUMBER,

    ACTUAL_MAX_TEMP NUMBER,

    AVERAGE_MIN_TEMP NUMBER,

    AVERAGE_MAX_TEMP NUMBER,

    AVERAGE_PRECIPITATION NUMBER(5,2));

begin

 DBMS_CLOUD.COPY_DATA(

    table_name =>'WEATHER_REPORT_DOUBLE_DATE',

    credential_name =>'OBJ_STORE_CRED',

    file_uri_list =>'&base_URL/Charlotte_NC_Weather_History_Double_Dates.csv',

    format => json_object('type' value 'csv',  'skipheaders' value '1'),

    field_list => 'REPORT_DATE DATE ''mm/dd/yy'',

                  REPORT_DATE_COPY DATE ''yyyy-mm-dd'',

                  ACTUAL_MEAN_TEMP,

                  ACTUAL_MIN_TEMP,

                  ACTUAL_MAX_TEMP,

                  AVERAGE_MIN_TEMP,

                  AVERAGE_MAX_TEMP,

                  AVERAGE_PRECIPITATION'

 );

end;

/

SELECT * FROM WEATHER_REPORT_DOUBLE_DATE where actual_mean_temp > 69 and actual_mean_temp < 74;
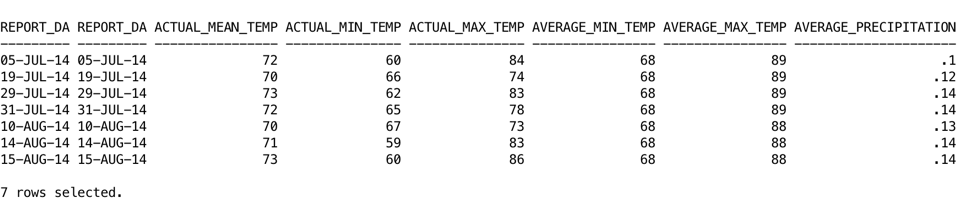
It’s important to recognize that the date format parameters are to provide the API with the information to read the data file. The output format from your query will be your Database default (based on your NLS Parameters). This can also be formatted in your query using TO_CHAR.
JSON Files
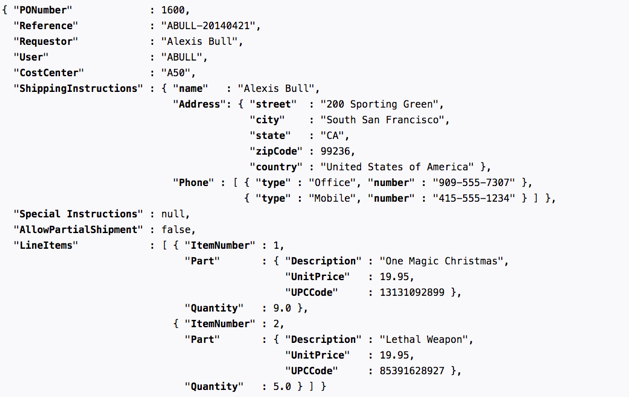
You may be familiar with JSON files for unstructured and semi-structured data. The “PurchaseOrders.txt” file contains JSON Purhcase Order data, which when parsed and formatted looks like the following.
Using JSON data in an ADW instance can be as simple as putting each JSON document into a table row as a BLOB, and using the powerful, native JSON features that the Oracle Database provides to parse and query it. You can also view the JSON documentation for additional features here.
Let’s try this! Copy and run the script below:
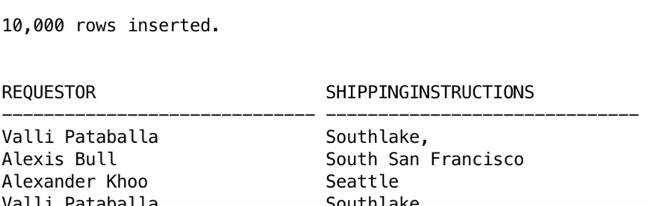
CREATE TABLE JSON_DUMP_FILE_CONTENTS (json_document blob);

begin

 DBMS_CLOUD.COPY_DATA(

   table_name =>'JSON_DUMP_FILE_CONTENTS',

   credential_name =>'OBJ_STORE_CRED',

   file_uri_list =>'&base_URL/PurchaseOrders.dmp',

   field_list => 'json_document CHAR(5000)'

);

end;

/

COLUMN Requestor FORMAT A30

COLUMN ShippingInstructions FORMAT A30


SELECT JSON_VALUE(json_document,'$.Requestor') as Requestor,

       JSON_VALUE(json_document,'$.ShippingInstructions.Address.city') as ShippingInstructions

FROM JSON_DUMP_FILE_CONTENTS where rownum < 50;
The query above lists all the PO requestors and the city where their shipment is to be delivered. Here, we have simply created one column ‘json_document’ in the table ‘JSON_FILE_CONTENTS’. We do not incur the time it takes to validate these JSON document, and are instead directly querying the table using the Database’s JSON_VALUE feature. This means the check for well-formed JSON data will be on the fly, which would fail unless you properly skip over the failed data. Here, ‘COPY_DATA’ will not check for valid JSON data, but will simply check that the data is of the correct native datatype (less than 5000 characters long), that is the datatype of the table’s column.
For better performance on large JSON data files, using this ADW table we can also make use of the Database’s JSON features to parse and insert the JSON data into a new table ‘j_purchaseorder’ ahead of time, as below. Note that this insert statement actually brings the data into your ADW instance. You benefit from doing this as it checks to make sure your JSON data is well-formed and valid ahead of time, and therefore incur less of a performance impact when you query this JSON data from your ADW instance.
CREATE TABLE j_purchaseorder

 (id          VARCHAR2 (32) NOT NULL,

  date_loaded TIMESTAMP (6) WITH TIME ZONE,

  po_document BLOB

  CONSTRAINT ensure_json CHECK (po_document IS JSON));


INSERT INTO j_purchaseorder (id, date_loaded, po_document)

SELECT SYS_GUID(), SYSTIMESTAMP, json_document FROM json_file_contents

   WHERE json_document IS JSON;
We can now query down JSON paths using the JSON simplified syntax as with the following query:
SELECT po.po_document.Requestor,

       po.po_document.ShippingInstructions.Address.city

FROM j_purchaseorder po;
Beyond Copying Data into your Autonomous Data Warehouse
Here, we’ve gone through simple examples of how to copy your Oracle object store data into your Autonomous Data Warehouse instance. In following posts, we will walk through more ways you might use to load your data, from on-premise or cloud based storage, as well as more detail on how you might troubleshoot any data loading errors you may encounter. See you in the next one!
