GoldenGate Free is a starter version of Oracle’s best in class replication software. With GoldenGate Free, application databate administrators (DBAs) can learn basic concepts while creating simple data replication processes in a simplified user interface.
It is the same powerful Oracle GoldenGate that enterprises rely on worldwide, packaged for simple download, ease-of-use, and a fully-featured experience. It is the entire application portfolio delivered in an Oracle Docker container ready to be deployed anywhere – on premises, in OCI, or on other cloud platforms.
Key Components:
- Oracle GoldenGate Free Release 23.3.0.0
- Oracle Database 23.3 running on OCI Database Systems
Objectives:
- Pull latest GoldenGate Free 23.3 image from Oracle Container Registry
- Create OCI Container instance using the GoldenGate Free image
- Access the WebUI of GoldenGate Free (23.3)
- Setup Source & Target Oracle Database 23.3
- Create Connections in GoldenGate Free 23.3 instance
- Create Pipeline and follow Unidirectional recipe to setup data replication
Prerequisites:
- Access to the Oracle Container Registry
- Access to a OCI tenancy and Cloud Shell
- User privileges to be able to create dynamic group, policies (these will allow the container instance to manage Compute Instances). If the user does not have these privileges, then a tenancy admin can create the dynamic group and policy.
- User privileges to work with images (push, pull, tag) in Oracle Cloud Infrastructure Registry and a token created for login into Oracle Cloud Infrastructure Registry.
- Familiar with pushing images to Oracle Cloud Infrastructure Registry.
- Oracle Database 23.3 running in OCI Database System
Limitations:
Learn about the limitations for using GoldenGate Free 23.3 here.
Supported connection types:
The following Oracle Database versions are supported:
- Oracle Database 11.2.0.4
- Oracle Database 12.1.0.2
- Oracle Database 19c
- Oracle Database 21c, 21c XE
- Oracle Database 23.3, 23.3 Free
Note: Oracle Autonomous Database and wallet authentication are not supported.
Step I : Oracle Container Registry
Sign in using your Oracle account and accept the license agreement before you can pull the GoldenGate Free docker image from the Oracle Container Registry.
https://container-registry.oracle.com/
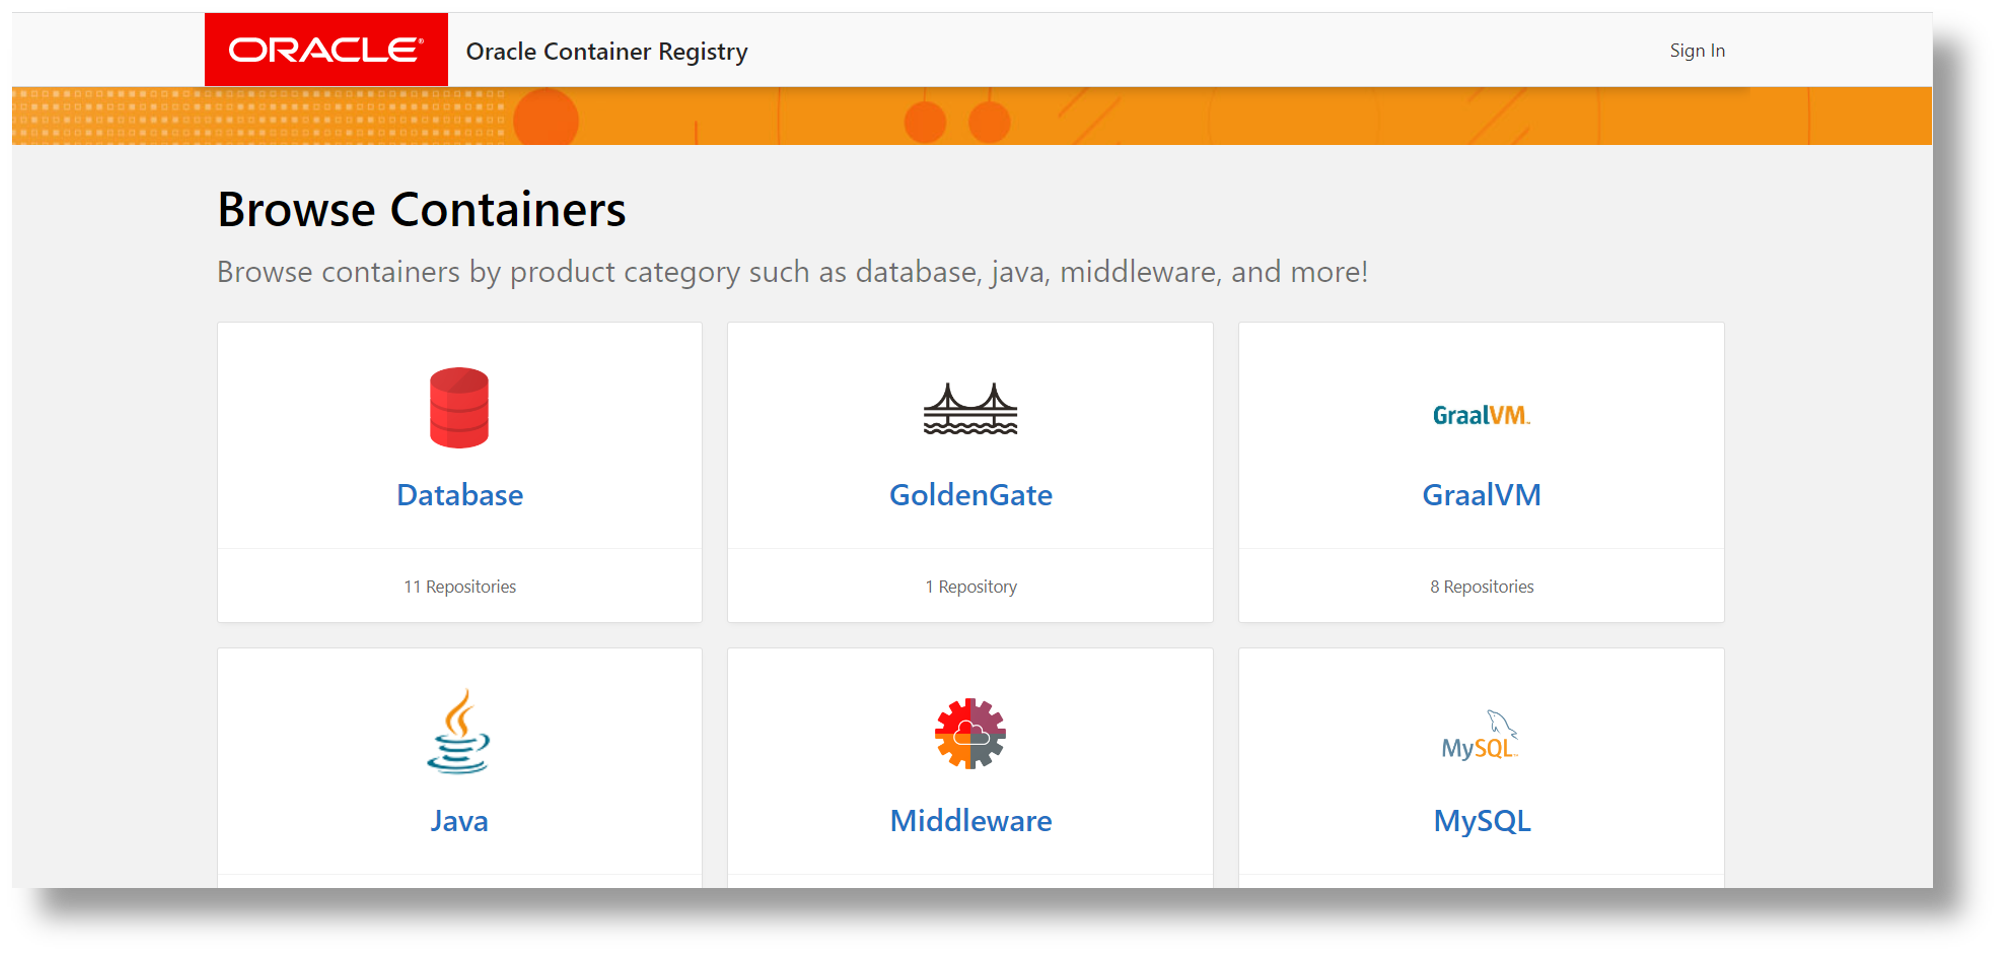
Click on GoldenGate repository.Then,click on goldengate-free Repository.
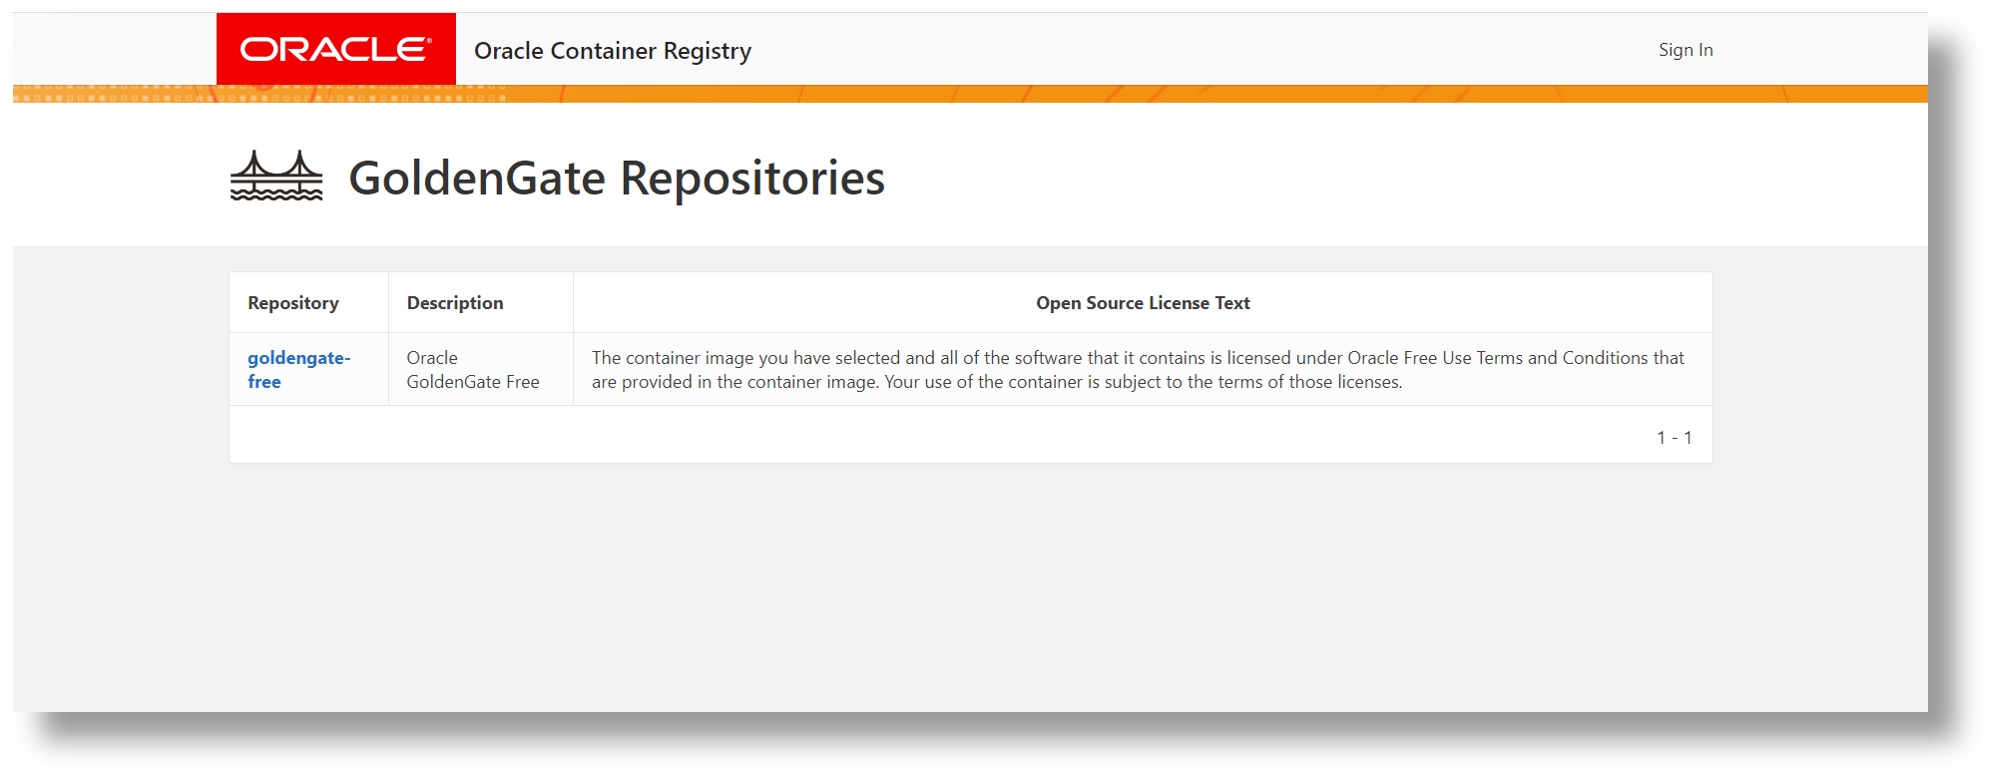
On the Next page, you will find all the details about GoldenGate Free including technical details on How to Run GoldenGate Free in a container.
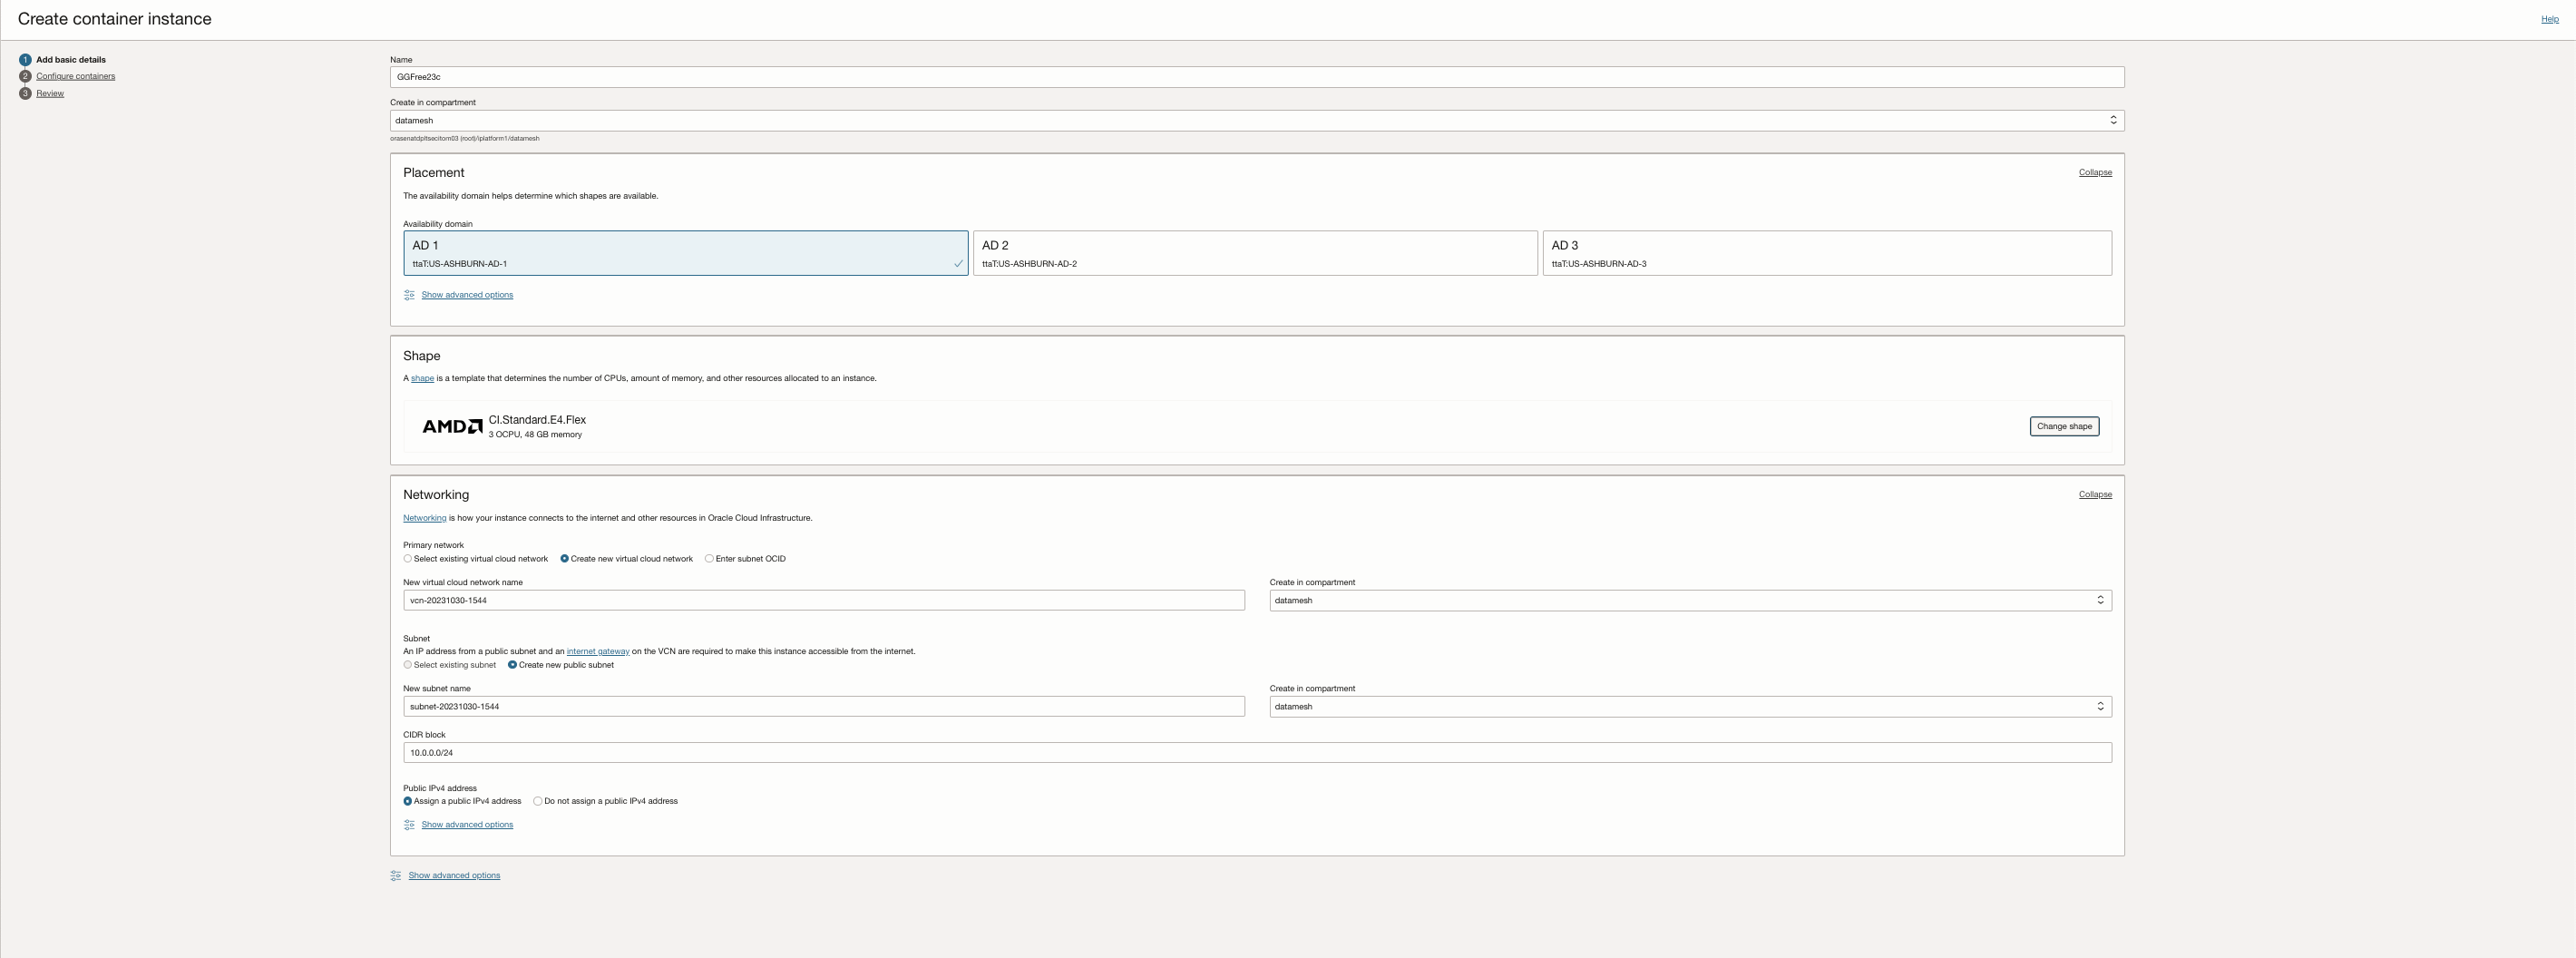
Create OCI Container Instances
In the Console, open the navigation menu and click Developer Services. Under Containers & Artifacts, click Container Instances.
Click Create container instance.

Enter a name for the container instance. You can add or change the name later.
Select the compartment to create the instance in. The other resources that you choose can come from different compartments.
In the Shape section, choose the flexible shape for the container instance. Flexible shapes have a customizable number of OCPUs and amount of memory.
For Number of OCPUs, choose the number of OCPUs that you want to allocate to this instance by dragging the slider. The other resources scale proportionately.
For Amount of memory (GB), choose the amount of memory that you want to allocate to this instance by dragging the slider. The amount of memory allowed is based on the number of OCPUs selected.
the Networking section, configure the network details for the instance:
NoteYou will need a security rule as a part of a security list or a network security group to allow network traffic to the applications running in the container. For example, GoldenGate Free will run on protocol TCP, port 8080, then you will need a security rule for TCP and port 8080. For information on configuring security rules, see Security Rules.
Select Public Subnet, you can optionally assign the instance a public IP address. A public IP address makes the instance accessible from the internet. Select the Assign a public IPv4 address option.
Click Next to configure the containers within the container instance.
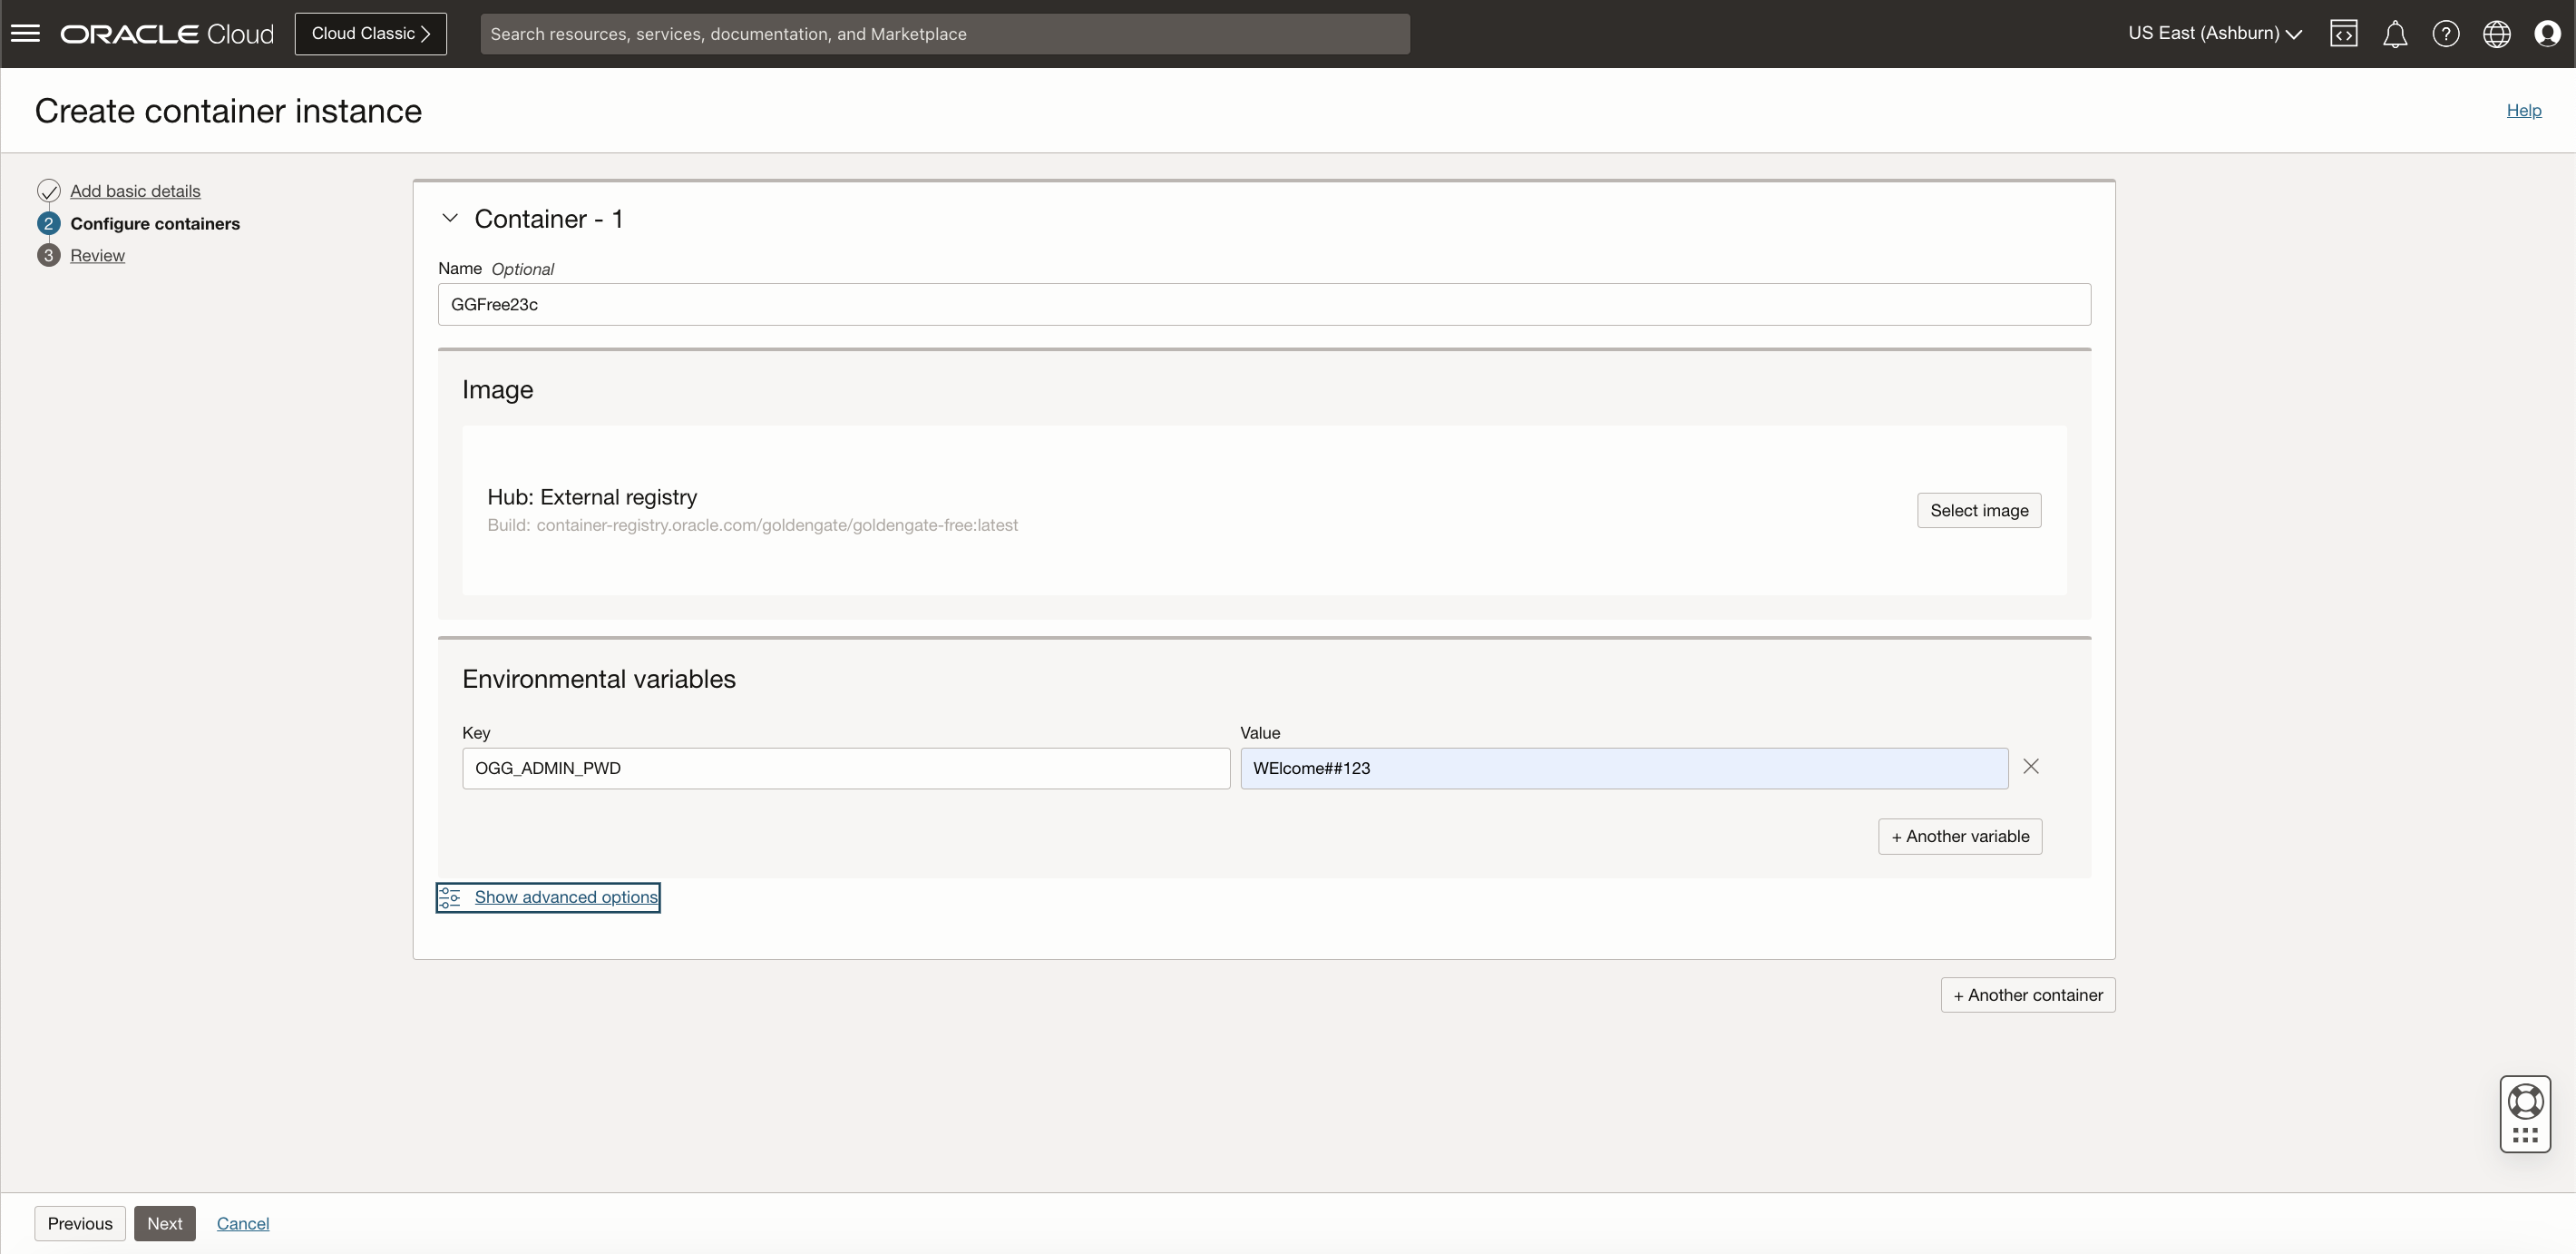
Enter a name for the container. You can add or change the name later.
In the Image section, click Select image to select a container image. Then, select OCI Container Registry as an image source.
Select the Repository hosting the GoldenGate Free Image pushed in previous section. Use the same Username & Password(Auth token) credentials used to push image to the repository.
Optional: In the Environmental variables section, you can set the environmental variables used by the container.Refer to the container Registry link for details .
Click Next to review the container instance and its containers.
Click Create.
The container instance launches within seconds and your GoldenGate Free instance is now live. Since we chose to assign a public IP address to the container instance, we can use that to reach our GoldenGate Free WebUI on the internet. The Public IP address assigned in displayed in the overview page for the container instance.
Accessing the IP address from a browser, now takes you to your GoldenGate Free WebUI on the internet.
For example: http://<public-ip>/
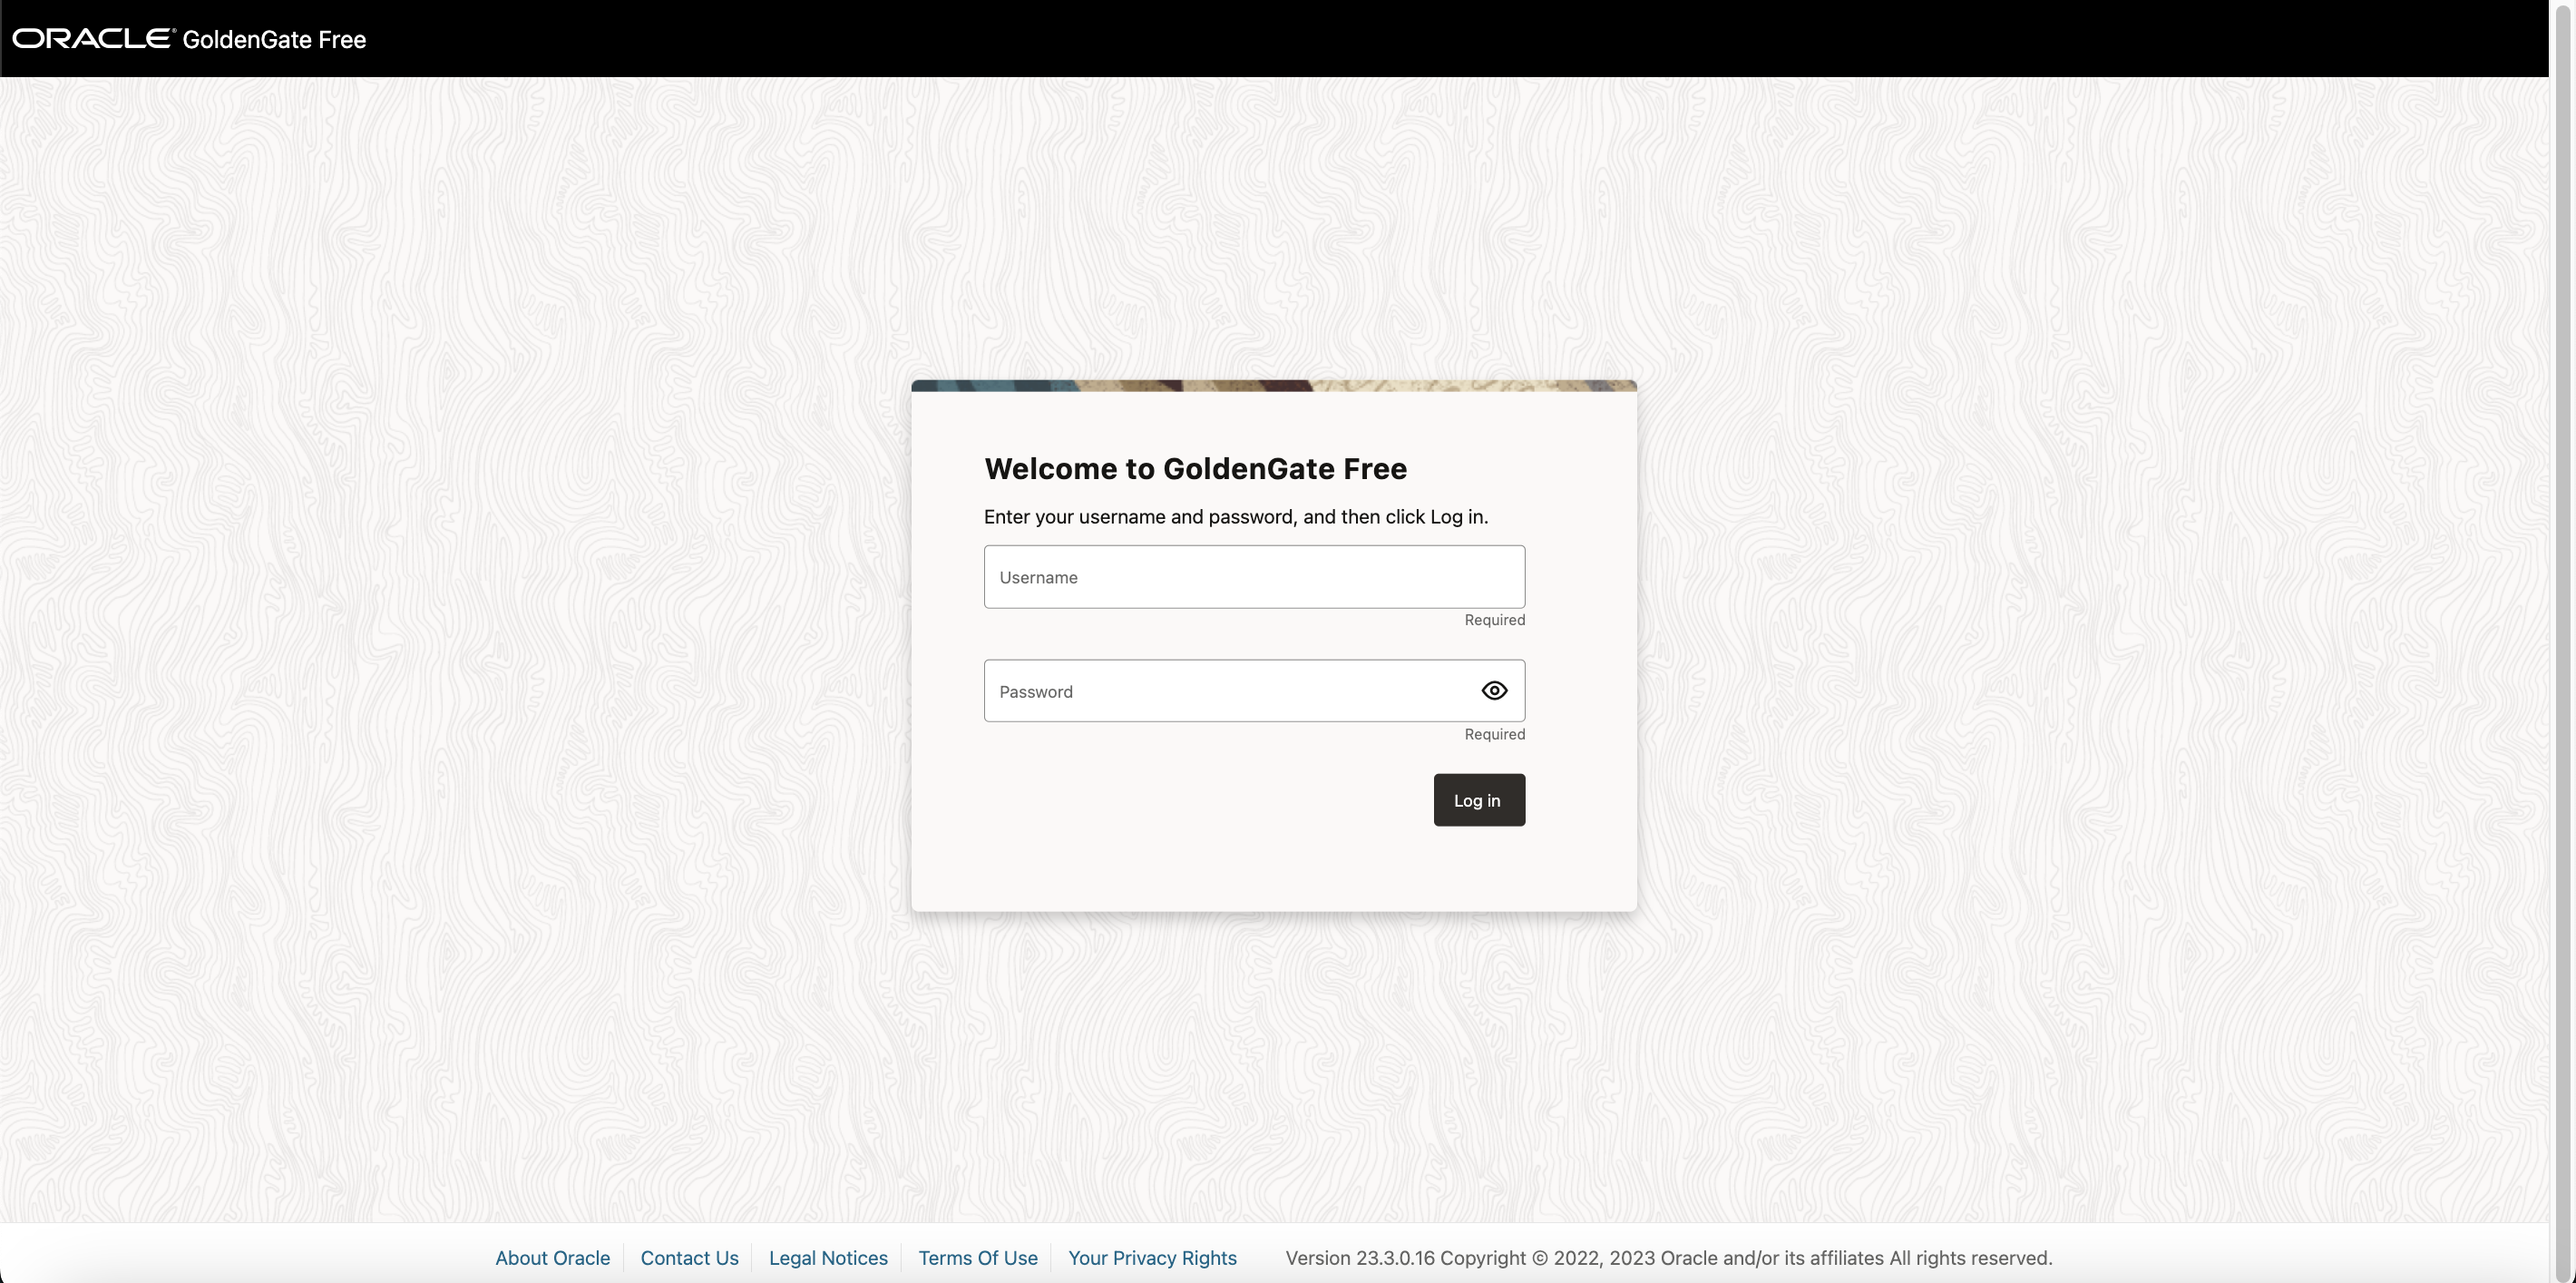
Default Username is oggadmin.
On the first startup of the container, a random password will be generated for the Oracle GoldenGate administrative user if not provided by the OGG_ADMIN_PWD environment variable. You can find this password at the start of the container log:
— Password for OGG administrative user ‘oggadmin’ is ‘xxxxxxxx’
————————————————————————————
You can view your container logs in the OCI Console,Click on Containers under Resources on the left side Menuand then click on the container name For example: GGFree
Click on View Logs option on the top to view the default password generated.

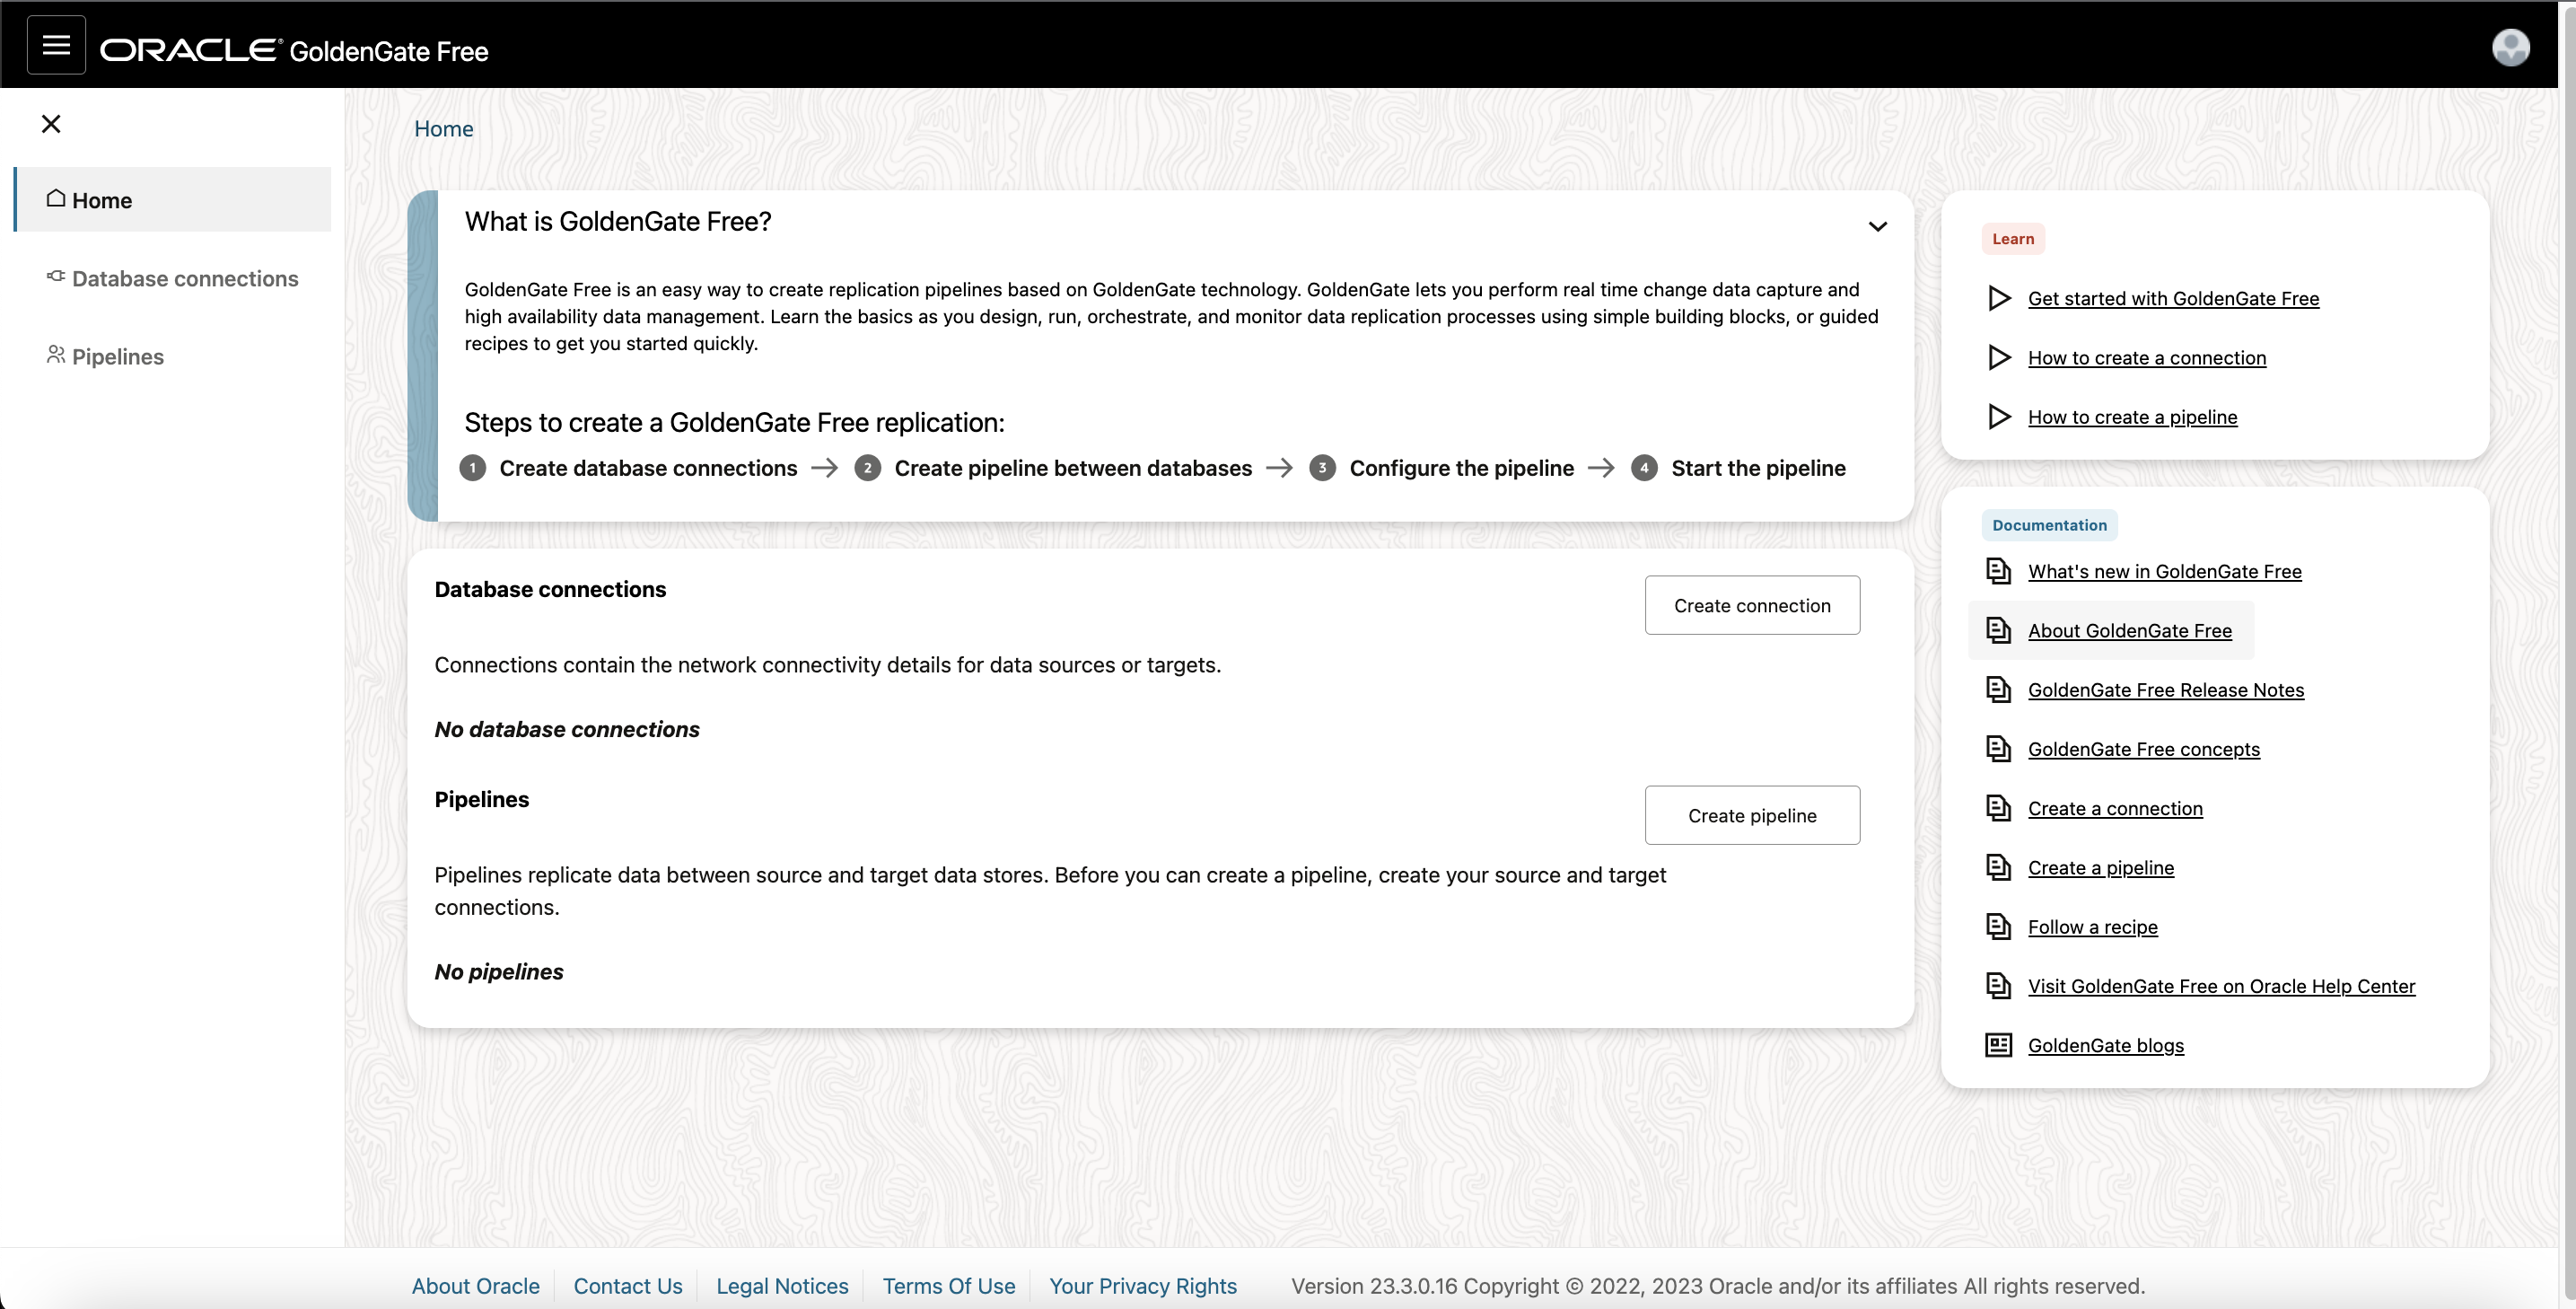
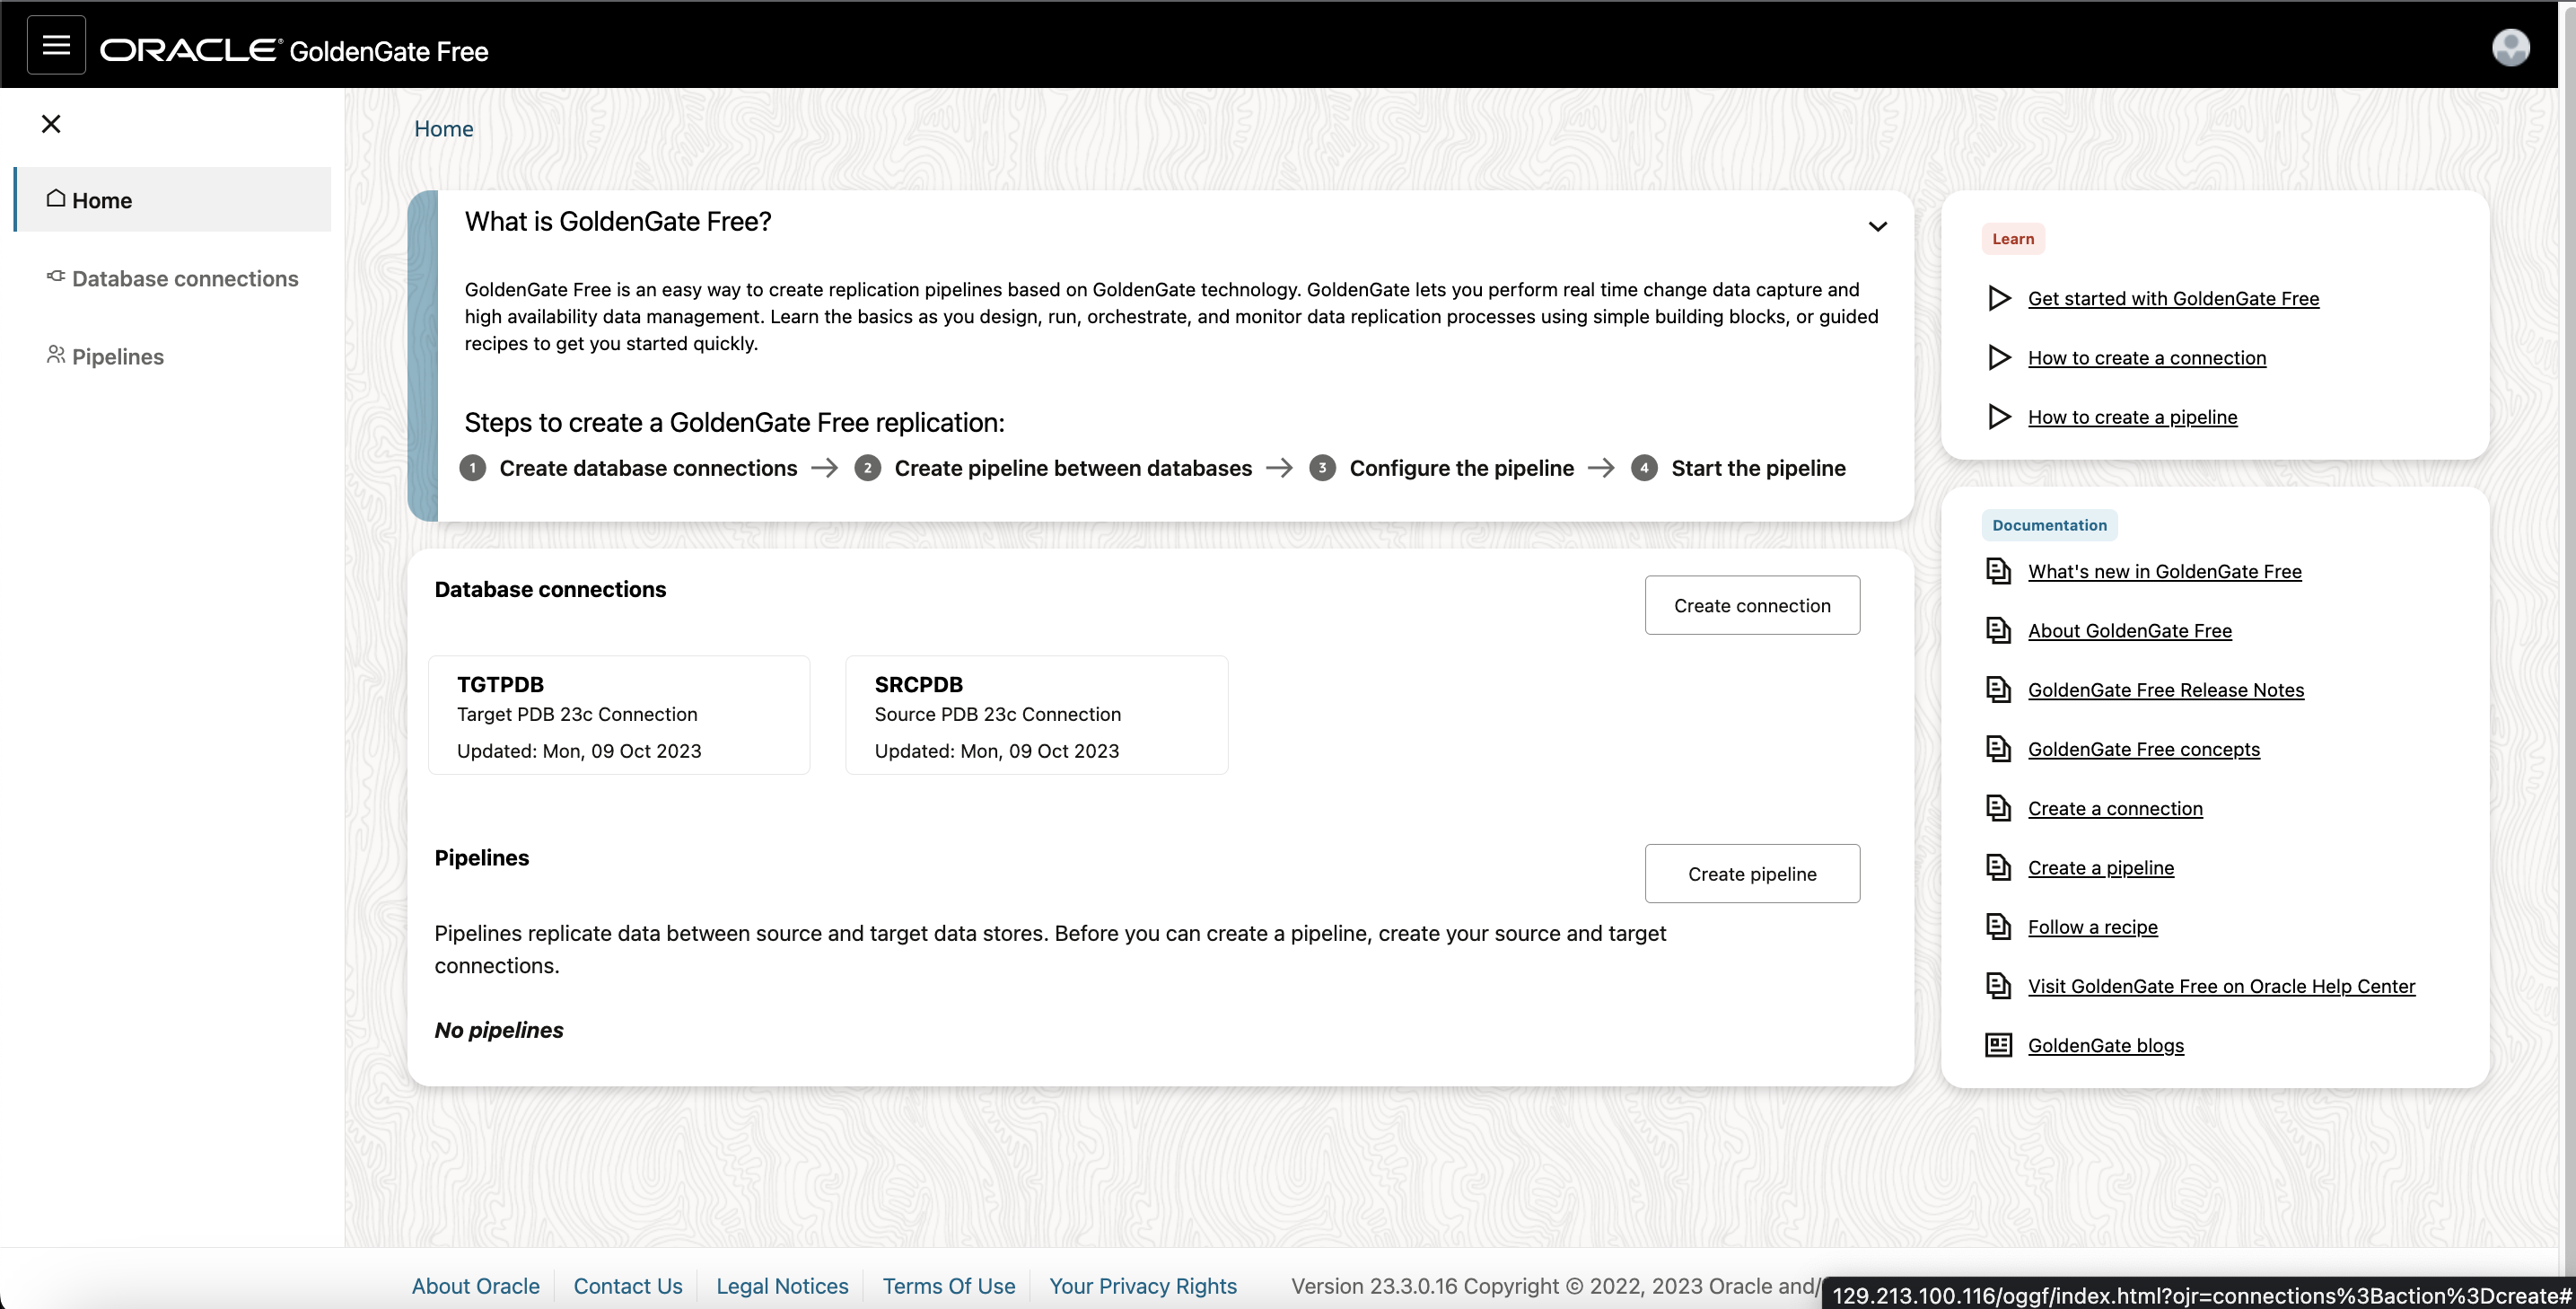
Once logged in, you can start to create connections to the Source/Target database and replication Pipeline.
Click on Create Connection button on the home page.
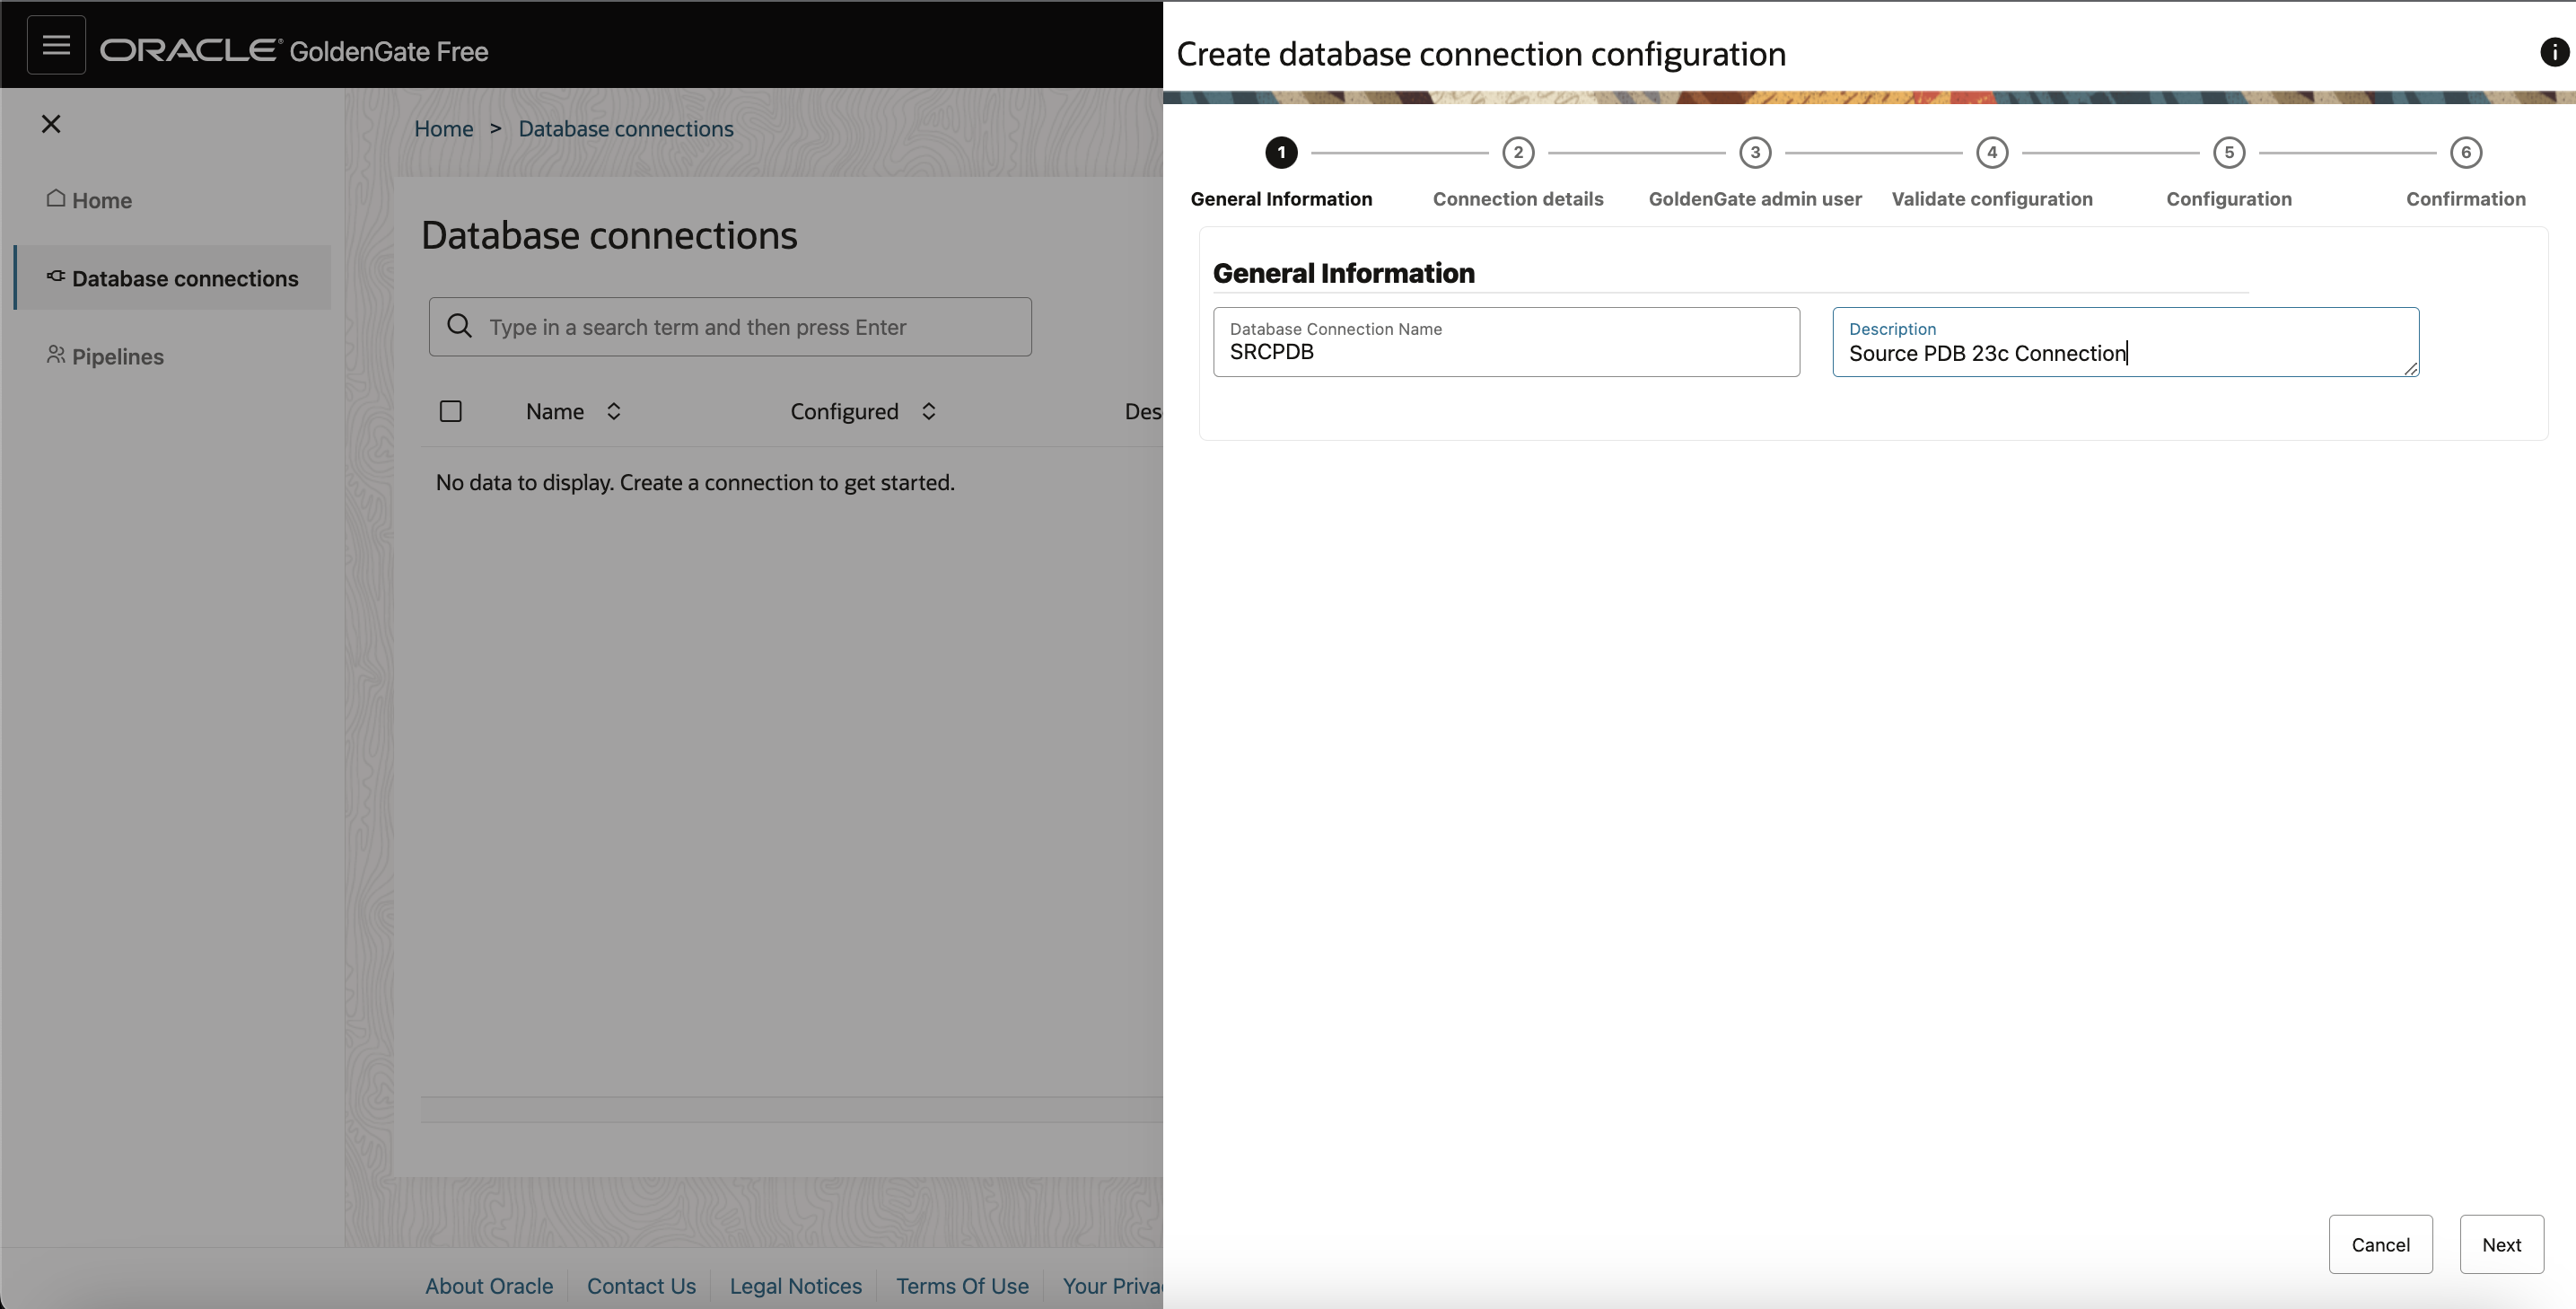
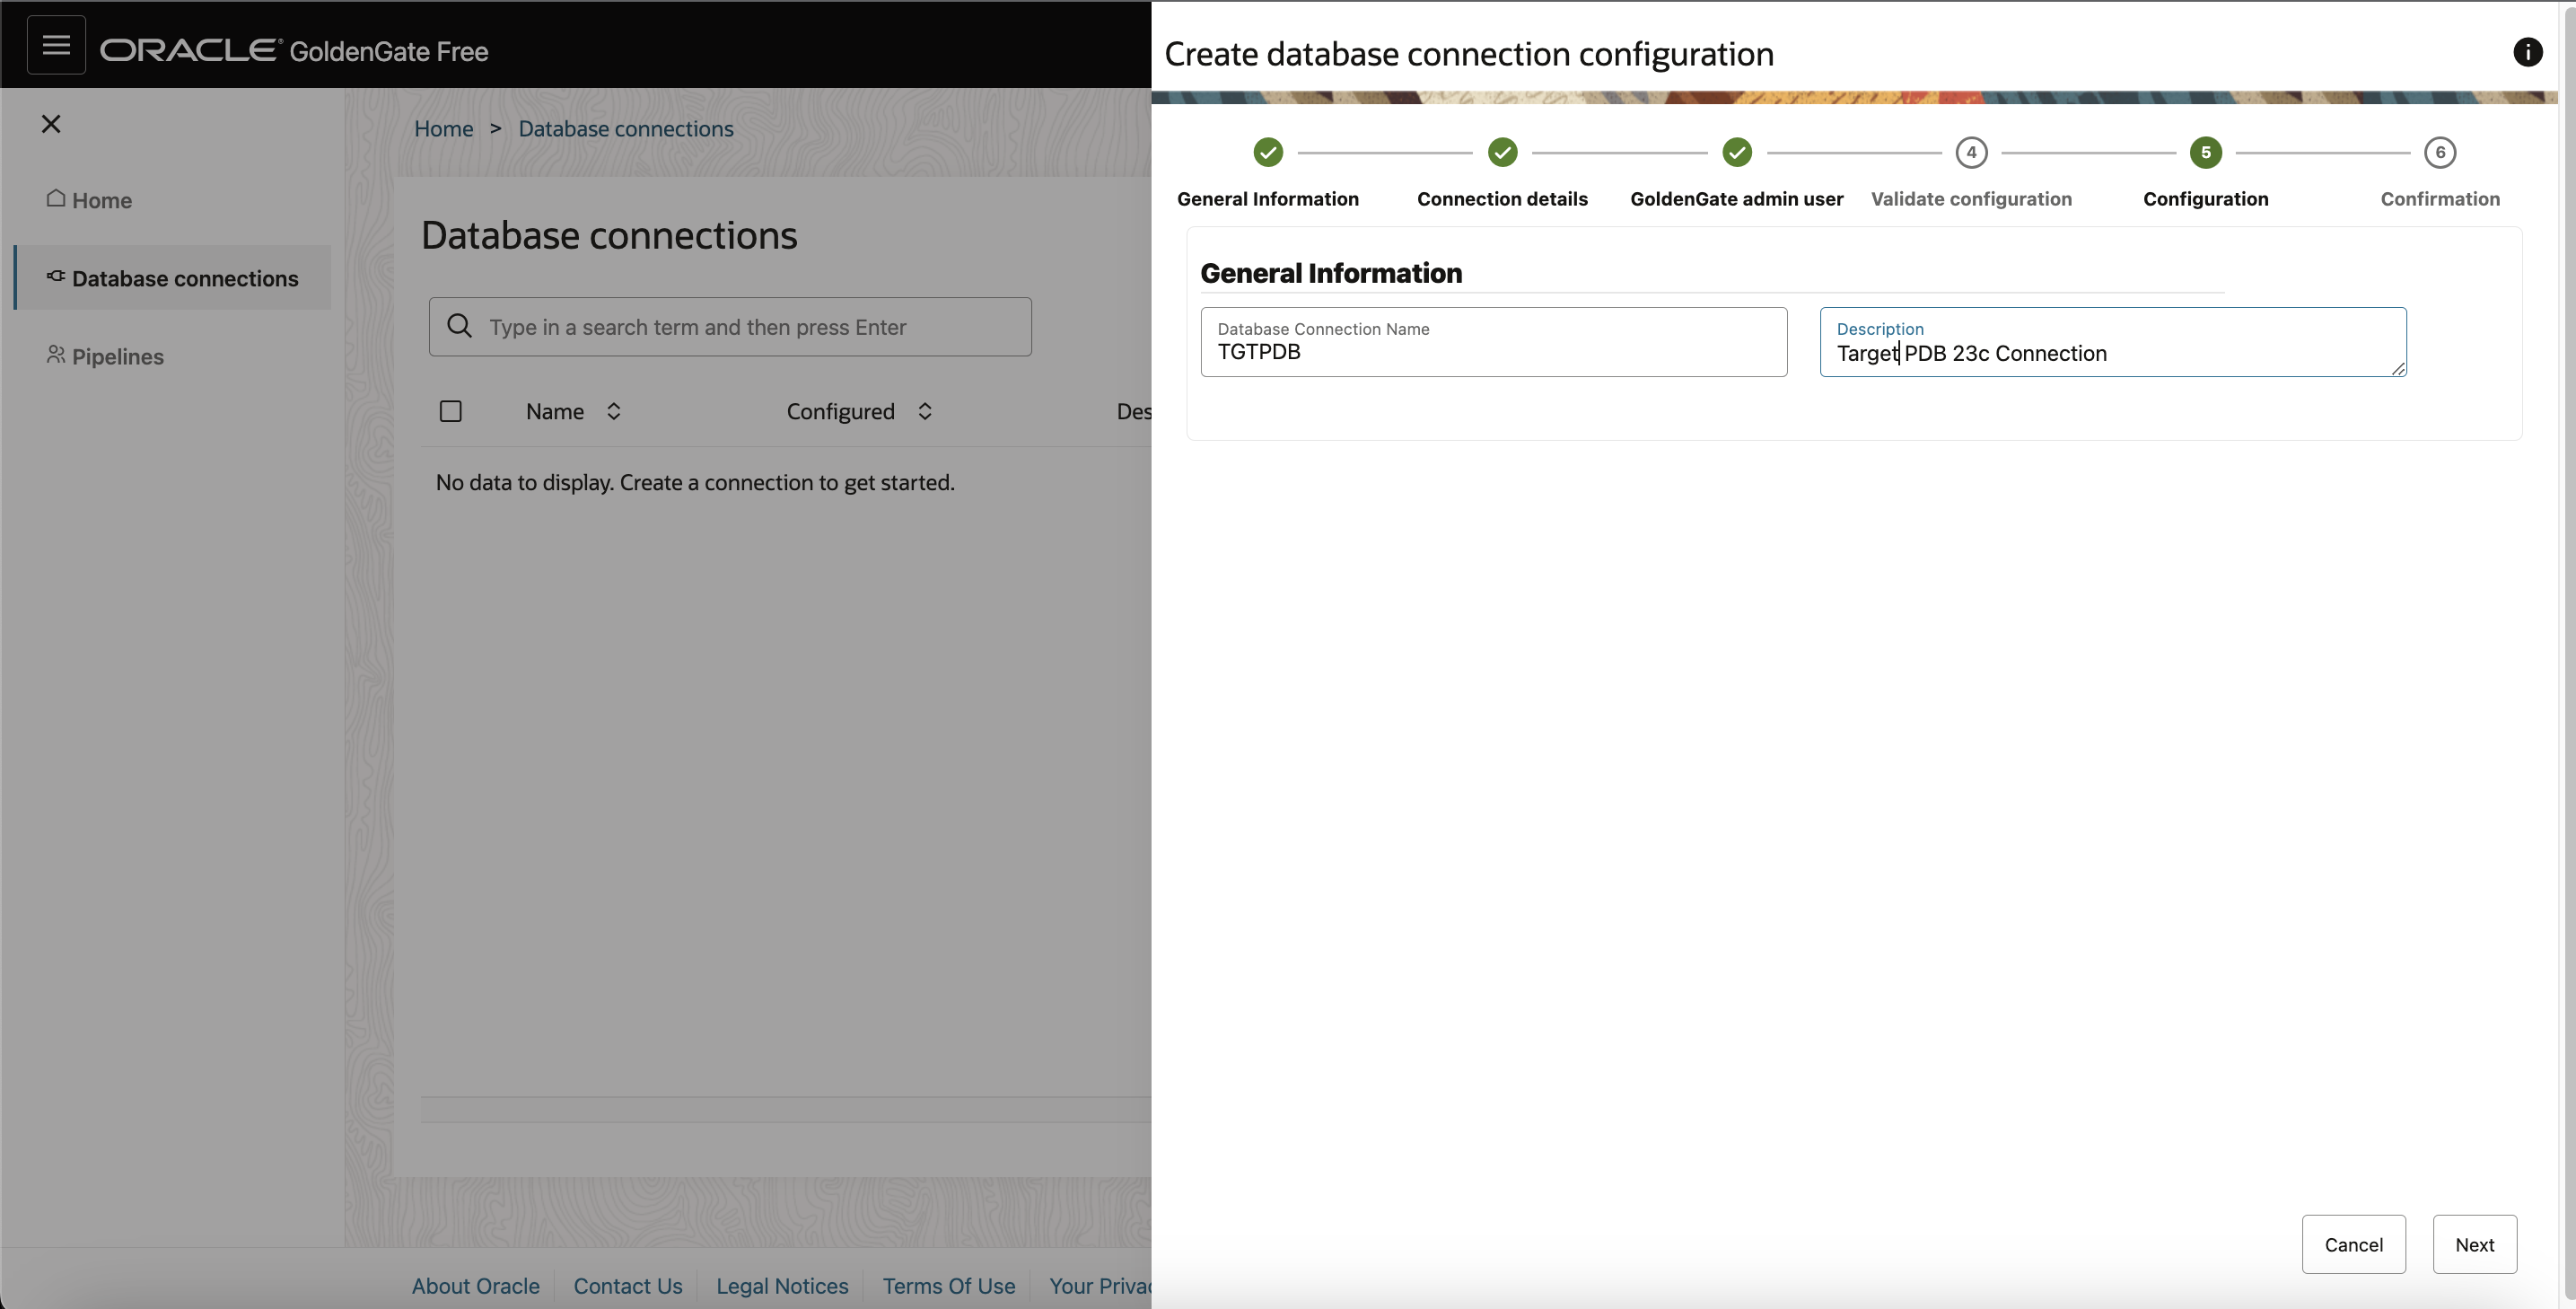
On the General Information page, specify a name and description for the connection and click Next.
On the Connection details page, Select Source under Connection Role. Select Basic under Connection Type and enter database host and port number in the following fields.
As the source for GoldenGate extract is Oracle Database 23.3, select Pluggable database (PDB) in Oracle Database 21c or above. Next ,provide Pluggable Database (PDB) service name .
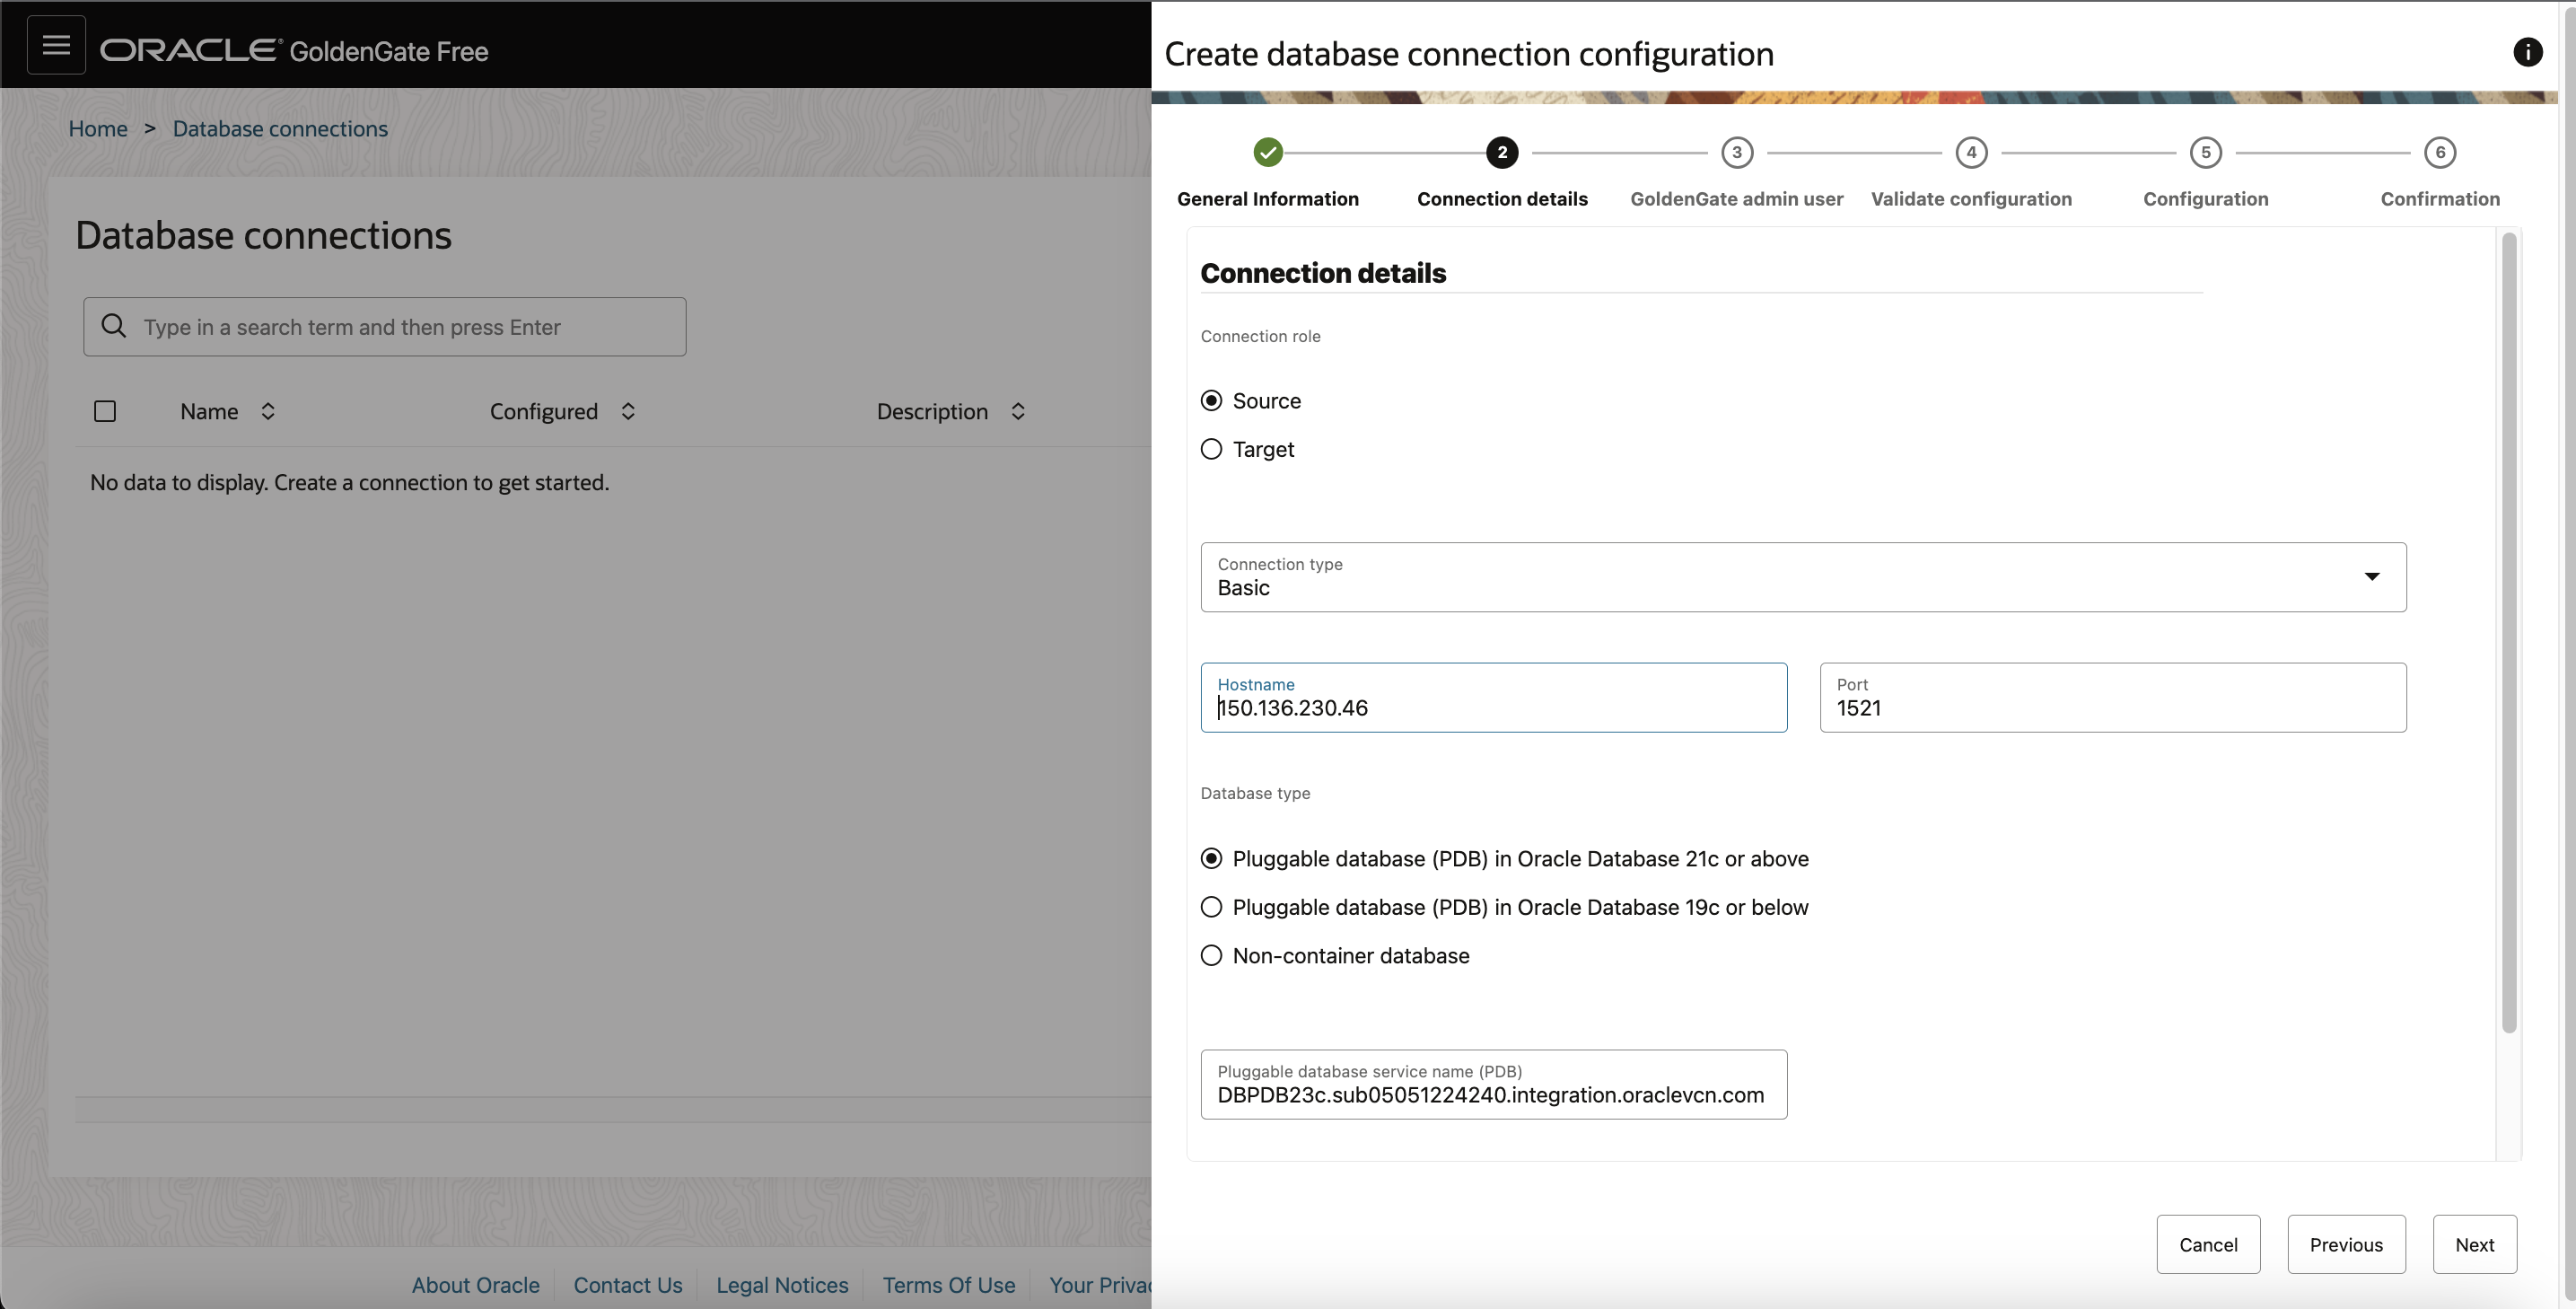
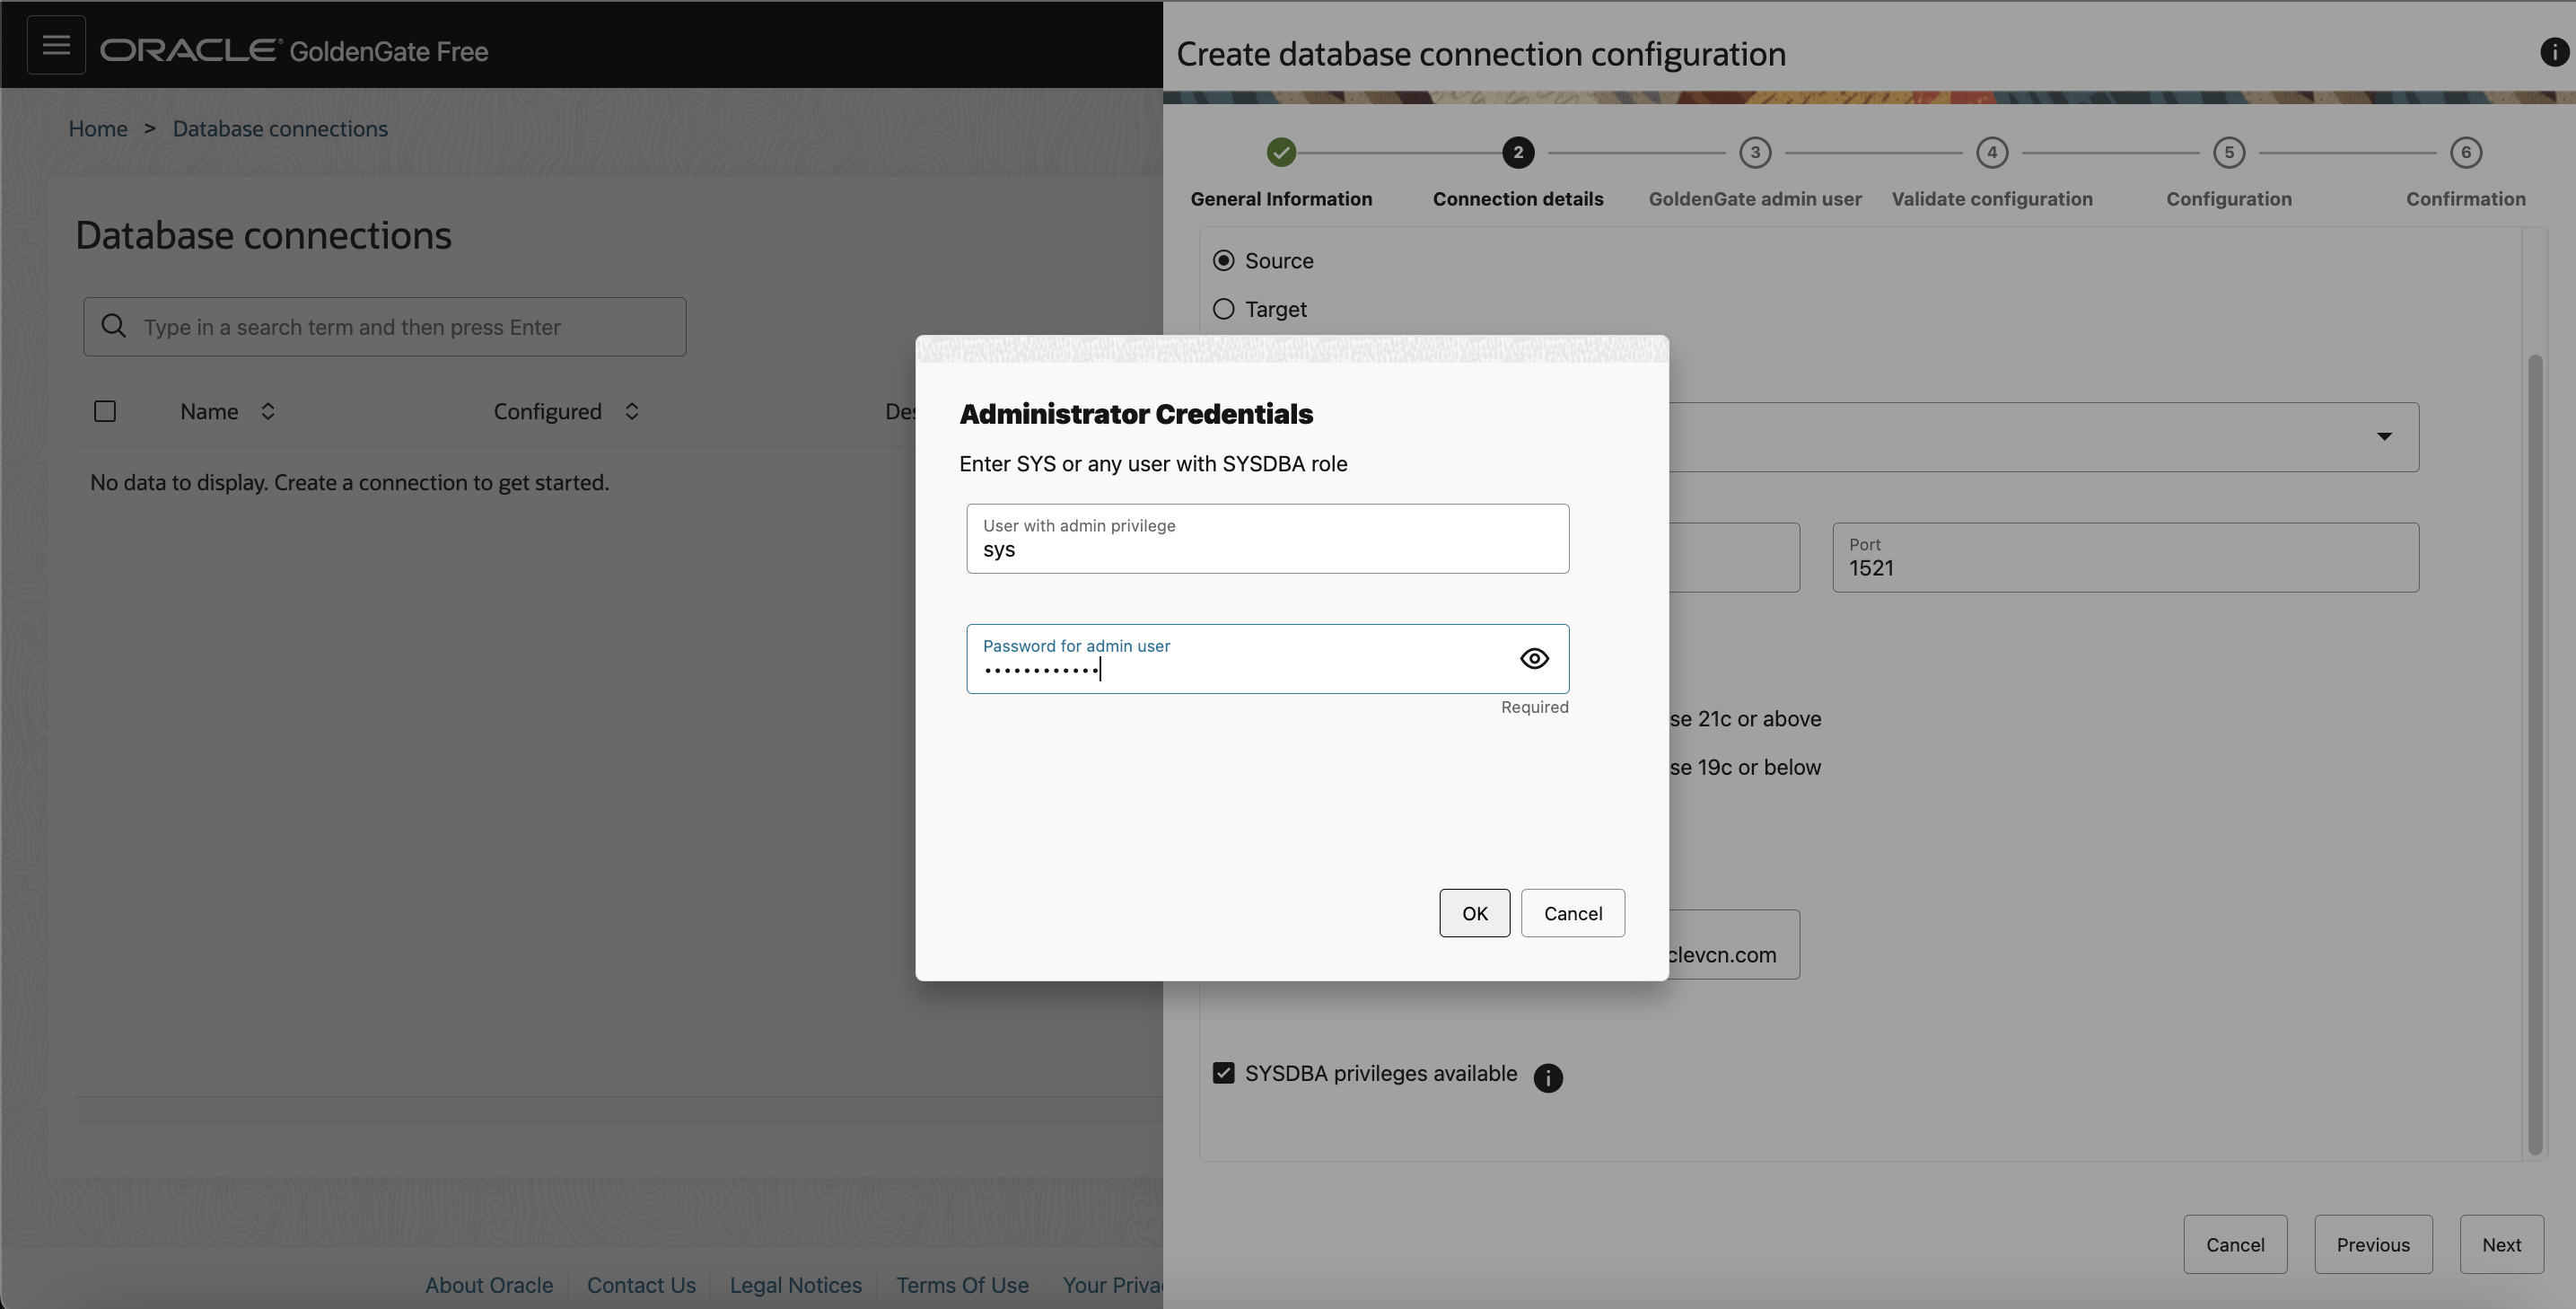
If you have DBA privileges for the container database, select SYSDBA privileges available checkbox, and then provide sys or system Credentials in the dialog box.
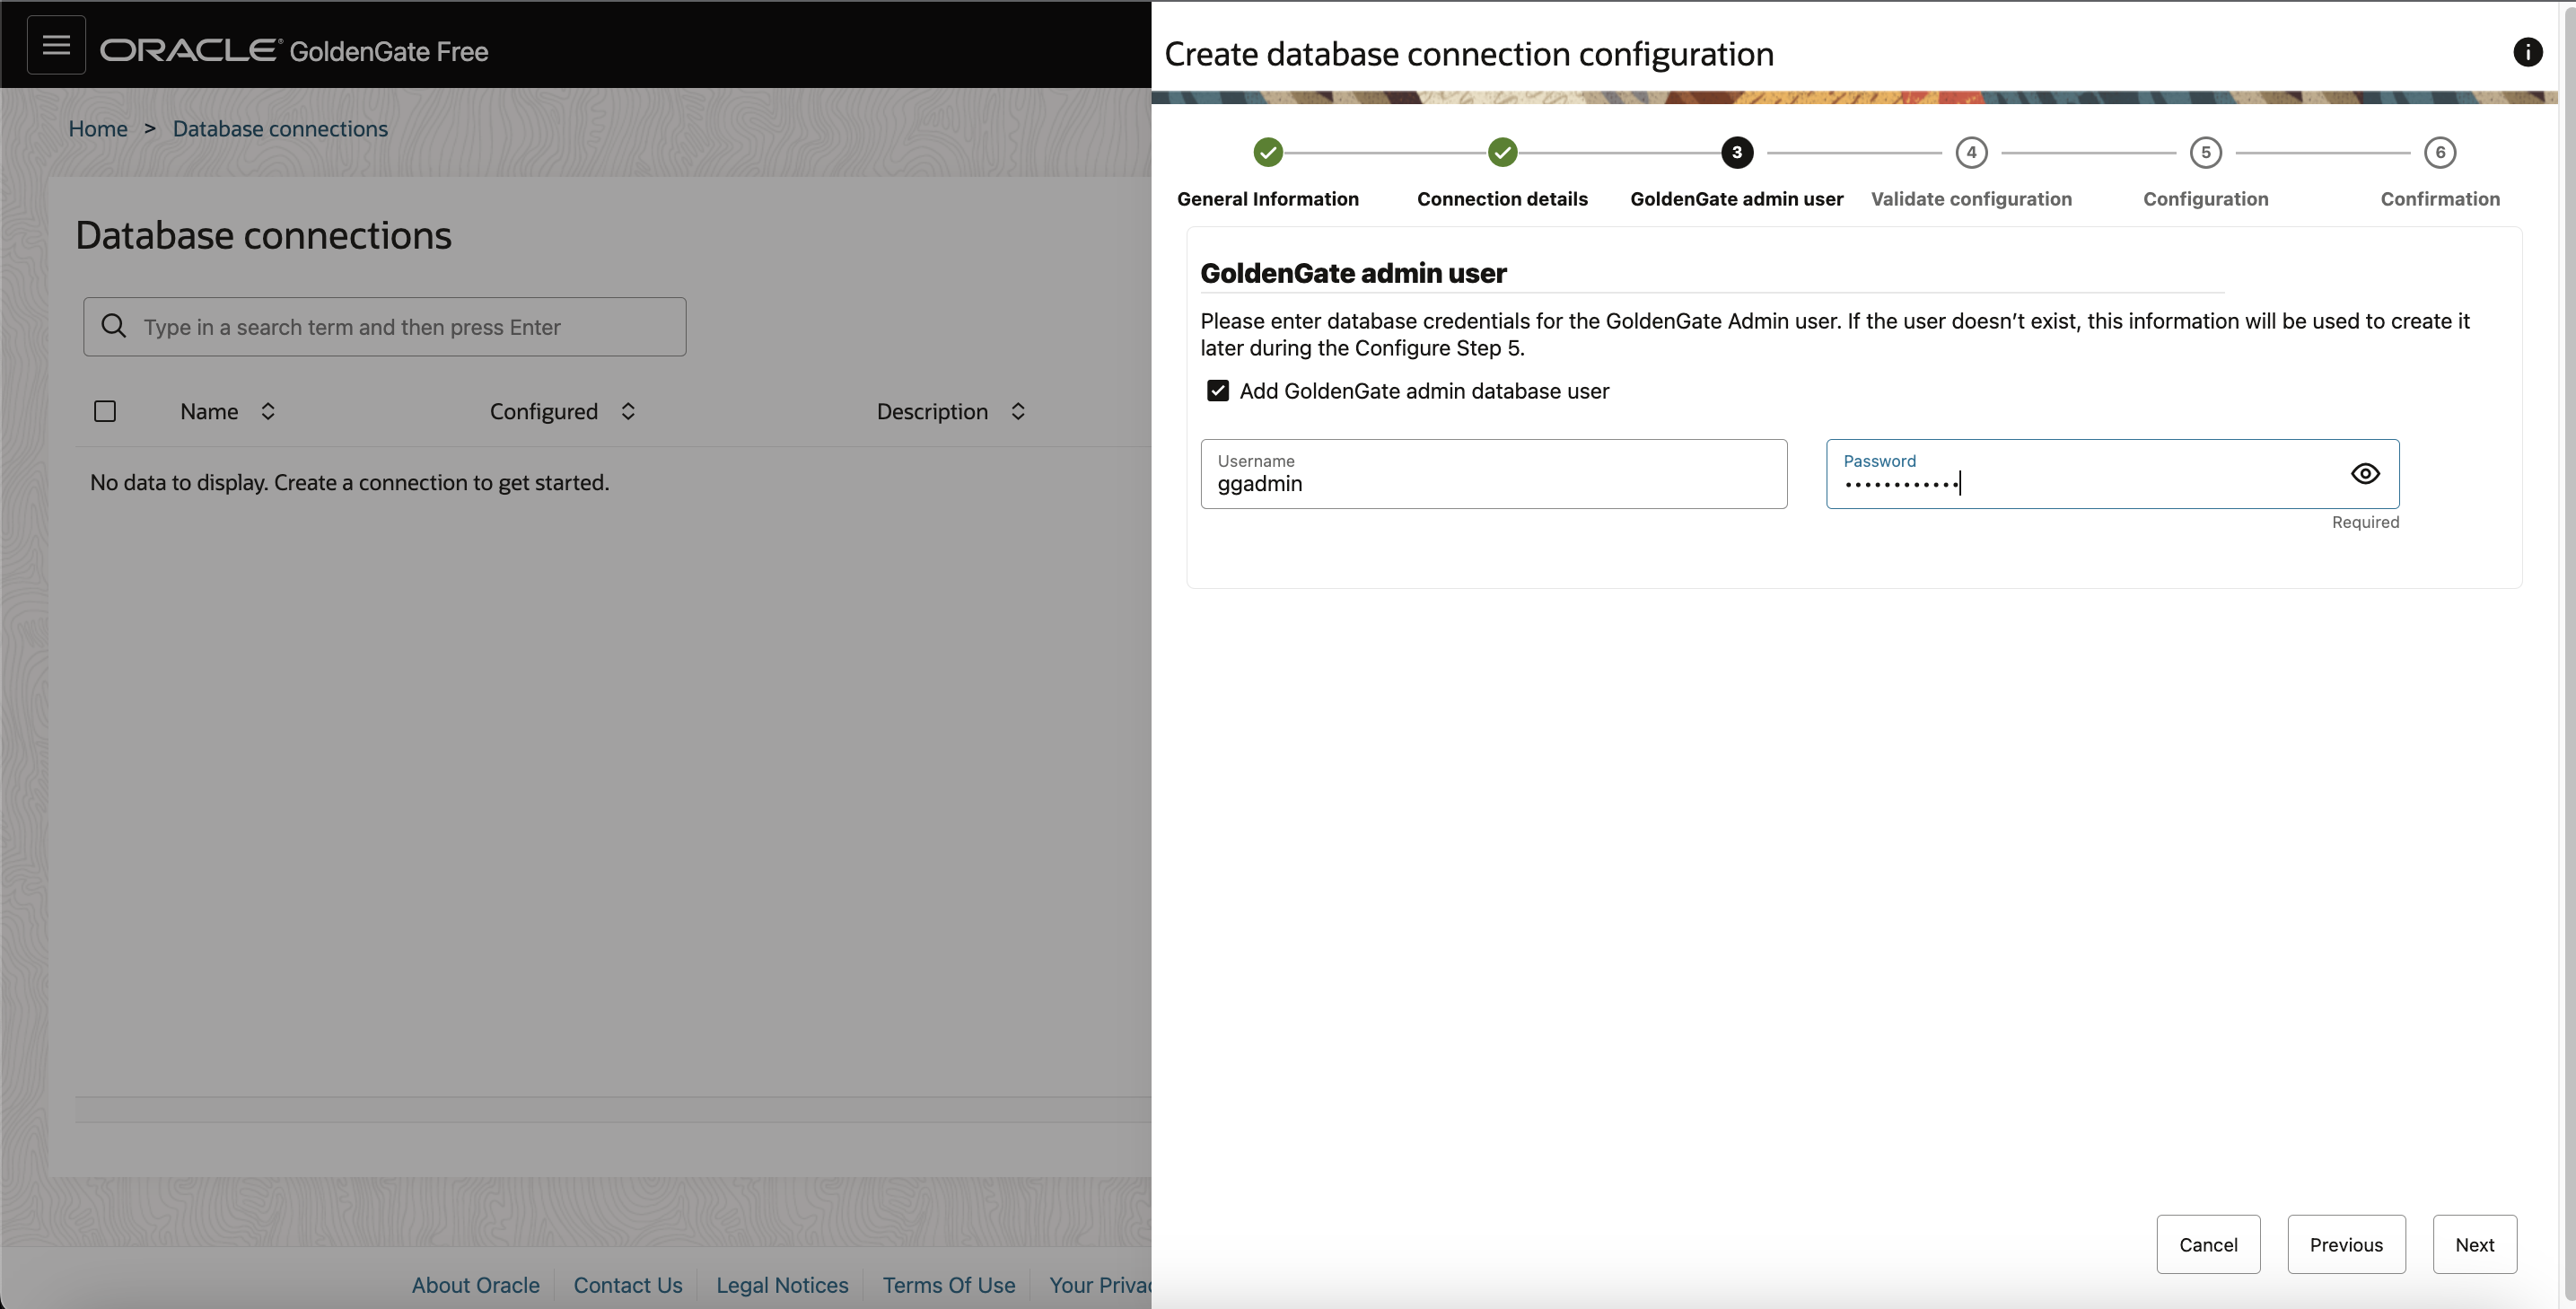
On the GoldenGate admin user page:
Select the checkbox with Add GoldenGate admin database user if one doesn’t yet exist. Enter the GoldenGate username and password.
Note: For a container (CDB) Oracle Database connection, the GoldenGate admin user is typically c##ggadmin. For a non-CDB Oracle Database connection, use ggadmin.Then click Next.
On the Configuration page , click Run analysis.
You can also Review the generated script completely, take note of recommended actions, and then select Run SQL to run it now, or Download SQL for your DBA to run the script separately.
Note: If you don’t have DBA privileges to execute the above step, click Download analysis script and have your DBA run it for you.
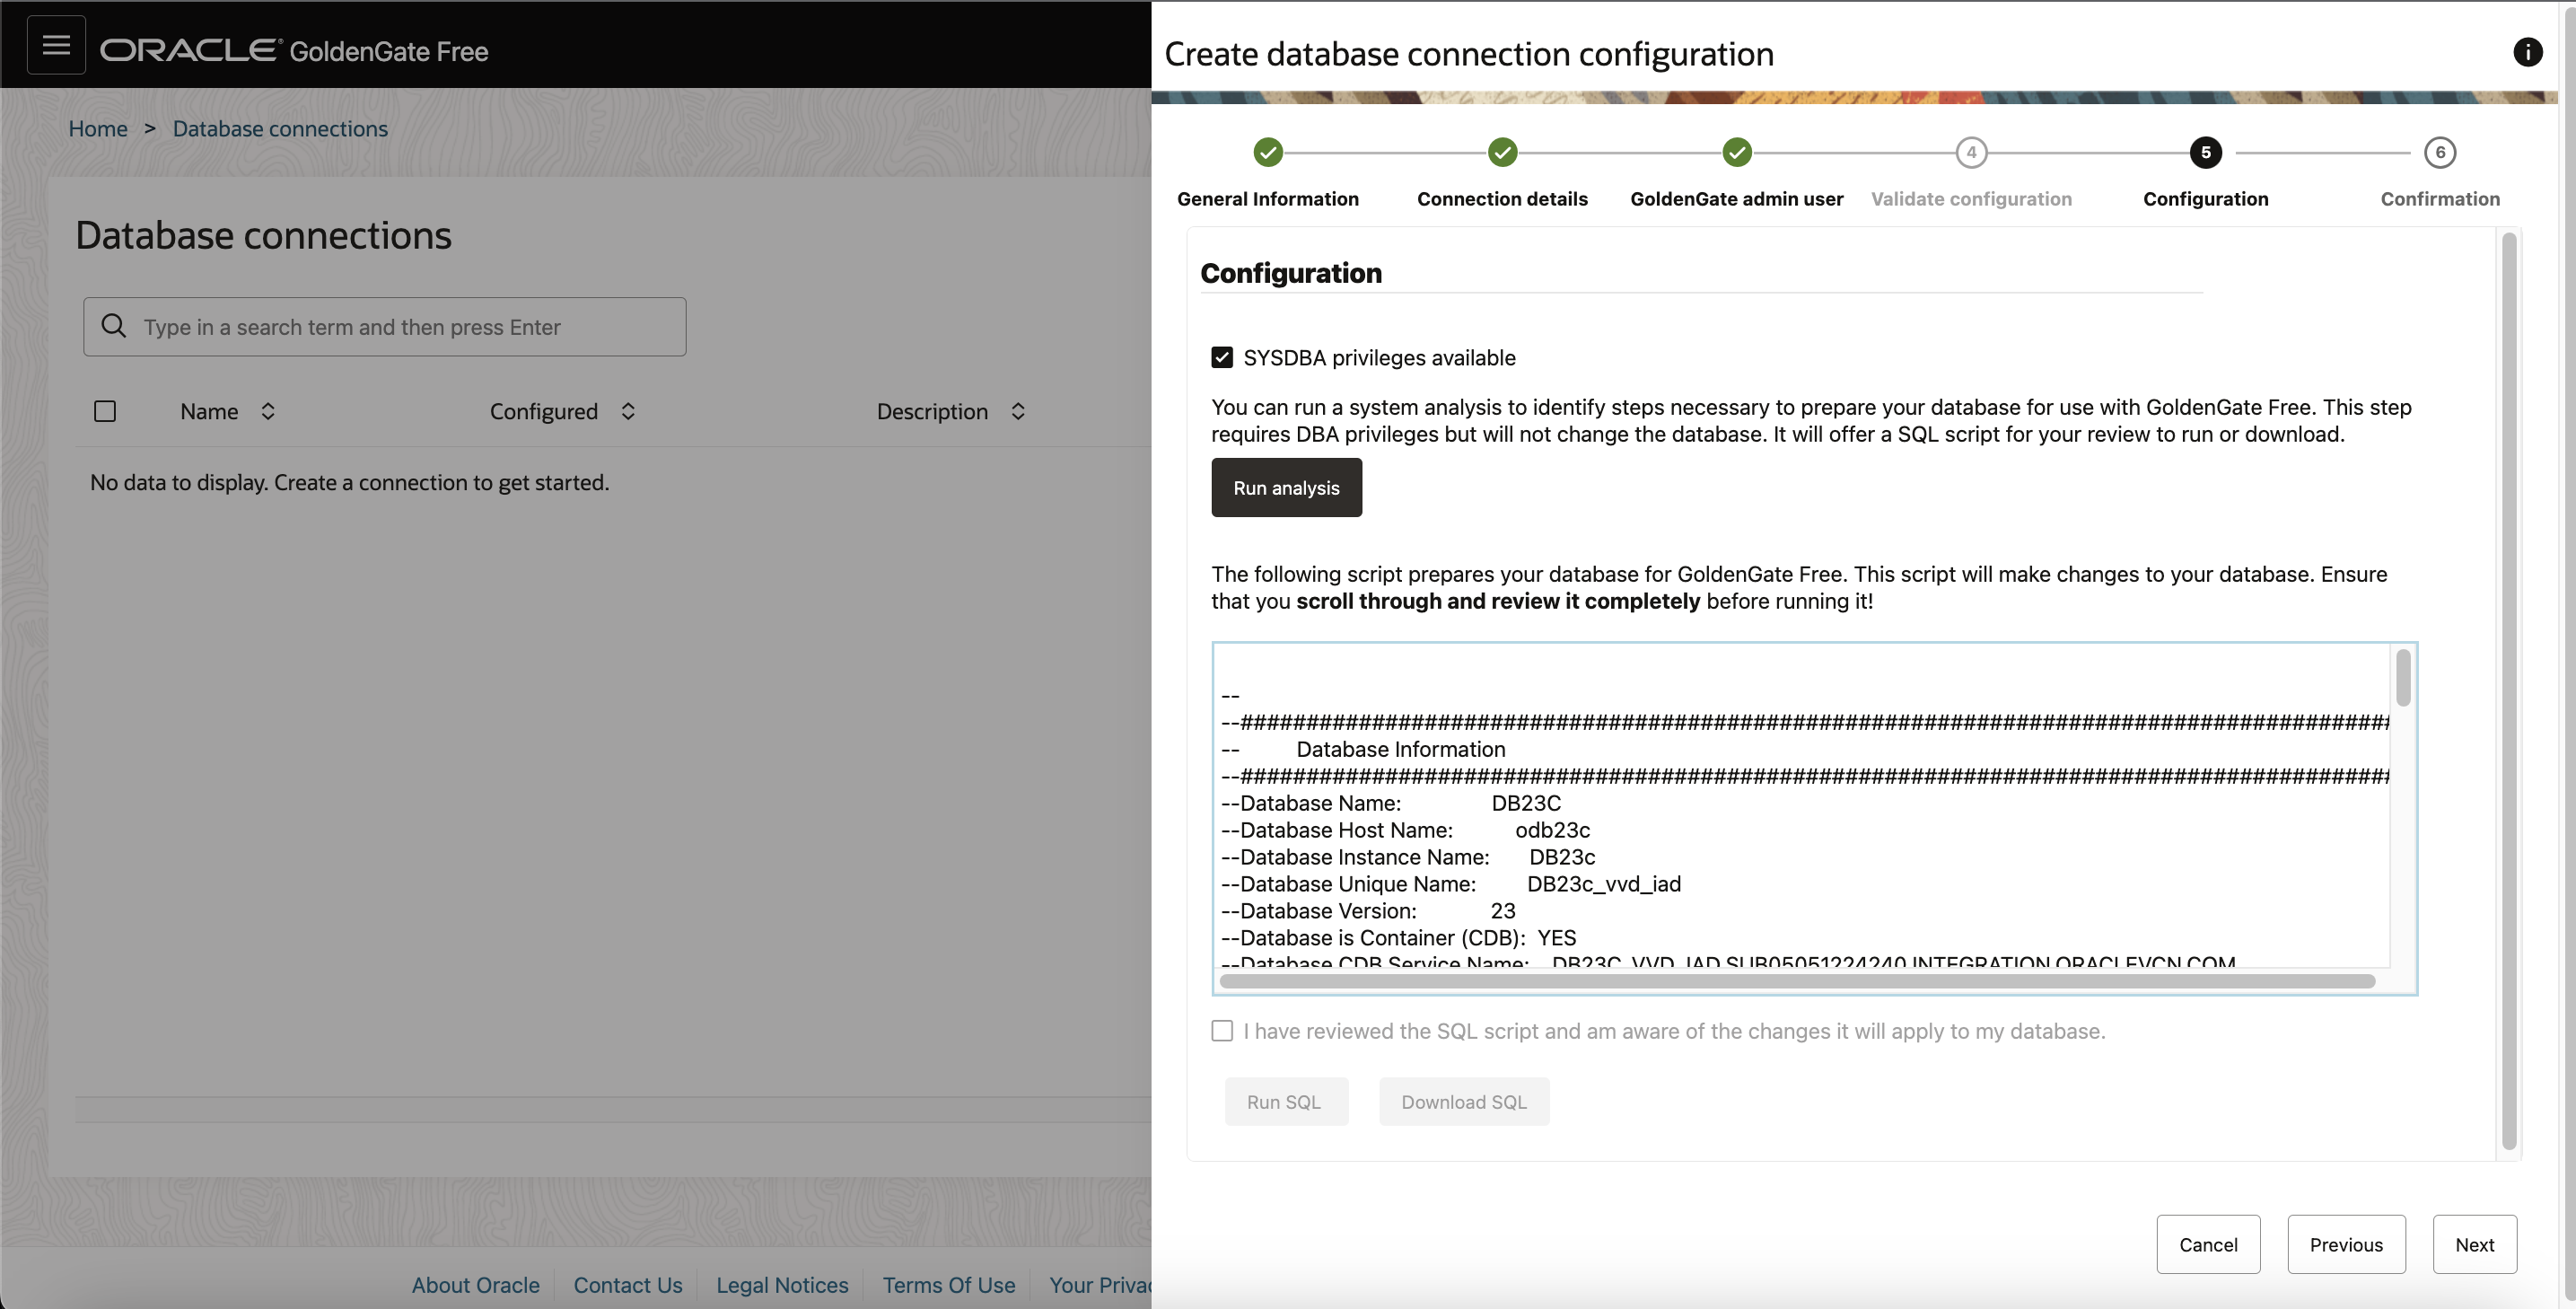
After the script is run, the output displays the database information, the status of the database settings set for Oracle GoldenGate, and confirmation of database privileges granted to the Oracle GoldenGate user. Inconsistencies and errors reported in the script output will also include guidance on how to fix them. These errors must be fixed before you can create connections and pipelines.
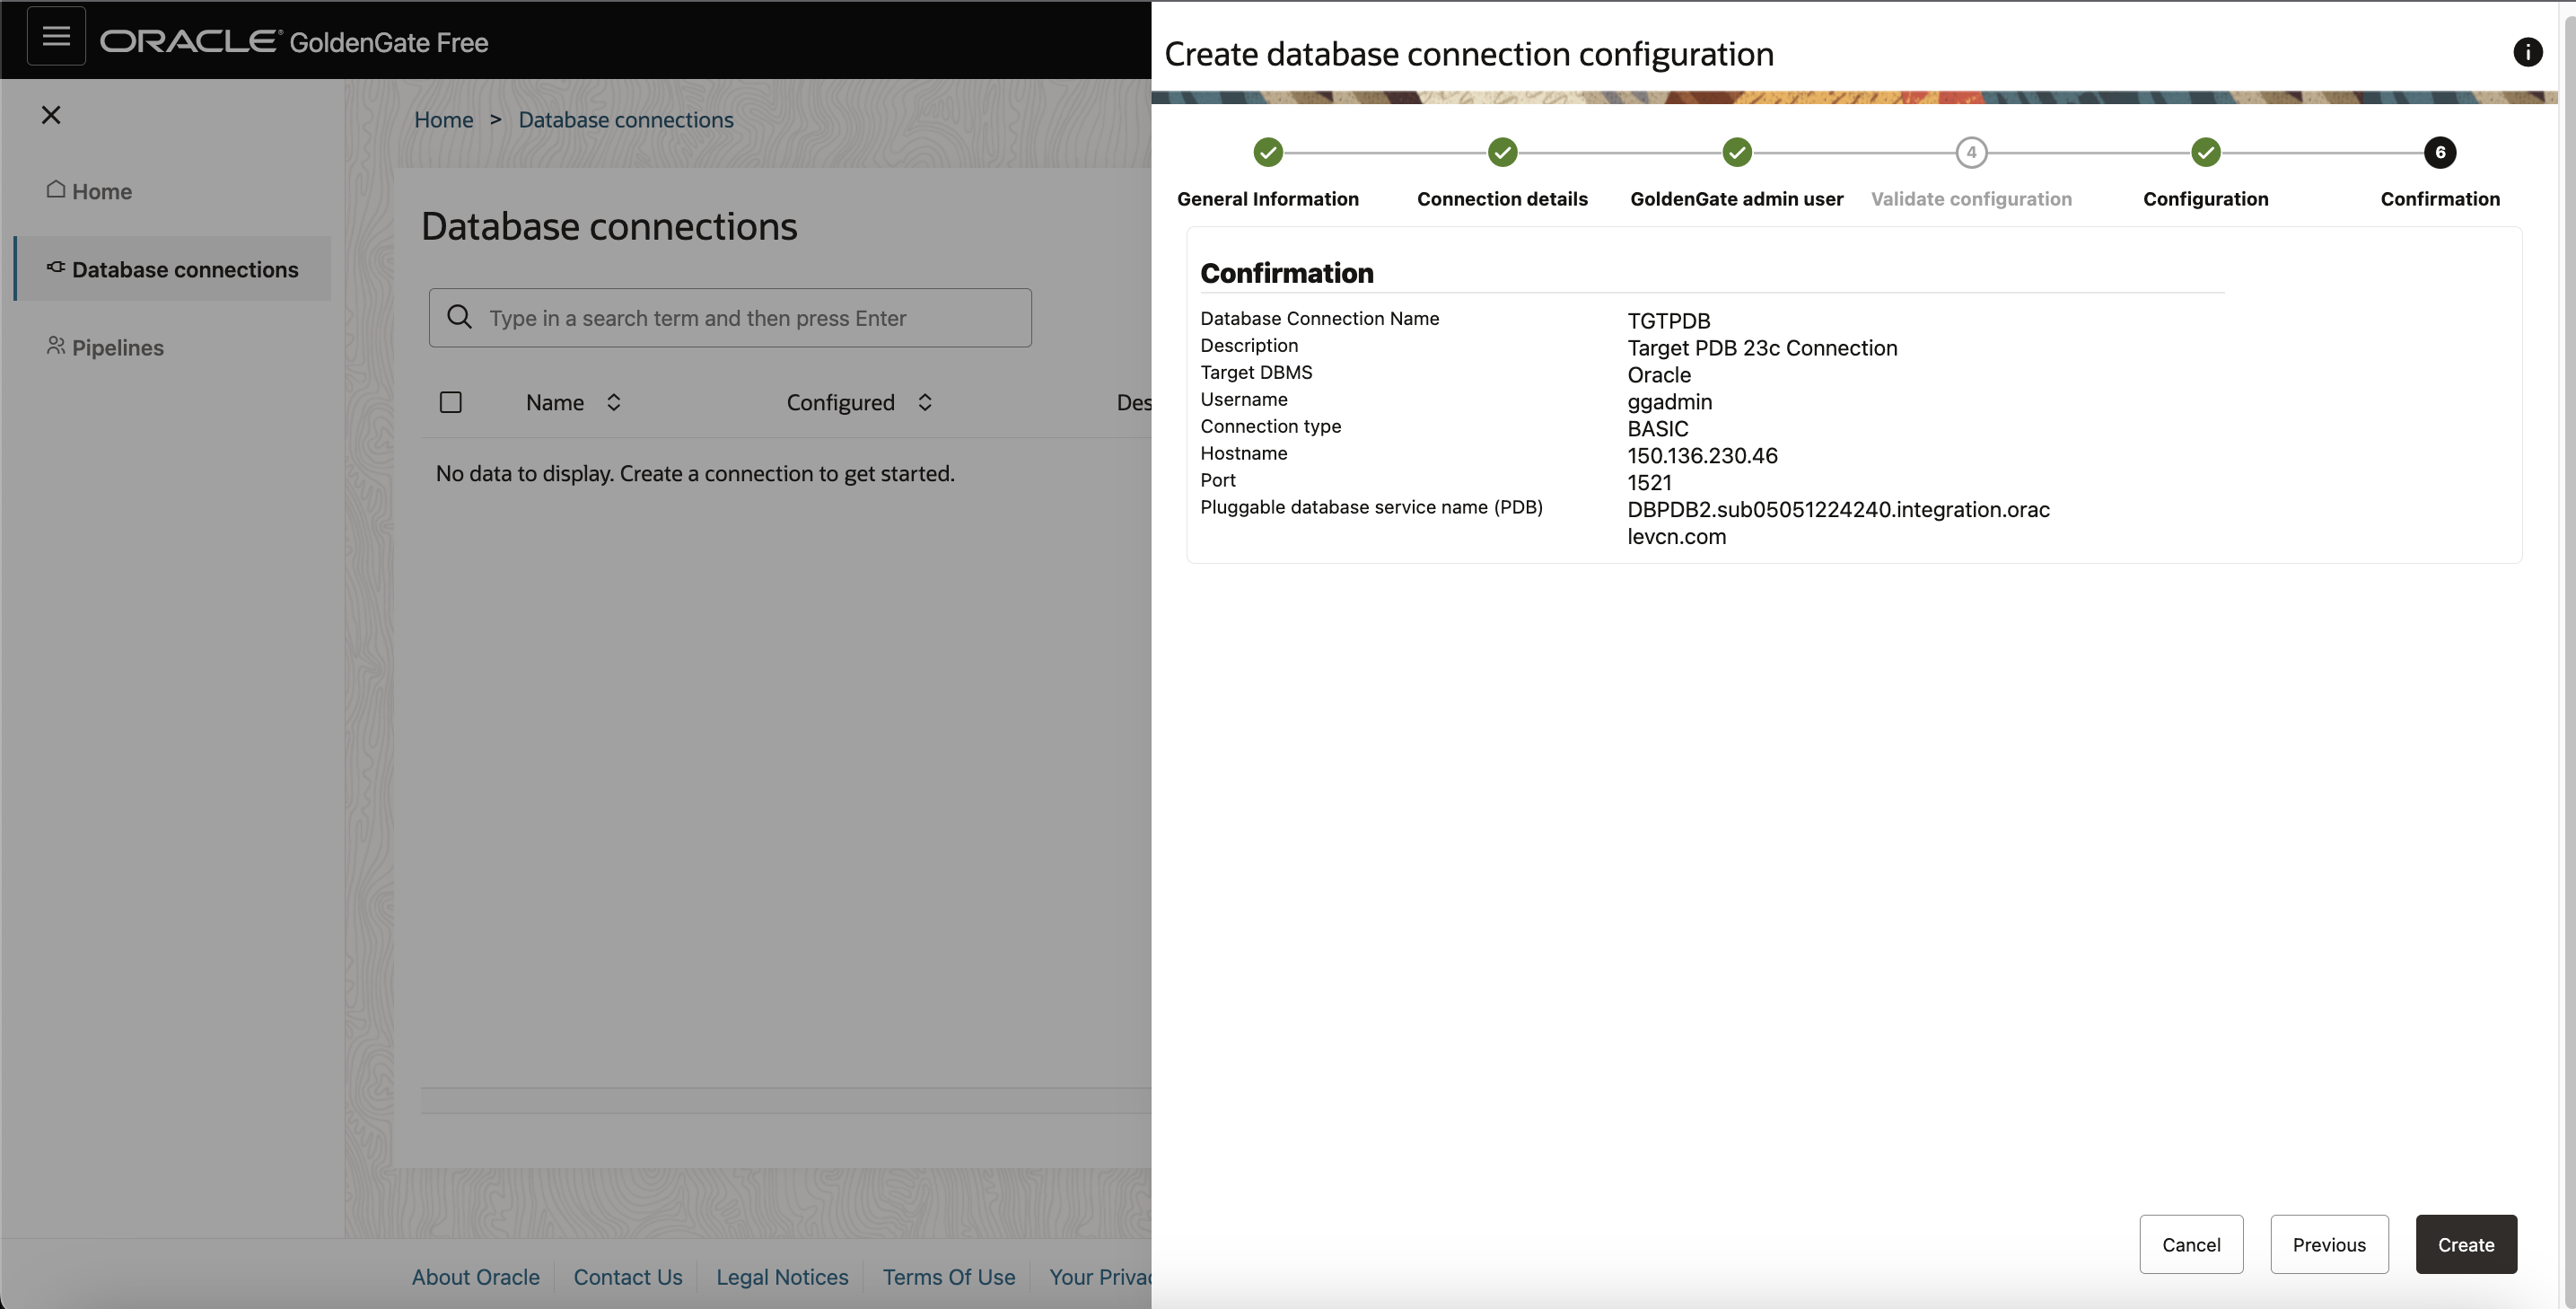
On the Next page, review a summary of your connection details, and then click Create.
For this blog post, the configuration includes data replication from one PDB to another with the same Database container 23.3.
For creating a connection to the Target Database, create on Create a Connection button again. On General Informaruion page, provide a connection name and details.
On the Connection details page , select Target as connection role .Provide connection details i.e. Host Port and Service name of Target Database (PDB),which will same in our case as the Target PDB is in the eame container as Source PDB.
Repeat the remaining steps as above mentioned for creating the source conenction.
On the Validate configuration page, click Validate to ensure that your database is accessible and ready for GoldenGate to use.
The database connection only validates when the correct service name and password are used. If the service name or password is incorrect, then an error message appears and action must be taken by your database administrator to update the analysis script.
Finally, Click Create to create a connetion for Target Database.
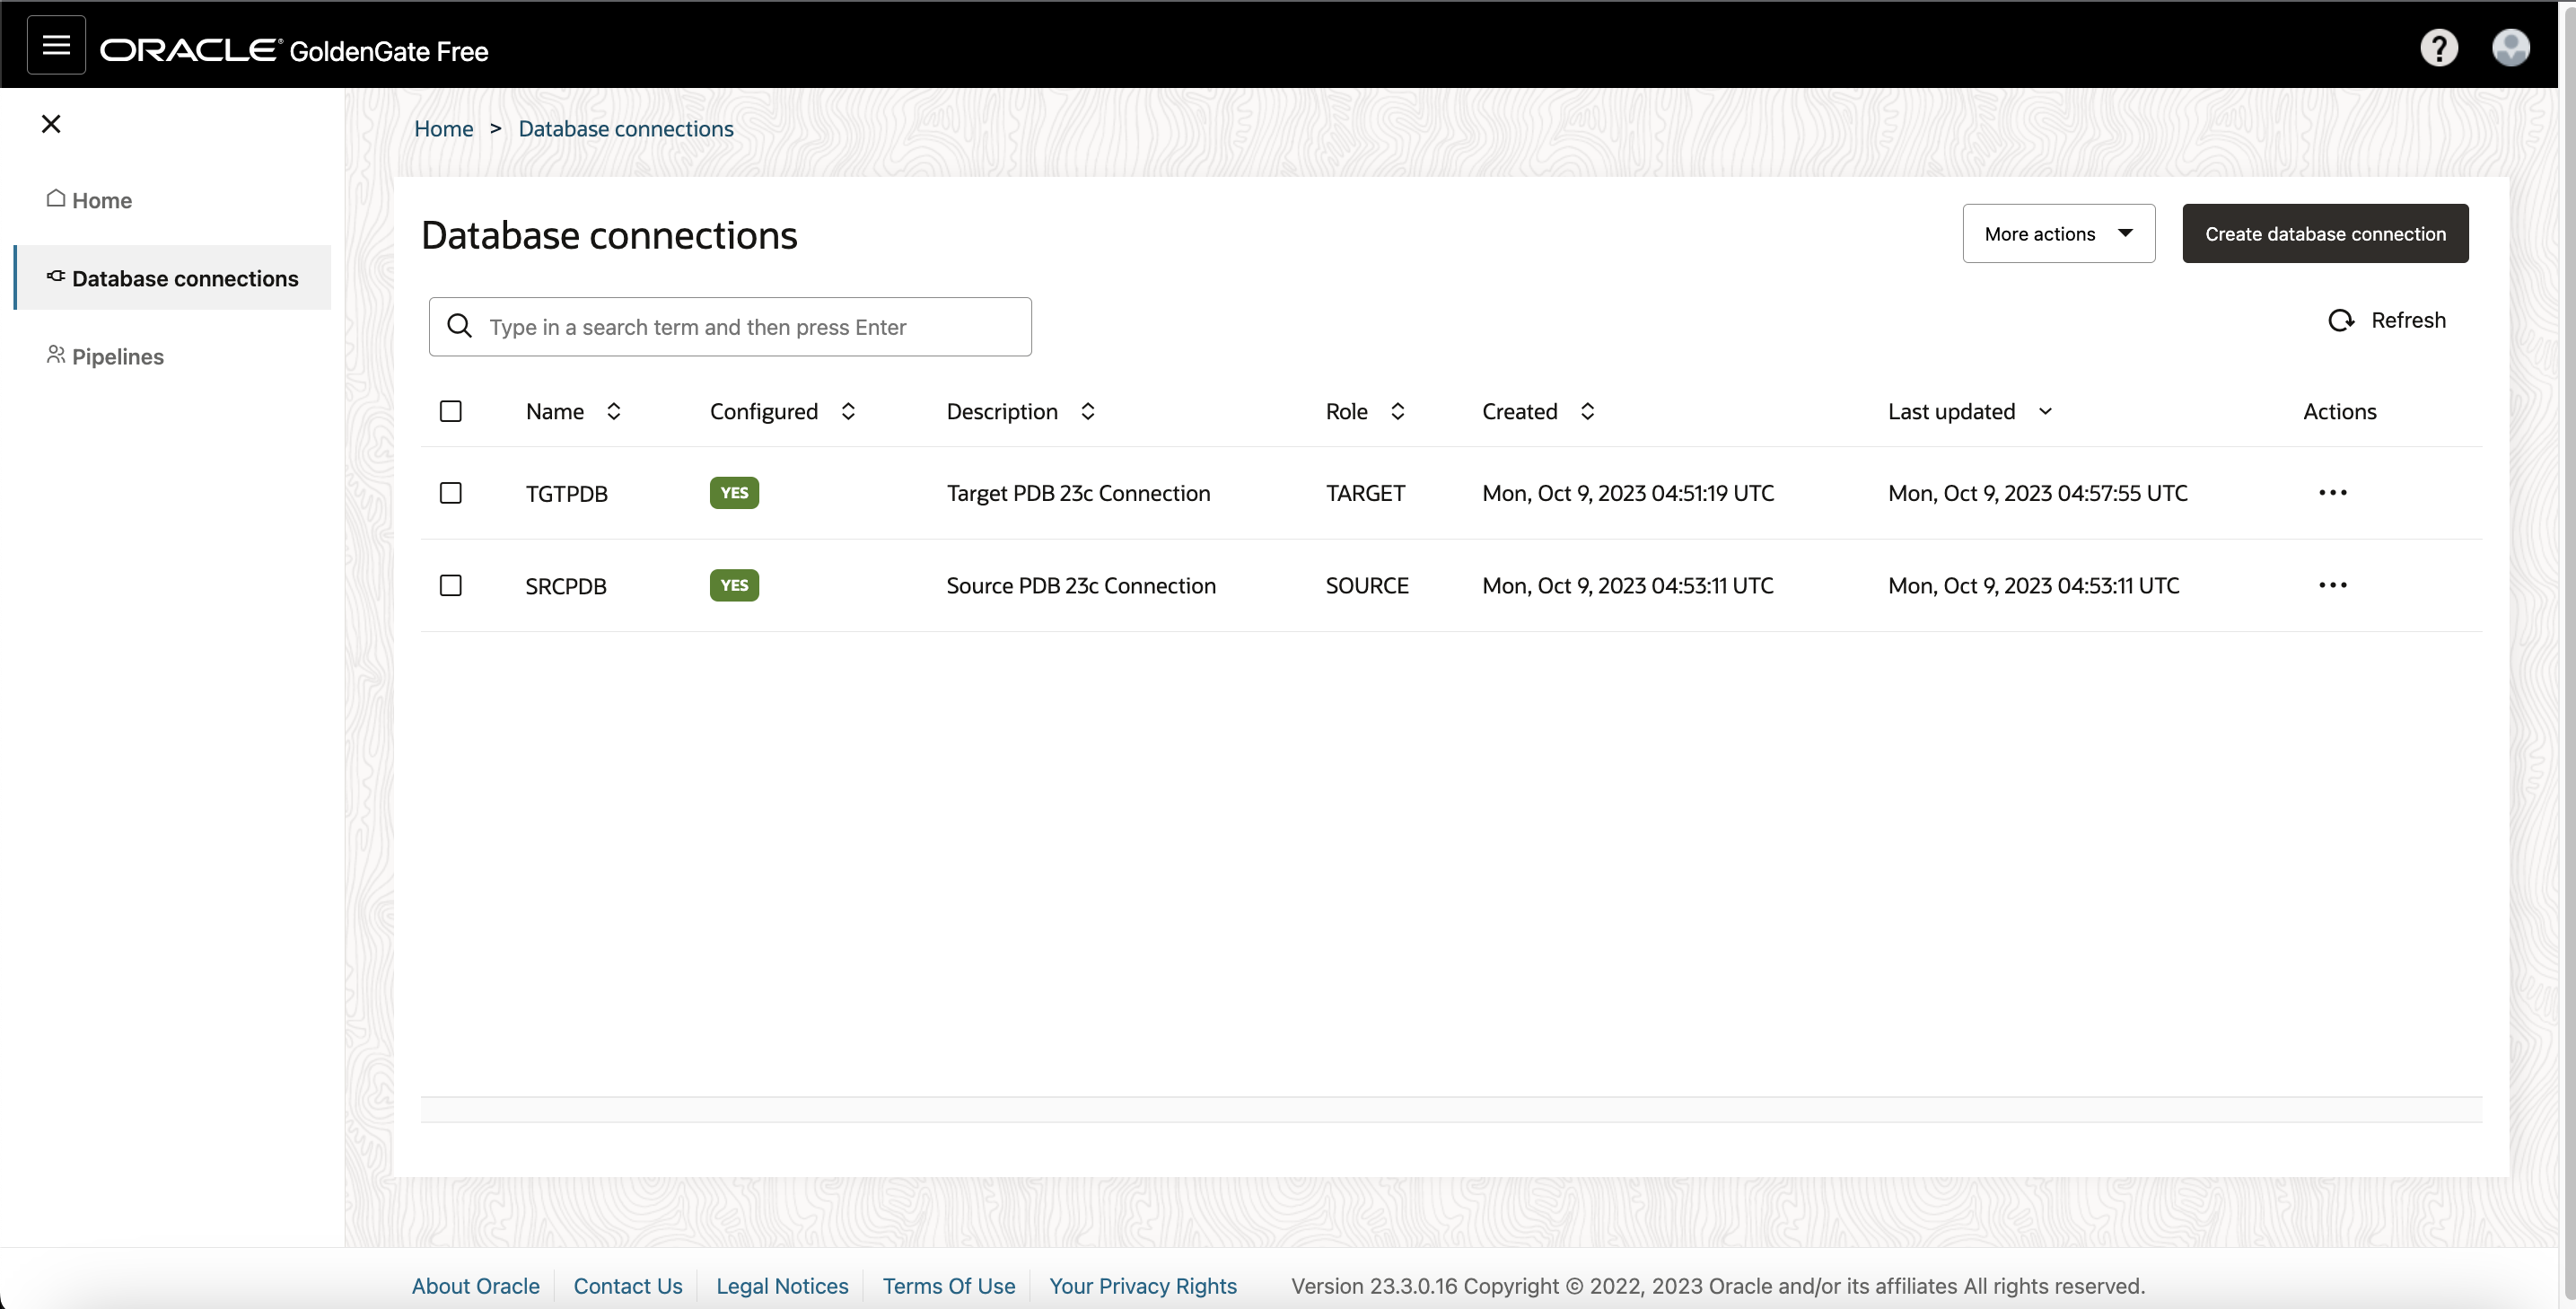
On the Home page, you can view that both the Source and Target Database connections are successfully created.
Follow a recipe and Create a Pipeline
Note: If you’re familiar with Oracle GoldenGate Extract and Replicats, then pipelines are an abstraction of the Oracle GoldenGate replication process.
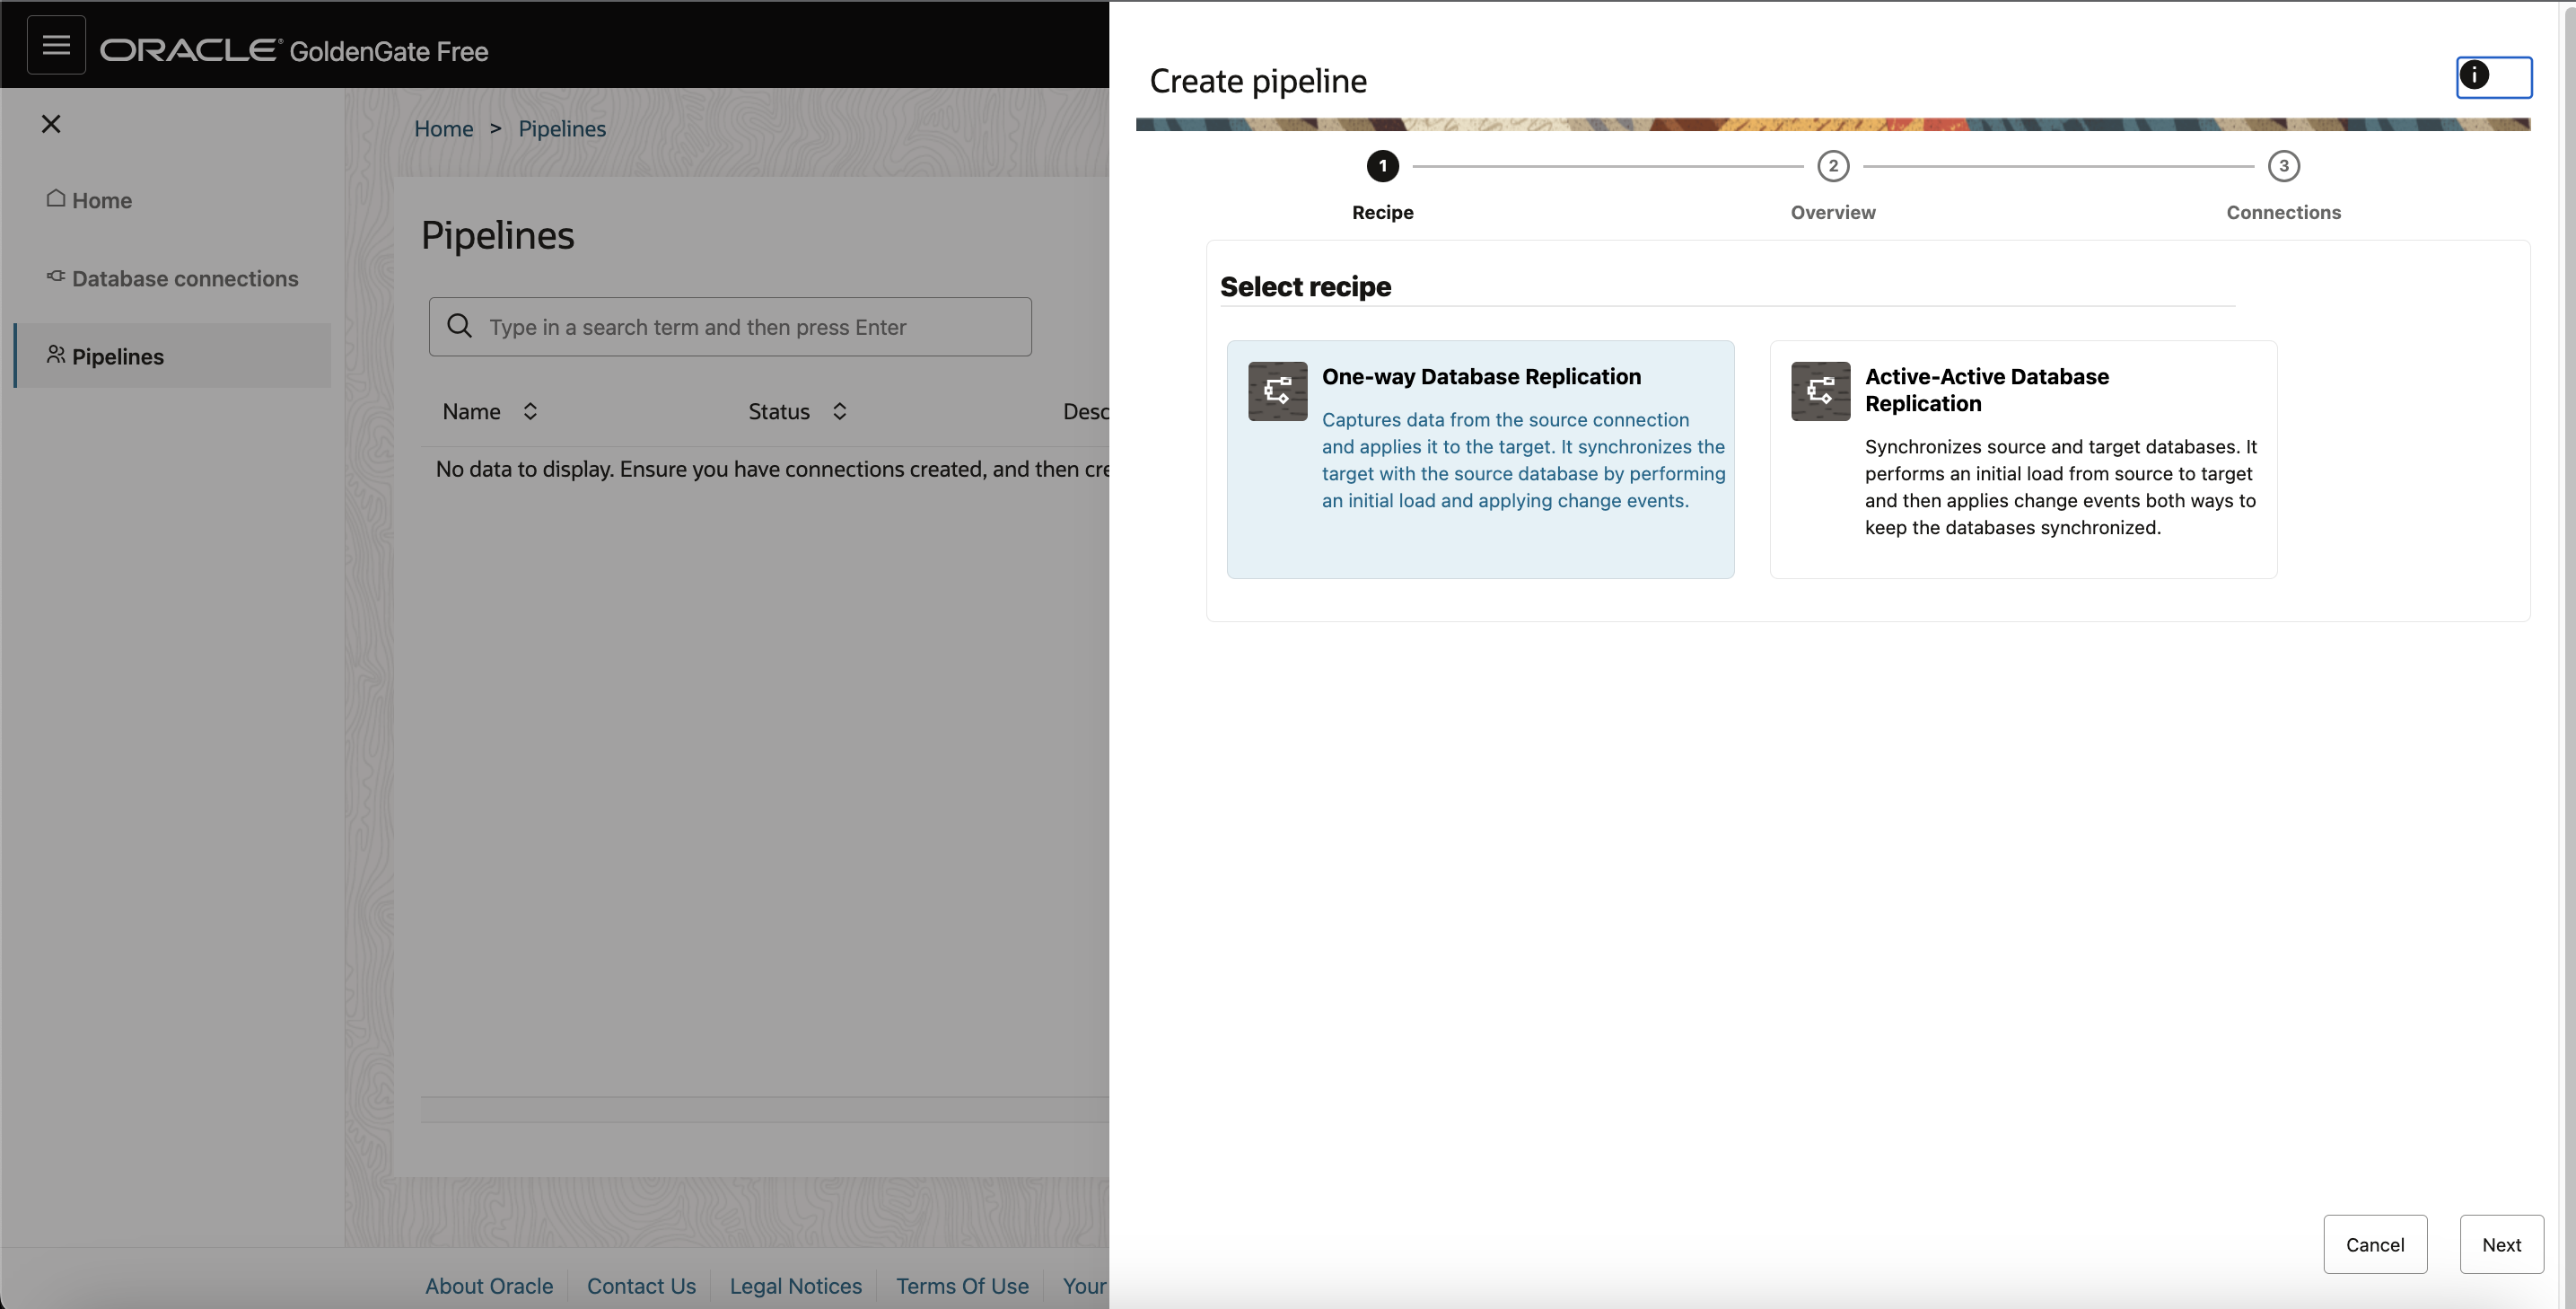
- On the GoldenGate Free Home page, click Create pipeline.
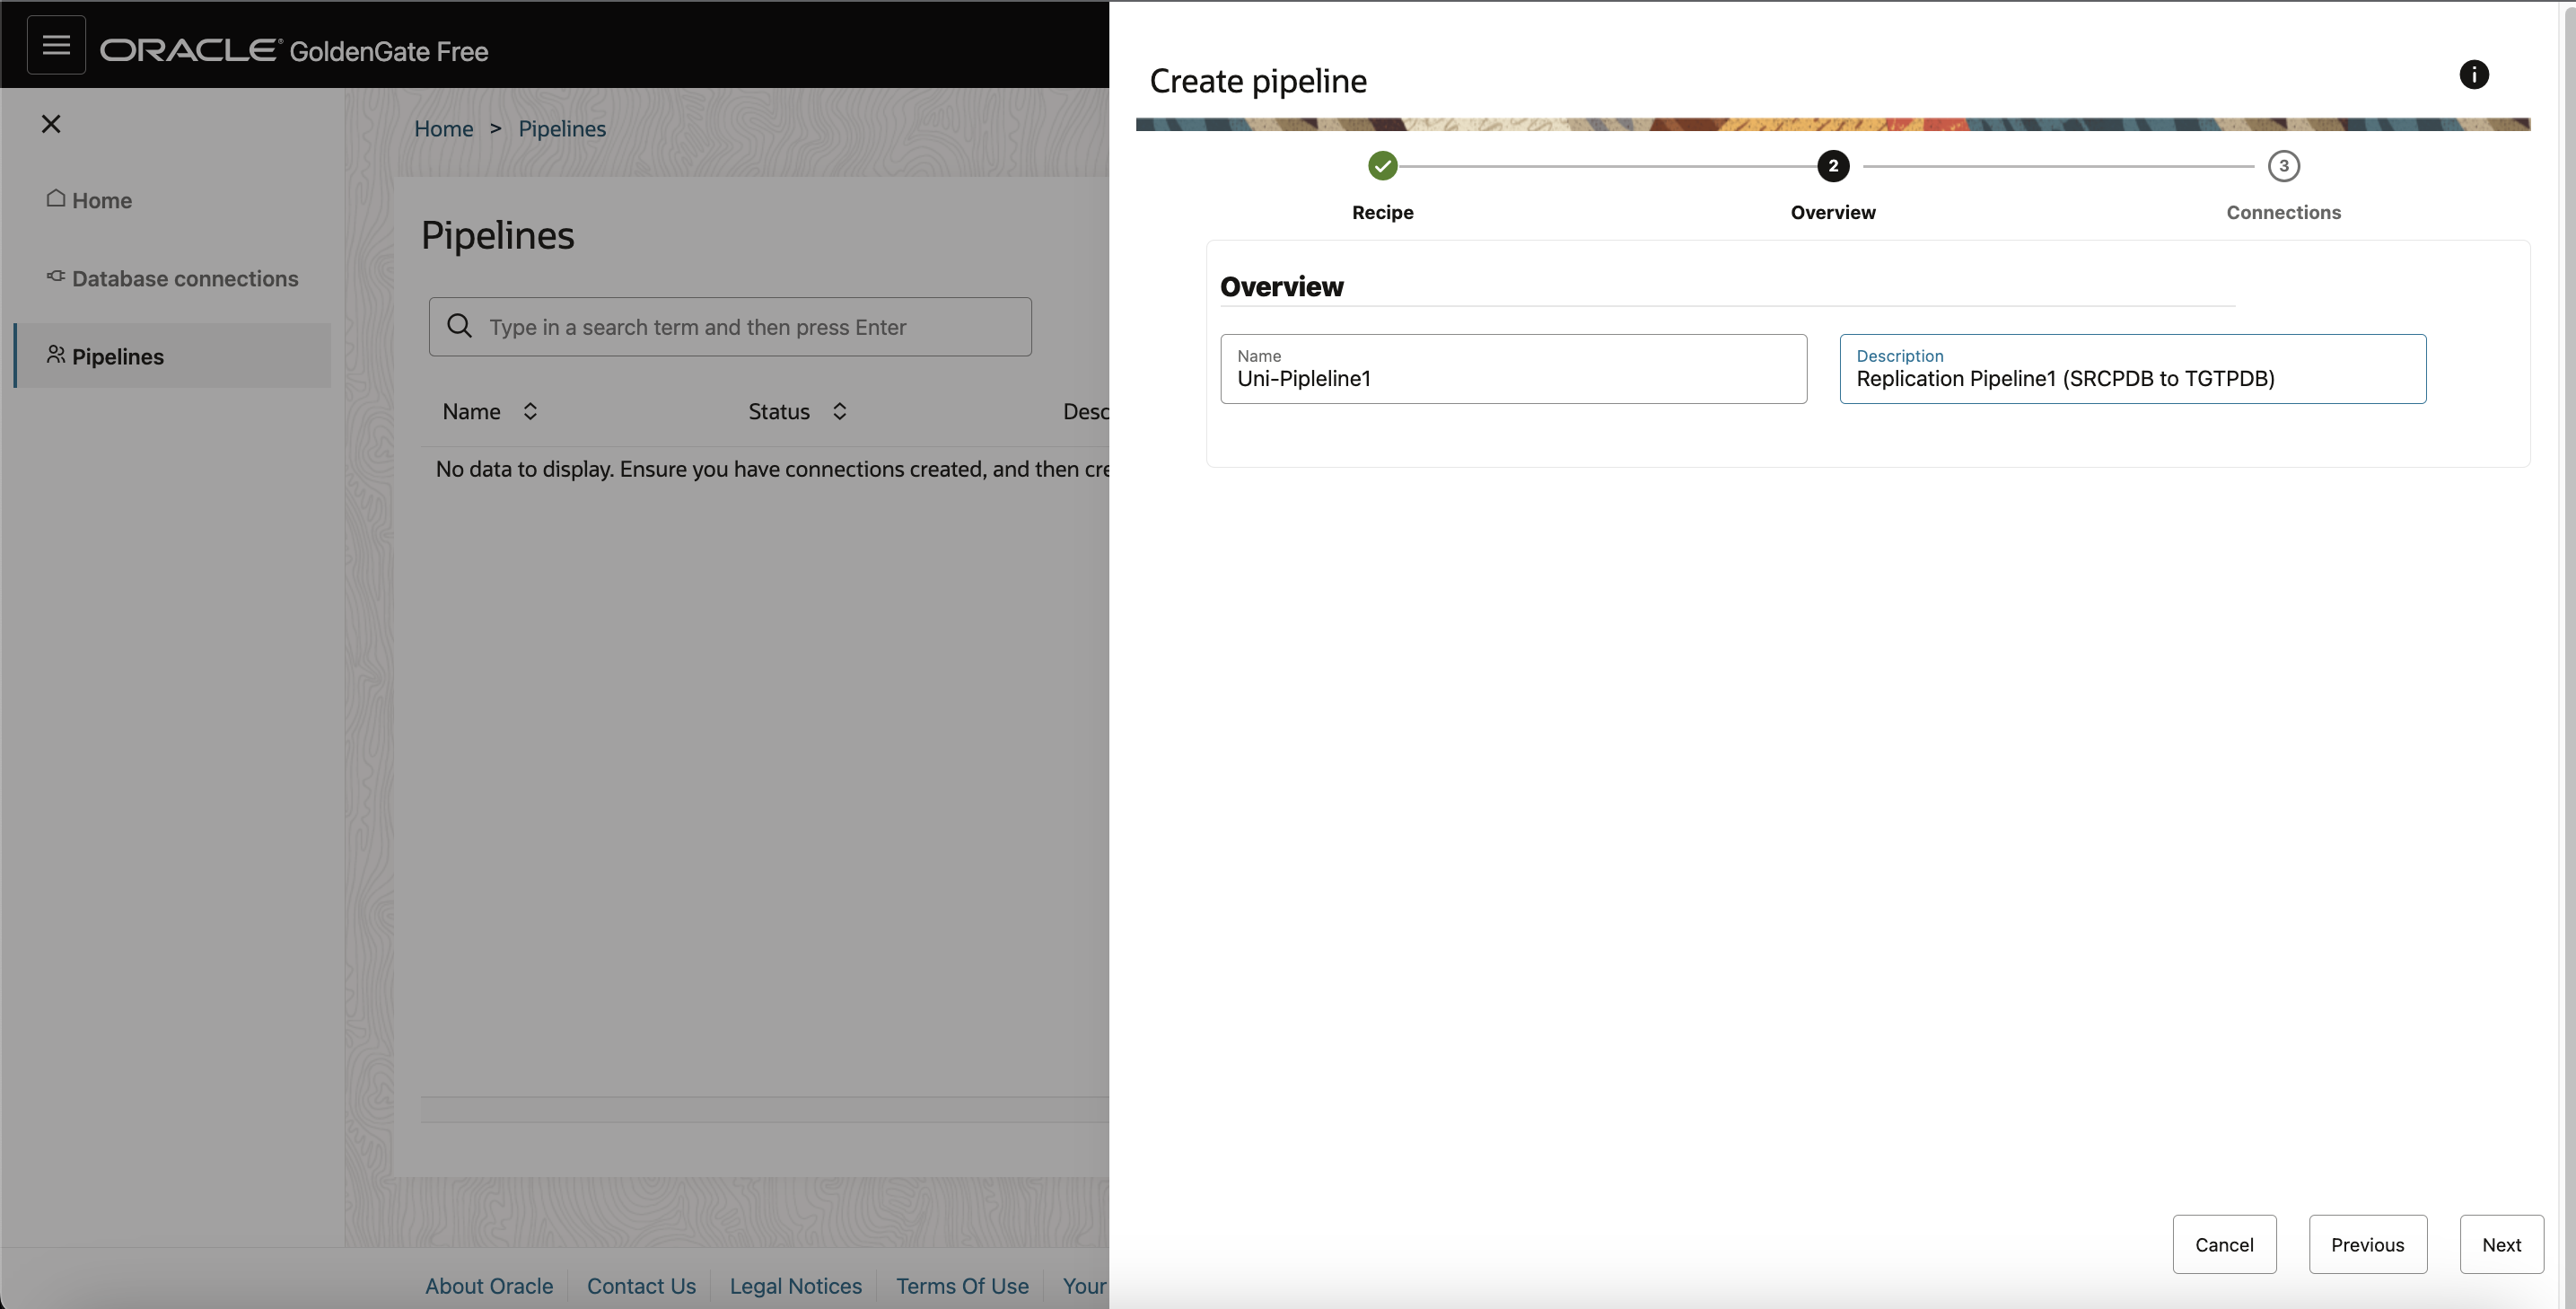
- The Create Pipeline process consists of three pages. On the Recipe page, select a recipe, and then click Next.
- On the Overview page, enter a Name for the pipeline, and optionally, a Description, and then click Next.
- On the Connections page, select your source and target connections from their respective dropdowns, and then click Save & configure.
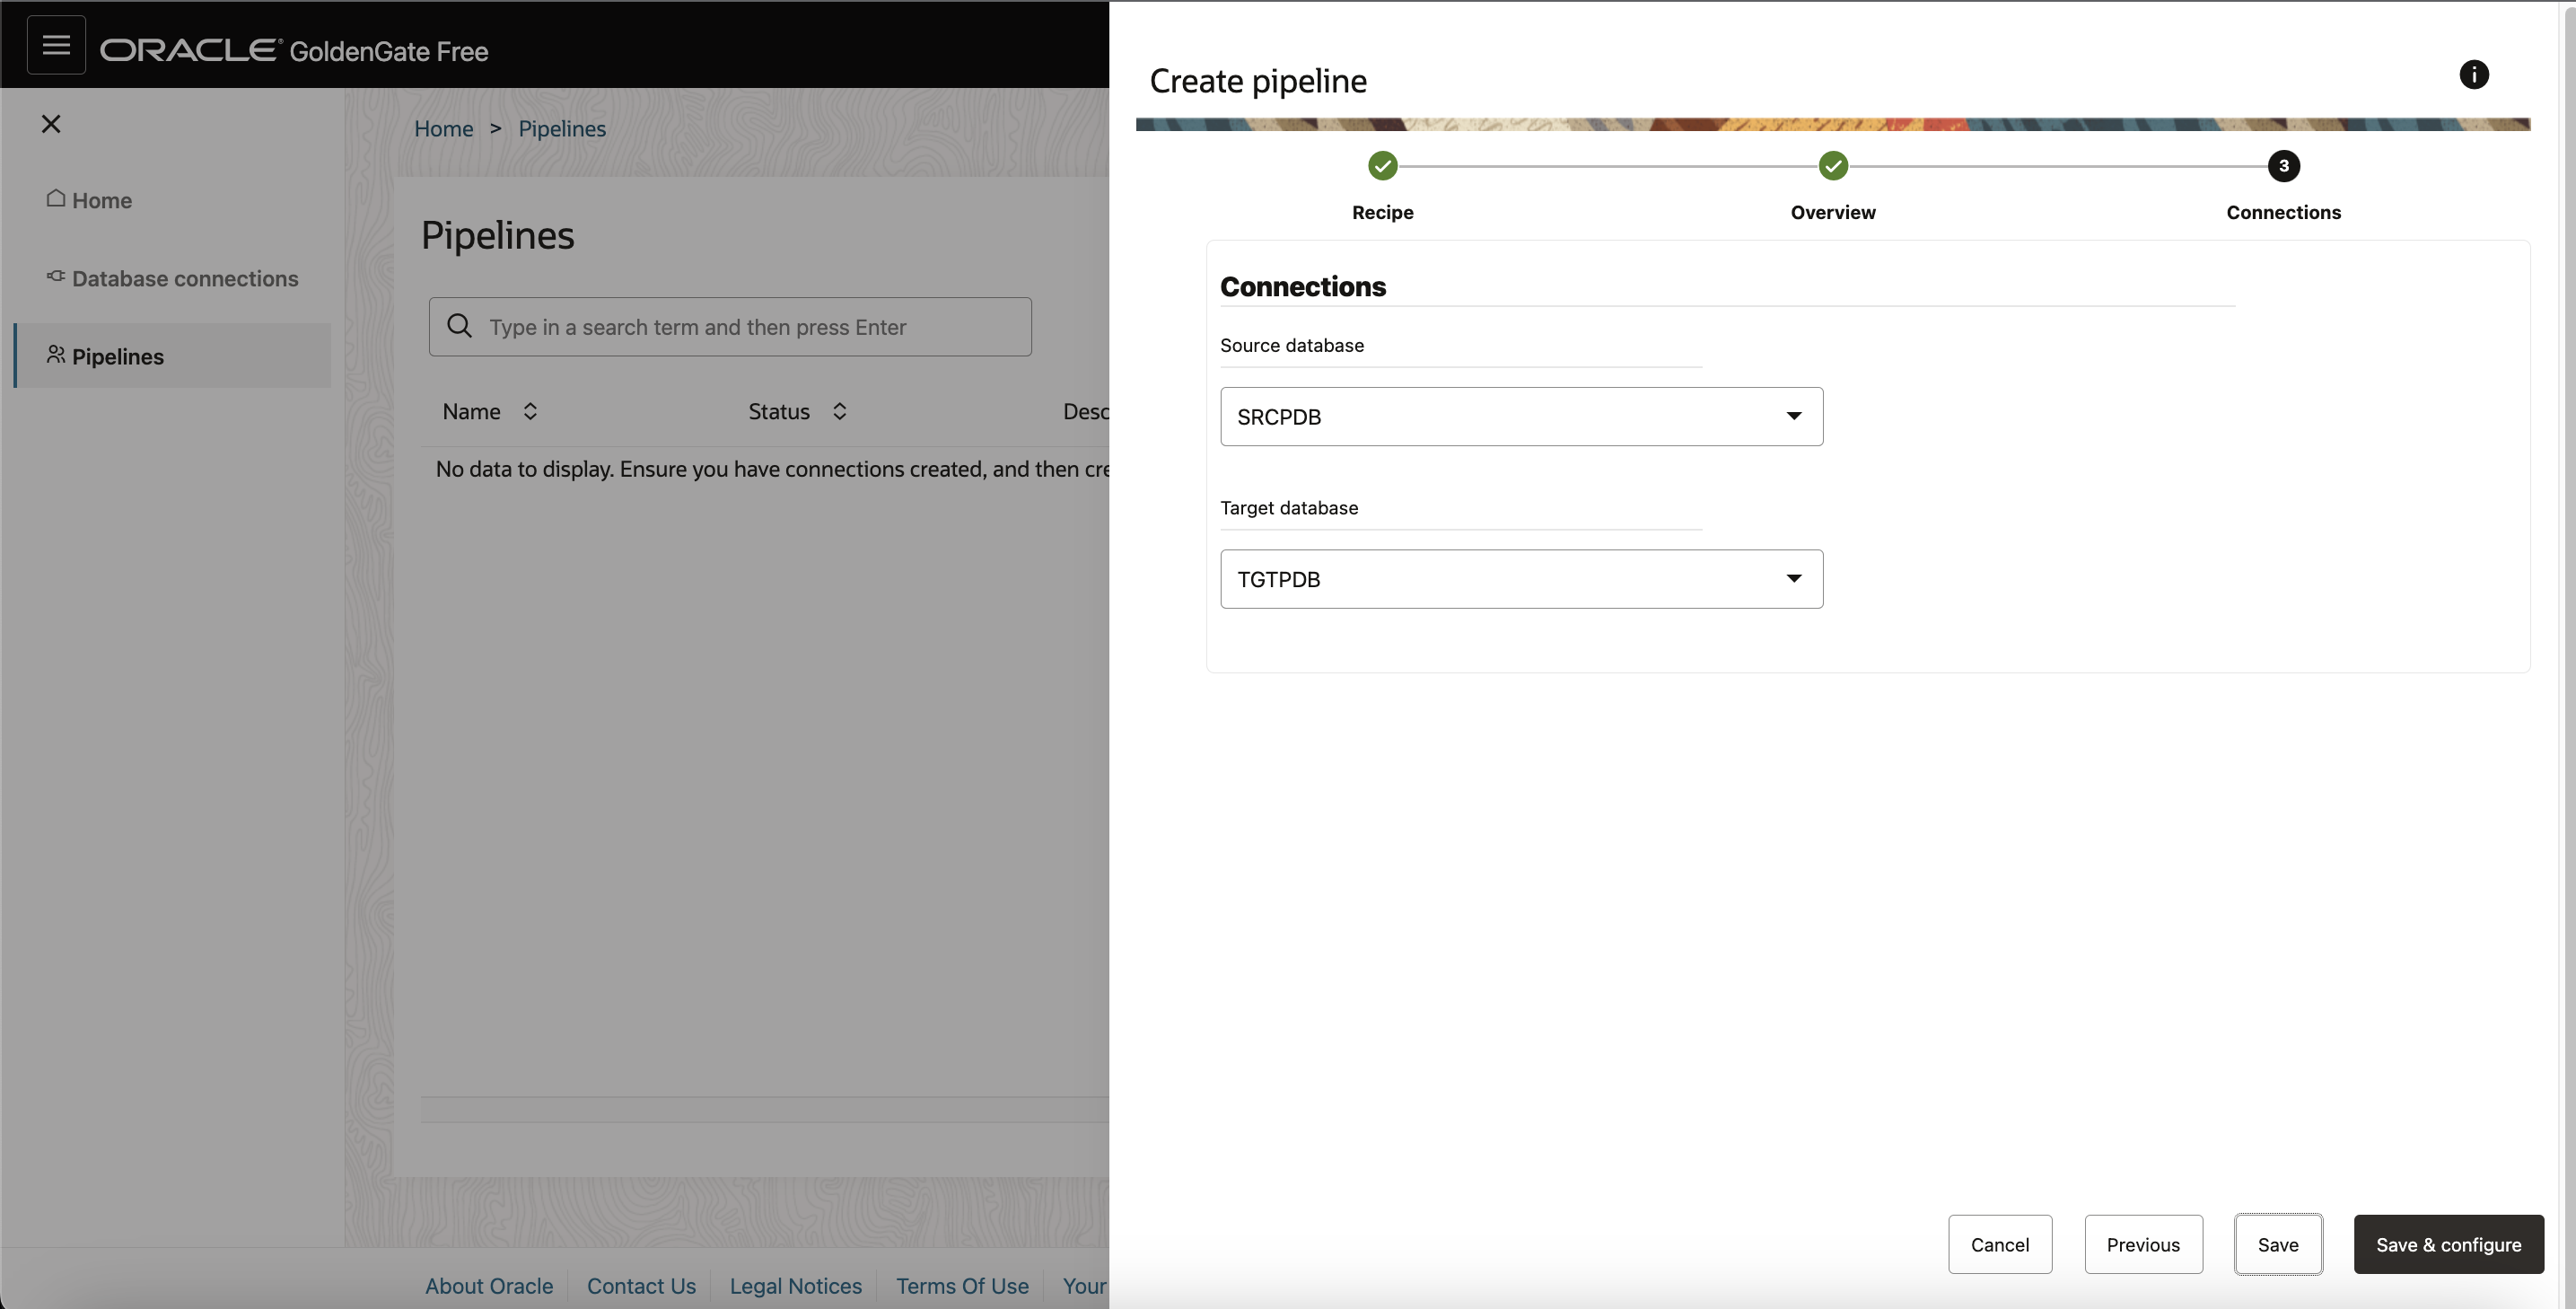
After your pipeline is created, you’re brought to the Pipeline Configuration screen.
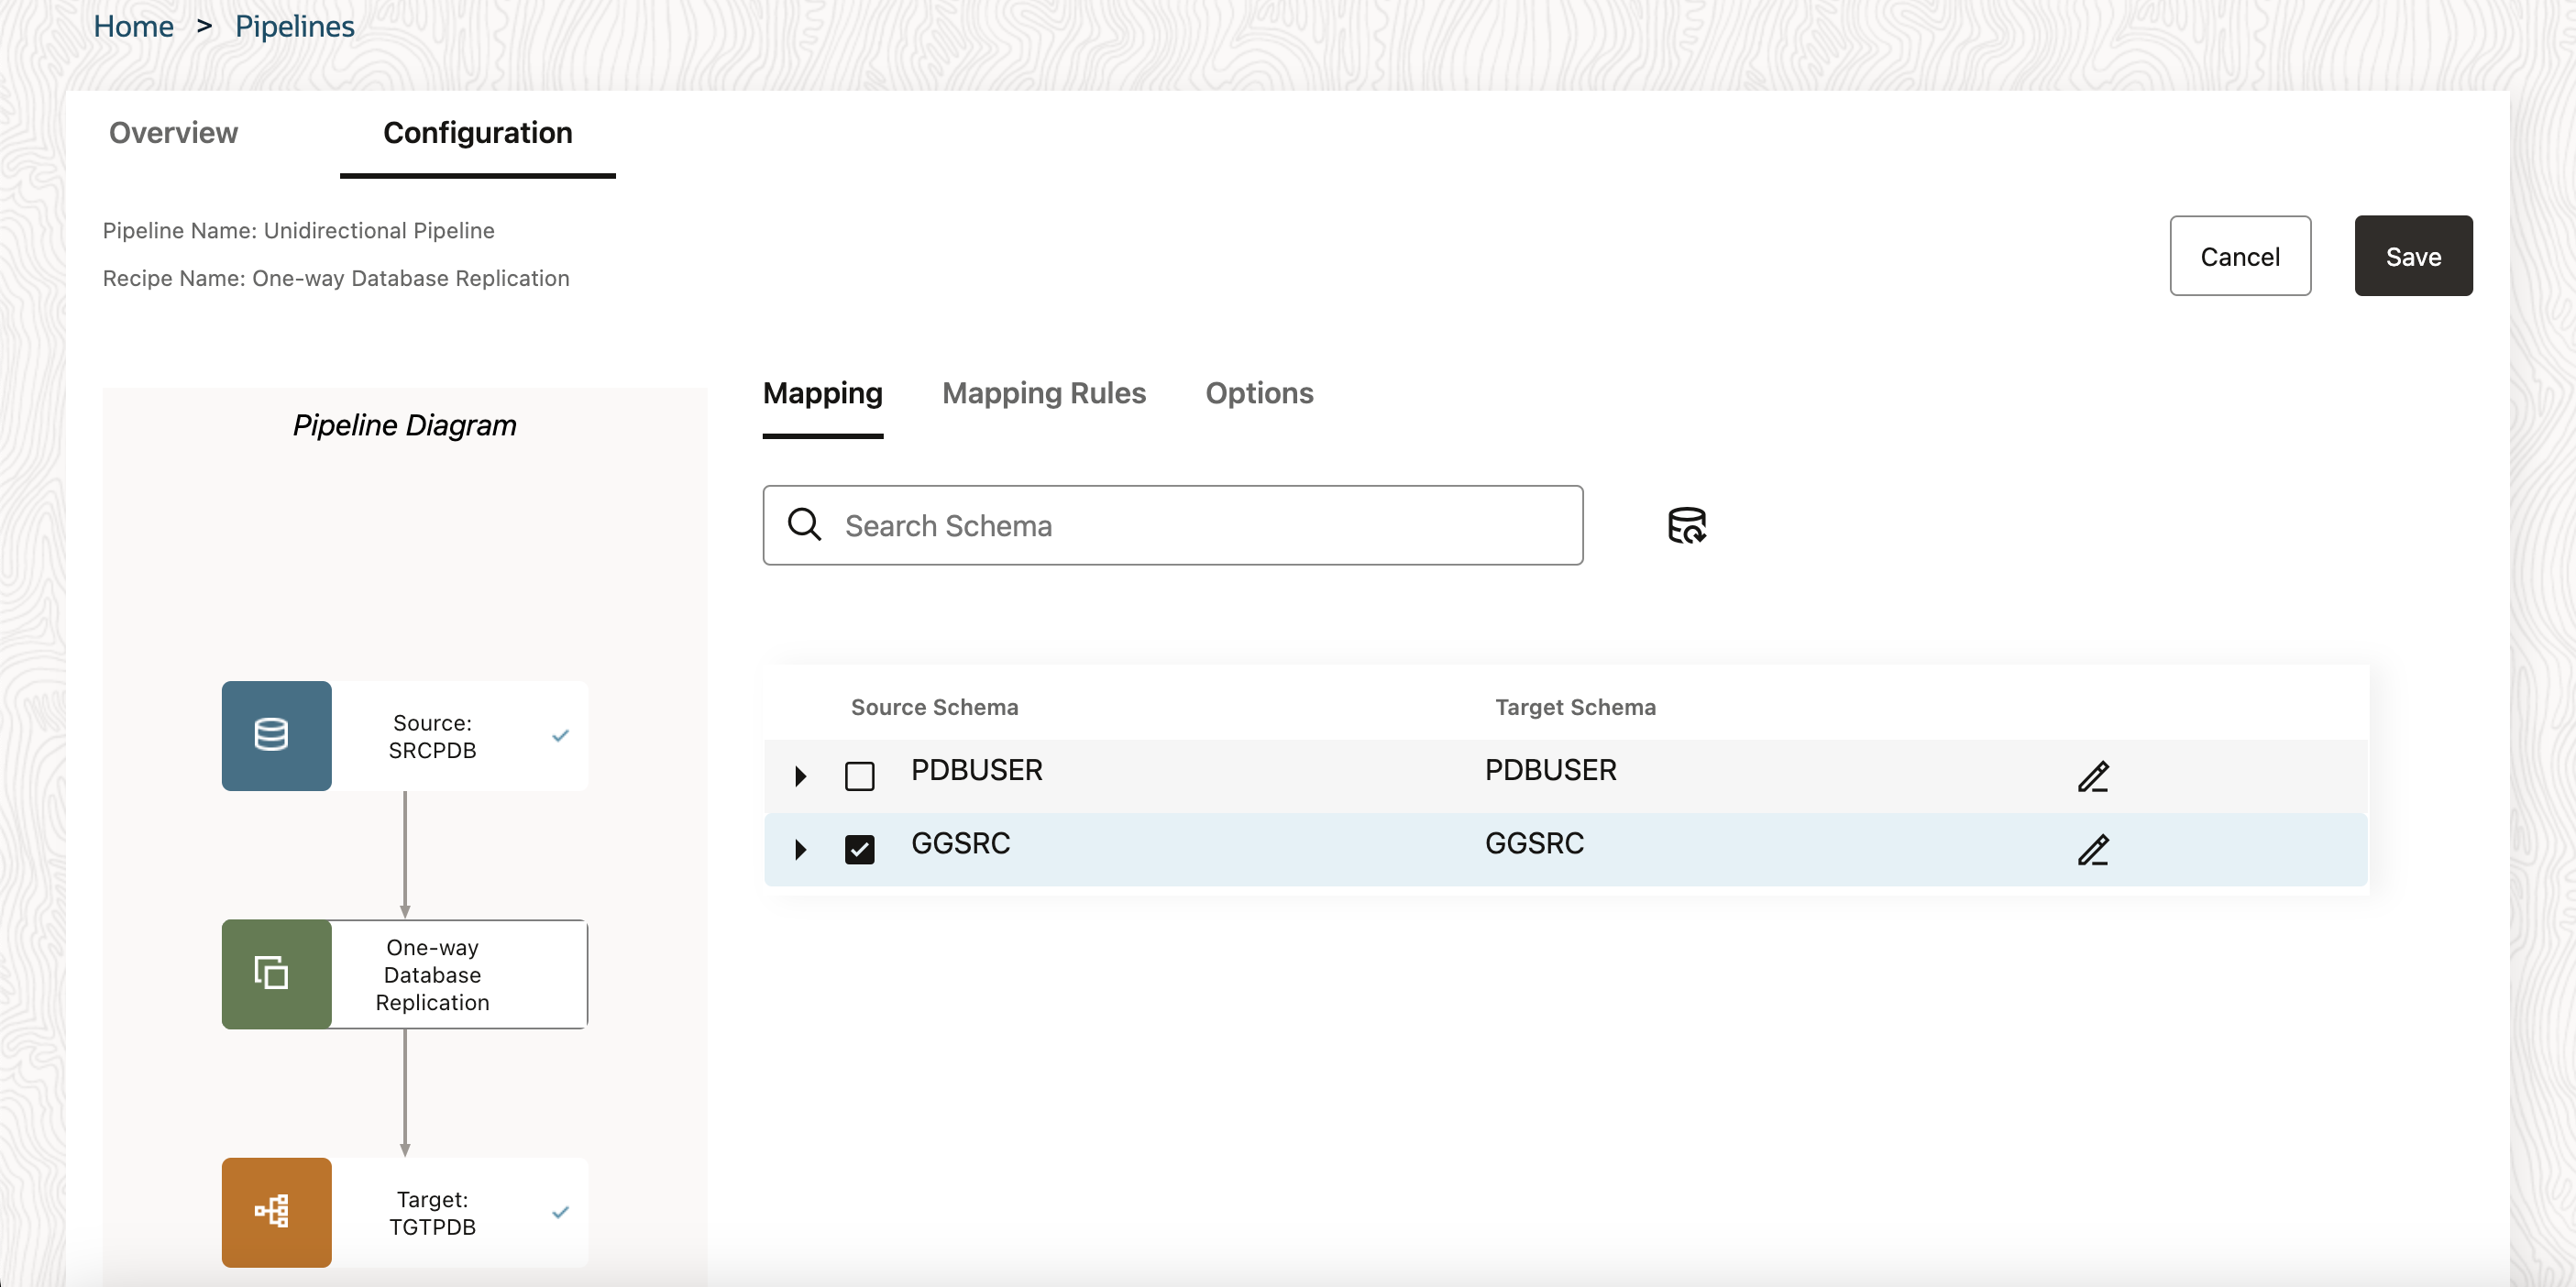
To configure a pipeline:
- Under Mapping, you can review and select the source database schemas and tables to replicate.
- As you select or deselect source schemas and tables, or edit target schemas or tables, rules are added to Mapping Rules.
- Under Mapping Rules, you can review, add, delete, and reorder rules to include/exclude schema and tables from replication.
- Under Options, you can configure a limited set of GoldenGate parameters:
Initial Load of existing schemas and/or tables
Replicate Data Definition Language (DDL)
Advanced options for Initial Load (Data Pump), Extract, or Replicat - Click Save and then Start to run the pipeline.
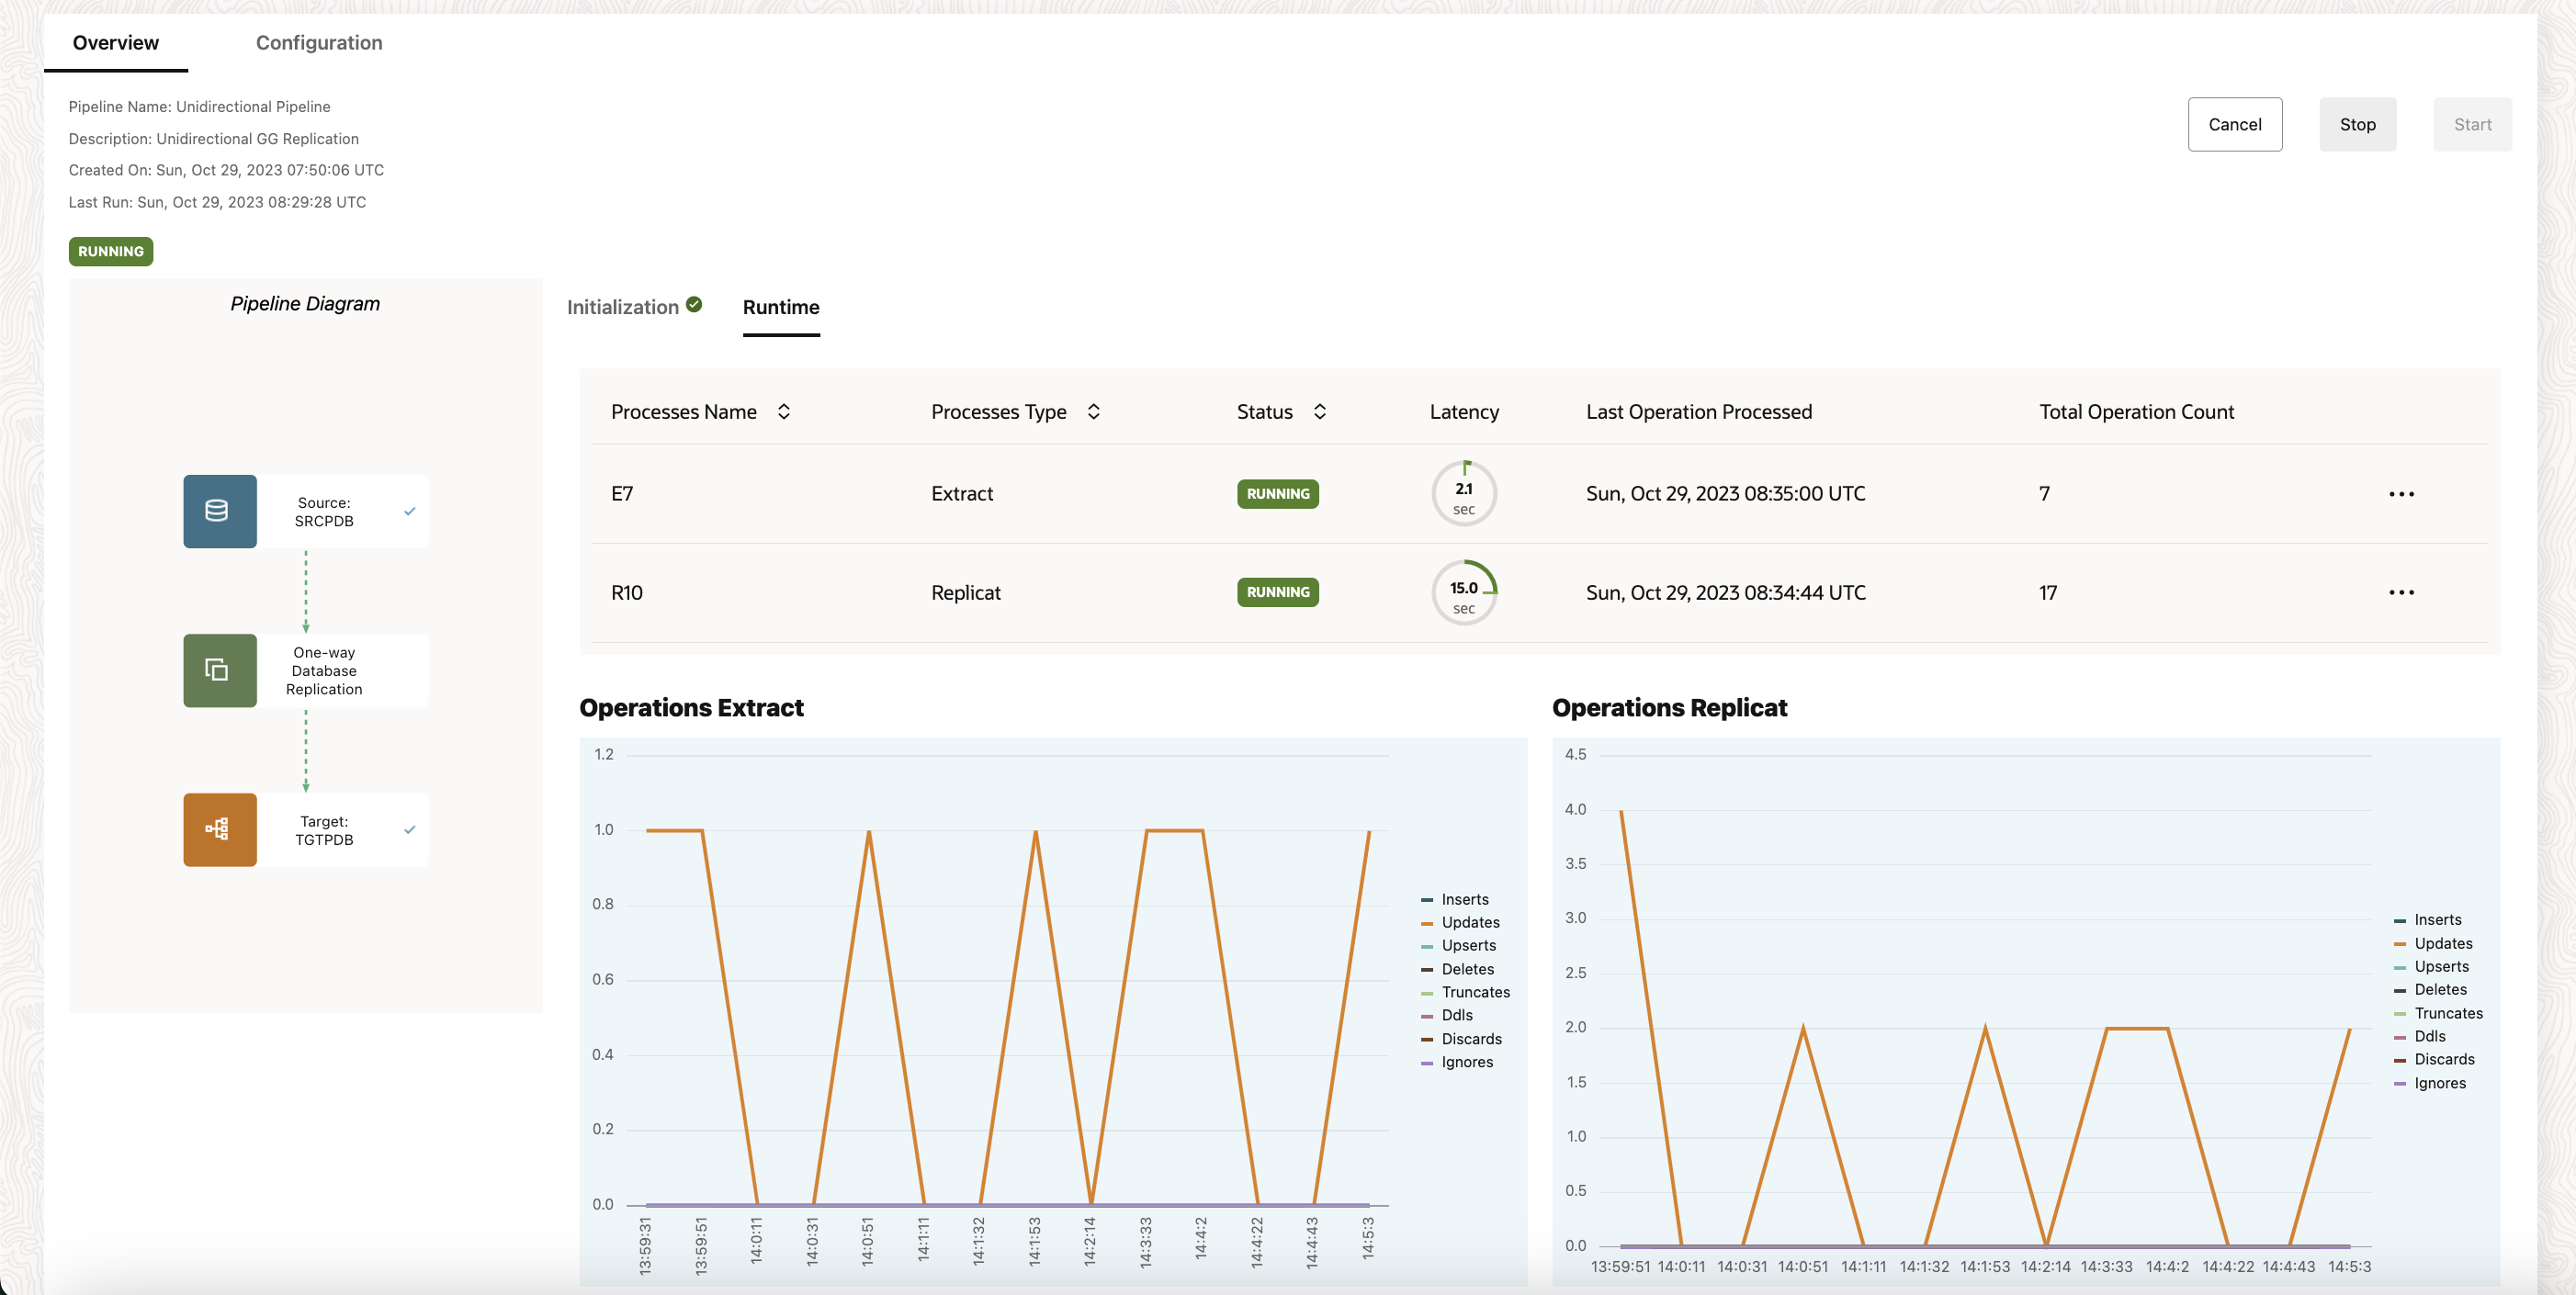
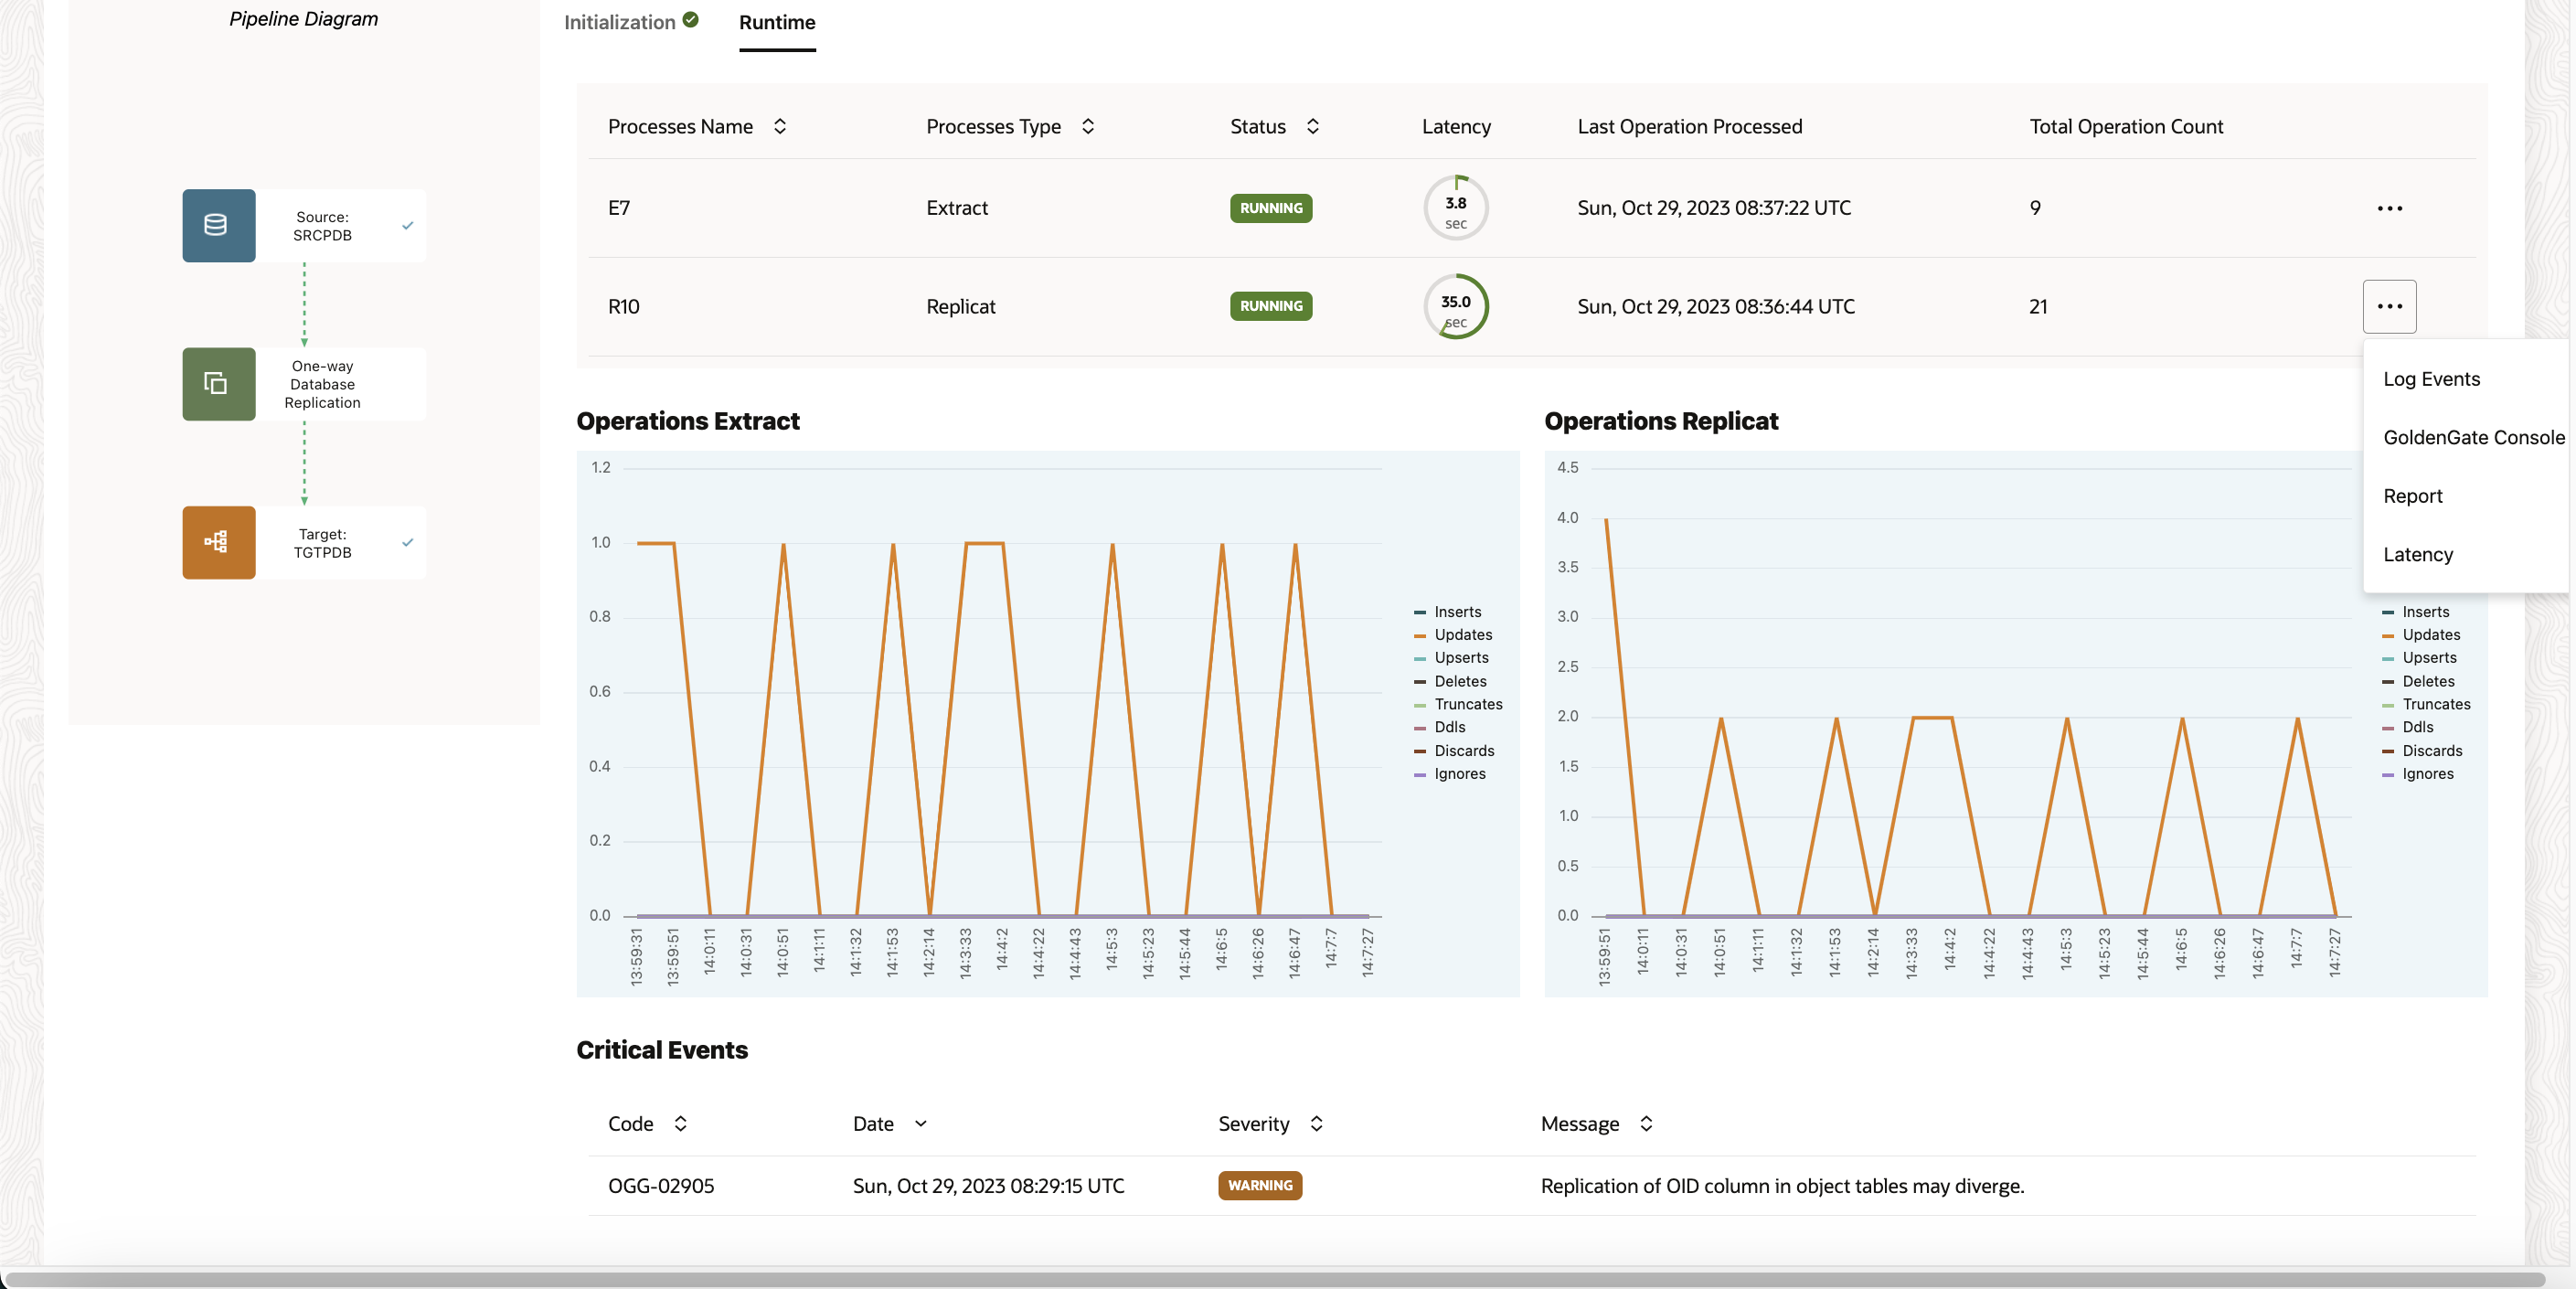
On the pipeline’s initialization page, you can observe the initial load tasks performed on the target database, as well as the creation and start of Extract and Replicat processes. After the pipeline is initialized, you’re brought to the Runtime page, where you can observe data capture operations on the source database replicated to the target database.
The pipeline runs continuously until it’s stopped.
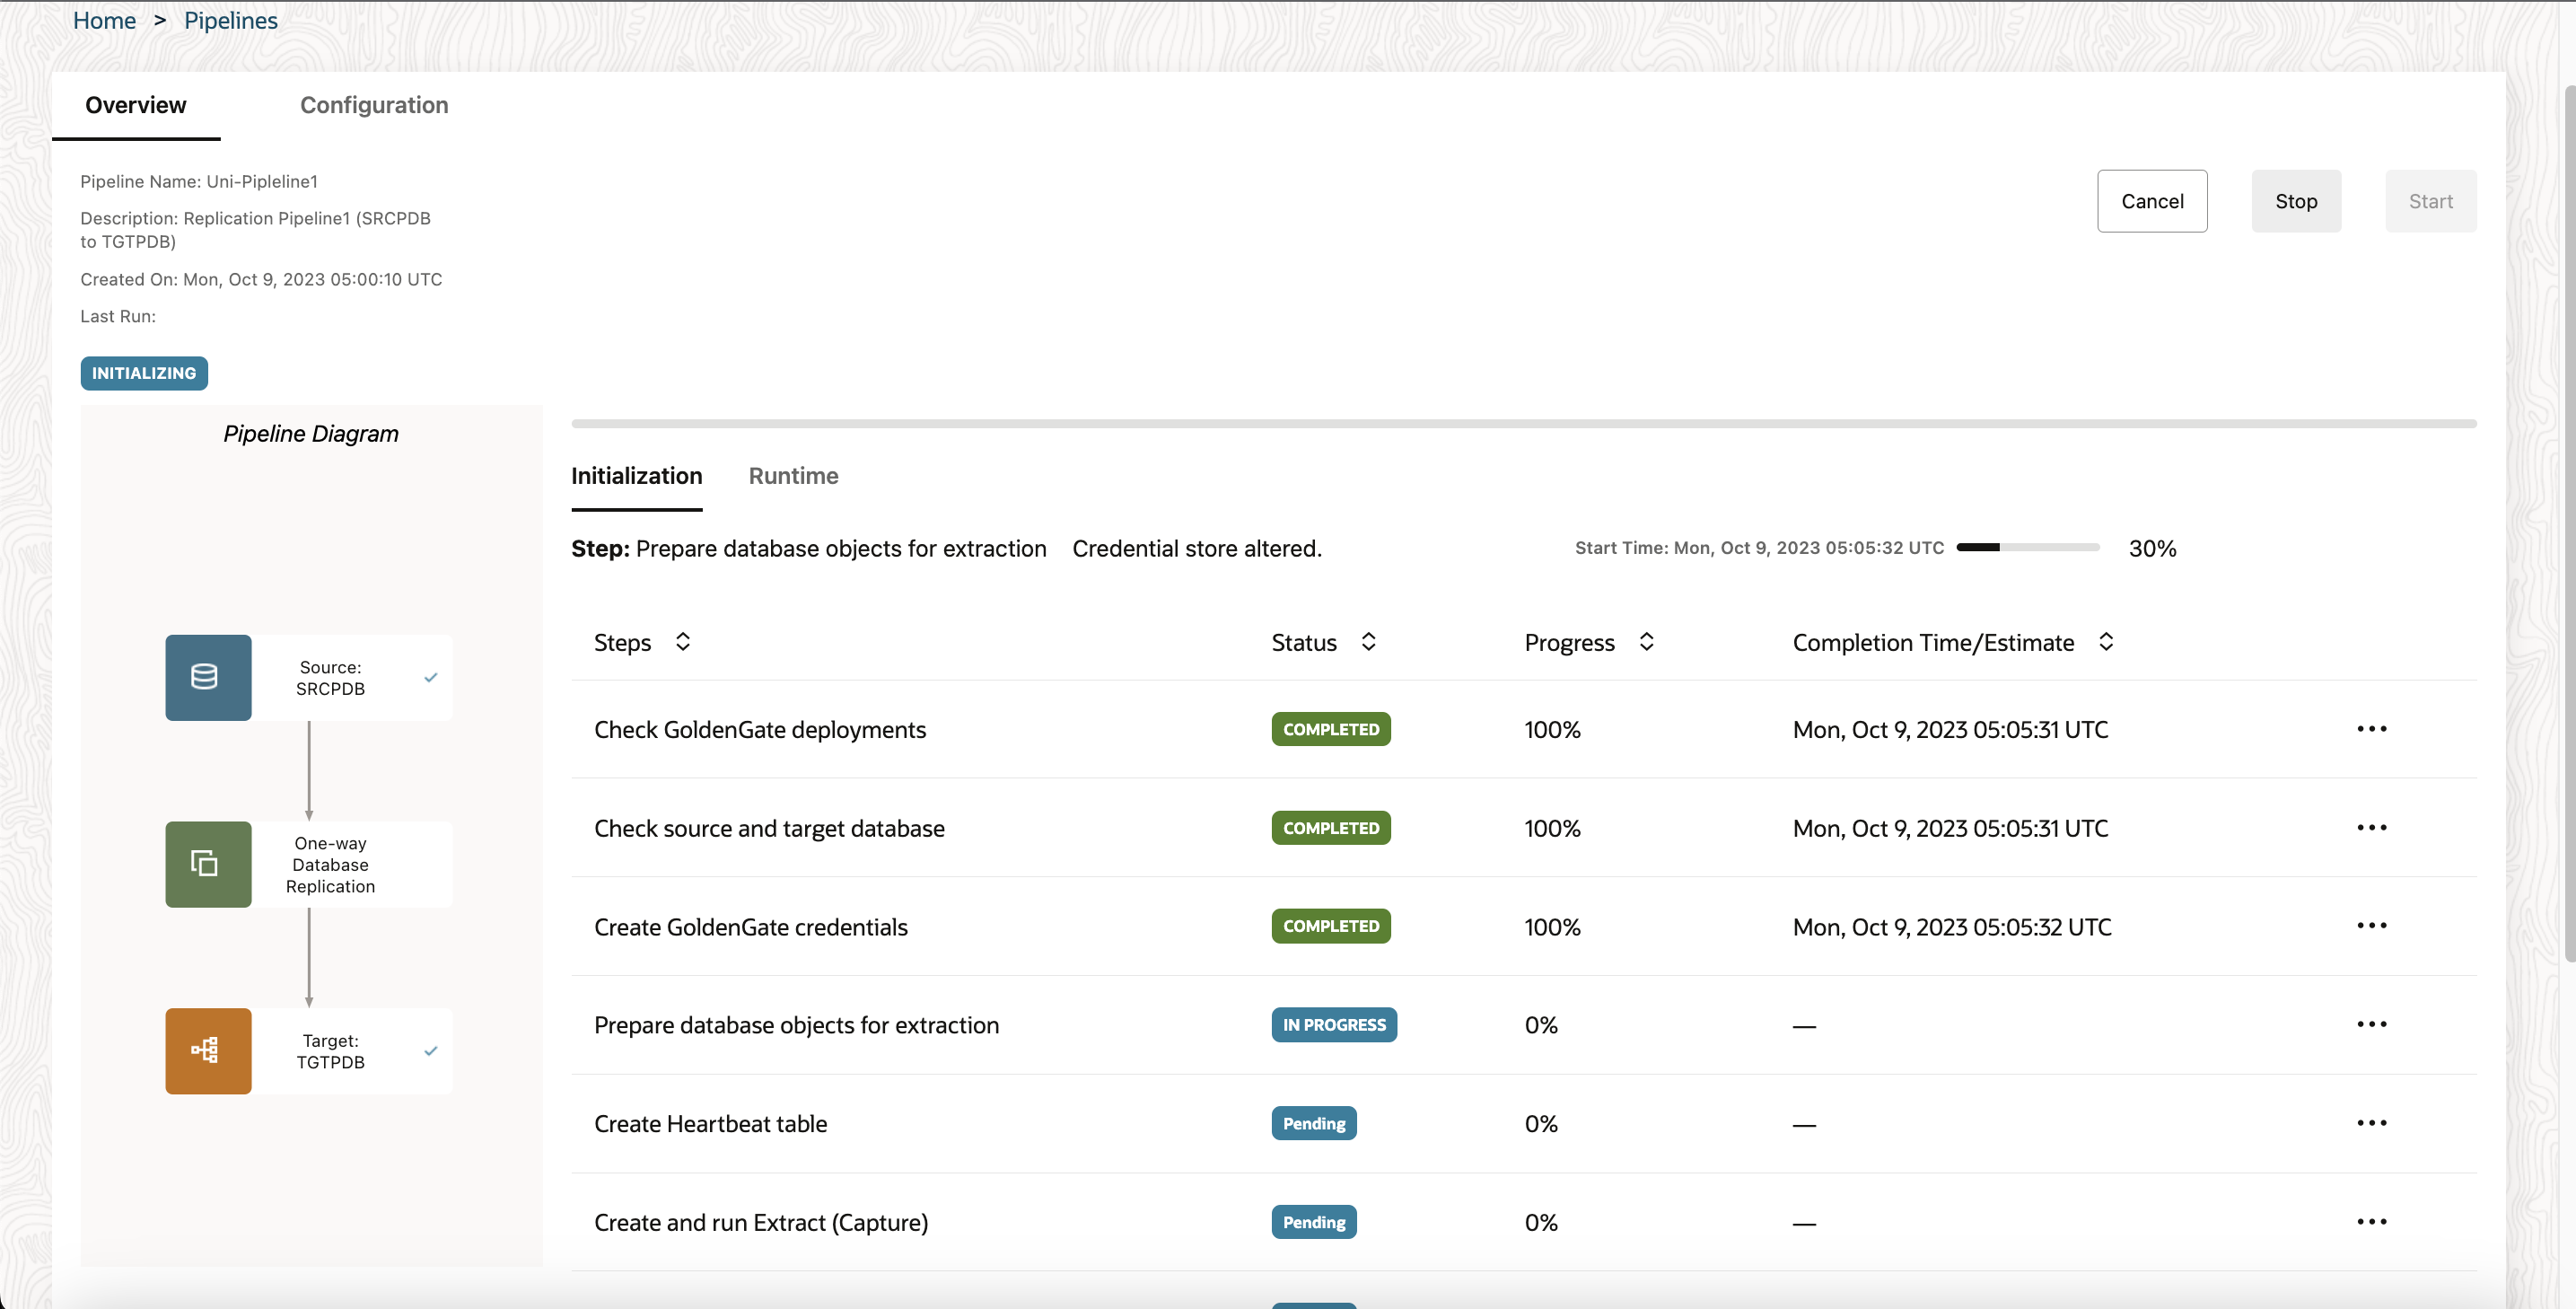
On pipeline’s Runtime page, you can view the Information about the pipeline processes, including process names, process types, their statuses, their latency, when their last operation was processed, and their total operation count.
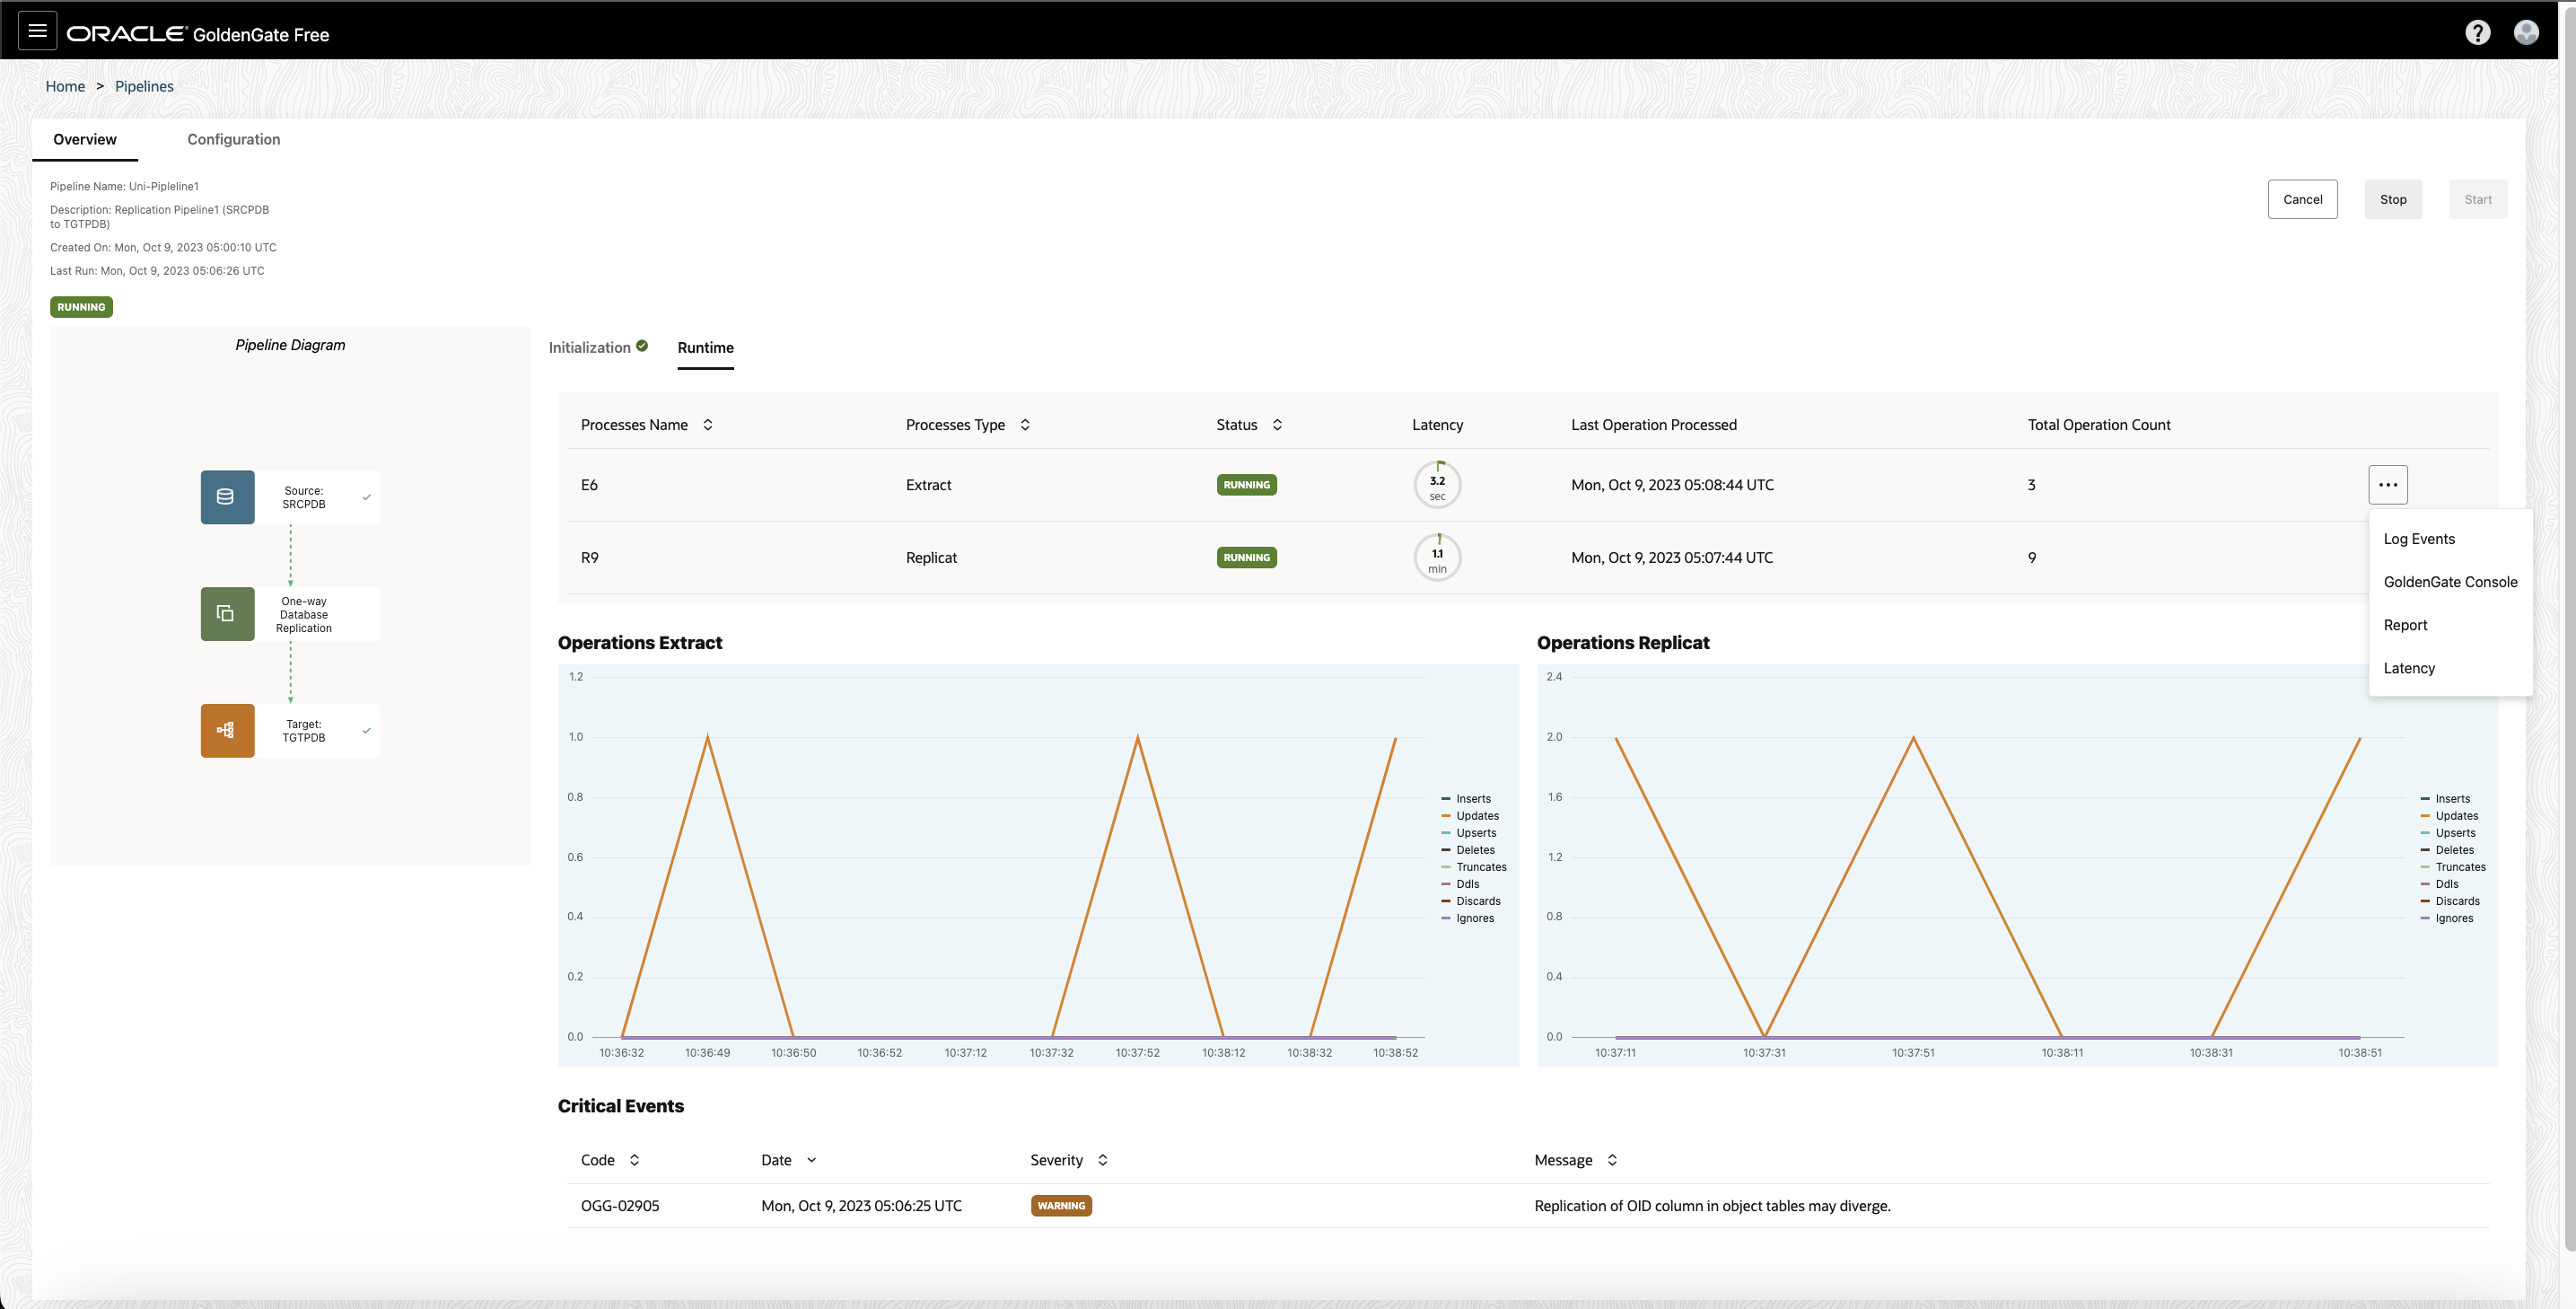
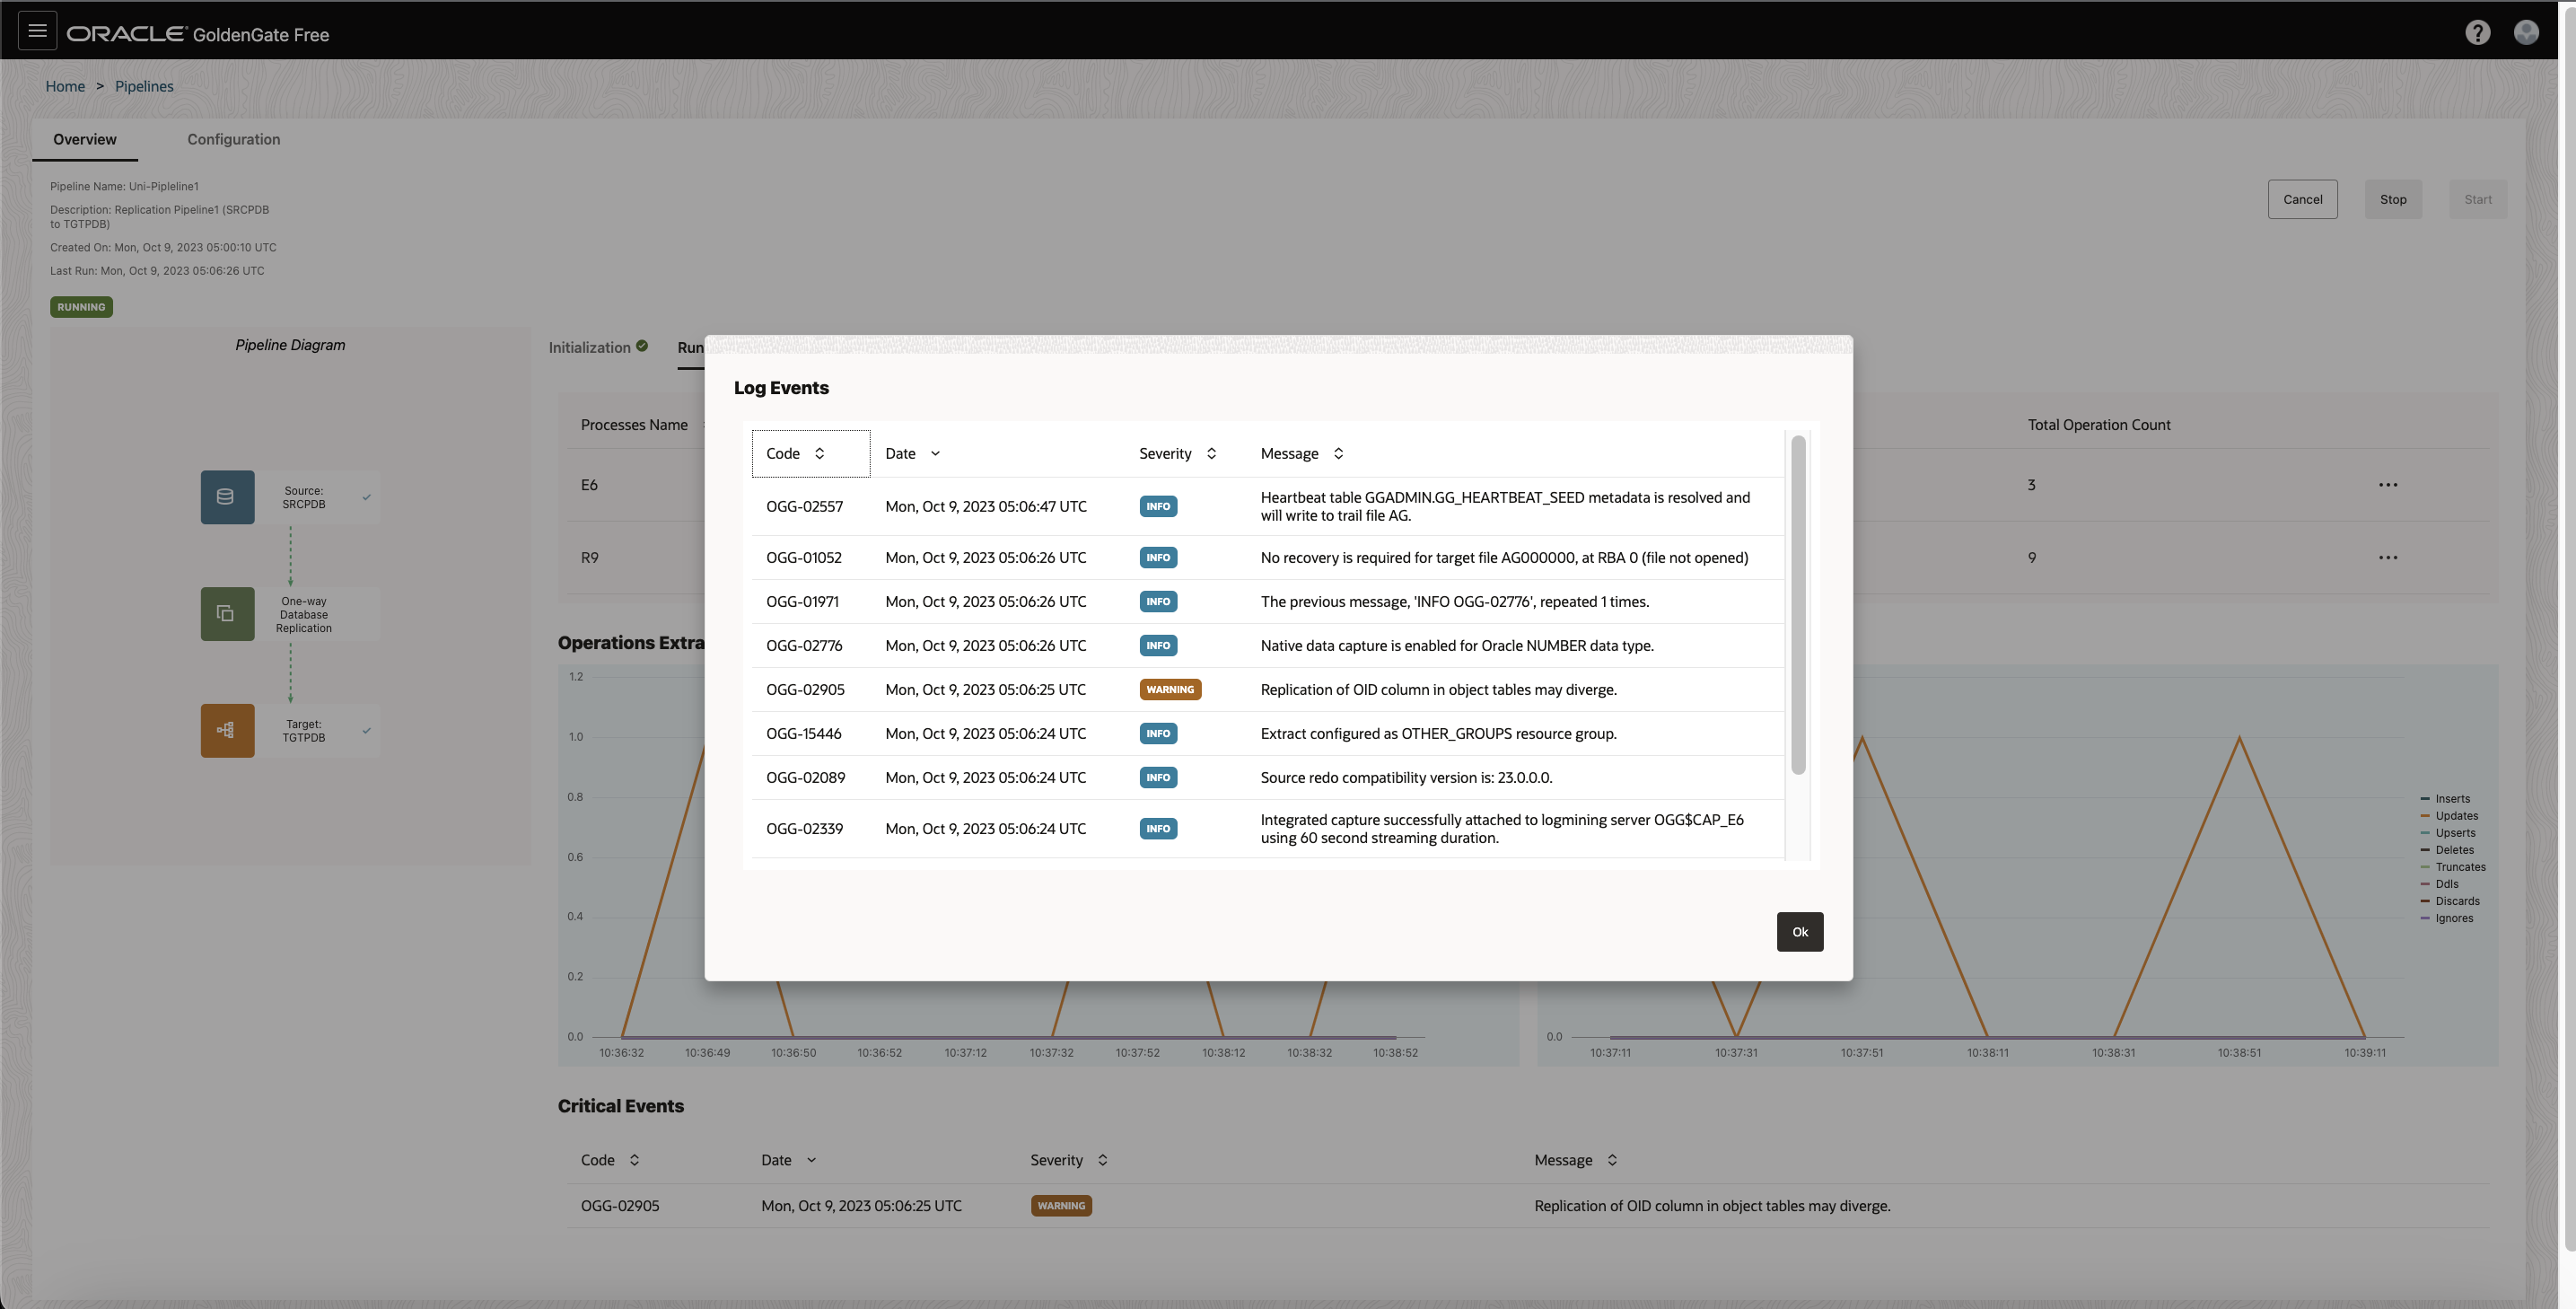
You can also view the processes’ log events, reports, latency graphs, or launch the full GoldenGate console for advanced monitoring from the processes’ Action menus.
For each process, click on the elipsis (thre can access the following when you open the ellipsis (three dots) menu:
- View log events
- Access the Oracle GoldenGate Administration Server UI
- Download reports
- Download latency details
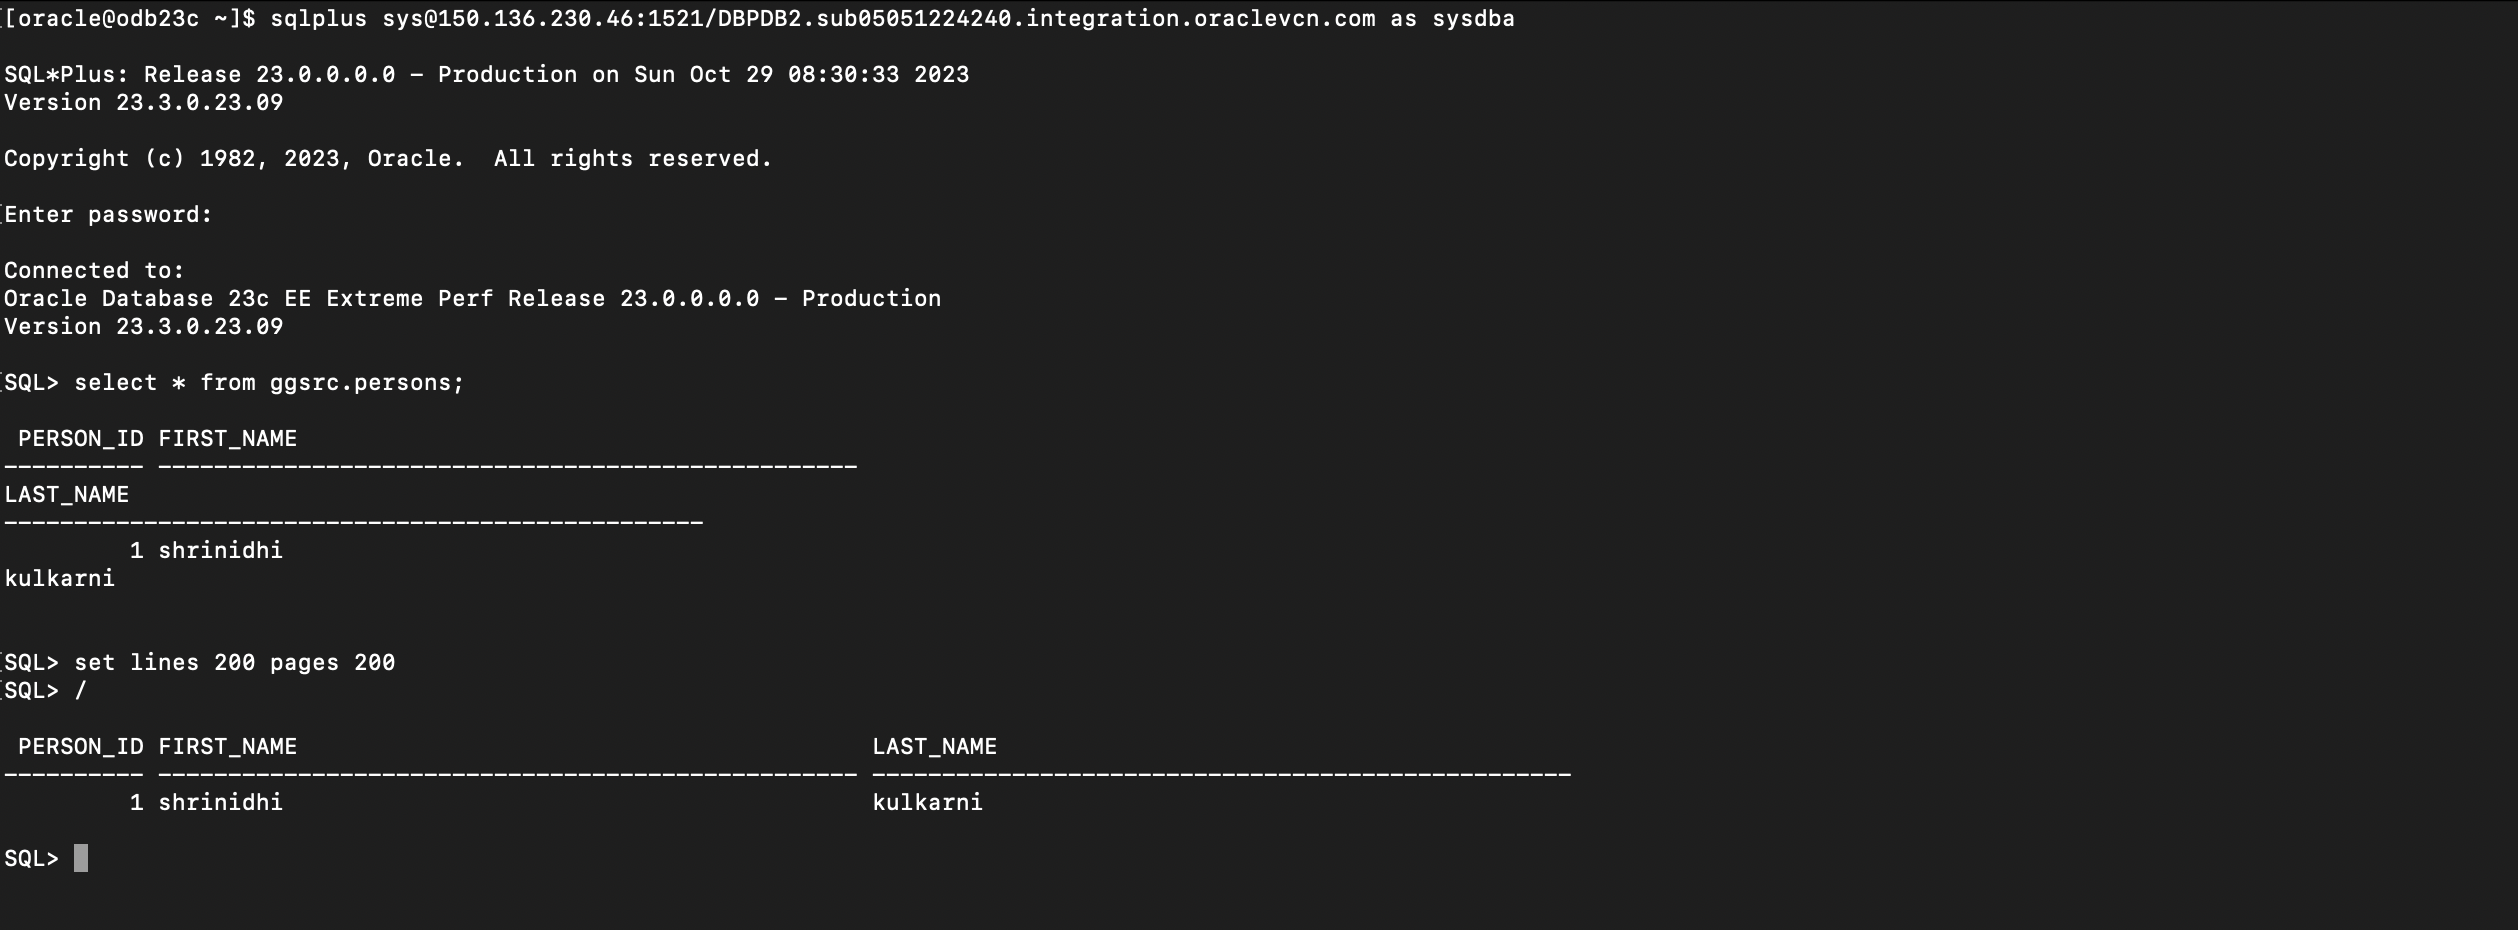
Once the initial load is completed, you can verify that the records on the targets PDB are already loaded

Once the Initial load has been completed, the CDC extract and Replicat are automatically started. You can check the status from Pipleine page under Runtime tab
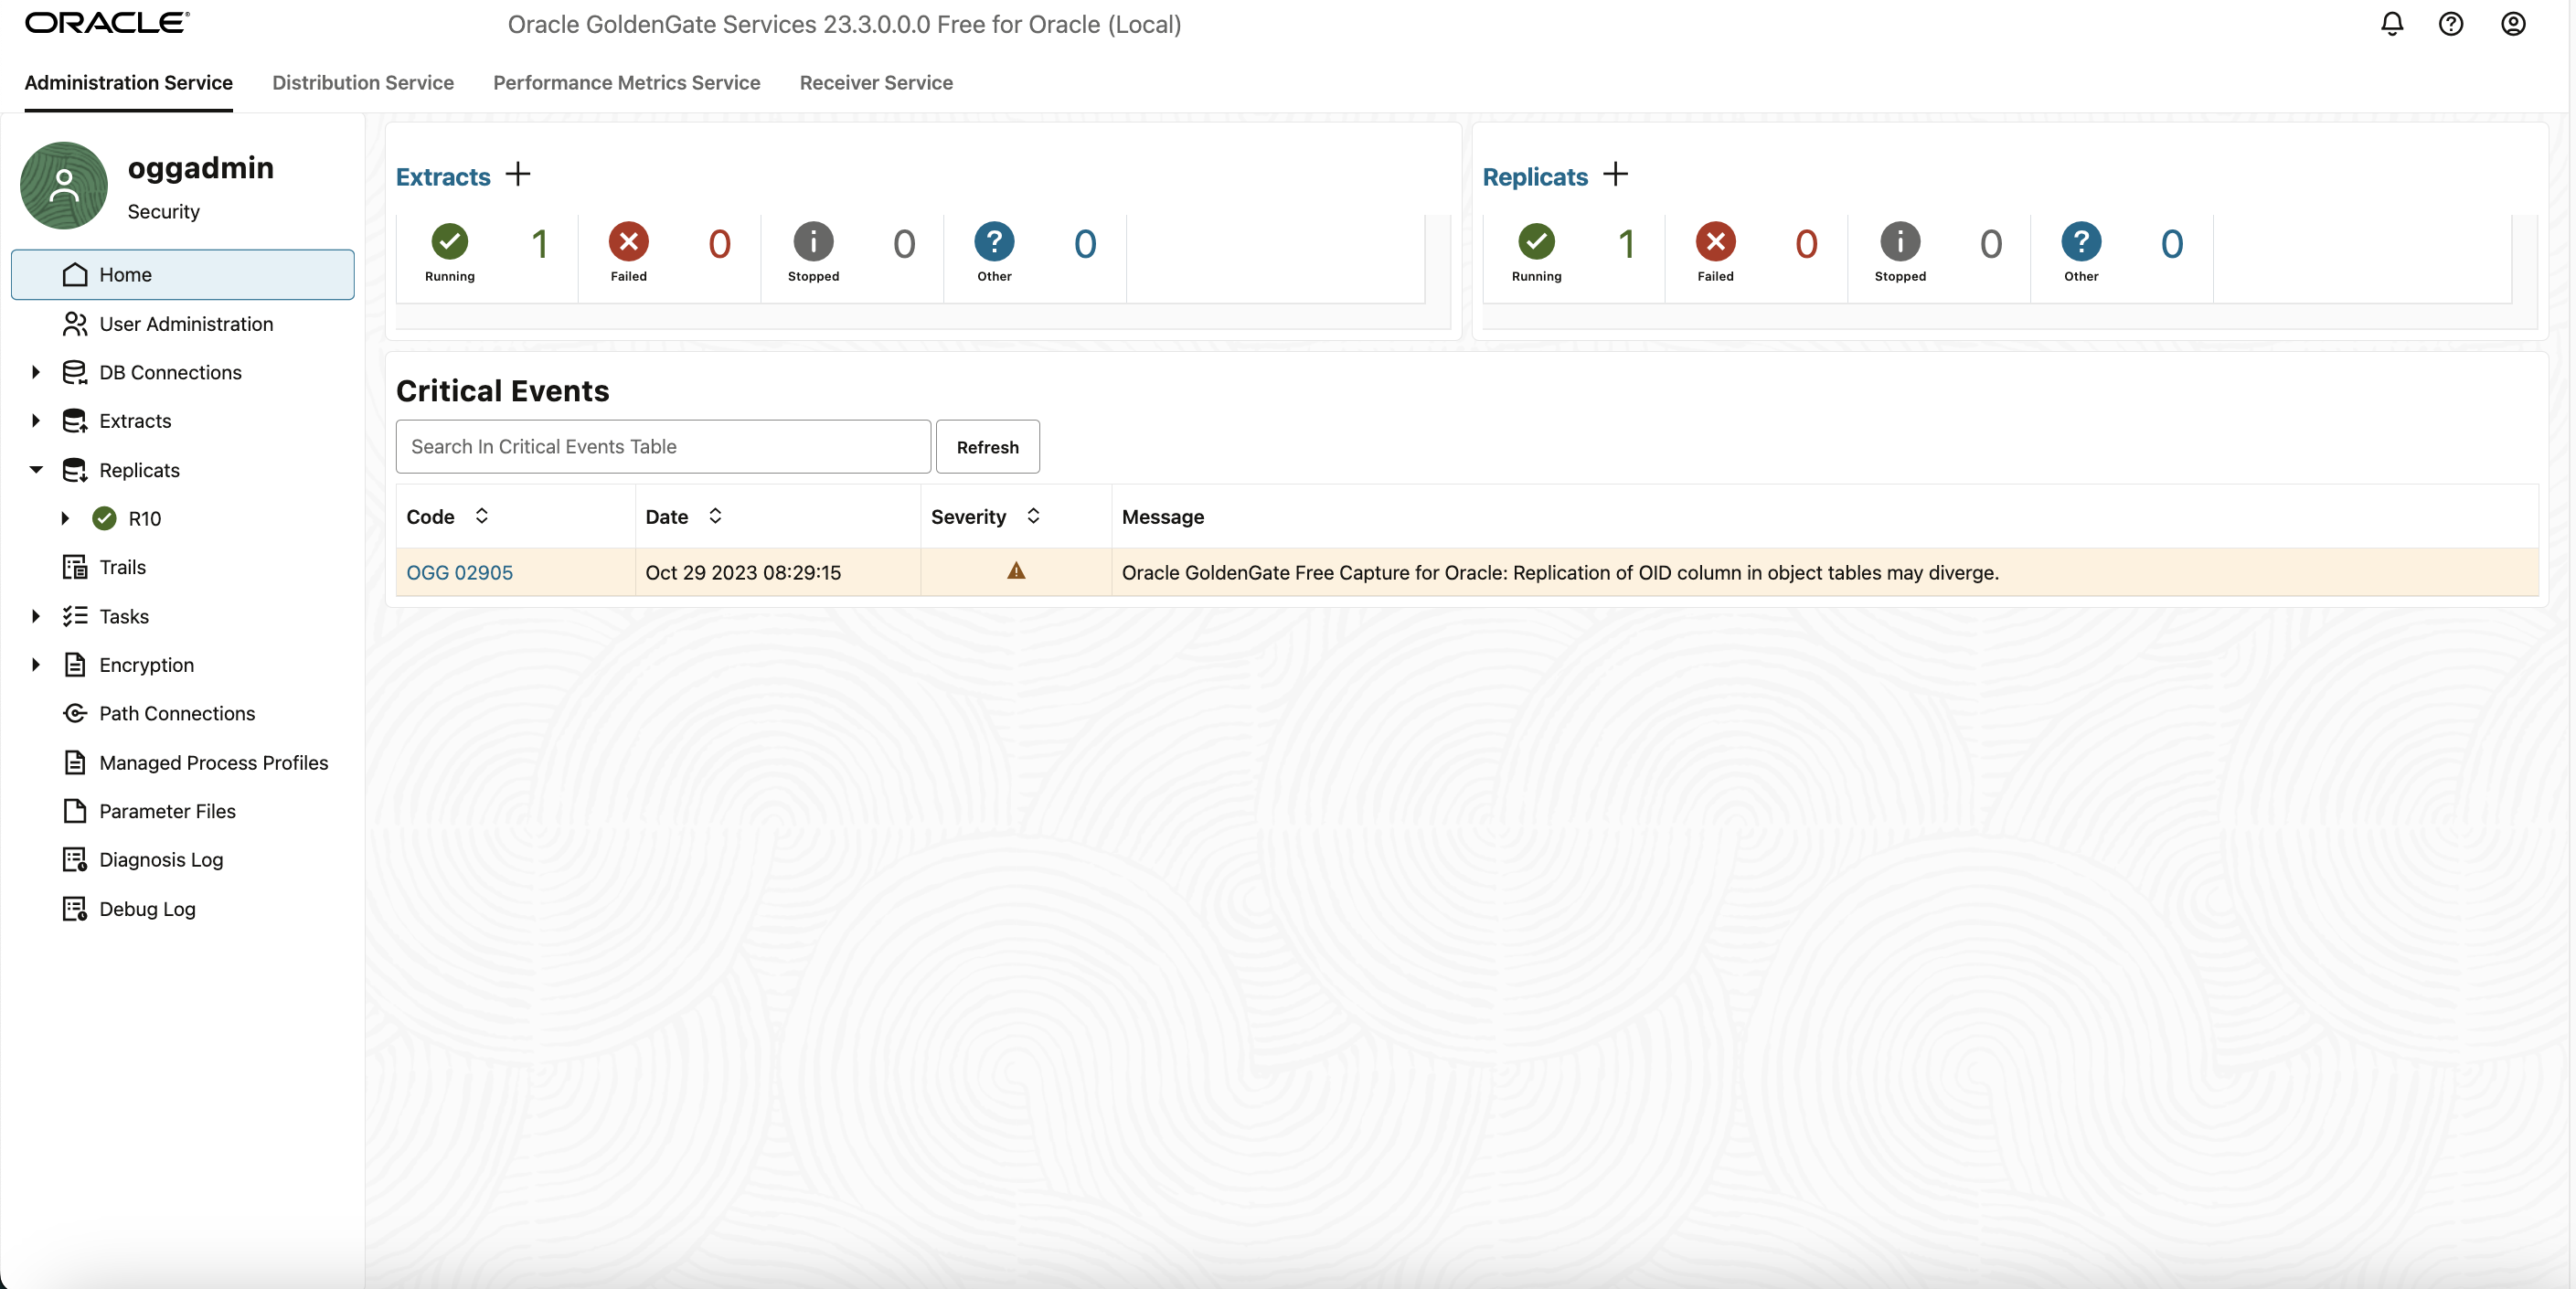
You can access the GoldenGate Microservices UI Console by clicking on the three horizontal dots besides the Extract/Replicats.
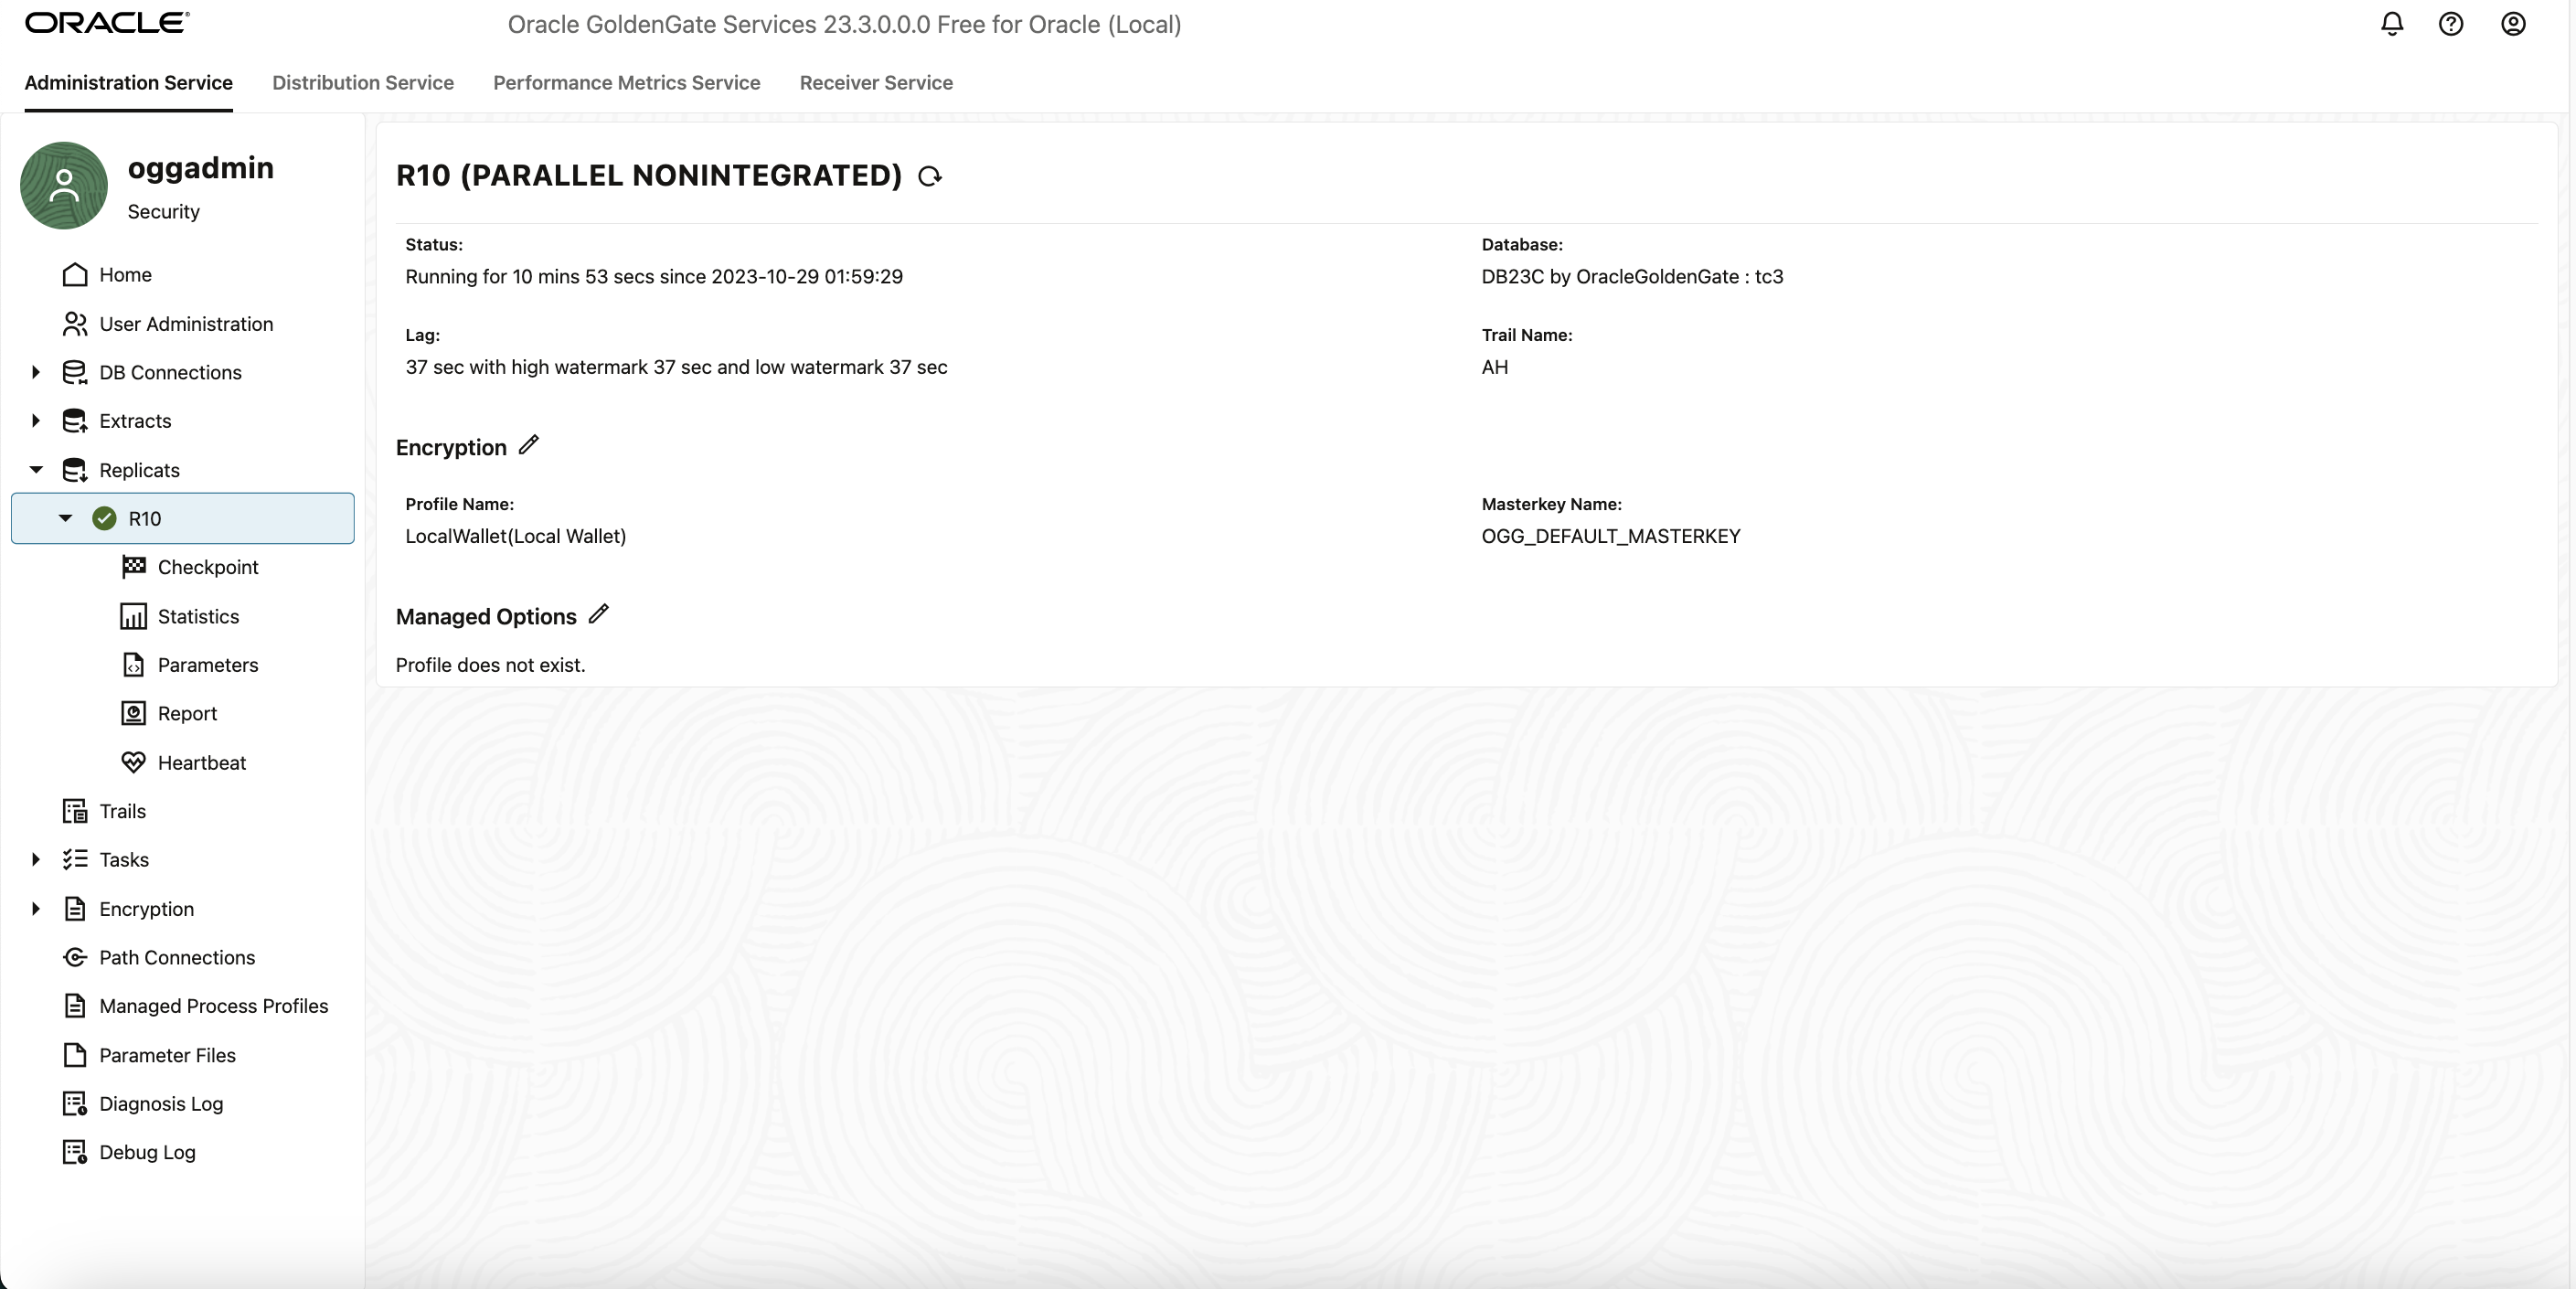
Also, check for other details of the extract/repllicat by expanding the dropdown on the Extract and Replicat section in the left hand side-bar.
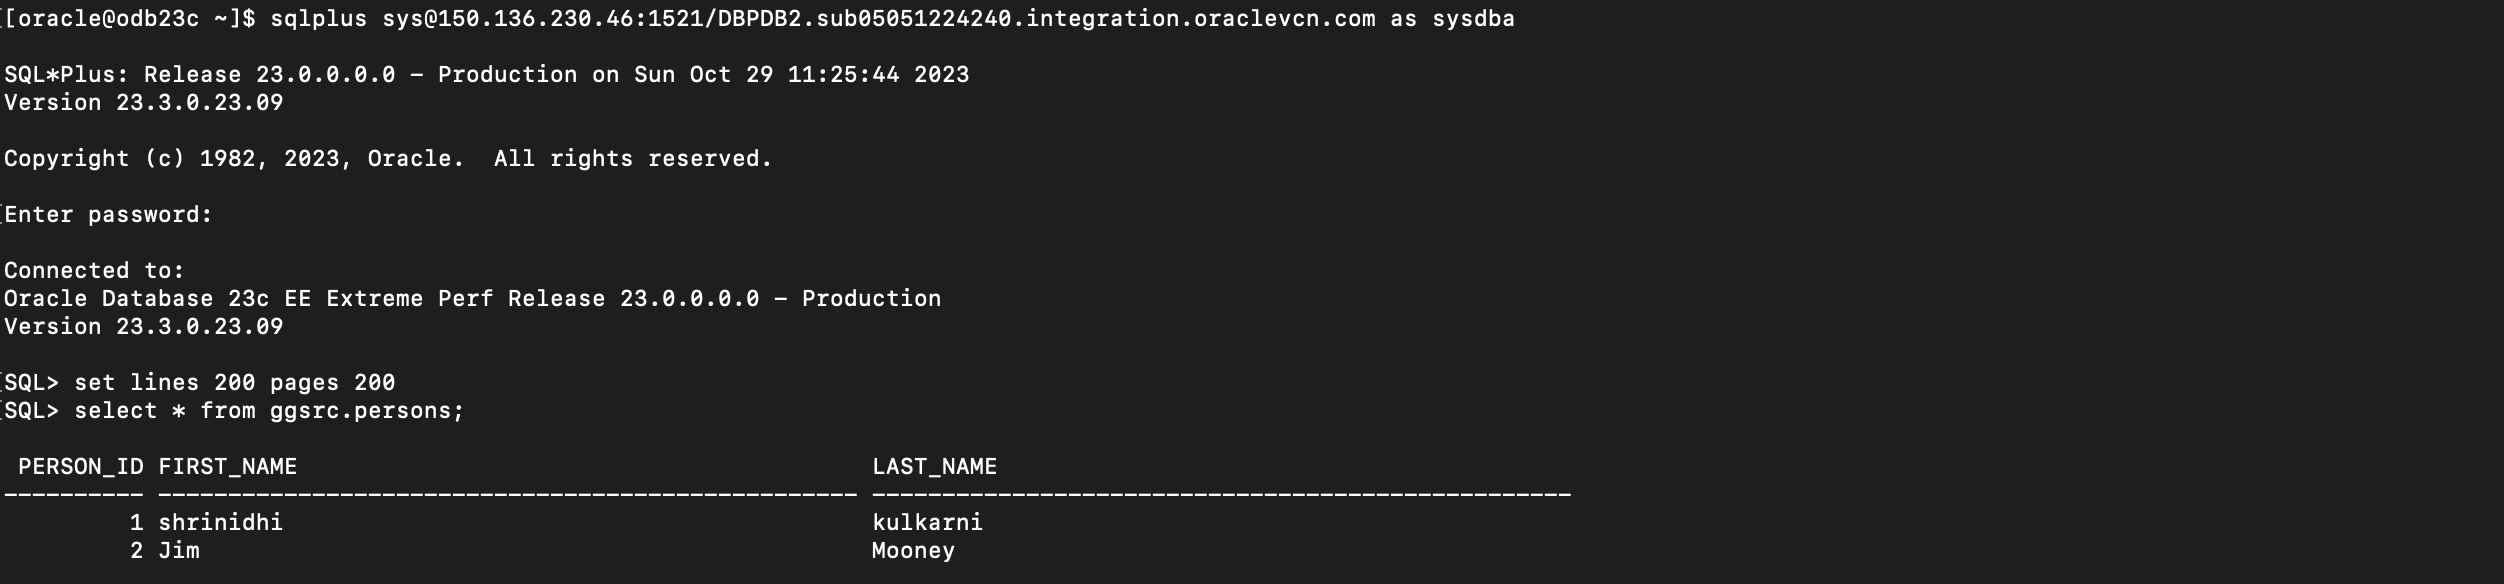
Now perform some DML on the source PDB tables and verify the unidirectional replication is working correctly as expected.
Insert a recond on the Source PDB table and verify ifd the row gets replicated to target table successfully.
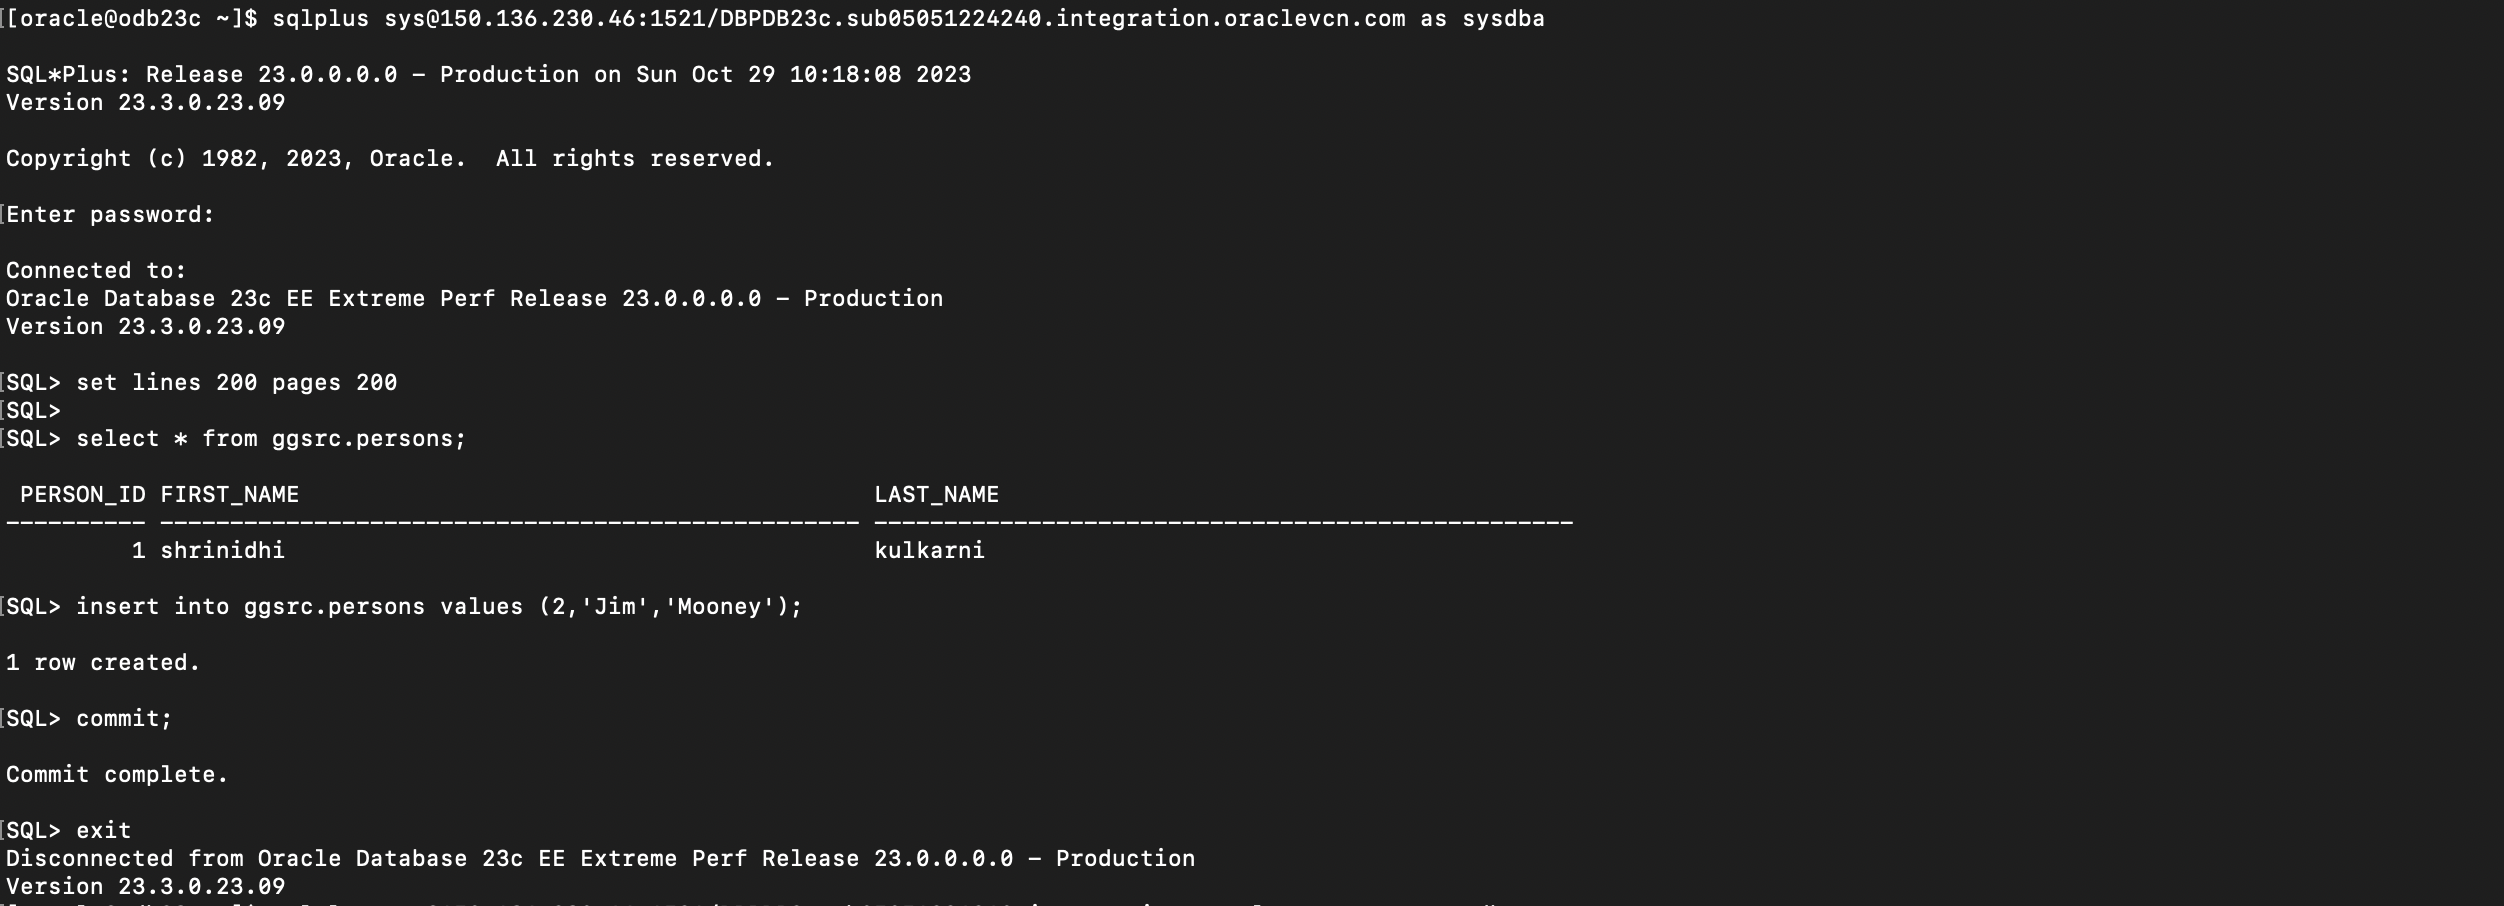
Target Table :GGSRC.PERSONS