Oracle Autonomous JSON Database is a cloud document database service that makes it simple to develop JSON-centric applications. It features NoSQL-style document APIs (Oracle SODA and Oracle Database API for MongoDB), serverless scaling, high performance ACID transactions, comprehensive security, and low pay-per-use pricing. You can get more details about Autonomous JSON Database here.
Oracle GoldenGate is a comprehensive software package for real-time data integration and replication. It enables high availability solutions, real-time data integration, transactional change data capture, data replication, transformations, and verification between operational and analytical enterprise systems.
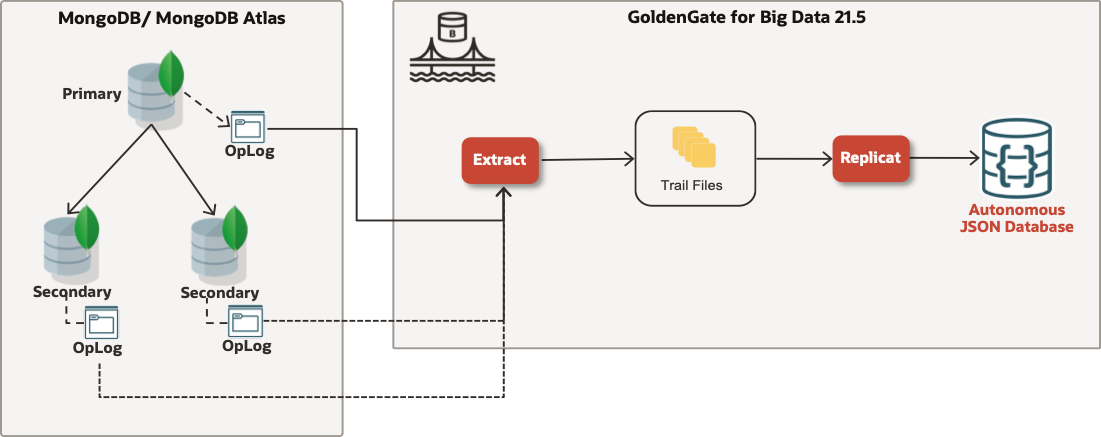
Oracle GoldenGate for Big Data supports real-time data ingestion into more then 25 different technologies. Oracle GoldenGate for Big Data also supports several technologies as source. The current GoldenGate for Big Data version (21.5) when this article is published, supports change data capture from Kafka, Cassandra and MongoDB.
GoldenGate for Big Data can be configured for no down-time migrations from MongoDB to Autonomous JSON Database. Here are some details about what’s supported in GoldenGate for Big Data MongoDB capture:
• Supported versions are 3.6, 4x, 5x and 6.
• Supported data types BSON & extended JSON
• Supported MongoDB products: MongoDB Atlas, MongoDB Enterprise & Community Editions
GoldenGate for Big Data monitors oplog (operation log) files in MongoDB to capture change data. Oplog files keeps the rolling record of all operations in MongoDB. Oplog are not default in MongoDB. They are generated when MongoDB is configured with a replica set. Replica set is a group of MongoDB processes that stores the same data set and it is used for redundancy in MongoDB. Replicat set can be configured in a MongoDB cluster or by running multiple MongoDB services on different ports in a single node MongoDB. The minimum recommended replica set is three members set with one primary and two secondaries; but two-member replica set can be used for dev&test scenarios as well.
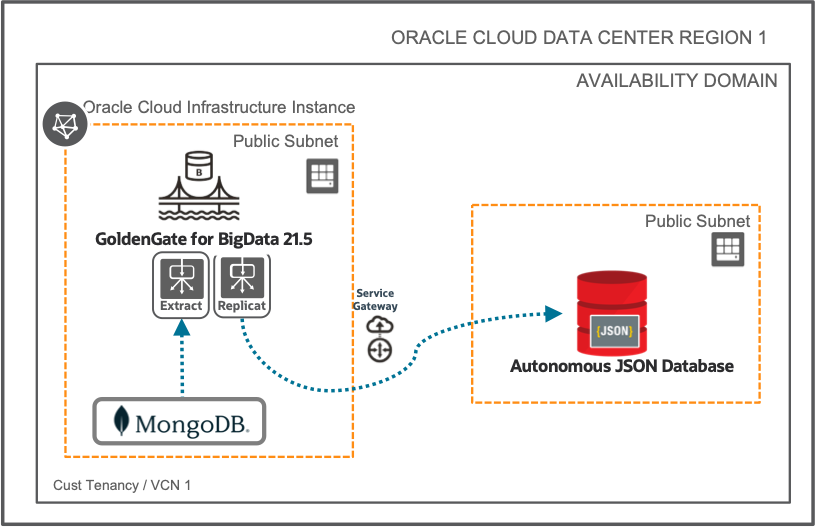
First step is installing GoldenGate for Big Data. As GoldenGate supports hub deployments, so you can install GoldenGate for Big Data either in your own data centre or in Oracle Cloud Infrastructure. For step-by-step instructions, you can check this recording.
While writing this blog, I used a single Oracle Cloud Infrastructure compute instance. I have a single node MongoDB Community Edition version 5.0.6 with two replica sets configured as source and a GoldenGate for Big Data 21.5 deployment in the same compute node. I’m using Goldengate for Big Data deployment to capture from MongoDB and to replicate into Autonomous JSON.
There are couple of steps that we need to follow to configure no downtime migration from MongoDB to OCI Autonomous JSON with GoldenGate for Big Data. In overall, we will follow the below steps:
1. Creating OCI Autonomous JSON Database on OCI
2. Downloading GoldenGate for Big Data dependency jar files
3. Creating the GLOBALS file and MongoDB Credentials
4. Creating & Starting Change Data Capture Extract from MongoDB
5. Creating & Starting Initial Load Extract from MongoDB
6. Creating & Starting GoldenGate Initial Load Replicat
7. Creating & Starting GoldenGate CDC Replicat
1. Creating OCI Autonomous JSON Database on OCI
In this blog post, we will not create an Autonomous JSON Database step by step; but, you can get all necessary steps in another blog post which is available here.
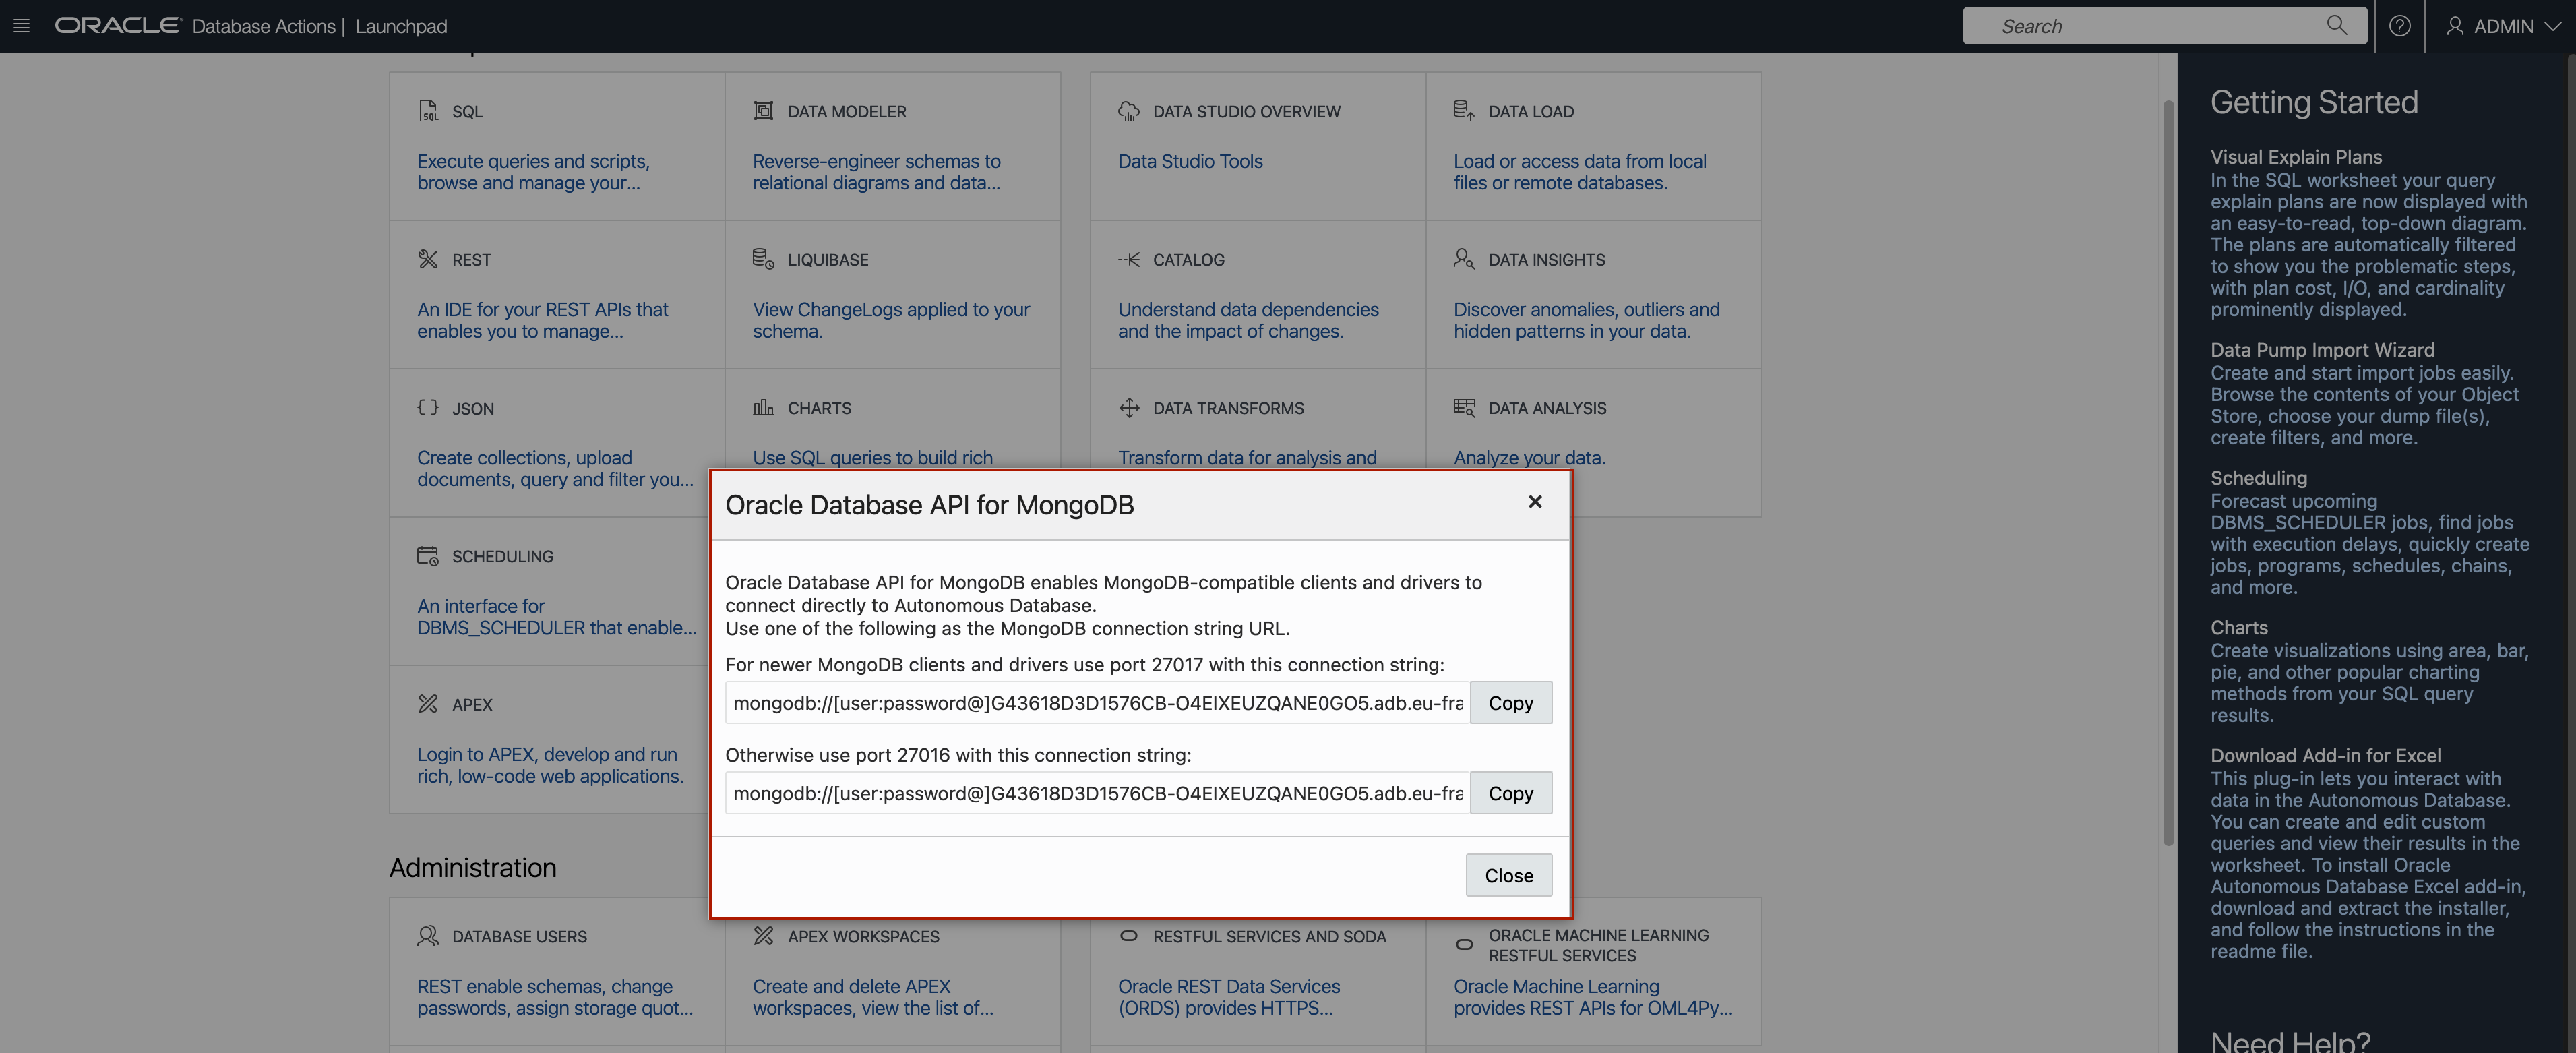
GoldenGate for Big Data uses “Oracle Database API for MongoDB” to connect to Autonomous JSON Database. The Database API for MongoDB will only be available if you define “Secure access from allowed Ips and VCNs only” in “Choose Network Access” step of Autonomous JSON Database service creation. You can see the details in the above shared link.
Once Autonomous JSON Database is created, you can check the Oracle Database API for MongoDB from Service Console/ Development.
2. Downloading GoldenGate for Big Data dependency jar files
GoldenGate for Big Data uses client dependency jars for the various supported Oracle GoldenGate for Big Data integrations.
To download dependency jars, you can use “dependency downloader” which is a set of utility scripts that have been added to download 3rd party dependency libraries for various integrations.
Dependency downloader is located at /GGHOME/opt/DependencyDownloader.
We need to execute mongodb_capture.sh for MongoDB capture dependencies and mongodb.sh for Autonomous JSON Database dependencies.
mongodb.sh will download MongoDB Java drivers needed for Autonomous JSON replication. You can refer to MongoDB Java Driver document to see the list of driver versions. Oracle GoldenGate requires that you use the 3.12.8 MongoDB Java Driver or higher.
mongodb_capture.sh will download the drivers needed for capturing from MongoDB. You can refer to repository for versions that you can use.

![]()
![]()


Please note the paths to both dependency directories. We’ll need them in the later steps.
3. Creating GLOBALS file and MongoDB Credentials
Before configuring the CDC Extract, we need to configure the Globals file. You can configure the GLOBALS file in Administration Service/ Configuration/ Parameter Files/ Add File.
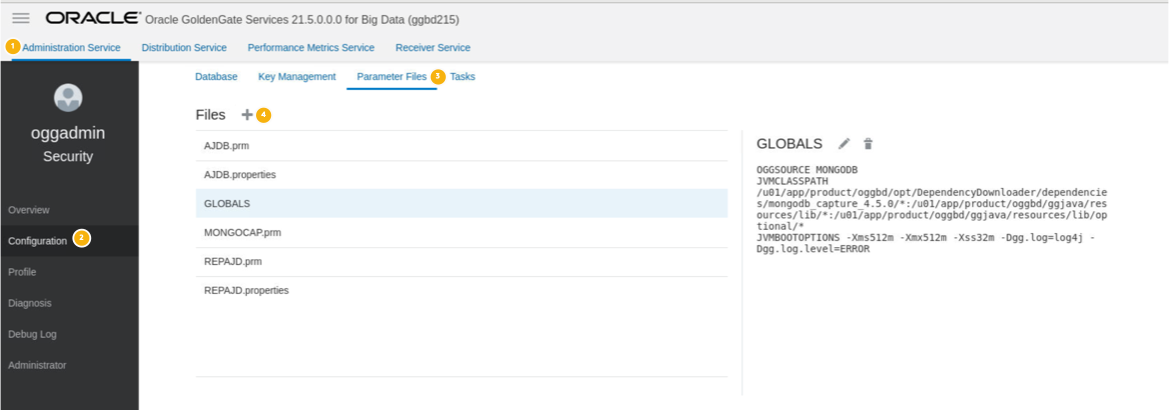
This is the GLOBALS file configuration that I used in my setup:
OGGSOURCE MONGODB
JVMCLASSPATH /u01/app/product/oggbd/opt/DependencyDownloader/dependencies/mongodb_capture_4.5.0/*:/u01/app/product/oggbd/ggjava/resources/lib/*:/u01/app/product/oggbd/ggjava/resources/lib/optional/*
JVMBOOTOPTIONS -Xms512m -Xmx512m -Xss32m -Dgg.log=log4j -Dgg.log.level=INFO
First line indicates that source is MongoDB. The second line (JVMCLASSPATH) sets the Java JVM classpath. The Java classpath provides the pathing to load all the required Oracle GoldenGate for Big Data libraries and MongoDB client libraries that we downloaded in the previous step. The third line is the JVM boot options. You can use this to configure the maximum Java heap size (-Xmx512m) and the log4j logging parameters to generate the .log file.
MongoDB capture uses Oracle GoldenGate credential store to manage user IDs and their encrypted passwords (together known as credentials) that are used by Oracle GoldenGate processes to interact with the MongoDB database.
MongoDB capture uses Oracle GoldenGate credential store to manage user IDs and their encrypted passwords (together known as credentials) that are used by Oracle GoldenGate processes to interact with the MongoDB database. You can configure Credentials in Administration Service/ Configuration/ Database/ Credentials/ Add Credential.
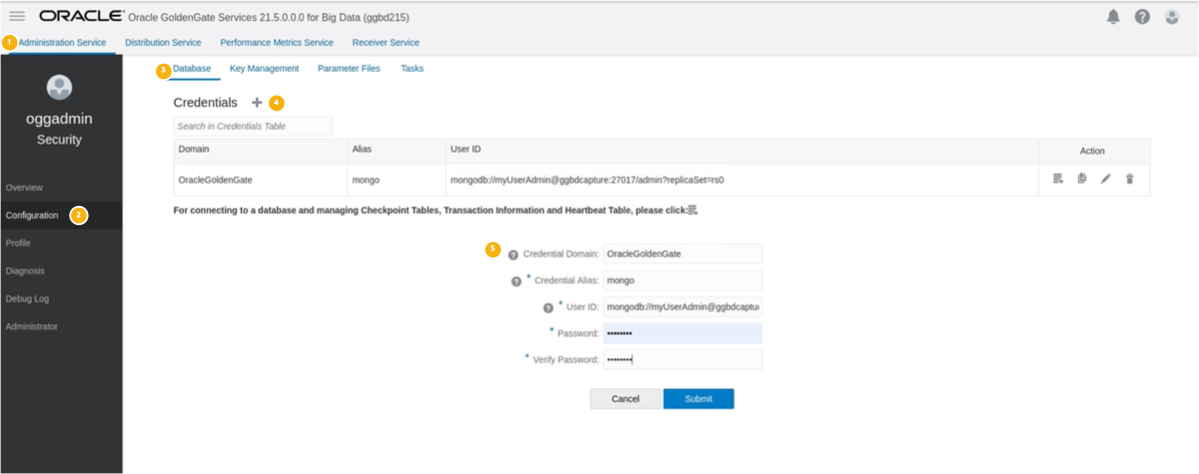
User ID is the MongoDB connection URI that you use to connect to your MongoDB deployment. ReplicatSet also needs to be provided in User ID. Example for User ID:
mongodb://myUserAdmin@localhost:27017/admin?replicaSet=rs0
In this example, “myUserAdmin” is the user name to connect to MongoDB, “localhost” is the hostname where MongoDB is running, “admin” ,is the user name (but not mendatory) and “replicaSet” is the Mongo DB replica set name. To use TSL/ SSL, you can add “+srv” to connection string. For example:
Mongodb+srv://myUserAdmin@localhost:27017/admin?replicaSet=rs0
Password is the one that is used with the above connection string.
4. Creating & Starting Change Data Capture Extract from MongoDB
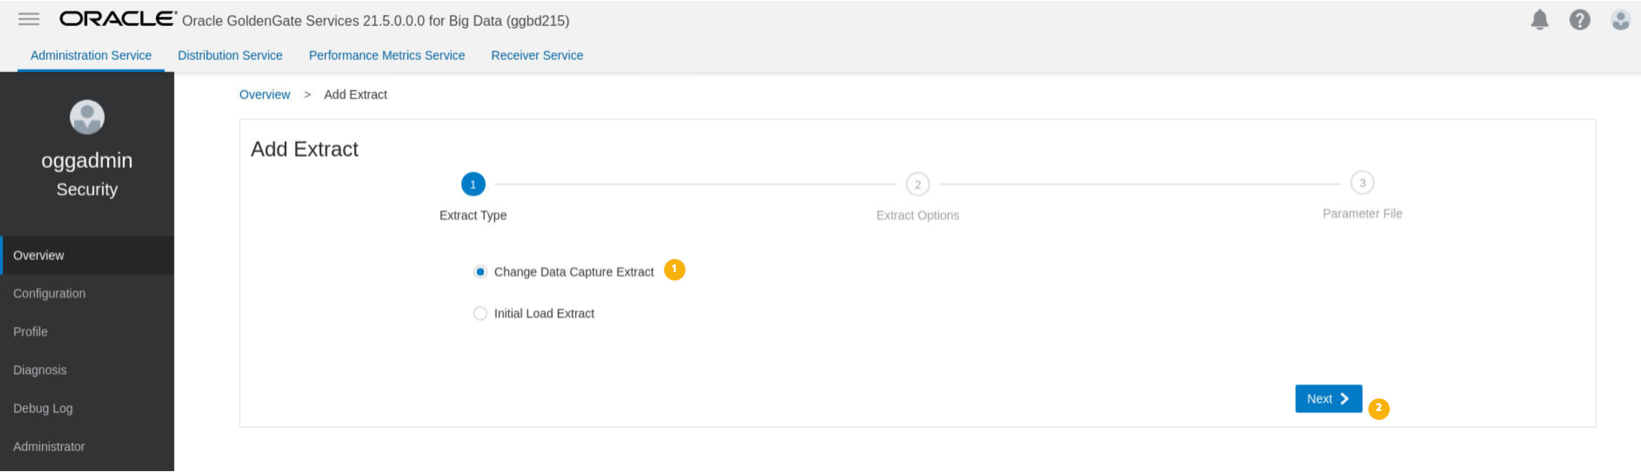
GoldenGate for Big Data has 2 different extract modes: Change Data Capture Extract and Initial Load Extract. Change Data Capture Extract will capture the new transactions from MongoDB oplog files. Initial Load Extract will capture all the data in the oplog files and will be used only for initial load process.
To create a Change Data Capture extract, go to Administration Service/ Extracts/ Add Extract.
Select “Change Data Capture Extract” and click “Next”.
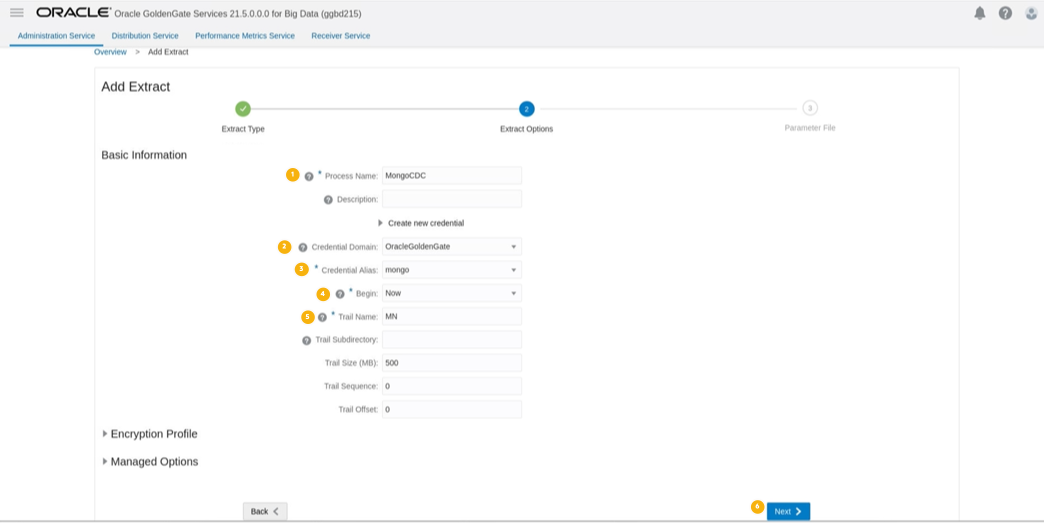
Provide the “Extract Options” details and click “Next”.
| Process Name | Name of the extract process |
| Credential Domain | Credential Domain that was created in step 3 |
| Credential Alias | Credential Alias that was created in step 3 |
| Begin | When to begin the extract. Select as “Now” |
| Train Name | Name of the trail file that will be generated by GoldenGate |
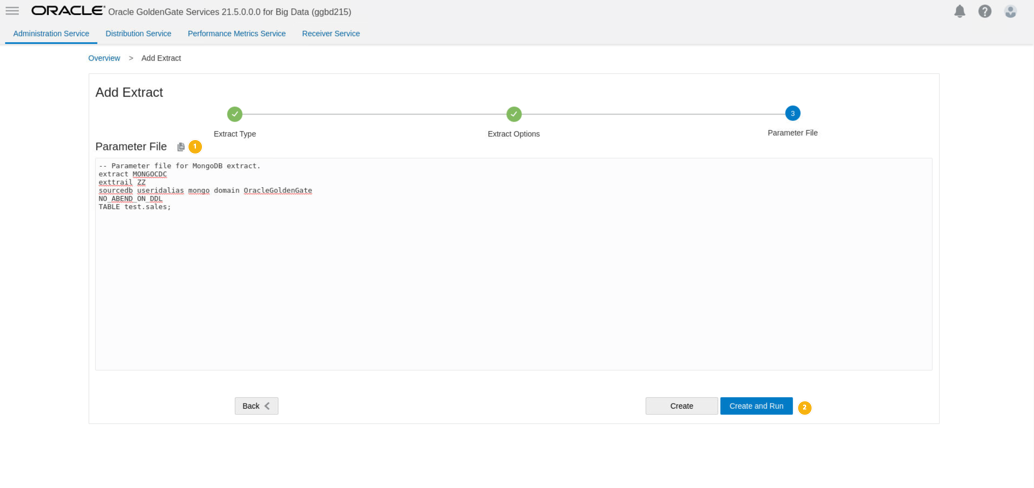
Parameter File will be generated automatically with a wild card selection of Source Databases Collections (“Table *.*;”).
In my setup, I’m capturing from a database named “test” and a collection called “sales”. I’ve also added “No_ABEND_ON_DDL”property as Mongo DB capture currently does not support Create/ Ranema/ Drop Collection operations. Edit Parameter File and click “Create & Run”.
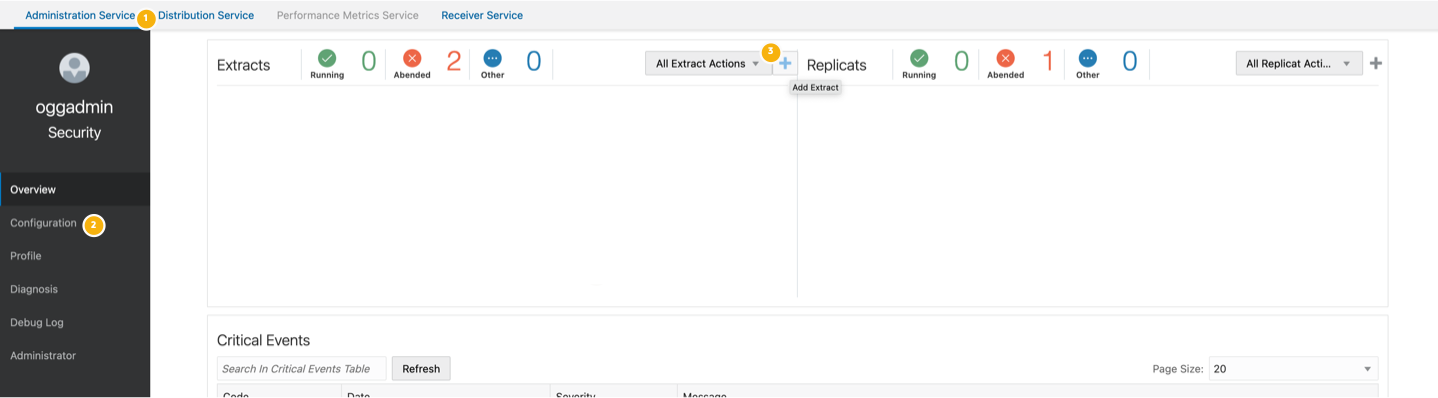
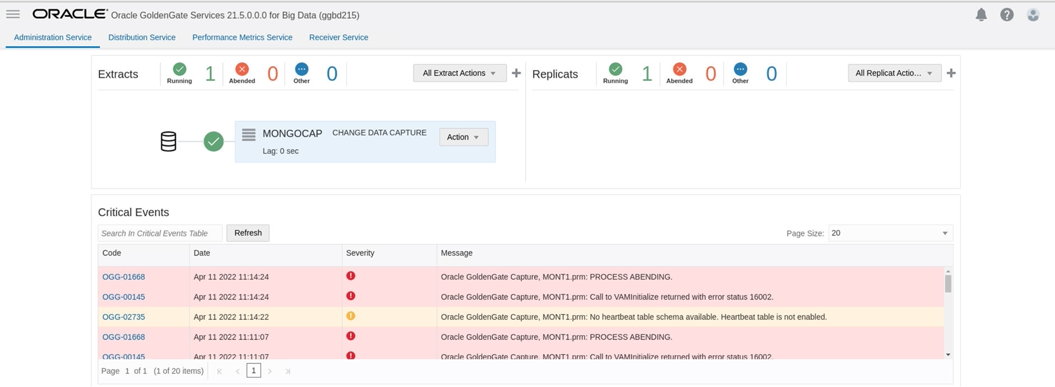
If your Extract starts successfully, it will be shown in the “Running” status as seen below.
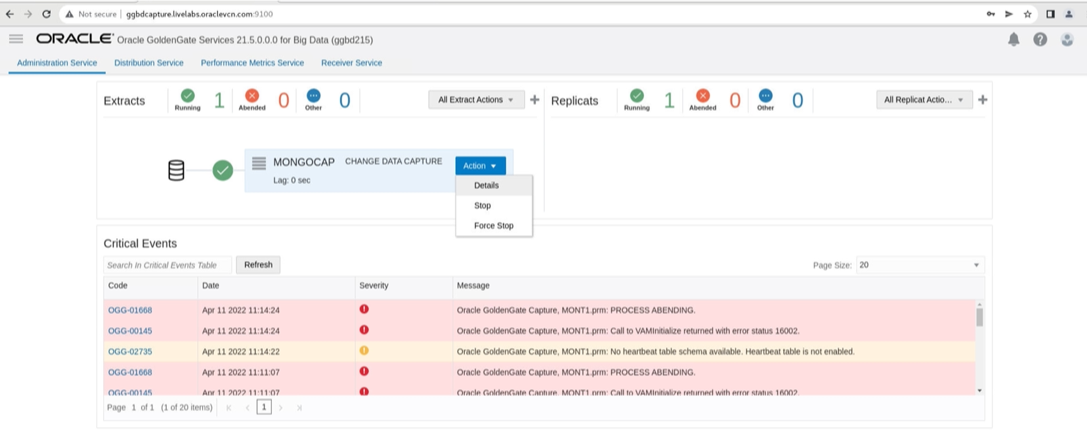
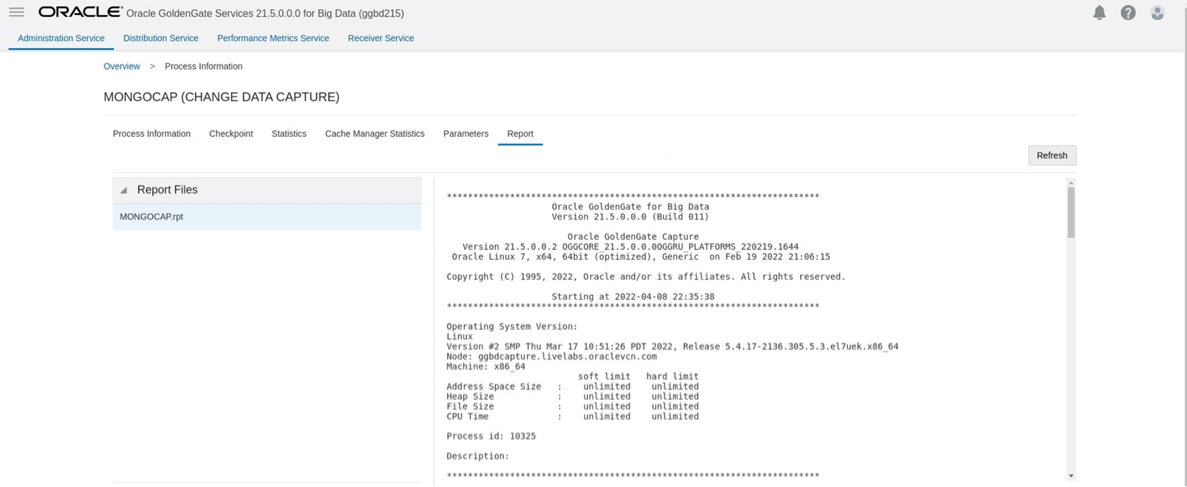
If your Extract fails, you can check the error message in Action/ Details/ Report.
5. Creating & Starting Initial Load Extract from MongoDB
After creating Change Data Capture Extract, we will configure “Initial Load Extract”. “Initial Load Extract” can be used to extract source table data to Oracle GoldenGate trail files. It will create a file that will be used by the replicat.
To add initial load extract, Administration Service/ Add Extract/ Initial Load Extract/ Next.
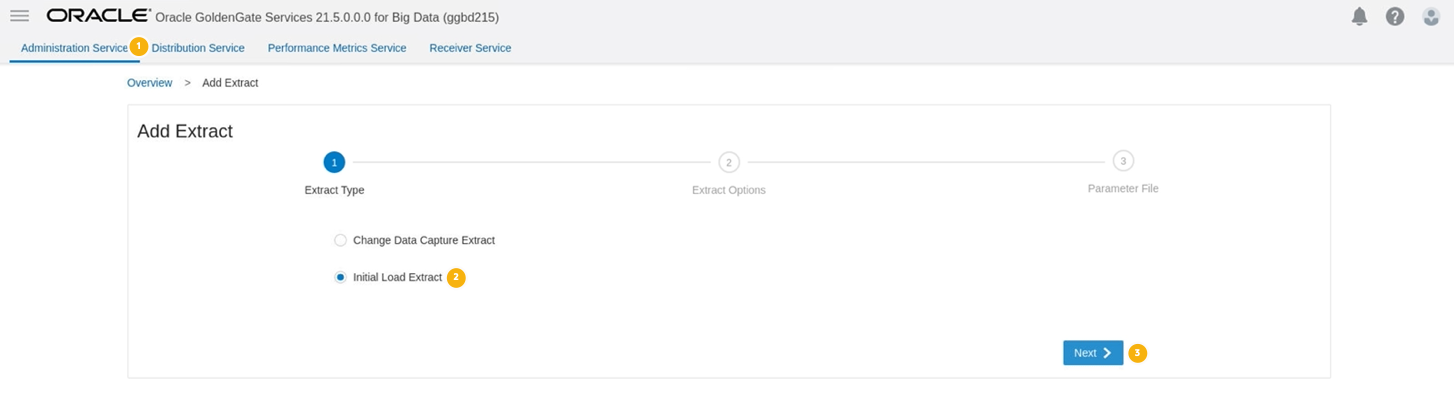
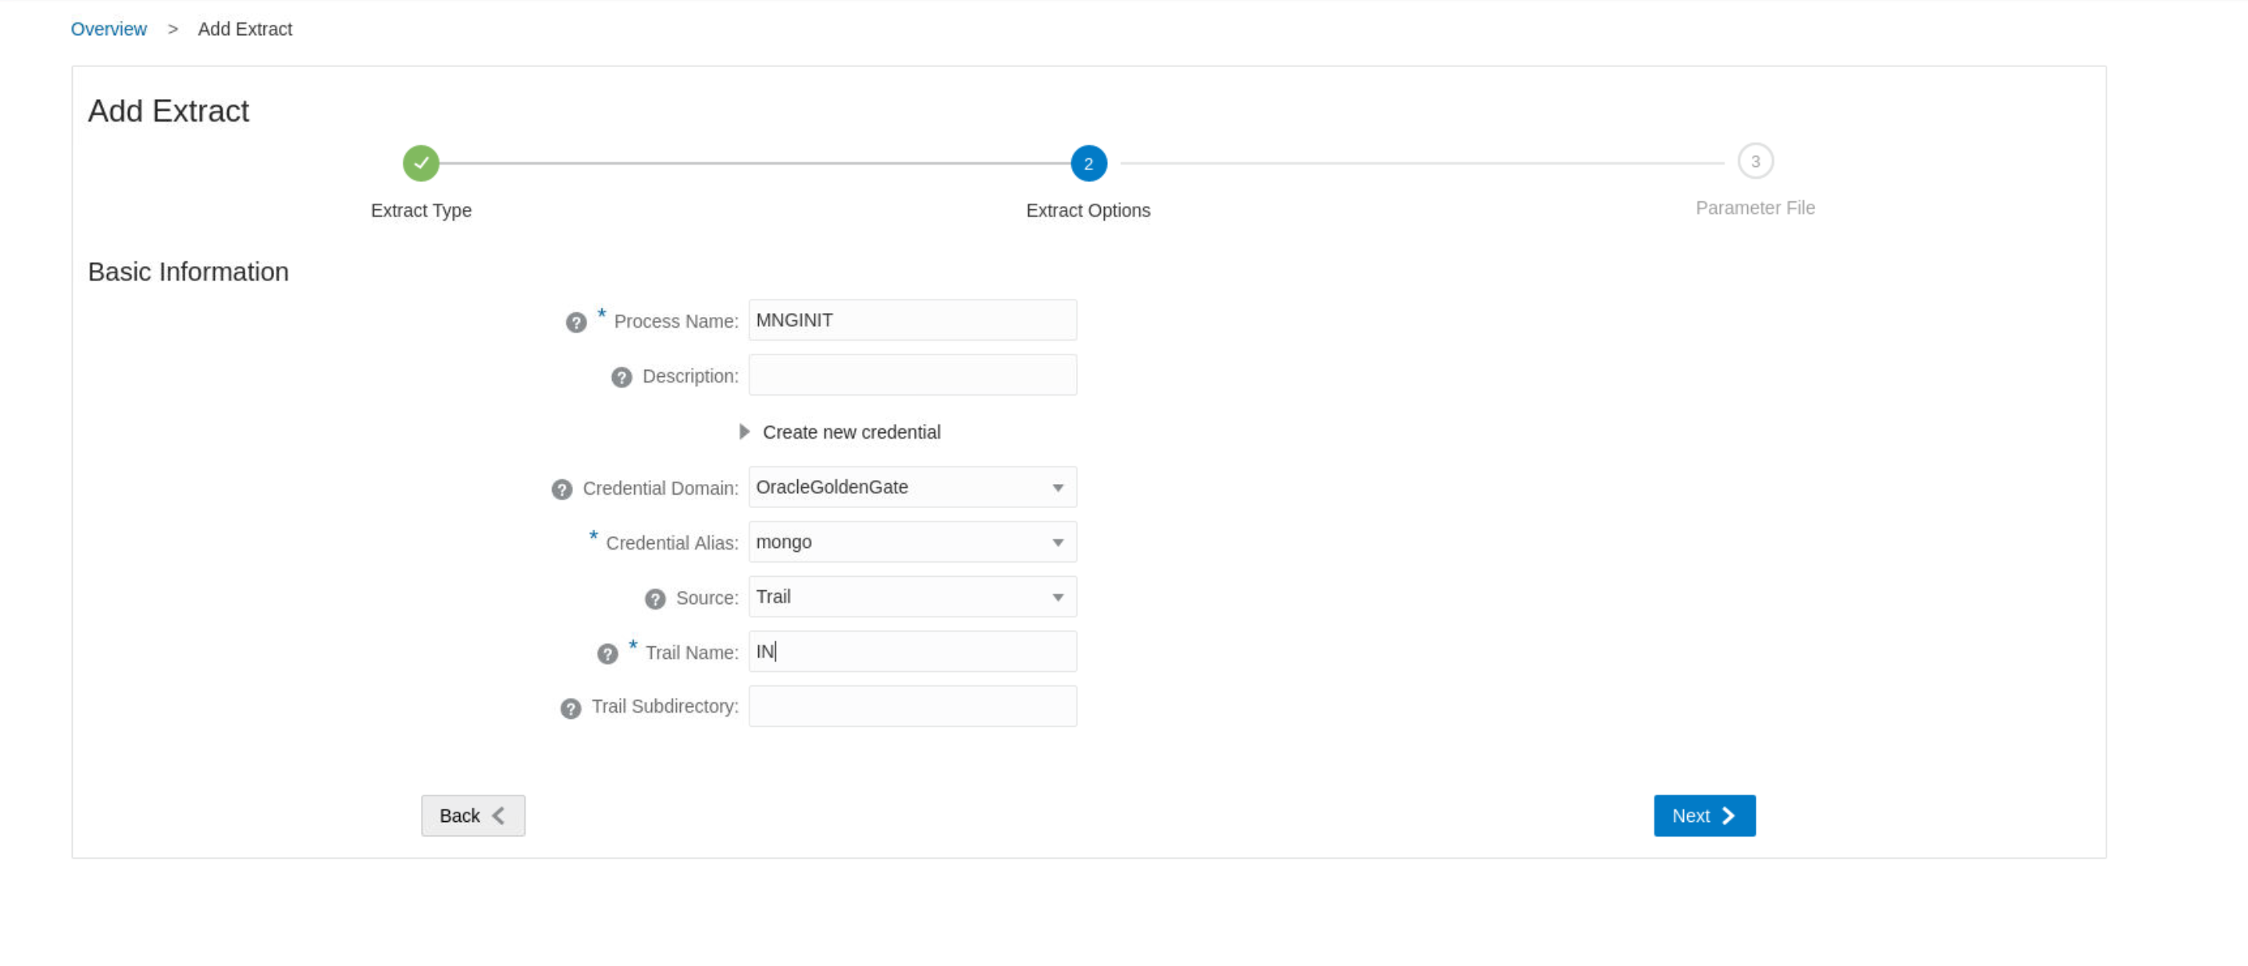
Provide the “Extract Options” and click “Next”. You can use the same Credential Domain & Alias that was created in step 3.
| Process Name | Name of the extract process |
| Credential Domain | Credential Domain that was created in step 3 |
| Credential Alias | Credential Alias that was created in step 3 |
| Source | Trail |
| Train Name | Name of the trail file that will be generated by GoldenGate |
You need to make some changes in the parameter file.
System generated Parameter File will look like this:
— Parameter file for MongoDB extract.
extract MNGINIT
exttrail IN
sourcedb useridalias mongo domain OracleGoldenGate
TABLE *.*;
You need to change “exttrail” into “extfile” and provide the trail name that you defined in “Extract Options” (in my case it was IN). EXTFILE parameter specifies an extract file that will be read by the Initial Load Replicat. You’d also need to change the size of the trail file with “Megabytes” option.
Also, system will create a wild card selection of Source Databases/ Collections (“Table *.*;”). You can define your source database/ collections here. In my setup, I’m capturing from a database named “ggdemo” and from a collection called “sales”.
Parameter File that I used for this blog is:
— Parameter file for MongoDB extract.
extract MNGINIT
extfile IN Megabytes 2000
sourcedb useridalias mongo domain OracleGoldenGate
TABLE ggdemo.sales;
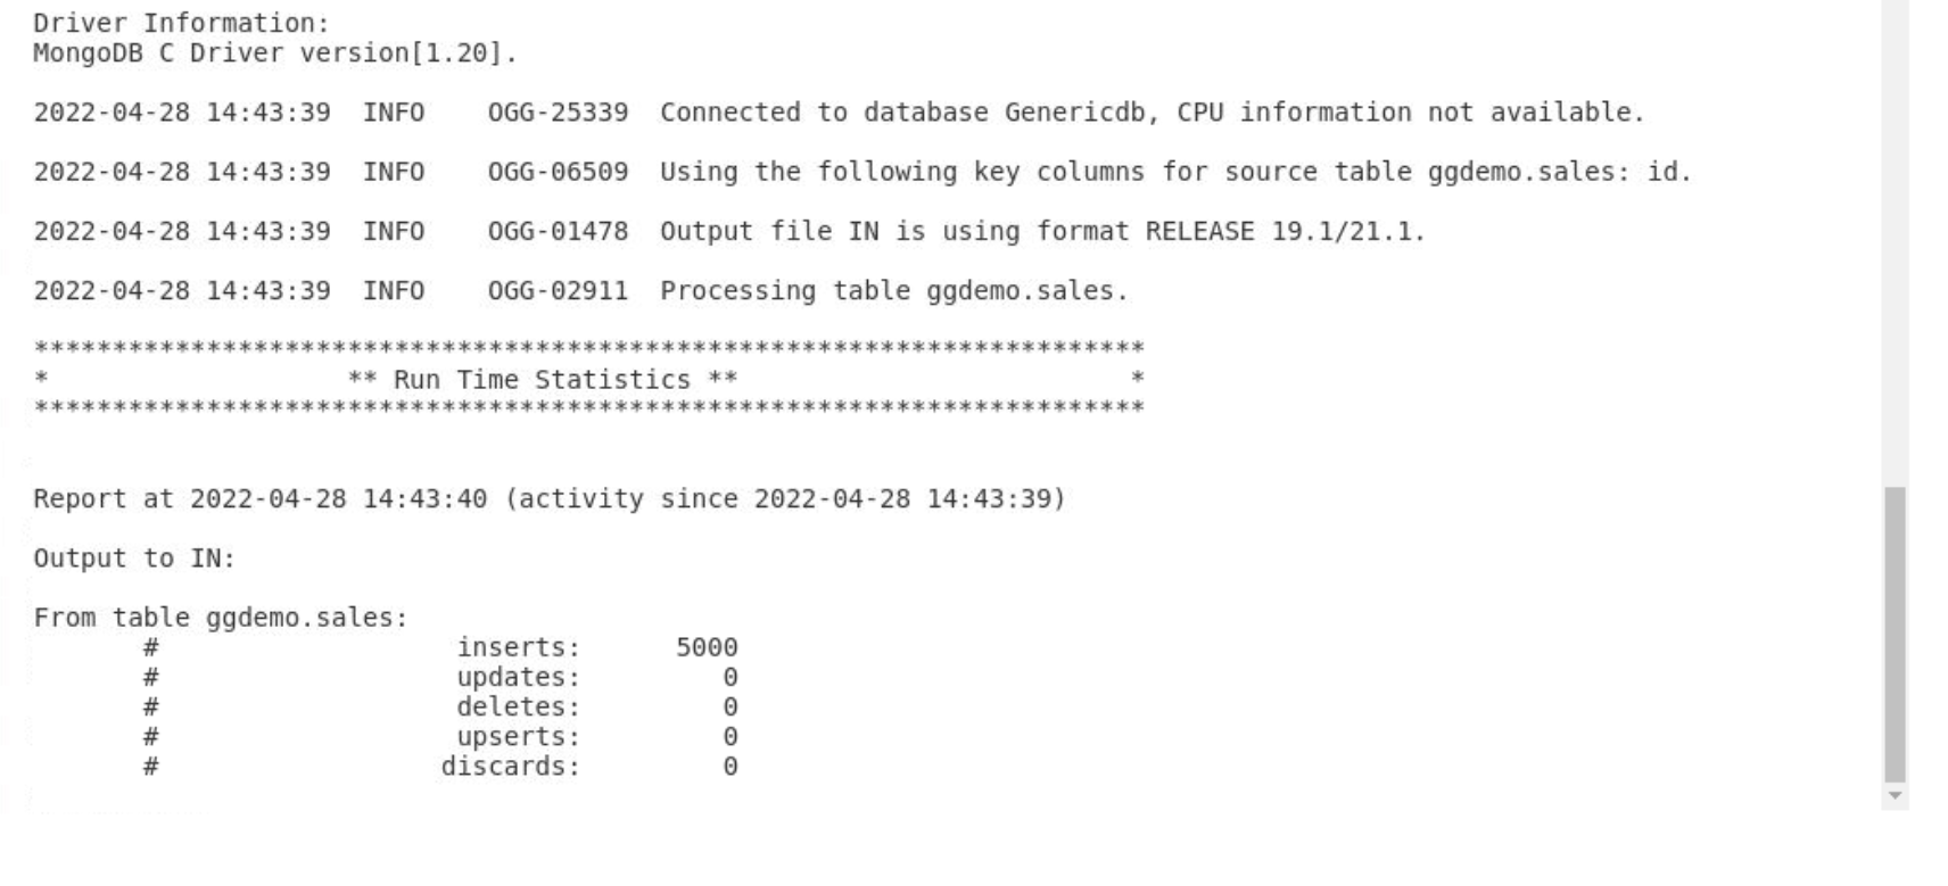
You can click Create & Run. This action will initiate the load. To see if it is successfully completed, you can go to Actions/ Details/ Report. If you scroll down, you’ll see the number of inserts completed. Below screen shot is from my extract report.
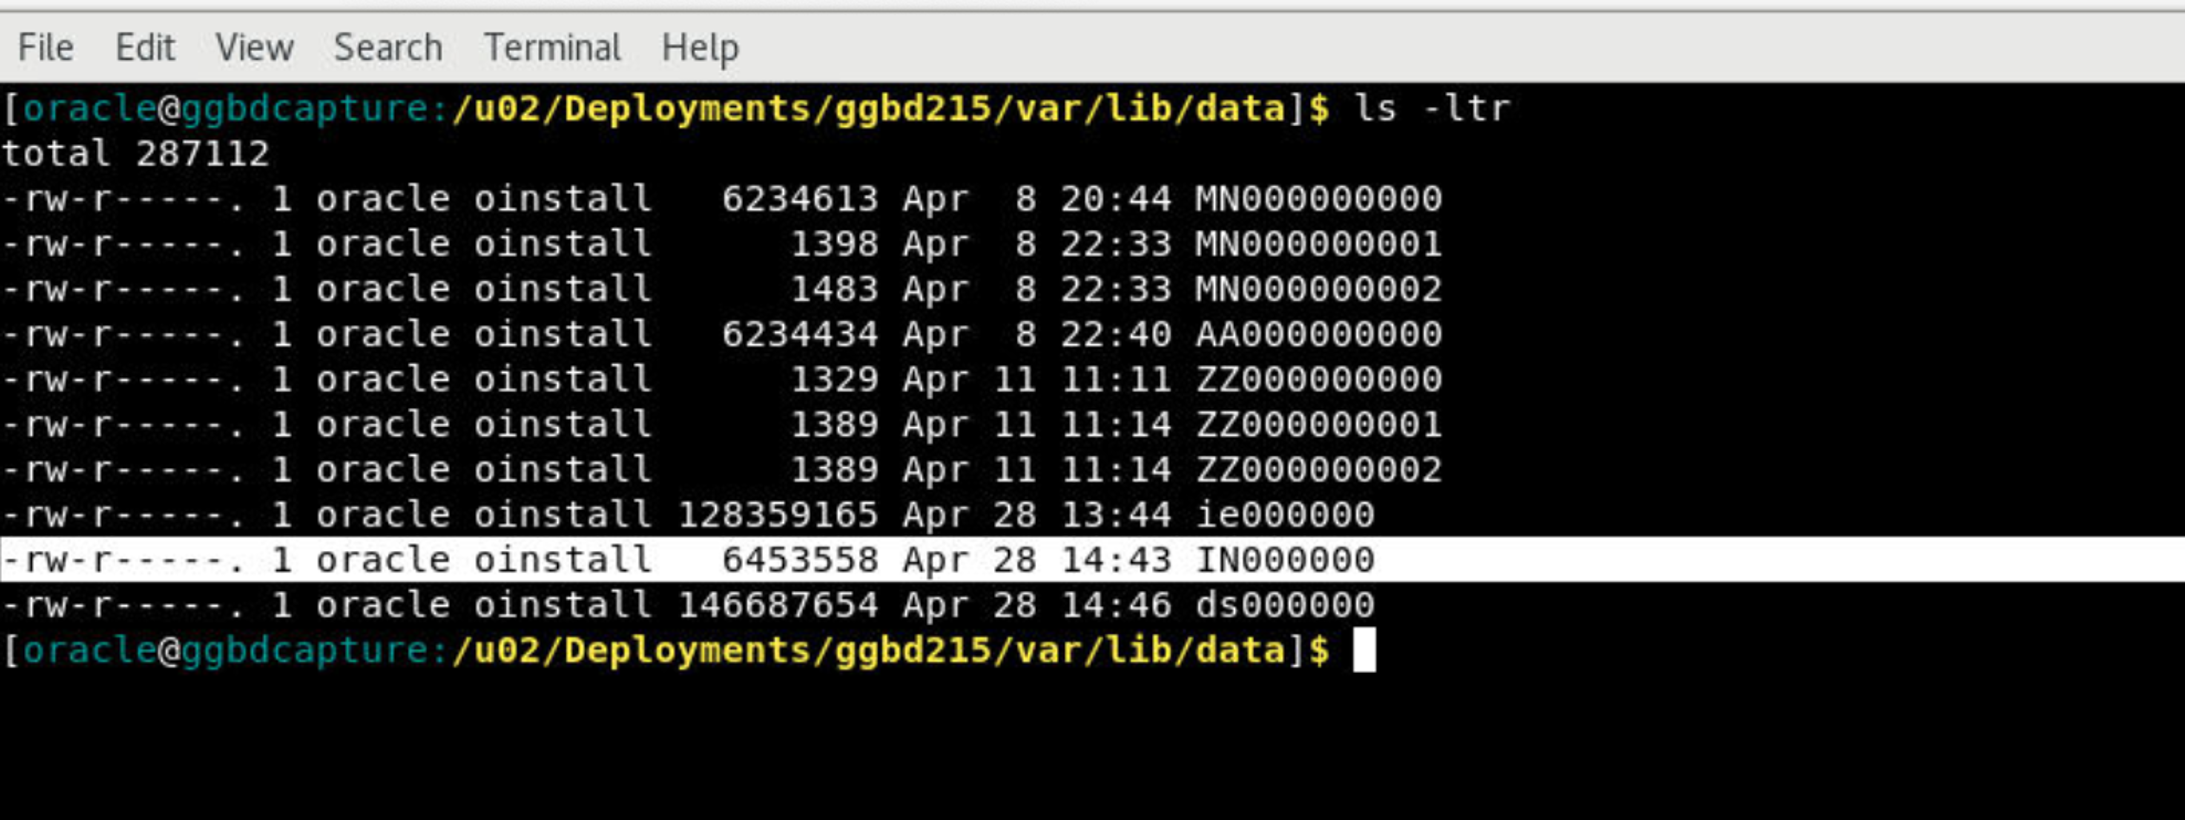
You can also see the file being created in DeploymentHome/var/lib/data:
6. Creating & Starting Initial Load Replicat
“Initial Load Replicat” will load the trail files generated by “Initial Load Extract” to Autonomous JSON Database.
To configure the replicat, we need to get the “Oracle Database API for MongoDB” from the Autonomous JSON Database you created in step 1. To get it, go to Autonomuos Database Details and click Database Actons. You’ll see Oracle Database API for MongoDB in Related Services.
When you copied, it looks like similar to this:
mongodb://[user:password@]G43618D3D1576CB-AJDTARGET.adb.eu-frankfurt-1.oraclecloudapps.com:27016/[user]?authMechanism=PLAIN&authSource=$external&ssl=true&retryWrites=false
You need to update it with the appropriate username and password. So, it would look like this:
mongodb://DSENDIL:MyPassWord@G43618D3D1576CB-AJDTARGET.adb.eu-frankfurt-1.oraclecloudapps.com:27016/DSENDIL?authMechanism=PLAIN&authSource=$external&ssl=true&retryWrites=false
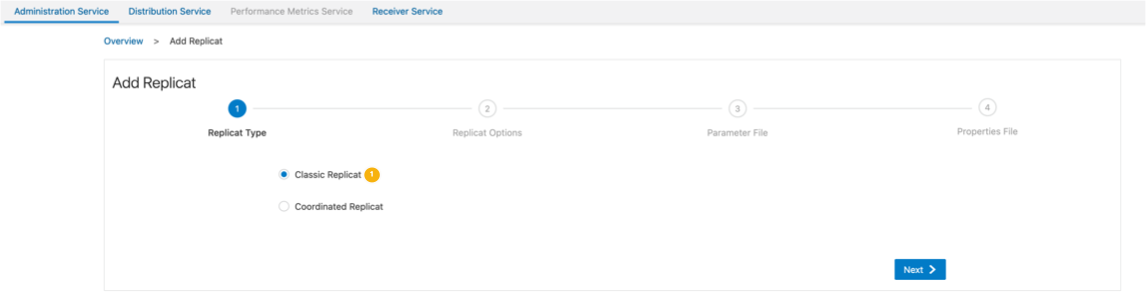
To configure the initial load replicat, Administration Service/ Replicats/ Add Replicat.
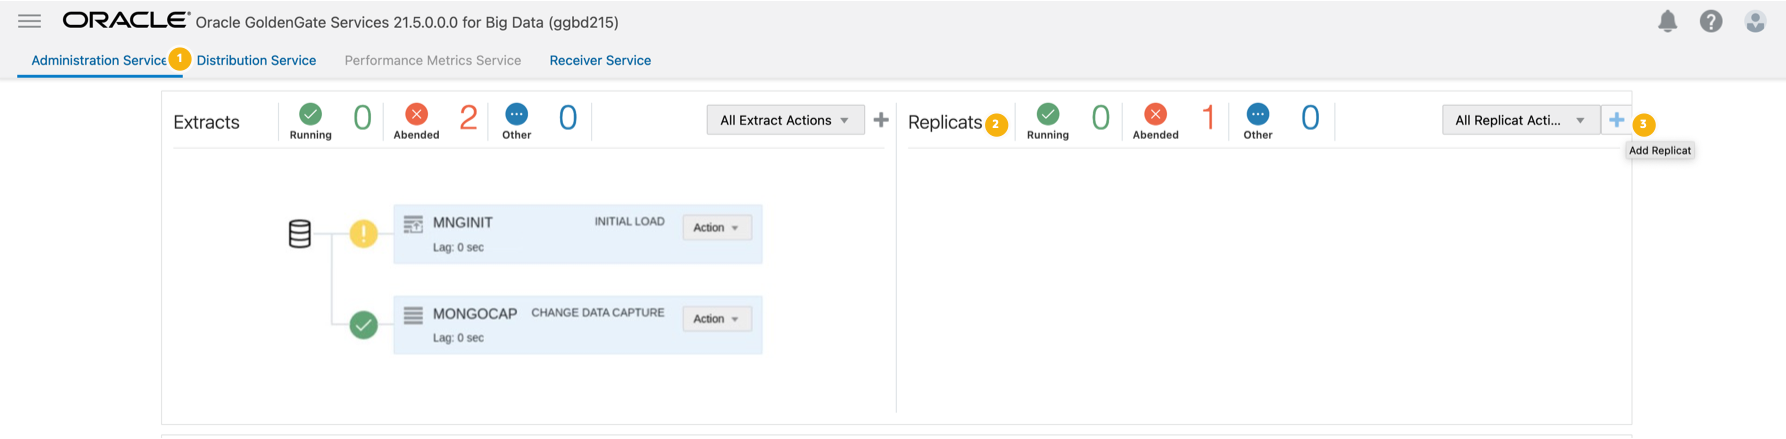
Select Classic Replicat and click “Next”
Provide “Basic Information”
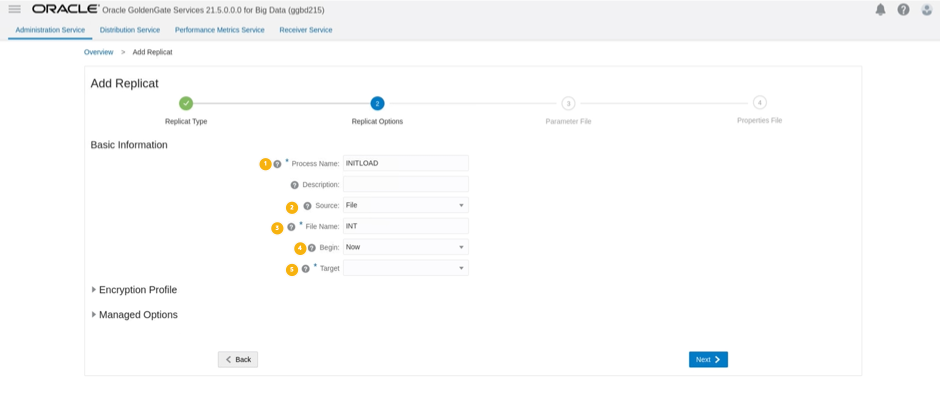
| Process Name | Name of the replicat |
| Source | File |
| File Name | IN (This is the name of the file generated by the extract in step 5) |
| Begin | Now |
| Target | MongoDB (if you can’t see it in the list, you can just type MongoDB and it will show up) |
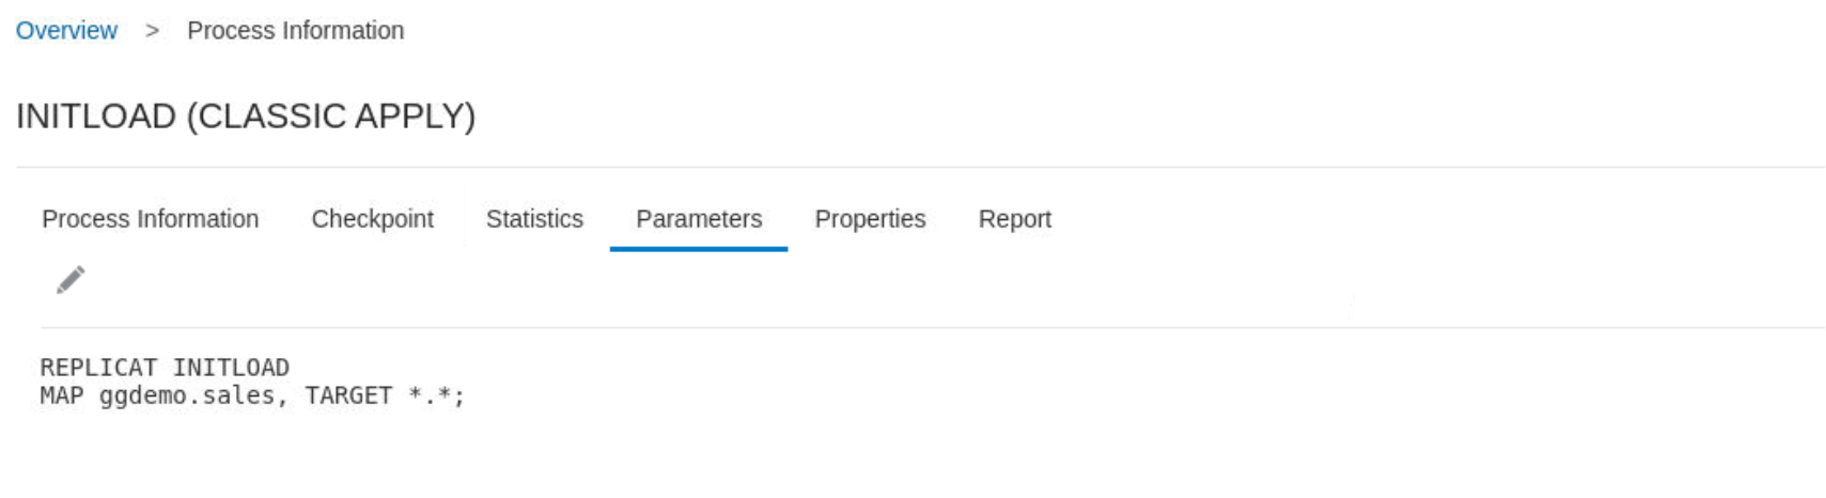
Next is the parameter file configuration. In the parameters part, you can define your source to target mappings. You’ll see it as “MAP *.*;” by default. As you can see below, I’ve updated my source database & collection; but, left target as “*.*” In this scenario, GoldenGate will create a schema named “ggdemo” and a database named “sales”.
Next is properties. You will see properties file is already populated. This template is driven by the Target selection that we made in the previous step. The default properties would look like:
# Properties file for Replicat INITLOAD
#MongoDB Handler Template
# Note: Recommended to only edit the configuration marked as TODO
gg.handlerlist=mongodb
gg.handler.mongodb.type=mongodb
#TODO: Edit the MongoDB Client URI
gg.handler.mongodb.clientURI=mongodb://localhost:27017/
#TODO: Edit the path to MongoDB Java driver.
gg.classpath=/path/to/mongodb/java/driver/mongo-java-driver-3.2.2.jar
jvm.bootoptions=-Xmx512m -Xms32m
We need to update gg.handler.mongodb.clientURI and gg.classpath.
gg.handler.mongodb.clientURI is the connection string that you can find in Autonomous JSON that was created in step 1. We will use the one with port 27016.
gg.classpath is the path to MongoDB dependency files directory that you created in step 2 by using the “Dependency Downloader Utility”.
Below is the property file that I used for my replicat:
# Properties file for Replicat INITLOAD
gg.handlerlist=mongodb
gg.handler.mongodb.type=mongodb
#TODO: Edit the MongoDB Client URI
gg.handler.mongodb.clientURI= mongodb://DSENDIL:MyPassWord@G43687F3D1576CB-AJDTARGET.adb.eu-frankfurt-1.oraclecloudapps.com:27016/DSENDIL?authMechanism=PLAIN&authSource=$external&ssl=true&retryWrites=false
#TODO: Edit the path to MongoDB Java driver.
gg.classpath= /u01/app/product/oggbd/opt/DependencyDownloader/dependencies/mongodb/*
jvm.bootoptions=-Xmx512m -Xms32m
Once ready, click Create & Start. If all is good, you’ll see the replicat in running status with a green check.

If you go to Action/ Details/ Statistics, you’ll see the number of inserts.

Once initial load is complete, stop the initial load replicat.
7. Creating & Starting GoldenGate CDC Replicat with HANDLECOLLISIONS
Once initial load is complete, we need to make sure that source MongoDB and target Autonomous JSON databases are in sync continuously. To achieve source and target sync, we need to configure a CDC (Change Data Capture) replicat. CDC replicat will write messages to target Autonomous JSON as captured from the source MongoDB.
But there is a small challenge here. We have configured and started the CDC Extract from MongoDB in step 4. It means that it has been capturing the change data from source MongoDB for a while and there might be a gap between the completion of Initial Load and CDC Extract. To make sure that there no transactions missing, we can use the HANDLECOLLISIONS parameter.
HANDLECOLLISIONS will resolve the issues with duplicate/ missing records while applying the replicat. On the other hand, HANDLECOLLISIONS parameter has a negative impact on the performance and that’s why it is recommended to use as needed. We will configure the CDC Replicat with HANDLECOLLISIONS and start it. Then we will remove HANDLECOLLLIONS after the transactional changes captured during the initial load are applied to the target tables, so that Replicat does not automatically handle subsequent errors.
To configure the CDC replicat, Administration Service/ Replicats/ Add Replicat.

Select Classic Replicat and click “Next”
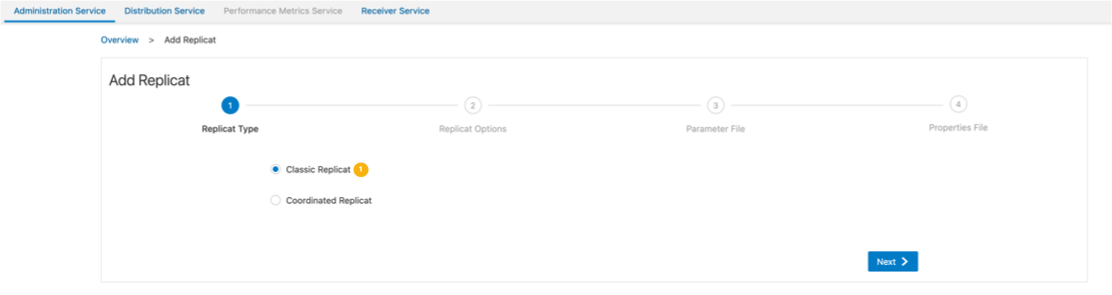
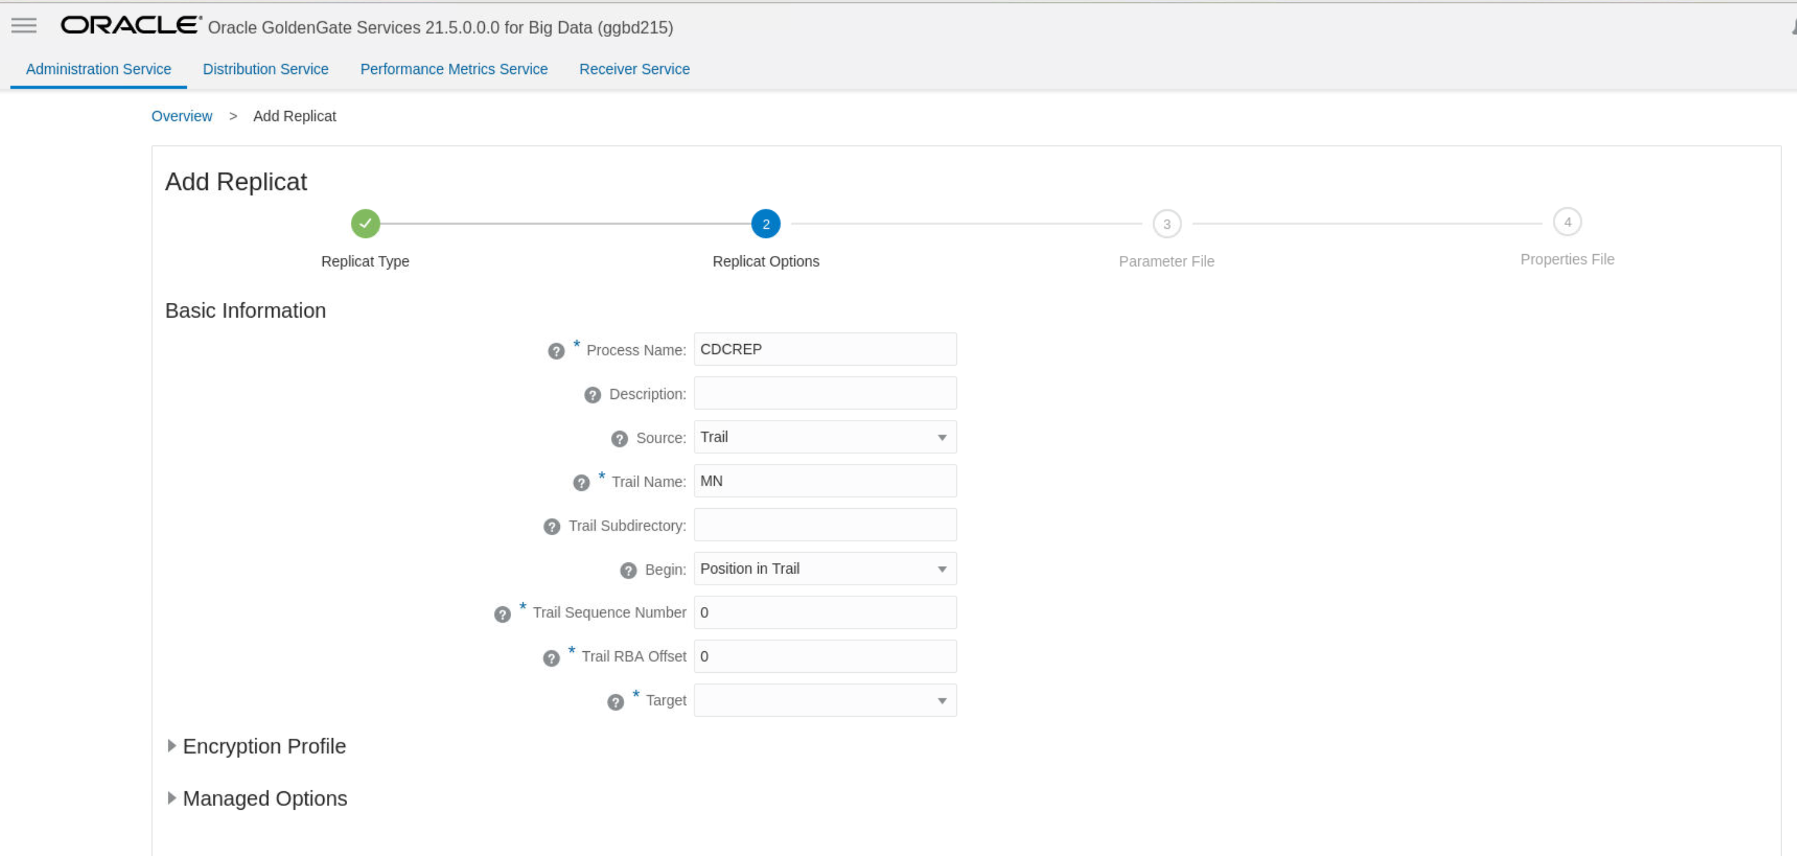
Provide “Basic Information”
| Process Name | Name of the replicat |
| Source | Trail |
| File Name | MN (This is the name of the trail generated by CDC Extract that we configured in step 4.) |
| Begin | Now |
| Target | MongoDB (if you can’t see it in the list, you can just type MongoDB and it will show up) |
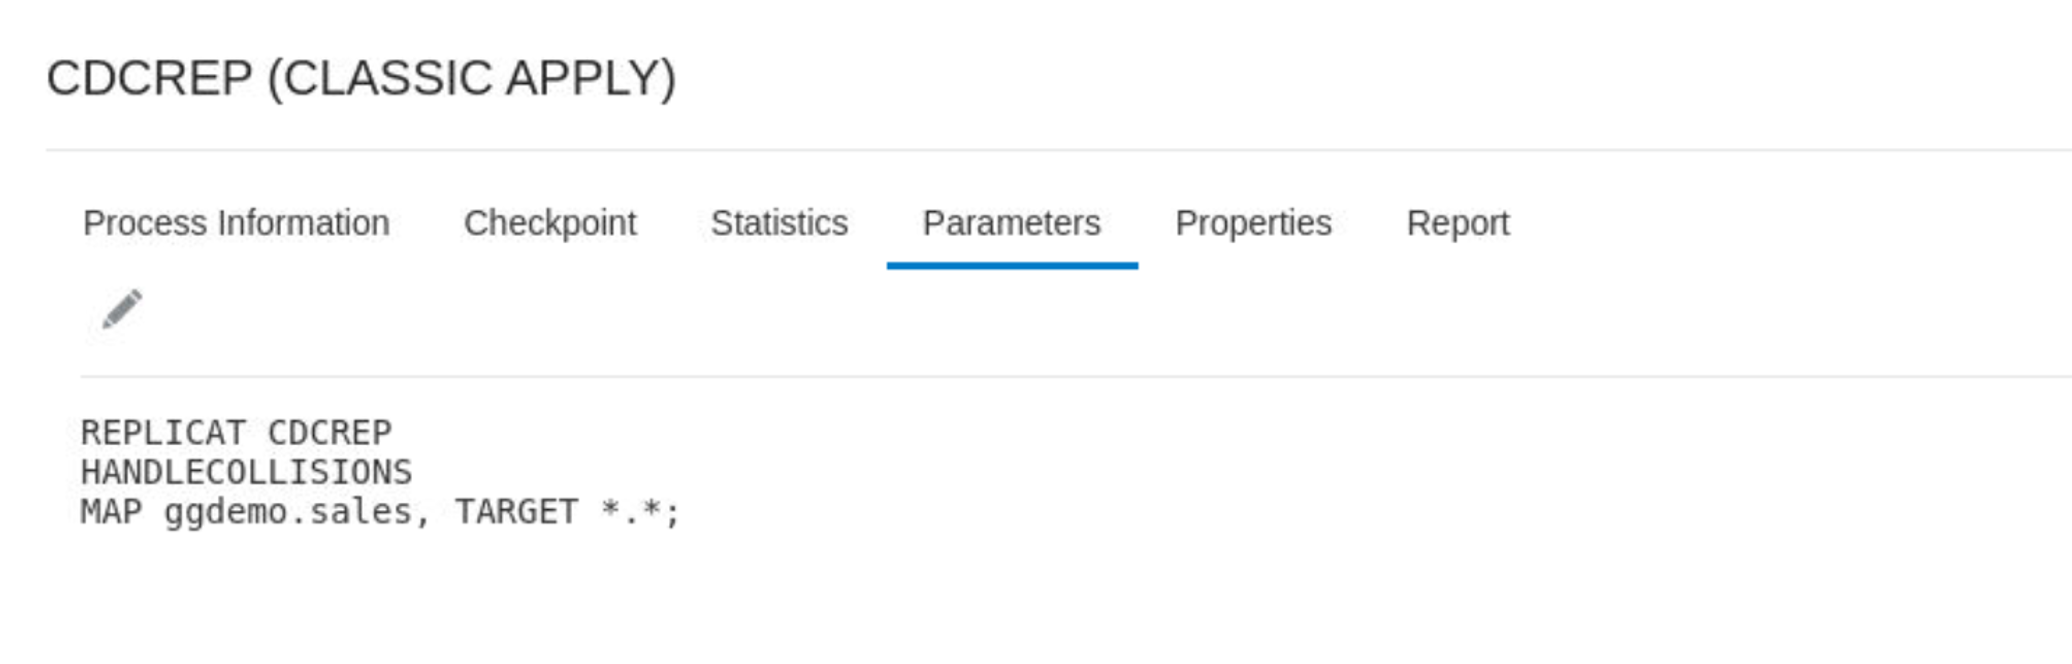
Next is the parameter file configuration. In the parameters part, you can define your source to target mappings. You’ll see it as “MAP *.*;” by default. As you can see below, I’ve updated my source database/collection; but, left target as “*.*” We’ll also add HANDLECOLLISIONS parameter here.
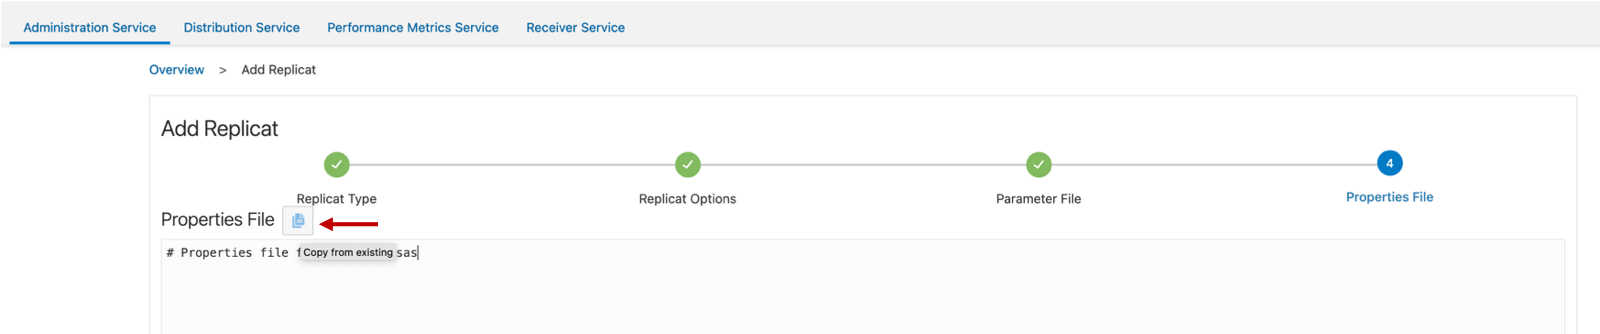
Next step is to configure properties file. There is an icon next to “Properties File”. If you click that, it will show you the properties in the other replicats that were created. You can re-use the property from the initial load that you created in the earlier steps.
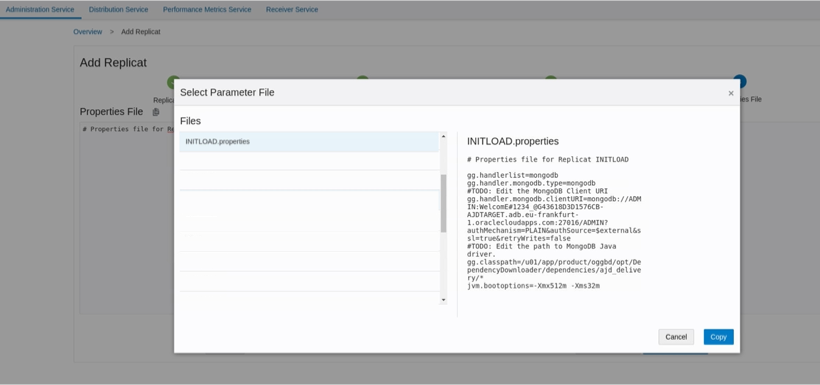
Once “Properties” are set, you can click & run and start the replicat.
When your source & target is synced, you can stop the CDC replicat, remove HANDLECOLLISIONS and re-start the replicat. HANDLECOLLISIOS has a negative impact on the performance and that’s why it is recommended to remove it.
Conculusion:
GoldenGate for Big Data is an easy to configure solution and easily can be used for no down-time migrations from MongoDB into Oracle Cloud Infrastructure Autonomous JSON Database. No downtime migrations from MongoDB to OCI Autonomous JSON Database can be achieved with GoldenGate for Big Data.