Oracle Identity Cloud Service (IDCS) offers a comprehensive suite of identity and access management (IAM) capabilities that can significantly enhance the security and efficiency of the organization’s operations like Authentication & Authorization, SSO, Centralized Identity Management, Integration capabilites with all non-oracle and oracle applications, scalability & Flexibility and many more.
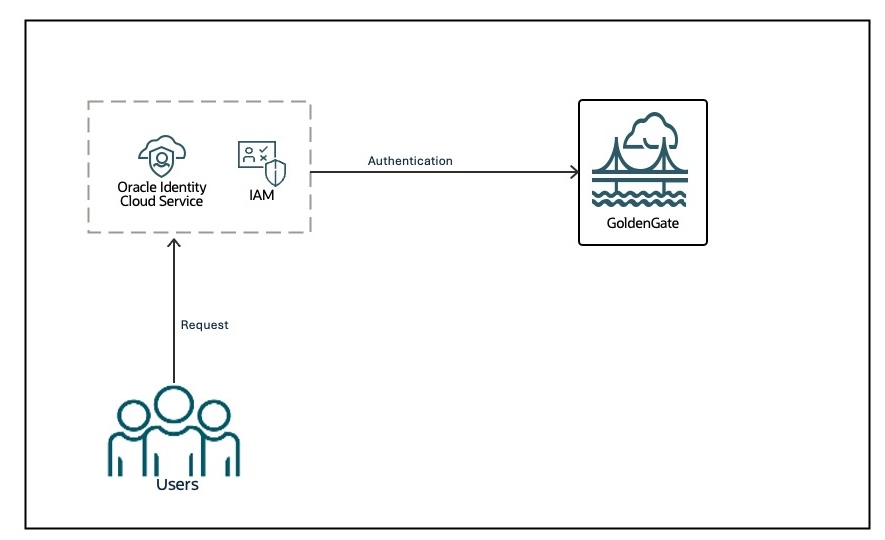
By default, GoldenGate includes its own local credential store for authentication and authorization. Identity and Access Management (IAM) utilizes identity domains to offer features like authentication, single sign-on (SSO), and identity lifecycle management for Oracle Cloud.
This blog aims to demonstrate the integration with OCI’s IAM/IDCS. After installation, customers can switch identity management from GoldenGate’s local credential store to IAM, though only one can be active at a time. This switching capability allows the existing customers to migrate to IDCS if they choose.
Identity Domain is a collection of users, groups, and applications. A default domain is automatically created for any new tenancy in its root compartment. When the tenancy/domain administrator subscribes to new regions, the Default domain is automatically replicated to those regions. For security best practices and departmental segregation, users are encouraged to create additional identity domains. Non-default domains are not automatically replicated to other regions. The non-default domain administrator must explicitly setup the replication.
Policies : Ensure to create one policy either at the tenancy level or within the compartment.
The policy should grant the ‘goldengate’ the permissions of ‘idcs_user_viewer’ and ‘domain_resources_viewer’ across the tenancy or compartment.
“allow service goldengate to {idcs_user_viewer, domain_resources_viewer} in tenancy”

More information regarding policies can be found here.
IDCS Configuration
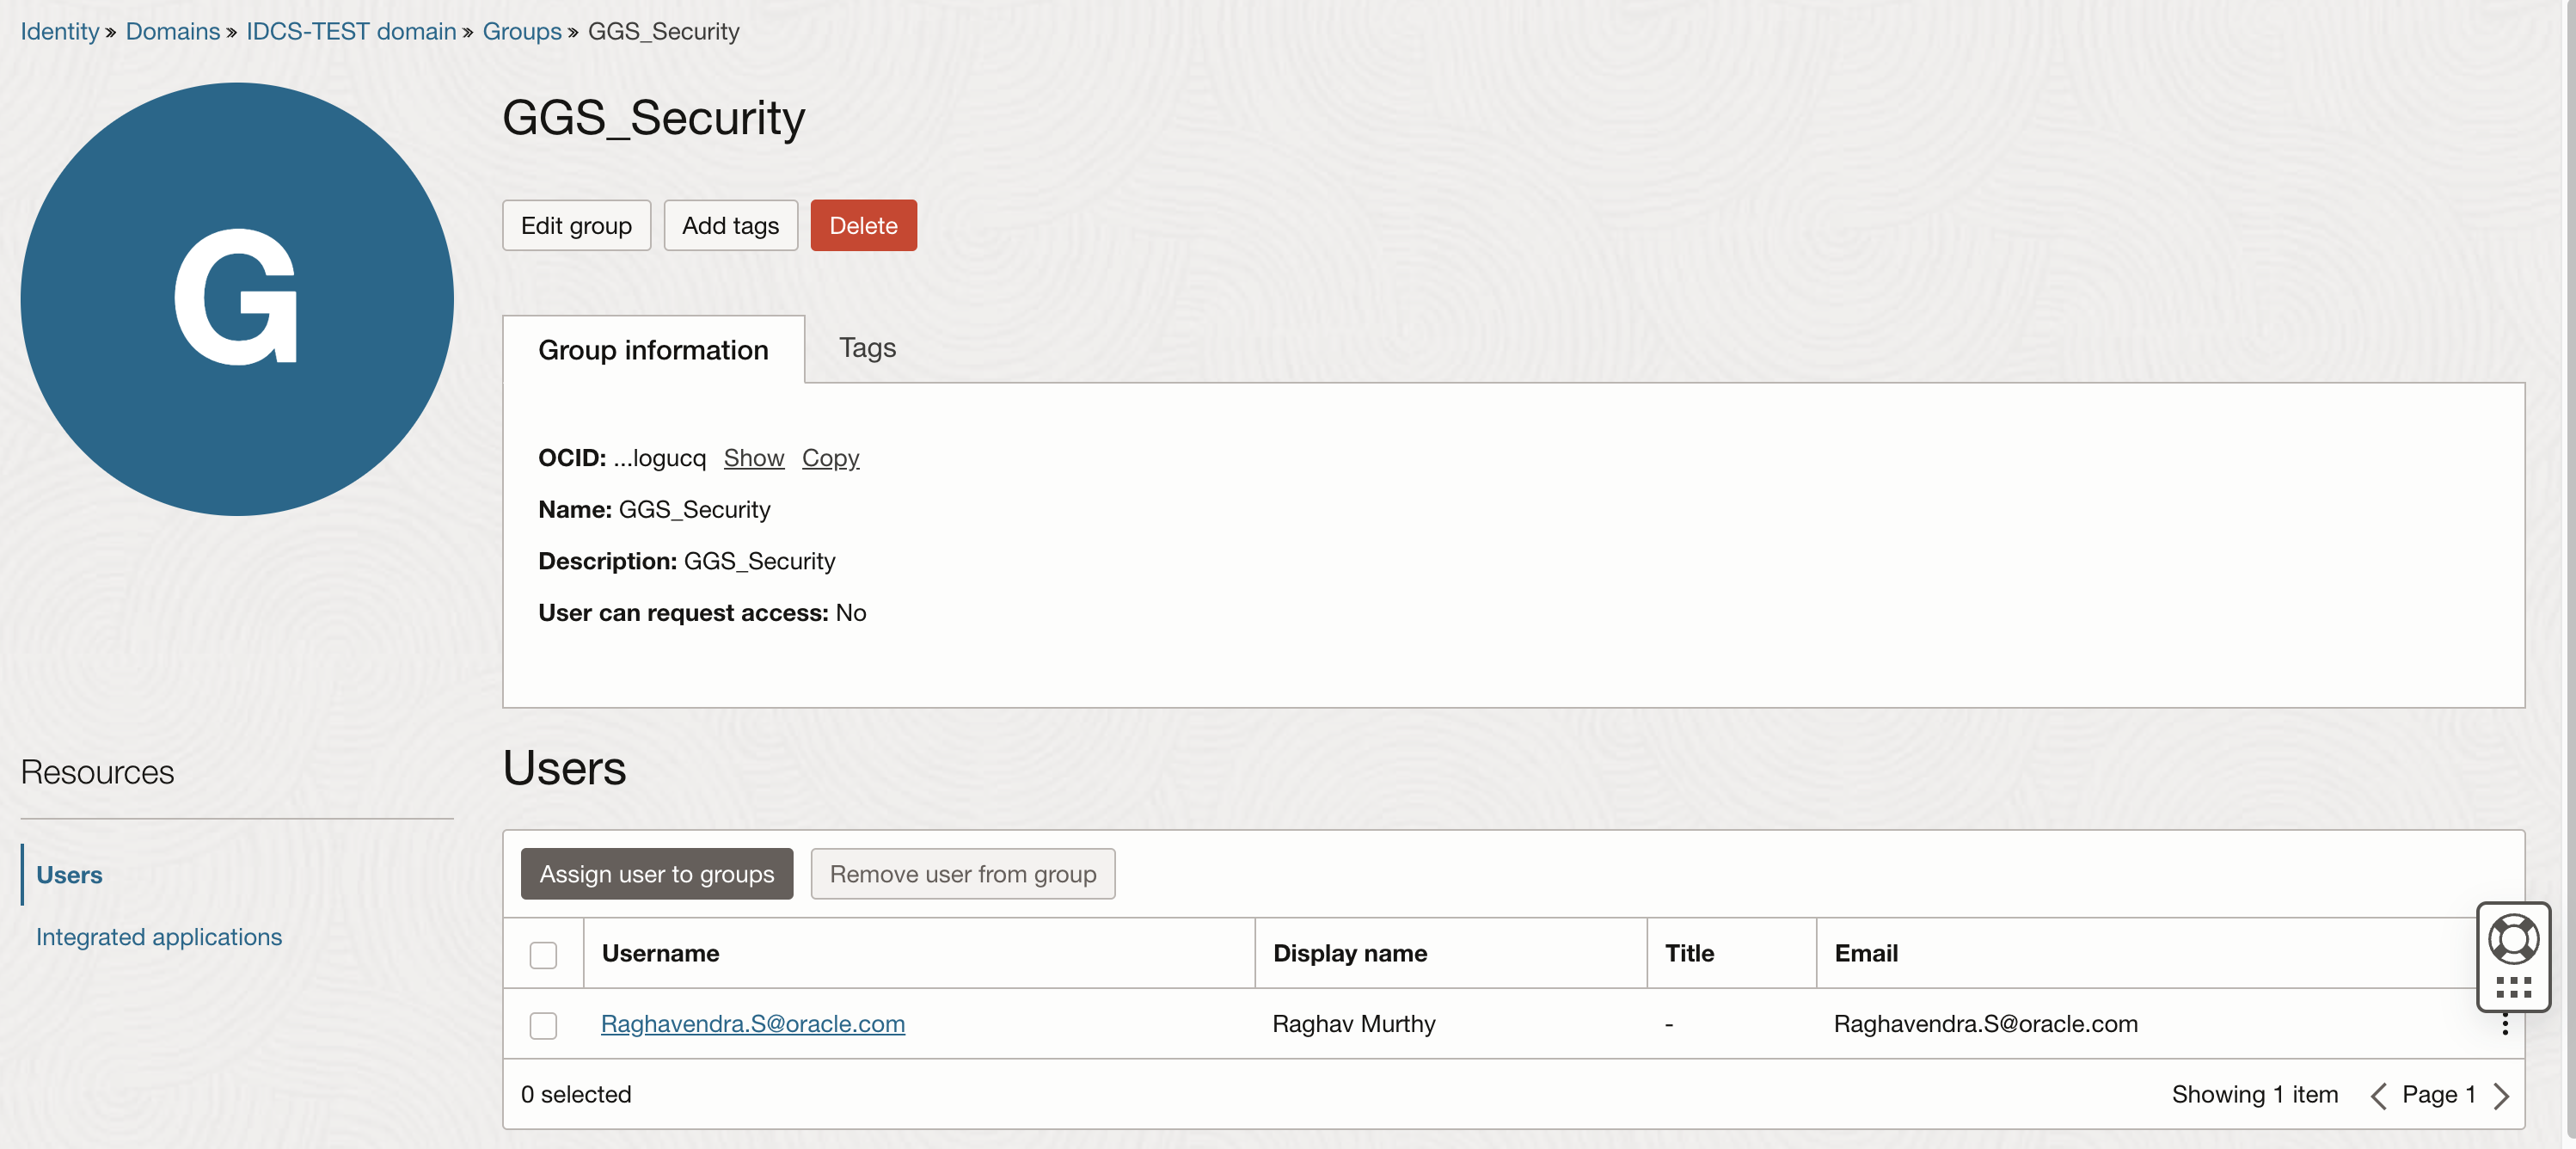
In Identity Domain , Create 4 groups as listed below.
- GGS_Administrator
- GGS_Security
- GGS_Operator
- GGS_User

Assign users to the group , In this example user Current User has been assigned to GGS_Administrator, GGS_Security.
Create an Integrated application in Identitiy Domain.
Identity & Security -> Under Identity click Domains -> Click Integrated applications-> Select Confidentational application
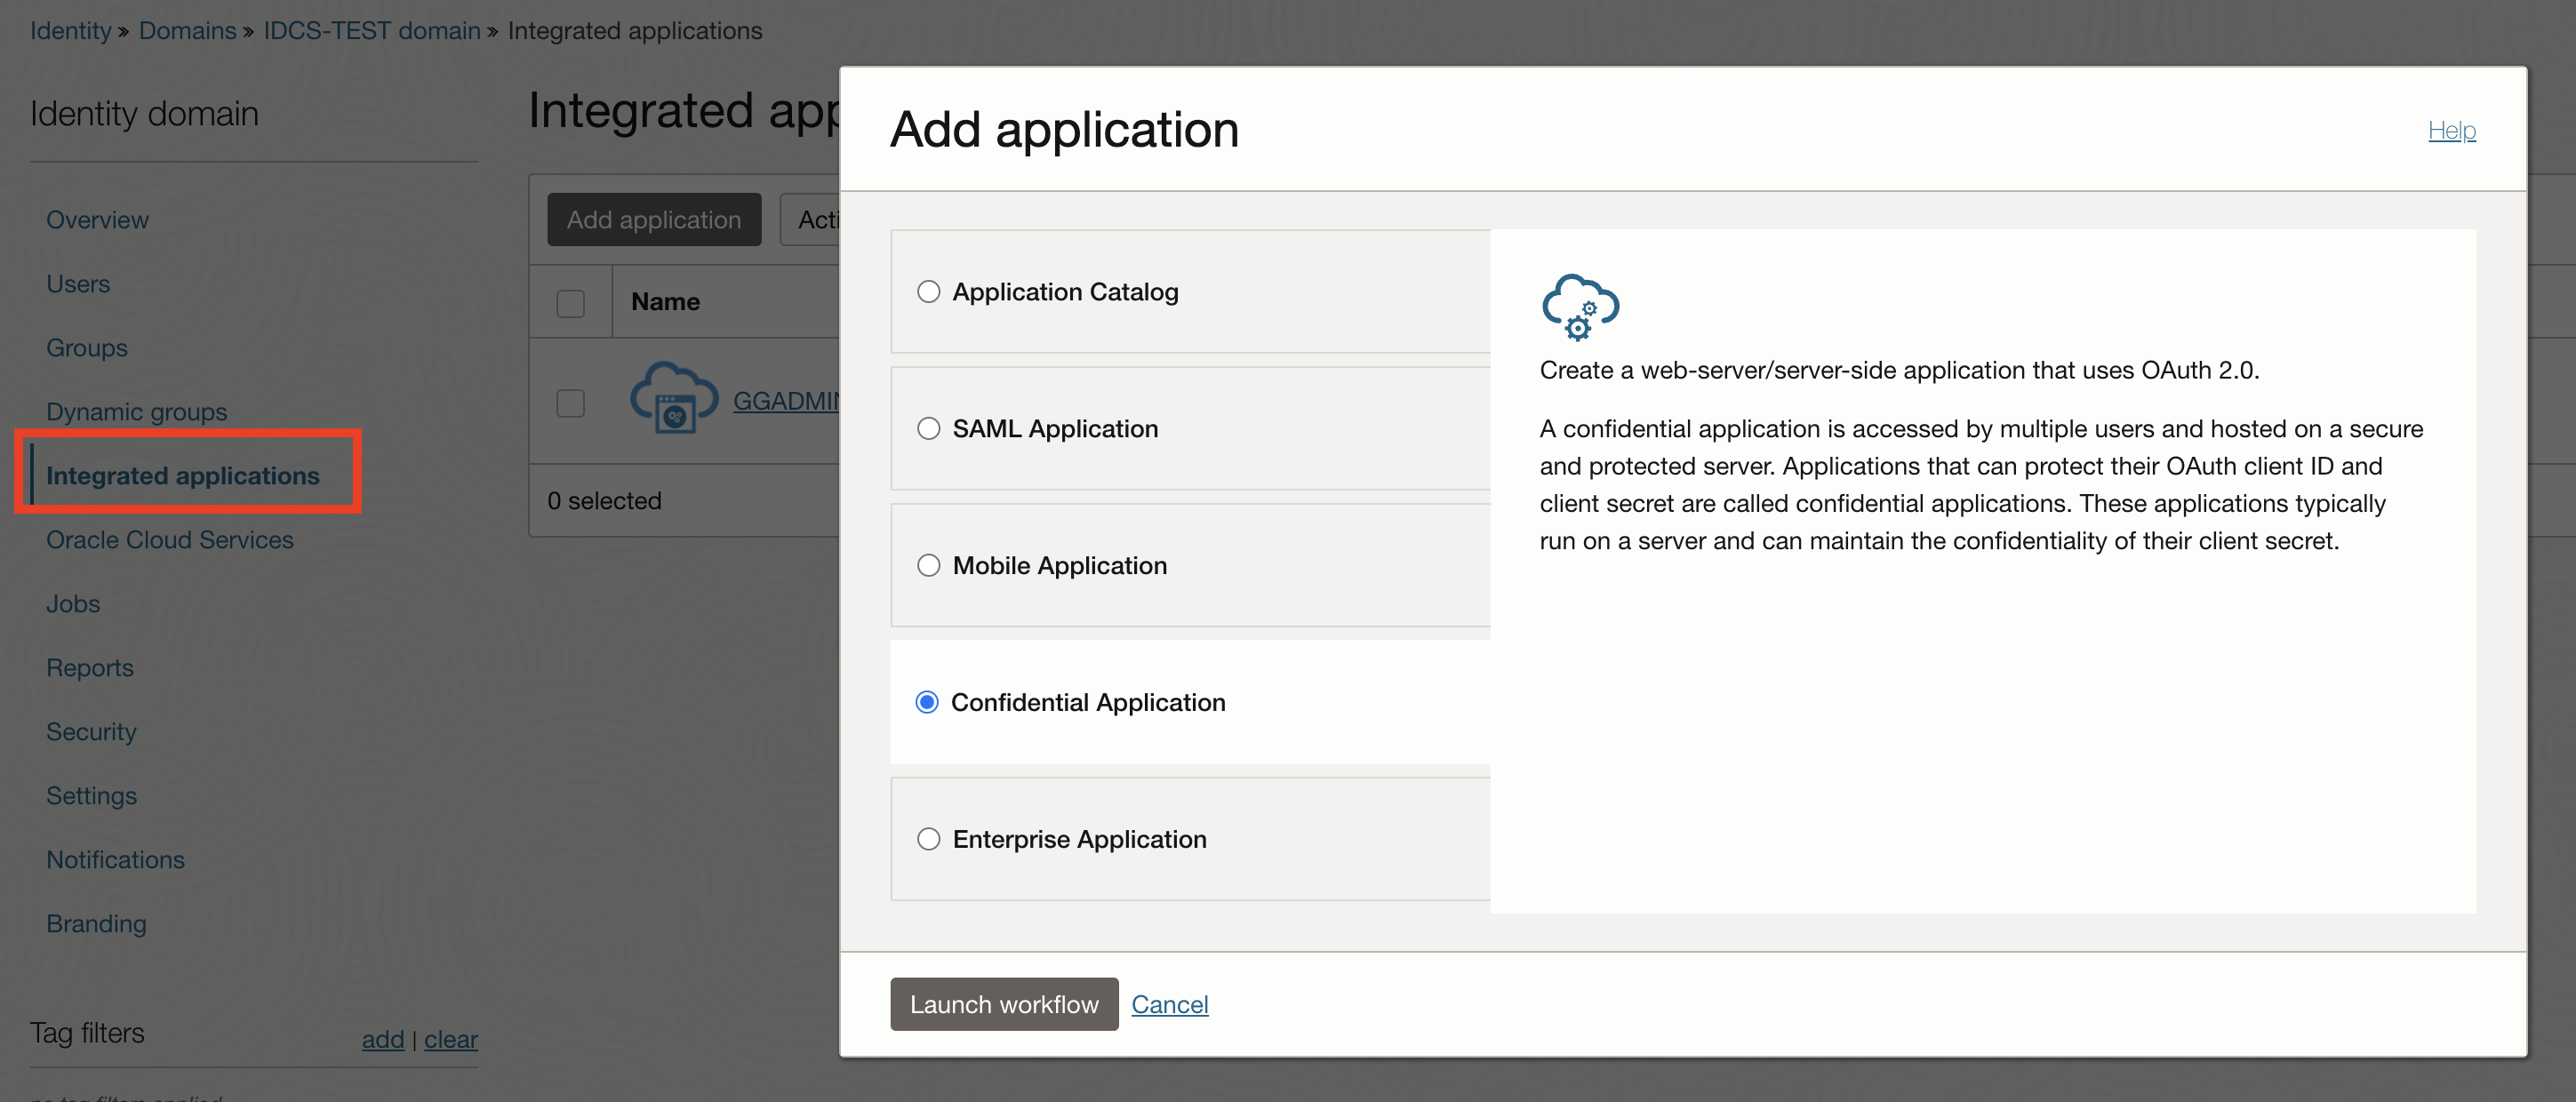
A confidential application in IDCS is a type of application that is designed to securely authenticate and authorize client applications, typically web or server-based applications, using OAuth 2.0. These applications are termed “confidential” because they can securely store credentials, such as Client ID and Client Secret, that are necessary for authenticating with IDCS.
Add Confidential Application , In this page only add Name & Description. Other fields are optional and it is not required to add any other fields.

Select “Configure this application as a resource server now”
Access token expiration : 3600 seconds -> specifies the duration for which the access token associated with confidential application remains valid.
The primary audience (recipient) is the entity that processes the access token for the confidential application.
Primary Audience : GG_Primary

Scopes: In IDCS Scopes are a fundamental part of the OAuth 2.0 authorization framework. Scopes define the specific permissions that an application can request from the user, determining the extent of access the application will have to the user’s resources.
The scope here is fixed as (urn:ogg:serviceToService).

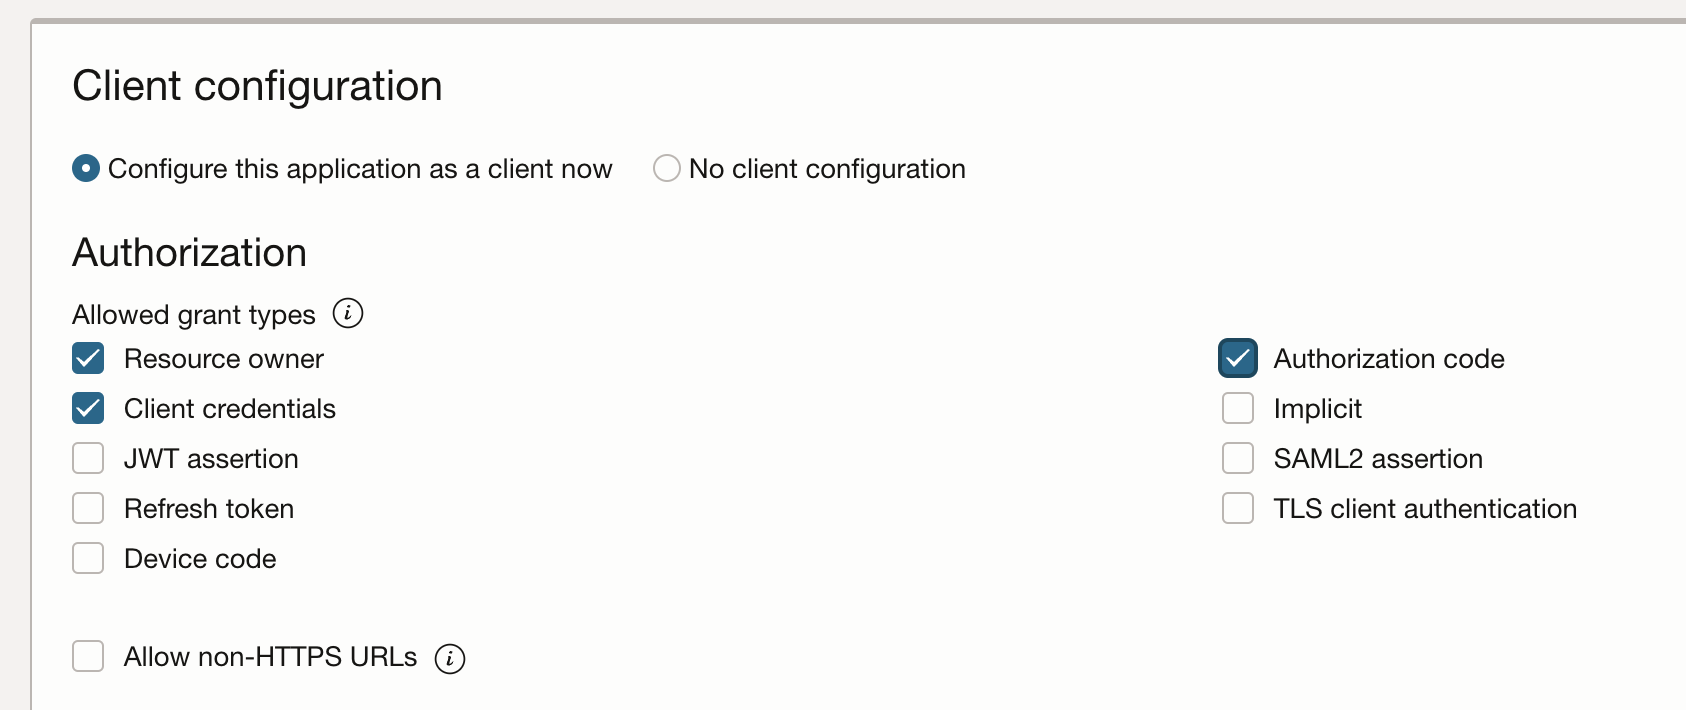
Configuring an OAuth client in IDCS meaning setting up an application that can securely authenticate and authorize users using the OAuth 2.0 protocol.
Configure OAuth – Client
Select Resource owner, Client credentials and Authorization code
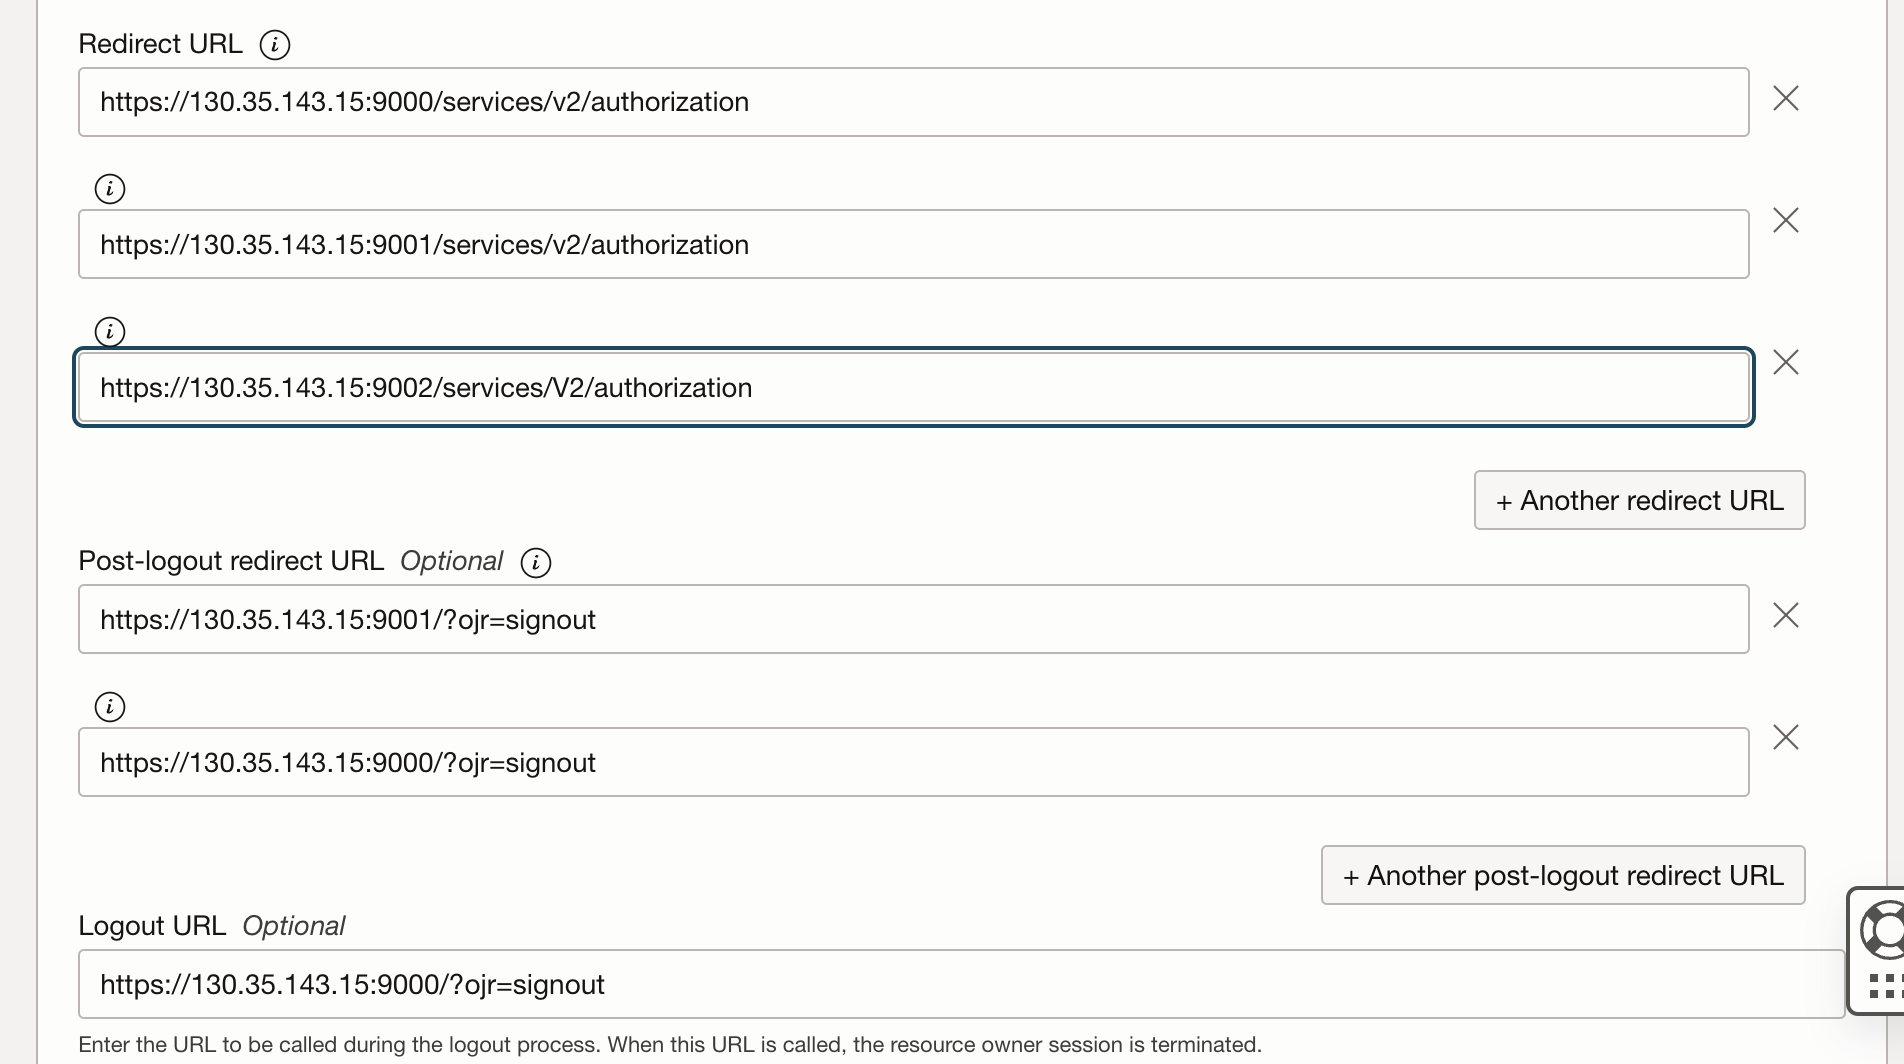
When configuring an OAuth client in IDCS for Oracle GoldenGate, it is essential to specify the redirect URLs for logins and logouts.
These URLs determine where users are redirected after they authenticate to login or log out.
Add the Redirect URL for Logins
Format : https:OGGServerName:SrvrPort:/services/v2/authorization
Examples are
Service Manager : https://130.35.xx.xx:9000/services/v2/authorization
Administration Server : https://130.35.xx.xx:9001/services/v2/authorization
Add Redirect URL for Logouts
For Service Manager : https://130.35.xx.xx:9000/?ojr=signout
For Administrator Server : https://130.35.xx.xx:9001/?ojr=signout
Add App Roles
Click on Add Roles and add “Me” and “Identity Domain Administrator”
These roles help manage permissions and access controls for users interacting with GoldenGate.
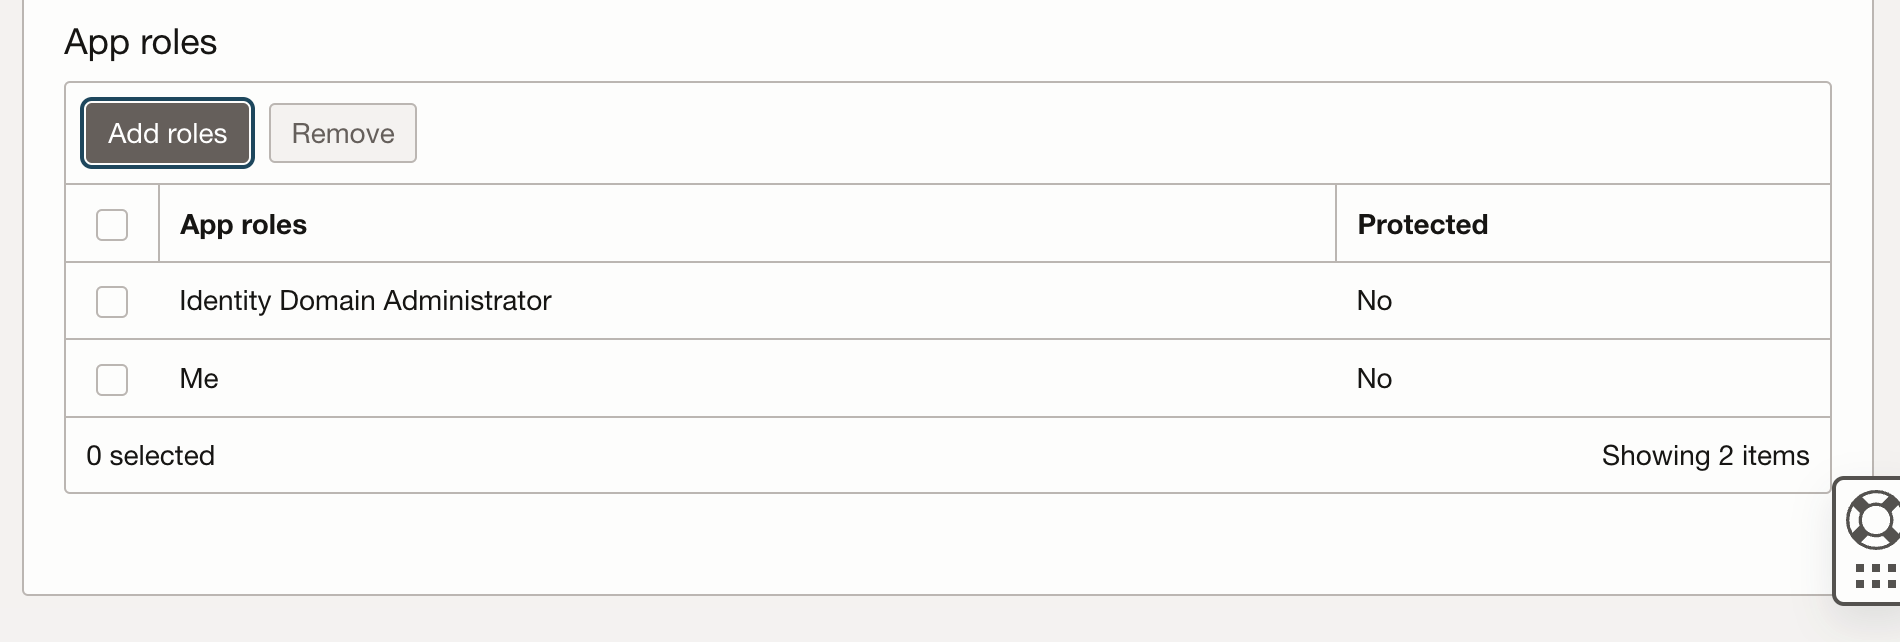
Click on Save configuration
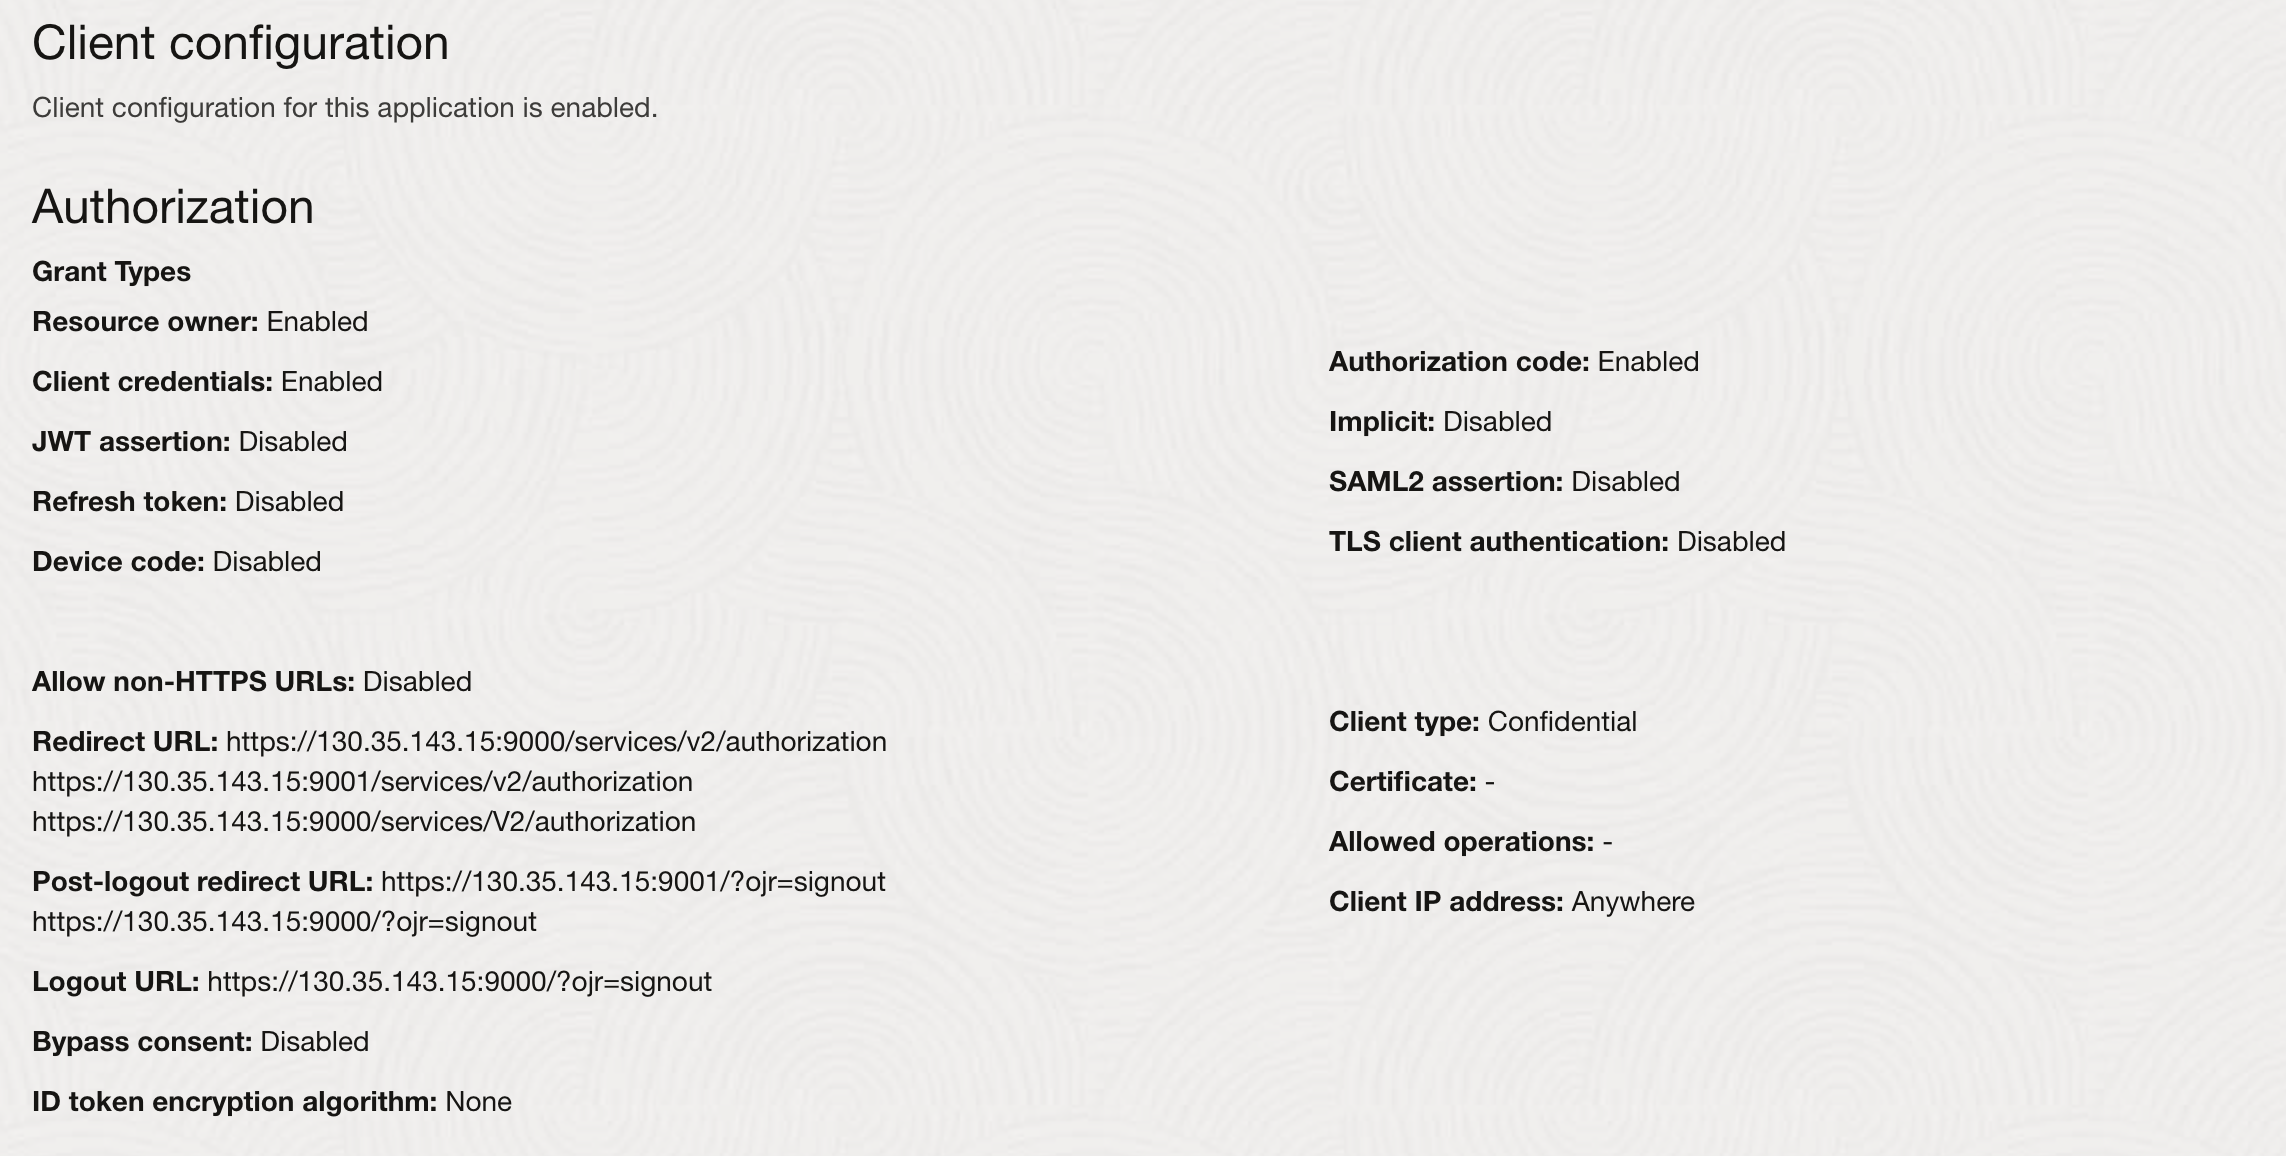
The client configuration appears as follows after making the modifications.
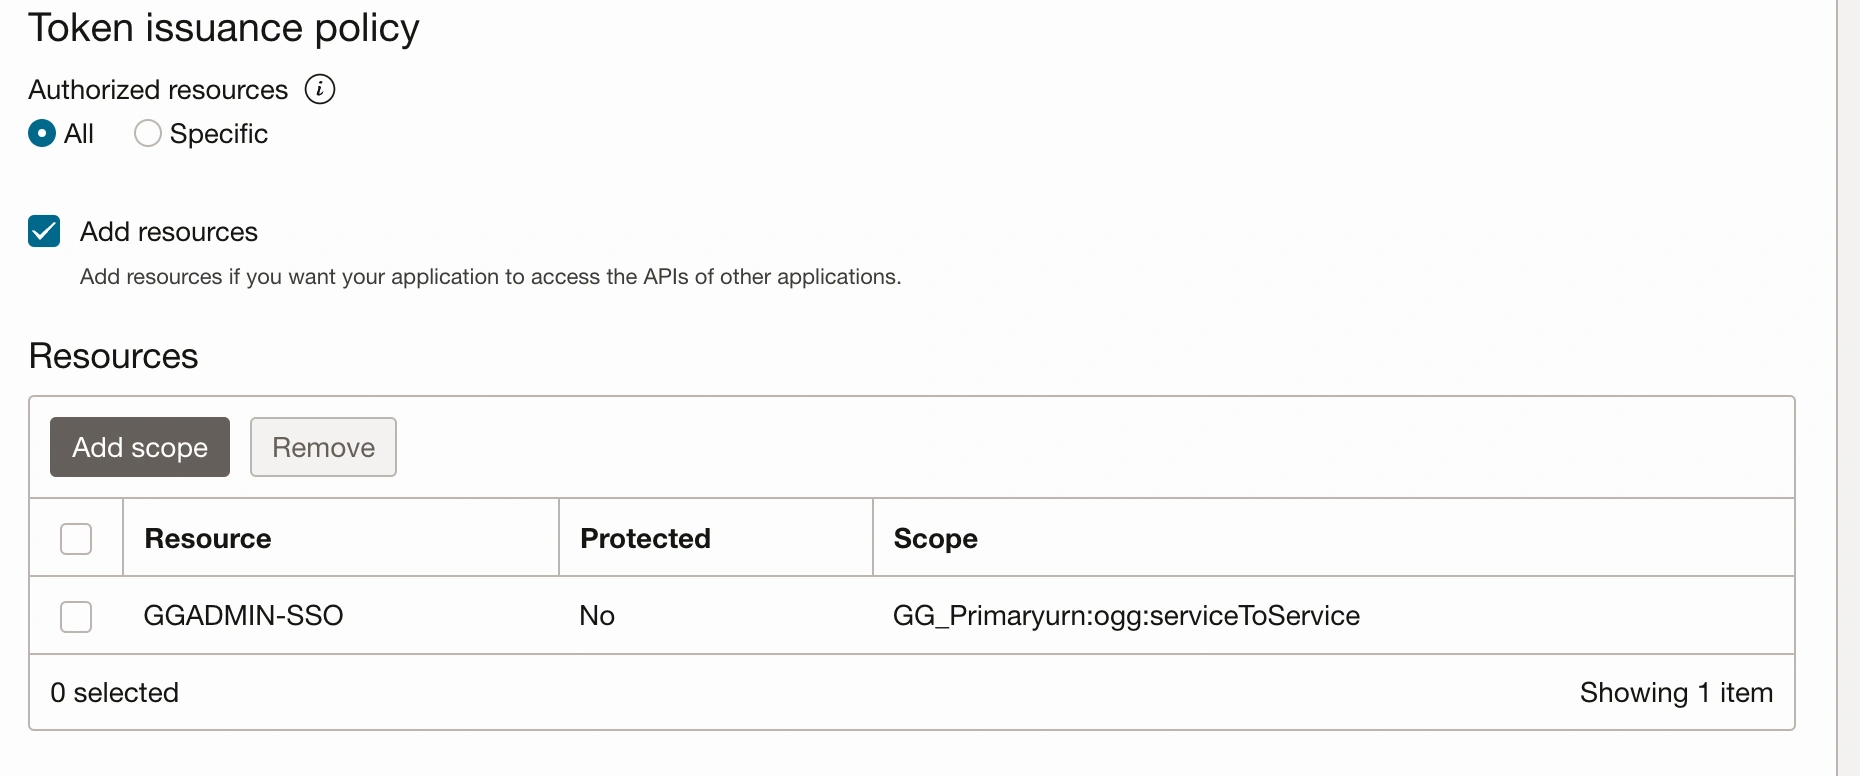
Adding resources is an important step in configuring to OAuth client application
Proceed to “Add resources”, but ensure to complete this step before activating the application.

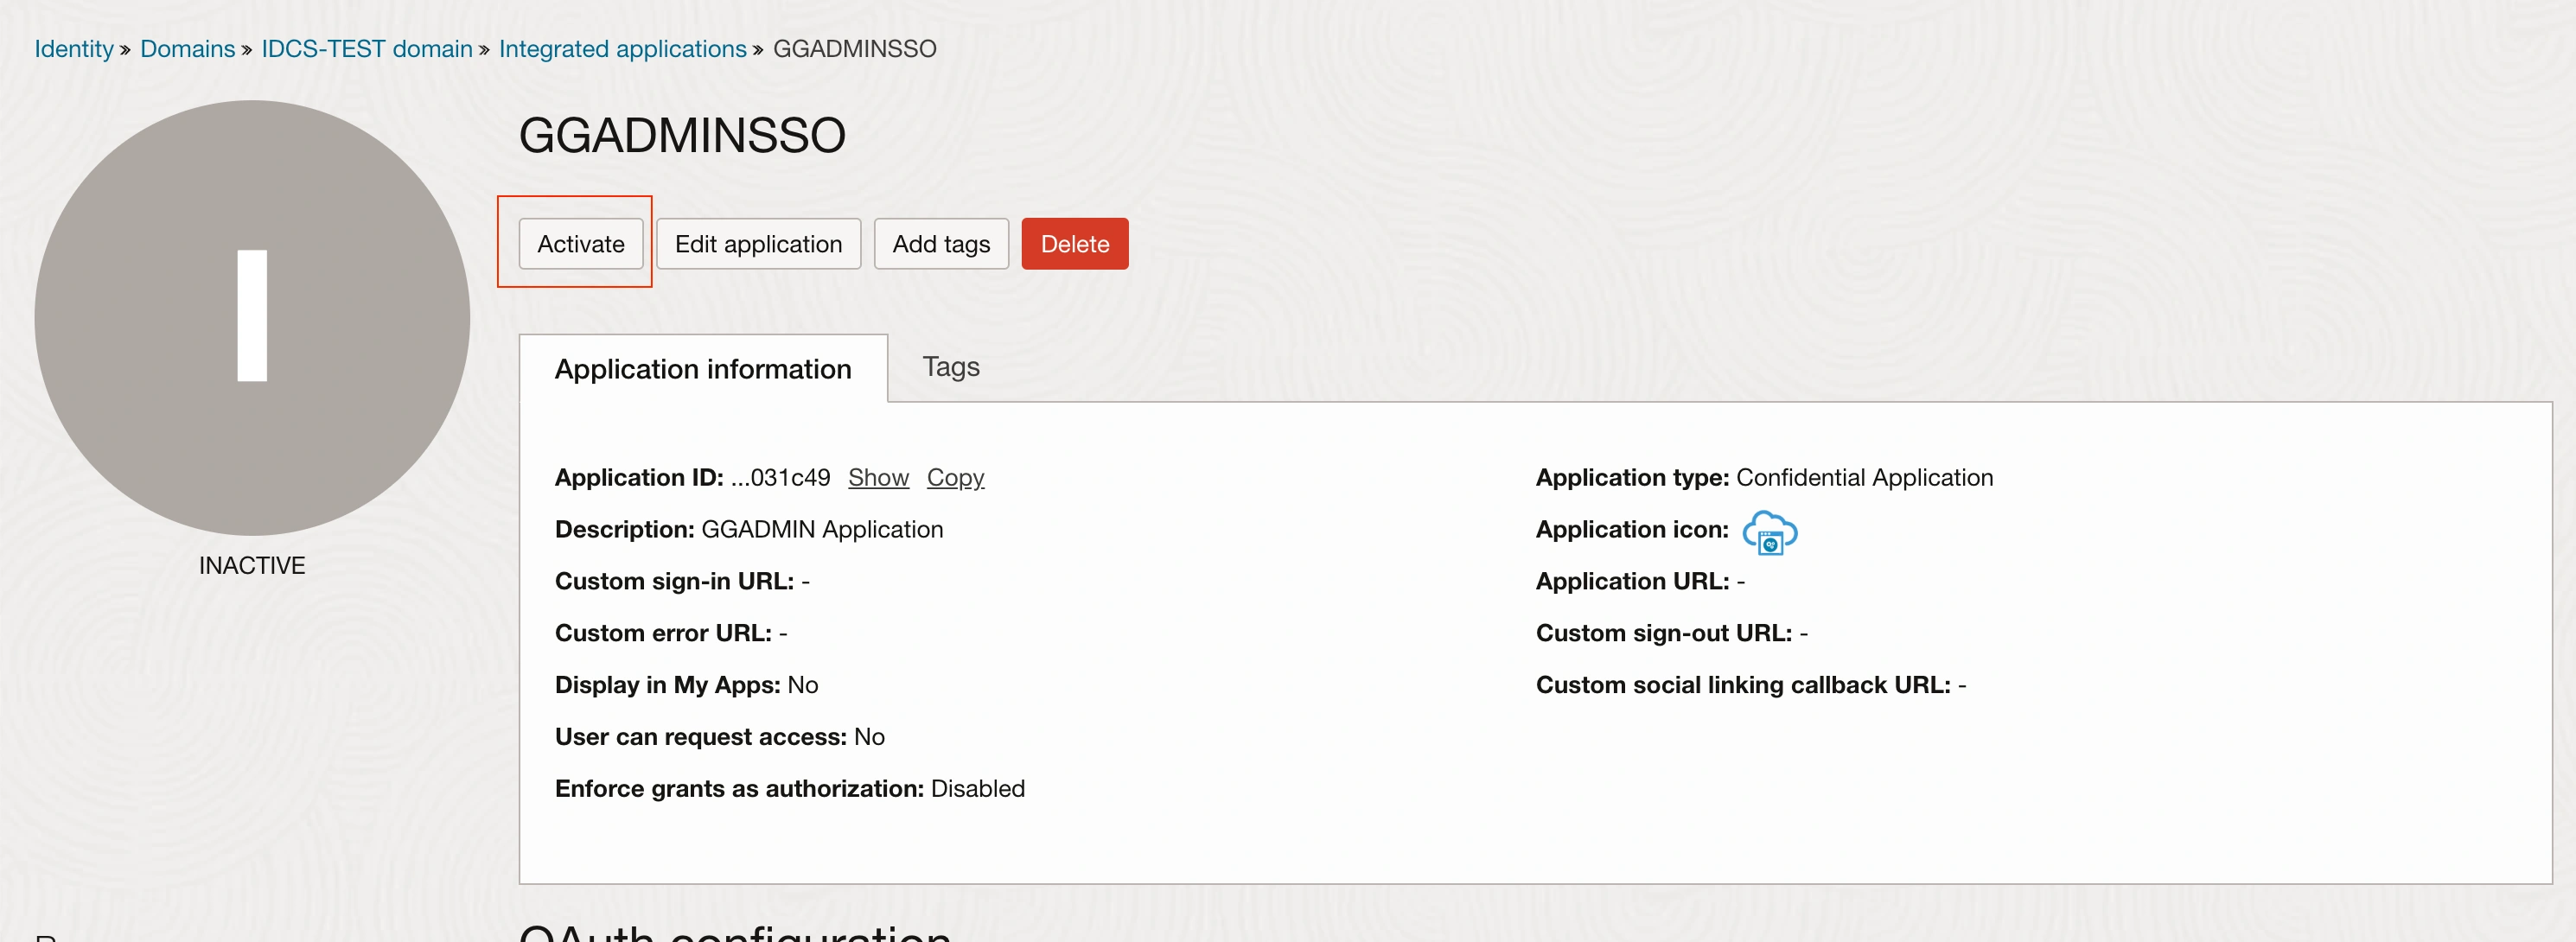
After configuring your OAuth client application, including adding roles, redirect URLs, and resources, the final step is to activate the application.
By activating the application, you complete the setup process, making the OAuth client ready for use with IDCS.
Activate the application
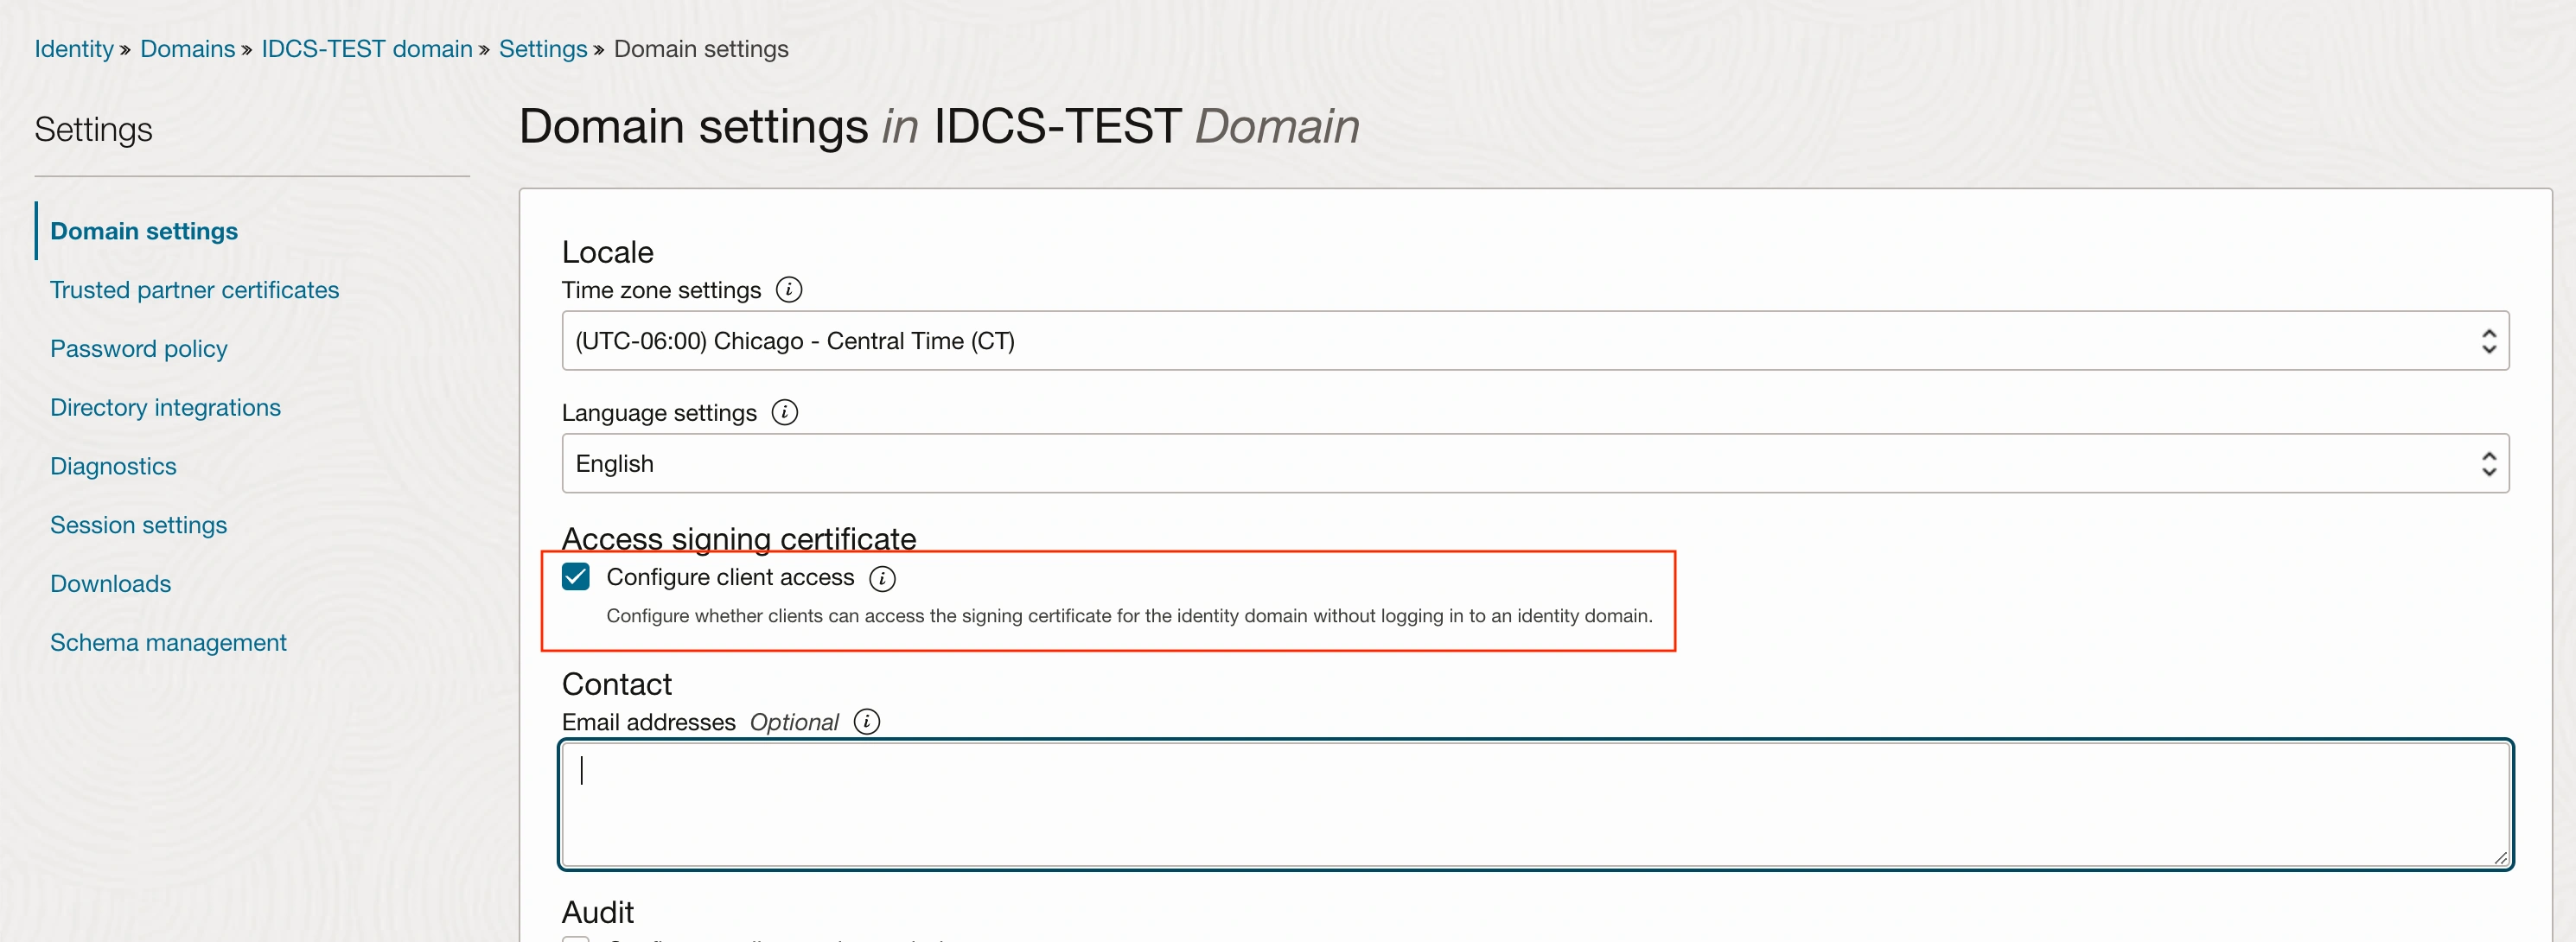
Cross check the Domain settings to make sure the “configure client access” is Enabled.
Next, retrieve the client ID and secret from the application named ‘GGADMIN-SSO’ that was created in the Domain.
Under General Information record the Client ID and Show Secret

Identity -> Domain -> IDCS-Test domain -> Integrated applications -> Application_Name
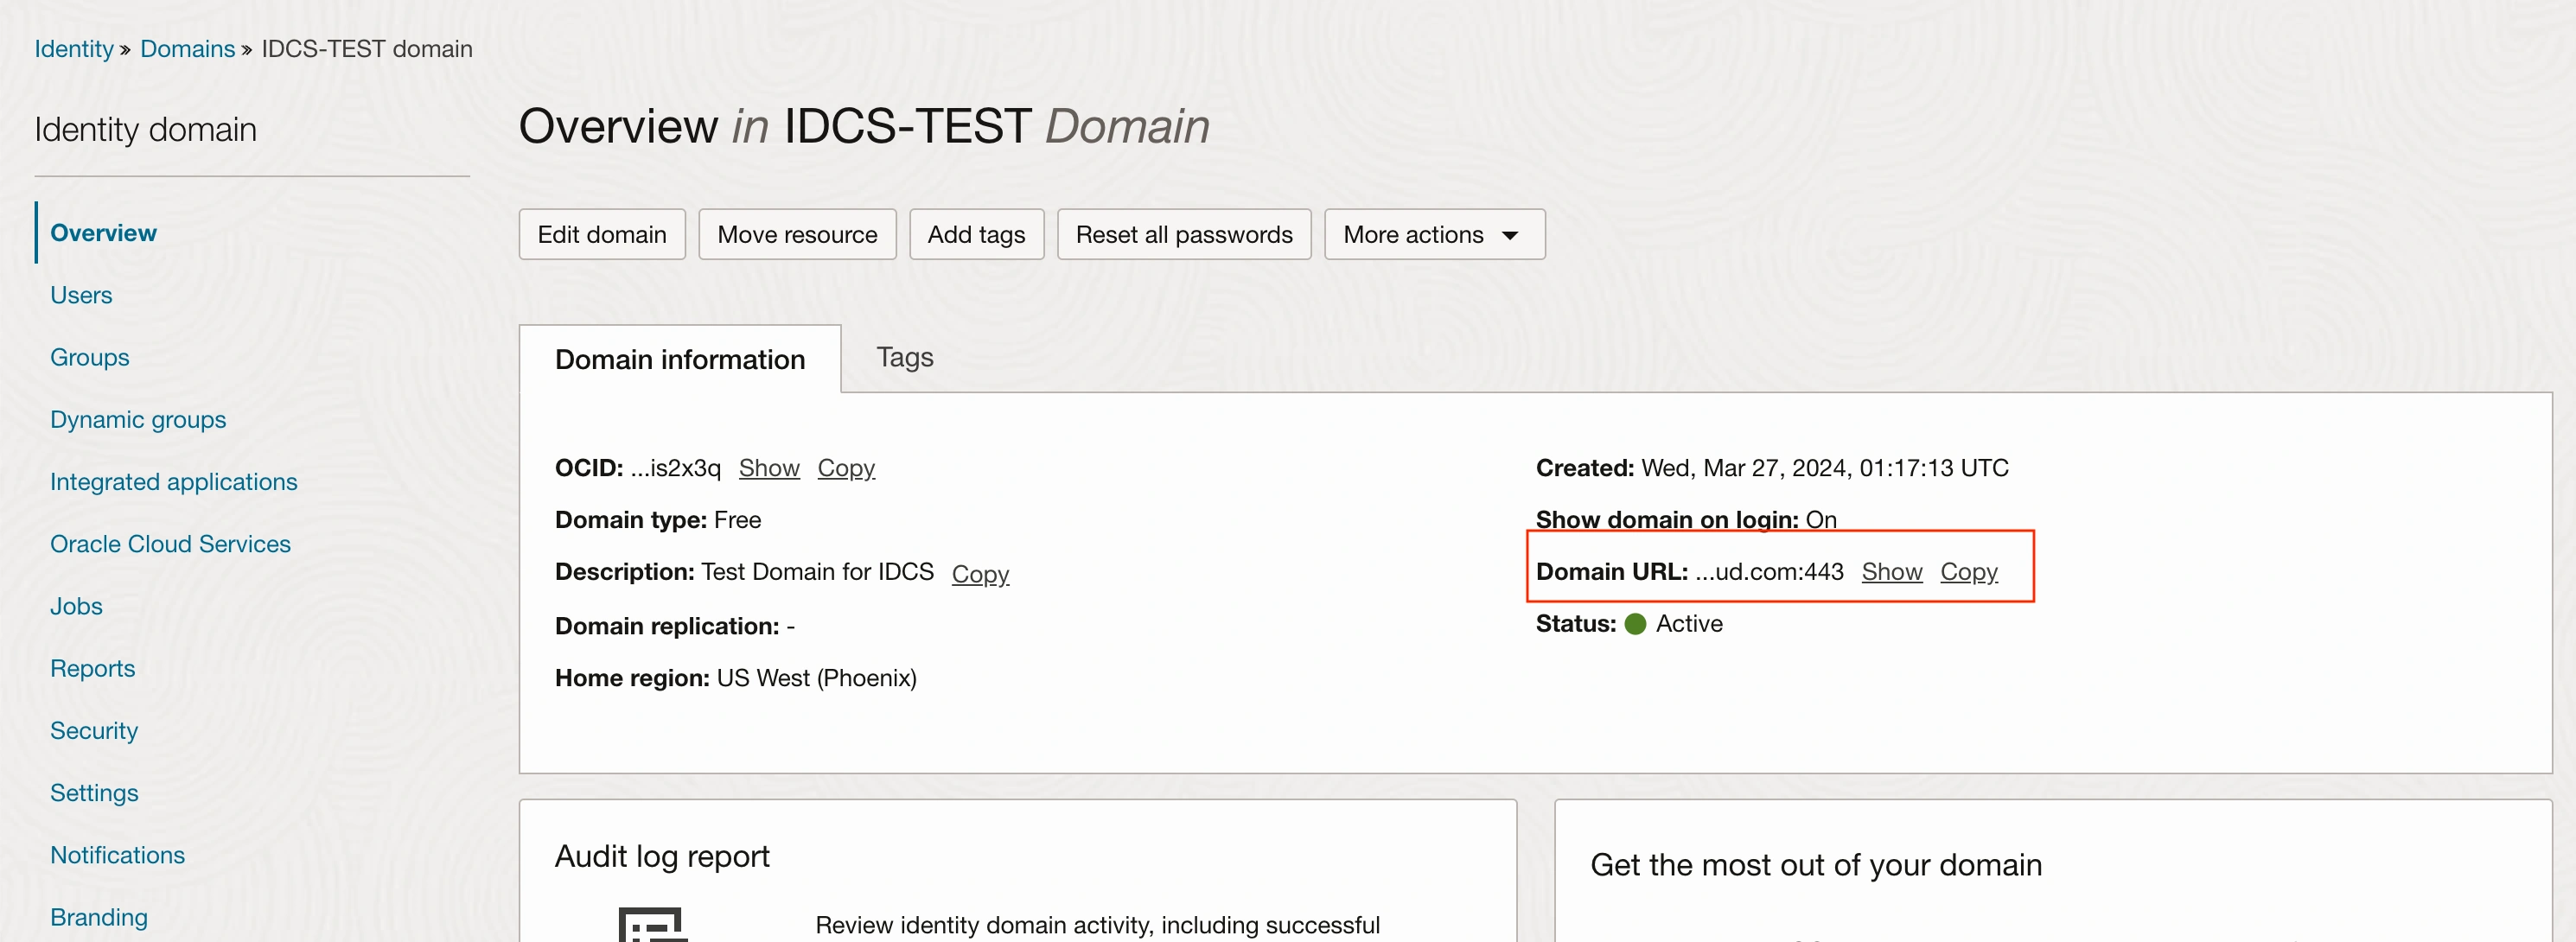
Keep the Domain URL, Client ID, and Secret available for reference.
CERTIFICATES
Let’s import the certificate from the Identity and Access Management (IAM) service into the GoldenGate environment.
Example here in this case : https://idcs-fb4c77ddb8254.identity.oraclecloud.com:443
On a terminal extract the rootCA certifcate using the above URL.
echo | openssl s_client -connect IDCS-URL:443 -showcerts
For Example : echo | openssl s_client -connect idcs-fb4c77ddb.identity.oraclecloud.com:443 -showcerts
This output displays Certificate Chain, Intermediate Certificate and the Root certificate.
Make sure to download Root certificate at the end of the output.

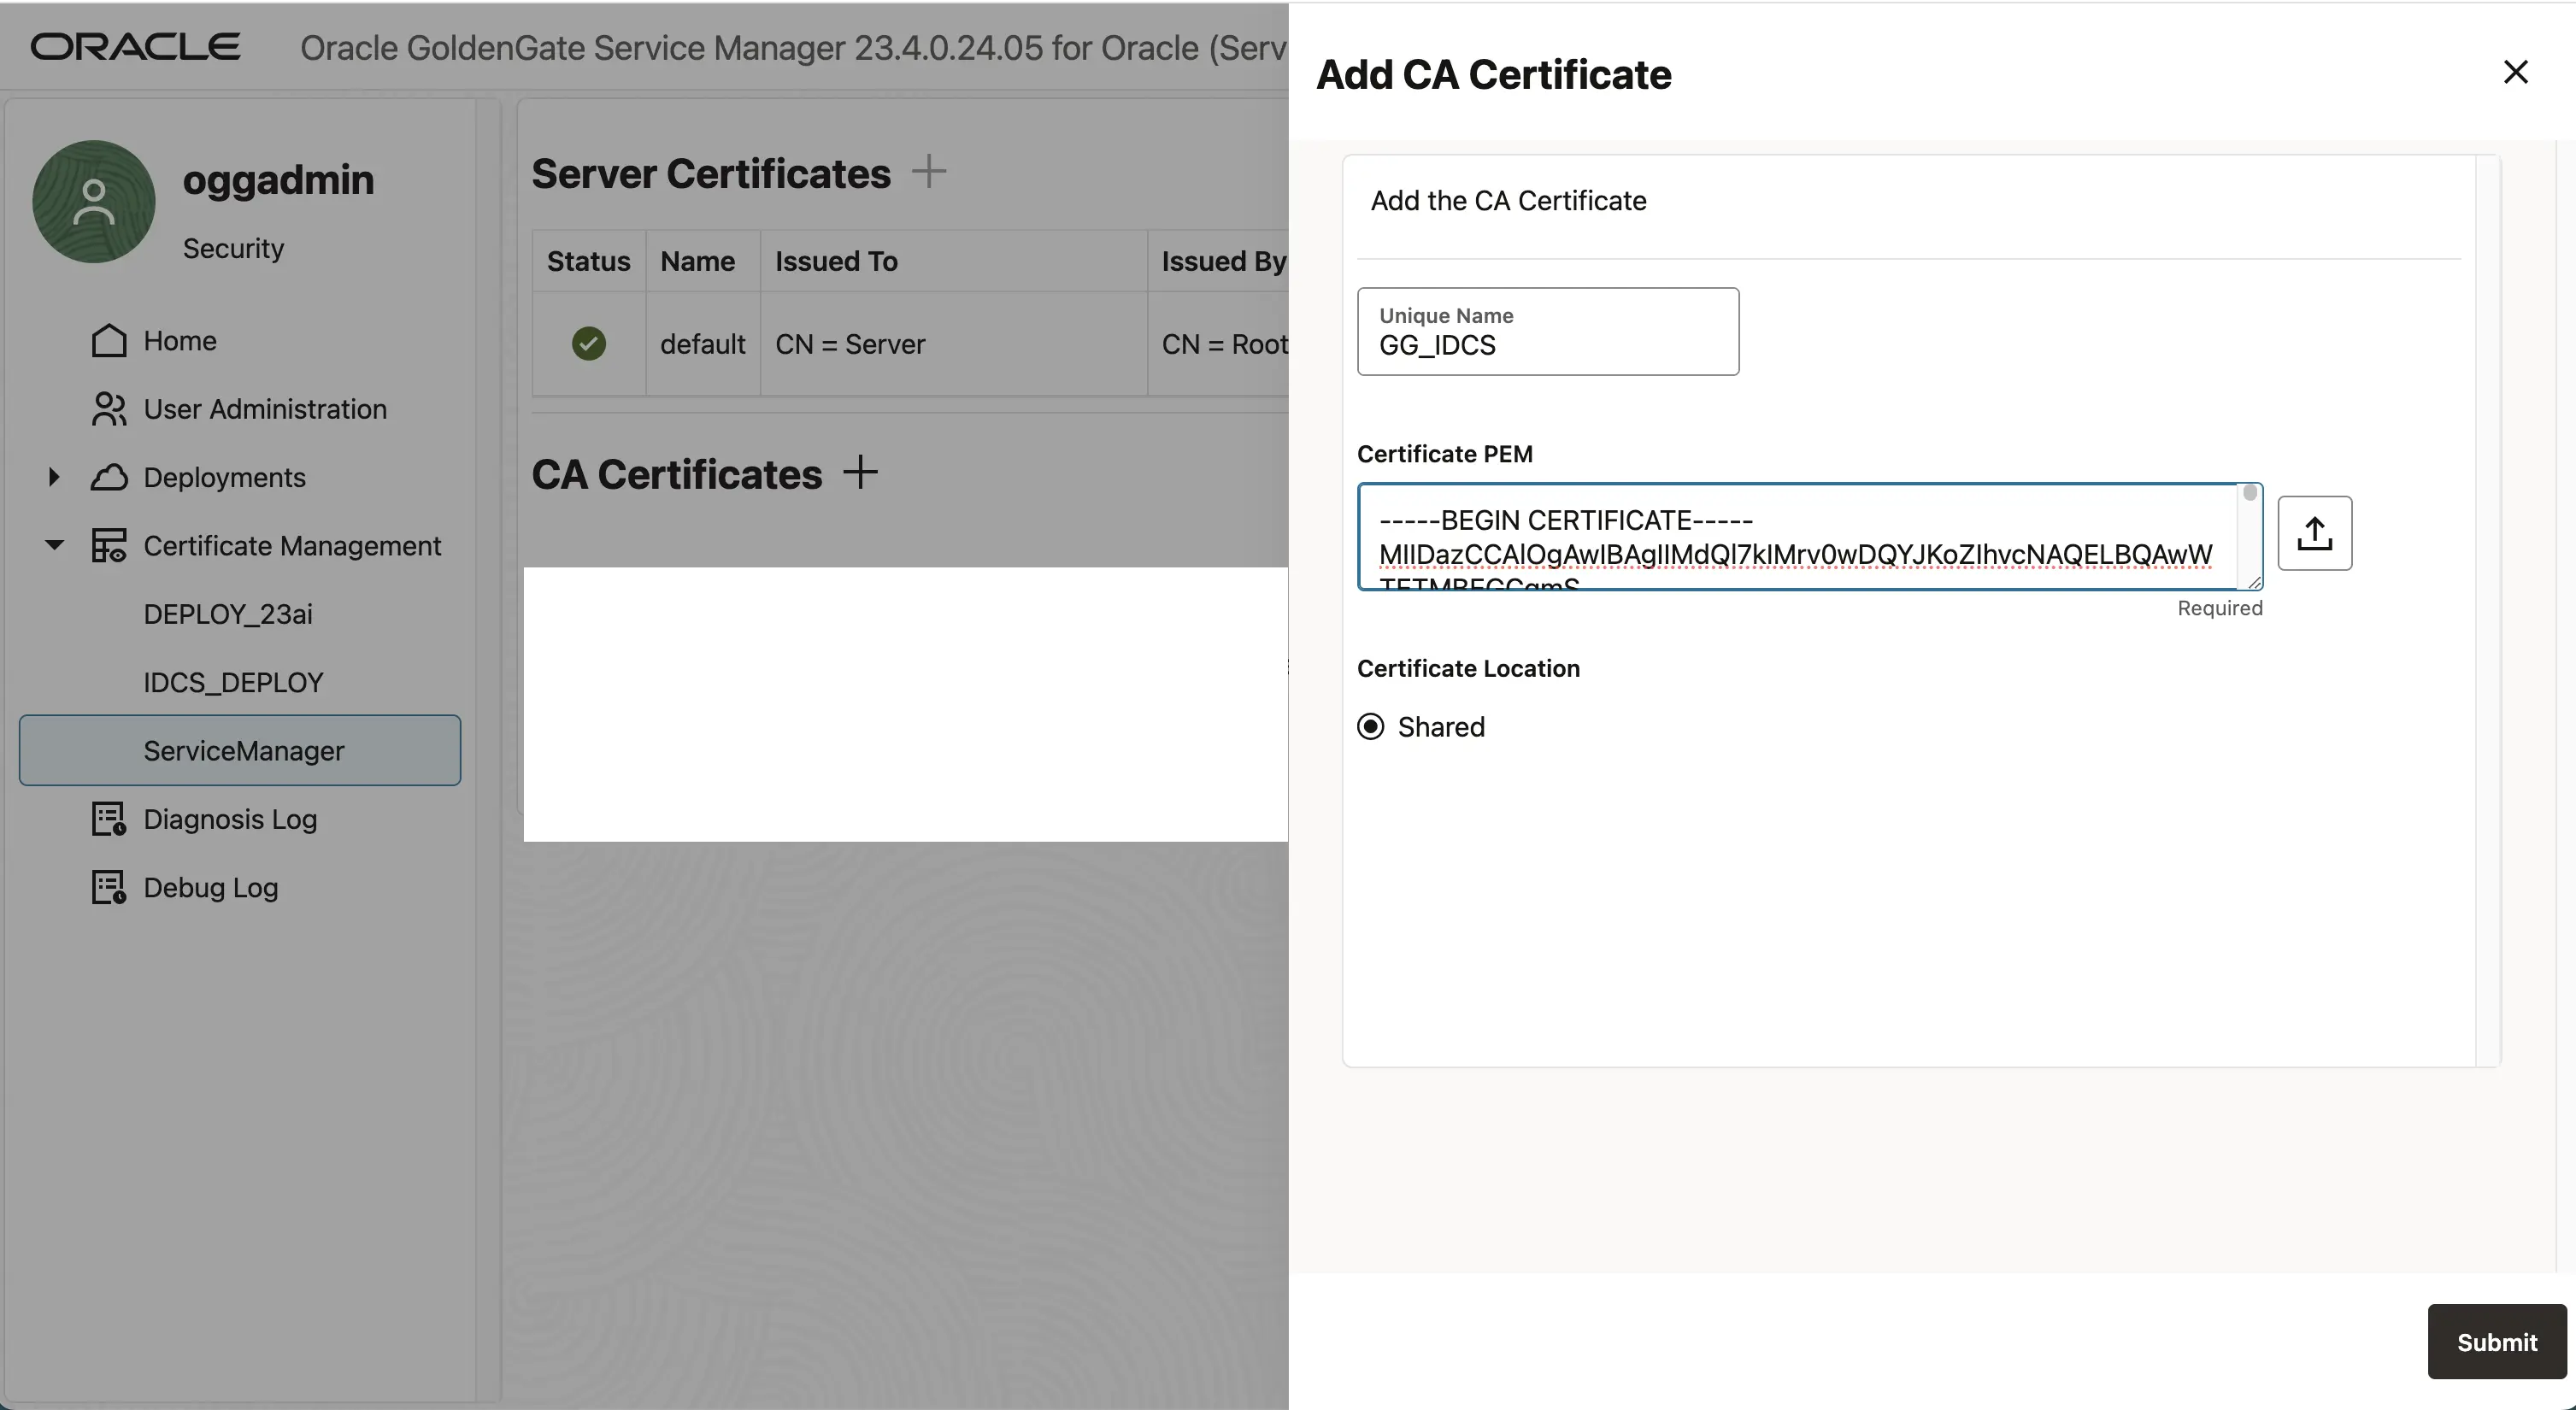
Copy this Certficate and import it into GoldenGate. On Service Manager home page -> Certificate Management -> Add CA Certificate
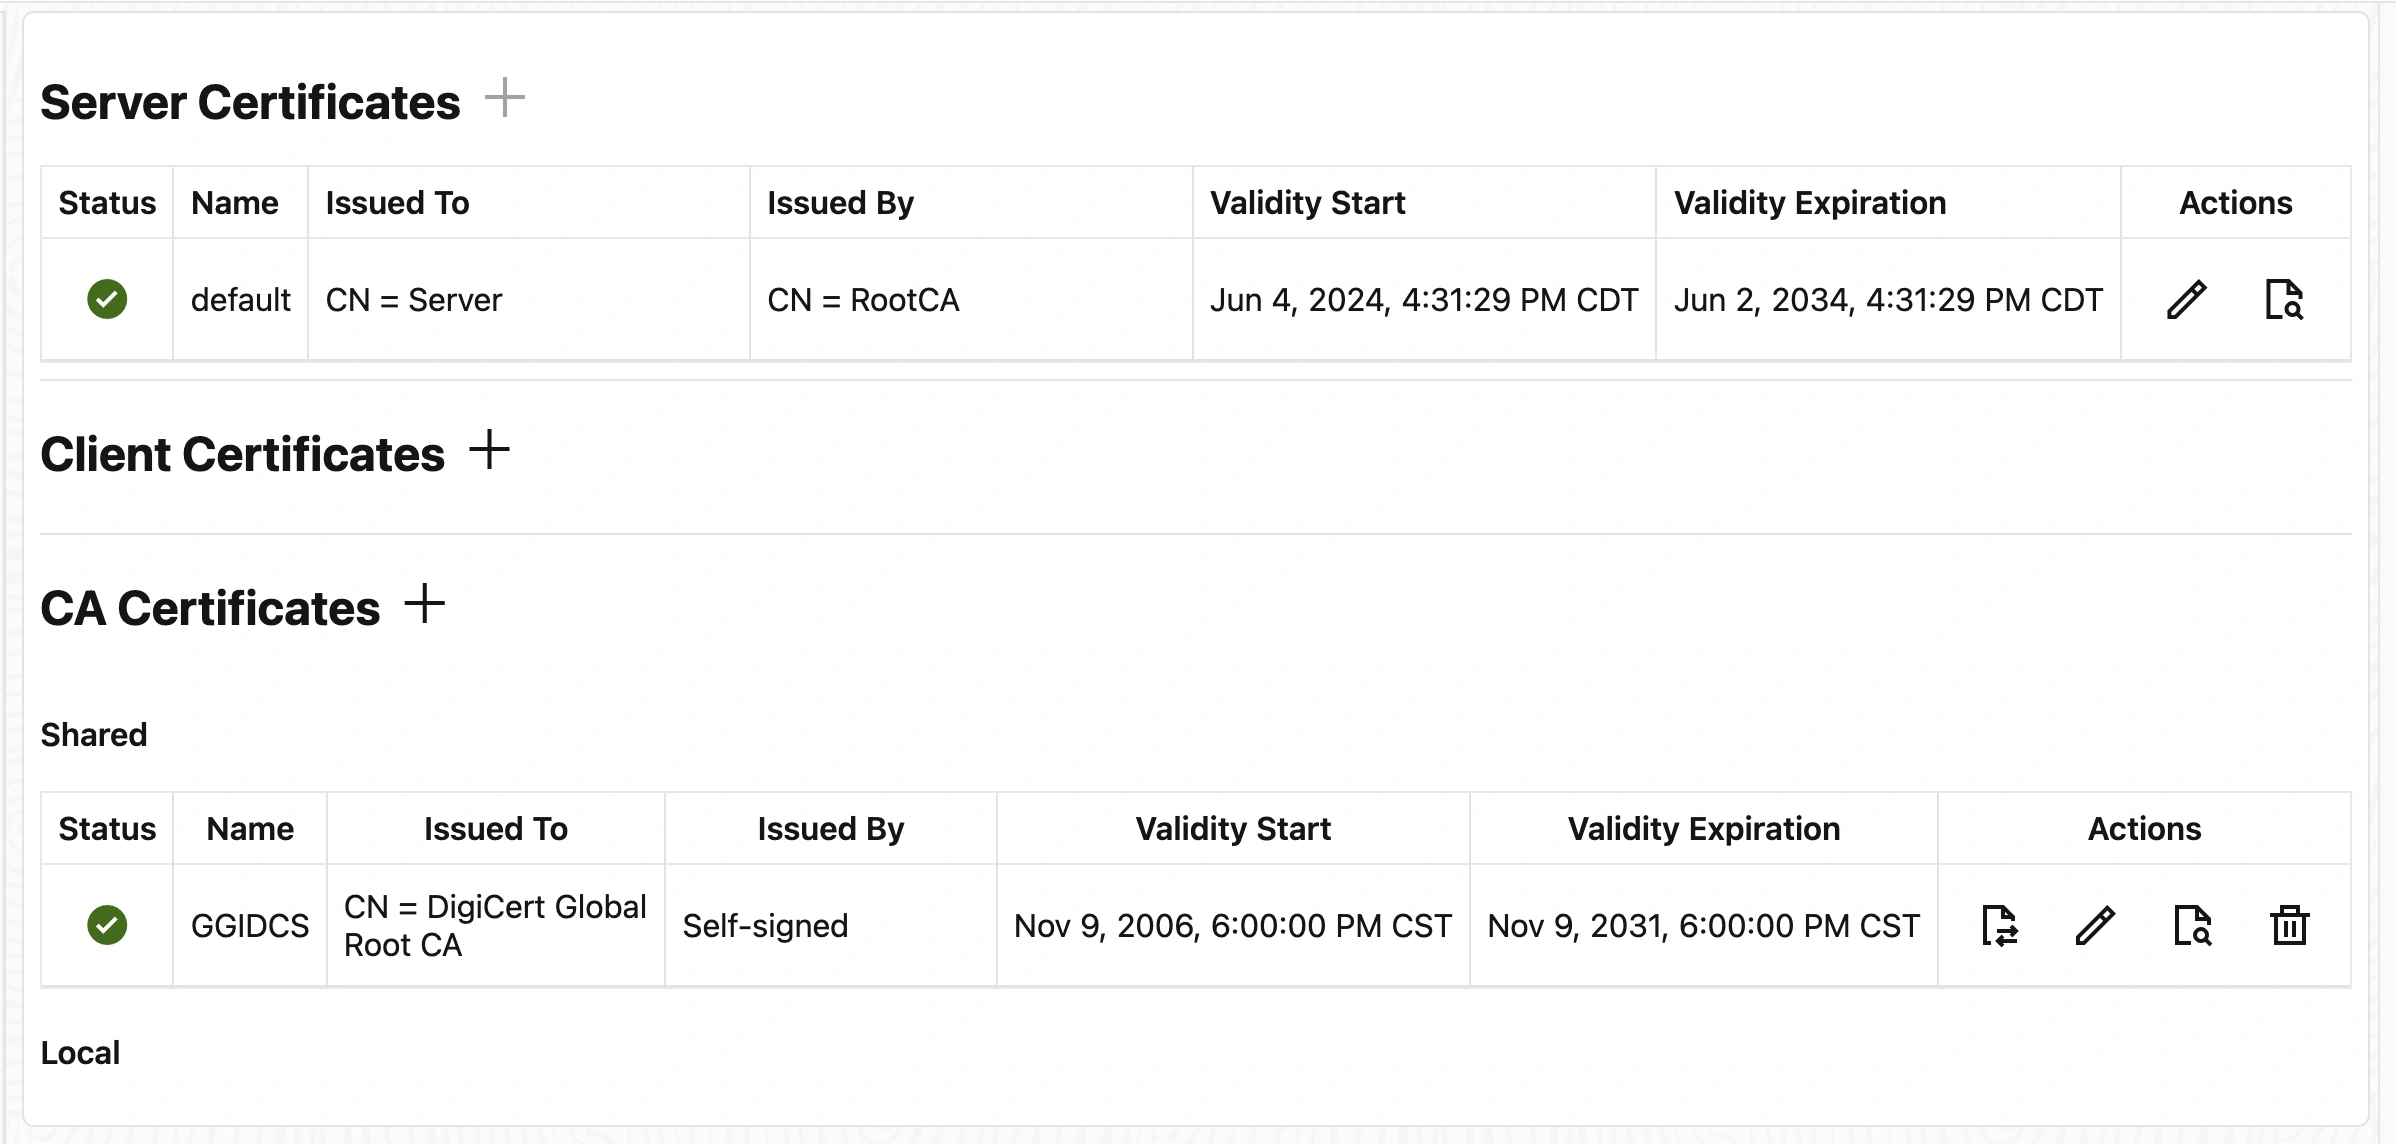
Once the IDCS Certificate is imported, this is the appearance of the Certificate Management Page
The Authorization Profile can be configured either at the Service Manager level or at the individual deployment level. While creating an Authorization Profile at the Service Manager level makes it applicable solely to the Service Manager, it is recommended to establish Authorization Profiles both at the Service Manager level and for each deployment.
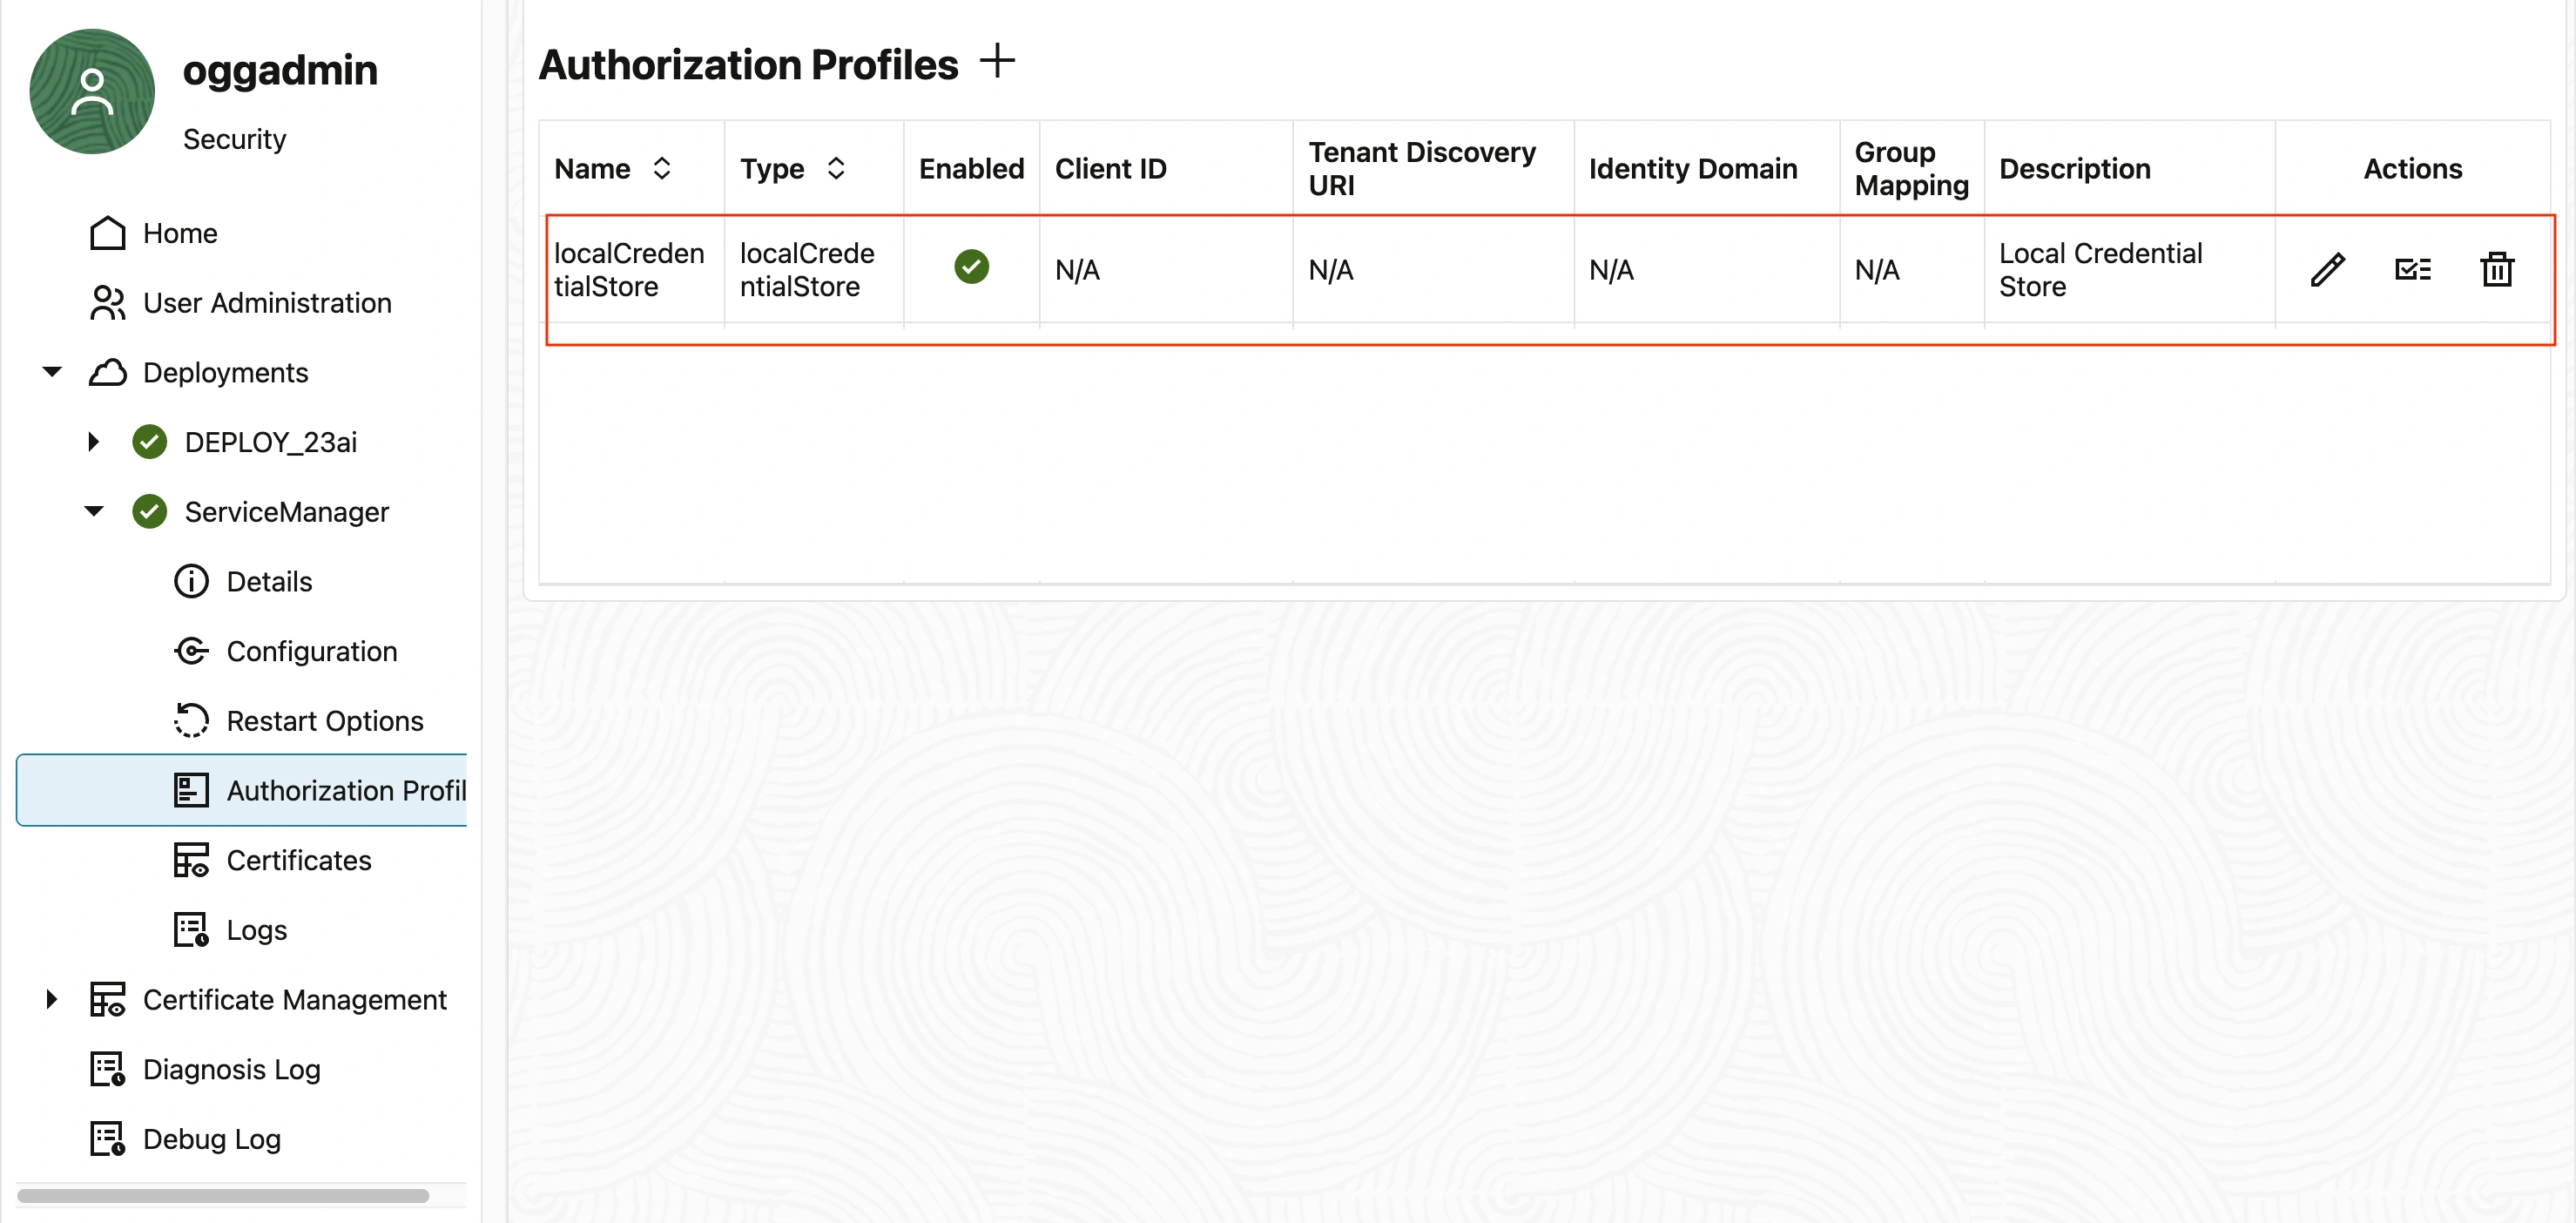
The default profile is local credential store
On the Authorization Profiles page, click the plus sign (+) next to Authorization Profiles. The Authorization Profiles dialog box is displayed.
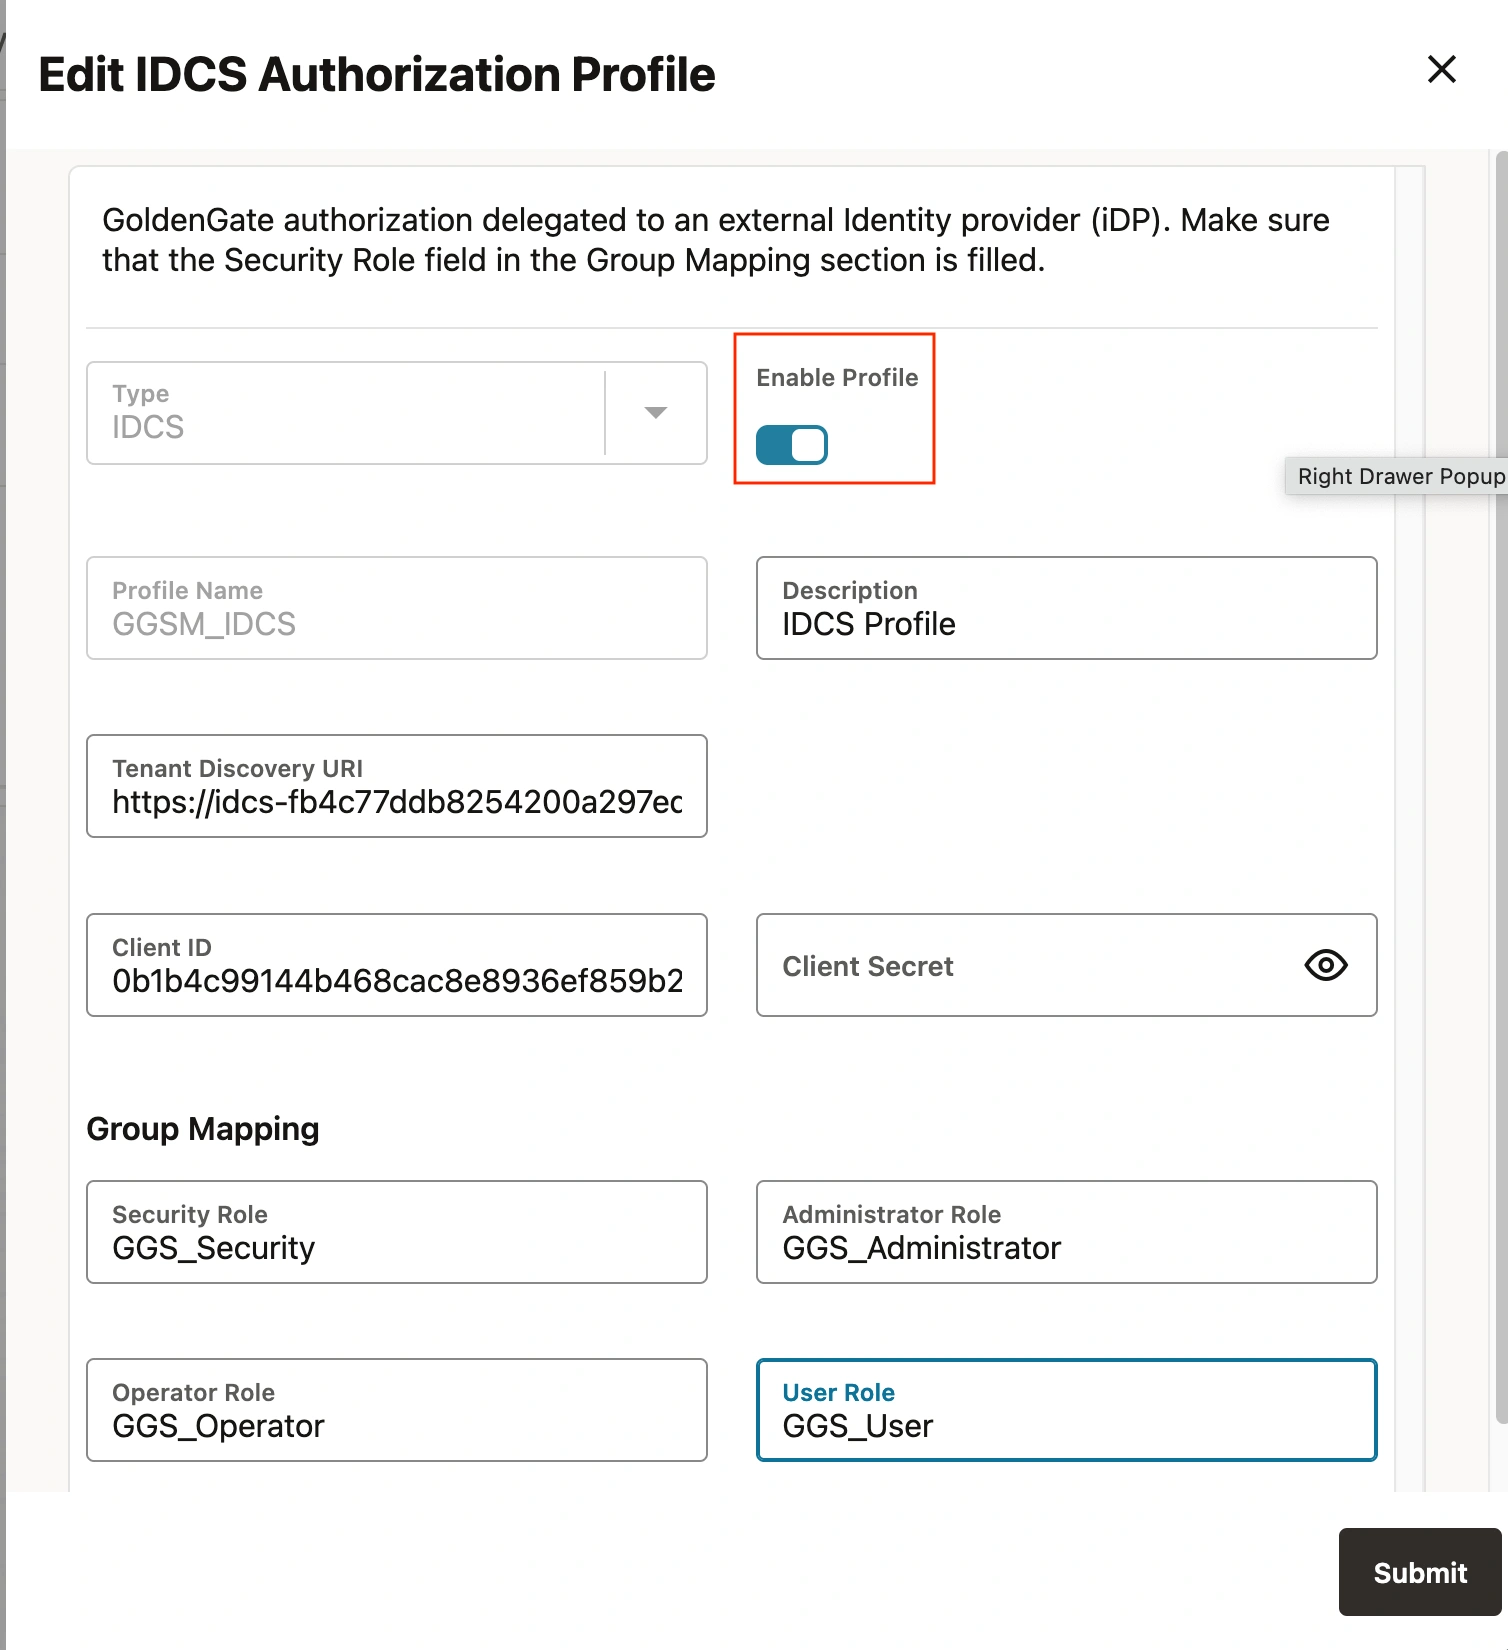
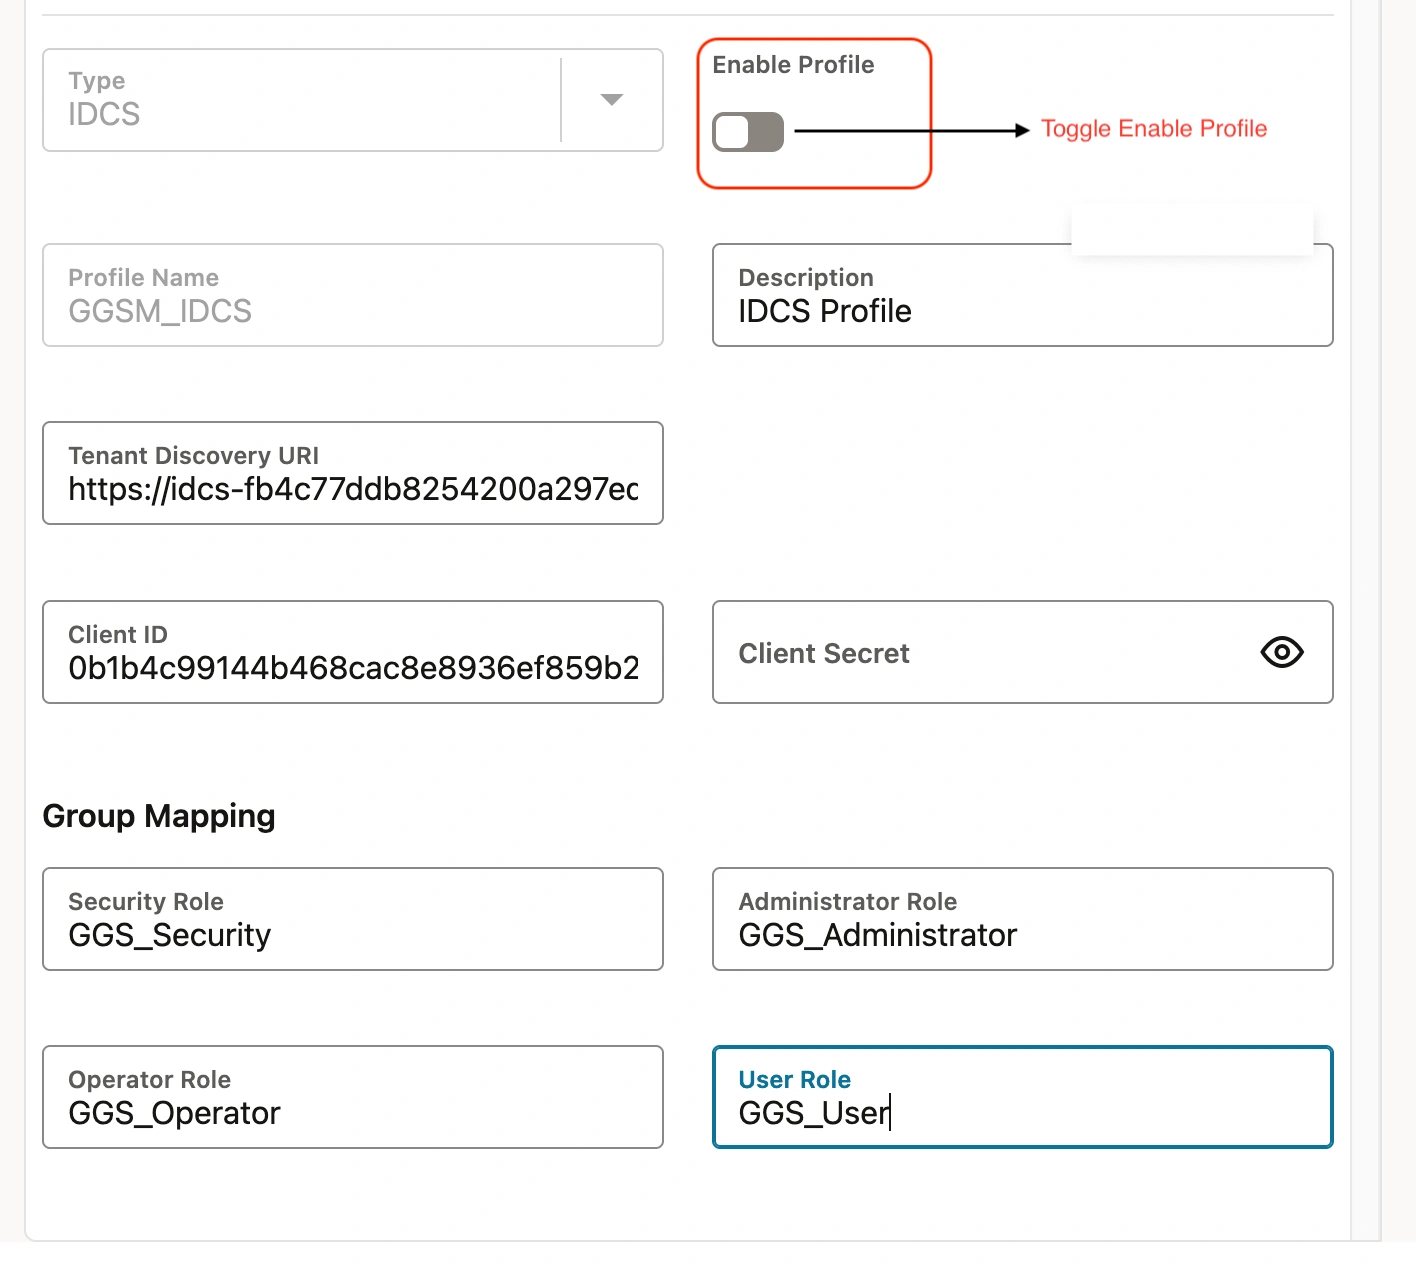
Select and Fill in the details
- Profile Name: Name of the authorization profile.
- Description (optional): Short summary of the profile being created.
- Authorization Profile Type: IDCS
- Tenant Discovery URI: Copied from the previous step. (suffix with /.well-known/openid-configuration).
Example : https://idcs-xxx.identity.oraclecloud.com:443/.well-known/openid-configuration - Client ID: IDP application’s client ID -> Copied in the previous step.
- Client Secret: IDP application’s client secret -> Copied in the previous step
Group Mapping: This configuration have to aligns with the groups created within the Domain.
- GGS_Administrator
- GGS_Security
- GGS_Operator
- GGS_User

Note : Do not select “Enable Profile” option during the profile creation process. This feature will be enabled at a later stage.
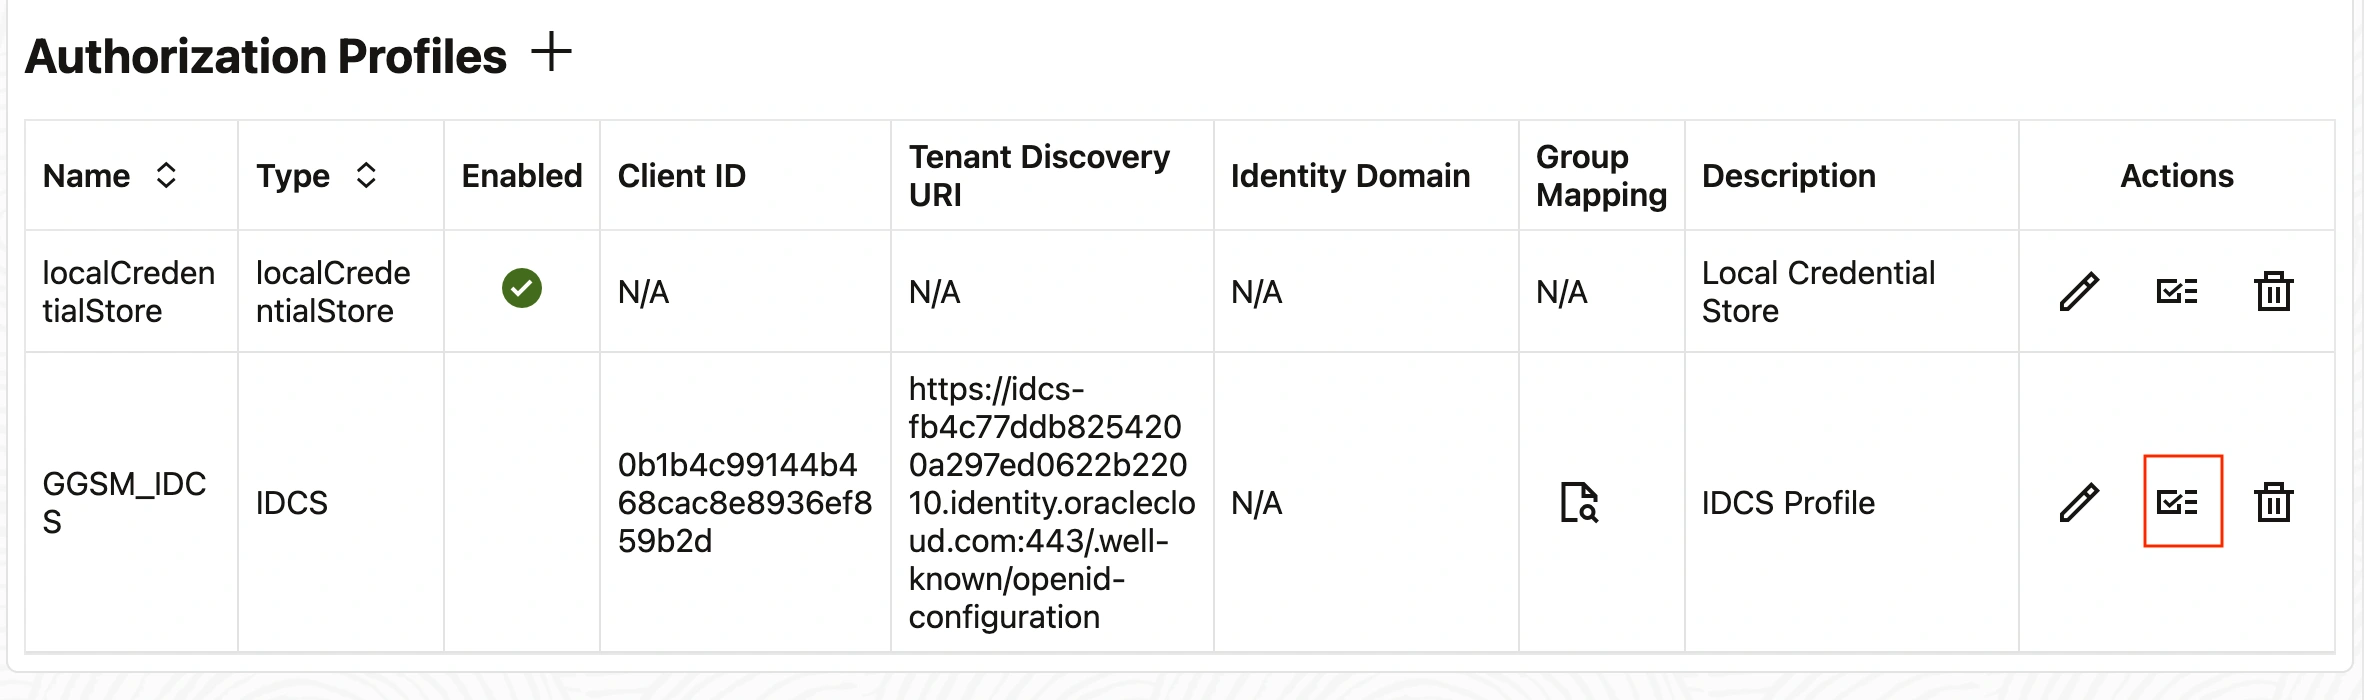
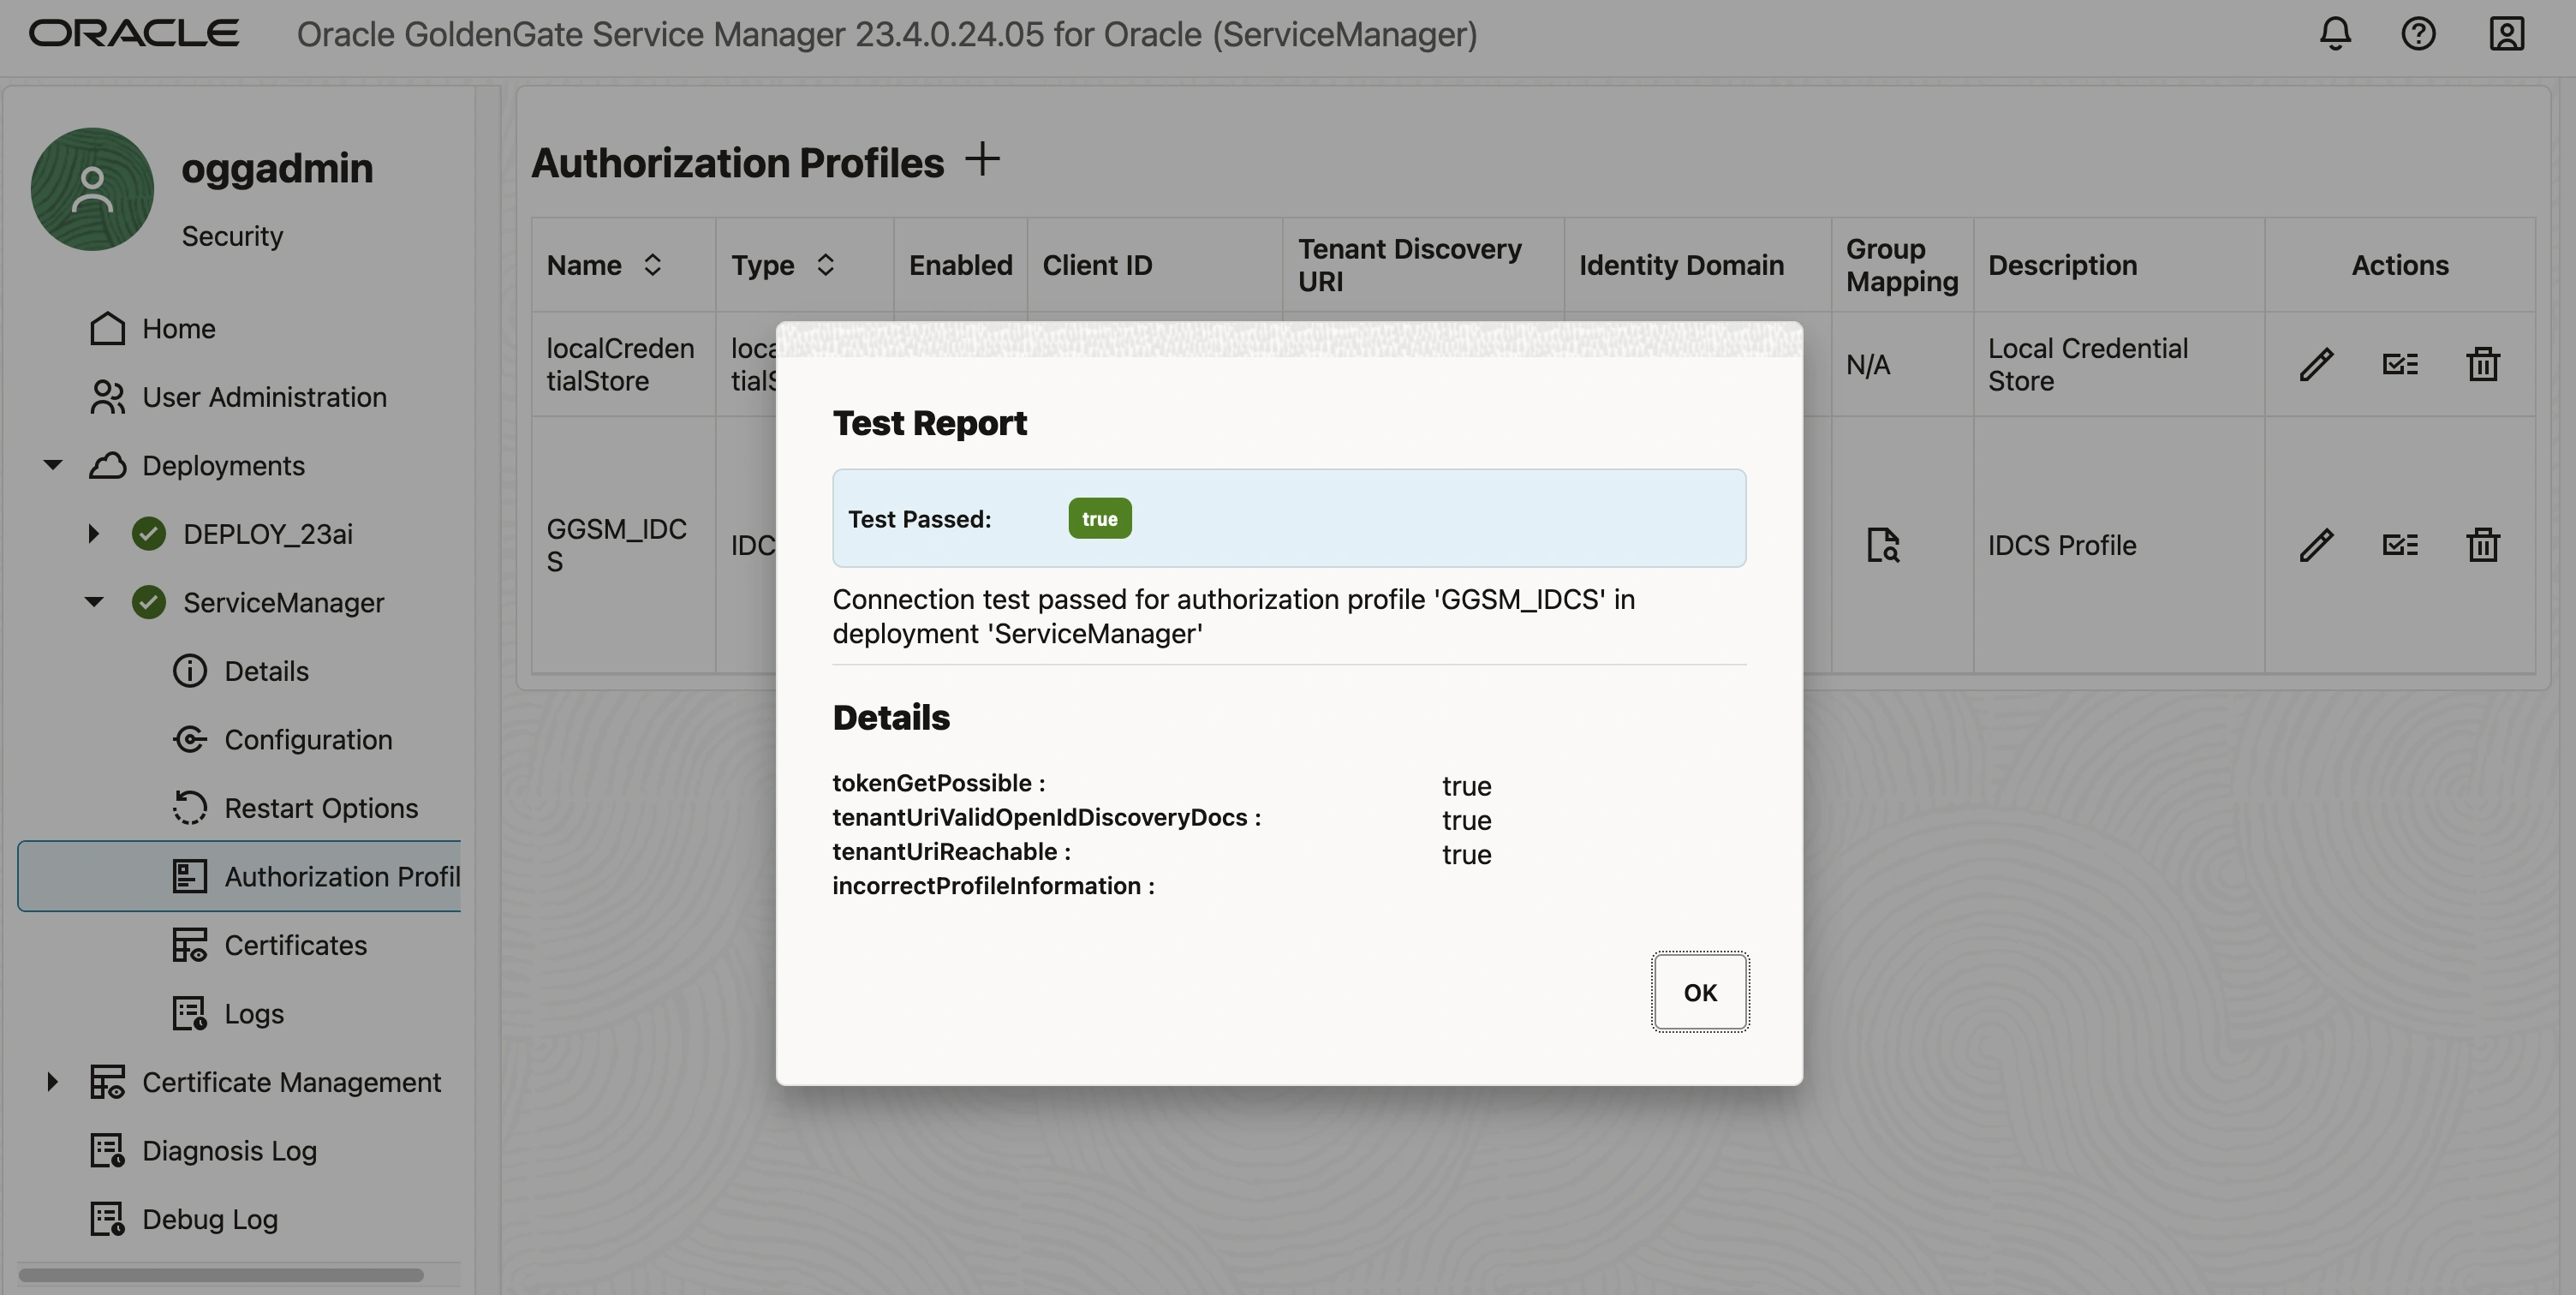
Once the profile is created, locate the ‘Actions’ section where a button is available to validate the profile. Click on this button to test and verify the profile configuration. If all settings are correct, the Test Report will display a green indicator with the status ‘True’
After succesful profile validation edit the profile and enable the profile.
Click on editable pencil mark and enable the profile
Enabling the Authorization profile will initiate a sign-out process and prompt you to enter your IDCS credentials for authentication. This is applicable for only Service Manager, for other deployments it require a restart of deployment to integrate with IDCS.
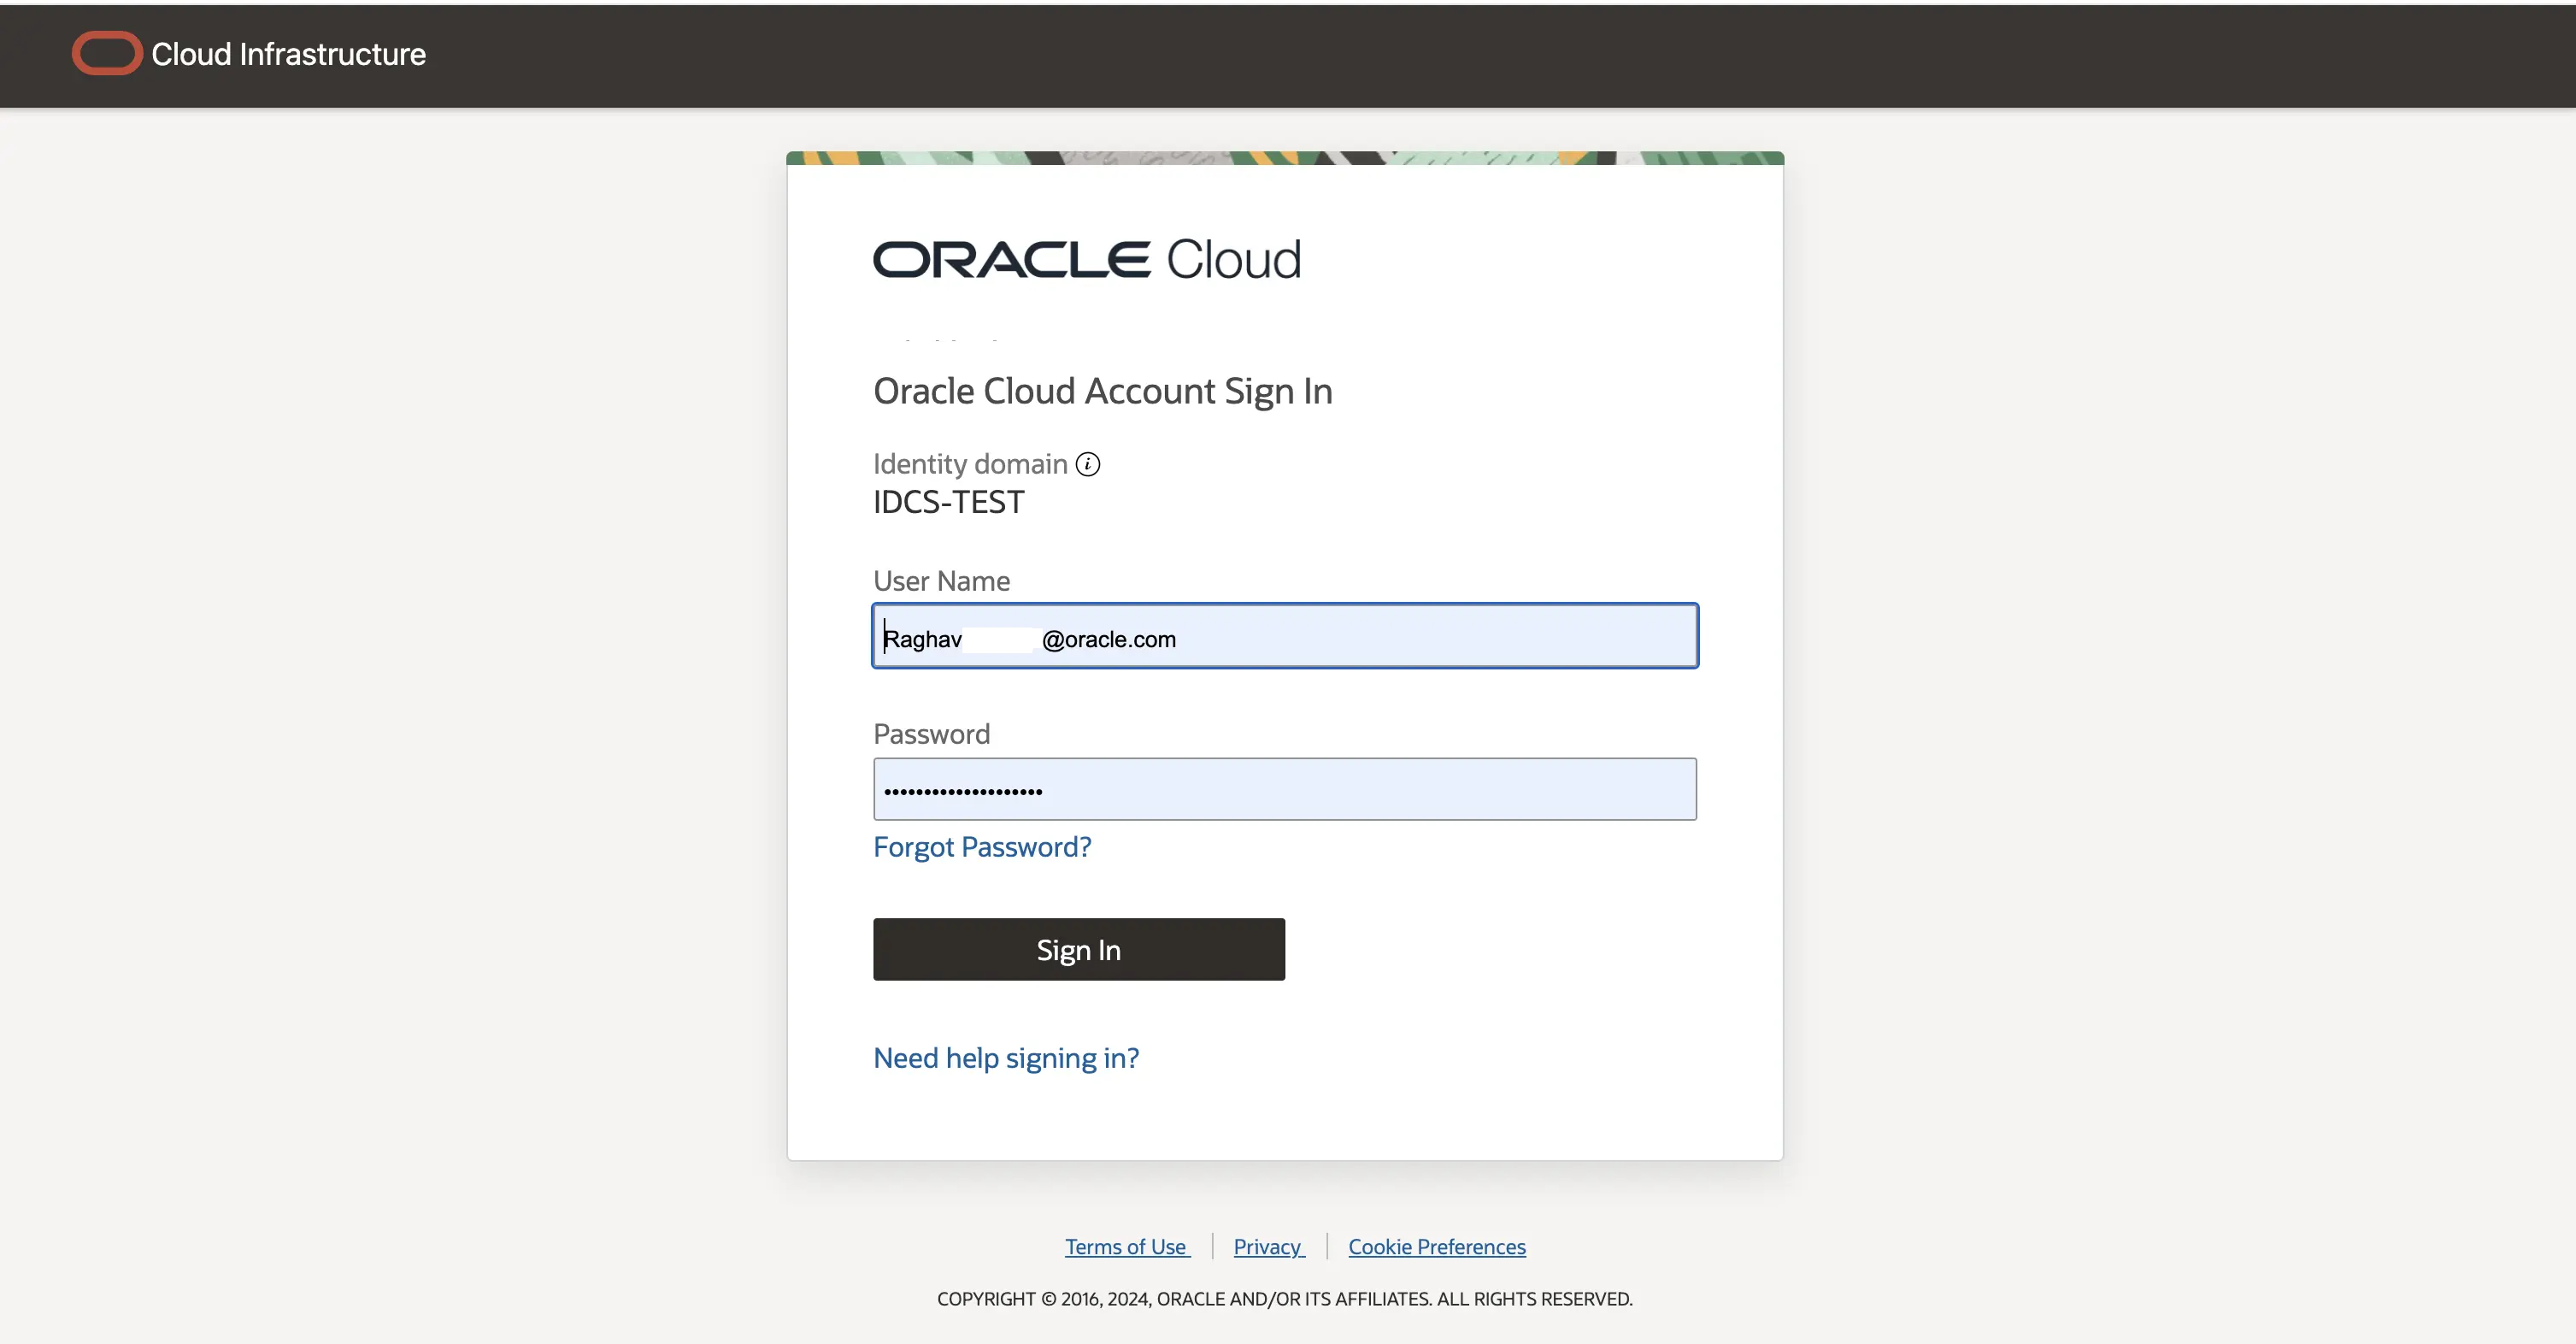
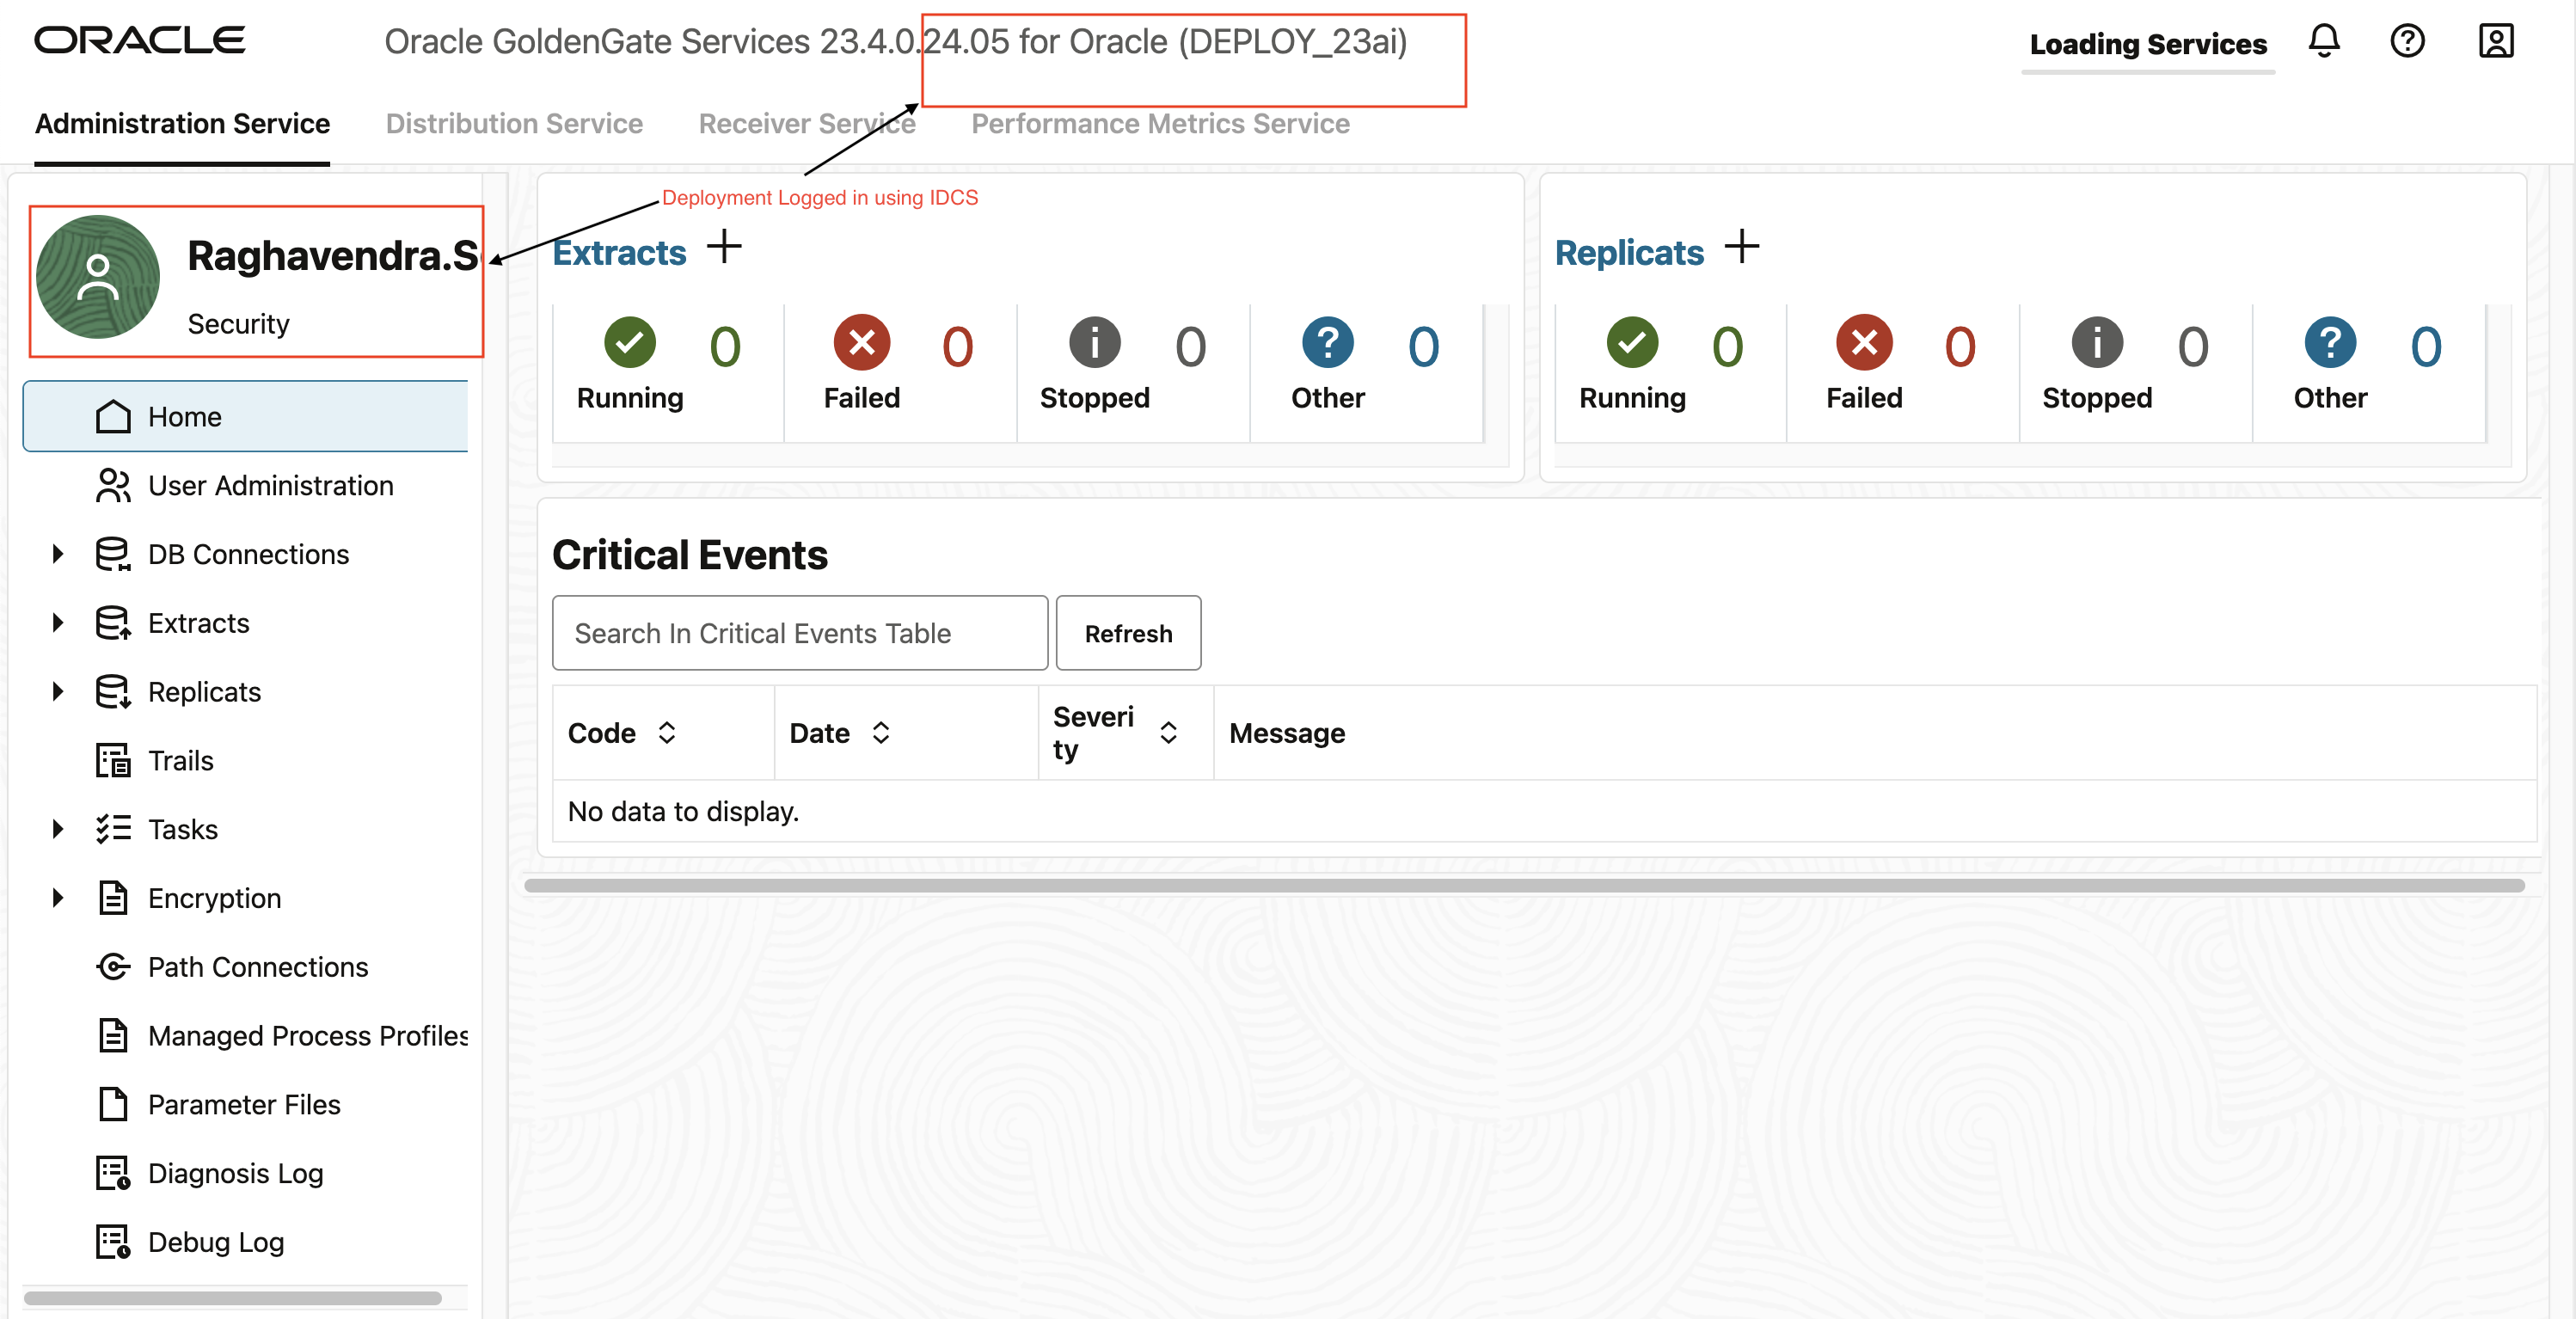
Upon providing the IDCS credentials, the interface will indicate that the user has successfully authenticated using the Identity Cloud Service.
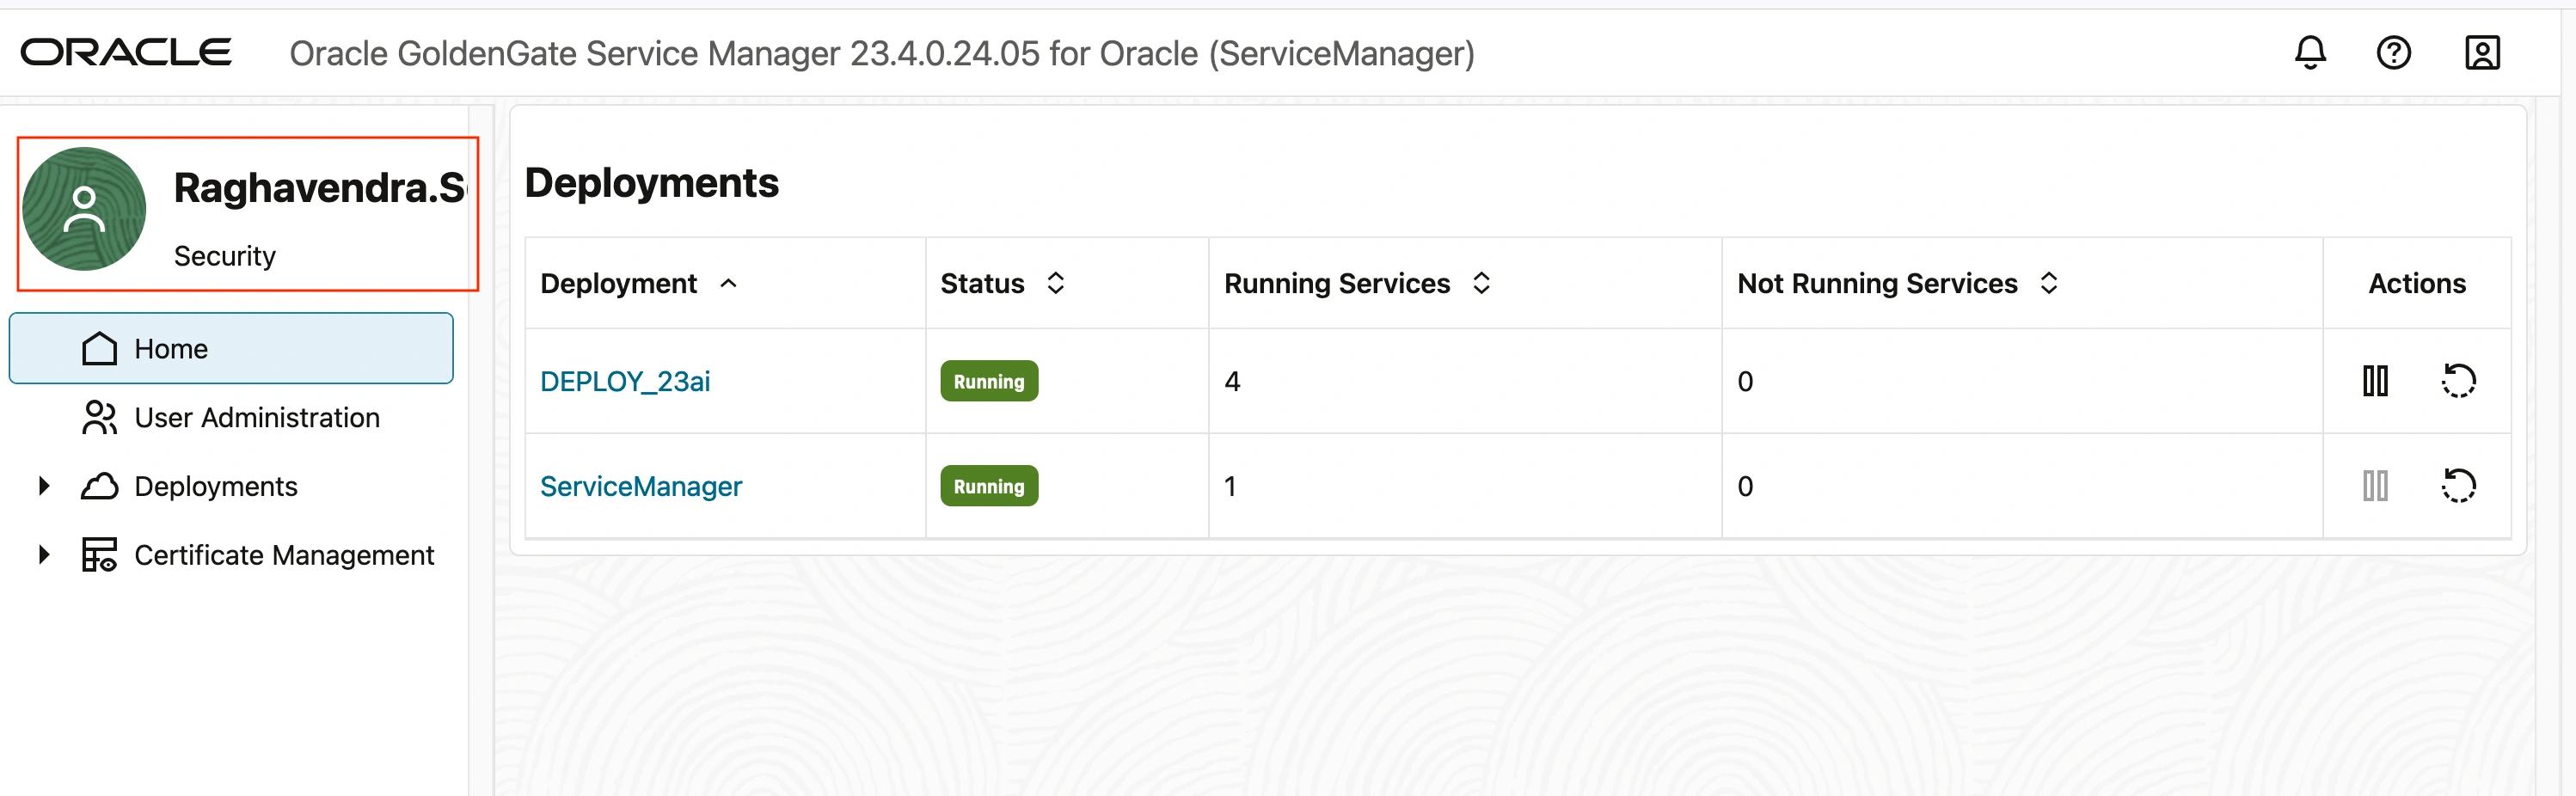
As evident from the screen below, both the Service Manager and the Deployment are now utilizing the IDCS credentials for authentication, enabling users to log in with their Identity Cloud Service credentials.
What happens if you create additional Deployments ?
When you create additional deployments, they can be seamlessly integrated with IDCS. To enable this integration, simply set the authorization profile of the new deployment to IDCS. This straightforward step ensures that the additional deployments are automatically connected to your IDCS system.
Let’s create a new deployment, configure the authorization profile for IDCS integration, and add the new URLs to the IDCS client configuration.
New Deployment Name : IDCS_DEPLOY
IDCS Client Configuration :
New Deployment uses the port number of 9100 series.
Update the Client configuration on IDCS as described in the previous section.
Add Redirect URL for Logins
Administration Server : https://130.35.xx.xx:9101/services/v2/authorization
Add Redirect URL for Logouts
Adminstrator Logout URL : https://130.35.xx.xx:9101/?ojr=signout
Create an Autohorization profile for new Deployment IDCS_DEPLOY
Input Client ID, Secret and Tenant Discovery URI. Peform the test and upon sucess enable Toggle profile as discussed in previous steps.
Enable the authorization profile and this confirms the login for the ‘IDCS_DEPLOY’ deployment is utilizing the IDCS authentication mechanism.
NOTE : Deployments require a restart to integrate with IDCS

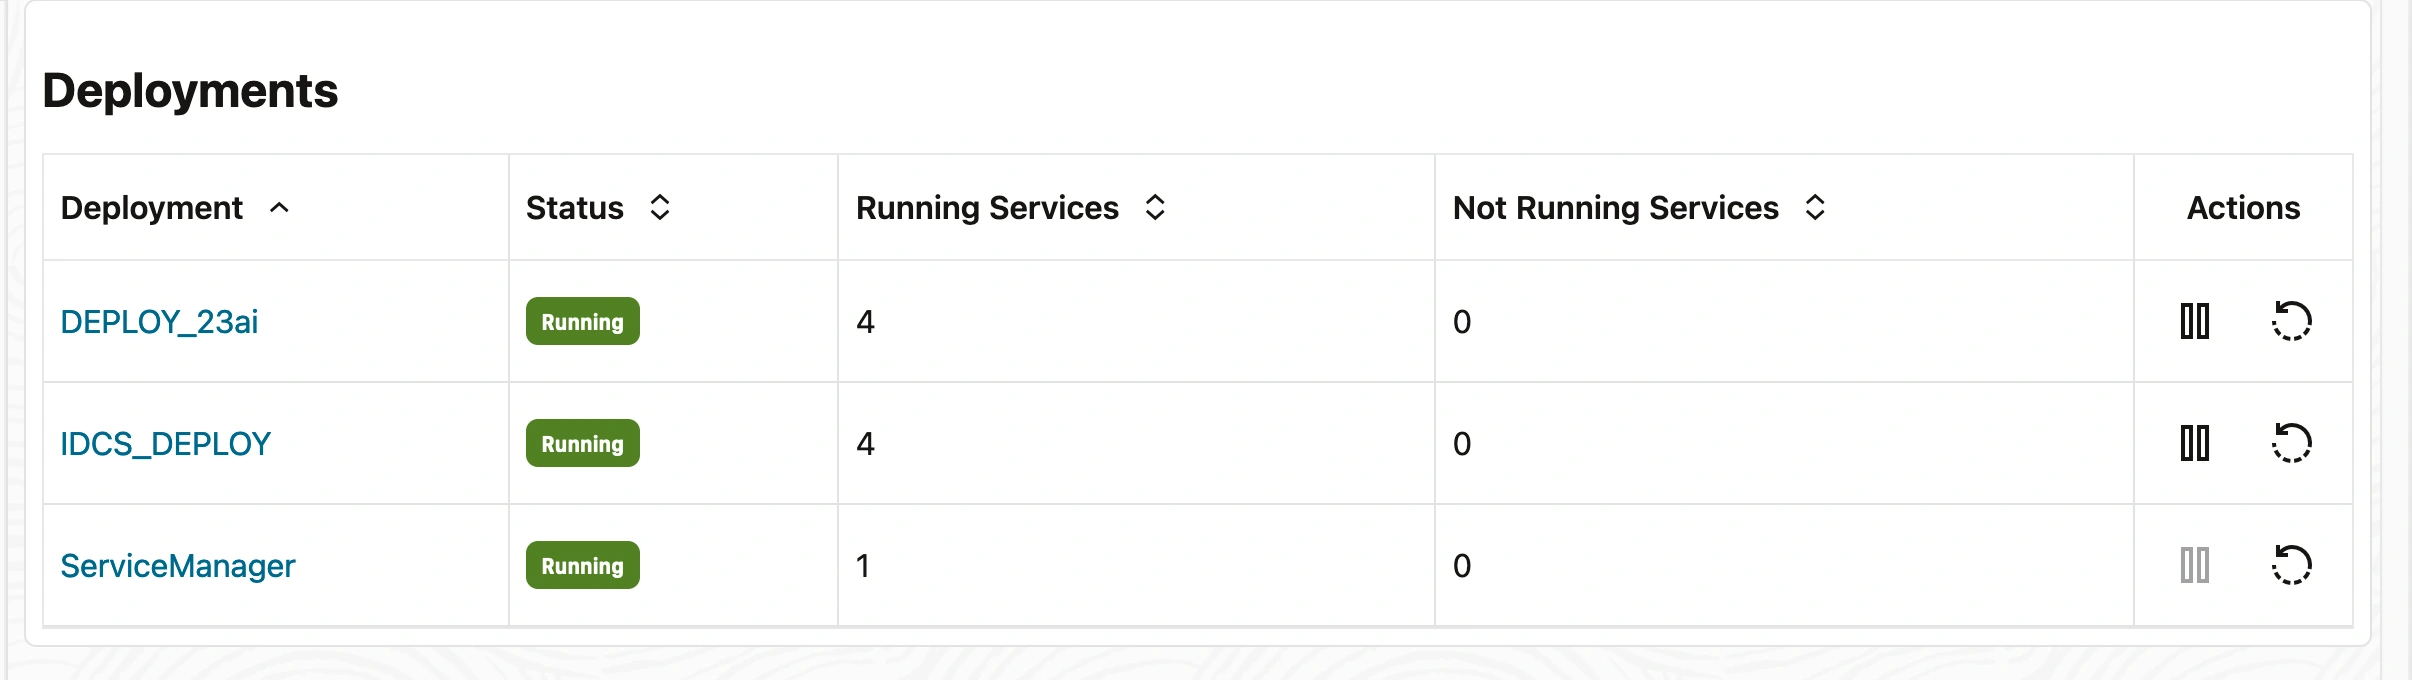
As evident from the screen above, the newly created deployment is configured to use IDCS Authorization.
This confirms that the integration with IDCS has been successfully applied to the new deployment.
After adding the GG deployments to IDCS, restart the deployment for the changes to take effect.
This allows to navigate through multiple deployments without needing to re-enter the password.
How to Navigate Multiple Deployments Seamlessly Without Re-entering Passwords
With IDCS configured at the Service Manager level, only once need to enter the credentials at the root level.
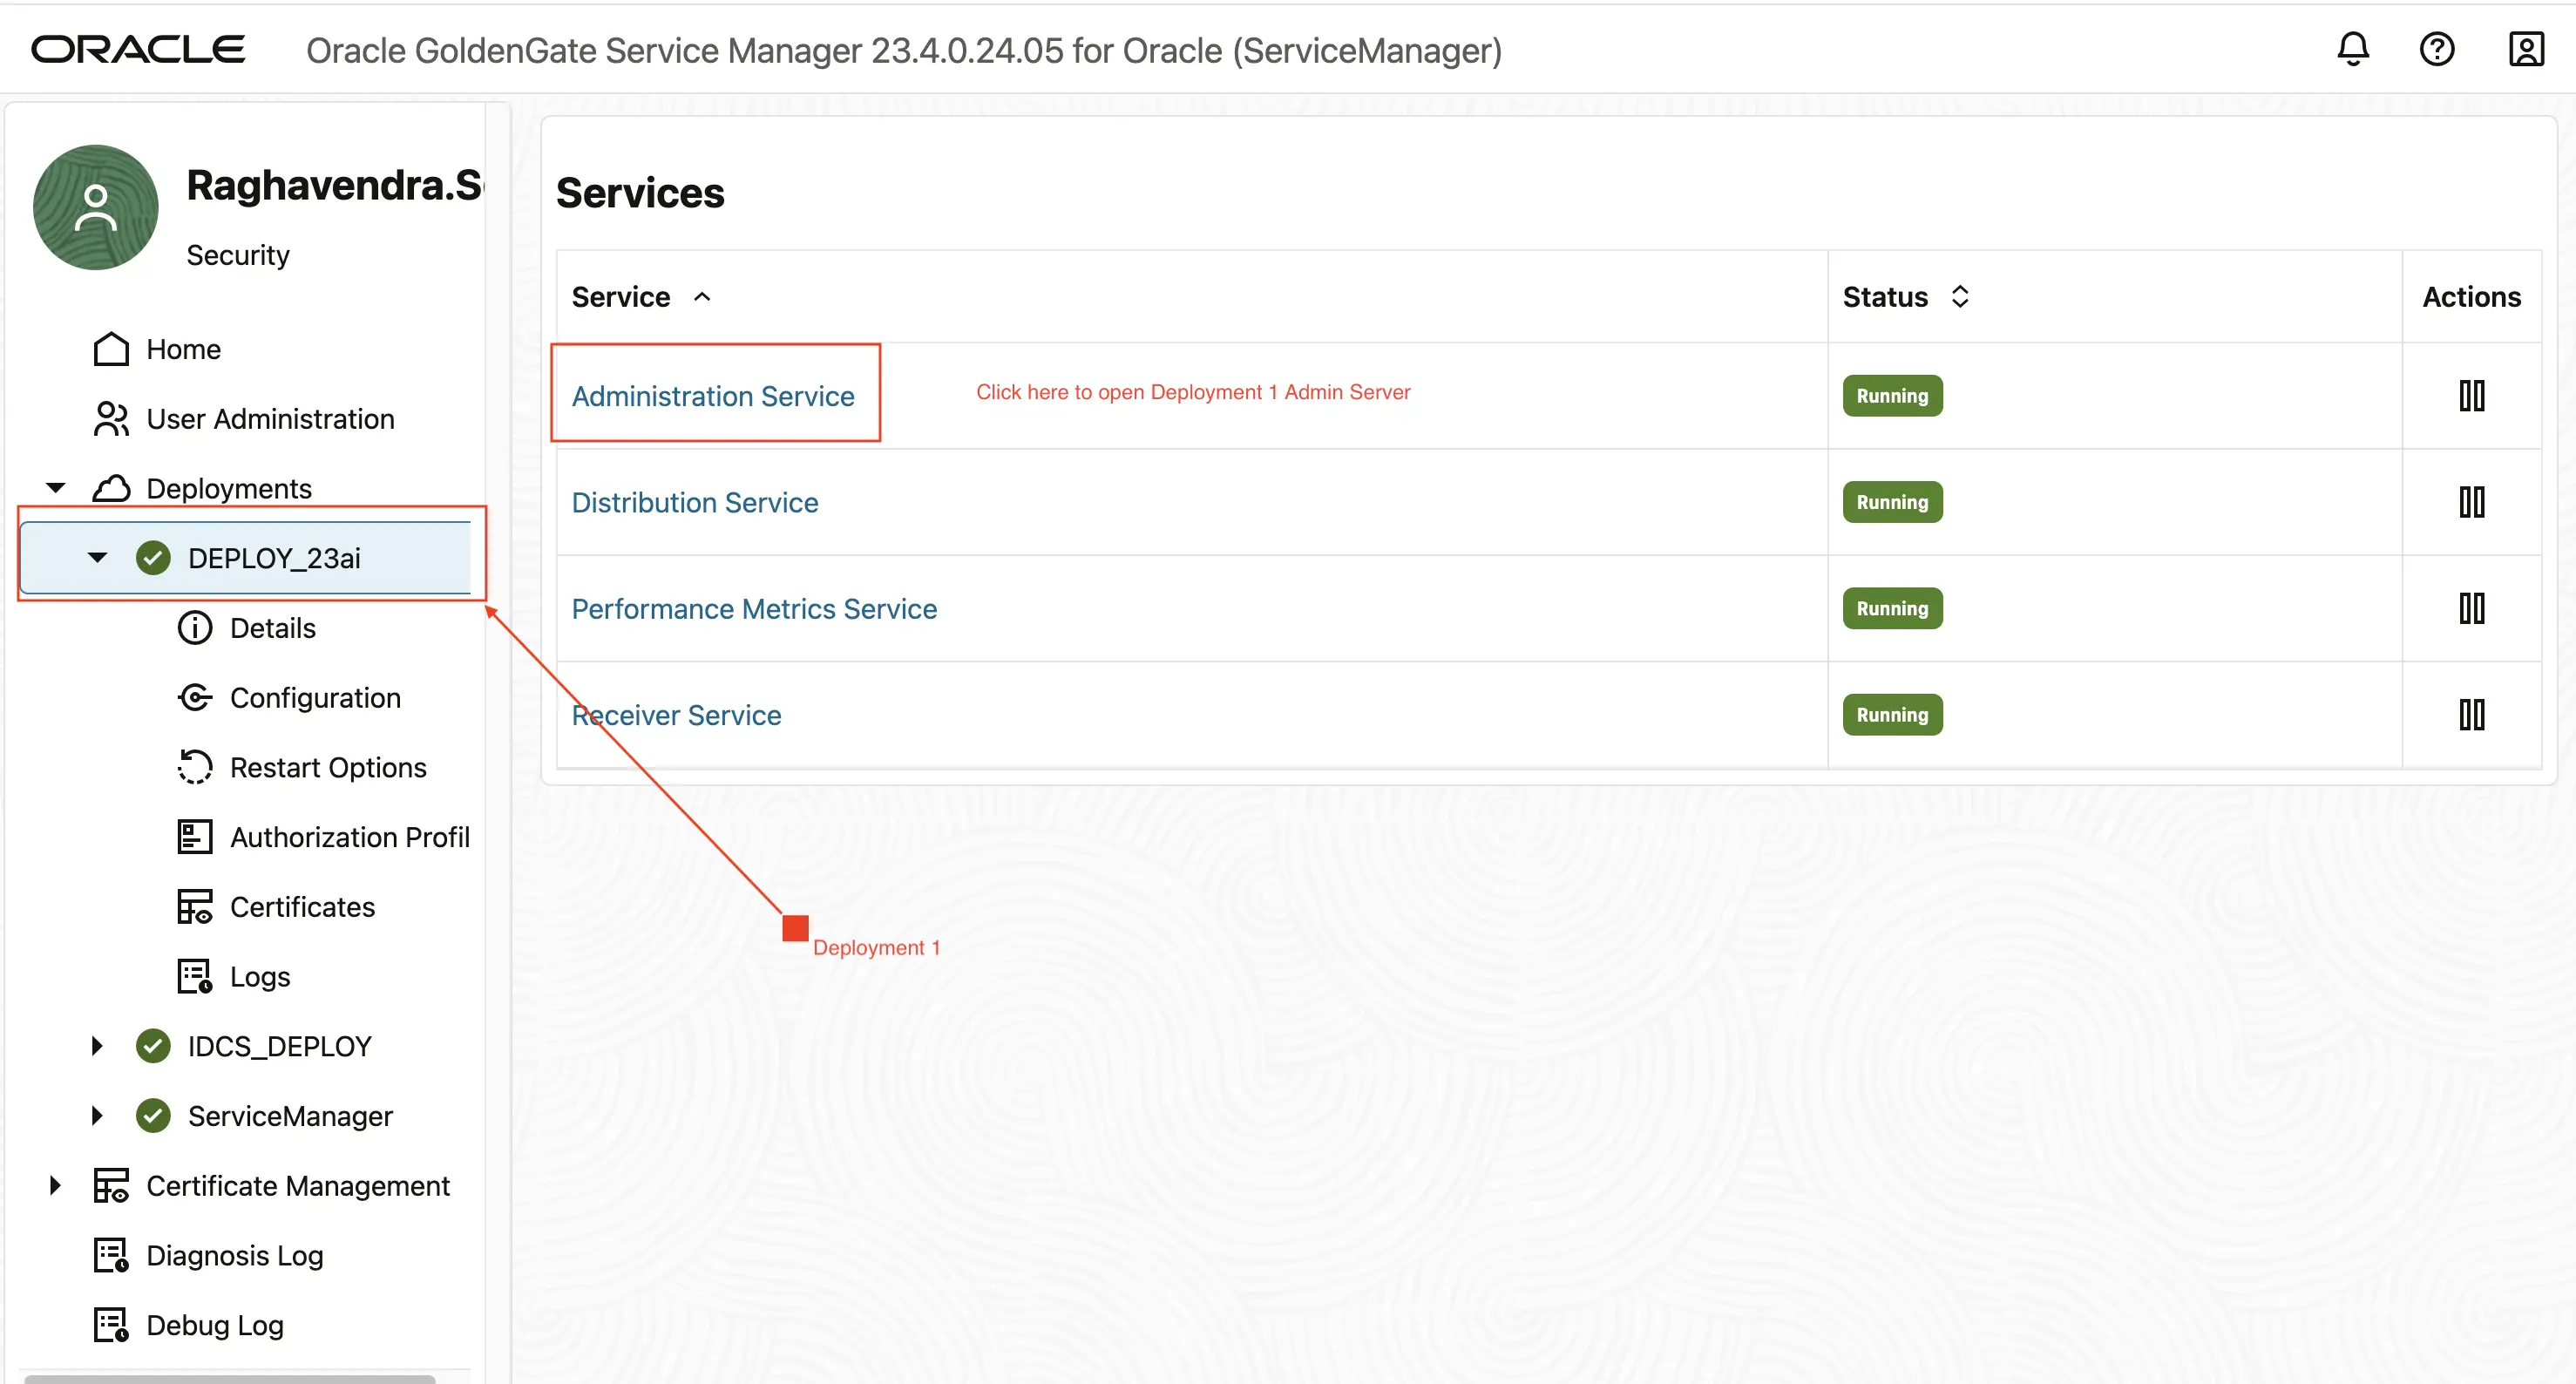
Log in to the Service Manager.
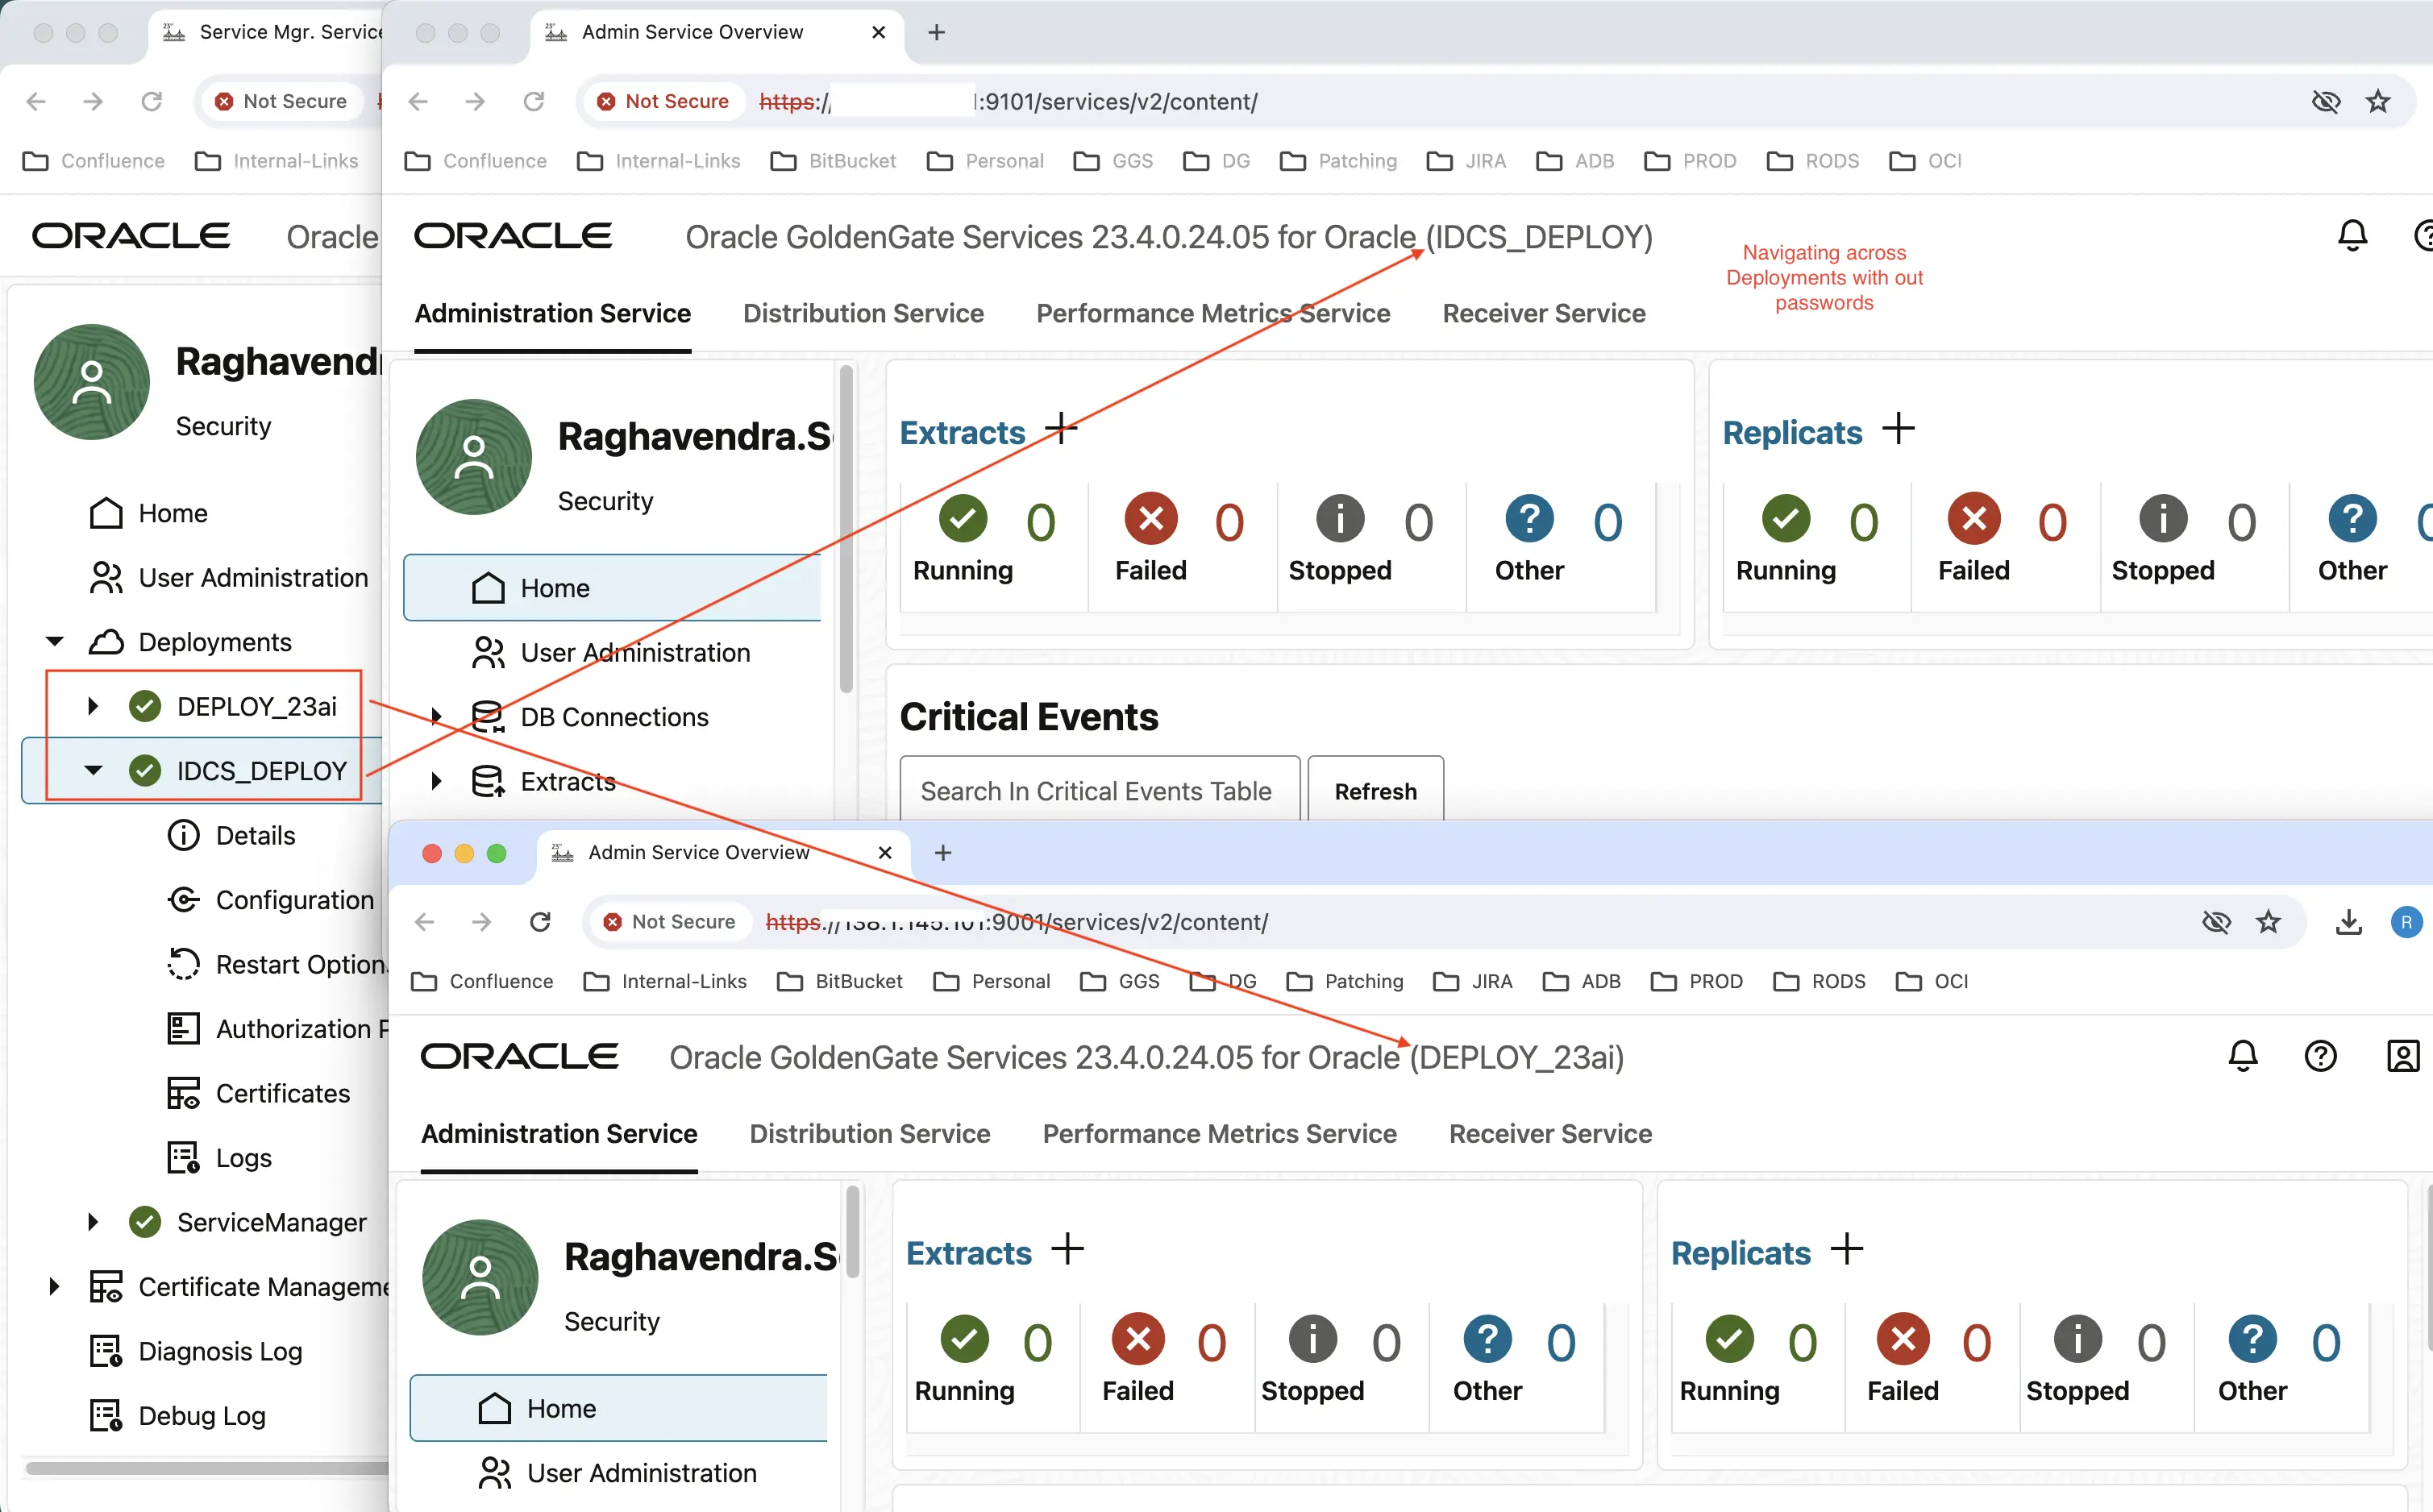
After logging into the Service Manager, Select Deployment 1 i.e (Deploy_23ai). Click on Adminstration Service. Notice that it is not prompted to enter a password and it will open up Admin Server Page.

Go back into the Service Manager console, Select Deployment 2 i.e (IDCS_DEPLOY). Click on Adminstration Service. Notice that it is not prompted to enter a password and it will open up Admin Server Page.


A sample screenshot is provided here with both the deployments logged in, and at the end of the blog short video demonstration is available for reference.
SUMMARY : Oracle GoldenGate facilitates integration with external Identity Providers (IdPs) such as IAM, IDCS, and OAM by providing essential information like redirect URIs and post-logout URLs. This integration streamlines user management and enhances security by allowing you to handle Oracle GoldenGate user access through external servers. As a result, there is no need to create and manage individual user accounts specifically for accessing Oracle GoldenGate.
By leveraging this setup, organizations can Centralize User Management, Enhance Security, Simplify Access, Implement Single Sign-On (SSO) to provide seamless access to Oracle GoldenGate and Improve User Experience.
For more detailed information, refer to the official documentation on IAM/IDCS here
Short Demo :