Oracle Cloud Infrastructure (OCI) GoldenGate is a managed service providing a real-time data mesh platform that uses replication to keep data highly available and enable real-time analysis.
OCI GoldenGate is based on a Microservices Architectures that provides REST-enabled services as part of the Oracle GoldenGate environment. The REST-enabled services provide remote configuration, administration, and monitoring through its user interface.
Project requirements can often change throughout their lifecycle, and Oracle customers developing GoldenGate (GG) processes want to be as productive as possible. Taking advantage of native APIs of OCI GG, we can increase developers, DBAs, or Data Engineers’ productivity. How can we do that? With Ansible, REST APIs, and Jenkins.
With Ansible, we will create/destroy/update our environment every time we need to. We will use GoldenGate REST APIs in Ansible to manage GoldenGate processes and Jenkins to automate deployments in different environments.
Pre-requisites
- Policies must be set up to use OCI GoldenGate. Please refer to this documentation link — https://docs.oracle.com/en-us/iaas/goldengate/doc/policies.html
- Even if it is not mandatory, I recommend using a Compute instance on OCI with the Oracle Linux Cloud Developer image. This image comes by default with the most common software used by Developers. Go here to see how to create one.
- OCI CLI must be installed. It is already there in the Oracle Linux Cloud Developer image. You need to configure its config file. Go here to see how to do it.
- Git must be installed. From a shell in your Compute instance, run the following command to add it: sudo dnf install git-all
- Have your compartment (in which the OCI GoldenGate Deployment will be created) and subnet OCID handy.
As we are using OCI GG, we are assuming that you have one or more Oracle databases up and running to test your processes.
Getting Started with Ansible
Go to your compute instance, and let’s get started by installing Ansible:
#For Oracle Linux 8
sudo dnf install -y oci-ansible-collection –enablerepo ol8_developer –enablerepo ol8_developer_EPEL
#Checking if it was installed and its version
[opc@developerinstance2021 .oci]$ ansible –version
ansible 2.9.25
config file = /etc/ansible/ansible.cfg
configured module search path = [‘/home/opc/.ansible/plugins/modules’, ‘/usr/share/ansible/plugins/modules’]
ansible python module location = /usr/lib/python3.6/site-packages/ansible
executable location = /usr/bin/ansible
python version = 3.6.8 (default, May 19 2021, 10:00:09) [GCC 8.4.1 20200928 (Red Hat 8.4.1-1.0.1)]
#Check if ansible is running
[opc@developerinstance2021 .oci]$ ansible localhost -m oracle.oci.oci_object_storage_namespace_facts
#Create a folder to save Ansible Playbooks
[opc@developerinstance2021 .oci]$ mkdir ~/Ansible-Playbooks
You can find all documentation for OCI Ansible collections here. We are focusing on GoldenGate.
Using vi, create a new file. E.g., CREATE_OCI_GG_DEPLOYMENT.yml
Paste this code (check the comments to understand what needs to be done).
#The first line you define the name of this play
#The second the machine where is going to connect. In this case, it’s localhost
#The third line the collection we need to run our tasks.
– name: Create OCI GoldenGate Deployment
hosts: localhost
collections:
– oracle.oci
vars:
#ansible_python_interpreter: /usr/bin/python3
tasks:
– name: Create GoldenGate Deployment
oci_golden_gate_deployment:
display_name: MyGGDeployment
license_model: BRING_YOUR_OWN_LICENSE
compartment_id: >-
ocid1.compartment.oc1..aaa….
subnet_id: >-
ocid1.subnet.oc1.eu-frankfurt-1.a….
cpu_core_count: 1
is_auto_scaling_enabled: true
is_public: true
deployment_type: OGG
ogg_data:
admin_username: oggadmin
admin_password: ‘<password>’
deployment_name: MyGGDeployment1
Replace the parameters marked with “<>” and put your compartment ID and subnet ID.
Save the file and run the playbook:
[opc@developerinstance2021 Ansible-Playbooks]$ ansible-playbook CREAT_OCI_GG_DEPLOYMENT.yml
[WARNING]: provided hosts list is empty, only localhost is available. Note that the implicit localhost does not match ‘all’
PLAY [Create OCI GoldenGate Deployment] ************************************************************************************
TASK [Gathering Facts] *****************************************************************************************************
ok: [localhost]
TASK [Create GoldenGate Deployment] ****************************************************************************************
changed: [localhost]
PLAY RECAP *****************************************************************************************************************
localhost : ok=2 changed=1 unreachable=0 failed=0 skipped=0 rescued=0 ignored=0
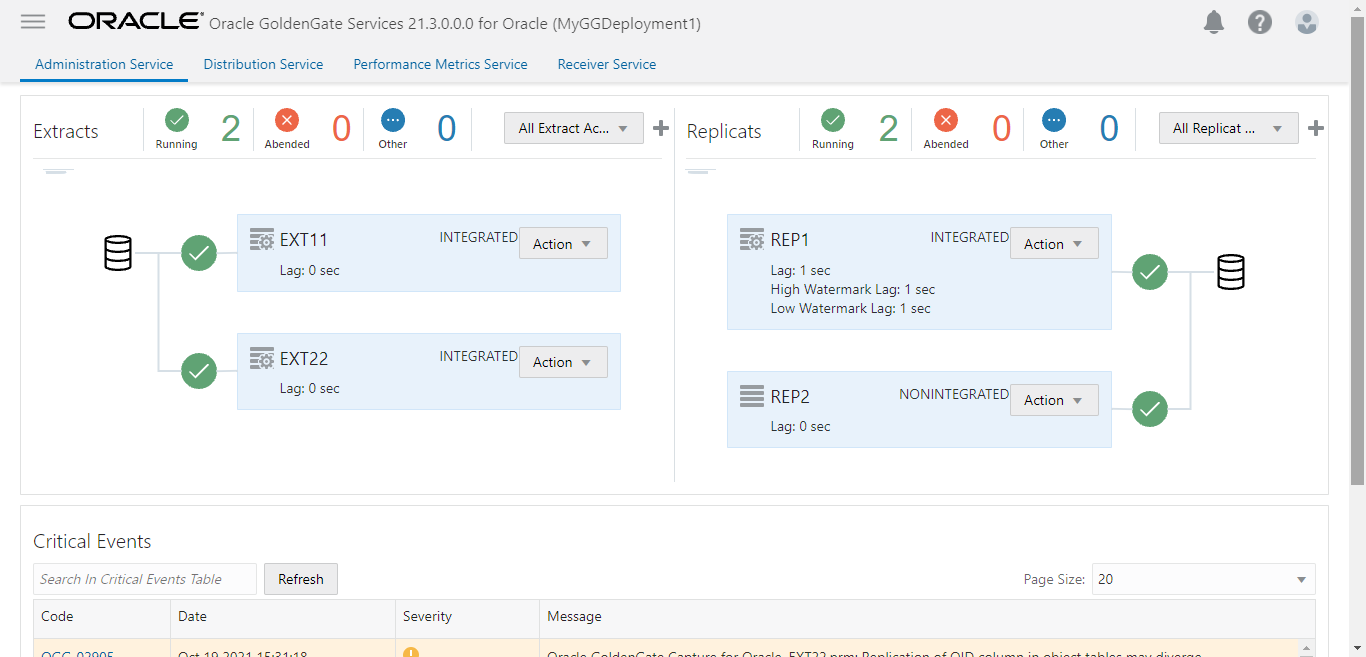
The script can take a couple of minutes to execute since it is creating the deployment. After that, you should see your deployment on OCI.
We have already seen how to use Ansible to create OCI GoldenGate artifacts. You can check our GitHub repository, where you can find more examples (register databases, update deployment, etc.).
Let’s move on and get started with REST APIs in Ansible.
GoldenGate REST APIs with Ansible
Oracle GoldenGate exposes REST APIs to interact with the service without having to use the user interface.
Let’s use this example in which we want to create an Extract:
– hosts: localhost
vars:
#your OCI GG instance
destination_host: <GG instance>/services/v2/extracts
#Extract name
extract: EXT1
tasks:
– name: CREATE EXTRACT
uri:
#calling the rest API to create the extract
url: https://{{ destination_host }}/{{ extract }}
url_username: oggadmin
url_password: <Password>
method: POST
body_format: json
body:
# Configuration of Extract
config: [“Extract <Extract name>”,”ExtTrail <trail file>”,”UseridAlias <your alias> DOMAIN <Your domain>”,”Table <schema>.<table>;”]
source: {“tranlogs”:”integrated”}
credentials: {“alias”:”<your alias>”,”domain”:”<Your domain>”}
begin: “now”
targets: [{“name”:”<trail file>”}]
# The API even when finishes successfully, there is a warning, that’s why we put to ignore errors.
#If there is a real error you will see it in the log after running the script
ignore_errors: yes
register: rest_post
– name: DEBUG / GOT INFO
debug:
msg: “{{ rest_post.json }}”
#shows output when runs without any error (201 status)
when: rest_post.status == 201
Save the code in a YAML (yml) file and run the playbook:
[opc@developerinstance2021 Ansible-Playbooks]$ ansible-playbook OCI_GG_CREATE_EXTRACT.yml
[WARNING]: provided hosts list is empty, only localhost is available. Note that the implicit localhost does not match ‘all’
PLAY [localhost] ***********************************************************************************************************
TASK [Gathering Facts] *****************************************************************************************************
ok: [localhost]
TASK [CREATE EXTRACT] ******************************************************************************************************
TASK [DEBUG / GOT INFO] ****************************************************************************************************
ok: [localhost] => {
“msg”: {
“$schema”: “api:standardResponse”,
“links”: [
{
“href”: “https://h656s4zodc2q.deployment.goldengate.eu-frankfurt-1.oci.oraclecloud.com/services/v2/extracts/EXT3“,
“mediaType”: “application/json”,
“rel”: “canonical”
},
{
“href”: “https://h656s4zodc2q.deployment.goldengate.eu-frankfurt-1.oci.oraclecloud.com/services/v2/extracts/EXT3“,
“mediaType”: “application/json”,
“rel”: “self”
}
],
“messages”: [
{
“$schema”: “ogg:message”,
“code”: “OGG-12142”,
“issued”: “2021-09-14T08:39:52Z”,
“severity”: “WARNING”,
“title”: “The json property ‘/source/tranlogs’ has been deprecated. Expected value is: ‘/source’.”,
“type”: “http://www.w3.org/Protocols/rfc2616/rfc2616-sec10.html#sec10.4.1“
},
{
“$schema”: “ogg:message”,
“code”: “OGG-08100”,
“issued”: “2021-09-14T08:39:53Z”,
“severity”: “INFO”,
“title”: “Integrated Extract added.”,
“type”: “http://docs.oracle.com/goldengate/c2130/gg-winux/GMESG/oggus.htm#OGG-08100“
},
{
“$schema”: “ogg:message”,
“code”: “OGG-10183”,
“issued”: “2021-09-14T08:39:53Z”,
“severity”: “INFO”,
“title”: “Parameter file EXT3.prm passed validity check.”,
“type”: “http://docs.oracle.com/goldengate/c2130/gg-winux/GMESG/oggus.htm#OGG-10183“
},
{
“$schema”: “ogg:message”,
“code”: “OGG-08100”,
“issued”: “2021-09-14T08:39:53Z”,
“severity”: “INFO”,
“title”: “EXTTRAIL added.”,
“type”: “http://docs.oracle.com/goldengate/c2130/gg-winux/GMESG/oggus.htm#OGG-08100“
}
]
}
}
PLAY RECAP *****************************************************************************************************************
localhost : ok=3 changed=0 unreachable=0 failed=0 skipped=0 rescued=0 ignored=1
As you can see, Ansible is quite handy when we need to quickly and easily create processes in GoldenGate. Now, it would be great only to have to code it and have a tool automatically deploy and execute it on our behalf. For that, we need Jenkins!!!
Configuring Jenkins
Let’s get started by installing Jenkins:
wget http://yum.oracle.com/repo/OracleLinux/OL8/developer/EPEL/x86_64/getPackage/daemonize-1.7.8-1.el8.x86_64.rpm
sudo rpm -i daemonize-1.7.8-1.el8.x86_64.rpm
sudo wget -O /etc/yum.repos.d/jenkins.repo \
https://pkg.jenkins.io/redhat-stable/jenkins.repo
sudo rpm –import https://pkg.jenkins.io/redhat-stable/jenkins.io.key
sudo yum upgrade
sudo yum install java-11-openjdk-devel
sudo yum install jenkins
Start Jenkins:
sudo systemctl daemon-reload
sudo systemctl start jenkins
[opc@developerinstance2021 Ansible-Playbooks]$ sudo systemctl status jenkins
● jenkins.service – LSB: Jenkins Automation Server
Loaded: loaded (/etc/rc.d/init.d/jenkins; generated)
Active: active (running) since Tue 2021-09-14 13:32:02 GMT; 4s ago
Docs: man:systemd-sysv-generator(8)
Process: 169796 ExecStart=/etc/rc.d/init.d/jenkins start (code=exited, status=0/SUCCESS)
Tasks: 30 (limit: 98556)
Memory: 234.8M
CGroup: /system.slice/jenkins.service
└─169802 /etc/alternatives/java -Djava.awt.headless=true -DJENKINS_HOME=/var/lib/jenkins -jar /usr/lib/jenkins/j>
Open ports on the firewall. Don’t forget also to open up the ports of the appropriate OCI Virtual Connection Network (VCN).
sudo firewall-cmd –permanent –new-service=jenkins
sudo firewall-cmd –permanent –service=jenkins –set-short=”Jenkins ports”
sudo firewall-cmd –permanent –set-description=”Jenkins port exceptions”
sudo firewall-cmd –permanent –add-port=8080/tcp
sudo firewall-cmd –permanent –add-service=jenkins
sudo firewall-cmd –zone=public –add-service=http –permanent
sudo firewall-cmd –reload
Try to access Jenkins — <ip / host>/8080
You should see this message:
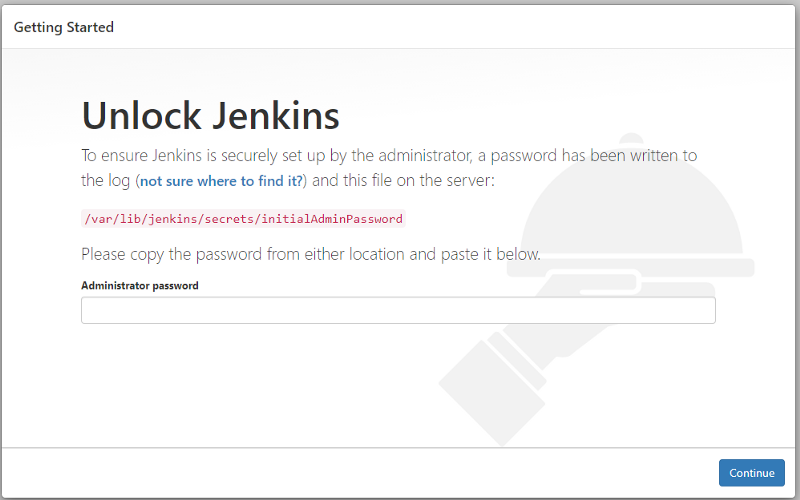
Copy the password:
sudo cat /var/lib/jenkins/secrets/initialAdminPassword
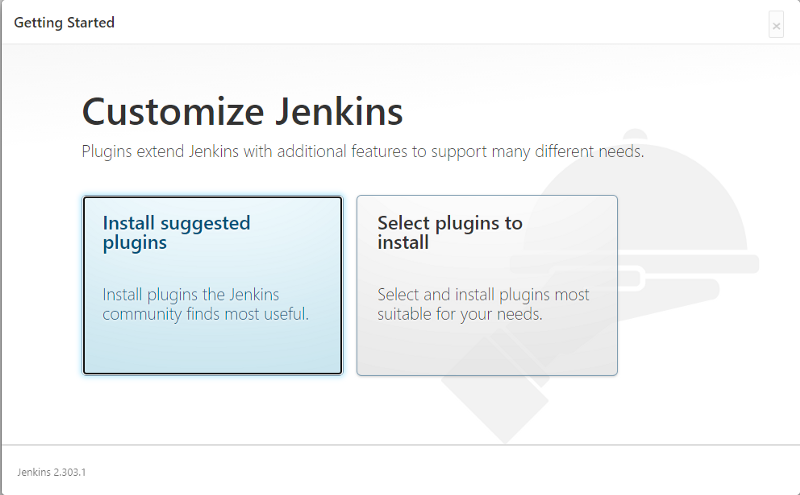
Choose “Install Suggested Plugins”:
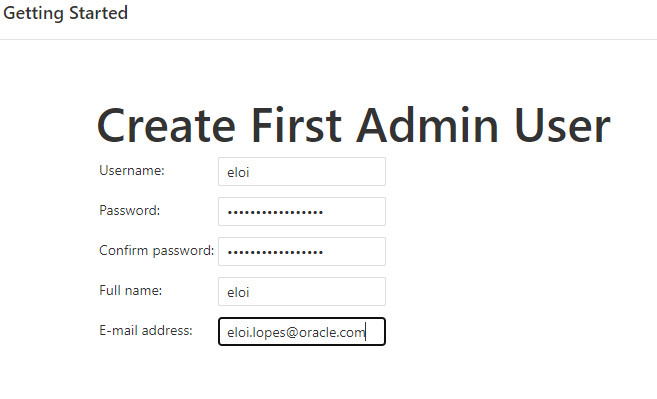
Create the Admin user and then Save and Finish:
Getting started with Jenkins
To get things done automatically, we need to install Ansible plugin for Jenkins, configure credentials for GitHub (for private repositories), and the required credentials to access Ansible from Jenkins.
Why do we need a plugin and two credentials? Because we will create a Pipeline on Jenkins that will orchestrate the deployments using the code on GitHub and then run it on Ansible.
Let’s start by installing the plugin.
Installing Ansible Plugin
Go to Manage Jenkins and then Manage Plugins. Click on Available and search for Ansible:
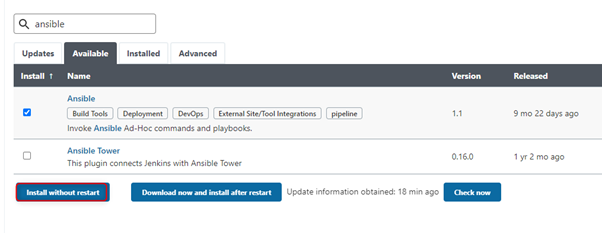
Select the first option and “Install without restart”.
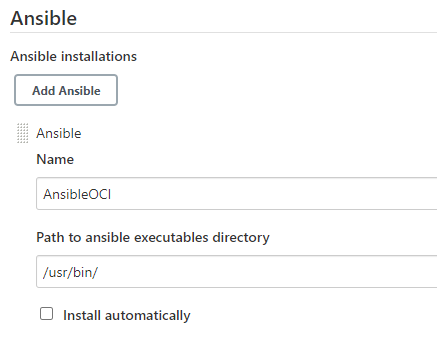
Now we need to configure the Ansible plugin. Go to Manage Jenkins and then Global Tool Configuration:

Scroll down and click Add Ansible. You can find the Ansible path using the command “which ansible” from the command on your Linux instance. Click Save.
Configuring GitHub on Jenkins (Optional — only for private repositories)
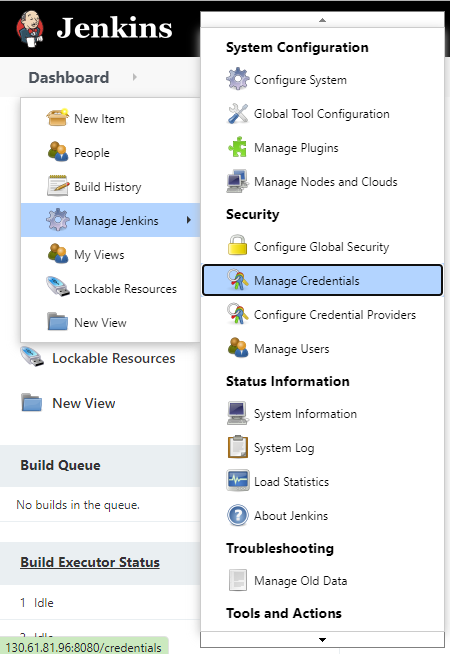
Click on Dashboard and then Manage Credentials:
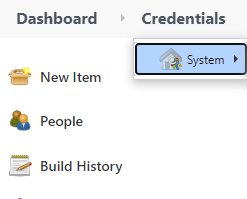
And then System:
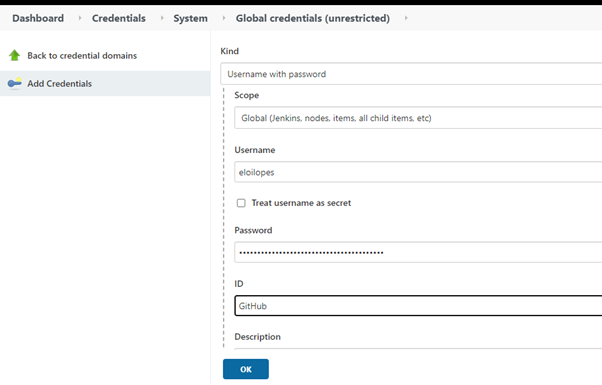
Click on “Global credentials (unrestricted)”, and on the left side, you should see “Add Credentials”. Click on it.
Please fill out the fields with your GitHub credentials (username and token):
Creating credentials for Ansible
Click again on “Add credentials” and then choose “SSH Username with Private Key”. For Private Key, select Enter directly and paste your SSH private key from your Ansible instance:

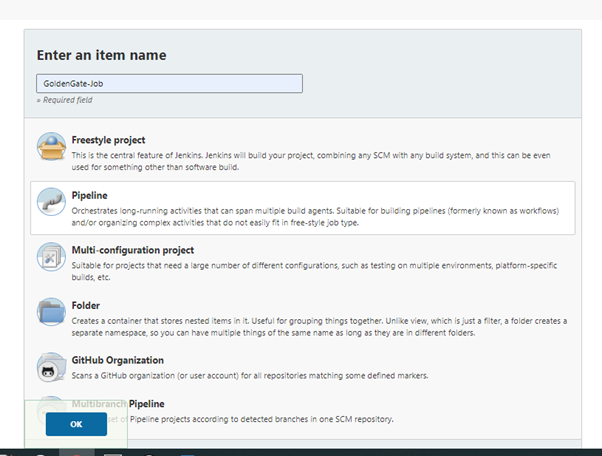
Creating Jenkins Pipeline
Click on New Item, give a name to your pipeline, choose Pipeline and click OK:
pipeline{
agent any
stages{
stage(‘Call GitHub’){
steps{
git branch: ‘Ansible’, credentialsId: ‘github’, url: ‘https://github.com/eloilopes/GoldenGateExamples’
}
}
stage(‘Execute Ansible’){
steps{
ansiblePlaybook credentialsId: ‘<the credential ID for Ansible>’, disableHostKeyChecking: true, installation: ‘<The name of Anisble installation we defined in the plugin>AnsibleOCI’, playbook: ‘OCI_GG_RESET_DEVELOPMENT.yml’
}
}
}
Click Save.
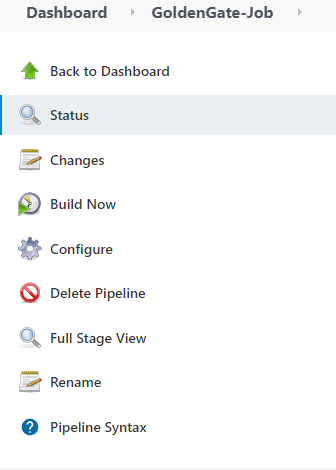
Now, click on “Build now” to deploy your pipeline.
If everything goes well, you should see this:
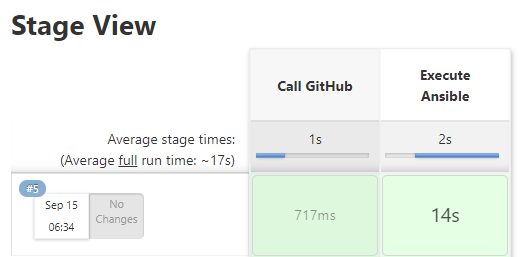
Now check your OCI GoldenGate Deployment. You should see that all processes have been created.