Welcome back! We recently announced the pipeline functionality in Oracle Cloud Infrastructure (OCI) Data Integration. Today, we’re learning about the pipelines feature in OCI Data Integration.
A pipeline is a set of tasks connected in a sequence or in parallel to facilitate data processing. It manages and orchestrates the execution of a set of related tasks and processes. The pipeline functionality in Oracle Cloud Infrastructure (OCI) Data Integration helps write complex data pipelines using published tasks from any application, you can add data loader, integration or SQL tasks. You can create pipelines quickly using a designer similar to the Data Flow designer. You don’t need to worry about setting up the underlying infrastructure because OCI Data Integration is fully managed, serverless, cloud-based service.
Today, we will show how to create our first data pipeline on OCI Data Integration with a simple use case.
Use case
Let’s use a simple, common scenario where customer data is in JSON format and the revenue information is maintained by the departments in csv and excel files. We want to load data from multiple sources in parallel, apply transformations on it, and join revenue information with the customer information so that the downstream applications can analyze this information. At a high level, building the pipeline involves the following steps:
- Load customer and revenue data in parallel.
- On successful completion of the preceding steps, perform some transformations.
- Save the output.
Pipeline functionality
OCI Data Integration’s pipeline functionality is an intuitive, no-code cloud-based data integration tool that helps data engineers and ETL developers deploy data pipelines in no time. Developers can drag and drop operators on the canvas and connect them to design their flow. They can configure properties for each of the operators using the Properties panel. A pipeline is a collection of published tasks and activities. You have the following operators available:
- Data loader task operator helps load data from a source to a target
- Integration task operator enables you to run data integration tasks in a pipeline
- SQL task operator for running SQL stored procedures
- Pipeline task operator enables you to run a pipeline task from another pipeline
- Merge operator waits for preceding parallel tasks to complete and then proceeds with the execution of the pipeline, based on the merge condition, including all success, all failed, all completed, at least one succeeded, and at least one failed
- Expression operator enables you to created derived fields in a pipeline
Before we dive into making our first pipeline, let’s familiarize ourselves with pipelines. In your workspace, go to Projects and select the project where you want to create your first pipeline. In the Details section, click Pipelines. To create a pipeline, click Create Pipeline, as shown in the following image:
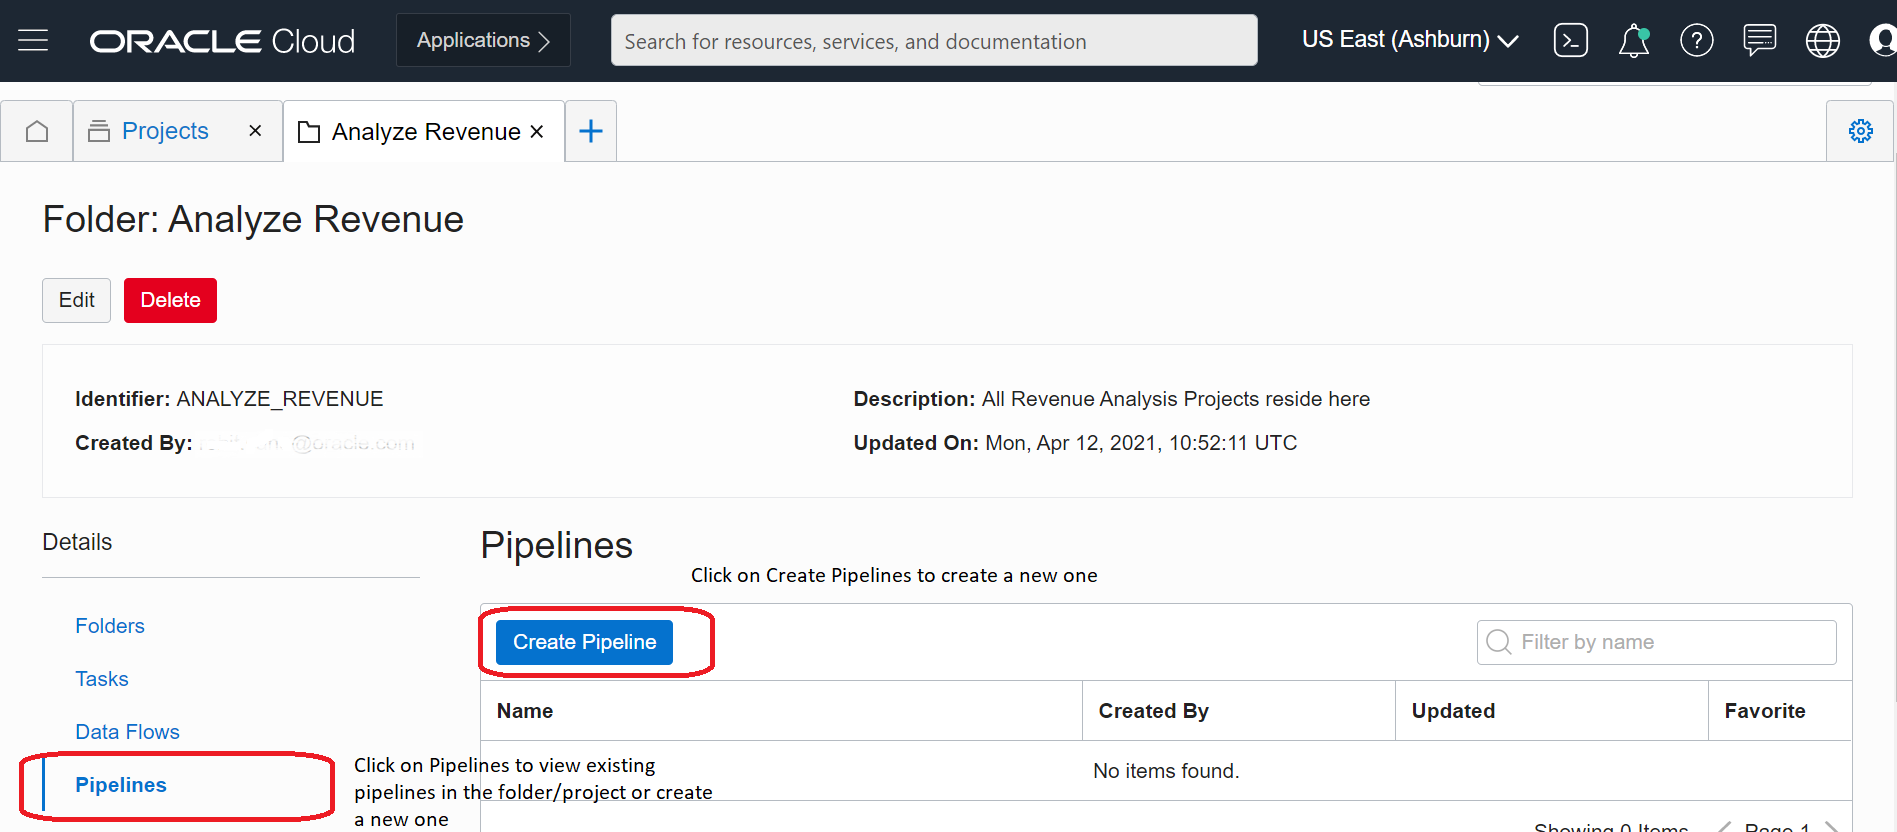
Figure 1: Create pipeline
The following image shows the Create Pipeline layout, which has the following key elements:
- Canvas: Where you drag and drop operators. It comes prepopulated with the Start and End operators
- Operators panel: Houses operators, such as Data Integration, Data Loader, SQL, Expression, and Merge operators
- Properties panel: Where you can change the properties by selecting an operator on the panel and browsing through the tabs in the panel

Figure 2: Pipeline designer
Best practices suggest that you keep all related artifacts in a folder. In this example, I keep all tasks and related items in a folder named “Analyze Revenue.” After you click Create Pipeline, click anywhere on the canvas, go to the properties panel, and name the pipeline “Revenue Analysis.”

Figure 3: Pipeline details
Let’s now dive into the main use case.
Load data
The first step is to load data from the source system. We use the data loader task. For more details on how to create a data loader task, visit our previous blog, Data Loader Task in Oracle Cloud Infrastructure (OCI) Data Integration.
We’ve created two data loader tasks to load from the source systems in to the Data Warehouse. Publish them to an application. The following screenshot shows data loader tasks for ingesting source data:
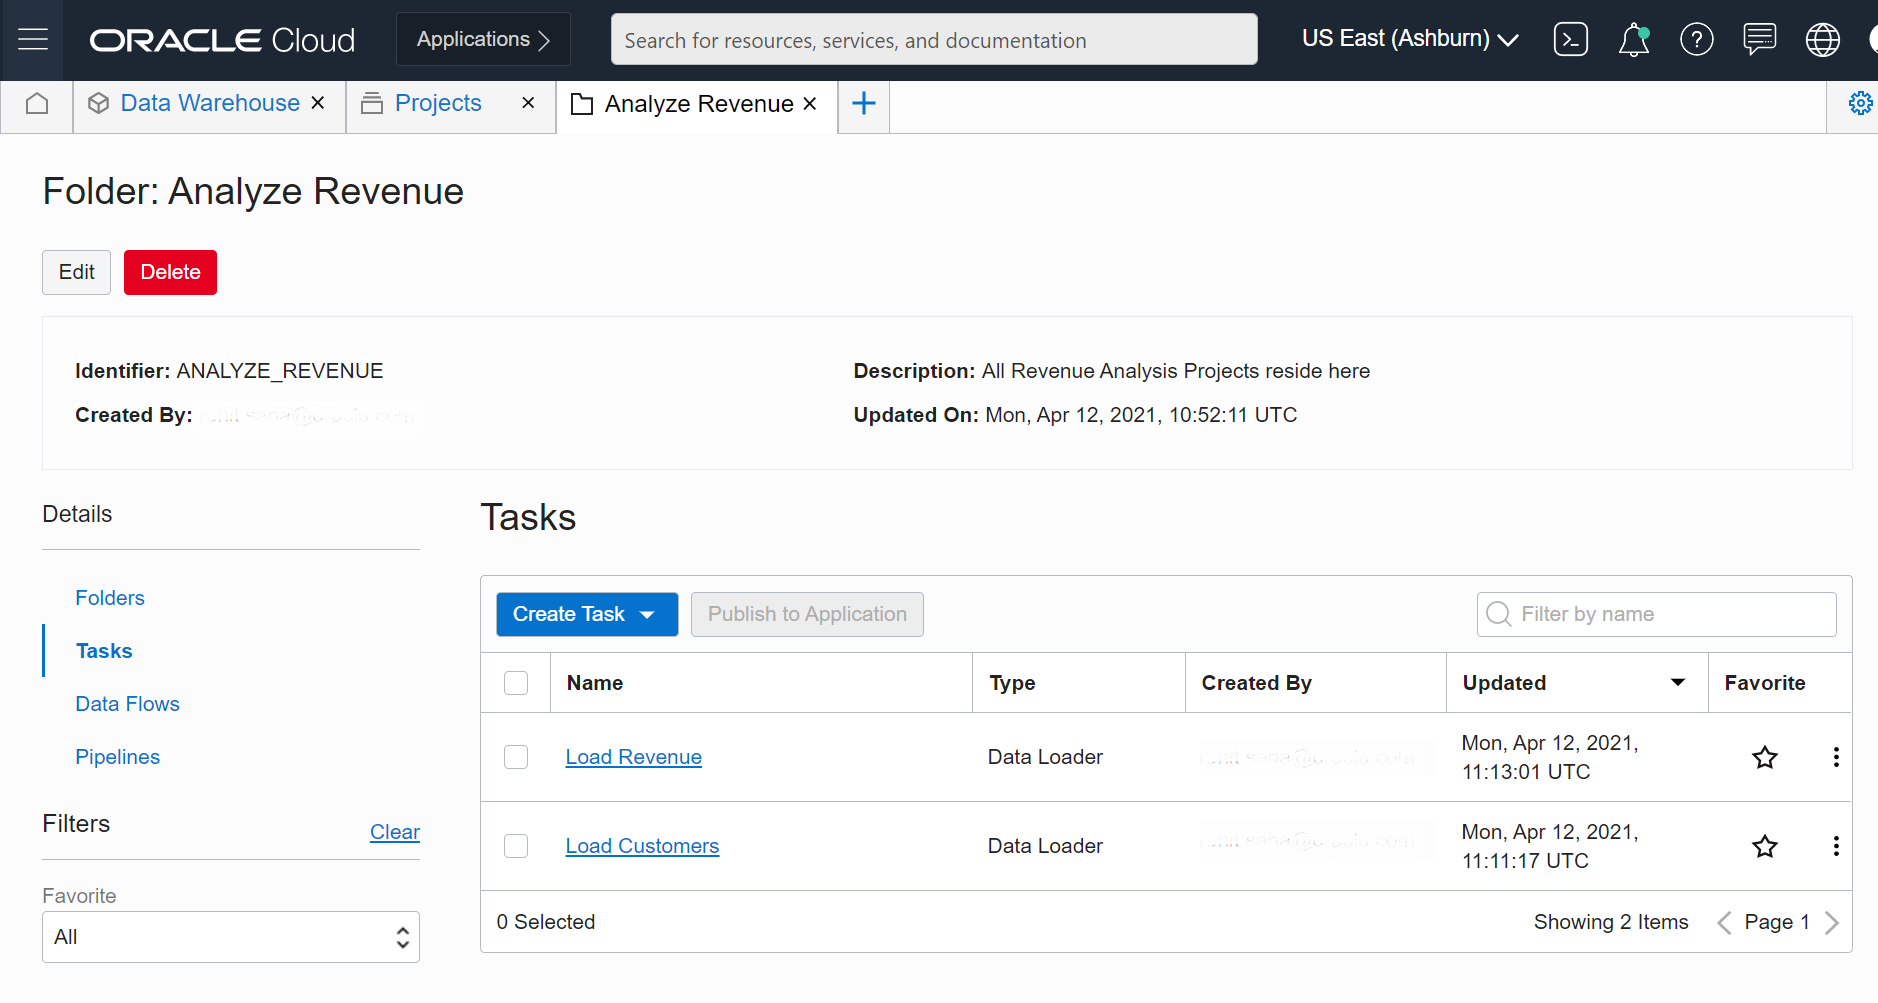
Figure 4: Published data loader tasks
Now that we have the data loader tasks published, we can create our pipeline. We wanted to load the two data sources in parallel, so we need two data loader tasks in our pipeline. Let’s drag and drop two data loader operators and name them “customer” and “revenue.”
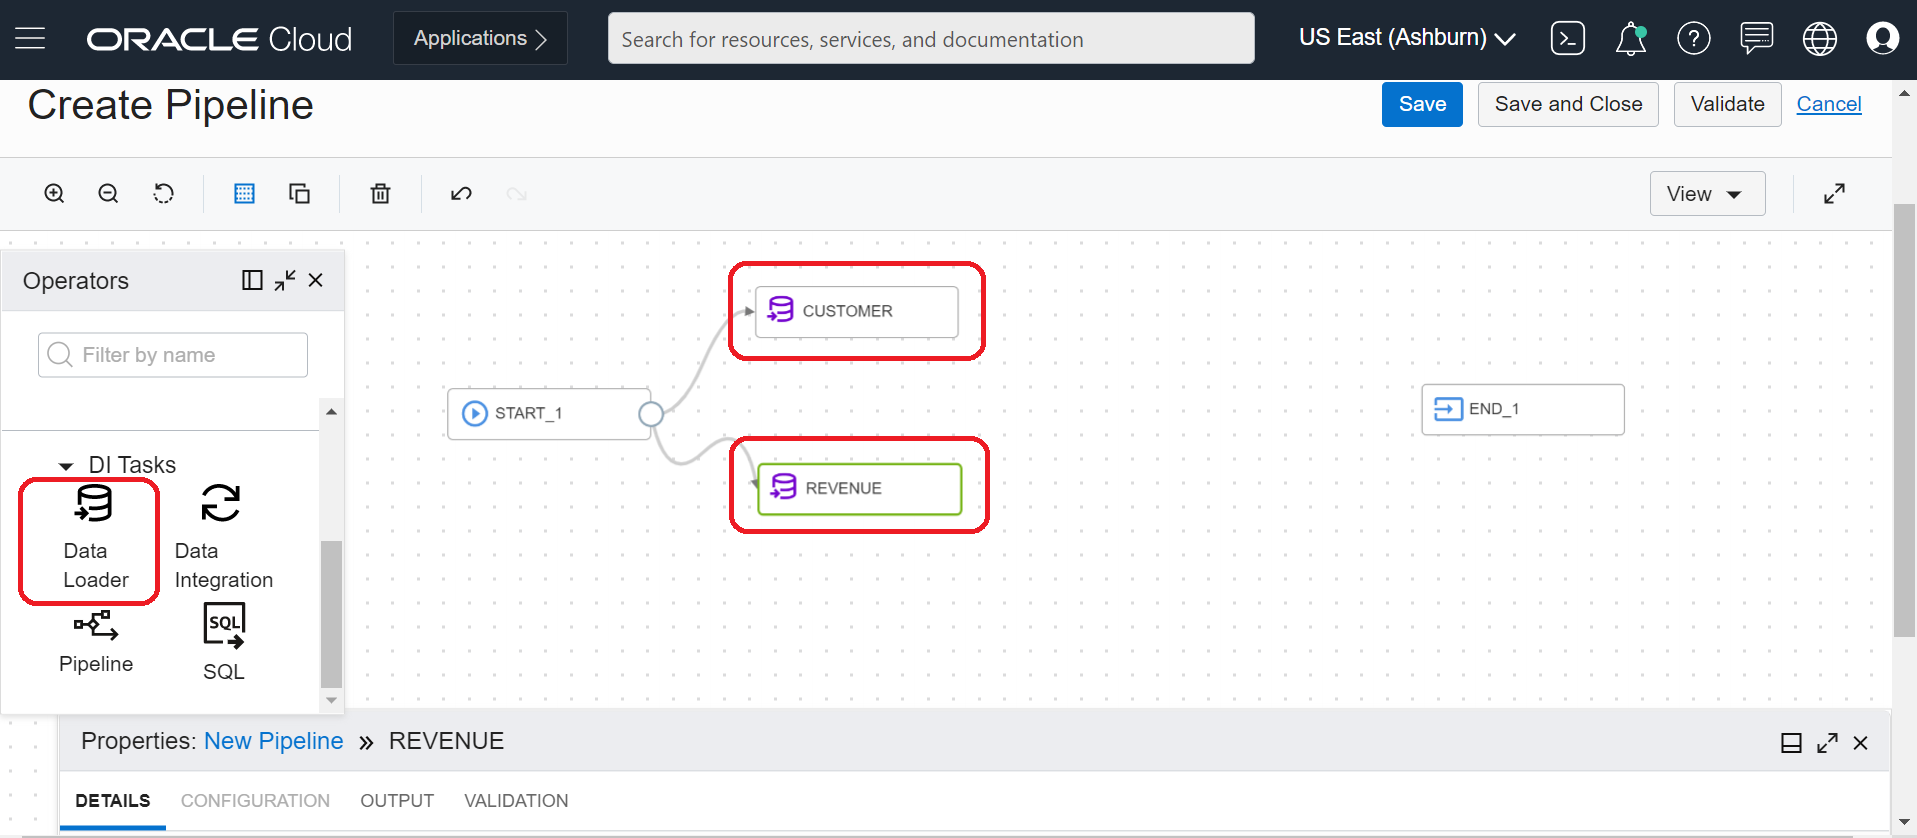
Figure 5: Add data loader task operators
Select the customer data loader task is selected. Now let’s configure it to point to the load customer:

Figure 6: Configure data loader tasks
Clicking the highlighted Select button opens a snap in window. Select the compartment, workspace, and application where the data loader tasks were published. The list of published tasks shows up in the table. Select Load Customers and apply the changes.

Figure 7: Select data loader tasks
Similarly configure the revenue data loader task operator to point to the load revenue.
The two data loader tasks will run in parallel. Drag and drop the merge operator from the Operators panel to the canvas and connect it to the data loader tasks:

Figure 8: Add merge operator
Select the merge operator on the canvas. Go to the Properties panel and specify the merge condition as “All Success.”

Figure 9: Configure merge operator
Now, we’re ready to apply transformations.
Apply transformations and save
The integration task enables us to run data flows. We already created a data flow that reads from the Data Warehouse, applies a filter to only select revenue details for US customers, joins them to their customer details by applying a join on CUST_ID, and then saves it to the target table. Then we create an integration task to use in our pipeline. Ensure that you publish the task to an application. To learn how to create an Integration task, see our previous blog, Integration tasks in Oracle Cloud Infrastructure (OCI) Data Integration.
In our pipeline, drag and drop the integration task operator:
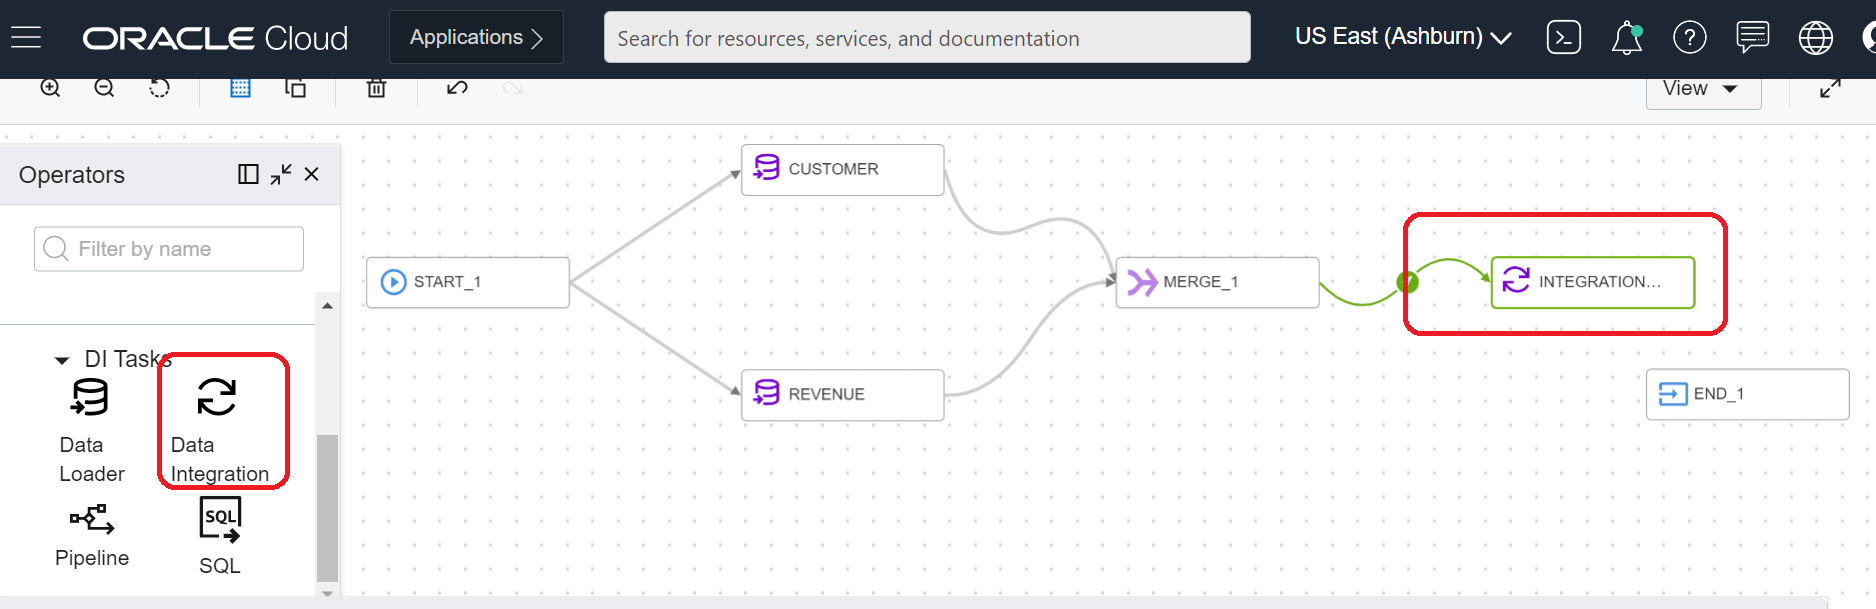
Figure 10: Add integration task operator
Click the integration task operator on the canvas, go to the Properties panel, and click the Select button next to the integration task.
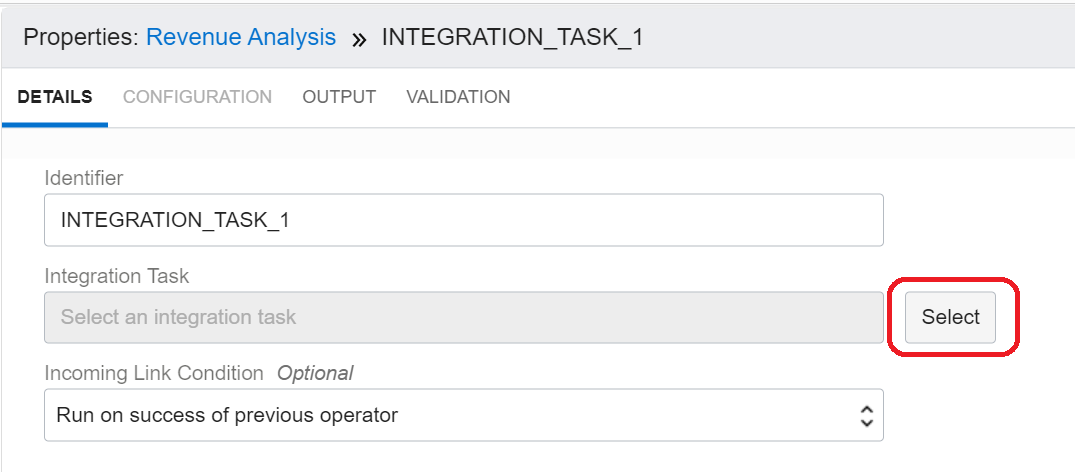
Figure 11: Configure integration task
Select the intended integration task and connect it to the end operator.
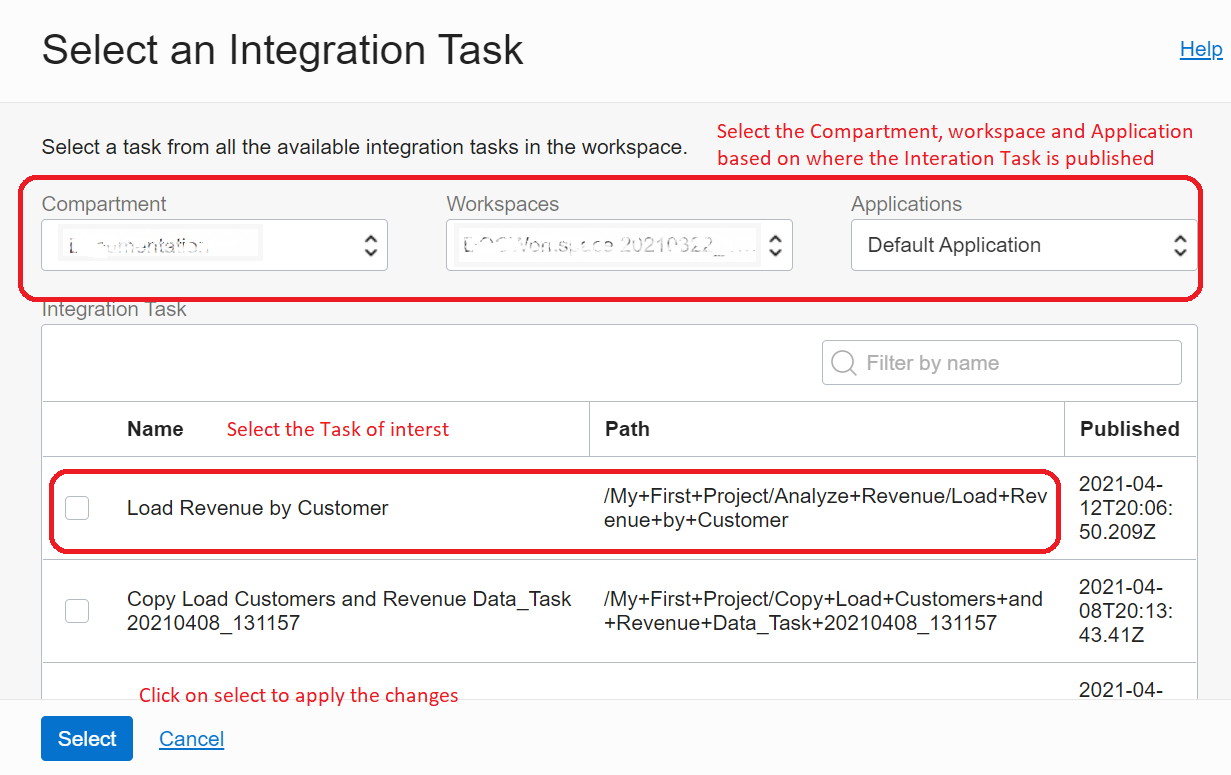
Figure 12: Select integration task
Our first data pipeline is ready! We advise that you validate the pipeline using the Validate button in the top-right corner of the canvas.
Create a pipeline task
We need to create the pipeline as a task and publish it to an application so that it can run. Go to Tasks, click Create Task, and click Select Pipeline.

Figure 13: Create pipeline task
The window for Create Pipeline Task opens. Provide a name and description, and select the newly created pipeline by clicking the Select button in the pipeline block.

Figure 14: Define pipeline task
In the Select Pipeline window that opens, select the newly created pipeline and save the changes.

Figure 15: Select pipeline
When you create the task, it shows up in the Tasks tab. Click the three dots to open the menu, as shown in the following screenshot. Select Publish to Application and choose your application.

Figure 16: Publish pipeline task to application
Run and monitor
Browse to the application. In this example, I published the task to the default application. My new pipeline task shows in the Tasks tab in Default Application.

Figure 17: Run pipeline task
When you click Run, you can browse to the Runs tab in Details to monitor the progress of the run.

Figure 18: Monitor pipeline task run
Conclusion
The pipeline functionality helps you orchestrate tasks for loading data, data integration, and executing a SQL procedure. In the above example, the user was able to leverage pipeline functionality to automate the multi-step process of revenue analysis. The process involved loading customer and revenue data from Data Lake and applying transformations and saving it in desired target location. Without pipelines, the user would have to manually start each of the data loader tasks, monitor them for completion, initiate the integration task, watch for completion and handle any/all error conditions. Pipelines allows users to build the dependency graph, sequential/parallel steps and automate the entire workload that consists of interdependent tasks.
We hope that this blog helps as you learn more about Oracle Cloud Infrastructure Data Integration. For more information, check out the tutorials and documentation. Remember to check out all the blogs on OCI Data Integration!