Oracle Cloud Infrastructure (OCI) GoldenGate is a fully managed, native cloud service that moves data in real-time, at scale. On top of core GoldenGate for Big Data capabilities, it brings additional advantages of a fully managed service like auto-scaling, flexible/ data throughput-based licensing, improved user experience.
You can use OCI GoldenGate for running initial data load and real-time data replication into Snowflake. In this blog, we will cover the required settings for configuring an OCI GoldenGate Snowflake Replication targeting Snowflake running with private endpoints. If interested, you can refer to below resources about OCI GoldenGate and Snowflake:
- Replicat Data from PostgreSQL to Snowflake – Quick Start
- Using OCI GoldenGate for Snowflake Initial Load and Real-time Data Sync
- American Airlines Customer Case
- OCI GoldenGate Documentation
OCI GoldenGate supports both internal staging and external staging. This blog post covers the steps for OCI GoldenGate Snowflake with Internal Staging replication.
Prerequisites:
Please note that, you may need to work with your networking and Snowflake teams to complete the following prerequisites.
- Replicating into Snowflake Private Endpoints with OCI GoldenGate requires IPSec VPN or interconnect between OCI and target cloud service provider. Please make sure that connectivity is succesful before moving into next steps.
- After IPSec VPN/ interconnect is in place, please configure Snowflake Private Endpoints and DNS settings in target cloud service provider. While configuring DNS settings, please make sure that you create records for both privatelink-account-url (<account_name>.<region>.privatelink.snowflakecomputing.com) and privatelink-ocsp-url (ocsp.<account_name>.<region>.privatelink.snowflakecomputing.com)
For configuring Snowflake Private Endpoints, you can refer to following Snowflake documents: - After configuring DNS settings in target cloud service provider, configure DNS settings in OCI. In OCI, you can configure the DNS records in Networking/ DNS Management/ Private Views. Please make sure that you use the Private View named with your VCN name which is connected to target 3rd party cloud. While configuring DNS settings, please make sure that you create records for both privatelink-account-url (<account_name>.<region>.privatelink.snowflakecomputing.com) and privatelink_ocsp-url (ocsp.<account_name>.<region>.privatelink.snowflakecomputing.com)
- In your Private View, create a Zone with the Zone Name as privatelink.snowflakecomputing.com
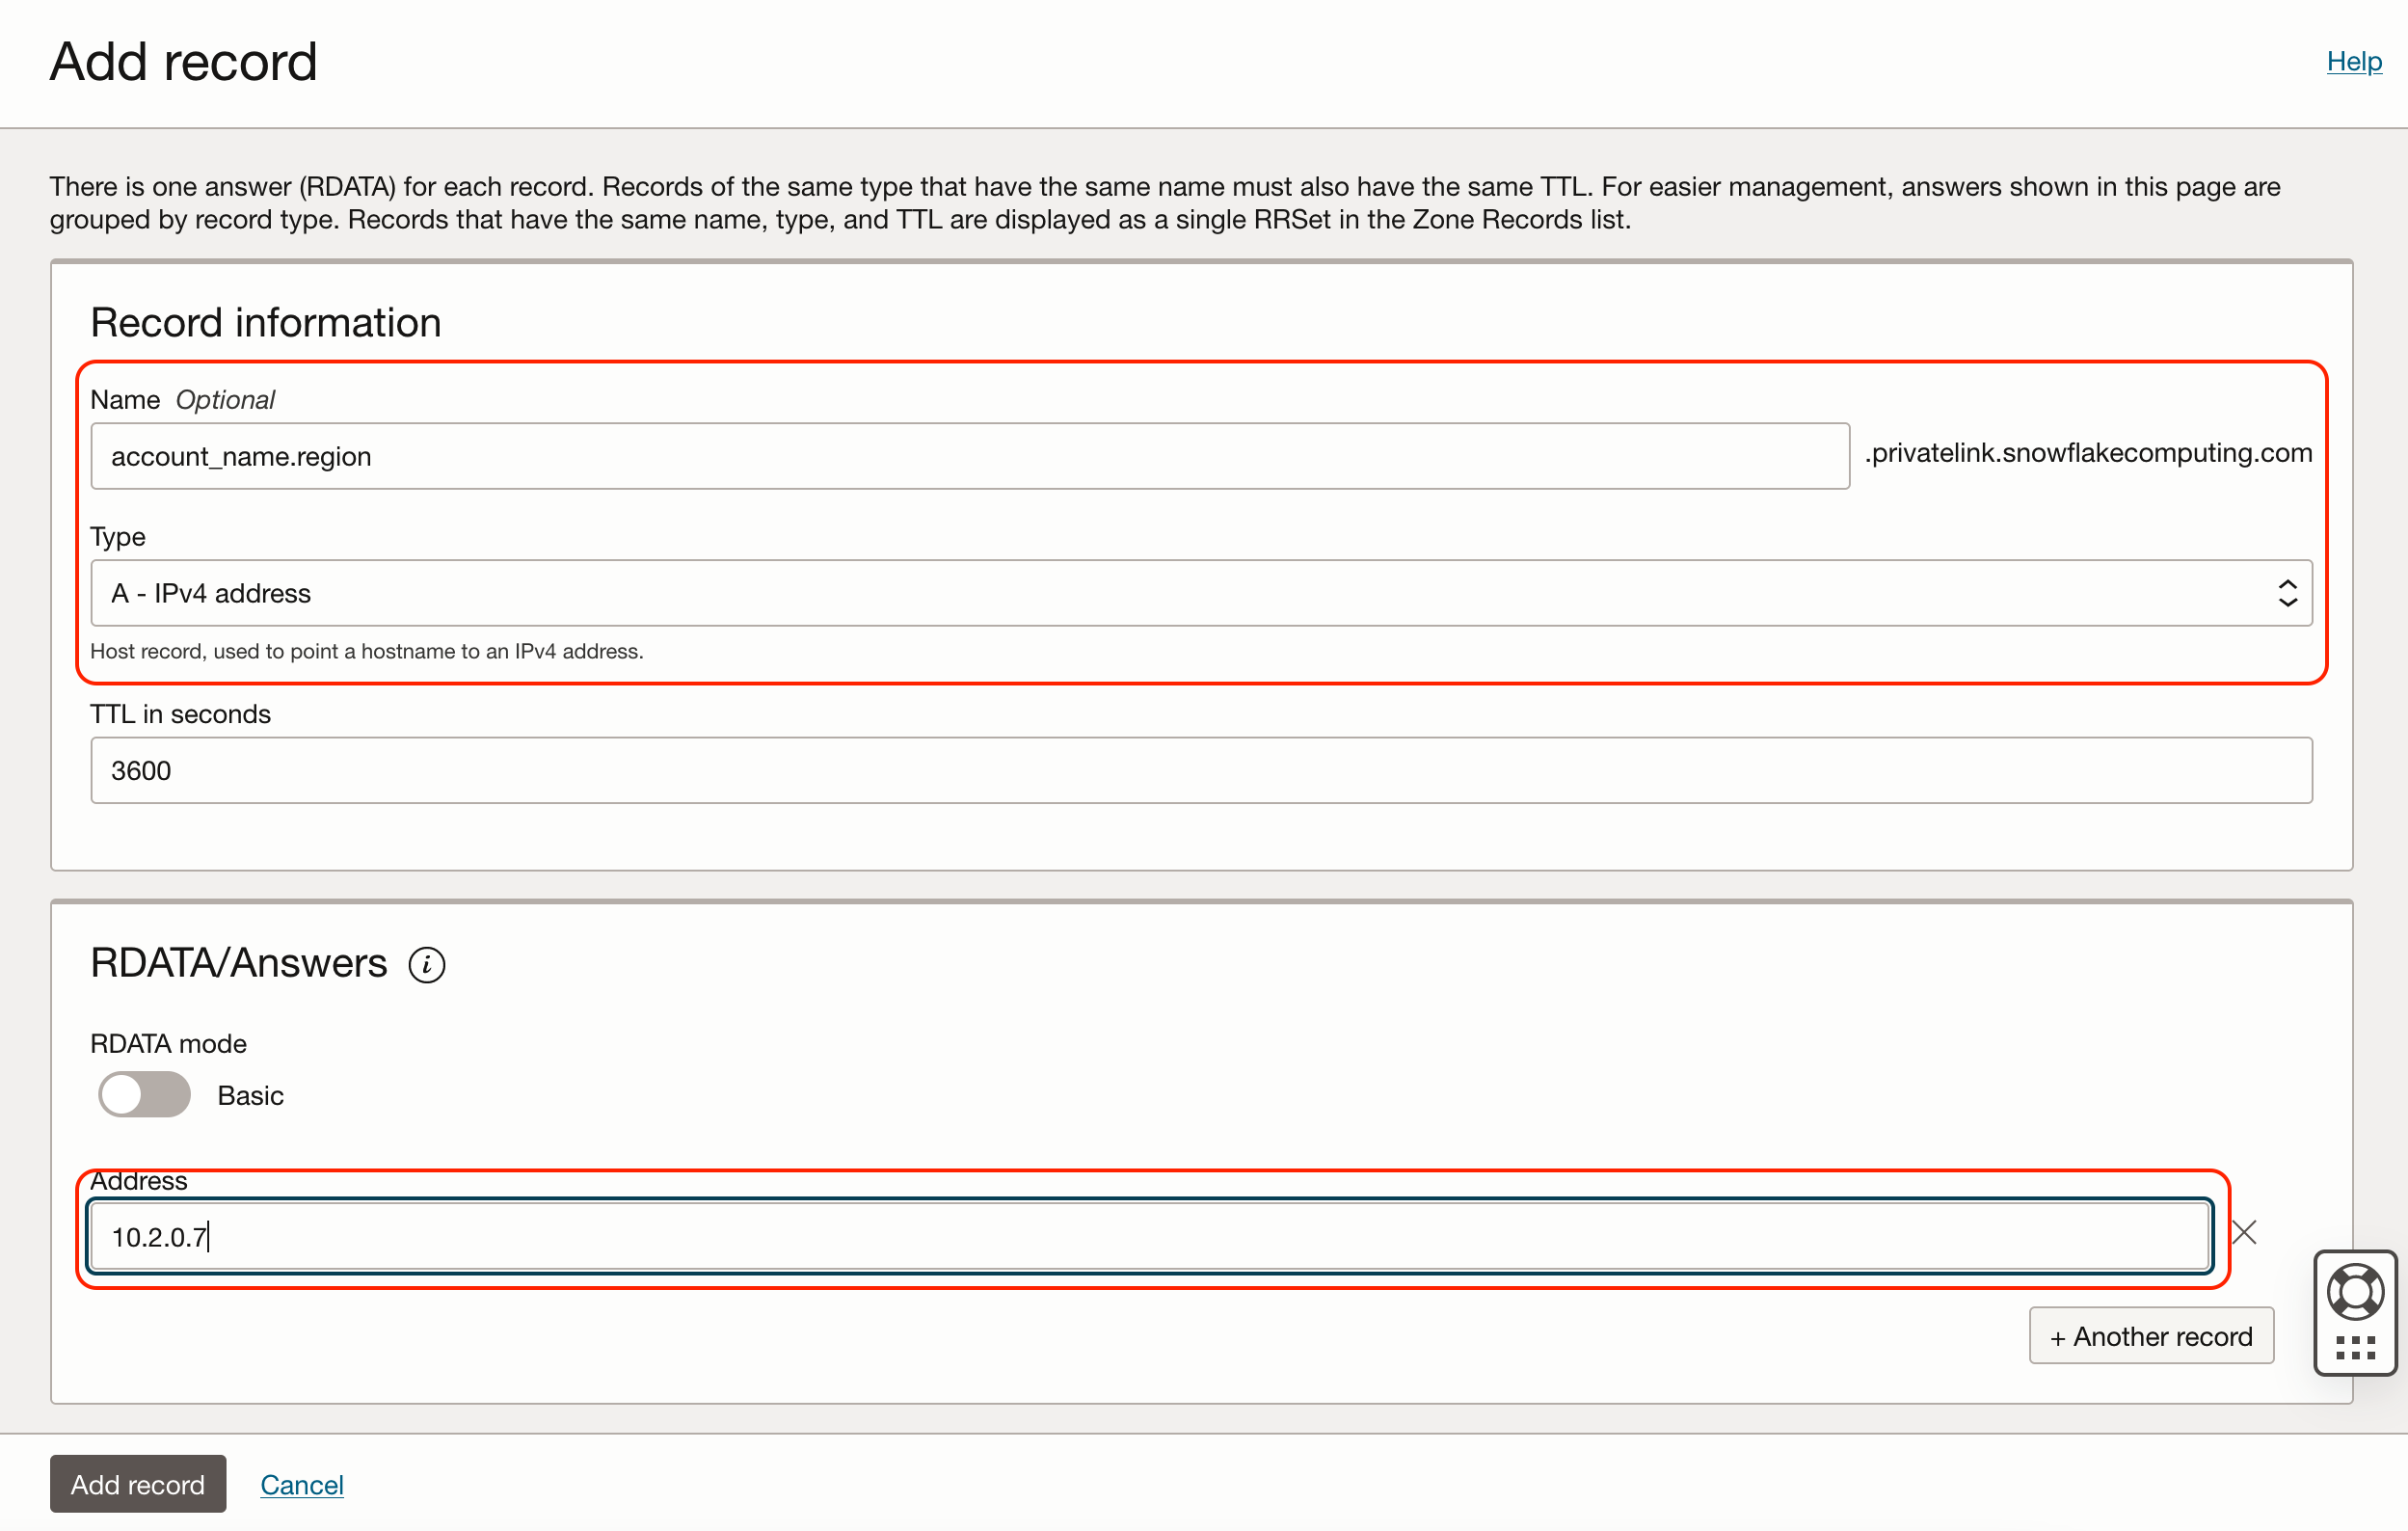
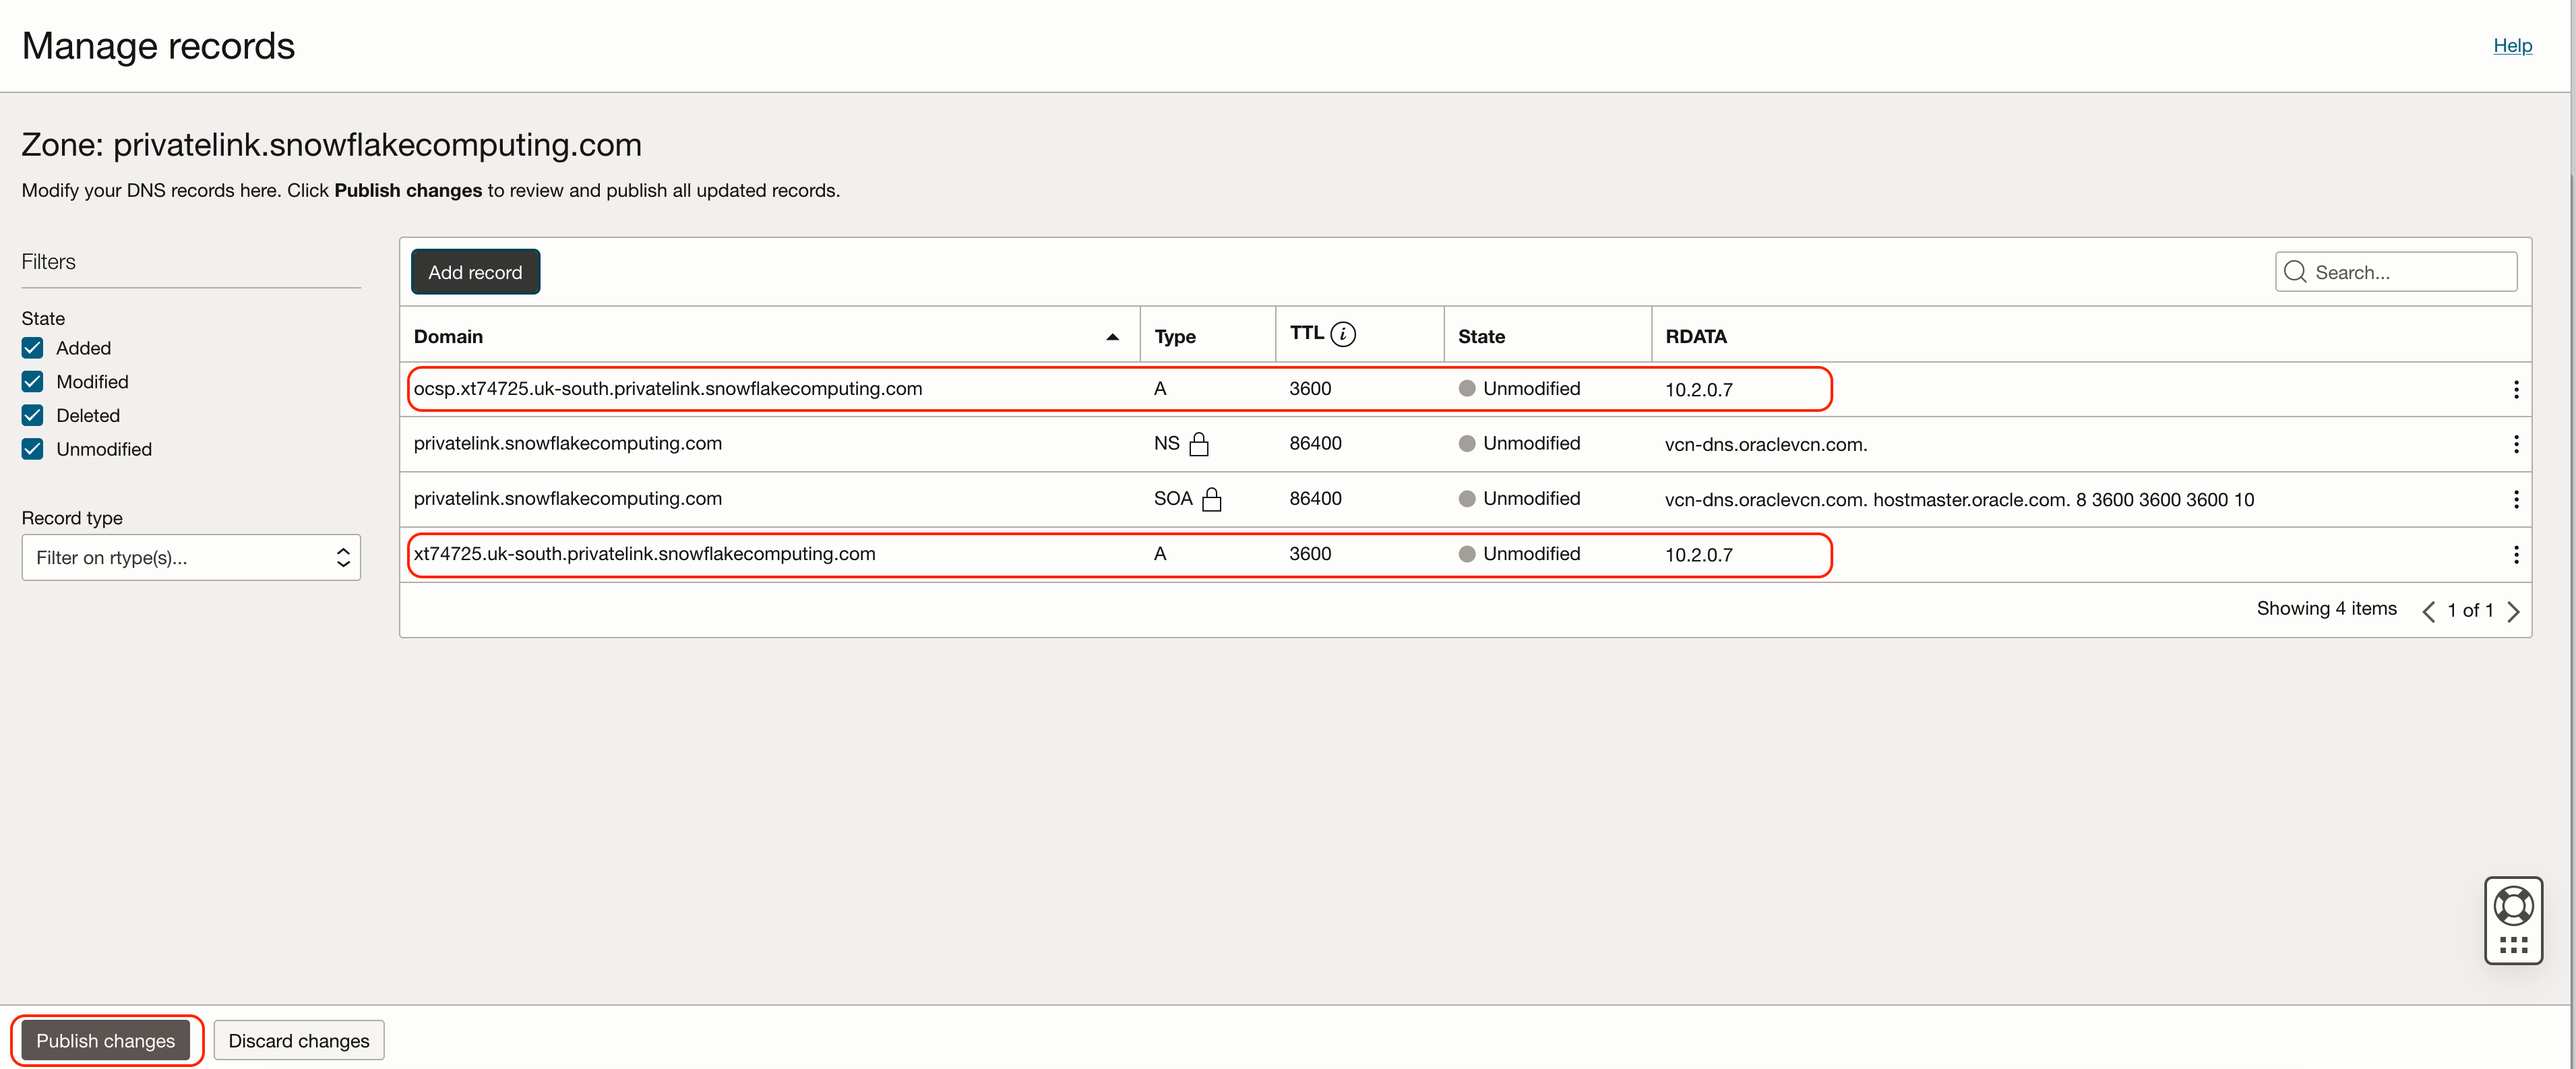
- Add two records to zone you created in the previous step.
Enter Name:
(1) For Snowflake account url: <account_name>.<region>
(2) For Snowflake OCSP url: ocsp.<account_name>
Type:
Select A – IPv4 address
Address
Provide PrivateIP generated by target cloud service provider Private Endpoint
- Click Add Record and Publish Changes
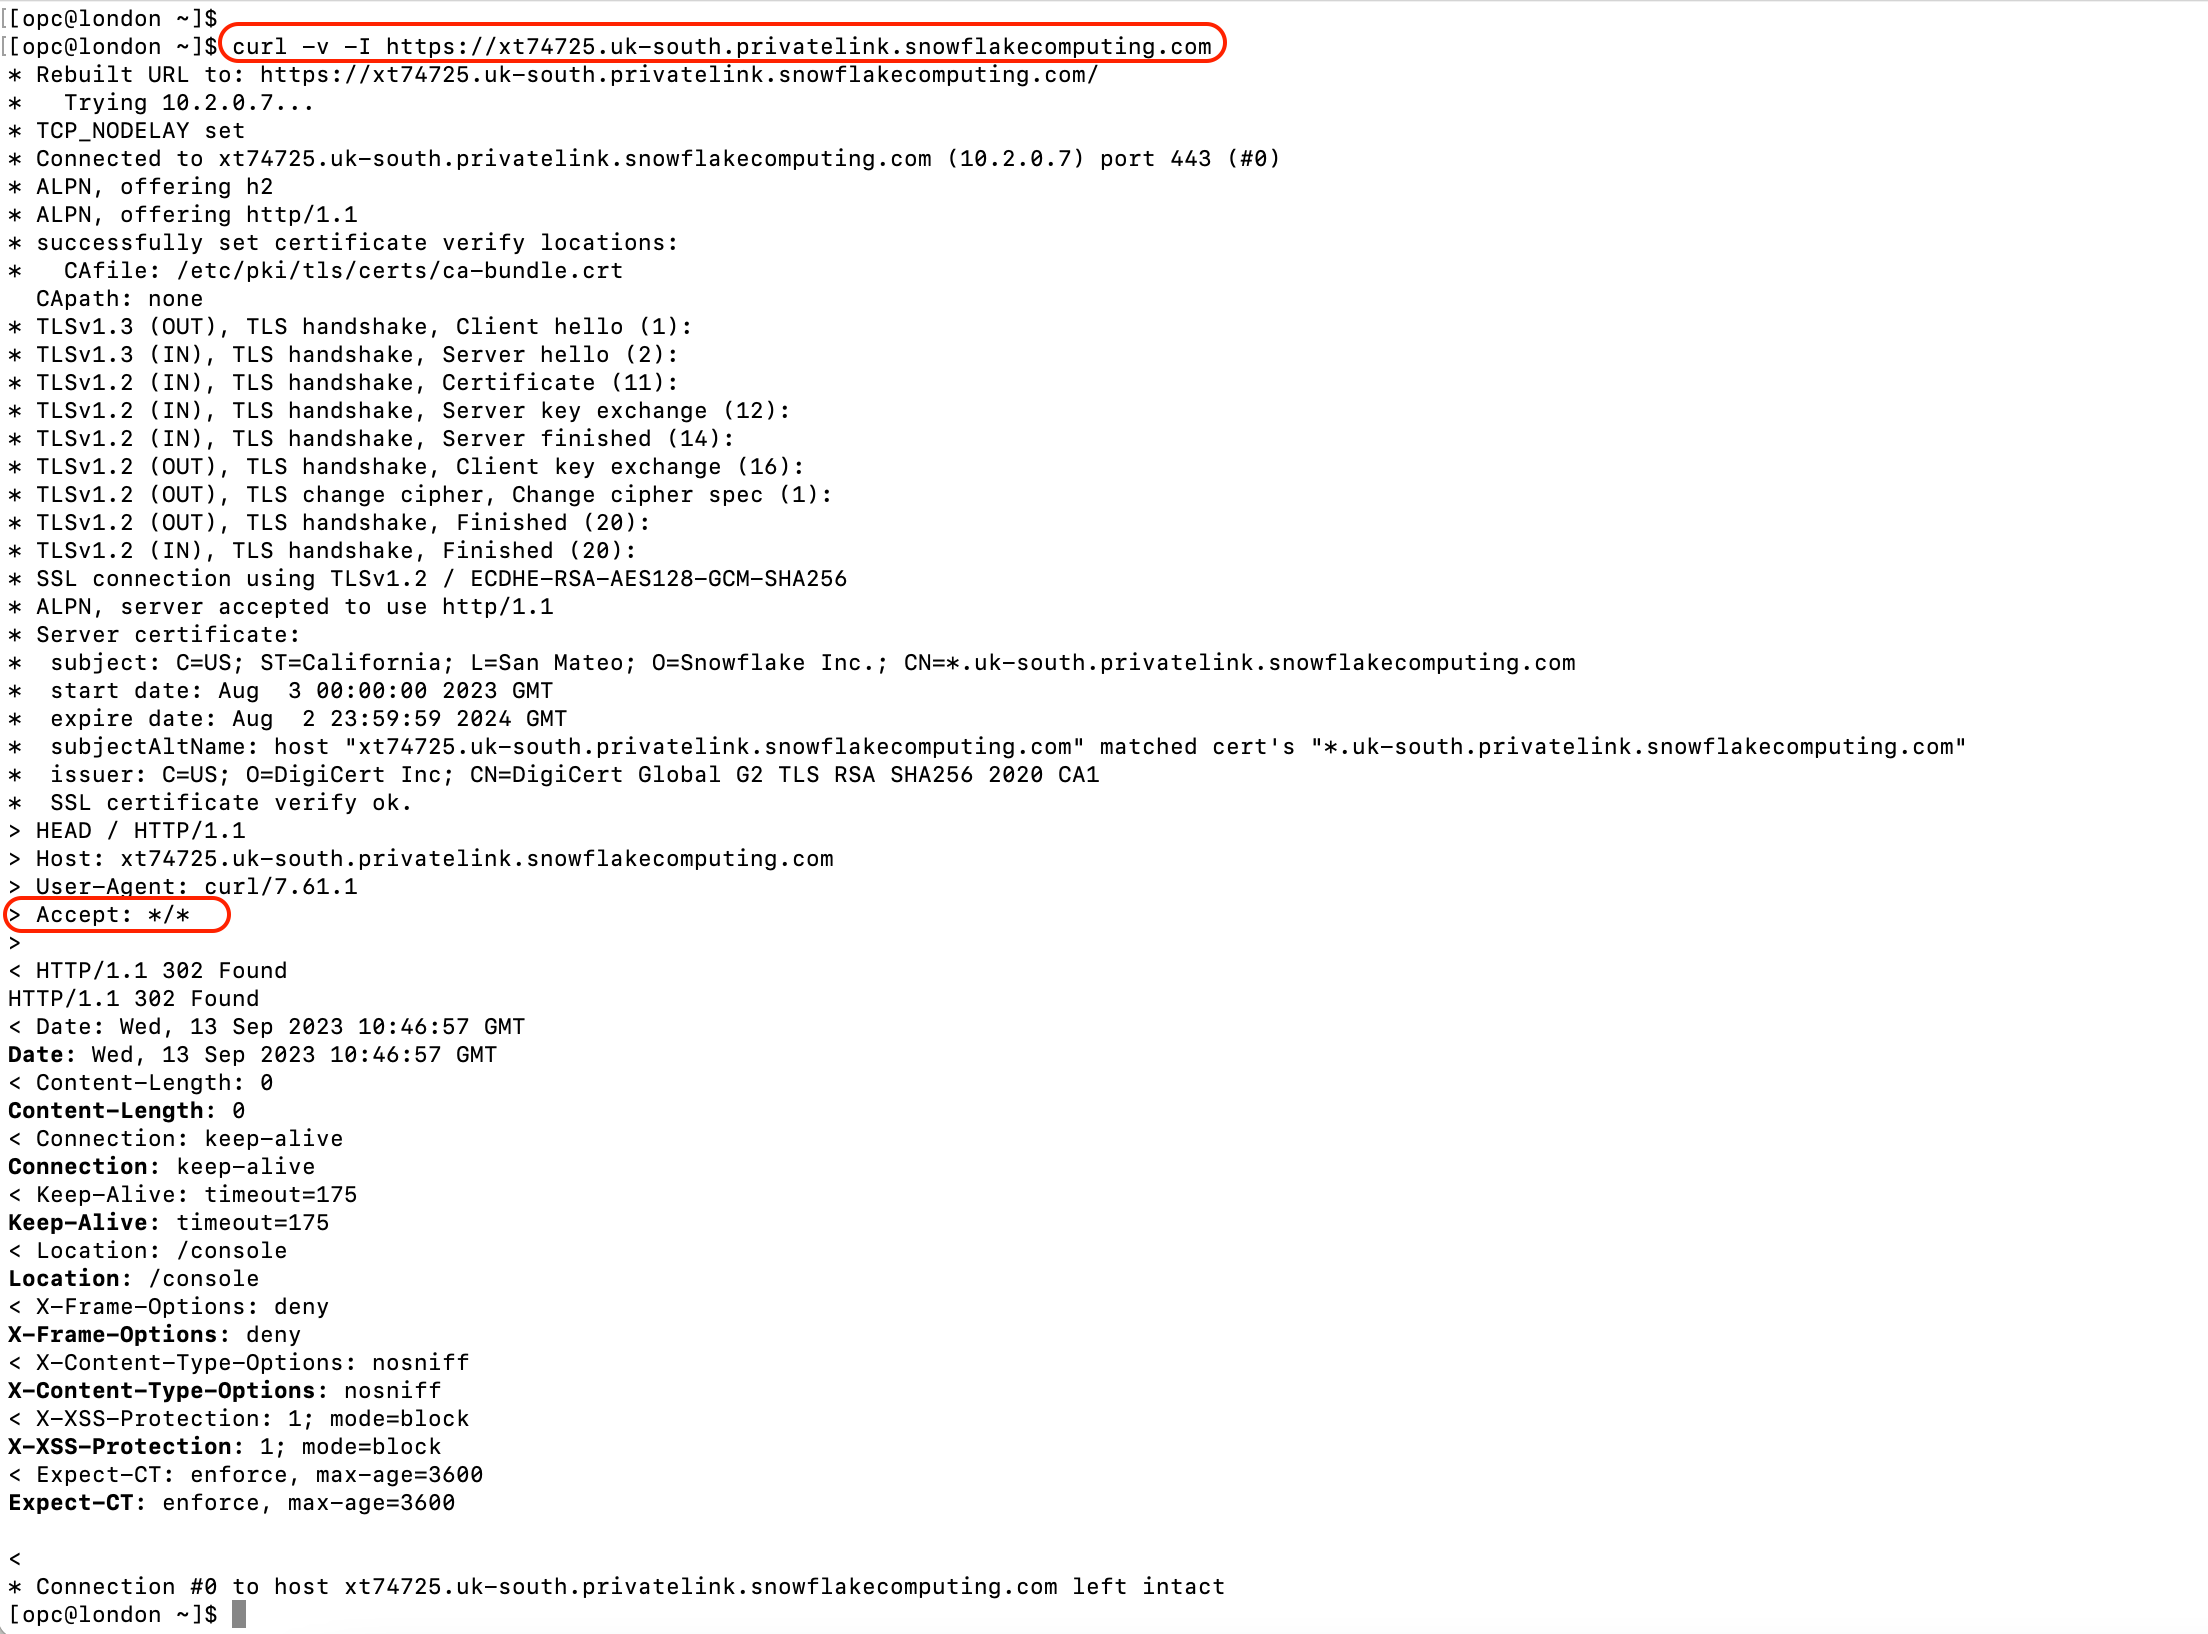
- After configuring the network and DNS records on both OCI and target cloud, you can test the connection from a compute VM running in OCI with the subnet which is connected to your target cloud. You can test with the following command. If successful, you should see ‘> Accept: */*’ in the HTTP response. If fails, please review your networking and DNS settings.
curl -v -I https:< your_privatelink_account_URL>
For example: curl -v -I https:<account_name>.<region>.privatelink.snowflakecomputing.com
Create a Snowflake Connection:
We need to create an OCI GoldenGate connection with Snowflake Type.
- Snowflake Connection:
For creating Snowflake connection, you can follow the steps in OCI GoldenGate Documentation.
Please make sure that you use Snowflake privatelink connection URL in Snowflake connection.
In Network Connectivity, select Dedicated endpoint and select the subnet that is used in IPSec VPN or interconnect between OCI and target cloud service provider.
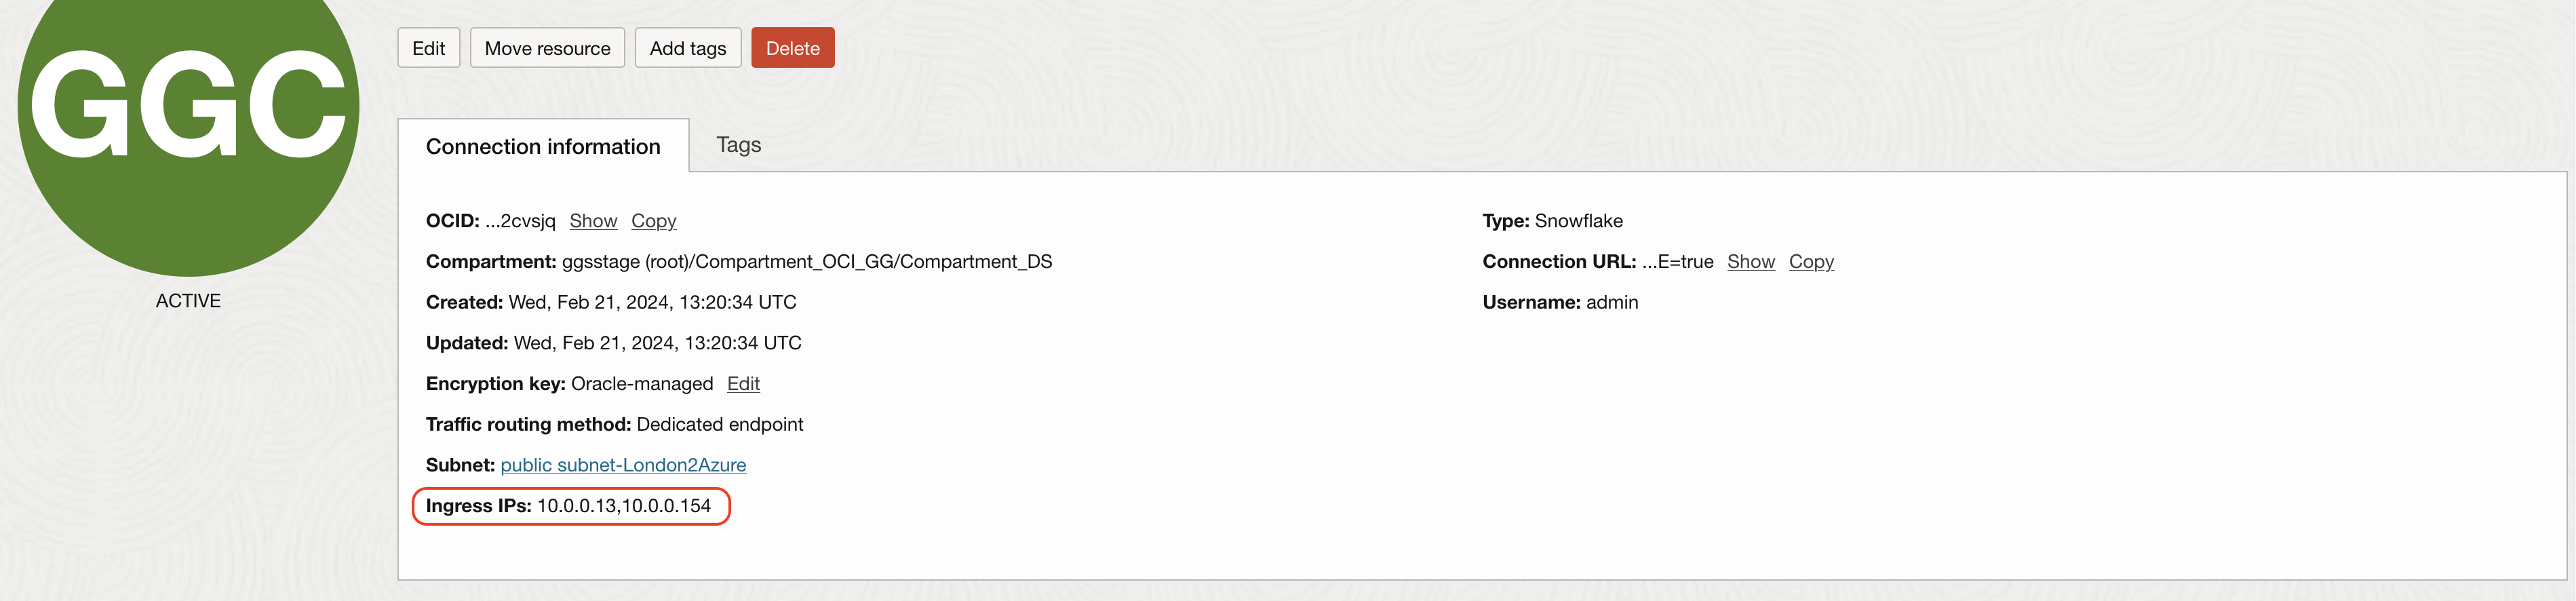
Once Snowflake connection is created, check Connection Details/ Connection Information/ Ingress IPs. Please make sure that these Ingress IPs are whitelisted in your VCN’s Security List/ Ingress Rules.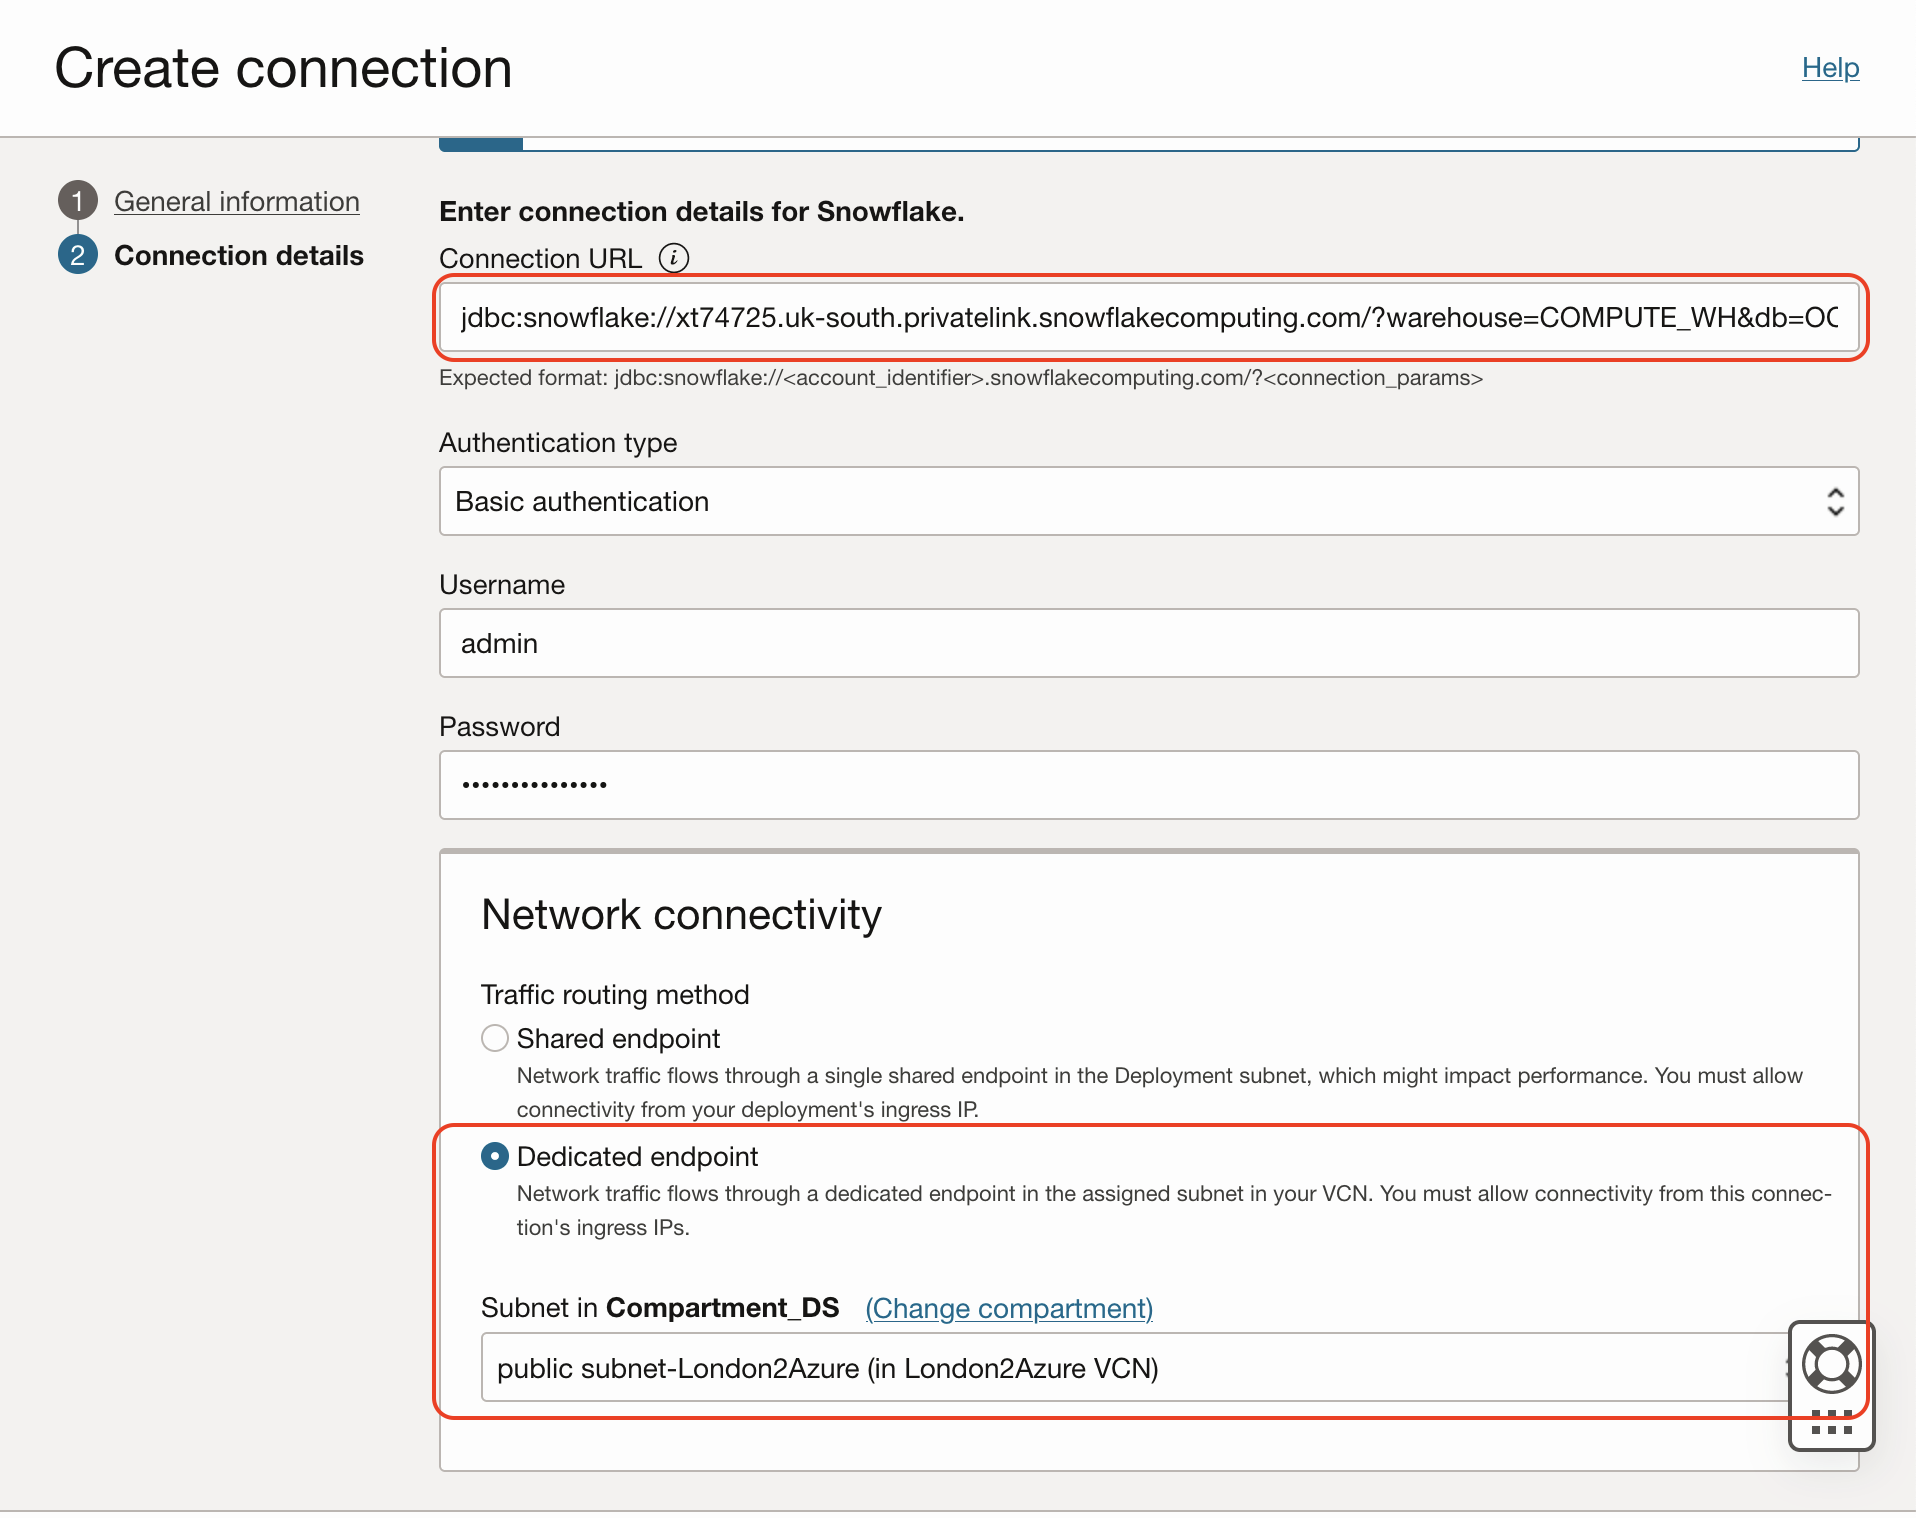
Note: Please make sure that Snowflake connection is assigned to the same OCI GoldenGate Big Data deployment.
3. Create the replicat:
After you create the Snowflake connection and assign to your deployment, you can configure the replicat. Before configuring the replicat, please make sure that target Snowflake tables are in place.
To create replicat:
- In OCI GoldenGate console, click Add Replicat.
- Select Classic Replicat
- Provide Replicat Details:
- Enter a Process Name
- For Trail Name, enter the name of the trail from extract
- For Target, select the target Snowflake connection from the dropdown
- Select an Alias from the Available Aliases dropdown
- Click Next
- On the Replicat Parameters page, add the necessary mappings, and then click Next
- On the Properties File page, review the properties and click Create and Run
- Click Action/ Details/ Statistics to review replicat statistics
For more details on OCI Snowflake Replicaails, you can refer to OCI GoldenGate Document.