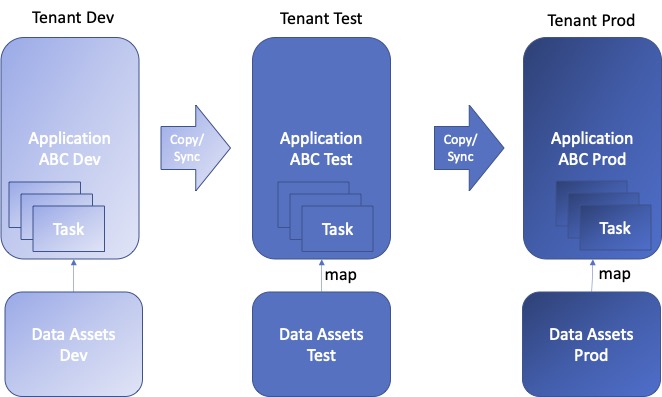
In this blog, I will illustrate how to use SDKs and script to manage the lifecycle of your Data Integration applications. Generally development starts and projects get created containing your integration tasks, these are published into applications (the publish step is done by creating a patch containing tasks to be published and the result is published objects) and development tests run (see this blog on Applications, and this one on copying Applications). Any changes in a development or test application can be kept in sync, this can then be copied and synchronized to production by again creating a production application and then mapping the data assets, synchronizing content and so on (rinse and repeat). The image below illustrates that flow.
In this example we will see how this can be achived across tenancies, you will see the commands for this and also the policies.
Prerequisites – Permissions required
For cross tenancy setup, this is required. Within a tenancy its much simpler.
Target Workspace: User should have READ & WRITE permission on target workspace to create a new application.
Source Workspace: User should have READ & WRITE permission on the source workspace. Read permission is required since the source application, the patches applied on it and the objects within the application (published and dependent) should be read. Write permission is required since we create a DEPLOY patch on the source application as a means to obtain a lock on the source application to prevent patches from being applied on it while the refresh is in progress.
If the user has the required permissions on target workspace, but not on source workspace, there are 2 things we can do:
1) Prevent the creation of target workspace upfront
2) Create the target workspace, but fail while the actual refresh happens. If the refresh fails due to permission issue, the only way to fix the issue would be to grant the required permission on the source workspace. It is not possible to fix the target application by changing the source application / workspace to point to a different workspace. We do not permit the user to change source application after the target application is created.
It may be more user friendly to do 1) as opposed to 2).
There are 4 ways usage of this feature can be achieved
1. OCI SDK (see the create application details here)
2. REST API (through POSTMAN or CURL)
3. OCI CLI (straight forward if OCI CLI is installed)
4. DIS Rest Task (leveraging rest calls in Data Integration)
Policy Definition (for REST API/ OCI SDK/ OCI CLI)
In this section, we define the policies that need to be defined in the Source and Target tenancies. In the following examples, Source Tenancy is Tenancy_Source and Target Tenancy is Tenancy_Target.
Target Tenancy
In the Target Tenancy (where the application will be created), the following steps have to be performed.
A.Create a User Group (say: DIS_Group) and add users to the group.
B.Define a policy with the following statements;
- define tenancy <Tenancy_Source> as <Tenancy_Source_OCID>
- endorse group <DIS_Group> to manage dis-family in tenancy <Tenancy_Source>
- endorse group <DIS_Group> to inspect compartments in tenancy <Tenancy_Source>
Source Tenancy
The following context variables are available for use in the policy definition
- target.workspace.id: The OCID of Target Workspace (where application is created)
- source.workspace.id: The OCID of the Source Workspace from where application will be copied
- source.application.key: The key of the source application
The policy can provide generic access to the DIS_Group group on all workspaces or a more fine grained permission based on the source workspace ID or application key.
Define a policy with the following statements, there are examples for how that can be done in options 1-3;
| Define the tenancy | define tenancy <Tenancy_Target> as <Tenancy_Target_OCID> |
| Define the group | define group <DIS_Group> as <DIS_Group_OCID> |
| Allow inspect compartments | admit group <DIS_Group> of tenancy <Tenancy_Target> to inspect compartments in tenancy |
| Option 1: Generic access (use workspaces in tenancy) | admit group <DIS_Group> of tenancy <Tenancy_Target> to use dis-workspaces in tenancy |
| Option 2: Access based on a specific source workspace OCID | admit group <DIS_Group> of tenancy <Tenancy_Target> to use dis-workspaces in tenancy where source.workspace.id= ‘<Tenancy_Source_WorkspaceOCID>’ |
| Option 3: Access based on a specific source application key | admit group <DIS_Group> of tenancy <Tenancy_Target> to use dis-workspaces in tenancy where source.application. key='<source.application.key>’ |
Create Application Copy Option 1 – OCI SDK Python
Using the OCI Python SDK we can use the create_application API to copy our base application; we may create an application for test based on dev, or an application for production based on test for example.
def application_deploy(userConfigOci,sourceWorkspaceName, sourceWorkspaceOcid, targetWorkspaceOcid,
sourceApplicationKey):
    config = from_file(profile_name=userConfigOci)
    dip = DataIntegrationClient(config=config)
    appDeployName = "Application_Deploy_From_" + sourceWorkspaceName
    create_application_details = oci.data_integration.models.CreateApplicationDetails(
        name=appDeployName.upper(), #name should be unique
        identifier=appDeployName.upper(),
        model_type="INTEGRATION_APPLICATION",
        source_application_info=oci.data_integration.models.CreateSourceApplicationInfo(
            workspace_id=sourceWorkspaceOcid,
            application_key=sourceApplicationKey
        )
    )
    appDeploy = dip.create_application(targetWorkspaceOcid, create_application_details)
    print(appDeploy.data)
if __name__ == "__main__":
    Source_Workspace_Name = "TestDevWorkspace_xxxx"  #just for creating a new application name in target tenancy
    Source_Workspace_OCID = "ocid1.disworkspace.oc1.iad.xxxx"
    Target_Workspace_OCID = "ocid1.disworkspace.oc1.iad.yyyyy"
    Source_Application_key = "e1b4360a-76ee-451a-bb8f-bb965d113389"
    application_deploy(userConfig, Source_Workspace_Name, Source_Workspace_OCID, target_Workspace_OCID,Source_Application_key)
|
Create Application Copy Option 2 – OCI REST API
See the blog post here for how to setup Postman when using OCI REST APIs; https://www.ateam-oracle.com/post/invoking-oci-rest-apis-using-postman
Find and use the Region specific endpoint: https://dataintegration.ap-chiyoda-1.oci.oraclecloud.com/20200430/workspaces/<Target_Workspace_OCID>/applications Method: POST
Request Body:(JSON)
{
"modelType": "INTEGRATION_APPLICATION",
"name": "Application_Deploy_From_Source_Workspace",
"identifier": "APPLICATION_DEPLOY_FROM_SOURCE_WORKSPACE",
"description": "Application Deploy From Another workspace of different tenancy(Same Region)",
"sourceApplicationInfo": {
     "workspaceId": "<Source_Workspace_OCID>",
     "applicationKey": "<Source_Application_key>"
   }
} |
Create Application Copy Option 3 – OCI CLI
See the reference for this command here.
oci –profile <oci_profile_user> data-integration application create –identifier APPLICATION_DEPLOY_FROM_SOURCE_WORKSPACE –name Applicati on_Deploy_From_Source_Workspace –workspace-id <Target_Workspace_OCID> –from-json file://SourceApplication.json
The SourceApplication.json payload could look like the example below;
{
    "modelType": "INTEGRATION_APPLICATION",
    "description": "Application Deploy From Another workspace of different tenancy(Same Region)",
    "sourceApplicationInfo": {
        "workspaceId": "<Source_Workspace_OCID>",
        "applicationKey": "<Source_Application_key>"
    }
} |
Create Application Copy Option 4 – DI REST Task
For this option, different policy statement is required as DI Rest Task uses resource principal (instead of group, it needs dynamic group)
Target Tenancy
In the Target Tenancy (where the application will be created), the following steps have to be performed.
1) Create a dynamic Group (say: DIS_Dynamic_Group) and add the rules as ALL{resource.type = ‘disworkspace’}
2) Define a policy with the following statements
-
define tenancy <Tenancy_Source> as <Tenancy_Source_OCID>
-
endorse group DIS_Dynamic_Group to manage dis-family in tenancy <Tenancy_Source>
-
endorse group DIS_Dynamic_Group to inspect compartments in tenancy <Tenancy_Source>
Source Tenancy
The following context variables are available for use in the policy definition
- target.workspace.id: The OCID of Target Workspace (where application is created)
- source.workspace.id: The OCID of the Source Workspace from where application will be copied
- source.application.key: The key of the source application
The policy can provide generic access to the DIS_Dynamic_Group group on all workspaces or a more fine grained permission based on the source workspace ID or application key.
Define a policy with the following statements, there are examples for how that can be done in options 1-3;
| Define the tenancy | define tenancy <Tenancy_Target> as <Tenancy_Target_OCID> |
| Define the dynamic group | define dynamic-group <DIS_Dynamic_Group> as <DIS_Dynamic_Group_OCID> |
| Allow inspect compartments | admit dynamic-group <DIS_Dynamic_Group> of tenancy <Tenancy_Target> to inspect compartments in tenancy |
| Option 1 – Generic access (use workspaces in tenancy) | admit dynamic-group <DIS_Dynamic_Group> of tenancy <Tenancy_Target> to use dis-workspaces in tenancy |
| Option 2 – Access based on a specific source workspace OCID | admit dynamic-group <DIS_Dynamic_Group> of tenancy <Tenancy_Target> to use dis-workspaces in tenancy where sour ce.workspace.id='<Tenancy_Source_WorkspaceOCID>’ |
| Option 3 – Access based on a specific source application key | admit dynamic-group <DIS_Dynamic_Group> of tenancy <Tenancy_Target> to use dis-workspaces in tenancy where source.application.key='<source.application.key>’ |
You then have to;
- Create a Rest Task with all required API URI and body details (as mentioned in Option-2 )
- Publish the task to a Application
- Run the task
So how do we synchronize? We’ve finished another phase of our development and we want to synchronize what we have done in QA or testing workspace? Let’s see…
Promote / Synchronize Application
Here we can use the Sync option the application panel…

How do we do this via the SDKs? Let’s look at one example this time, using the OCI CLI. We do this by creating an application patch with the patch type of REFRESH;
- oci –profile <oci_profile_user> data-integration application create-patch –workspace-id <Target_Workspace_OCID> –application-key <Application_key> —patch-type REFRESH –name <Patch_Name> –identifier <Patch_Identifier> –object-keys []
For example, in my example, I was promoting a release version 1.1 from development to test, I named the patch and used the patch-type of REFRESH as;
- oci data-integration application create-patch –workspace-id ocid1.tbd –application-key key.tbd –patch-type REFRESH –name RELEASE1.1 –identifier RELEASE1.1 –object-keys []
With that, we can create an application and also refresh and synchronize it when we are happy with the contents.
How to publish a task to an Application – Create Patch
The create patch API in Application is used to publish a task to an application, you can then call the get patch API to get its status. In the create patch API (see here) you use a patch-type of PUBLISH and pass the list of task keys you wish to publish. For example;
oci data-integration application create-patch –workspace-id <workspace_ocid> –application-key <application_key> –patch-type PUBLISH –object-keys ‘[“task_key”]’ –name PATCH$(date +%s) –identifier PATCH$(date +%s)
This creates the patch, the response has the patch key (see here), you can then check the patch status using that patch key.
oci data-integration application get-patch –workspace-id <workspace_ocid> –application-key <applicatgion_key> –patch-key <patch_key>
You will get the status of patch in patch-status property, SUCCESSFUL is a patch that is complete and was a success.
References within an Application
Applications have tasks and the tasks reference other object types such as data assets or other tasks. From an application you can list the references (CLI is here) for an application, references include data assets, connections (data assets and connections are referenced from many task types) and tasks themselves (tasks are referenced from task schedules and pipelines eg a REST task could be used in a pipeline).
When an application is copied you can reconfigure/update the references to objects in your workspace (see CLI here) – the references will obviously be different dependent on dev / test / production ie your development database will more than likely be different from your production one.
| Reference |
Development |
Test |
Production |
| Data asset X |
Data asset X |
Data asset X’ |
Data asset X’’ |
| – Connection X |
– Connection X |
– Connection X’ |
– Connection X’’ |
It’s possible to have dozens of tasks and they all reference data asset X above. Reconfiguring the reference for data asset X once will mean all uses of that data asset from the dozens of tasks will reference the new reference making it simple to move from dev to test to production.
How to update references in an Application – Update Reference
The update reference API in Reference is used to update data asset/connection/task references from an application – the child references can also be defined (such as connection within a data asset). For example below you can see from within my application there are references to different data asset types;

The ‘Map’ action in the OCI Console is the update reference API. So, for example from the OCI CLI you can do;
oci data-integration reference update –workspace-id <workspace_ocid> –application-key <application_key> –reference-key <rference_key> –child-references ‘[{“targetObject”: null,”key”: “child_key”}]’ –target-object ‘{“key”: “data_asset_key”,”modelType”: “data_asset_type”}’
You can retrieve the references from an application using the list references API call;
oci data-integration reference list –workspace-id <workspace_ocid> –application-key <application_key>
Summary
In this blog, we covered how to automate the promotion from development to test and production in SDLC for data integration applications. We saw how to use SDKs and script to manage the lifecycle of your Data Integration applications – we saw how to create the application and also synchronize it in our SDLC pipeline. Any changes in a development or test application can be kept in sync, this can then be copied and synchronized to production by again creating a production application and then mapping the data assets, synchronizing content and so on (rinse and repeat). See the OCI Data Integration documentation on Applications here for more information;
https://docs.oracle.com/en-us/iaas/data-integration/using/applications.htm#Applications