Interest in using Oracle Autonomous Database (ADB) is high. In fact, many developers ask how to connect their Azure Web Apps to ADB. It’s straightforward when using Oracle Data Provider for .NET (ODP.NET). I will show you how to configure and connect an ASP.NET web application hosted on Azure Web Apps to Oracle ADB in the Oracle Cloud. It’s actually quite simple!
If you’re already familiar deploying to Azure Web Apps, there is no special configuration needed for ODP.NET with ADB versus any other app. All you need is a dedicated (non-shared) web environment. That means the Azure App Service Basic Plan or higher. You will also need to configure the web server to load a user profile. That’s it!
To help you get started, below is a step by step guide for deploying a sample on-premises ADB Web app to Azure.
Developing an ASP.NET App for ADB (On-Premises)
Let’s first build a basic ASP.NET Web application in Visual Studio that connects to ADB. I’ll be using Visual Studio 2017, but steps in other Visual Studio versions should be similar. We will use managed ODP.NET for data access between the application and database, but ODP.NET Core works as well with these instructions.
- In Visual Studio, create a new ASP.NET Web Application (.NET Framework) → Empty Template project.
- Copy the following three files from the Oracle .NET GitHub sample code site into your web project root directory.
- autonomous-managed-odp.aspx
- autonomous-managed-odp.aspx.cs
- autonomous-managed-odp.aspx.designer.cs
These files constitute a web page that connects to ADB and returns the database version it is using to demonstrate basic connectivity.
- Add these files to your project as “Existing items”.
- Using NuGet, import the managed ODP.NET assembly (Oracle.ManagedDataAccess). I recommend using version 18.6 or higher.
- In the autonomous-managed-odp.aspx.cs file, modify the User Id and Password credentials in the connection string specific to your ADB instance. We will first test connectivity locally before deploying the web app to Azure.
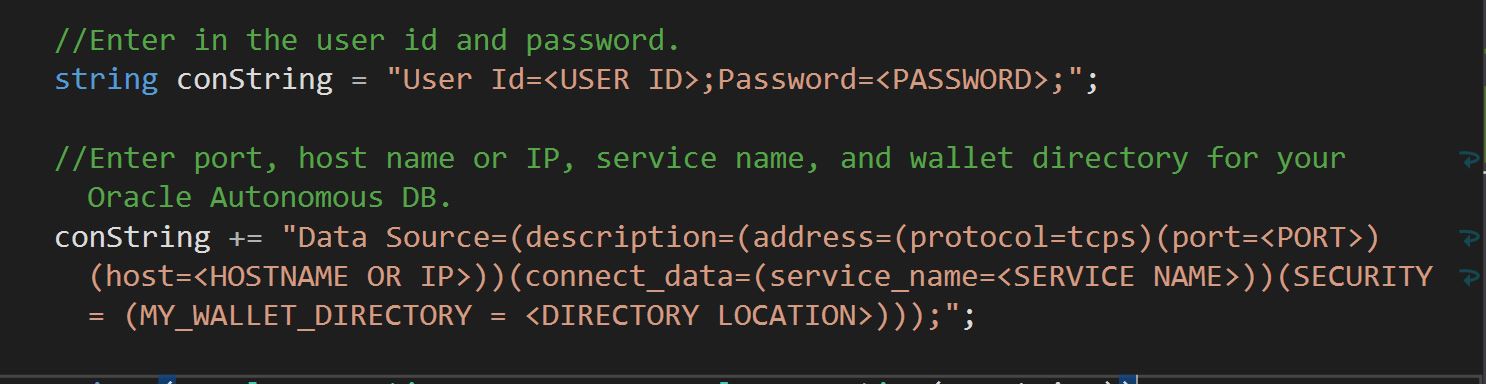
- On the next connection string line, modify the following settings for your ADB instance:
- Port (e.g. 1521)
- Host name or IP (e.g. hostname.oraclecloud.com)
- Service name (e.g. servicename.adb.oracle.com)
- Wallet directory (e.g. d:\wallets)
You will find these entries in the tnsnames.ora file from the downloaded ADB client credentials zip file.
The wallet directory must be set to the local machine directory where your ADB wallet file will reside. For this tutorial, we will copy the file to the web project’s root directory. You can thus set “MY_WALLET_DIRECTORY = .” (i.e. the website’s current working directory), which will be where the wallet is located when running this website both on-premises and on Azure.
- Add the wallet file, cwallet.sso, from the credentials zip file to the web project root directory in line with the MY_WALLET_DIRECTORY setting. When you create a Web Deploy package of this project later for Azure deployment, the wallet file will automatically be included.
- If it’s not already set, configure your local IIS attribute Load User Profile to “true” so that you can use the local wallet.
- Set the autonomous-managed-odp.aspx as the start page.
- Run your web application. You should see something similar to the following:

Congratulations! You are connected to Oracle Autonomous Database.
Deploying an ASP.NET App for ADB to Azure Web Apps
Now, let’s deploy to Azure Web Apps and connect to the same ADB instance. We will package up the application, deploy it to your Azure Web Apps account, and then connect to ADB from Azure.
- Using the existing Web project you’ve just tested, create a new Azure App Service profile for publishing your app. Choose an Azure App Service Basic Plan level or higher.
- Publish the application to Azure via Visual Studio to start the service. You will see a web page that indicates your App Service is up and running.
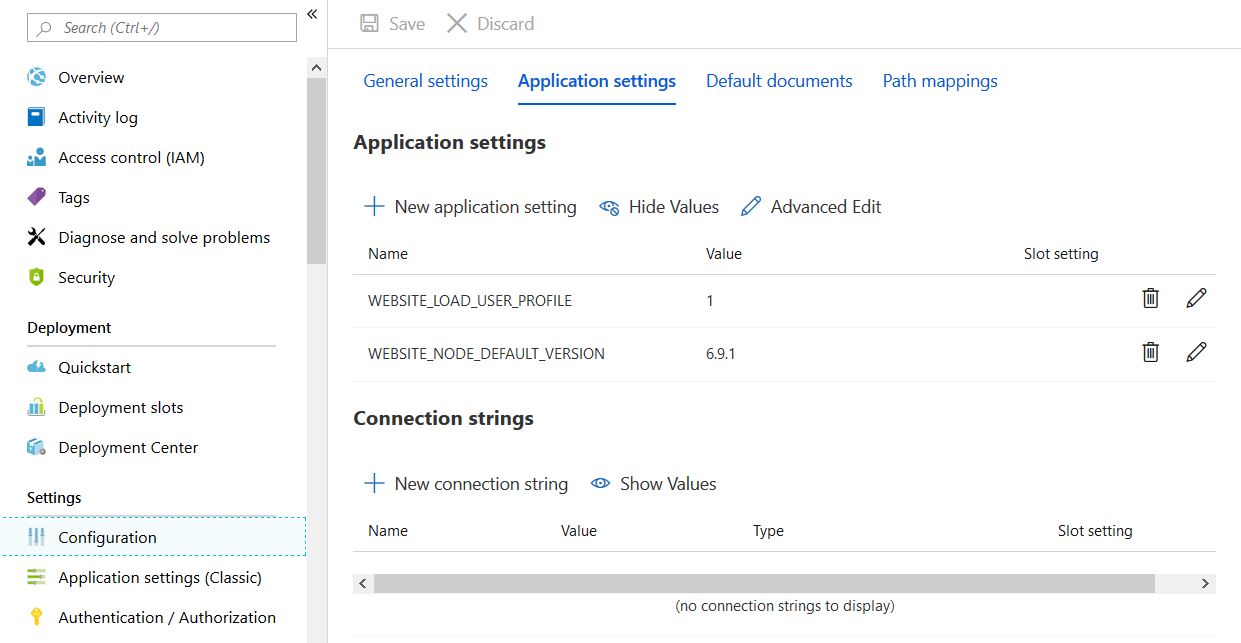
- We will now configure the App Service to enable ADB connectivity. Open a new browser tab to connect to Azure Portal. Next, navigate to the just deployed website’s management dashboard.
- Under Settings, click on the Configuration link, then click the Application settings tab. Add a new application setting, WEBSITE_LOAD_USER_PROFILE, and set it to 1. This step enables you to use the Oracle wallet on Azure. When completed, your setting will look like the following:
- Click on the Default documents tab to add autonomous-managed-odp.aspx as the default page to load for your website. Be sure to also delete hostingstart.html from the list to prevent Azure from loading this document by default.
- Save these settings before you leave the configuration page so that they take effect for your Azure website.
- Setup is now complete. Refresh the browser tab connected to your web app to verify your Azure Web App is now connected to ADB.