Use the Conversation Designer in Oracle Digital Assistant to model and test your conversational design.
By Frank Nimphius
September 30, 2019
Salespeople and service employees are usually trained in verbal and nonverbal communication to be efficient and successful and leave nothing to chance.
Planning chatbot communication is not so different from training your sales representatives or service staff and requires good conversation design skills when you’re implementing tasks you want to automate on the conversational interface.
Before you design chatbot conversations, you typically meet stakeholders and business users and run conversation design workshops to identify chatbot tasks, data requirements, and expectations. Once you have an initial draft of your conversation’s design, the next step is to show your design in action, ideally without waiting for developers to create the actual chatbot. This is exactly what the new Conversation Designer in Oracle Digital Assistant can do for you.
By reading this article and following the hands-on instructions, you’ll learn how to use the Conversation Designer in Oracle Digital Assistant by creating an example prototype of a chatbot for ordering pizza and pasta.
Follow these initial hands-on steps to access the skill dashboard in Oracle Digital Assistant:
Start Oracle Digital Assistant in a browser, by typing https://<your cloud URL>/botsui/ into the URL field.
Click the hamburger icon () at the upper left.
Choose Development and then Skills.
Close the menu, by clicking the hamburger icon ().
About the Sample Conversation
The skill conversation for which you will create a mock-up implementation is for users to order pizza or pasta. In a conversational design experience workshop you participated in, the following user/bot interaction was identified for the skill:
Users may not know how to use the bot and may simply type Hi. The bot should introduce itself, explain what it is for, and give users a menu choice to continue with the conversation.
If a user types I like to order pizza, that person should be routed to the pizza-ordering flow.
If a user types I like to order pasta, that person should be routed to the pasta-ordering flow.
If a user provides more information than prompted for, the system should detect other relevant information and not ask for it again. For example, if the user mentions the size of a pizza when asked for the pizza type, the bot does not need to prompt for the pizza size.
Users may type show me the menu, in which case the bot should welcome the user and show the ordering options.
Creating the Pizza-Ordering Flow
Following the instructions in this part of the hands-on exercise, you will create the pizza-ordering flow, which can be started when a user sends messages such as I like to order pizza or I like to order a large Hawaiian pizza. If no information about the pizza type, size, and crust is provided in the user message, the bot should prompt for this information.
In the Skills dashboard, click New Skill.
Set the Display Name to OraMag Visual Pizza, and click Create.
In the left menu, find and click the Conversation Designer menu item (). Note that in Oracle Digital Assistant 19.1.5, this feature is available as a beta version.
In the opened dialog box, type Order Pizza into the Enter task name field and click Create.
Place the cursor into the Type Here field, and enter I like to order pizza.
Click the green persona icon (Person Speaks) to the right of the field. The green persona icon represents the user sending a message.
For the bot response, first click the big blue bot icon (Bot Speaks) in the upper left of the conversation message field, as shown in Figure 1.
Figure 1: Icon to add a bot response
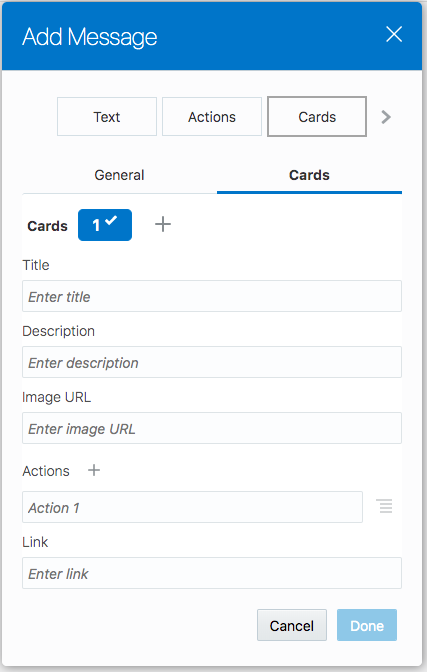
In the opened dialog box, select the Cards tab to build a carousel UI response for the pizza menu.
In the General subtab of the Cards panel, keep the Layout setting as Horizontal but type the following into the Bot’s Message field:
Great. Let's start. Please choose from these pizzas
Next, click the Cards subtab, as shown in Figure 2.
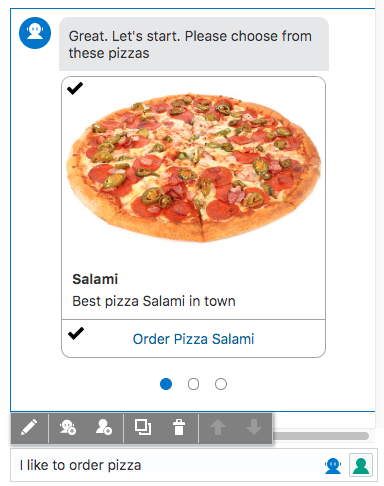
Note the three circles below the cards. Click each circle to see the carousel layout in action.
Also note, in Figure 3, that a menu toolbar appears that enables you to edit, delete, move, or copy the bot response you just created.
Figure 3: The modeled cards and menu toolbar in the Conversation Designer
Next, create the bot response that prompts the user for the pizza size.
Again, click the big blue bot icon (Bot Speaks) in the upper left of the conversation message field.
In the opened dialog box, select the Actions tab.
Provide the following information:
Hint: Use the Tab key to navigate from one Action field to the next.
Field name
Value
Bot’s Message
Big hunger? Please choose a size
Action 1
Large
Action 2
Medium
Action 3
Small
Click Done to create the list of values.
Again, click the big blue bot icon (Bot Speaks) in the upper left of the conversation message field and select the Actions tab. Then provide the following information:
Field name
Value
Bot’s Message
Please choose a crust
Action 1
Thin
Action 2
Thick
Action 3
Stuffed
Click Done.
One more time, click the big blue bot icon (Bot Speaks) in the upper left of the conversation message field.
Click the Text tab.
Type the following text into the Bot’s Message field:
Perfect. Your large, thick crust pizza Salami is on its way. Enjoy.
Click Done.
What you just did: In this part of the hands-on tutorial, you created a mock-up of the pizza-ordering flow. Bot users will be able to select from three pizza types and define a pizza size and crust. Finally, the bot will confirm the order. Although the confirmation in the mock-up is for a large, thick-crust salami pizza, when the conversation mock-up is being demonstrated, the real selected values will be displayed.
Creating the Pasta-Ordering Flow
The pasta-ordering flow is similar to the pizza-ordering flow, although it is shorter. Here’s how to create it:
To begin, in the upper left of the Conversation Designer, above the Order Pizza task, click the plus icon (+) next to the Tasks label to create the pasta-ordering flow.
In the opened dialog box, type Order Pasta into the Name field and click Create.
Select the new Order Pasta task.
Place the cursor into the Type Here field, and type I like pasta.
Click the green persona icon (Person Speaks) that shows to the right of the field. The green persona icon represents the user sending a message.
For the bot response, click the big blue bot icon (Bot Speaks) in the upper left of the conversation message field.
Figure 4: Icon to add a bot response
In the opened dialog box, select the Cards tab to build a carousel UI response for the pasta menu.
In the General subtab of the Cards panel, keep the Layout setting as Horizontal, but type the following into the Bot’s Message field:
Sure. Here is a selection of pastas
Next select the Cards subtab, as shown in Figure 5.
Click Done. You should see a menu and a conversation like the one shown in Figure 6.
Figure 6: The pasta card menu
Click the big blue bot icon (Bot Speaks) in the upper left of the conversation message field.
Select the Text tab.
Type the following text into the Bot’s Message field:
Got you. Your Spaghetti Bolognese is on its way. Enjoy.
Click Done.
Building the Menu Flow
With the pizza- and pasta-ordering flows in place, you have modeled the two business use cases. Now add the menu flow, which is a conversation convenience for users who are new to the pizza- and pasta-ordering bot and thus don’t know what they can choose from.
In the upper left of the Conversation Designer, above the Order Pasta and Order Pizza tasks, click the plus icon (+) next to the Tasks label to create the menu flow.
In the opened dialog box, type Show Menu into the Name field and click Create.
Select the new Show Menu task.
Type Please show me the menu into the Type Here field, and select the green user persona icon (Person Speaks).
For the bot response, click the big blue bot icon (Bot Speaks) in the upper left of the conversation message field.
In the opened dialog box, select Actions.
Provide the information listed in the table below:
Hint: Use the Tab key to navigate from one Action field to the next.
Field name
Value
Bot’s Message
Hey. Here are your options. You get a pizza or pasta.
Action 1
Order Pizza
Action 2
Order Pasta
Select the menu icon () next to the Order Pizza action, and choose Branch Conversation in the Action Type list, as shown in Figure 7.
Figure 7: Choosing a branch conversation
In the Select task | sub-task list, choose Order Pizza and click Done.
Select the menu icon () next to the Order Pasta action, and choose Branch Conversation in the Action Type list.
In the Select task | sub-task list, choose Order Pasta and click Done.
Click Done to close the Actions dialog box.
What you just did: You created a menu to guide users to the pizza- or pasta-ordering flow. Note that branching a conversation can be a top-level task (intent) or a subtask (state in the dialog flow).
Greeting Flow
It is not necessary to model the greeting flow with the Conversation Designer, because it will be added by default. However, to make sure the greeting uses a custom message string, you can create a Greeting task.
In the upper left of the Conversation Designer, above the Order Pasta, Order Pizza, and Show Menu tasks, click the plus icon (+) next to the Tasks label to create a new greeting flow.
In the opened dialog box, type Greeting into the Name field and click Create.
Select the new Greeting task.
Type Hi into the Type Here field, and select the green user persona icon (Person Speaks).
Click the big blue bot icon (Bot Speaks) in the upper left of the conversation message field.
In the opened dialog box, select Text.
In the Bot’s Message field, type:
Hey Frank. Welcome, I am a pizza and pasta order bot.
You can start by messaging me "I like to order pizza" or
"I like to have pasta" or just "show menu".
Note: If your name is not Frank, feel free to use a different one.
Click Done.
What you just did: Completing the greeting flow, you created a runnable model of the conversation design you developed during the design workshop you attended. The next step is to generate a skill from your mock-up definitions to see your design in action.
Generating the Skill
To showcase the conversation you’ve designed, you can use the simulator to replay each step in a task or you can generate the Oracle Digital Assistant skill for a real runtime test.
In this part of the hands-on exercise, you will go for the big “Wow!” and generate the skill, train the model, and test your design with the conversation tester in Oracle Digital Assistant.
Click the Generate Skill icon () in the top right of the Conversation Designer, next to the Preview your Task! link.
Note: You would use the Preview your Task! link to start the simulator.
Click Generate in the Generate Skill dialog box.
Wait for the skill to be generated, and then train the model by clicking the Train icon () in the top right of the page header.
In the opened Train dialog box, keep the default setting and click Submit.
Note: If the exclamation mark in front of the Train icon does not go away, repeat steps 69 and 70.
Next, click the corresponding icons on the left to explore the generated content for the skill you designed with the Conversation Designer:
Menu item to click
What to observe
Intents ()
There are four intents defined for the tasks you created. Each intent includes utterances generated from the user sentence that started the conversation for the task.
Entities ()
For each task you created, there are several entities generated to extract information from user messages and to ensure that the pizza and pasta orders get properly resolved in the dialog flow.
Flows ()
A complete working dialog flow was generated. You can see the BotML code in the flow editor.
Testing the Skill
With the intents, entities, and dialog flow generated and the intent model trained, you can now test and show your conversation design.
Click the conversation tester icon () at the bottom of the left menu.
Type Hi into the Message field at the bottom of the tester, and press Enter to try the “unexperienced user flow.” You should see a greeting message from the bot, explaining what else you can do.
Next, type Menu please and press Enter.
Select Order Pasta.
Click Order Bolognese. You should see a confirmation of the order.
Next you will test the “experienced user flow.” To do this, first click Reset in the right header of the tester.
Type I like pizza into the Message field, and press Enter.
Click Order Pizza Hawaiian.
Choose Large as the pizza size.
Choose Thin as the crust. Notice the confirmation message that reports the order of a large, thin-crust Hawaiian pizza.
Note: When you designed the message, you typed Perfect. Your large, thick crust pizza Salami is on its way. Nevertheless, the confirmation message correctly showed the order of a large, thin-crust Hawaiian pizza. This is because of the entity extraction that happens as part of the natural-language processing.
Click Reset in the right header of the tester.
Type I like to order pizza salami and press Enter. Notice how the pizza type menu is skipped.
Next type Oh, wait. Please make it a large, thick pizza supreme and press Enter. Notice how the bot not only changed the pizza type from Salami to Supreme but also skipped the prompts for the pizza size and crust.
One more time, click Reset.
Testing the “advanced user flow,” type I like to order a large, stuffed pizza salami and press Enter. With all the order information provided, the skill should skip the full order process flow and confirm the pizza delivery.
Conclusion
Reading this article and following the hands-on instructions, you learned how to work with the new Conversation Designer in Oracle Digital Assistant to model and test your conversational design. The Conversation Designer is for business domain expert users and is re-enterable, so that it can be used for an iterative design process.
Frank Nimphius is a Master Principal Product Manager at Oracle Corporation where he works on Oracle Digital Assistant and Health AI Frank joined Oracle Product Management more than 20 years ago and since then worked on various Oracle products including Oracle Forms, Oracle JDeveloper, Oracle Application Development Framework (ADF) and the Mobile Application Framework (MAF) and Oracle Mobile Hub. In his 20+ years at Oracle Frank enjoyed the many opportunities the job offered and became an author, an in-class and online-video trainer, a presenter at various international conferences, a collateral and training writer, a Java developer, as well as a product marketer and blogger.
 ) at the upper left.
 ).
). ). Note that in Oracle Digital Assistant 19.1.5, this feature is available as a beta version.


 ) next to the Order Pizza action, and choose Branch Conversation in the Action Type list, as shown in Figure 7.
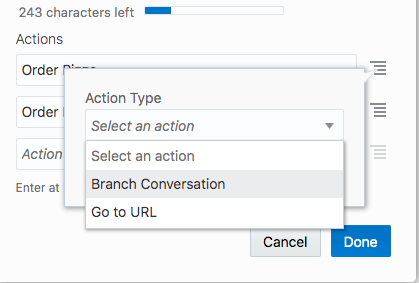
 ) next to the Order Pasta action, and choose Branch Conversation in the Action Type list.
 ) in the top right of the Conversation Designer, next to the Preview your Task! link.
 ) in the top right of the page header.


 ) at the bottom of the left menu.