Part 3 in a series on the basics of the relational database and SQL
By Melanie CaffreyJanuary/February 2012
Part 2 in this series, “Modeling and Accessing Relational Data” (Oracle Magazine, November/December 2011), introduced readers to the ways data entities (tables) can relate to one another in a relational database. When your logical models and physical implementations use meaningful entities and well-chosen datatypes, you have multiple options for accessing the data. This article focuses on the purpose and anatomy of the SQL SELECT statement—also called a query—and explains how to use Oracle SQL Developer and Oracle Application Express to construct queries and view their results. (Although I’ll briefly review the concepts covered in Part 2, I encourage you to read that installment before starting this one.)
It All Begins with a QueryThe goal of writing a SQL query is usually to get the answer from the database to a question or questions. For example, you might want to ask
-
How many employees work in the accounting department?
-
Of those employees, which ones are currently working on multiple projects?
-
Which employees working on multiple projects in the accounting department have received a salary increase between their date of hire and today, and which employees haven’t?
You obtain the answers to these questions by using a SQL SELECT statement. A SELECT statement has at least two parts: the SELECT list and the FROM clause. The SELECT list specifies one or more columns (or expressions, to be explained in subsequent installments of this series)—selected from one or more tables—that you want to display. The FROM clause lists the table(s) from which your desired column data should be obtained.
Know Your Data
Before you write a SELECT statement, you must determine which table or tables contain the information of interest. For example, if you want to know all employees’ hire dates, you must first determine which table contains employee information. Perusal of your schema diagram reveals that employee data is in a table called EMPLOYEE. You can then use the following SELECT statement:
SELECT first_name, last_name, hire_date
  FROM employee
The SELECT list in the above statement specifies three columns—listing the first name, last name, and date of hire for every employee contained in the EMPLOYEE table, which is specified in the FROM clause. (To specify multiple columns in a SELECT list, you separate the column names with commas; a good practice is to insert a space after each comma for readability.)
When the above statement is executed, the result set is a list of all the values found in the first_name, last_name, and hire_date columns of the EMPLOYEE table, as shown in Listing 1.
Code Listing 1: Code Listing 1: SELECT statement result for three columns
SELECT first_name, last_name, hire_date
  FROM employee
FIRST_NAME  LAST_NAME        HIRE_DATE
——————————  ———————————————  —————————————
Frances     Newton           14-SEP-05
Emily       Eckhardt         07-JUL-04
Donald      Newton           24-SEP-06
Matthew     Michaels         16-MAY-07
Everything with a Mere *
If you want to display all the columns for a particular table, you can use the asterisk (*) wildcard character as the SELECT list instead of typing the name of every column. For example
SELECT *
  FROM employee
When this statement executes, the result set displays the columns in the order in which they are defined in the table, as shown in Listing 2.
Code Listing 2: SELECT statement result for all columns
SELECT *
  FROM employee
EMPLOYEE_ID  FIRST_NAME  LAST_NAME  HIRE_DATE   SALARY  MANAGER  DEPARTMENT_ID
———————————  ——————————  —————————  ——————————  ——————  ———————  —————————————
37           Frances     Newton     2005-09-14  75000
28           Emily       Eckhardt   2004-07-07  100000
1234         Donald      Newton     2006-09-24  80000   28       10
7895         Matthew     Michaels   2007-05-16  70000   28       10
4 rows selected
This is the same column order you see when you issue the DESCRIBE command (or when you click the Columns tab in Oracle SQL Developer), as shown in Listing 3.
Code Listing 3: DESCRIBE result for the EMPLOYEE table describe employee
Name           Null     Type
———————————    ———————  ————————————
EMPLOYEE_ID             NUMBER
FIRST_NAME              VARCHAR2(30)
LAST_NAME               VARCHAR2(30)
HIRE_DATE               DATE
SALARY                  NUMBER(9,2)
MANAGER                 NUMBER
DEPARTMENT_ID           NUMBER
7 rows selected
You should use the asterisk wildcard character primarily for ad hoc querying—when you want an answer from the database that you have not already asked for via programmatic code. When you include SELECT statements in programmatic blocks of code (which you’ll learn about in subsequent articles in this series), it is a good practice to list your columns of interest by name in your SELECT lists.
SELECT with Oracle SQL DeveloperIn Oracle SQL Developer, an easy way to construct a SELECT statement is to drag and drop a table name from the TABLES node in the Connections Navigator into the SQL Worksheet. This action automatically creates an editable SELECT statement in the SQL Worksheet whose select list includes all the columns in the table. Figure 1 shows the result of dragging and dropping the EMPLOYEE table into the Oracle SQL Developer SQL Worksheet.

Figure 1: Result of dragging and dropping the EMPLOYEE table into the SQL Worksheet
Figure 2 shows the SQL Worksheet icons.

Figure 2: The SQL Worksheet icon tool bar
The leftmost green arrow in Figure 2 is the Execute Statement icon. When you want to obtain the results for a single statement, place your cursor anywhere on the statement line and click the Execute Statement icon. The results appear on the Results tab, as shown in Figure 3.
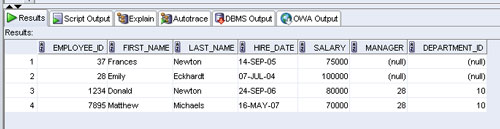
Figure 3: The Results tab in the SQL Worksheet
In the tool bar, the small green arrow superimposed on the image of a piece of paper is the Run Script icon. By clicking it, you execute a SQL*Plus-like script consisting of multiple statements (as I’ll illustrate in the next article in this series). The results are displayed on the Script Output tab, as shown in Figure 4.
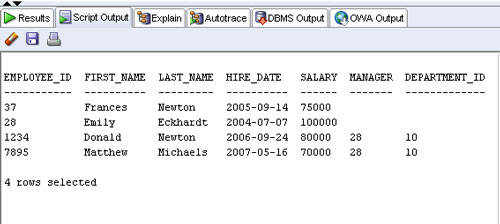
Figure 4: The Script Output tab in the SQL Worksheet
Build and Run a SELECT Statement with Oracle Application ExpressYou can also construct a SELECT statement in the SQL Commands window of Oracle Application Express’ SQL Workshop, a Web-based interface to the database. The SQL Workshop SQL Commands window has no drag-and-drop facility, so you must type your statement explicitly. Next, click Run to see your result set in the Results section of SQL Workshop, as shown in Figure 5. The results format is similar to that used on the Results tab of the SQL Worksheet, as you can see by comparing Figure 5 with Figure 3.
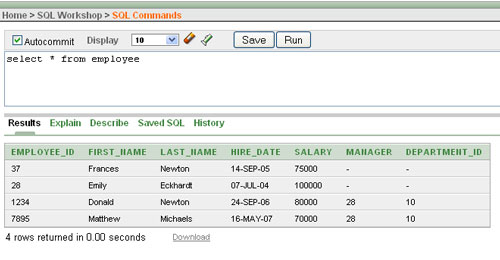
Figure 5: The Results section in SQL Workshop
Constructing a SELECT statement in the SQL Commands window of the SQL Workshop in Oracle Application Express is similar to constructing a SELECT statement in SQL*Plus (as I will illustrate in the next article in this series).
Eliminate Redundancy with DistinctionAs you know from previous installments in this series, one of your database design goals should be to eliminate redundancy. Sometimes, however, the way you select data might cause the results to include duplicate values. Use of the DISTINCT or UNIQUE keyword in your SELECT list, however, helps you eliminate duplicate data in your result sets.
In the example in Figure 6, four rows are returned yet only two employees are assigned to departments. Frances Newton and Emily Eckhardt have NULL values for DEPARTMENT_ID.
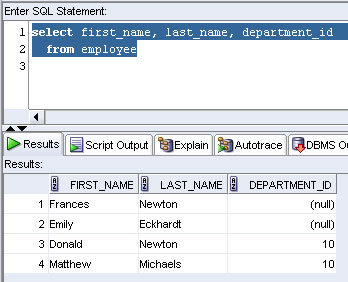
Figure 6: Employee first and last name data with corresponding departments
If you want to display only the distinct (or unique) DEPARTMENT_ID values in the EMPLOYEE table, you can construct a SELECT statement like the one in Figure 7.
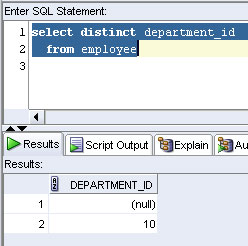
Figure 7: A DISTINCT list of the DEPARTMENT_ID values in the EMPLOYEE table
Using the DISTINCT keyword to query a table containing only a few rows (as in this example) is probably unnecessary, because duplicate data would be obvious in the full results. But in a table with hundreds or thousands of EMPLOYEE records, it might not be at all obvious which departments are represented (or not).
Improve Readability Through Consistent FormattingThe more consistently code is formatted, the easier it is to read. The easier code is to read, the easier it is for people reviewing it to discover obvious or potential bugs and suggest improvements. If your IT management insists that all developers adhere to a standard code format, Oracle SQL Developer’s formatting facilities can help you comply with such mandates more easily.
For example, this article’s examples show a mix of uppercase and lowercase keywords. However, your environment’s standards might dictate that you use a particular casing style. Oracle SQL Developer provides several methods to help you achieve consistency. At a minimum, you can make a statement’s keywords all uppercase, lowercase, or initial-capped by highlighting the statement, right-clicking in the SQL Worksheet, and selecting To Upper/Lower/InitCap (or typing Ctrl+Quote), as shown in Figure 8.
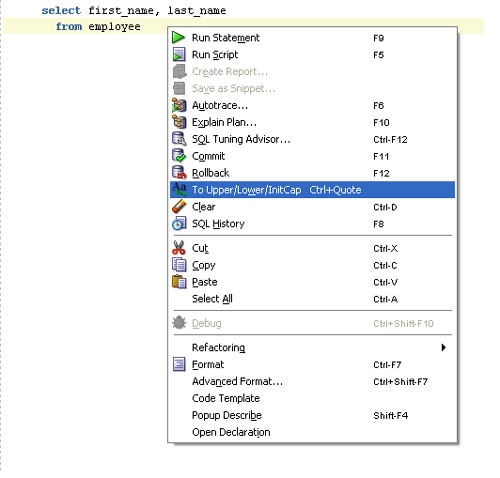
Figure 8: Changing keyword case
Figure 9 shows the result of changing a statement’s keywords to uppercase via the mechanism illustrated in Figure 8.
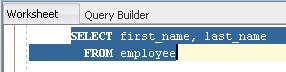
Figure 9: Keyword case changed
Another way to control your code’s formatting is to right-click in the SQL Worksheet and choose Format (or type Ctrl-F7). (Be aware that selecting this option affects all the code in the SQL Worksheet—as of Oracle SQL Developer Release 3.0.04.) To set your preferences for this option, select Tools -> Preferences -> Database -> SQL Formatter -> Oracle Formatting and click Edit. Figure 10 shows some of the available formatting options.
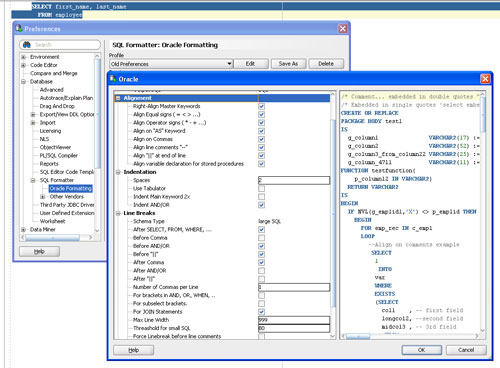
Figure 10: SQL Formatter options in Oracle SQL Developer
Finishing Your ThoughtYou might occasionally need to refer to your schema diagram to identify the table(s) you want to include in a query or to look up the syntax for correct statement construction in the Oracle documentation. The code completion facility in Oracle SQL Developer helps you with both tasks. If you pause while typing your statement, the code completion facility will prompt you with a list of appropriate table names, column names, and commands you can select from. Figure 11 shows an example of this feature in action.

Figure 11: Code completion facility in Oracle SQL Developer
Highlight Your CodeSyntax highlighting in Oracle SQL Developer marks the SQL language keywords in your code with a color different from that of the table names, column names, and other statement criteria. When this feature is enabled, your SQL language commands appear by default in blue and other statement criteria appear in black. Syntax highlighting, illustrated in Figure 12, can greatly improve your code’s readability, enabling you and others to spot errors more readily.
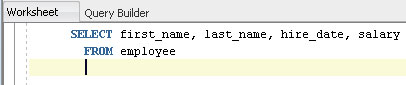
Figure 12: Syntax highlighting in Oracle SQL Developer
Syntax highlighting, along with the other Oracle SQL Developer formatting facilities I’ve described in this article, can be edited or disabled via Tools -> Preferences. By default, they are enabled and exhibit the behavior and results shown in this article.
ConclusionThis article has shown you how to construct and execute simple SQL SELECT statements with Oracle SQL Developer and the SQL Workshop SQL Commands facility in Oracle Application Express. You’ve also seen how the formatting, syntax highlighting, and code completion facilities in Oracle SQL Developer can enhance your code’s readability and accuracy.
The next installment of SQL 101 will examine the WHERE and ORDER BY clauses of a SQL statement and take a closer look at Oracle’s SQL*Plus tool.
Next StepsREAD more about relational database design, concepts, and SQL
![]() Oracle Database Concepts 11g Release 2 (11.2)
Oracle Database Concepts 11g Release 2 (11.2)
![]() Oracle Database SQL Language Reference 11g Release 1 (11.1)
Oracle Database SQL Language Reference 11g Release 1 (11.1)
![]() Oracle SQL Developer User’s Guide Release 2.1
Oracle SQL Developer User’s Guide Release 2.1
![]() READ SQL 101 Parts 1-2
READ SQL 101 Parts 1-2
DOWNLOAD
![]() Oracle Database, Express Edition 11g
Oracle Database, Express Edition 11g
![]() Oracle SQL Developer
Oracle SQL Developer
![]() Oracle Application Express
Oracle Application Express
Photography by Dmitri Popov, Unsplash