All the major clouds offer a managed Kubernetes service—and it’s all the same Kubernetes.
 [This article is excerpted from Learn Kubernetes in a Month of Lunches, by Elton Stoneman, 2021, with the kind permission of Manning Publications. —Ed.]
Kubernetes is a platform for running containers. It takes care of starting your containerized applications, rolling out updates, maintaining service levels, scaling to meet demand, securing access, and much more.
Independence and standardization are the main reasons Kubernetes is so popular. Once you have your apps running nicely in Kubernetes you can deploy them anywhere, which is very attractive for organizations moving to the cloud, because it keeps them free to move apps between data centers and other clouds without a rewrite. It’s also very attractive for practitioners—once you’ve mastered Kubernetes, you can move between projects and organizations and be very productive very quickly.
Kubernetes is an open source system for automating the deployment, scaling, and management of containerized applications. Its development is stewarded by the Cloud Native Computing Foundation (CNCF), which itself is part of The Linux Foundation. Other projects endorsed by the CNCF include several de facto industry-standard technologies such as containerd, CoreDNS, Harbor, Helm, and Prometheus.
Combined, these projects, whether sandboxed, incubating, or graduated, define a cloud native application development and deployment framework that is the basis of most cloud native digital transformation efforts. The CNCF also provides conformance testing for Kubernetes to help ensure consistency across vendor implementations.
The two core concepts in Kubernetes are the API that you use to define your applications, and the cluster that runs your applications. A cluster is a set of individual servers that have all been configured with a container runtime such as Docker and then joined together into a single logical unit with Kubernetes. Figure 1 shows a high-level view of the cluster.
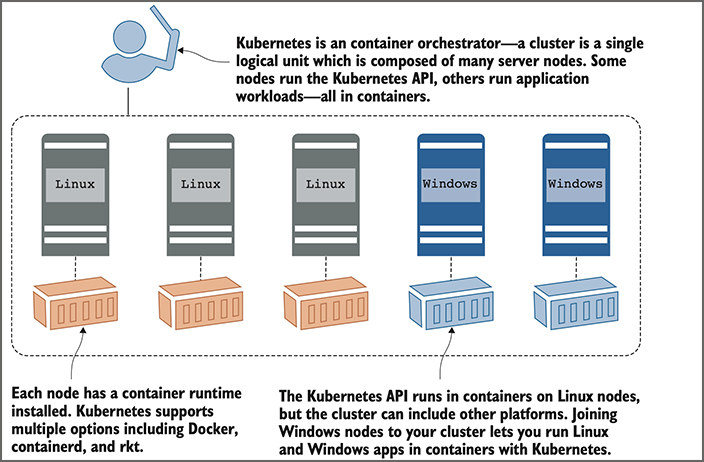
Figure 1. A Kubernetes cluster is a bunch of servers that can run containers, joined into a group.
Cluster administrators manage the individual servers—called nodes in Kubernetes. You can add nodes to expand the capacity of the cluster, take nodes offline for servicing, or roll out an upgrade of Kubernetes across the cluster. In a managed cloud service, those functions are all wrapped in simple web interfaces or command lines. In normal usage, you forget about the underlying nodes, and you treat the cluster as a single entity.
The Kubernetes cluster is there to run your applications. You define your apps in YAML files and send those files to the Kubernetes API. Kubernetes looks at what you’re asking for in the YAML and compares it to what’s already running in the cluster. It makes any changes it needs to get to the desired state, which could be updating configuration, removing containers, or creating new containers. Containers are distributed around the cluster for high availability, and they can all communicate over virtual networks managed by Kubernetes. Figure 2 shows the deployment process without the nodes, because you don’t really care about them at this level.
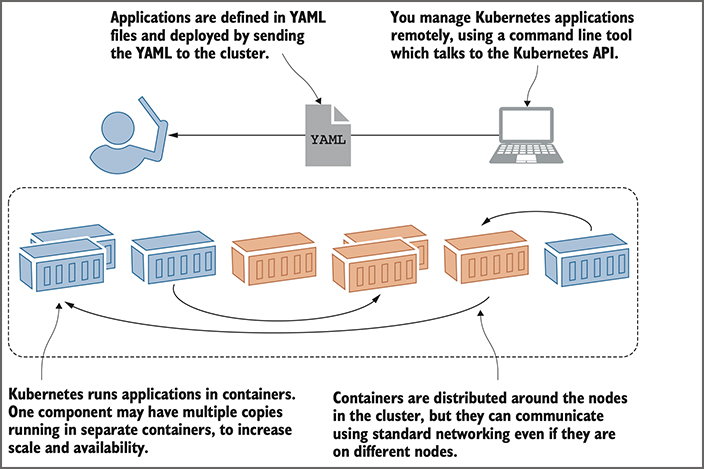
Figure 2. When deploying apps to a Kubernetes cluster, you can usually ignore the actual nodes.
Defining the structure of the application is your job but running and managing everything is up to Kubernetes. If a node in the cluster goes offline and takes some containers with it, Kubernetes sees that and starts replacement containers on other nodes. If an application container becomes unhealthy, Kubernetes can restart it. If a component is under stress because of high load, Kubernetes can start extra copies of the component in new containers. If you put the work into your Docker images and Kubernetes YAML files, you’ll get a self-healing app that runs in the same way on any Kubernetes cluster.
Kubernetes manages more than just containers, which is what makes it a complete application platform. The cluster has a distributed database, and you can use that to store configuration files for your applications and to store secrets such as API keys and connection credentials. Kubernetes delivers those seamlessly to your containers, which lets you use the same container images in every environment and apply the correct configuration from the cluster. Kubernetes also provides storage so your applications can maintain data outside of containers, giving you high availability for stateful apps. And Kubernetes manages network traffic coming into the cluster, sending it to the right containers for processing. Figure 3 shows those other resources, which are the main features of Kubernetes.
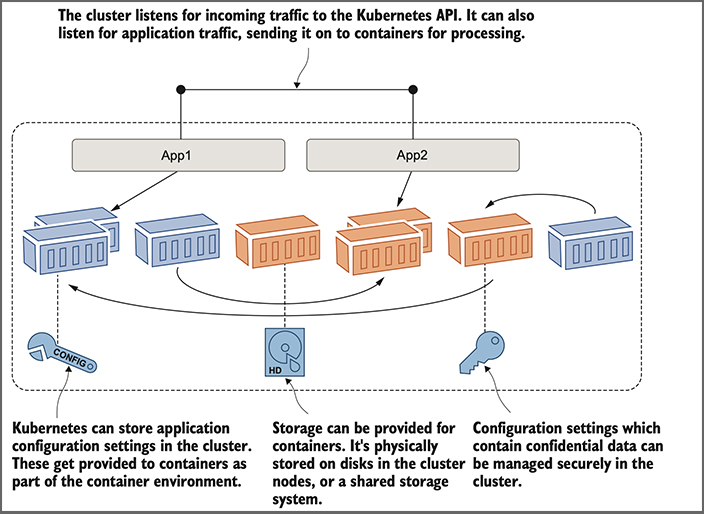
Figure 3. There’s more to Kubernetes than just containers—the cluster manages other resources too.
I haven’t talked about what those applications in the containers look like, and that’s because Kubernetes doesn’t really care. You can run a new application built with cloud native design across microservices in multiple containers. You can run a legacy application built as a monolith in one big container. They could be Linux apps or Windows apps. You define all types of applications in YAML files using the same API, and you can run them all on a single cluster. The joy of working with Kubernetes is that it adds a layer of consistency on top of all your apps: Java and .NET monoliths, and Node.js and Go microservices, are all described, deployed, and managed in the same way.
That’s just about all the theory needed to get started with Kubernetes, but before going any further, I want to put some proper names to the concepts I’ve been talking about. Those YAML files are properly called application manifests, because they’re a list of all the components that go into shipping the app. And those components are Kubernetes resources—they have proper names too. Figure 4 takes the concepts from Figure 3 and applies the correct Kubernetes resource names.
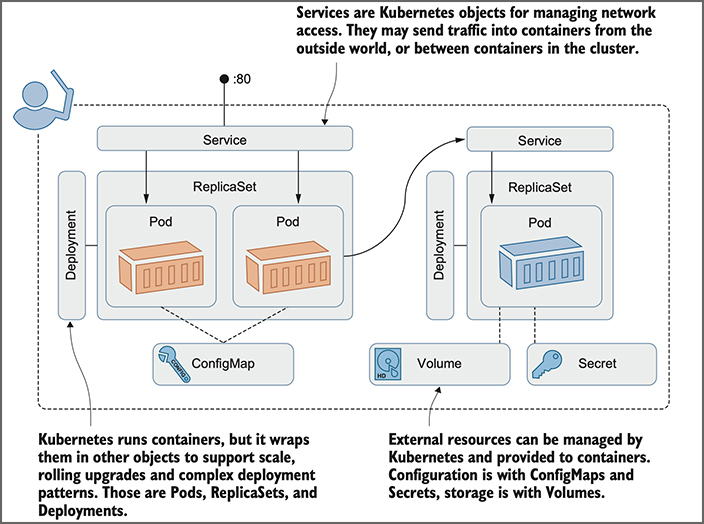
Figure 4. The true picture: These are the basic Kubernetes resources you need to master.
Creating a learning lab environment
A Kubernetes cluster can have hundreds of nodes, but for learning about Kubernetes, a single-node cluster is fine. I’ll describe how to create your lab on Linux, Windows, macOS, and the cloud, which covers all the major options. I’m using Kubernetes version 1.18, but earlier or later versions should be fine too.
The easiest option to run Kubernetes locally is Docker Desktop, which is a single package that gives you Docker and Kubernetes and all the command-line tools. It also integrates nicely with your computer’s network and has a handy Reset Kubernetes button that clears everything. Docker Desktop is supported for Windows 10 and macOS, and if that doesn’t work for you, I’ll also walk through some alternatives.
One point you should know—the components of Kubernetes itself need to run as Linux containers. You can’t run Kubernetes in Windows (although you can run Windows apps in containers with a multinode Kubernetes cluster), so you’ll need a Linux virtual machine if you’re working on Windows. Docker Desktop sets that up and manages it for you.
And one last note for Windows users: Please use PowerShell to follow along with the exercises. PowerShell supports many Linux commands, and the try-it-now exercises are built to run on Linux (and macOS) shells and PowerShell. If you try to use the classic Windows command terminal, you’re going to get issues from the start.
Install Docker Desktop. Docker Desktop runs on Windows 10 or macOS Sierra (version 10.12 or higher). Browse to docker.com/products/docker-desktop and choose to install the stable version. Download the installer and run it, accepting all the defaults. On Windows, that might include a reboot to add new Windows features. When Docker Desktop is running, you’ll see Docker’s whale icon near the clock on the Windows taskbar or the macOS menu bar. If you’re an experienced Docker Desktop user on Windows, you’ll need to make sure you’re in Linux container mode (which is the default for new installations).
Kubernetes isn’t set up by default, so you’ll need to click that whale icon to open the menu, and then click Settings. That opens the window you can see in Figure 5; select Kubernetes from the menu and select the Enable Kubernetes checkbox.
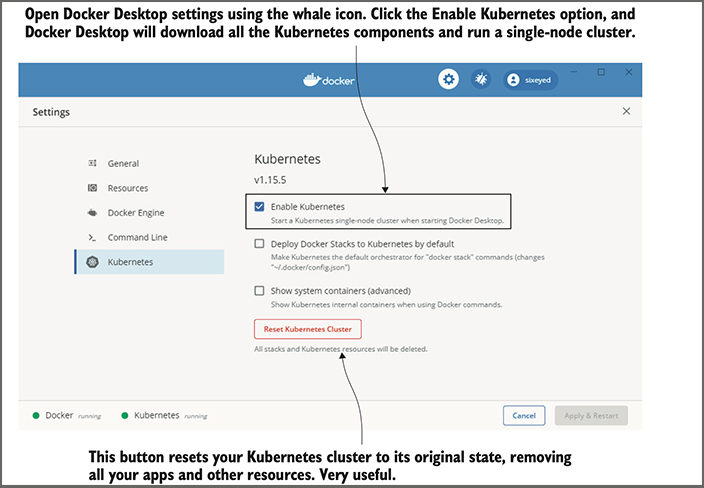
Figure 5. Docker Desktop creates and manages a Linux VM to run containers—and it can run Kubernetes.
Docker Desktop downloads all the container images for the Kubernetes runtime, which might take a while, and then starts everything up. When you see the two green dots at the bottom of the settings screen, then your Kubernetes cluster is ready to go.
Other Kubernetes distributions can run on top of Docker Desktop, but they don’t integrate very well with the network setup that Docker Desktop uses, so you’ll have problems running the exercises. The Kubernetes option in Docker Desktop is definitely the easiest option.
Install Docker Community Edition and K3s. If you’re using a Linux machine or a Linux VM, then there are several options for running a single-node cluster. Minikube and Kind are popular, but my preference is K3s. It’s is a minimal installation but has all the features you’ll need for the exercises. (The name is a play on “K8s,” which is an abbreviation of Kubernetes. K3s trims the Kubernetes codebase, and the name indicates that it’s half the size of K8s.)
K3s works with Docker and first you should install Docker Community Edition. You can check the full installation steps at rancher.com/docs/k3s/latest/en/quick-start/, but this will get you up and running:
# install Docker:
curl -fsSL https://get.docker.com | sh
# install K3s:
curl -sfL https://get.k3s.io | sh -s - --docker --disable=traefik --write- kubeconfig-mode=644
Install the Kubernetes command-line tool
You manage Kubernetes with a tool called Kubectl (which is pronounced “cube-cuttle” as in “cuttlefish”—don’t let anyone tell you different). It connects to a Kubernetes cluster and works with the Kubernetes API. If you’re using Docker Desktop or K3s, they install Kubectl for you, but if you’re using one of the other options here, then you’ll need to install it yourself.
The full installation instructions are at kubernetes.io/docs/tasks/tools/install-kubectl/. You can use Homebrew on the macOS and Chocolatey on Windows, and for Linux you can download the following binary:
# macOS:
brew install kubernetes-cli
# Windows:
choco install kubernetes-cli
# Linux:
curl -Lo ./kubectl https://storage.googleapis.com/kubernetes-release/release/v1.18.8/bin/linux/amd64/kubectl
chmod +x ./kubectl
sudo mv ./kubectl /usr/local/bin/kubectl
Verify your cluster
Now you have a running Kubernetes cluster, and regardless of which option you chose, they all work in the same way. Run the following command to check that your cluster is up and running:
kubectl get nodes
You should see output like what’s shown in Figure 6. It’s a list of all the nodes in your cluster, with some basic details such as the status and Kubernetes version. The details of your cluster may be different, but if you see a node listed and it’s in the Ready state, then your cluster is good to go.
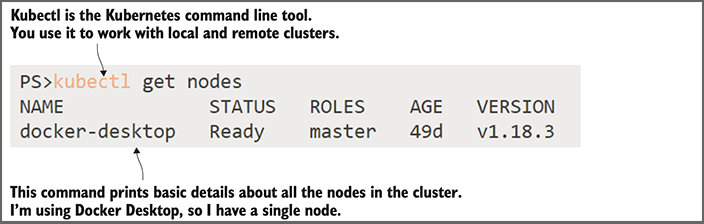
Figure 6. If you can run Kubectl and your nodes are ready, then you’re all set to carry on.
Conclusion
From here, you should be able to experiment and learn Kubernetes, using any number of exercises you can find online, but specifically those covered in my book, Learn Kubernetes in a Month of Lunches, the first week of which you can download for no cost, complements of the team behind Oracle Linux.